2001 NISSAN ALMERA N16 EL page 71
[x] Cancel search: EL page 71Page 1795 of 2493
NJST0006
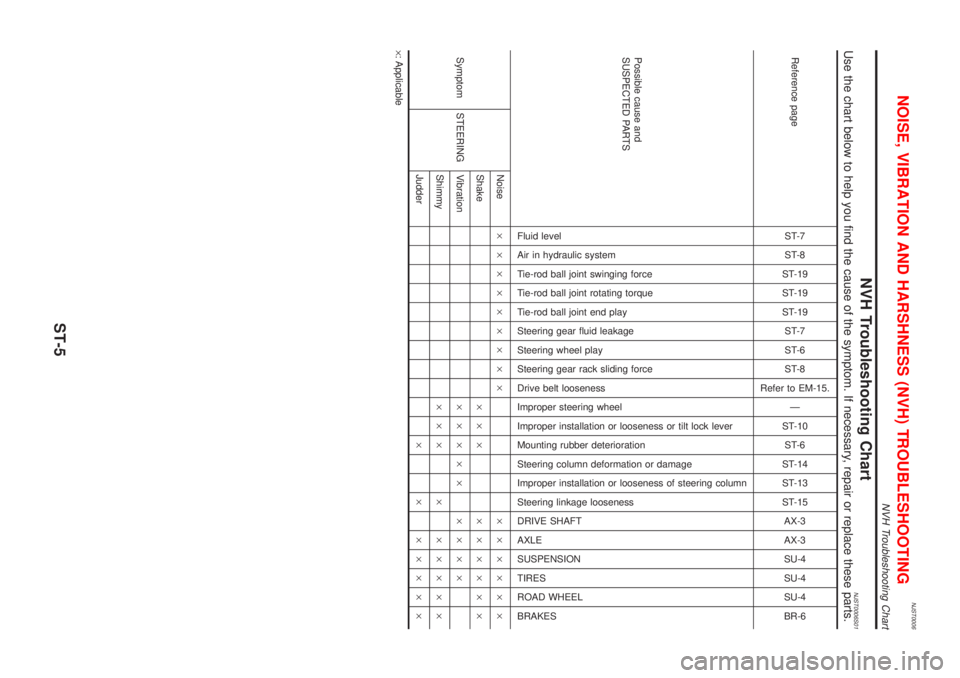
NVH Troubleshooting ChartNJST0006S01Use the chart below to help you find the cause of the symptom. If necessary, repair or replace these parts.
Reference pageST-7
ST-8
ST-19
ST-19
ST-19
ST-7
ST-6
ST-8
Refer to EM-15.
Ð
ST-10
ST-6
ST-14
ST-13
ST-15
AX-3
AX-3
SU-4
SU-4
SU-4
BR-6
Possible cause and
SUSPECTED PARTS
Fluid level
Air in hydraulic system
Tie-rod ball joint swinging force
Tie-rod ball joint rotating torque
Tie-rod ball joint end play
Steering gear fluid leakage
Steering wheel play
Steering gear rack sliding force
Drive belt looseness
Improper steering wheel
Improper installation or looseness or tilt lock lever
Mounting rubber deterioration
Steering column deformation or damage
Improper installation or looseness of steering column
Steering linkage looseness
DRIVE SHAFT
AXLE
SUSPENSION
TIRES
ROAD WHEEL
BRAKES
Symptom STEERINGNoise´´´´´´´´´ ´´´´´´
Shake´´´ ´´´´´´
Vibration´´´´´ ´´´´
Shimmy´´´ ´ ´´´´´
Judder´ ´ ´´´´´
´: Applicable
NOISE, VIBRATION AND HARSHNESS (NVH) TROUBLESHOOTING
NVH Troubleshooting Chart
ST-5
Page 1871 of 2493
![NISSAN ALMERA N16 2001 Electronic Repair Manual SRS772
7. Diagnostic codes are displayed on ªSELF-DIAG [CURRENT]º.
SRS701
If no malfunction is detected on ªSELF-DIAG [CURRENT]º but mal-
function is indicated by the ªAIR BAGº warning lamp, go NISSAN ALMERA N16 2001 Electronic Repair Manual SRS772
7. Diagnostic codes are displayed on ªSELF-DIAG [CURRENT]º.
SRS701
If no malfunction is detected on ªSELF-DIAG [CURRENT]º but mal-
function is indicated by the ªAIR BAGº warning lamp, go](/manual-img/5/57351/w960_57351-1870.png)
SRS772
7. Diagnostic codes are displayed on ªSELF-DIAG [CURRENT]º.
SRS701
If no malfunction is detected on ªSELF-DIAG [CURRENT]º but mal-
function is indicated by the ªAIR BAGº warning lamp, go to DIAG-
NOSTIC PROCEDURE 4, page RS-56, to diagnose the following
situations:
+Self-diagnostic result ªSELF-DIAG [PAST]º (previously stored
in the memory) might not be erased after repair.
+The SRS system malfunctions intermittently.
8. Touch ªPRINTº.
9. Compare diagnostic codes to ªCONSULT-II Diagnostic Code
Chartº, RS-51.
10. Touch ªBACKº key of CONSULT-II until ªSELECT SYSTEMº
appears in order to return to User mode from Diagnosis mode.
11. Turn ignition switch ªOFFº, then turn off and disconnect
CONSULT-II, and disconnect both battery cables.
12. Repair the system as outlined by the ªRepair orderº in ªCON-
SULT-II Diagnostic Code Chartº, that corresponds to the self-
diagnostic result. For replacement procedure of component
parts, refer to RS-26.
13. After repairing the system, go to DIAGNOSTIC PROCEDURE
3, page RS-54 for final checking.
CONSULT-II DIAGNOSTIC CODE CHART (ªSELF-DIAG
[CURRENT]º)
NJRS0048S0102
Diagnostic item ExplanationRepair order
Recheck SRS at each
replacement.
NO DTC IS DETECTED When malfunction is indicated
by the ªAIR BAGº warning
lamp in User mode+Self-diagnostic result ªSELF-
DIAG [PAST]º (previously
stored in the memory) might
not be erased after repair.
+Intermittent malfunction has
been detected in the past.+Go to DIAGNOSTIC PRO-
CEDURE 3 (RS-54).
+No malfunction is detected.+Go to DIAGNOSTIC PRO-
CEDURE 3 (RS-54).
SUPPLEMENTAL RESTRAINT SYSTEM (SRS)
Trouble Diagnoses with CONSULT-II (Cont'd)
RS-51
Page 1875 of 2493
![NISSAN ALMERA N16 2001 Electronic Repair Manual SRS701
7. If no malfunction is detected on ªSELF-DIAG [CURRENT]º,
repair of SRS is completed. Go to step 8.
If any malfunction is displayed on ªSELF-DIAG [CURRENT]º,
the malfunctioning part is not NISSAN ALMERA N16 2001 Electronic Repair Manual SRS701
7. If no malfunction is detected on ªSELF-DIAG [CURRENT]º,
repair of SRS is completed. Go to step 8.
If any malfunction is displayed on ªSELF-DIAG [CURRENT]º,
the malfunctioning part is not](/manual-img/5/57351/w960_57351-1874.png)
SRS701
7. If no malfunction is detected on ªSELF-DIAG [CURRENT]º,
repair of SRS is completed. Go to step 8.
If any malfunction is displayed on ªSELF-DIAG [CURRENT]º,
the malfunctioning part is not repaired completely or another
malfunctioning part is detected. Go to DIAGNOSTIC PROCE-
DURE 2, page RS-50, and repair malfunctioning part com-
pletely.
SRS773
8. Touch ªERASEº.
NOTE:
Touch ªERASEº to clear the memory of the malfunction
(ªSELF-DIAG [PAST]º).
If the memory of the malfunction in ªSELF-DIAG [PAST]º is not
erased, the User mode shows the system malfunction by the
operation of the warning lamp even if the malfunction is repaired
completely.
SRS697
9. Touch ªBACKº key of CONSULT-II to ªSELECT SYSTEMº
screen. Touch ªSELF-DIAG [PAST]º.
SRS702
10. Check that no malfunction is detected on ªSELF-DIAG
[PAST]º.
11. Touch ªBACKº key of CONSULT-II until ªSELECT SYSTEMº
appears in order to return to User mode from Diagnosis mode.
12. Turn ignition switch ªOFFº, then turn off and disconnect CON-
SULT-II.
13. Go to ªSRS Operation Checkº, page RS-49 to check SRS
operation by using ªAIR BAGº warning lamp with User mode.
SUPPLEMENTAL RESTRAINT SYSTEM (SRS)
Trouble Diagnoses with CONSULT-II (Cont'd)
RS-55
Page 1878 of 2493
10. Touch ªPRINTº.
11. Compare diagnostic codes to ªIntermittent Malfunction Diag-
nostic Code Chartº, RS-58.
12. Touch ªBACKº key of CONSULT-II until ªSELECT SYSTEMº
appears.
13. Turn ignition switch ªOFFº, then turn off and disconnect
CONSULT-II, and disconnect both battery cables.
14. Repair the system as outlined by the ªRepair orderº in ªInter-
mittent Malfunction Diagnostic Code Chartº, that corresponds
to the self-diagnostic result. For replacement procedure of
component parts, refer to RS-26.
15. Go to DIAGNOSTIC PROCEDURE 3, page RS-54, for final
checking.
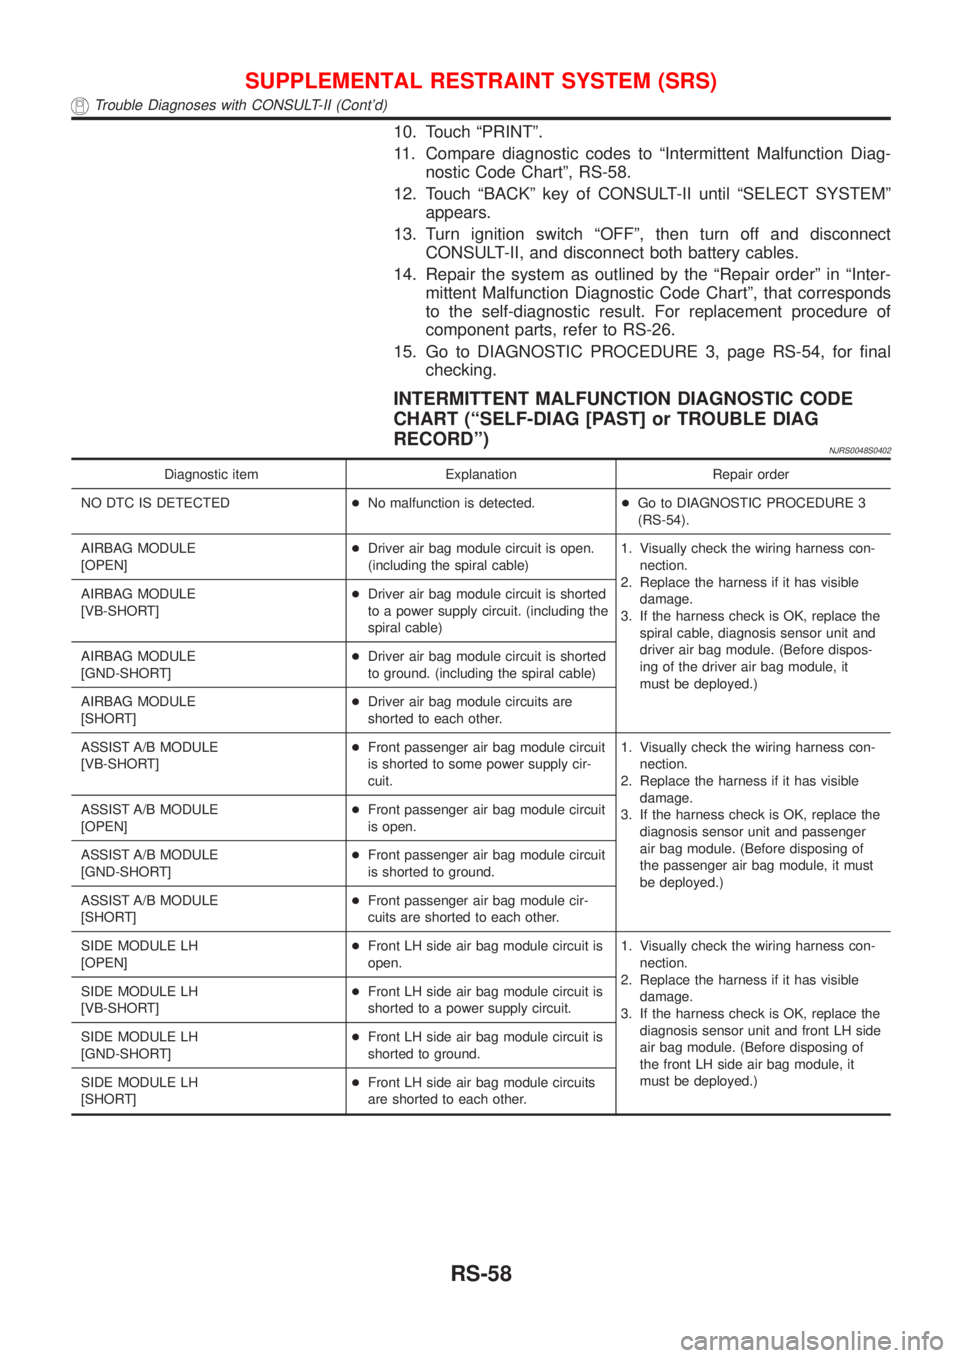
INTERMITTENT MALFUNCTION DIAGNOSTIC CODE
CHART (ªSELF-DIAG [PAST] or TROUBLE DIAG
RECORDº)
NJRS0048S0402
Diagnostic item Explanation Repair order
NO DTC IS DETECTED+No malfunction is detected.+Go to DIAGNOSTIC PROCEDURE 3
(RS-54).
AIRBAG MODULE
[OPEN]+Driver air bag module circuit is open.
(including the spiral cable)1. Visually check the wiring harness con-
nection.
2. Replace the harness if it has visible
damage.
3. If the harness check is OK, replace the
spiral cable, diagnosis sensor unit and
driver air bag module. (Before dispos-
ing of the driver air bag module, it
must be deployed.) AIRBAG MODULE
[VB-SHORT]+Driver air bag module circuit is shorted
to a power supply circuit. (including the
spiral cable)
AIRBAG MODULE
[GND-SHORT]+Driver air bag module circuit is shorted
to ground. (including the spiral cable)
AIRBAG MODULE
[SHORT]+Driver air bag module circuits are
shorted to each other.
ASSIST A/B MODULE
[VB-SHORT]+Front passenger air bag module circuit
is shorted to some power supply cir-
cuit.1. Visually check the wiring harness con-
nection.
2. Replace the harness if it has visible
damage.
3. If the harness check is OK, replace the
diagnosis sensor unit and passenger
air bag module. (Before disposing of
the passenger air bag module, it must
be deployed.) ASSIST A/B MODULE
[OPEN]+Front passenger air bag module circuit
is open.
ASSIST A/B MODULE
[GND-SHORT]+Front passenger air bag module circuit
is shorted to ground.
ASSIST A/B MODULE
[SHORT]+Front passenger air bag module cir-
cuits are shorted to each other.
SIDE MODULE LH
[OPEN]+Front LH side air bag module circuit is
open.1. Visually check the wiring harness con-
nection.
2. Replace the harness if it has visible
damage.
3. If the harness check is OK, replace the
diagnosis sensor unit and front LH side
air bag module. (Before disposing of
the front LH side air bag module, it
must be deployed.) SIDE MODULE LH
[VB-SHORT]+Front LH side air bag module circuit is
shorted to a power supply circuit.
SIDE MODULE LH
[GND-SHORT]+Front LH side air bag module circuit is
shorted to ground.
SIDE MODULE LH
[SHORT]+Front LH side air bag module circuits
are shorted to each other.
SUPPLEMENTAL RESTRAINT SYSTEM (SRS)
Trouble Diagnoses with CONSULT-II (Cont'd)
RS-58
Page 1880 of 2493
SRS800
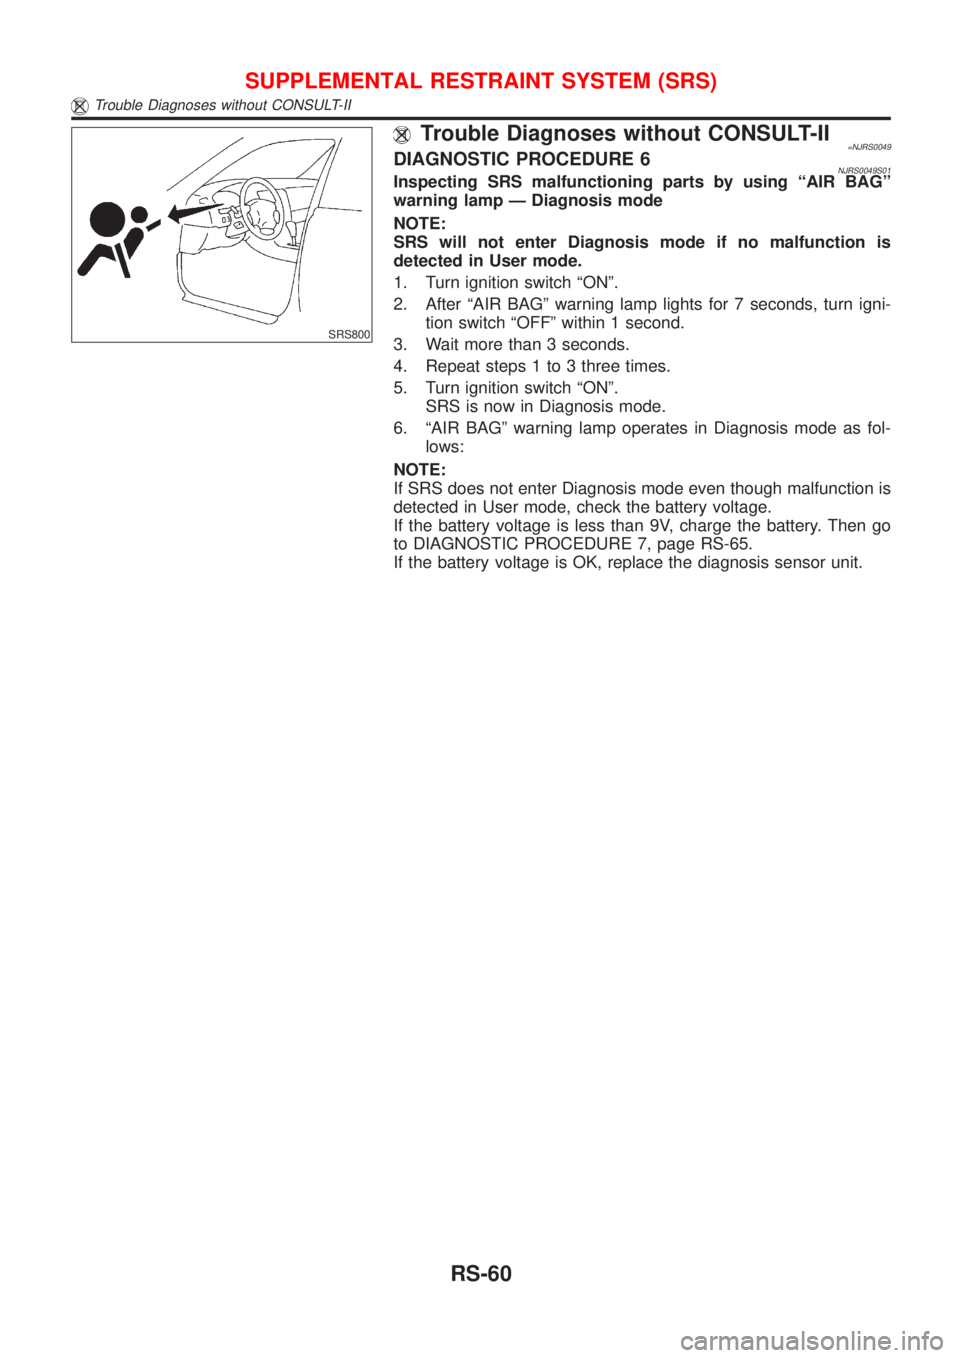
Trouble Diagnoses without CONSULT-II=NJRS0049DIAGNOSTIC PROCEDURE 6NJRS0049S01Inspecting SRS malfunctioning parts by using ªAIR BAGº
warning lamp Ð Diagnosis mode
NOTE:
SRS will not enter Diagnosis mode if no malfunction is
detected in User mode.
1. Turn ignition switch ªONº.
2. After ªAIR BAGº warning lamp lights for 7 seconds, turn igni-
tion switch ªOFFº within 1 second.
3. Wait more than 3 seconds.
4. Repeat steps 1 to 3 three times.
5. Turn ignition switch ªONº.
SRS is now in Diagnosis mode.
6. ªAIR BAGº warning lamp operates in Diagnosis mode as fol-
lows:
NOTE:
If SRS does not enter Diagnosis mode even though malfunction is
detected in User mode, check the battery voltage.
If the battery voltage is less than 9V, charge the battery. Then go
to DIAGNOSTIC PROCEDURE 7, page RS-65.
If the battery voltage is OK, replace the diagnosis sensor unit.
SUPPLEMENTAL RESTRAINT SYSTEM (SRS)
Trouble Diagnoses without CONSULT-II
RS-60
Page 1881 of 2493
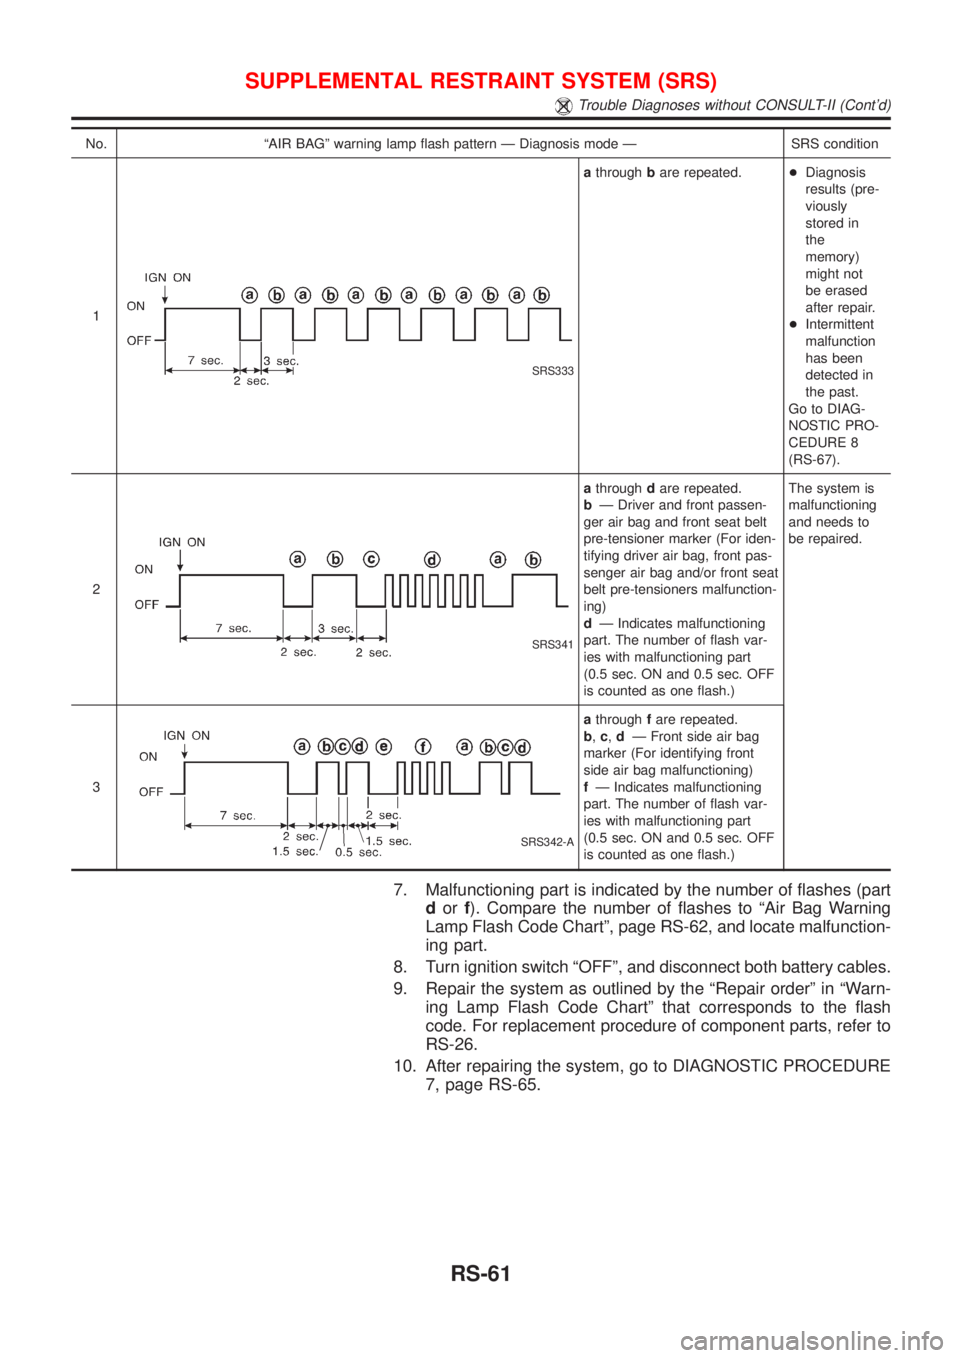
No. ªAIR BAGº warning lamp flash pattern Ð Diagnosis mode Ð SRS condition
1
SRS333
athroughbare repeated.+Diagnosis
results (pre-
viously
stored in
the
memory)
might not
be erased
after repair.
+Intermittent
malfunction
has been
detected in
the past.
Go to DIAG-
NOSTIC PRO-
CEDURE 8
(RS-67).
2
SRS341
athroughdare repeated.
bÐ Driver and front passen-
ger air bag and front seat belt
pre-tensioner marker (For iden-
tifying driver air bag, front pas-
senger air bag and/or front seat
belt pre-tensioners malfunction-
ing)
dÐ Indicates malfunctioning
part. The number of flash var-
ies with malfunctioning part
(0.5 sec. ON and 0.5 sec. OFF
is counted as one flash.)The system is
malfunctioning
and needs to
be repaired.
3
SRS342-A
athroughfare repeated.
b,c,dÐ Front side air bag
marker (For identifying front
side air bag malfunctioning)
fÐ Indicates malfunctioning
part. The number of flash var-
ies with malfunctioning part
(0.5 sec. ON and 0.5 sec. OFF
is counted as one flash.)
7. Malfunctioning part is indicated by the number of flashes (part
dorf). Compare the number of flashes to ªAir Bag Warning
Lamp Flash Code Chartº, page RS-62, and locate malfunction-
ing part.
8. Turn ignition switch ªOFFº, and disconnect both battery cables.
9. Repair the system as outlined by the ªRepair orderº in ªWarn-
ing Lamp Flash Code Chartº that corresponds to the flash
code. For replacement procedure of component parts, refer to
RS-26.
10. After repairing the system, go to DIAGNOSTIC PROCEDURE
7, page RS-65.
SUPPLEMENTAL RESTRAINT SYSTEM (SRS)
Trouble Diagnoses without CONSULT-II (Cont'd)
RS-61
Page 1886 of 2493
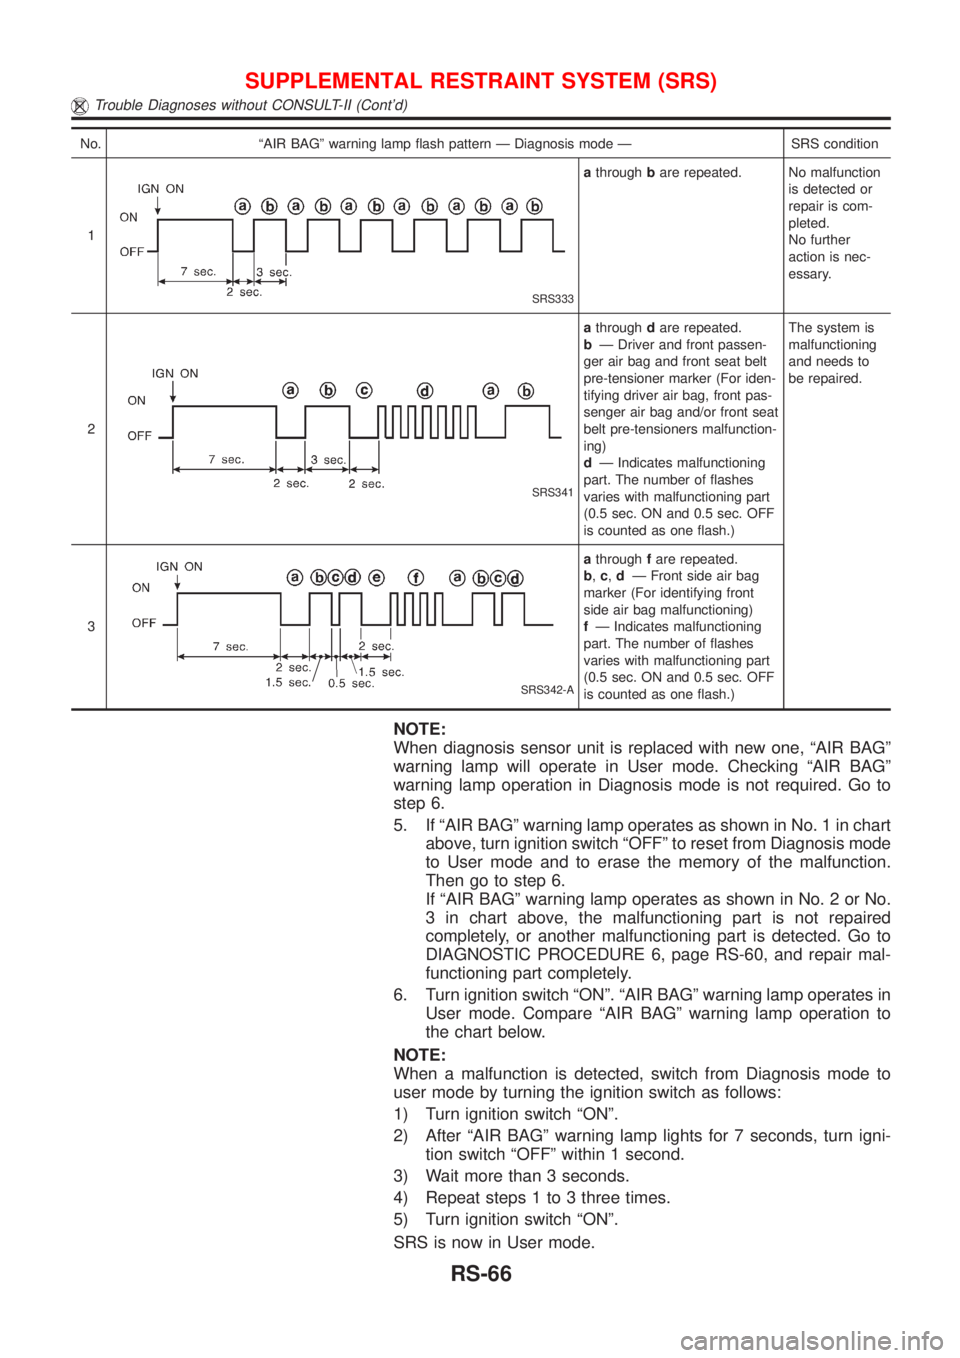
No. ªAIR BAGº warning lamp flash pattern Ð Diagnosis mode Ð SRS condition
1
SRS333
athroughbare repeated. No malfunction
is detected or
repair is com-
pleted.
No further
action is nec-
essary.
2
SRS341
athroughdare repeated.
bÐ Driver and front passen-
ger air bag and front seat belt
pre-tensioner marker (For iden-
tifying driver air bag, front pas-
senger air bag and/or front seat
belt pre-tensioners malfunction-
ing)
dÐ Indicates malfunctioning
part. The number of flashes
varies with malfunctioning part
(0.5 sec. ON and 0.5 sec. OFF
is counted as one flash.)The system is
malfunctioning
and needs to
be repaired.
3
SRS342-A
athroughfare repeated.
b,c,dÐ Front side air bag
marker (For identifying front
side air bag malfunctioning)
fÐ Indicates malfunctioning
part. The number of flashes
varies with malfunctioning part
(0.5 sec. ON and 0.5 sec. OFF
is counted as one flash.)
NOTE:
When diagnosis sensor unit is replaced with new one, ªAIR BAGº
warning lamp will operate in User mode. Checking ªAIR BAGº
warning lamp operation in Diagnosis mode is not required. Go to
step 6.
5. If ªAIR BAGº warning lamp operates as shown in No. 1 in chart
above, turn ignition switch ªOFFº to reset from Diagnosis mode
to User mode and to erase the memory of the malfunction.
Then go to step 6.
If ªAIR BAGº warning lamp operates as shown in No. 2 or No.
3 in chart above, the malfunctioning part is not repaired
completely, or another malfunctioning part is detected. Go to
DIAGNOSTIC PROCEDURE 6, page RS-60, and repair mal-
functioning part completely.
6. Turn ignition switch ªONº. ªAIR BAGº warning lamp operates in
User mode. Compare ªAIR BAGº warning lamp operation to
the chart below.
NOTE:
When a malfunction is detected, switch from Diagnosis mode to
user mode by turning the ignition switch as follows:
1) Turn ignition switch ªONº.
2) After ªAIR BAGº warning lamp lights for 7 seconds, turn igni-
tion switch ªOFFº within 1 second.
3) Wait more than 3 seconds.
4) Repeat steps 1 to 3 three times.
5) Turn ignition switch ªONº.
SRS is now in User mode.
SUPPLEMENTAL RESTRAINT SYSTEM (SRS)
Trouble Diagnoses without CONSULT-II (Cont'd)
RS-66
Page 1958 of 2493
Trouble Diagnoses=NJBT0022DIAGNOSTIC TABLENJBT0022S01NOTE:
For diagnosing electric problem, refer to ªELECTRIC SUNROOFº
in EL section.
Check items (Components)
Wind deflector Adjustment Drain hoses WeatherstripLink and wire
assembly
Reference page BT-64 BT-65 BT-66 BT-66 BT-67
SymptomExcessive wind
noise12 3
Water leaks 1 2 3
Sunroof rattles1423
Excessive opera-
tion noise123
The numbers in this table mean checking order.
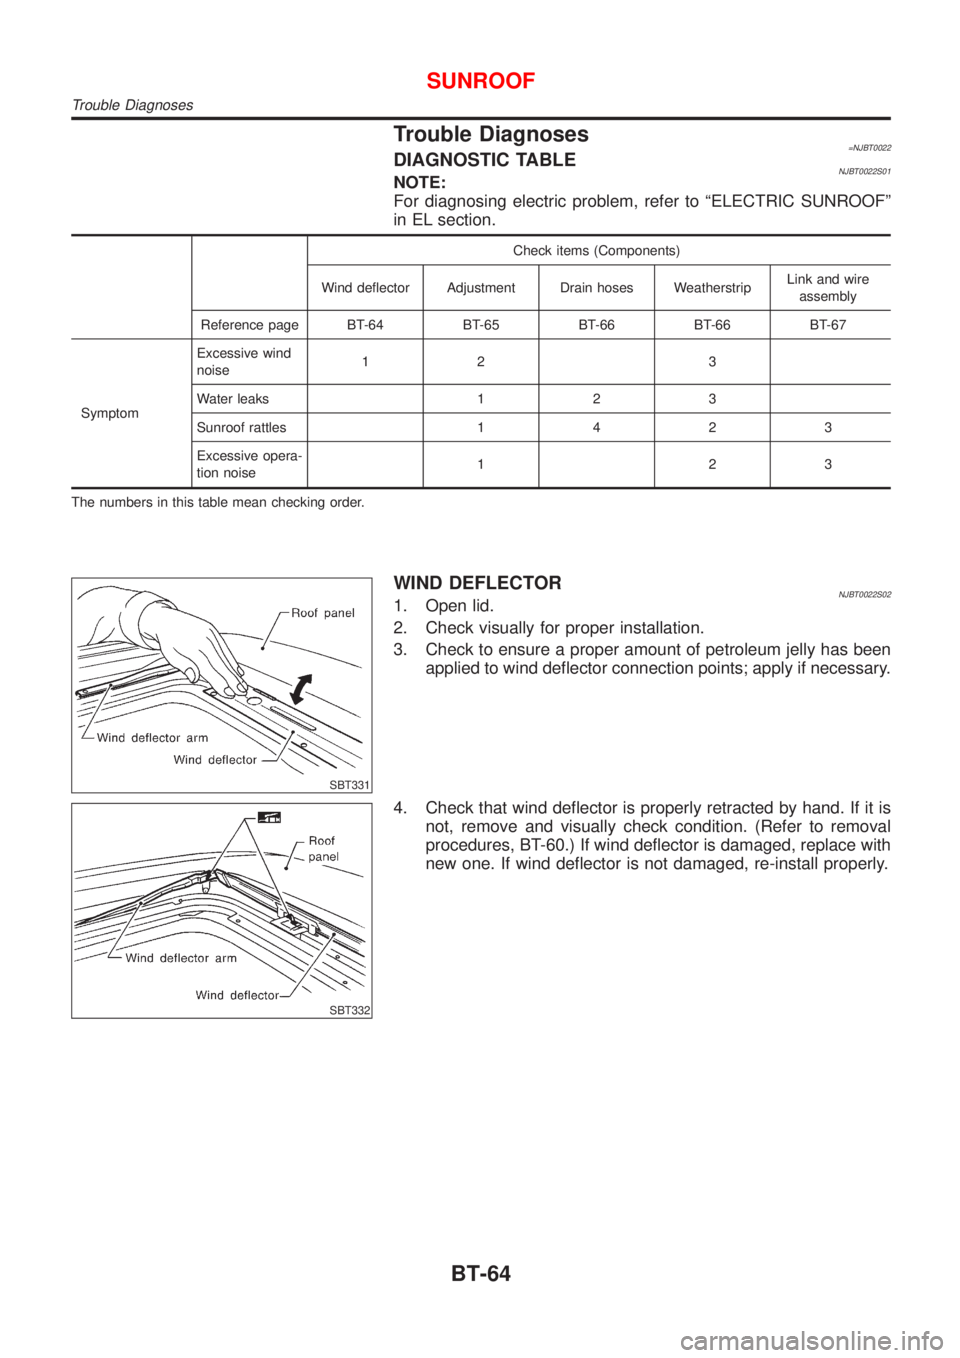
SBT331
WIND DEFLECTORNJBT0022S021. Open lid.
2. Check visually for proper installation.
3. Check to ensure a proper amount of petroleum jelly has been
applied to wind deflector connection points; apply if necessary.
SBT332
4. Check that wind deflector is properly retracted by hand. If it is
not, remove and visually check condition. (Refer to removal
procedures, BT-60.) If wind deflector is damaged, replace with
new one. If wind deflector is not damaged, re-install properly.
SUNROOF
Trouble Diagnoses
BT-64