2001 CHRYSLER VOYAGER ESP
[x] Cancel search: ESPPage 314 of 4284

TEST ACTION APPLICABILITY
3 Turn the ignition off.
Disconnect the ATC C1 harness connector.
Measure the resistance between the Rear Mode Door Driver (A) and (B) circuits.
Is the resistance above 100k ohms?All
Ye s®Go To 4
No®Repair the Rear Mode Door Driver (A) and (B) circuits for a short
together.
With the DRBIIIt, reset the ATC after repair/replacement is
complete.
Perform BODY VERIFICATION TEST - VER 1.
4 Turn the ignition off.
Disconnect the ATC C1 harness connector.
Disconnect the Rear Mode Door Actuator harness connector.
Measure the resistance of the Rear Mode Door Driver (A) circuit.
Is the resistance below 5.0 ohms?All
Ye s®Go To 5
No®Repair the Rear Mode Door Driver (A) circuit for an open.
With the DRBIIIt, reset the ATC after repair/replacement is
complete.
Perform BODY VERIFICATION TEST - VER 1.
5 Turn the ignition off.
Disconnect the ATC C1 harness connector.
Disconnect the Rear Mode Door Actuator harness connector.
Measure the resistance of the Rear Mode Door Driver (B) circuit.
Is the resistance below 5.0 ohms?All
Ye s®Go To 6
No®Repair the Rear Mode Door Driver (B) circuit for an open.
With the DRBIIIt, reset the ATC after repair/replacement is
complete.
Perform BODY VERIFICATION TEST - VER 1.
6 Turn the ignition off.
Disconnect the ATC C1 harness connector.
Measure the resistance between the Rear Mode Door Driver (A) and (B) circuits.
Is the resistance between 26.0 and 46.0 ohms?All
Ye s®Replace the ATC.
With the DRBIIIt, reset the ATC after repair/replacement is
complete.
Perform BODY VERIFICATION TEST - VER 1.
No®Go To 7
7 If there are no possible causes remaining, view repair. All
Repair
Replace the Rear Mode Door Actuator.
With the DRBIIIt, reset the ATC after repair/replacement is
complete.
Perform BODY VERIFICATION TEST - VER 1.
285
AUTOMATIC TEMPERATURE CONTROL
REAR MODE DOOR NOT RESPONDING (ACTIVE) ÐContinued
Page 315 of 4284

Symptom:
REAR MODE DOOR TRAVEL TOO LARGE (ACTIVE)
When Monitored and Set Condition:
REAR MODE DOOR TRAVEL TOO LARGE (ACTIVE)
When Monitored: With the ignition on and the IOD fuse installed.
Set Condition: This DTC is set when the ATC monitors the travel range during system
initialization and the measured range is greater than expected.
POSSIBLE CAUSES
CHECK THE ATC FOR DTCS
REAR MODE DOOR ACTUATOR
REAR MODE DOOR LINKAGE
AT C
TEST ACTION APPLICABILITY
1 Turn the ignition on.
With the DRB, read the active ATC DTCs.
Is the REAR MODE DOOR NOT RESPONDING DTC set?All
Ye s®Return to the symptom list and choose the symptom.
With the DRBIIIt, reset the ATC after repair/replacement is
complete.
Perform BODY VERIFICATION TEST - VER 1.
No®Go To 2
2 Turn the ignition off.
Remove the Rear Mode Door Actuator.
By hand, attempt to rotate the Rear Mode Door Actuator in both directions.
Did the mode door actuator turn in either direction?All
Ye s®Replace the Rear Mode Door Actuator.
With the DRBIIIt, reset the ATC after repair/replacement is
complete.
Perform BODY VERIFICATION TEST - VER 1.
No®Go To 3
286
AUTOMATIC TEMPERATURE CONTROL
Page 317 of 4284

Symptom:
REAR MODE DOOR TRAVEL TOO SMALL (ACTIVE)
When Monitored and Set Condition:
REAR MODE DOOR TRAVEL TOO SMALL (ACTIVE)
When Monitored: With the ignition on and the IOD fuse installed.
Set Condition: This DTC is set when the ATC monitors the travel range during system
initialization and the measured range is less than expected.
POSSIBLE CAUSES
CHECK THE ATC FOR DTCS
AT C
OBSTRUCTED MODE DOOR
REAR MODE DOOR ACTUATOR
TEST ACTION APPLICABILITY
1 Turn the ignition on.
With the DRB, read the active ATC DTCs.
Is the REAR MODE DOOR NOT RESPONDING DTC set?All
Ye s®Return to the symptom list and choose the symptom.
With the DRBIIIt, reset the ATC after repair/replacement is
complete.
Perform BODY VERIFICATION TEST - VER 1.
No®Go To 2
2 Turn the ignition off.
Disconnect the Rear Mode Door Actuator harness connector.
Connect a 12-volt Test Light between the rear mode door driver (A) and (B) circuits
in the Rear A/C Heater Unit harness connector.
Turn the ignition on.
While monitoring the test light, turn the rear mode control knob from lo to hi.
Note: Observe test light for approximately 30 seconds.
Does the test light start to flash and stay flashing?All
Ye s®Go To 3
No®Replace the ATC.
With the DRBIIIt, reset the ATC after repair/replacement is
complete.
Perform BODY VERIFICATION TEST - VER 1.
288
AUTOMATIC TEMPERATURE CONTROL
Page 319 of 4284

Symptom:
RECIRC DOOR NOT RESPONDING (ACTIVE)
When Monitored and Set Condition:
RECIRC DOOR NOT RESPONDING (ACTIVE)
When Monitored: Ignition in RUN and IOD fuse installed.
Set Condition: This DTC is set when the ATC does not receive feedback pulses within 5
seconds of the drive voltage being applied.
POSSIBLE CAUSES
RECIRC DOOR DRIVER CIRCUIT (A) SHORTED TO GROUND
RECIRC DOOR DRIVER CIRCUIT (B) SHORTED TO GROUND
RECIRC DOOR DRIVER CIRCUITS (A) AND (B) SHORTED TOGETHER
RECIRC DOOR DRIVER CIRCUIT (A) OPEN
RECIRC DOOR DRIVER CIRCUIT (B) OPEN
AT C
RECIRCULATION DOOR ACTUATOR
TEST ACTION APPLICABILITY
1 Turn the ignition off.
Disconnect the Recirculation Door Actuator harness connector.
Disconnect the ATC C1 harness connector.
Measure the resistance between ground and the Recirculation Door Driver (A)
circuit.
Is the resistance above 100k ohms?All
Ye s®Go To 2
No®Repair the Recirculation Door Driver (A) circuit for a short to
ground.
With the DRBIIIt, reset the ATC after repair/replacement is
complete.
Perform BODY VERIFICATION TEST - VER 1.
2 Turn the ignition off.
Disconnect the Recirculation Door Actuator harness connector.
Disconnect the ATC C1 harness connector.
Measure the resistance between ground and the Recirculation Door Driver (B)
circuit.
Is the resistance above 100k ohms?All
Ye s®Go To 3
No®Repair the Recirculation Door Driver (B) circuit for a short to
ground.
With the DRBIIIt, reset the ATC after repair/replacement is
complete.
Perform BODY VERIFICATION TEST - VER 1.
290
AUTOMATIC TEMPERATURE CONTROL
Page 320 of 4284

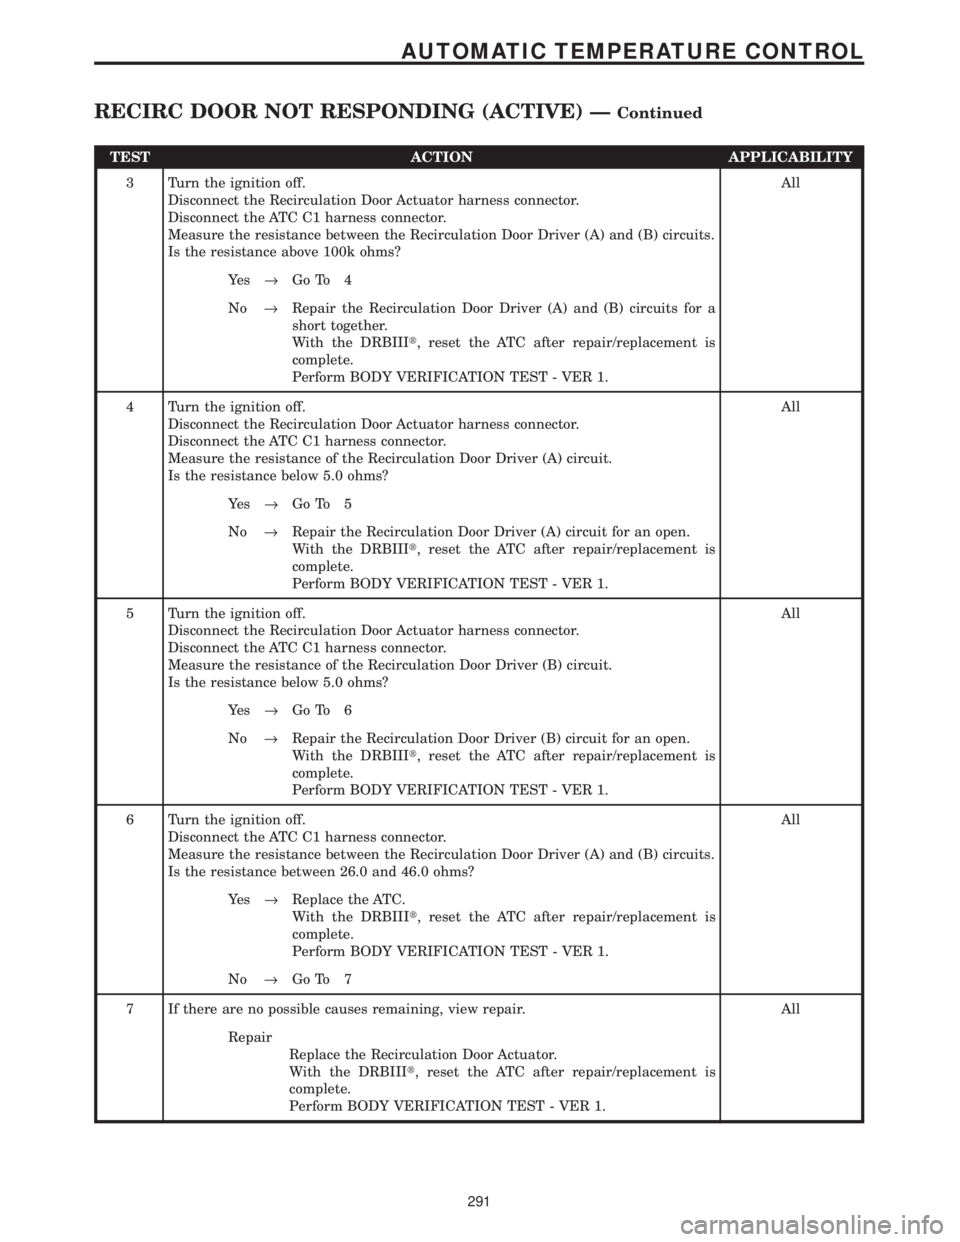
TEST ACTION APPLICABILITY
3 Turn the ignition off.
Disconnect the Recirculation Door Actuator harness connector.
Disconnect the ATC C1 harness connector.
Measure the resistance between the Recirculation Door Driver (A) and (B) circuits.
Is the resistance above 100k ohms?All
Ye s®Go To 4
No®Repair the Recirculation Door Driver (A) and (B) circuits for a
short together.
With the DRBIIIt, reset the ATC after repair/replacement is
complete.
Perform BODY VERIFICATION TEST - VER 1.
4 Turn the ignition off.
Disconnect the Recirculation Door Actuator harness connector.
Disconnect the ATC C1 harness connector.
Measure the resistance of the Recirculation Door Driver (A) circuit.
Is the resistance below 5.0 ohms?All
Ye s®Go To 5
No®Repair the Recirculation Door Driver (A) circuit for an open.
With the DRBIIIt, reset the ATC after repair/replacement is
complete.
Perform BODY VERIFICATION TEST - VER 1.
5 Turn the ignition off.
Disconnect the Recirculation Door Actuator harness connector.
Disconnect the ATC C1 harness connector.
Measure the resistance of the Recirculation Door Driver (B) circuit.
Is the resistance below 5.0 ohms?All
Ye s®Go To 6
No®Repair the Recirculation Door Driver (B) circuit for an open.
With the DRBIIIt, reset the ATC after repair/replacement is
complete.
Perform BODY VERIFICATION TEST - VER 1.
6 Turn the ignition off.
Disconnect the ATC C1 harness connector.
Measure the resistance between the Recirculation Door Driver (A) and (B) circuits.
Is the resistance between 26.0 and 46.0 ohms?All
Ye s®Replace the ATC.
With the DRBIIIt, reset the ATC after repair/replacement is
complete.
Perform BODY VERIFICATION TEST - VER 1.
No®Go To 7
7 If there are no possible causes remaining, view repair. All
Repair
Replace the Recirculation Door Actuator.
With the DRBIIIt, reset the ATC after repair/replacement is
complete.
Perform BODY VERIFICATION TEST - VER 1.
291
AUTOMATIC TEMPERATURE CONTROL
RECIRC DOOR NOT RESPONDING (ACTIVE) ÐContinued
Page 321 of 4284

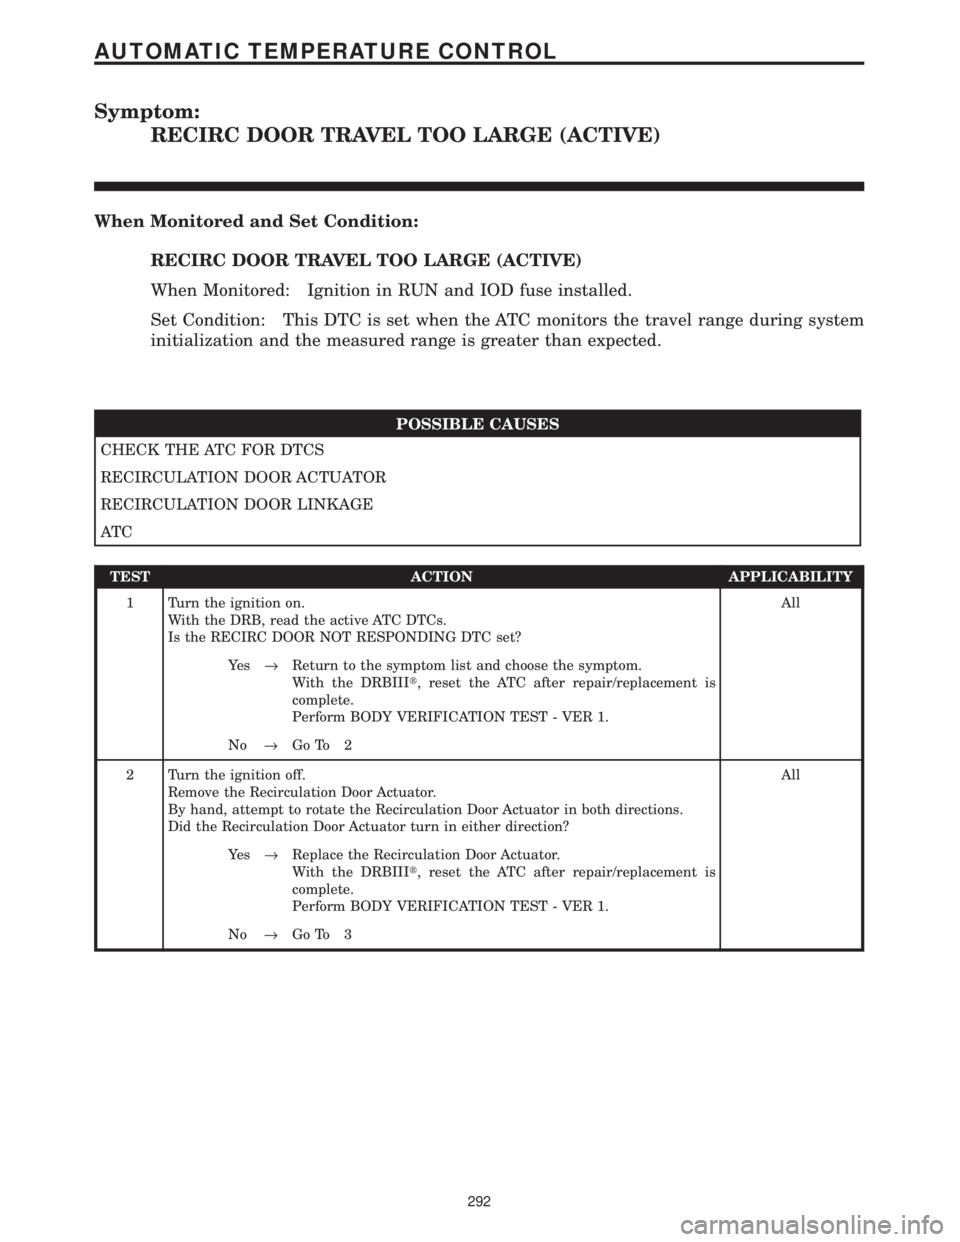
Symptom:
RECIRC DOOR TRAVEL TOO LARGE (ACTIVE)
When Monitored and Set Condition:
RECIRC DOOR TRAVEL TOO LARGE (ACTIVE)
When Monitored: Ignition in RUN and IOD fuse installed.
Set Condition: This DTC is set when the ATC monitors the travel range during system
initialization and the measured range is greater than expected.
POSSIBLE CAUSES
CHECK THE ATC FOR DTCS
RECIRCULATION DOOR ACTUATOR
RECIRCULATION DOOR LINKAGE
AT C
TEST ACTION APPLICABILITY
1 Turn the ignition on.
With the DRB, read the active ATC DTCs.
Is the RECIRC DOOR NOT RESPONDING DTC set?All
Ye s®Return to the symptom list and choose the symptom.
With the DRBIIIt, reset the ATC after repair/replacement is
complete.
Perform BODY VERIFICATION TEST - VER 1.
No®Go To 2
2 Turn the ignition off.
Remove the Recirculation Door Actuator.
By hand, attempt to rotate the Recirculation Door Actuator in both directions.
Did the Recirculation Door Actuator turn in either direction?All
Ye s®Replace the Recirculation Door Actuator.
With the DRBIIIt, reset the ATC after repair/replacement is
complete.
Perform BODY VERIFICATION TEST - VER 1.
No®Go To 3
292
AUTOMATIC TEMPERATURE CONTROL
Page 323 of 4284

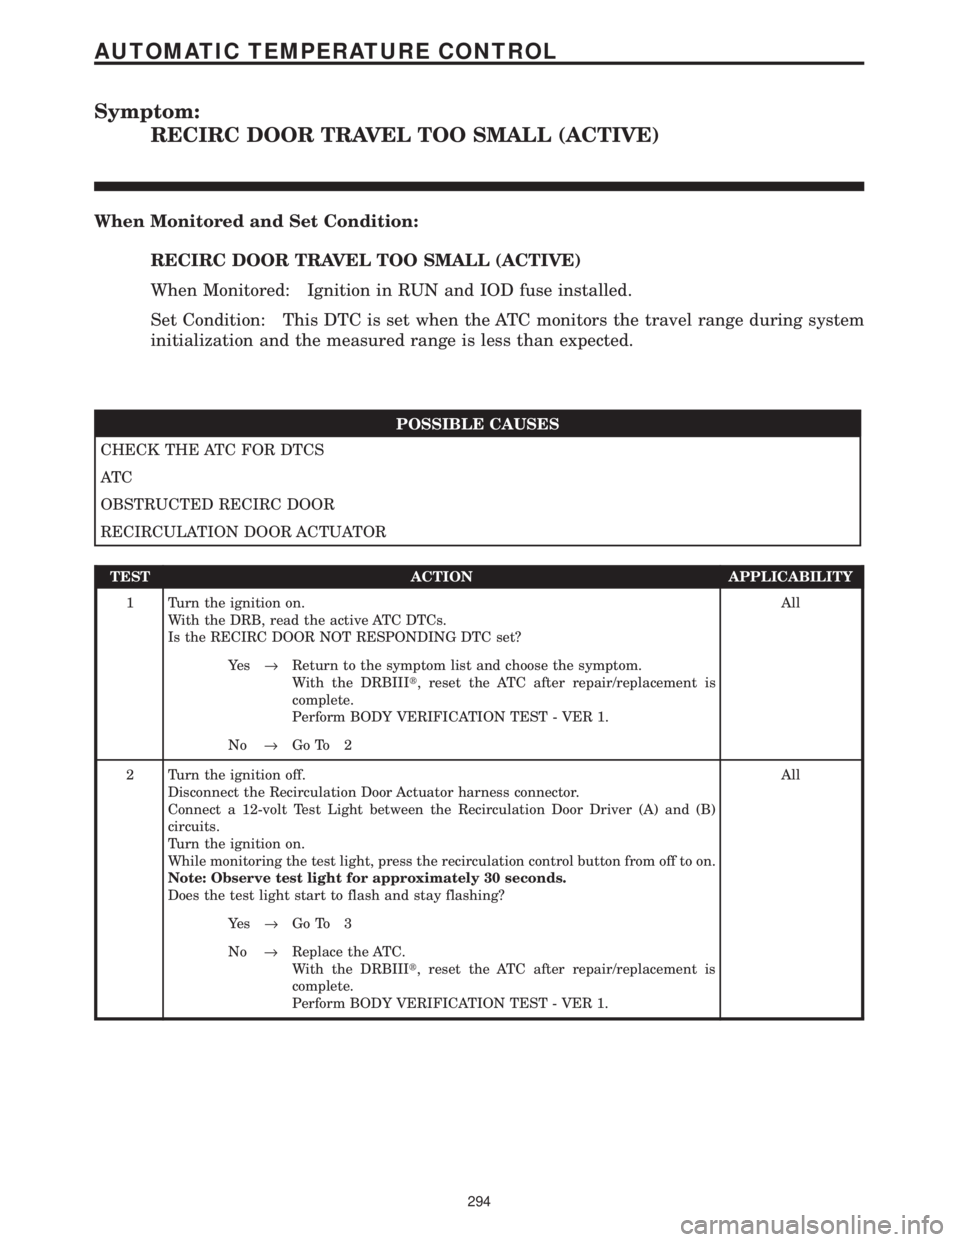
Symptom:
RECIRC DOOR TRAVEL TOO SMALL (ACTIVE)
When Monitored and Set Condition:
RECIRC DOOR TRAVEL TOO SMALL (ACTIVE)
When Monitored: Ignition in RUN and IOD fuse installed.
Set Condition: This DTC is set when the ATC monitors the travel range during system
initialization and the measured range is less than expected.
POSSIBLE CAUSES
CHECK THE ATC FOR DTCS
AT C
OBSTRUCTED RECIRC DOOR
RECIRCULATION DOOR ACTUATOR
TEST ACTION APPLICABILITY
1 Turn the ignition on.
With the DRB, read the active ATC DTCs.
Is the RECIRC DOOR NOT RESPONDING DTC set?All
Ye s®Return to the symptom list and choose the symptom.
With the DRBIIIt, reset the ATC after repair/replacement is
complete.
Perform BODY VERIFICATION TEST - VER 1.
No®Go To 2
2 Turn the ignition off.
Disconnect the Recirculation Door Actuator harness connector.
Connect a 12-volt Test Light between the Recirculation Door Driver (A) and (B)
circuits.
Turn the ignition on.
While monitoring the test light, press the recirculation control button from off to on.
Note: Observe test light for approximately 30 seconds.
Does the test light start to flash and stay flashing?All
Ye s®Go To 3
No®Replace the ATC.
With the DRBIIIt, reset the ATC after repair/replacement is
complete.
Perform BODY VERIFICATION TEST - VER 1.
294
AUTOMATIC TEMPERATURE CONTROL
Page 325 of 4284

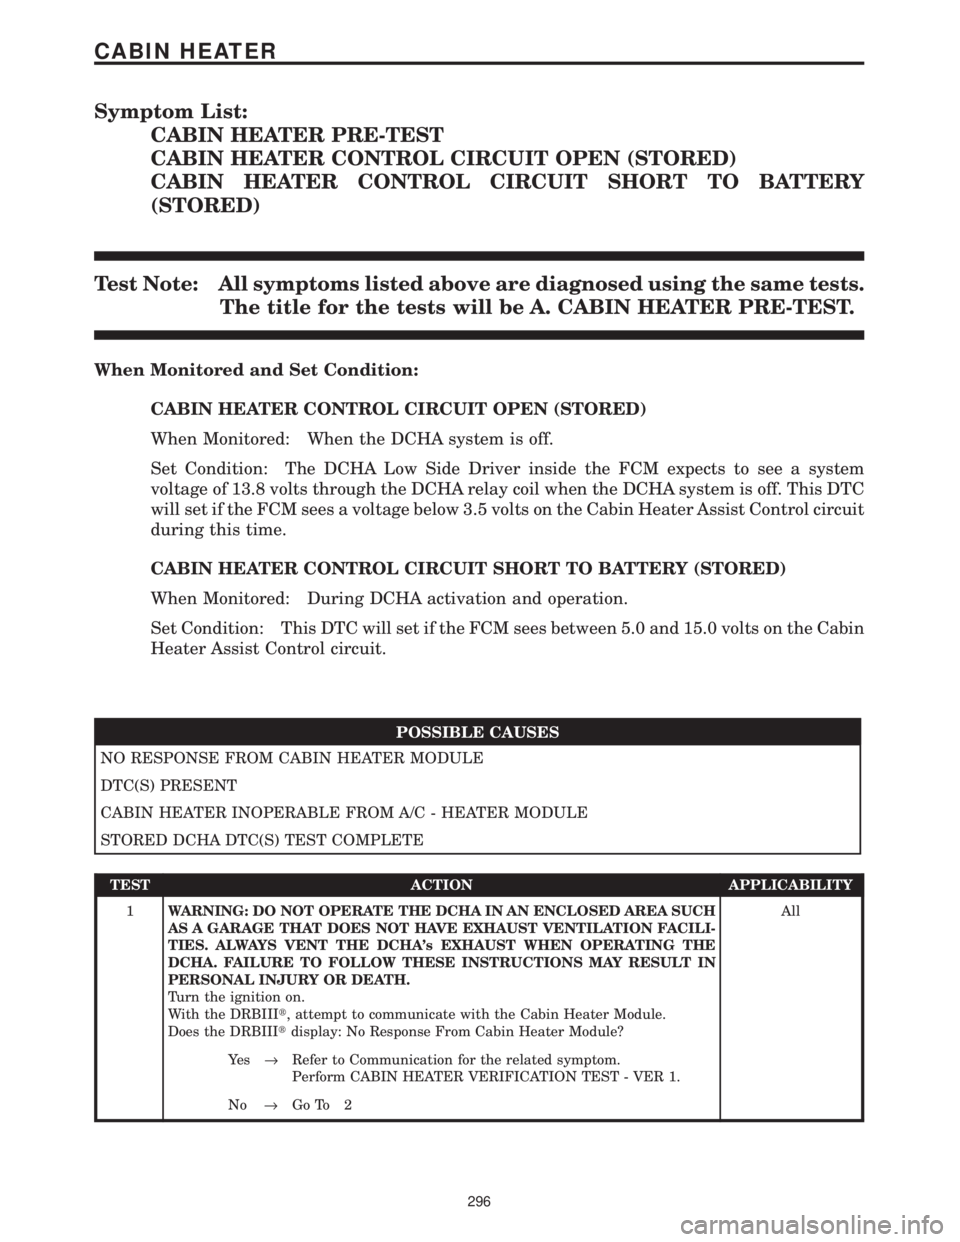
Symptom List:
CABIN HEATER PRE-TEST
CABIN HEATER CONTROL CIRCUIT OPEN (STORED)
CABIN HEATER CONTROL CIRCUIT SHORT TO BATTERY
(STORED)
Test Note: All symptoms listed above are diagnosed using the same tests.
The title for the tests will be A. CABIN HEATER PRE-TEST.
When Monitored and Set Condition:
CABIN HEATER CONTROL CIRCUIT OPEN (STORED)
When Monitored: When the DCHA system is off.
Set Condition: The DCHA Low Side Driver inside the FCM expects to see a system
voltage of 13.8 volts through the DCHA relay coil when the DCHA system is off. This DTC
will set if the FCM sees a voltage below 3.5 volts on the Cabin Heater Assist Control circuit
during this time.
CABIN HEATER CONTROL CIRCUIT SHORT TO BATTERY (STORED)
When Monitored: During DCHA activation and operation.
Set Condition: This DTC will set if the FCM sees between 5.0 and 15.0 volts on the Cabin
Heater Assist Control circuit.
POSSIBLE CAUSES
NO RESPONSE FROM CABIN HEATER MODULE
DTC(S) PRESENT
CABIN HEATER INOPERABLE FROM A/C - HEATER MODULE
STORED DCHA DTC(S) TEST COMPLETE
TEST ACTION APPLICABILITY
1WARNING: DO NOT OPERATE THE DCHA IN AN ENCLOSED AREA SUCH
AS A GARAGE THAT DOES NOT HAVE EXHAUST VENTILATION FACILI-
TIES. ALWAYS VENT THE DCHA's EXHAUST WHEN OPERATING THE
DCHA. FAILURE TO FOLLOW THESE INSTRUCTIONS MAY RESULT IN
PERSONAL INJURY OR DEATH.
Turn the ignition on.
With the DRBIIIt, attempt to communicate with the Cabin Heater Module.
Does the DRBIIItdisplay: No Response From Cabin Heater Module?All
Ye s®Refer to Communication for the related symptom.
Perform CABIN HEATER VERIFICATION TEST - VER 1.
No®Go To 2
296
CABIN HEATER