2001 CHRYSLER VOYAGER relay
[x] Cancel search: relayPage 1415 of 4284
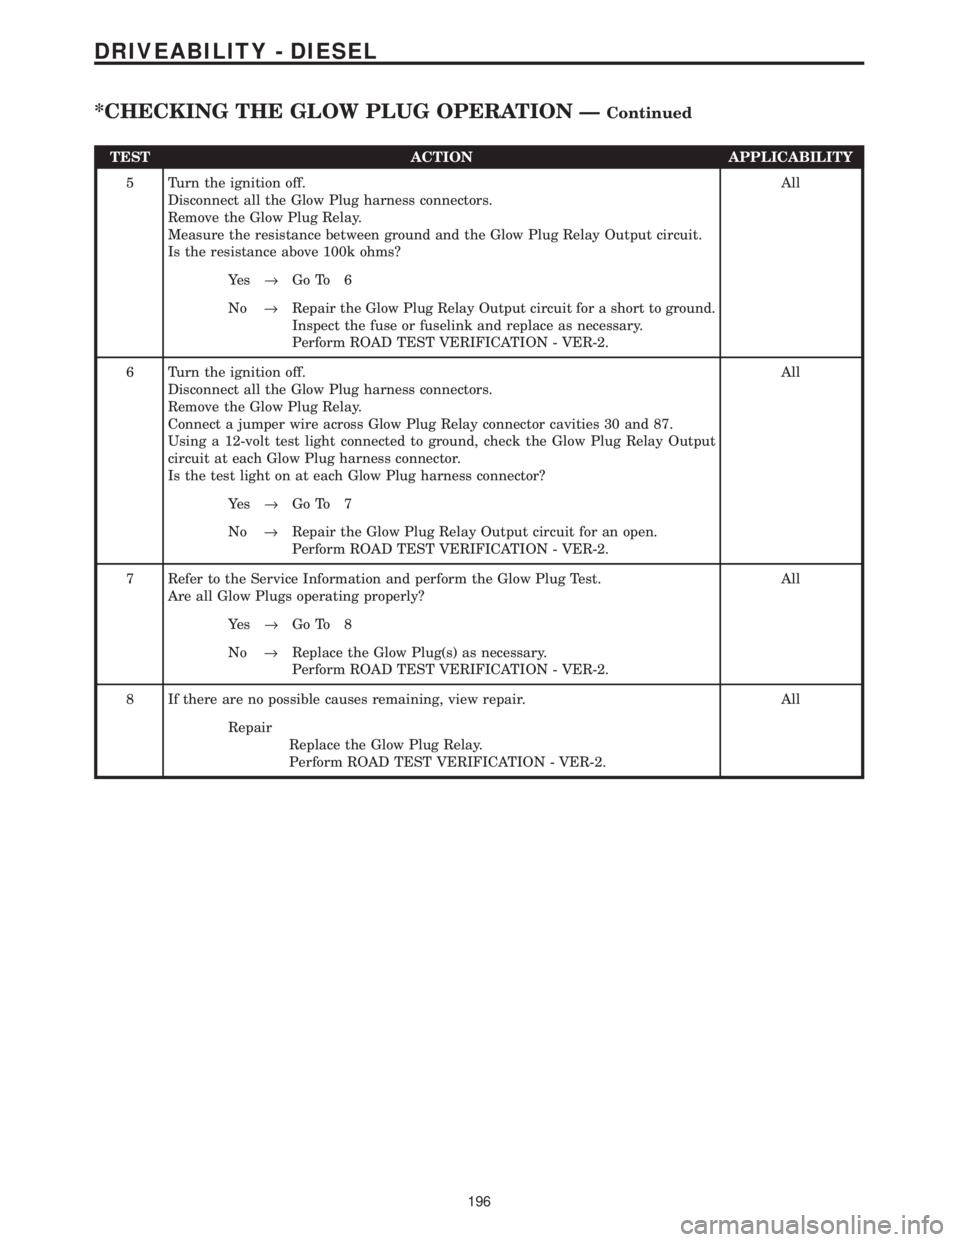
TEST ACTION APPLICABILITY
5 Turn the ignition off.
Disconnect all the Glow Plug harness connectors.
Remove the Glow Plug Relay.
Measure the resistance between ground and the Glow Plug Relay Output circuit.
Is the resistance above 100k ohms?All
Ye s®Go To 6
No®Repair the Glow Plug Relay Output circuit for a short to ground.
Inspect the fuse or fuselink and replace as necessary.
Perform ROAD TEST VERIFICATION - VER-2.
6 Turn the ignition off.
Disconnect all the Glow Plug harness connectors.
Remove the Glow Plug Relay.
Connect a jumper wire across Glow Plug Relay connector cavities 30 and 87.
Using a 12-volt test light connected to ground, check the Glow Plug Relay Output
circuit at each Glow Plug harness connector.
Is the test light on at each Glow Plug harness connector?All
Ye s®Go To 7
No®Repair the Glow Plug Relay Output circuit for an open.
Perform ROAD TEST VERIFICATION - VER-2.
7 Refer to the Service Information and perform the Glow Plug Test.
Are all Glow Plugs operating properly?All
Ye s®Go To 8
No®Replace the Glow Plug(s) as necessary.
Perform ROAD TEST VERIFICATION - VER-2.
8 If there are no possible causes remaining, view repair. All
Repair
Replace the Glow Plug Relay.
Perform ROAD TEST VERIFICATION - VER-2.
196
DRIVEABILITY - DIESEL
*CHECKING THE GLOW PLUG OPERATION ÐContinued
Page 1416 of 4284
Symptom:
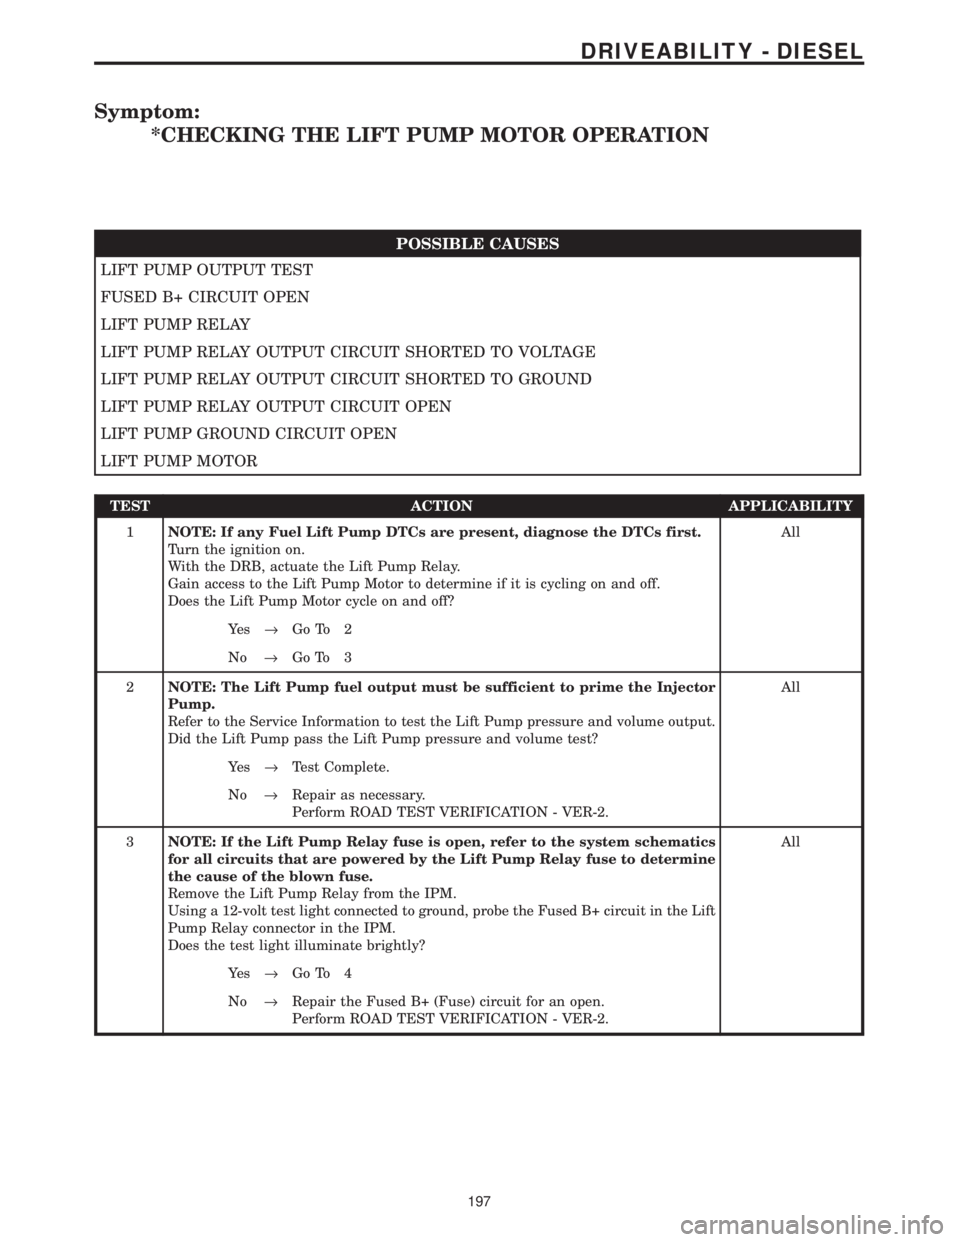
*CHECKING THE LIFT PUMP MOTOR OPERATION
POSSIBLE CAUSES
LIFT PUMP OUTPUT TEST
FUSED B+ CIRCUIT OPEN
LIFT PUMP RELAY
LIFT PUMP RELAY OUTPUT CIRCUIT SHORTED TO VOLTAGE
LIFT PUMP RELAY OUTPUT CIRCUIT SHORTED TO GROUND
LIFT PUMP RELAY OUTPUT CIRCUIT OPEN
LIFT PUMP GROUND CIRCUIT OPEN
LIFT PUMP MOTOR
TEST ACTION APPLICABILITY
1NOTE: If any Fuel Lift Pump DTCs are present, diagnose the DTCs first.
Turn the ignition on.
With the DRB, actuate the Lift Pump Relay.
Gain access to the Lift Pump Motor to determine if it is cycling on and off.
Does the Lift Pump Motor cycle on and off?All
Ye s®Go To 2
No®Go To 3
2NOTE: The Lift Pump fuel output must be sufficient to prime the Injector
Pump.
Refer to the Service Information to test the Lift Pump pressure and volume output.
Did the Lift Pump pass the Lift Pump pressure and volume test?All
Ye s®Test Complete.
No®Repair as necessary.
Perform ROAD TEST VERIFICATION - VER-2.
3NOTE: If the Lift Pump Relay fuse is open, refer to the system schematics
for all circuits that are powered by the Lift Pump Relay fuse to determine
the cause of the blown fuse.
Remove the Lift Pump Relay from the IPM.
Using a 12-volt test light connected to ground, probe the Fused B+ circuit in the Lift
Pump Relay connector in the IPM.
Does the test light illuminate brightly?All
Ye s®Go To 4
No®Repair the Fused B+ (Fuse) circuit for an open.
Perform ROAD TEST VERIFICATION - VER-2.
197
DRIVEABILITY - DIESEL
Page 1417 of 4284
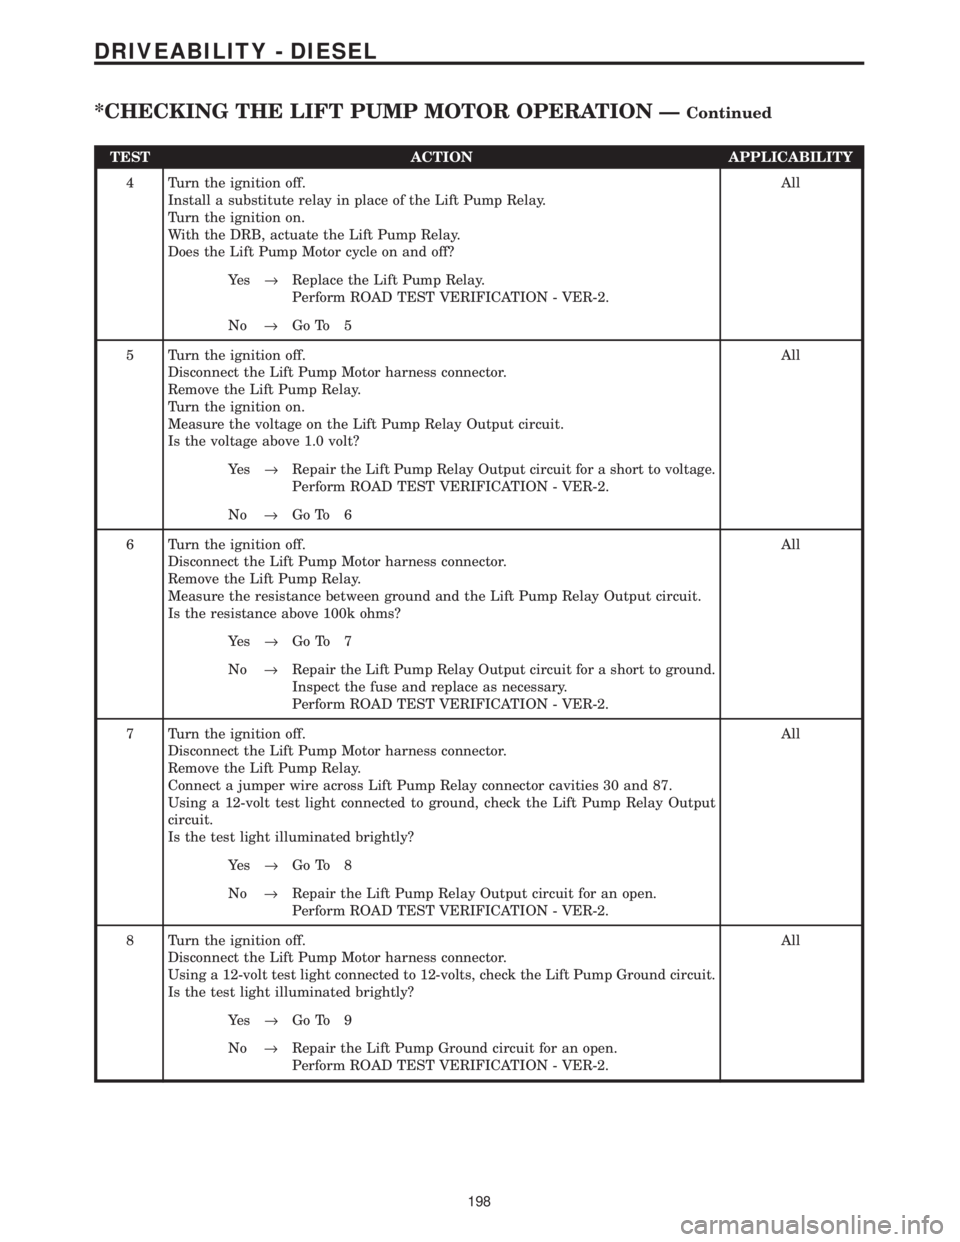
TEST ACTION APPLICABILITY
4 Turn the ignition off.
Install a substitute relay in place of the Lift Pump Relay.
Turn the ignition on.
With the DRB, actuate the Lift Pump Relay.
Does the Lift Pump Motor cycle on and off?All
Ye s®Replace the Lift Pump Relay.
Perform ROAD TEST VERIFICATION - VER-2.
No®Go To 5
5 Turn the ignition off.
Disconnect the Lift Pump Motor harness connector.
Remove the Lift Pump Relay.
Turn the ignition on.
Measure the voltage on the Lift Pump Relay Output circuit.
Is the voltage above 1.0 volt?All
Ye s®Repair the Lift Pump Relay Output circuit for a short to voltage.
Perform ROAD TEST VERIFICATION - VER-2.
No®Go To 6
6 Turn the ignition off.
Disconnect the Lift Pump Motor harness connector.
Remove the Lift Pump Relay.
Measure the resistance between ground and the Lift Pump Relay Output circuit.
Is the resistance above 100k ohms?All
Ye s®Go To 7
No®Repair the Lift Pump Relay Output circuit for a short to ground.
Inspect the fuse and replace as necessary.
Perform ROAD TEST VERIFICATION - VER-2.
7 Turn the ignition off.
Disconnect the Lift Pump Motor harness connector.
Remove the Lift Pump Relay.
Connect a jumper wire across Lift Pump Relay connector cavities 30 and 87.
Using a 12-volt test light connected to ground, check the Lift Pump Relay Output
circuit.
Is the test light illuminated brightly?All
Ye s®Go To 8
No®Repair the Lift Pump Relay Output circuit for an open.
Perform ROAD TEST VERIFICATION - VER-2.
8 Turn the ignition off.
Disconnect the Lift Pump Motor harness connector.
Using a 12-volt test light connected to 12-volts, check the Lift Pump Ground circuit.
Is the test light illuminated brightly?All
Ye s®Go To 9
No®Repair the Lift Pump Ground circuit for an open.
Perform ROAD TEST VERIFICATION - VER-2.
198
DRIVEABILITY - DIESEL
*CHECKING THE LIFT PUMP MOTOR OPERATION ÐContinued
Page 1424 of 4284
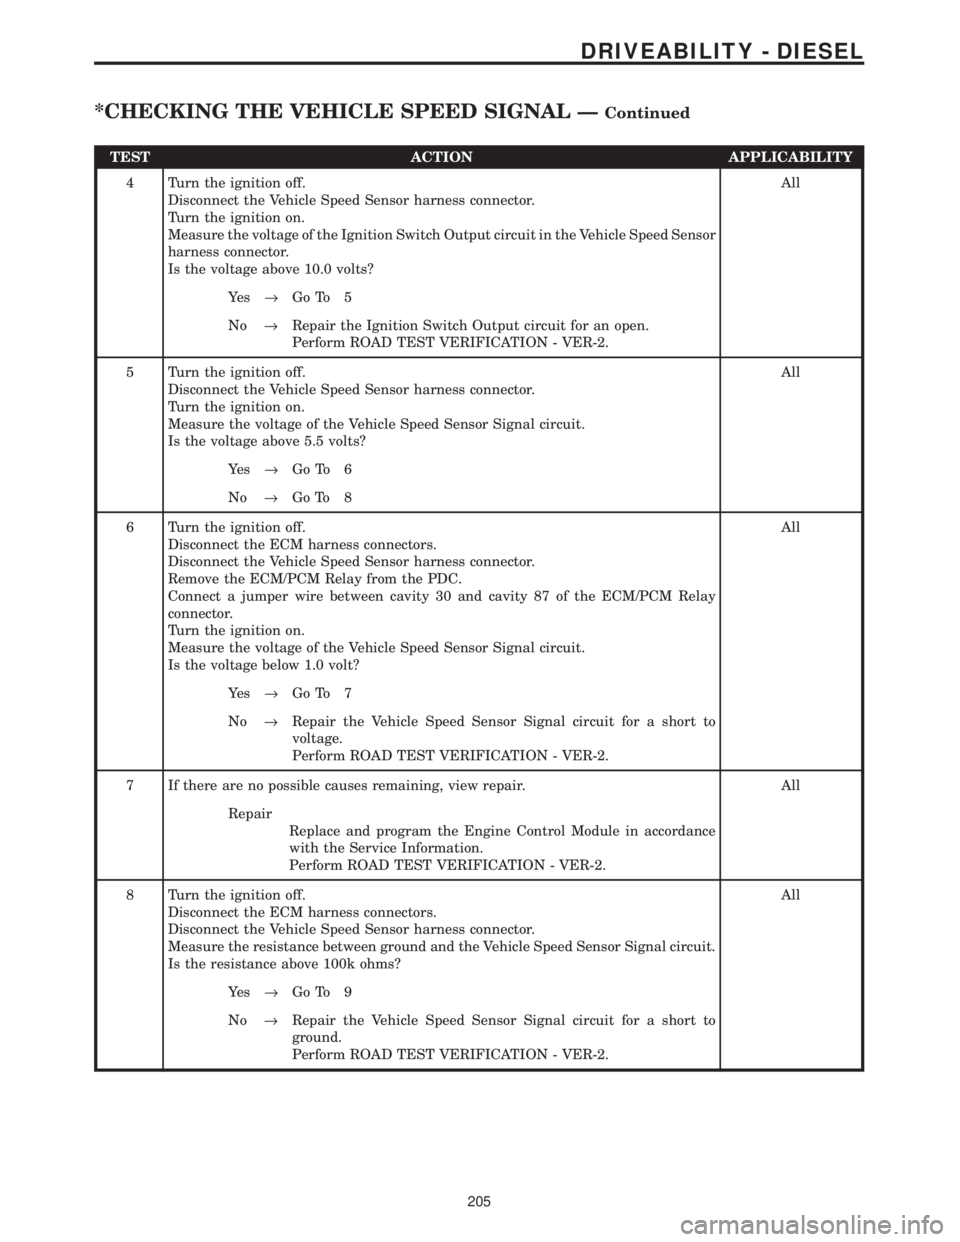
TEST ACTION APPLICABILITY
4 Turn the ignition off.
Disconnect the Vehicle Speed Sensor harness connector.
Turn the ignition on.
Measure the voltage of the Ignition Switch Output circuit in the Vehicle Speed Sensor
harness connector.
Is the voltage above 10.0 volts?All
Ye s®Go To 5
No®Repair the Ignition Switch Output circuit for an open.
Perform ROAD TEST VERIFICATION - VER-2.
5 Turn the ignition off.
Disconnect the Vehicle Speed Sensor harness connector.
Turn the ignition on.
Measure the voltage of the Vehicle Speed Sensor Signal circuit.
Is the voltage above 5.5 volts?All
Ye s®Go To 6
No®Go To 8
6 Turn the ignition off.
Disconnect the ECM harness connectors.
Disconnect the Vehicle Speed Sensor harness connector.
Remove the ECM/PCM Relay from the PDC.
Connect a jumper wire between cavity 30 and cavity 87 of the ECM/PCM Relay
connector.
Turn the ignition on.
Measure the voltage of the Vehicle Speed Sensor Signal circuit.
Is the voltage below 1.0 volt?All
Ye s®Go To 7
No®Repair the Vehicle Speed Sensor Signal circuit for a short to
voltage.
Perform ROAD TEST VERIFICATION - VER-2.
7 If there are no possible causes remaining, view repair. All
Repair
Replace and program the Engine Control Module in accordance
with the Service Information.
Perform ROAD TEST VERIFICATION - VER-2.
8 Turn the ignition off.
Disconnect the ECM harness connectors.
Disconnect the Vehicle Speed Sensor harness connector.
Measure the resistance between ground and the Vehicle Speed Sensor Signal circuit.
Is the resistance above 100k ohms?All
Ye s®Go To 9
No®Repair the Vehicle Speed Sensor Signal circuit for a short to
ground.
Perform ROAD TEST VERIFICATION - VER-2.
205
DRIVEABILITY - DIESEL
*CHECKING THE VEHICLE SPEED SIGNAL ÐContinued
Page 1427 of 4284
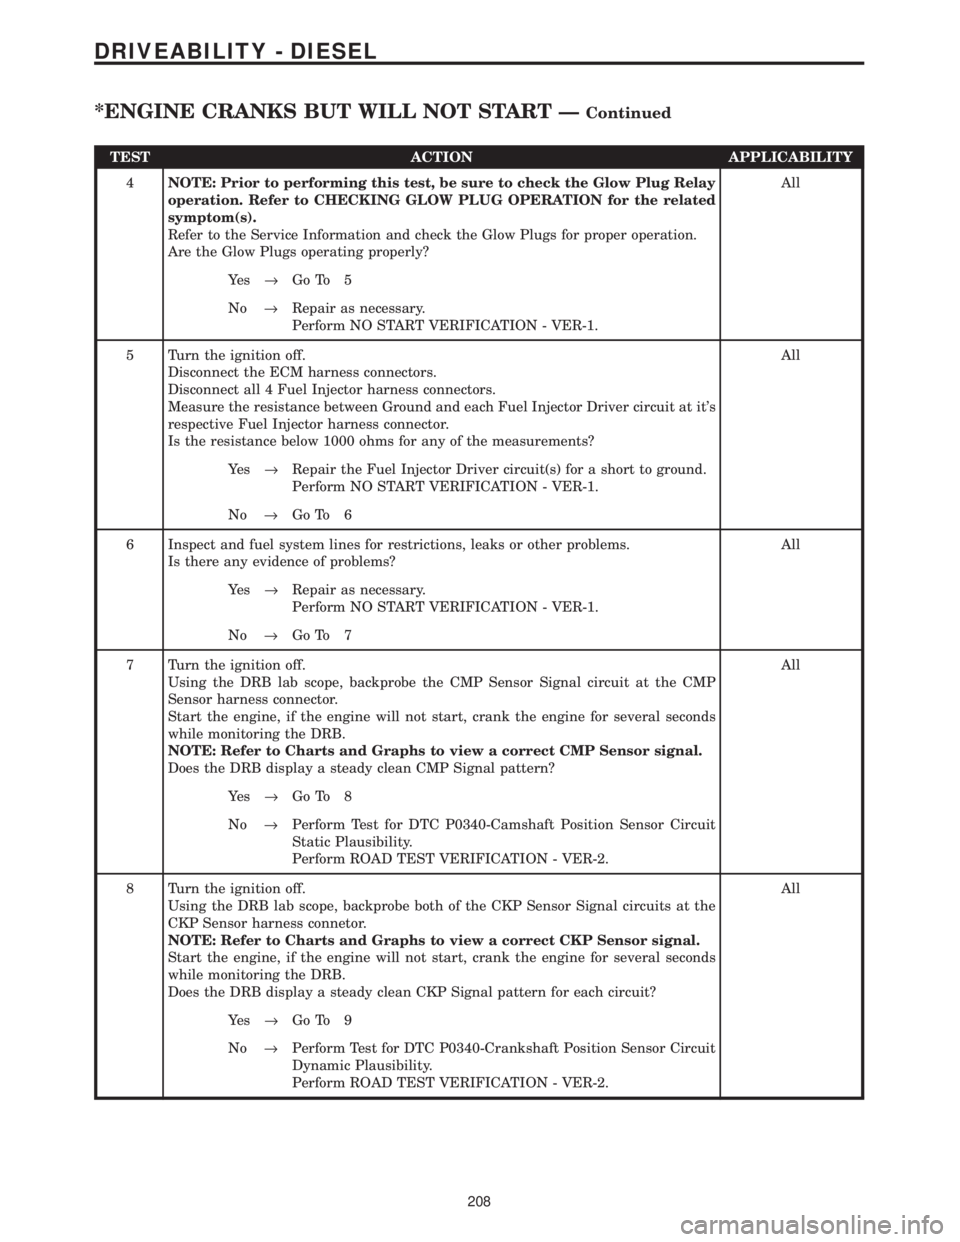
TEST ACTION APPLICABILITY
4NOTE: Prior to performing this test, be sure to check the Glow Plug Relay
operation. Refer to CHECKING GLOW PLUG OPERATION for the related
symptom(s).
Refer to the Service Information and check the Glow Plugs for proper operation.
Are the Glow Plugs operating properly?All
Ye s®Go To 5
No®Repair as necessary.
Perform NO START VERIFICATION - VER-1.
5 Turn the ignition off.
Disconnect the ECM harness connectors.
Disconnect all 4 Fuel Injector harness connectors.
Measure the resistance between Ground and each Fuel Injector Driver circuit at it's
respective Fuel Injector harness connector.
Is the resistance below 1000 ohms for any of the measurements?All
Ye s®Repair the Fuel Injector Driver circuit(s) for a short to ground.
Perform NO START VERIFICATION - VER-1.
No®Go To 6
6 Inspect and fuel system lines for restrictions, leaks or other problems.
Is there any evidence of problems?All
Ye s®Repair as necessary.
Perform NO START VERIFICATION - VER-1.
No®Go To 7
7 Turn the ignition off.
Using the DRB lab scope, backprobe the CMP Sensor Signal circuit at the CMP
Sensor harness connector.
Start the engine, if the engine will not start, crank the engine for several seconds
while monitoring the DRB.
NOTE: Refer to Charts and Graphs to view a correct CMP Sensor signal.
Does the DRB display a steady clean CMP Signal pattern?All
Ye s®Go To 8
No®Perform Test for DTC P0340-Camshaft Position Sensor Circuit
Static Plausibility.
Perform ROAD TEST VERIFICATION - VER-2.
8 Turn the ignition off.
Using the DRB lab scope, backprobe both of the CKP Sensor Signal circuits at the
CKP Sensor harness connetor.
NOTE: Refer to Charts and Graphs to view a correct CKP Sensor signal.
Start the engine, if the engine will not start, crank the engine for several seconds
while monitoring the DRB.
Does the DRB display a steady clean CKP Signal pattern for each circuit?All
Ye s®Go To 9
No®Perform Test for DTC P0340-Crankshaft Position Sensor Circuit
Dynamic Plausibility.
Perform ROAD TEST VERIFICATION - VER-2.
208
DRIVEABILITY - DIESEL
*ENGINE CRANKS BUT WILL NOT START ÐContinued
Page 1429 of 4284
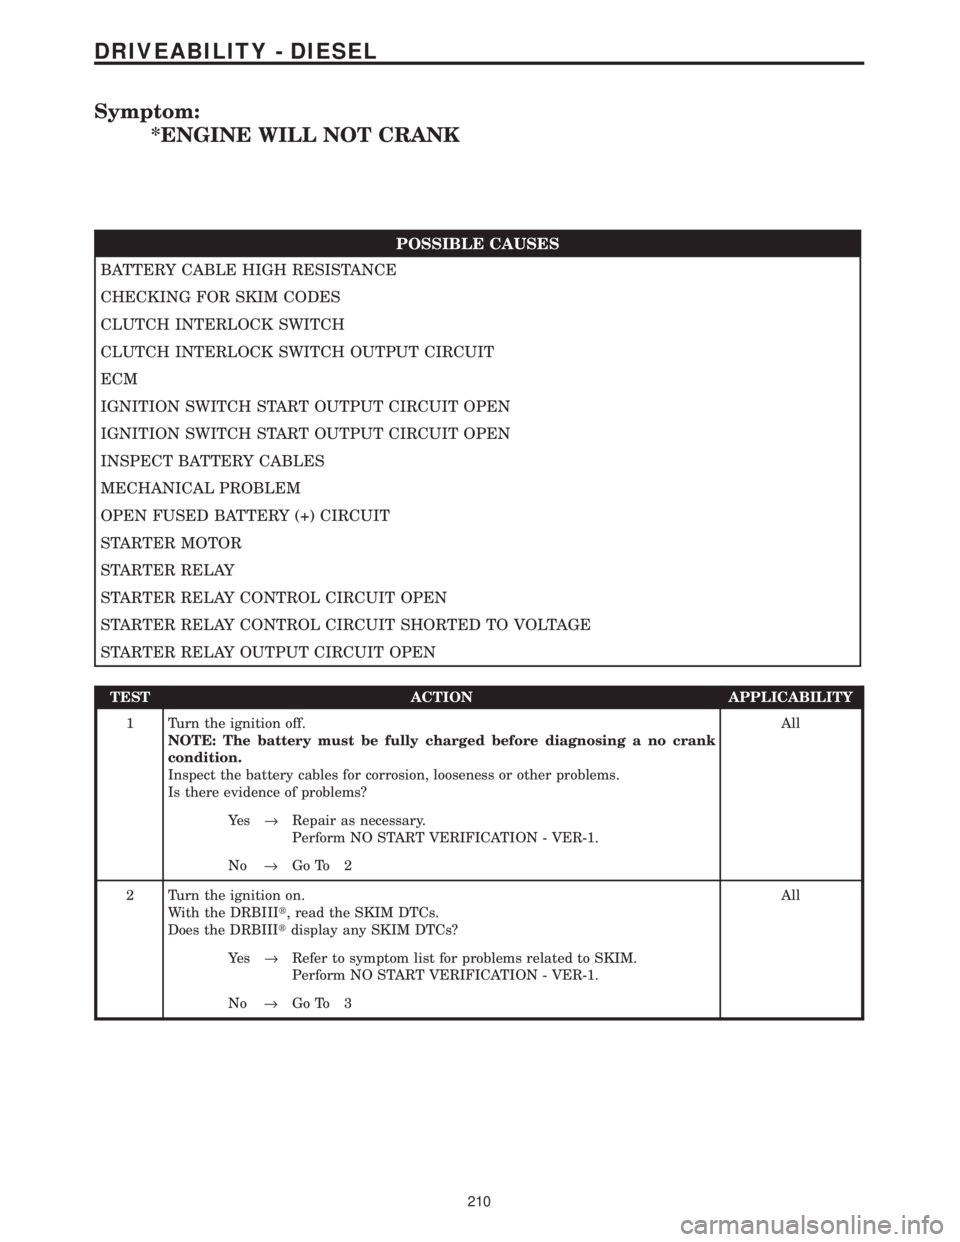
Symptom:
*ENGINE WILL NOT CRANK
POSSIBLE CAUSES
BATTERY CABLE HIGH RESISTANCE
CHECKING FOR SKIM CODES
CLUTCH INTERLOCK SWITCH
CLUTCH INTERLOCK SWITCH OUTPUT CIRCUIT
ECM
IGNITION SWITCH START OUTPUT CIRCUIT OPEN
IGNITION SWITCH START OUTPUT CIRCUIT OPEN
INSPECT BATTERY CABLES
MECHANICAL PROBLEM
OPEN FUSED BATTERY (+) CIRCUIT
STARTER MOTOR
STARTER RELAY
STARTER RELAY CONTROL CIRCUIT OPEN
STARTER RELAY CONTROL CIRCUIT SHORTED TO VOLTAGE
STARTER RELAY OUTPUT CIRCUIT OPEN
TEST ACTION APPLICABILITY
1 Turn the ignition off.
NOTE: The battery must be fully charged before diagnosing a no crank
condition.
Inspect the battery cables for corrosion, looseness or other problems.
Is there evidence of problems?All
Ye s®Repair as necessary.
Perform NO START VERIFICATION - VER-1.
No®Go To 2
2 Turn the ignition on.
With the DRBIIIt, read the SKIM DTCs.
Does the DRBIIItdisplay any SKIM DTCs?All
Ye s®Refer to symptom list for problems related to SKIM.
Perform NO START VERIFICATION - VER-1.
No®Go To 3
210
DRIVEABILITY - DIESEL
Page 1430 of 4284
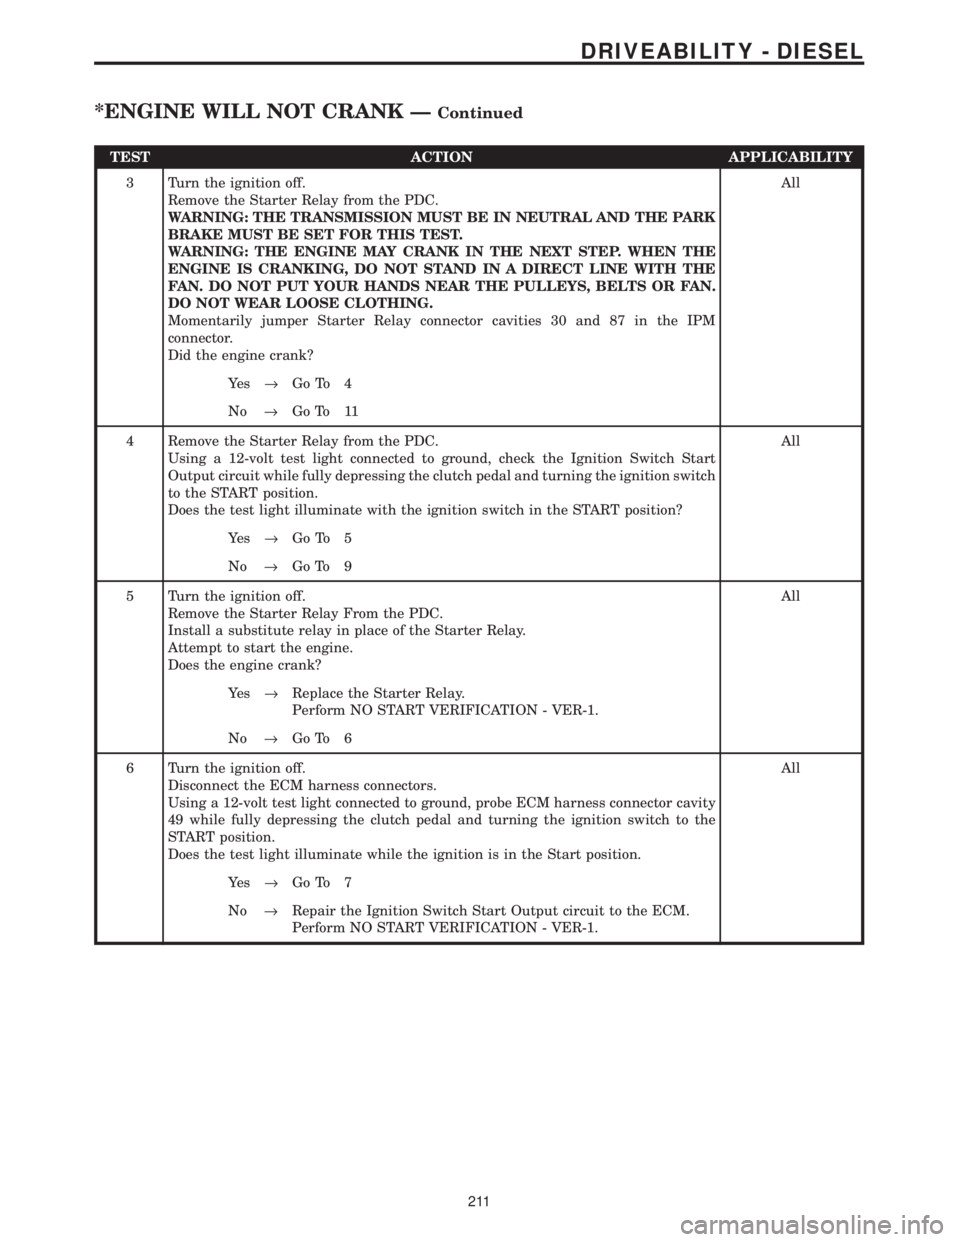
TEST ACTION APPLICABILITY
3 Turn the ignition off.
Remove the Starter Relay from the PDC.
WARNING: THE TRANSMISSION MUST BE IN NEUTRAL AND THE PARK
BRAKE MUST BE SET FOR THIS TEST.
WARNING: THE ENGINE MAY CRANK IN THE NEXT STEP. WHEN THE
ENGINE IS CRANKING, DO NOT STAND IN A DIRECT LINE WITH THE
FAN. DO NOT PUT YOUR HANDS NEAR THE PULLEYS, BELTS OR FAN.
DO NOT WEAR LOOSE CLOTHING.
Momentarily jumper Starter Relay connector cavities 30 and 87 in the IPM
connector.
Did the engine crank?All
Ye s®Go To 4
No®Go To 11
4 Remove the Starter Relay from the PDC.
Using a 12-volt test light connected to ground, check the Ignition Switch Start
Output circuit while fully depressing the clutch pedal and turning the ignition switch
to the START position.
Does the test light illuminate with the ignition switch in the START position?All
Ye s®Go To 5
No®Go To 9
5 Turn the ignition off.
Remove the Starter Relay From the PDC.
Install a substitute relay in place of the Starter Relay.
Attempt to start the engine.
Does the engine crank?All
Ye s®Replace the Starter Relay.
Perform NO START VERIFICATION - VER-1.
No®Go To 6
6 Turn the ignition off.
Disconnect the ECM harness connectors.
Using a 12-volt test light connected to ground, probe ECM harness connector cavity
49 while fully depressing the clutch pedal and turning the ignition switch to the
START position.
Does the test light illuminate while the ignition is in the Start position.All
Ye s®Go To 7
No®Repair the Ignition Switch Start Output circuit to the ECM.
Perform NO START VERIFICATION - VER-1.
211
DRIVEABILITY - DIESEL
*ENGINE WILL NOT CRANK ÐContinued
Page 1431 of 4284
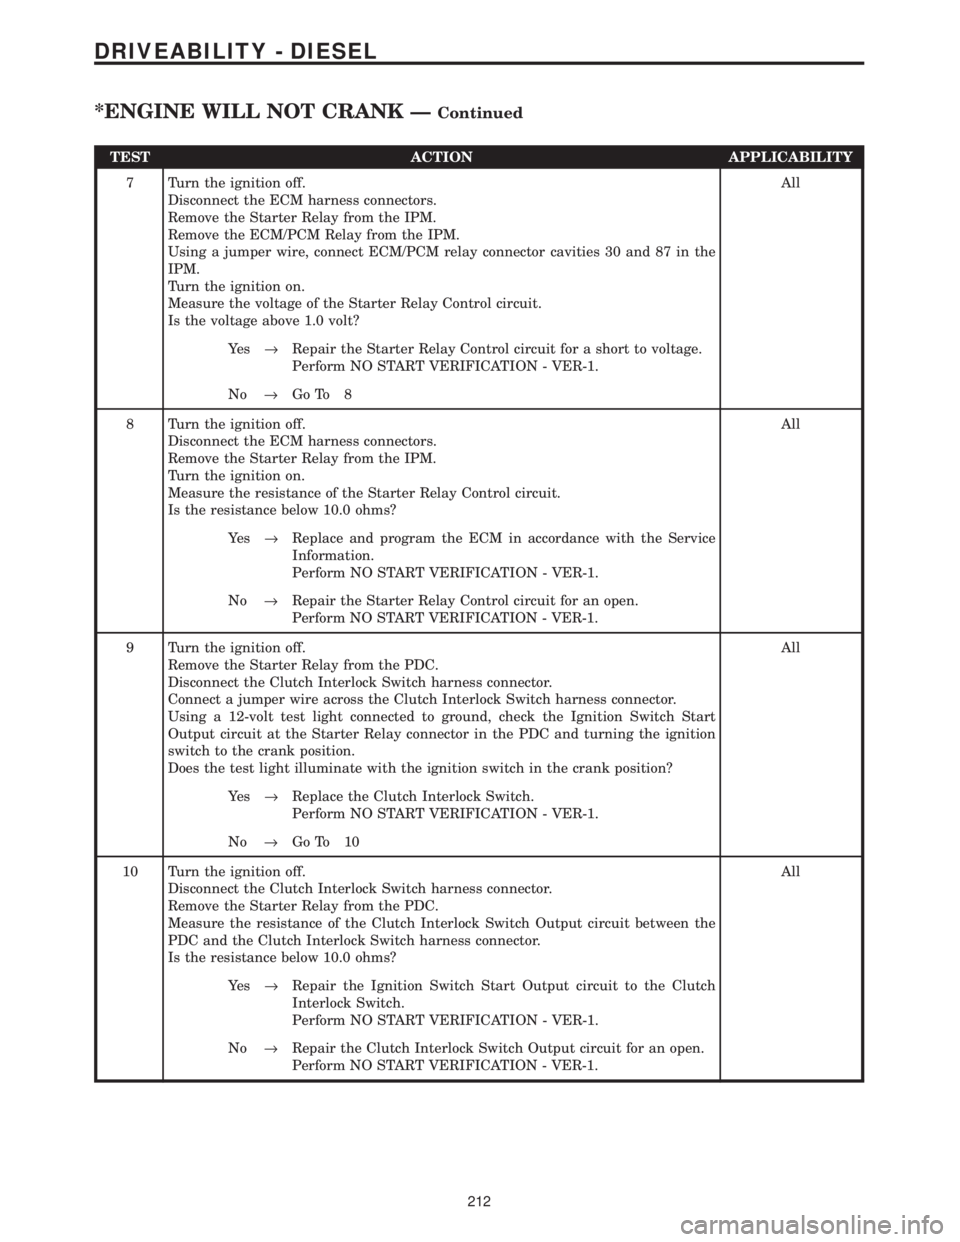
TEST ACTION APPLICABILITY
7 Turn the ignition off.
Disconnect the ECM harness connectors.
Remove the Starter Relay from the IPM.
Remove the ECM/PCM Relay from the IPM.
Using a jumper wire, connect ECM/PCM relay connector cavities 30 and 87 in the
IPM.
Turn the ignition on.
Measure the voltage of the Starter Relay Control circuit.
Is the voltage above 1.0 volt?All
Ye s®Repair the Starter Relay Control circuit for a short to voltage.
Perform NO START VERIFICATION - VER-1.
No®Go To 8
8 Turn the ignition off.
Disconnect the ECM harness connectors.
Remove the Starter Relay from the IPM.
Turn the ignition on.
Measure the resistance of the Starter Relay Control circuit.
Is the resistance below 10.0 ohms?All
Ye s®Replace and program the ECM in accordance with the Service
Information.
Perform NO START VERIFICATION - VER-1.
No®Repair the Starter Relay Control circuit for an open.
Perform NO START VERIFICATION - VER-1.
9 Turn the ignition off.
Remove the Starter Relay from the PDC.
Disconnect the Clutch Interlock Switch harness connector.
Connect a jumper wire across the Clutch Interlock Switch harness connector.
Using a 12-volt test light connected to ground, check the Ignition Switch Start
Output circuit at the Starter Relay connector in the PDC and turning the ignition
switch to the crank position.
Does the test light illuminate with the ignition switch in the crank position?All
Ye s®Replace the Clutch Interlock Switch.
Perform NO START VERIFICATION - VER-1.
No®Go To 10
10 Turn the ignition off.
Disconnect the Clutch Interlock Switch harness connector.
Remove the Starter Relay from the PDC.
Measure the resistance of the Clutch Interlock Switch Output circuit between the
PDC and the Clutch Interlock Switch harness connector.
Is the resistance below 10.0 ohms?All
Ye s®Repair the Ignition Switch Start Output circuit to the Clutch
Interlock Switch.
Perform NO START VERIFICATION - VER-1.
No®Repair the Clutch Interlock Switch Output circuit for an open.
Perform NO START VERIFICATION - VER-1.
212
DRIVEABILITY - DIESEL
*ENGINE WILL NOT CRANK ÐContinued