Page 3646 of 4770

BE20X±01
I21909
For Adjustment
in Vertical Direction
BE±28
± BODY ELECTRICALHEADLIGHT AND TAILLIGHT SYSTEM
2238 Author�: Date�:
2001 CAMRY (RM819U)
ADJUSTMENT
ADJUST HEADLIGHT AIM ONLY
(a) Place the vehicle in the following conditions.
�The area around the headlight is not deformed.
�The vehicle is parked on a level surface.
�Tire inflation pressure is the specified value.
�A driver is in the driver's seat and the vehicle is in a state ready for driving (with a tank full).
�The vehicle has been bounced several times.
(b) Check the headlight aiming.
(1) Prepare a thick white paper.
(2) Stand the paper perpendicular to the ground at the position 9.84 ft away from the headlights.
(3) Ensure that the center line of the vehicle and the paper face forms a 90±degree angle as shown
in the illustration.
(4) Draw a horizontal line (H line) on the paper, showing where the headlights should strike.
(5) Draw a vertical line (V line) to where the center line of the vehicle is to be.
(6) Draw 2 vertical lines to where the the headlights should strike (V RH and V LH lines).
(7) Draw a horizontal line (by connecting the both low beam center marks) to where the headlights
should strike (H RH and H LH lines).
HINT:
The H RH and H LH line is 0.4° below the horizontal line (H line) of the light axis.
(8) Start the engine.
Page 4467 of 4770
NEW SEAT BELT TONGUE PLATE STOPPER SERVICE PARTS ± BO011±01 March 23, 2001
Page 2 of 3
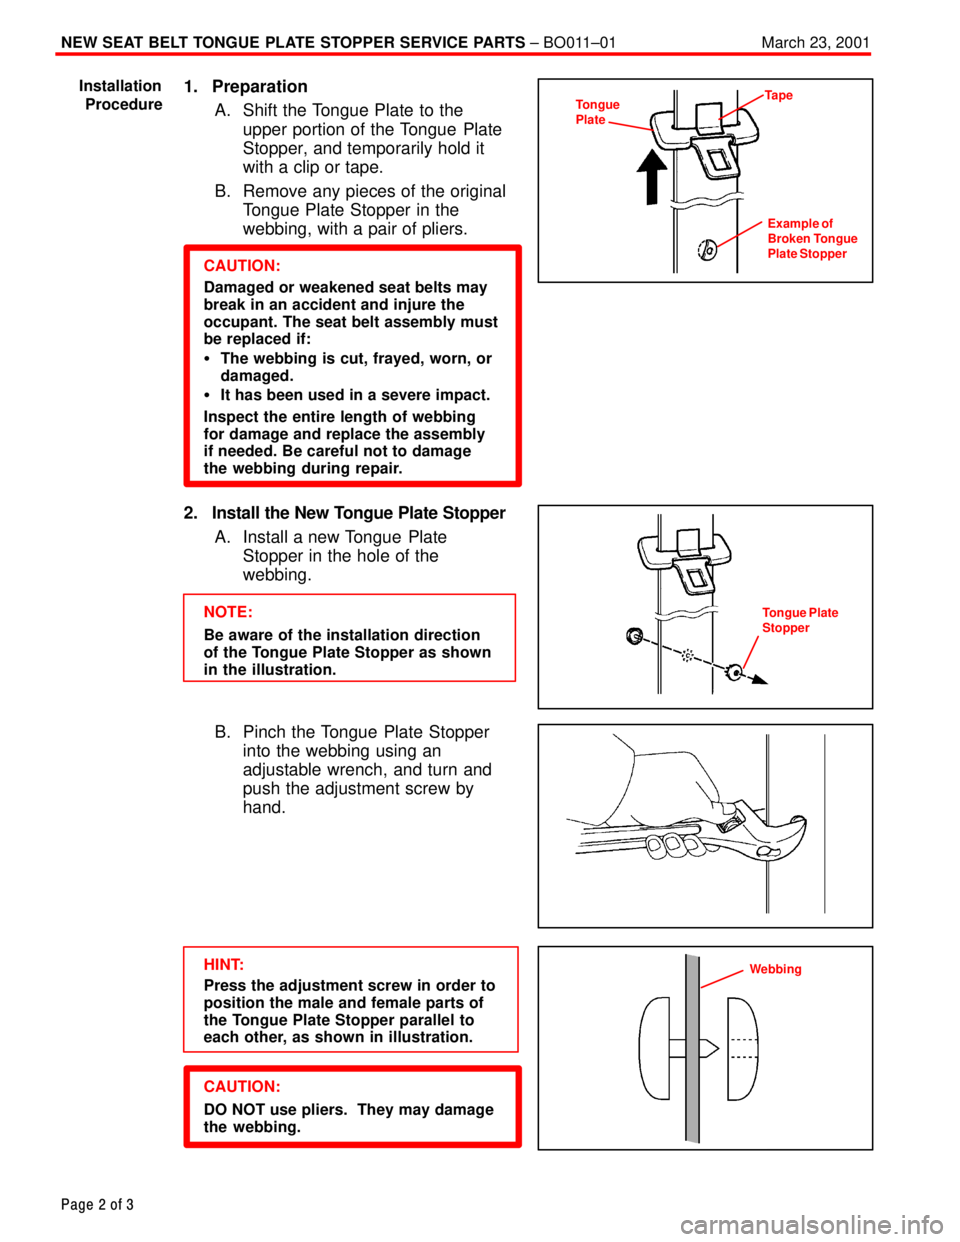
1. Preparation
A. Shift the Tongue Plate to the
upper portion of the Tongue Plate
Stopper, and temporarily hold it
with a clip or tape.
B. Remove any pieces of the original
Tongue Plate Stopper in the
webbing, with a pair of pliers.
CAUTION:
Damaged or weakened seat belts may
break in an accident and injure the
occupant. The seat belt assembly must
be replaced if:
�The webbing is cut, frayed, worn, or
damaged.
�It has been used in a severe impact.
Inspect the entire length of webbing
for damage and replace the assembly
if needed. Be careful not to damage
the webbing during repair.
2. Install the New Tongue Plate Stopper
A. Install a new Tongue Plate
Stopper in the hole of the
webbing.
NOTE:
Be aware of the installation direction
of the Tongue Plate Stopper as shown
in the illustration.
B. Pinch the Tongue Plate Stopper
into the webbing using an
adjustable wrench, and turn and
push the adjustment screw by
hand.
HINT:
Press the adjustment screw in order to
position the male and female parts of
the Tongue Plate Stopper parallel to
each other, as shown in illustration.
CAUTION:
DO NOT use pliers. They may damage
the webbing. Installation
Procedure
Tongue
PlateTape
Example of
Broken Tongue
Plate Stopper
Tongue Plate
Stopper
Webbing
Page 4468 of 4770
NEW SEAT BELT TONGUE PLATE STOPPER SERVICE PARTS ± BO011±01 March 23, 2001
Page 3 of 3
C. When the adjustment screw for
the adjustable wrench can't be
turned by hand, tighten the
adjustment screw using a pair of
adjustable joint pliers until the
space between jaws of the
adjustable wrench is 4.5 ± 5.0 mm.
(See illustrations.)
D. Check to be sure that the male
pin of the Tongue Plate Stopper
has become deformed evenly in
the hole of the female part and is
firmly held to the belt webbing.
(See illustrations.)
4.5 ± 5.0 mm
Installation
Procedure
(Continued)
CORRECT
INCORRECT
Page 4473 of 4770
Toyota Supports ASE CertificationPage 1 of 2
BO017-01Title:
POWER SEAT MOTOR CABLE REPAIR TIP
Models:
'99 ± '00 Camry & Solara, '99 ± '01 Sienna
Technical Service
BULLETIN
May 25, 2001
TSB REVISION NOTICE:
June 25, 2003: The Parts Information table has been updated.
The previous TSB should be discarded.
A field fix has been developed to repair loose power seat motor cables (instead of seat
adjuster replacement). Loose cables can cause seat movement feel or no movement of
seat adjustment.
�1999 ± 2000 model year Camry and Solara vehicles.
�1999 ± 2001 model year Sienna vehicles.
3M PART NUMBERPART NAMEQUANTITY
3M 365963M EPS±300 Thin±Wall1 Per Seat Motor
TOOLS & MATERIALSQUANTITY
Heat Gun1
OP CODEDESCRIPTIONTIMEOPNT1T2
BD1017R & R Seat Assembly;
Install Shrink Sleeves0.5
72020±06020 (Solara)
72020±AA011 (Camry
72020±08010 (Sienna)
9515
Applicable Warranty*:
This repair is covered under the Toyota Comprehensive Warranty. This warranty is in
effect for 36 months or 36,000 miles, whichever occurs first, from the vehicle's
in-service date.
* Warranty application is limited to correction of a problem based upon a customer's specific complaint.
BODY
Introduction
Applicable
Vehicles
Parts
Information
Required
Tools &
Material
Warranty
Information
Page 4474 of 4770
POWER SEAT MOTOR CABLE REPAIR TIP ± BO017-01 Revised May 25, 2001
Page 2 of 2
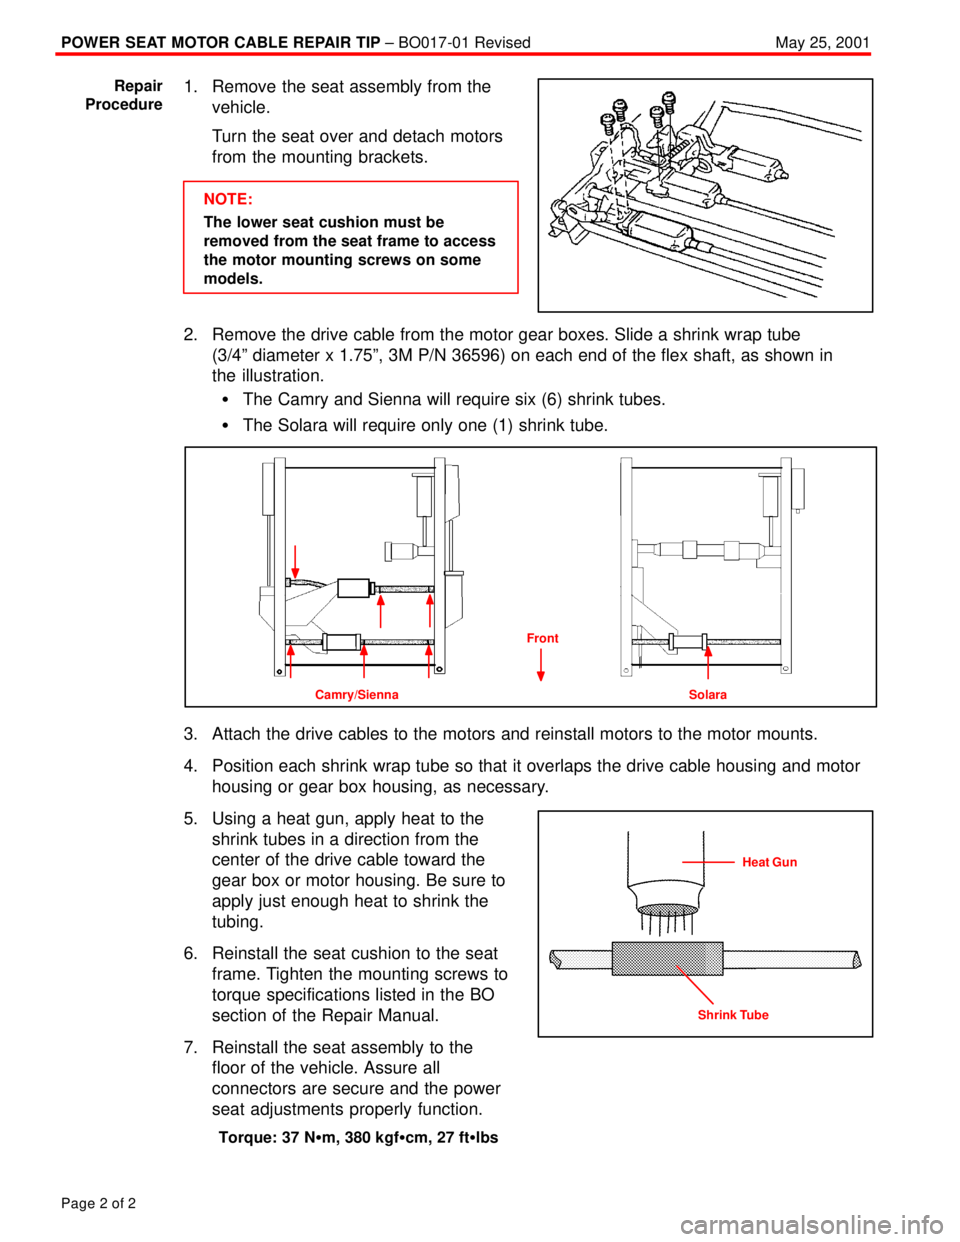
1. Remove the seat assembly from the
vehicle.
Turn the seat over and detach motors
from the mounting brackets.
NOTE:
The lower seat cushion must be
removed from the seat frame to access
the motor mounting screws on some
models.
2. Remove the drive cable from the motor gear boxes. Slide a shrink wrap tube
(3/4º diameter x 1.75º, 3M P/N 36596) on each end of the flex shaft, as shown in
the illustration.
�The Camry and Sienna will require six (6) shrink tubes.
�The Solara will require only one (1) shrink tube.
Camry/Sienna Solara
Front
3. Attach the drive cables to the motors and reinstall motors to the motor mounts.
4. Position each shrink wrap tube so that it overlaps the drive cable housing and motor
housing or gear box housing, as necessary.
5. Using a heat gun, apply heat to the
shrink tubes in a direction from the
center of the drive cable toward the
gear box or motor housing. Be sure to
apply just enough heat to shrink the
tubing.
6. Reinstall the seat cushion to the seat
frame. Tighten the mounting screws to
torque specifications listed in the BO
section of the Repair Manual.
7. Reinstall the seat assembly to the
floor of the vehicle. Assure all
connectors are secure and the power
seat adjustments properly function.
Torque: 37 N�m, 380 kgf�cm, 27 ft�lbs
Repair
Procedure
Heat Gun
Shrink Tube
Page 4479 of 4770
DOOR MIRROR WIND NOISE ± BO019±99 December 3, 1999
Page 2 of 2
INCORRECT POSITION A INCORRECT POSITION B INCORRECT POSITION C
Mirror Housing
ConnectorGrommetMirror Housing
Mirror Housing
Grommet Grommet
ConnectorConnector
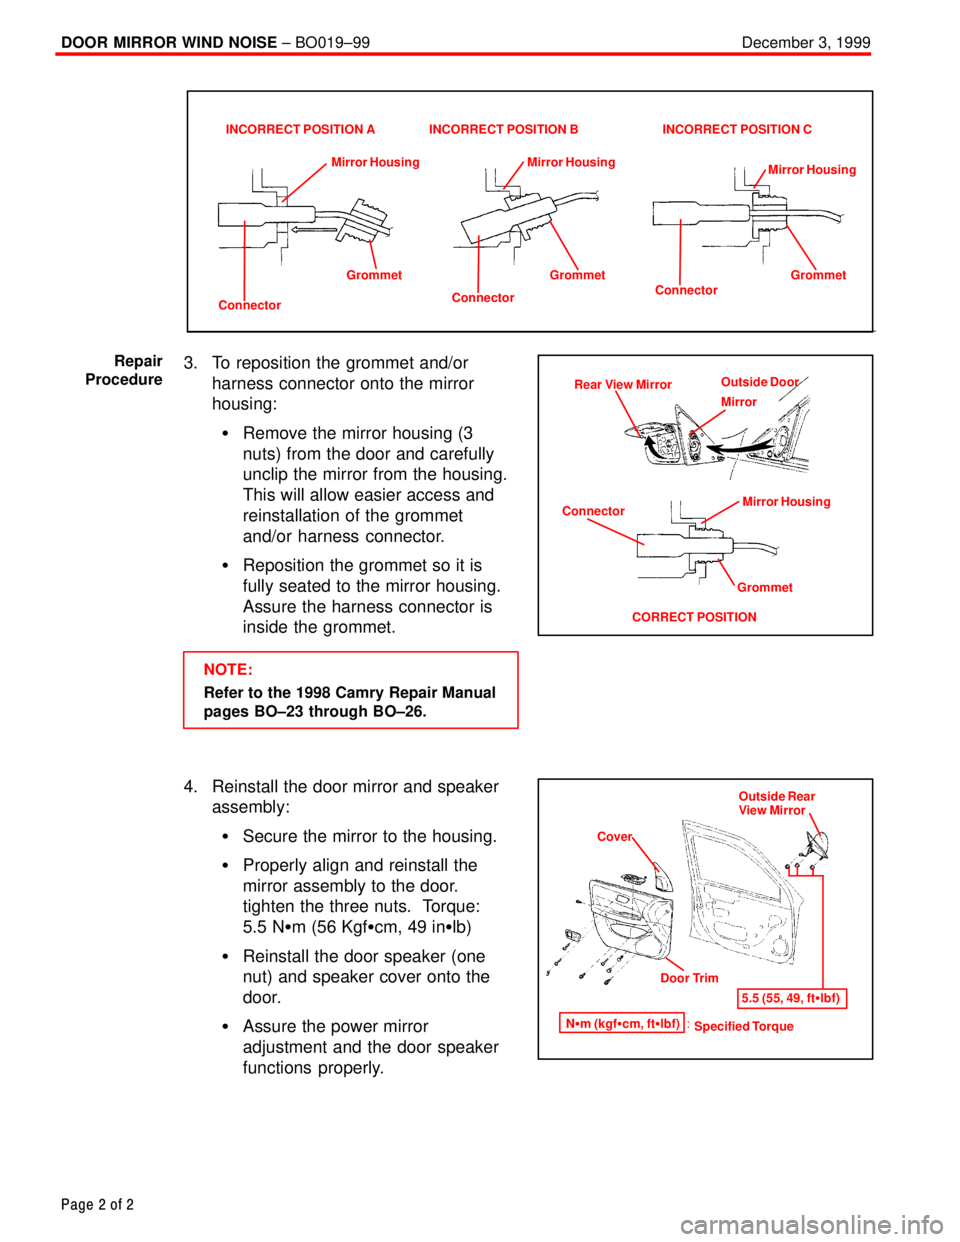
3. To reposition the grommet and/or
harness connector onto the mirror
housing:
�Remove the mirror housing (3
nuts) from the door and carefully
unclip the mirror from the housing.
This will allow easier access and
reinstallation of the grommet
and/or harness connector.
�Reposition the grommet so it is
fully seated to the mirror housing.
Assure the harness connector is
inside the grommet.
NOTE:
Refer to the 1998 Camry Repair Manual
pages BO±23 through BO±26.
4. Reinstall the door mirror and speaker
assembly:
�Secure the mirror to the housing.
�Properly align and reinstall the
mirror assembly to the door.
tighten the three nuts. Torque:
5.5 N�m (56 Kgf�cm, 49 in�lb)
�Reinstall the door speaker (one
nut) and speaker cover onto the
door.
�Assure the power mirror
adjustment and the door speaker
functions properly.
ConnectorRear View MirrorOutside Door
Mirror
Mirror Housing
Grommet
CORRECT POSITION
Repair
Procedure
CoverOutside Rear
View Mirror
Door Trim
Specified Torque N�m (kgf�cm, ft�lbf) :5.5 (55, 49, ft�lbf)
Page 4609 of 4770
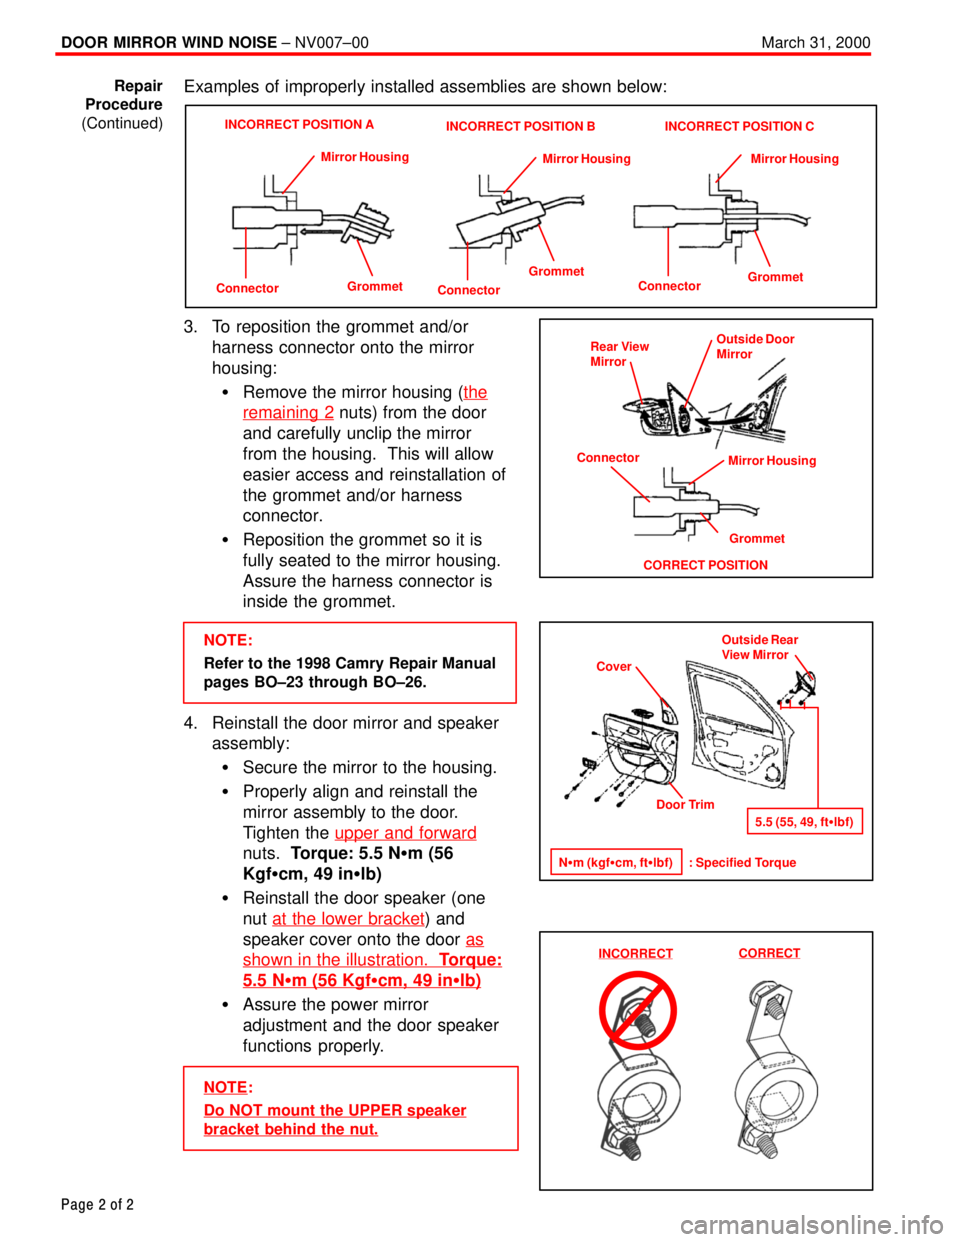
DOOR MIRROR WIND NOISE ± NV007±00 March 31, 2000
Page 2 of 2
Examples of improperly installed assemblies are shown below:
ConnectorGrommet Mirror Housing
INCORRECT POSITION A
Connector
GrommetMirror Housing
INCORRECT POSITION B
Connector
GrommetMirror Housing
INCORRECT POSITION C
3. To reposition the grommet and/or
harness connector onto the mirror
housing:
�Remove the mirror housing (the
remaining 2 nuts) from the door
and carefully unclip the mirror
from the housing. This will allow
easier access and reinstallation of
the grommet and/or harness
connector.
�Reposition the grommet so it is
fully seated to the mirror housing.
Assure the harness connector is
inside the grommet.
NOTE:
Refer to the 1998 Camry Repair Manual
pages BO±23 through BO±26.
4. Reinstall the door mirror and speaker
assembly:
�Secure the mirror to the housing.
�Properly align and reinstall the
mirror assembly to the door.
Tighten the upper and forward
nuts. Torque: 5.5 N�m (56
Kgf�cm, 49 in�lb)
�Reinstall the door speaker (one
nut at the lower bracket
) and
speaker cover onto the door as
shown in the illustration. Torque:
5.5 N�m (56 Kgf�cm, 49 in�lb)
�Assure the power mirror
adjustment and the door speaker
functions properly.
NOTE:
Do NOT mount the UPPER speaker
bracket behind the nut.
Repair
Procedure
(Continued)
Rear View
Mirror
Grommet
CORRECT POSITIONOutside Door
Mirror
Mirror Housing
Connector
Cover
Door Trim
N�m (kgf�cm, ft�lbf) : Specified TorqueOutside Rear
View Mirror
5.5 (55, 49, ft�lbf)
INCORRECTCORRECT