2000 DODGE NEON tire type
[x] Cancel search: tire typePage 4 of 1285
MAINTENANCE SCHEDULES
TABLE OF CONTENTS
page page
DESCRIPTION AND OPERATION
MAINTENANCE SCHEDULES................3
SPECIFICATIONS
UNSCHEDULED INSPECTION................3SCHEDULE ± A...........................3
SCHEDULE ± B...........................4
DESCRIPTION AND OPERATION
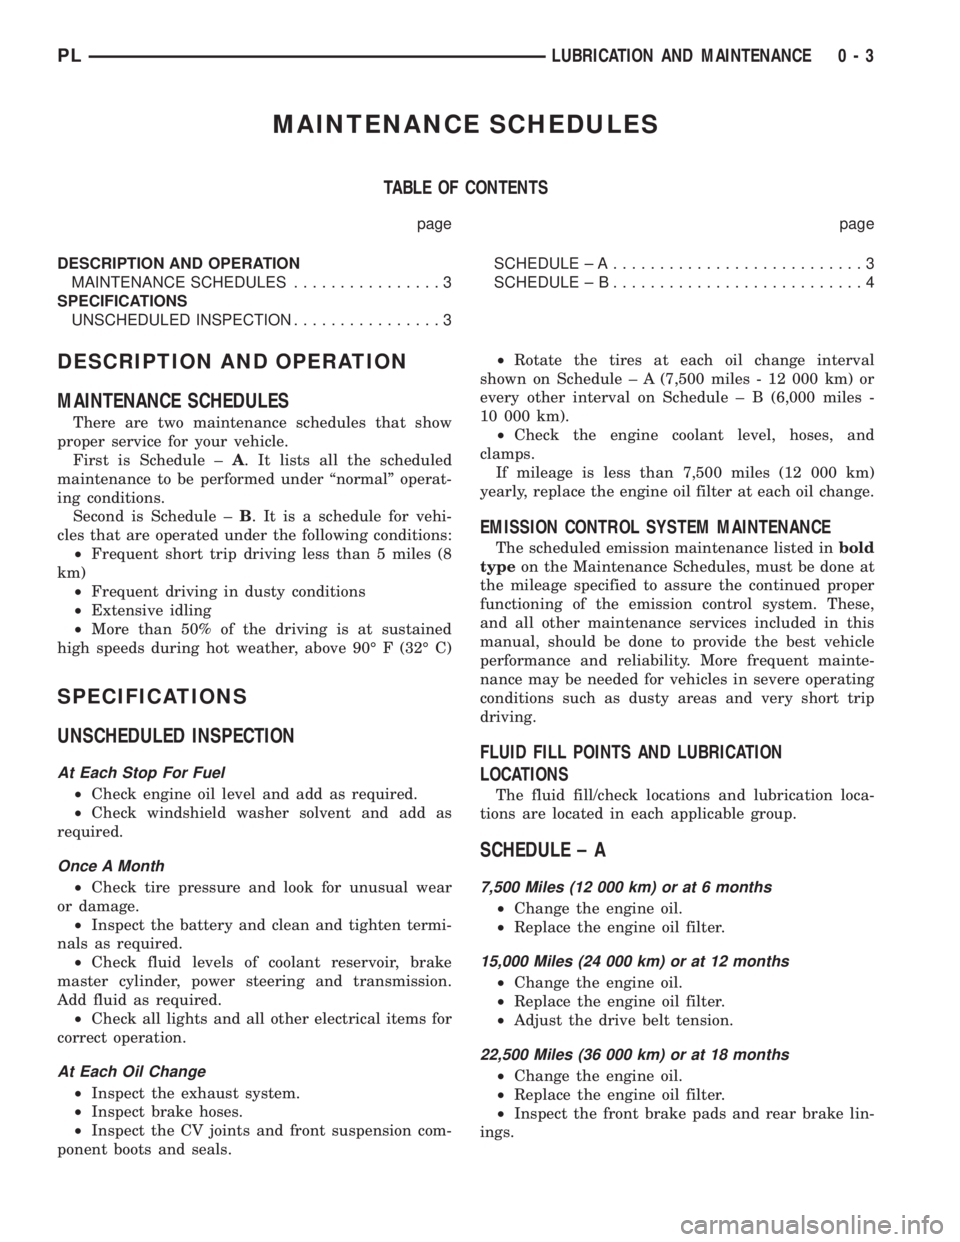
MAINTENANCE SCHEDULES
There are two maintenance schedules that show
proper service for your vehicle.
First is Schedule ±A. It lists all the scheduled
maintenance to be performed under ªnormalº operat-
ing conditions.
Second is Schedule ±B. It is a schedule for vehi-
cles that are operated under the following conditions:
²Frequent short trip driving less than 5 miles (8
km)
²Frequent driving in dusty conditions
²Extensive idling
²More than 50% of the driving is at sustained
high speeds during hot weather, above 90É F (32É C)
SPECIFICATIONS
UNSCHEDULED INSPECTION
At Each Stop For Fuel
²Check engine oil level and add as required.
²Check windshield washer solvent and add as
required.
Once A Month
²Check tire pressure and look for unusual wear
or damage.
²Inspect the battery and clean and tighten termi-
nals as required.
²Check fluid levels of coolant reservoir, brake
master cylinder, power steering and transmission.
Add fluid as required.
²Check all lights and all other electrical items for
correct operation.
At Each Oil Change
²Inspect the exhaust system.
²Inspect brake hoses.
²Inspect the CV joints and front suspension com-
ponent boots and seals.²Rotate the tires at each oil change interval
shown on Schedule ± A (7,500 miles - 12 000 km) or
every other interval on Schedule ± B (6,000 miles -
10 000 km).
²Check the engine coolant level, hoses, and
clamps.
If mileage is less than 7,500 miles (12 000 km)
yearly, replace the engine oil filter at each oil change.
EMISSION CONTROL SYSTEM MAINTENANCE
The scheduled emission maintenance listed inbold
typeon the Maintenance Schedules, must be done at
the mileage specified to assure the continued proper
functioning of the emission control system. These,
and all other maintenance services included in this
manual, should be done to provide the best vehicle
performance and reliability. More frequent mainte-
nance may be needed for vehicles in severe operating
conditions such as dusty areas and very short trip
driving.
FLUID FILL POINTS AND LUBRICATION
LOCATIONS
The fluid fill/check locations and lubrication loca-
tions are located in each applicable group.
SCHEDULE ± A
7,500 Miles (12 000 km) or at 6 months
²Change the engine oil.
²Replace the engine oil filter.
15,000 Miles (24 000 km) or at 12 months
²Change the engine oil.
²Replace the engine oil filter.
²Adjust the drive belt tension.
22,500 Miles (36 000 km) or at 18 months
²Change the engine oil.
²Replace the engine oil filter.
²Inspect the front brake pads and rear brake lin-
ings.
PLLUBRICATION AND MAINTENANCE 0 - 3
Page 10 of 1285

FLAT TOWING WITH TOW BAR
²3-speed automatic transaxle vehicles can be flat
towed at speeds not to exceed 40 km/h (25 mph) for
not more than 25 km (15 miles). The steering column
must be unlocked and gear selector in neutral.
²5-speed manual transaxle vehicles can be flat
towed at any legal highway speed for extended dis-
tances. The gear selector must be in the neutral posi-
tion.
TOWING ± FRONT WHEEL LIFT
DaimlerChrysler Corporation recommends that a
vehicle be towed with the front end lifted, whenever
possible.
TOWING ± REAR WHEEL LIFT
If a vehicle cannot be towed with the front wheels
lifted, the rear wheels can be lifted provided the fol-
lowing guide lines are observed.
CAUTION: Do not use steering column lock to
secure steering wheel during towing operation.
²Unlock steering column and secure steering
wheel in straight ahead position with a clamp device
designed for towing.
²Verify that front drive line and steering compo-
nents are in good condition.
²5-speed manual transaxle vehicles can be towed
at any legal highway speed for extended distances.
The gear selector must be in the neutral position.
²3-speed automatic transaxle vehicles can be
towed at speeds not to exceed 40 km/h (25 mph) for
not more than 25 km (15 miles). The gear selector
must be in the neutral position.
HOISTING RECOMMENDATIONS
Refer to Owner's Manual provided with vehicle for
proper emergency jacking procedures.
WARNING: THE HOISTING AND JACK LIFTING
POINTS PROVIDED ARE FOR A COMPLETE VEHI-
CLE. WHEN THE ENGINE OR REAR SUSPENSION
IS REMOVED FROM A VEHICLE, THE CENTER OF
GRAVITY IS ALTERED MAKING SOME HOISTING
CONDITIONS UNSTABLE. PROPERLY SUPPORT OR
SECURE VEHICLE TO HOISTING DEVICE WHEN
THESE CONDITIONS EXIST.
CAUTION: Do not position hoisting device on sus-
pension components, damage to vehicle can result.Do not attempt to raise one entire side of the
vehicle by placing a floor jack midway between the
front and rear wheels. This practice may result in
permanent damage to the body.
FLOOR JACK
When properly positioned, a floor jack can be used
to lift a PL vehicle (Fig. 3). Support the vehicle in the
raised position with jack stands.
A floor jack or any lifting device, must never be
used on any part of the underbody other then the
described areas.
HOIST
A vehicle can be lifted with:
²A single-post, frame-contact hoist.
²A twin-post, chassis hoist.
²A ramp-type, drive-on hoist.
NOTE: When a frame-contact type hoist is used,
verify that the lifting pads are positioned properly
(Fig. 3).
Fig. 3 Hoisting and Jacking Points
1 Frame Contract Lift (Single Post)
Chassis Lift (Dual Post)
Outboard Lift (Dual Post)
Floor Jack
2 Drive On Lift
PLLUBRICATION AND MAINTENANCE 0 - 9
SERVICE PROCEDURES (Continued)
Page 12 of 1285
SUSPENSION
TABLE OF CONTENTS
page page
WHEEL ALIGNMENT........................ 1
FRONT SUSPENSION....................... 9REAR SUSPENSION....................... 35
WHEEL ALIGNMENT
TABLE OF CONTENTS
page page
DESCRIPTION AND OPERATION
WHEEL ALIGNMENT.......................1
DIAGNOSIS AND TESTING
SUSPENSION AND STEERING DIAGNOSIS.....3
SERVICE PROCEDURES
CURB HEIGHT MEASUREMENT..............5WHEEL ALIGNMENT.......................5
SPECIFICATIONS
WHEEL ALIGNMENT SPECIFICATIONS.........8
DESCRIPTION AND OPERATION
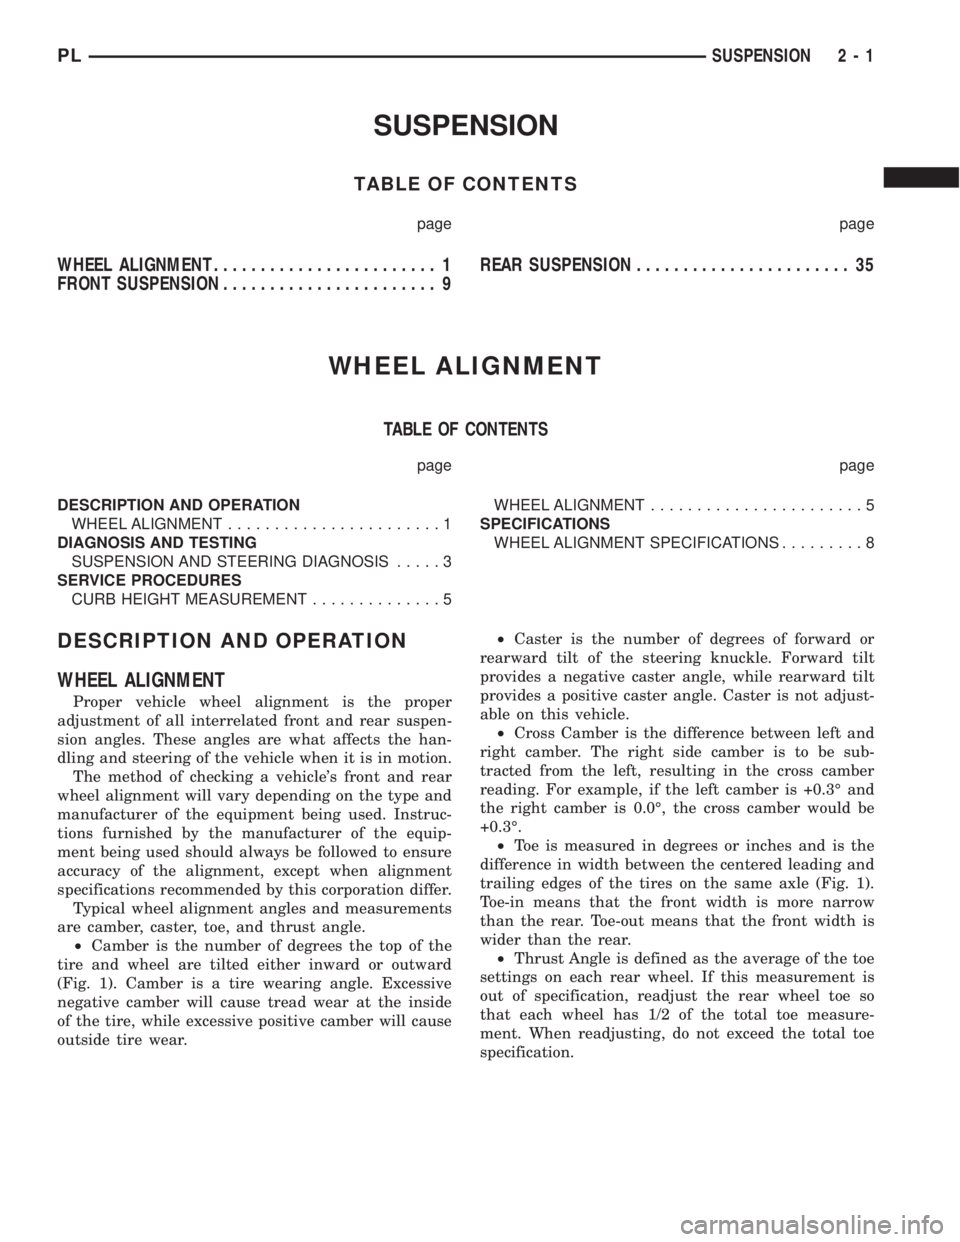
WHEEL ALIGNMENT
Proper vehicle wheel alignment is the proper
adjustment of all interrelated front and rear suspen-
sion angles. These angles are what affects the han-
dling and steering of the vehicle when it is in motion.
The method of checking a vehicle's front and rear
wheel alignment will vary depending on the type and
manufacturer of the equipment being used. Instruc-
tions furnished by the manufacturer of the equip-
ment being used should always be followed to ensure
accuracy of the alignment, except when alignment
specifications recommended by this corporation differ.
Typical wheel alignment angles and measurements
are camber, caster, toe, and thrust angle.
²Camber is the number of degrees the top of the
tire and wheel are tilted either inward or outward
(Fig. 1). Camber is a tire wearing angle. Excessive
negative camber will cause tread wear at the inside
of the tire, while excessive positive camber will cause
outside tire wear.²Caster is the number of degrees of forward or
rearward tilt of the steering knuckle. Forward tilt
provides a negative caster angle, while rearward tilt
provides a positive caster angle. Caster is not adjust-
able on this vehicle.
²Cross Camber is the difference between left and
right camber. The right side camber is to be sub-
tracted from the left, resulting in the cross camber
reading. For example, if the left camber is +0.3É and
the right camber is 0.0É, the cross camber would be
+0.3É.
²Toe is measured in degrees or inches and is the
difference in width between the centered leading and
trailing edges of the tires on the same axle (Fig. 1).
Toe-in means that the front width is more narrow
than the rear. Toe-out means that the front width is
wider than the rear.
²Thrust Angle is defined as the average of the toe
settings on each rear wheel. If this measurement is
out of specification, readjust the rear wheel toe so
that each wheel has 1/2 of the total toe measure-
ment. When readjusting, do not exceed the total toe
specification.
PLSUSPENSION 2 - 1
Page 25 of 1285
CAUTION: No attempt should be made to service
the headless grease fitting on the ball joint. It has
been purposely snapped off by the manufacturer to
avoid over-greasing.
STABILIZER BAR (FRONT)
Inspect for broken, cracked or distorted stabilizer
bar cushions and retainers. Inspect for worn or dam-
aged stabilizer bar links (Fig. 1).
SERVICE PROCEDURES
LUBRICATION
There are no serviceable lubrication points on the
front suspension. The front lower ball joints have
grease fittings which have had the head snapped off
by the manufacturer after they have been filled. This
has been done to eliminate the possibility of damag-
ing the non-vented seals. Grease will not leak from
the broken grease fittings. The ball joints are sealed
for life and require no maintenance.
CAUTION: No attempt should be made to replace
the ball joint grease fitting with a new fitting, then
filling the ball joint with grease. Damage to the
grease seal can result.
REMOVAL AND INSTALLATION
SERVICE WARNINGS AND CAUTIONS
WARNING: DO NOT REMOVE THE STRUT SHAFT
NUT WHILE STRUT ASSEMBLY IS INSTALLED IN
VEHICLE, OR BEFORE THE COIL SPRING IS COM-
PRESSED WITH A COMPRESSION TOOL. THE
SPRING IS HELD UNDER HIGH PRESSURE.
CAUTION: Only frame contact hoisting equipment
can be used on this vehicle. All vehicles have a
fully independent rear suspension. The vehicles
cannot be hoisted using equipment designed to lift
a vehicle by the rear axle. If this type of hoisting
equipment is used, damage to rear suspension
components will occur.
CAUTION: At no time when servicing a vehicle can
a sheet metal screw, bolt, or other metal fastener be
installed in the shock tower to take the place of an
original plastic clip. It may come into contact with
the strut or coil spring.CAUTION: Wheel bearing damage will result if after
loosening the hub nut, the vehicle is rolled on the
ground or the weight of the vehicle is allowed to be
supported by the tires for a length of time.
STRUT ASSEMBLY (FRONT)
NOTE: Before proceeding with this procedure,
review SERVICE WARNINGS AND CAUTIONS at the
beginning of REMOVAL AND INSTALLATION in this
section.
REMOVAL
(1) Raise the vehicle. Refer to HOISTING in the
LUBRICATION AND MAINTENANCE group for the
proper lifting procedure.
(2) Remove tire and wheel assembly from location
on front of vehicle requiring strut removal.
(3) If both strut assemblies are to be removed,
mark the strut assemblies right or left according to
which side of the vehicle they were removed from.
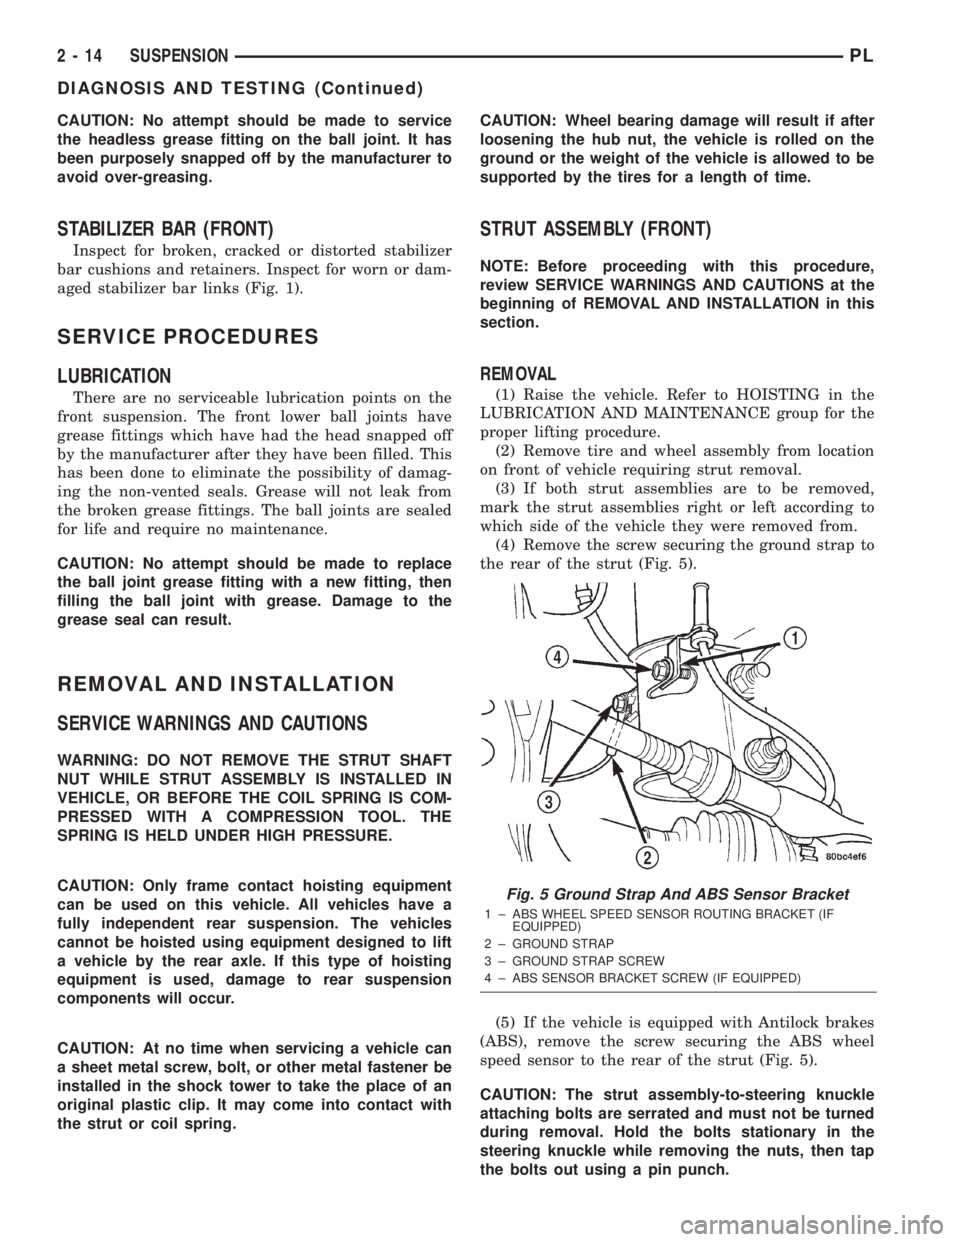
(4) Remove the screw securing the ground strap to
the rear of the strut (Fig. 5).
(5) If the vehicle is equipped with Antilock brakes
(ABS), remove the screw securing the ABS wheel
speed sensor to the rear of the strut (Fig. 5).
CAUTION: The strut assembly-to-steering knuckle
attaching bolts are serrated and must not be turned
during removal. Hold the bolts stationary in the
steering knuckle while removing the nuts, then tap
the bolts out using a pin punch.
Fig. 5 Ground Strap And ABS Sensor Bracket
1 ± ABS WHEEL SPEED SENSOR ROUTING BRACKET (IF
EQUIPPED)
2 ± GROUND STRAP
3 ± GROUND STRAP SCREW
4 ± ABS SENSOR BRACKET SCREW (IF EQUIPPED)
2 - 14 SUSPENSIONPL
DIAGNOSIS AND TESTING (Continued)
Page 48 of 1285
For more information on the description and oper-
ation of an individual component, refer to the appli-
cable component heading in this section.
STRUT ASSEMBLY (REAR)
The rear strut assemblies support the weight of
the vehicle using coil springs positioned around
struts. The coil springs are contained between the
upper mount of the strut assembly and a lower
spring seat on the body of the strut.
The top of each strut assembly is bolted to the top
of the inner fender through a rubber isolated mount.
The bottom of the strut assembly attaches to the rear
knuckle using 2 thru-bolts with prevailing torque
nuts.
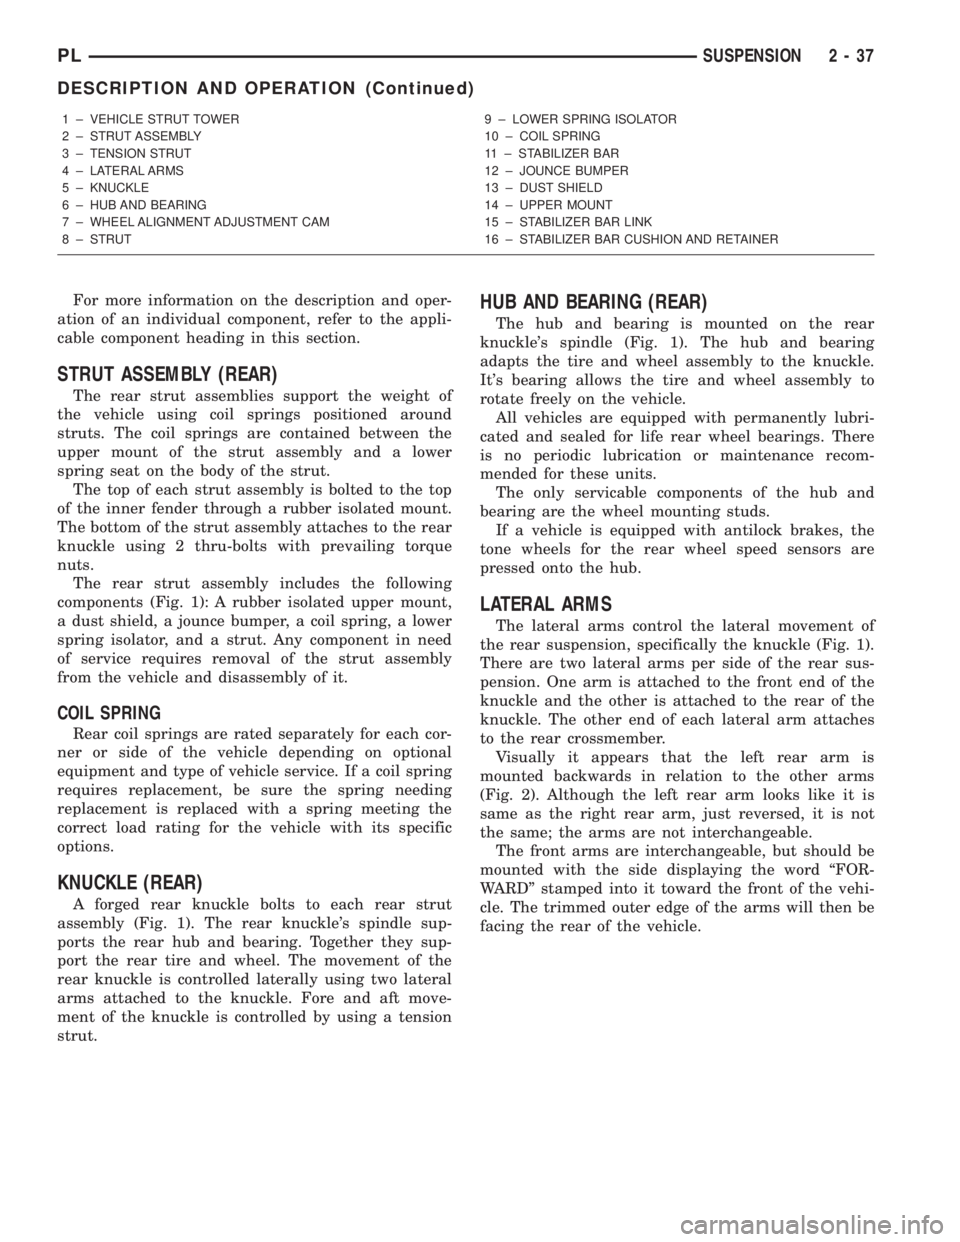
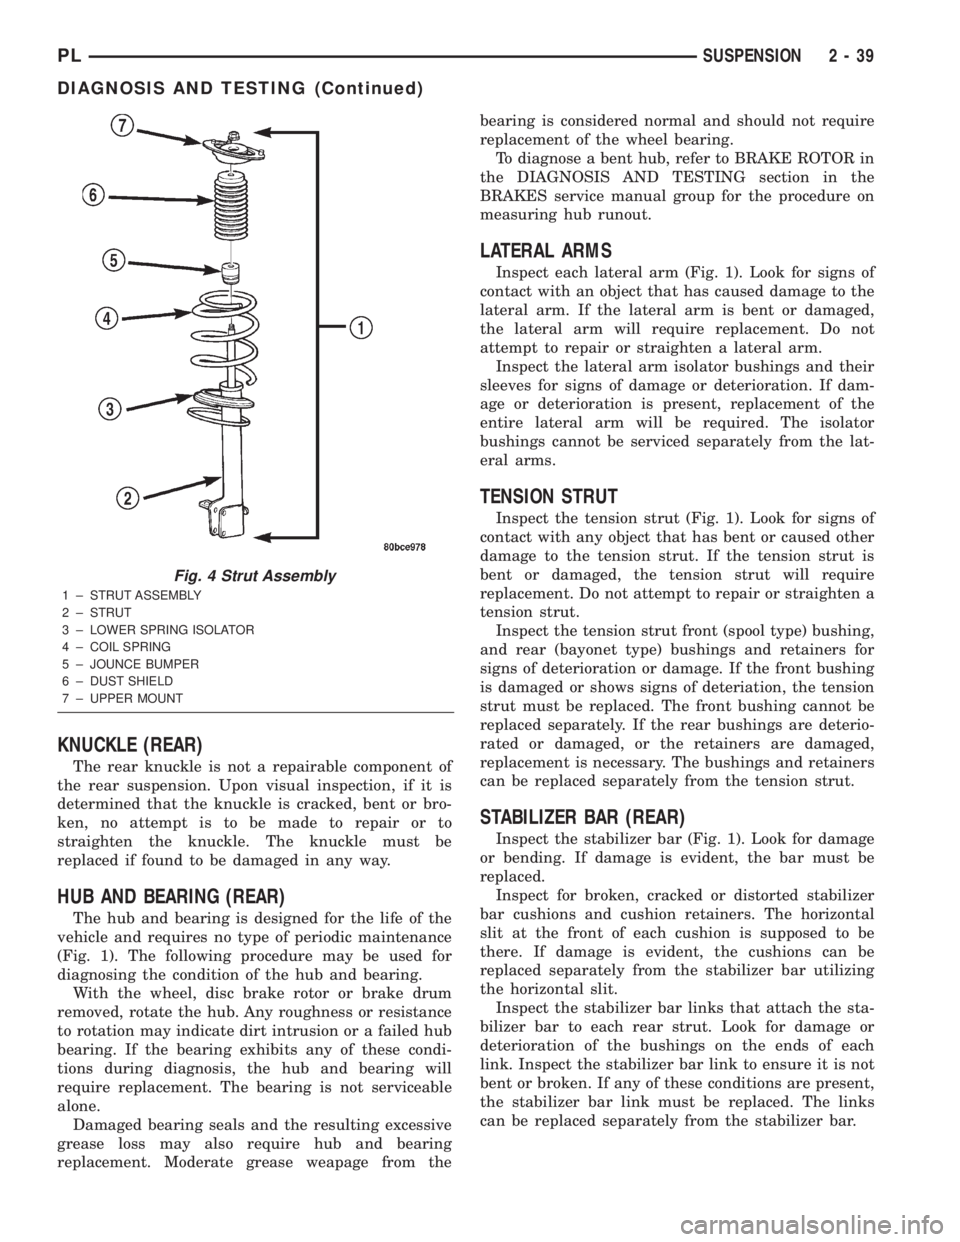
The rear strut assembly includes the following
components (Fig. 1): A rubber isolated upper mount,
a dust shield, a jounce bumper, a coil spring, a lower
spring isolator, and a strut. Any component in need
of service requires removal of the strut assembly
from the vehicle and disassembly of it.
COIL SPRING
Rear coil springs are rated separately for each cor-
ner or side of the vehicle depending on optional
equipment and type of vehicle service. If a coil spring
requires replacement, be sure the spring needing
replacement is replaced with a spring meeting the
correct load rating for the vehicle with its specific
options.
KNUCKLE (REAR)
A forged rear knuckle bolts to each rear strut
assembly (Fig. 1). The rear knuckle's spindle sup-
ports the rear hub and bearing. Together they sup-
port the rear tire and wheel. The movement of the
rear knuckle is controlled laterally using two lateral
arms attached to the knuckle. Fore and aft move-
ment of the knuckle is controlled by using a tension
strut.
HUB AND BEARING (REAR)
The hub and bearing is mounted on the rear
knuckle's spindle (Fig. 1). The hub and bearing
adapts the tire and wheel assembly to the knuckle.
It's bearing allows the tire and wheel assembly to
rotate freely on the vehicle.
All vehicles are equipped with permanently lubri-
cated and sealed for life rear wheel bearings. There
is no periodic lubrication or maintenance recom-
mended for these units.
The only servicable components of the hub and
bearing are the wheel mounting studs.
If a vehicle is equipped with antilock brakes, the
tone wheels for the rear wheel speed sensors are
pressed onto the hub.
LATERAL ARMS
The lateral arms control the lateral movement of
the rear suspension, specifically the knuckle (Fig. 1).
There are two lateral arms per side of the rear sus-
pension. One arm is attached to the front end of the
knuckle and the other is attached to the rear of the
knuckle. The other end of each lateral arm attaches
to the rear crossmember.
Visually it appears that the left rear arm is
mounted backwards in relation to the other arms
(Fig. 2). Although the left rear arm looks like it is
same as the right rear arm, just reversed, it is not
the same; the arms are not interchangeable.
The front arms are interchangeable, but should be
mounted with the side displaying the word ªFOR-
WARDº stamped into it toward the front of the vehi-
cle. The trimmed outer edge of the arms will then be
facing the rear of the vehicle.
1 ± VEHICLE STRUT TOWER
2 ± STRUT ASSEMBLY
3 ± TENSION STRUT
4 ± LATERAL ARMS
5 ± KNUCKLE
6 ± HUB AND BEARING
7 ± WHEEL ALIGNMENT ADJUSTMENT CAM
8 ± STRUT9 ± LOWER SPRING ISOLATOR
10 ± COIL SPRING
11 ± STABILIZER BAR
12 ± JOUNCE BUMPER
13 ± DUST SHIELD
14 ± UPPER MOUNT
15 ± STABILIZER BAR LINK
16 ± STABILIZER BAR CUSHION AND RETAINER
PLSUSPENSION 2 - 37
DESCRIPTION AND OPERATION (Continued)
Page 50 of 1285
KNUCKLE (REAR)
The rear knuckle is not a repairable component of
the rear suspension. Upon visual inspection, if it is
determined that the knuckle is cracked, bent or bro-
ken, no attempt is to be made to repair or to
straighten the knuckle. The knuckle must be
replaced if found to be damaged in any way.
HUB AND BEARING (REAR)
The hub and bearing is designed for the life of the
vehicle and requires no type of periodic maintenance
(Fig. 1). The following procedure may be used for
diagnosing the condition of the hub and bearing.
With the wheel, disc brake rotor or brake drum
removed, rotate the hub. Any roughness or resistance
to rotation may indicate dirt intrusion or a failed hub
bearing. If the bearing exhibits any of these condi-
tions during diagnosis, the hub and bearing will
require replacement. The bearing is not serviceable
alone.
Damaged bearing seals and the resulting excessive
grease loss may also require hub and bearing
replacement. Moderate grease weapage from thebearing is considered normal and should not require
replacement of the wheel bearing.
To diagnose a bent hub, refer to BRAKE ROTOR in
the DIAGNOSIS AND TESTING section in the
BRAKES service manual group for the procedure on
measuring hub runout.
LATERAL ARMS
Inspect each lateral arm (Fig. 1). Look for signs of
contact with an object that has caused damage to the
lateral arm. If the lateral arm is bent or damaged,
the lateral arm will require replacement. Do not
attempt to repair or straighten a lateral arm.
Inspect the lateral arm isolator bushings and their
sleeves for signs of damage or deterioration. If dam-
age or deterioration is present, replacement of the
entire lateral arm will be required. The isolator
bushings cannot be serviced separately from the lat-
eral arms.
TENSION STRUT
Inspect the tension strut (Fig. 1). Look for signs of
contact with any object that has bent or caused other
damage to the tension strut. If the tension strut is
bent or damaged, the tension strut will require
replacement. Do not attempt to repair or straighten a
tension strut.
Inspect the tension strut front (spool type) bushing,
and rear (bayonet type) bushings and retainers for
signs of deterioration or damage. If the front bushing
is damaged or shows signs of deteriation, the tension
strut must be replaced. The front bushing cannot be
replaced separately. If the rear bushings are deterio-
rated or damaged, or the retainers are damaged,
replacement is necessary. The bushings and retainers
can be replaced separately from the tension strut.
STABILIZER BAR (REAR)
Inspect the stabilizer bar (Fig. 1). Look for damage
or bending. If damage is evident, the bar must be
replaced.
Inspect for broken, cracked or distorted stabilizer
bar cushions and cushion retainers. The horizontal
slit at the front of each cushion is supposed to be
there. If damage is evident, the cushions can be
replaced separately from the stabilizer bar utilizing
the horizontal slit.
Inspect the stabilizer bar links that attach the sta-
bilizer bar to each rear strut. Look for damage or
deterioration of the bushings on the ends of each
link. Inspect the stabilizer bar link to ensure it is not
bent or broken. If any of these conditions are present,
the stabilizer bar link must be replaced. The links
can be replaced separately from the stabilizer bar.
Fig. 4 Strut Assembly
1 ± STRUT ASSEMBLY
2 ± STRUT
3 ± LOWER SPRING ISOLATOR
4 ± COIL SPRING
5 ± JOUNCE BUMPER
6 ± DUST SHIELD
7 ± UPPER MOUNT
PLSUSPENSION 2 - 39
DIAGNOSIS AND TESTING (Continued)
Page 51 of 1285
REMOVAL AND INSTALLATION
SERVICE WARNINGS AND CAUTIONS
WARNING: DO NOT REMOVE THE STRUT SHAFT
NUT WHILE STRUT ASSEMBLY IS INSTALLED IN
VEHICLE, OR BEFORE THE COIL SPRING IS COM-
PRESSED WITH A COMPRESSION TOOL. THE
SPRING IS HELD UNDER HIGH PRESSURE.
CAUTION: Only frame contact or wheel lift hoisting
equipment can be used on vehicles having a fully
independent rear suspension. Vehicles with inde-
pendent rear suspension can not be hoisted using
equipment designed to lift a vehicle by the rear
axle. If this type of hoisting equipment is used dam-
age to rear suspension components will occur.
NOTE: If a rear suspension component becomes
bent, damaged or fails, no attempt should be made
to straighten or repair it. Always replace it with a
new component.
STRUT ASSEMBLY (REAR)
NOTE: Before proceeding with this procedure,
review SERVICE WARNINGS AND CAUTIONS at the
beginning of REMOVAL AND INSTALLATION in this
section.
REMOVAL
(1) Raise the vehicle. Refer to HOISTING in the
LUBRICATION AND MAINTENANCE group for the
proper lifting procedure.
(2) Remove the rear wheel and tire assembly from
the vehicle.
(3) If the vehicle is equipped with rear drum
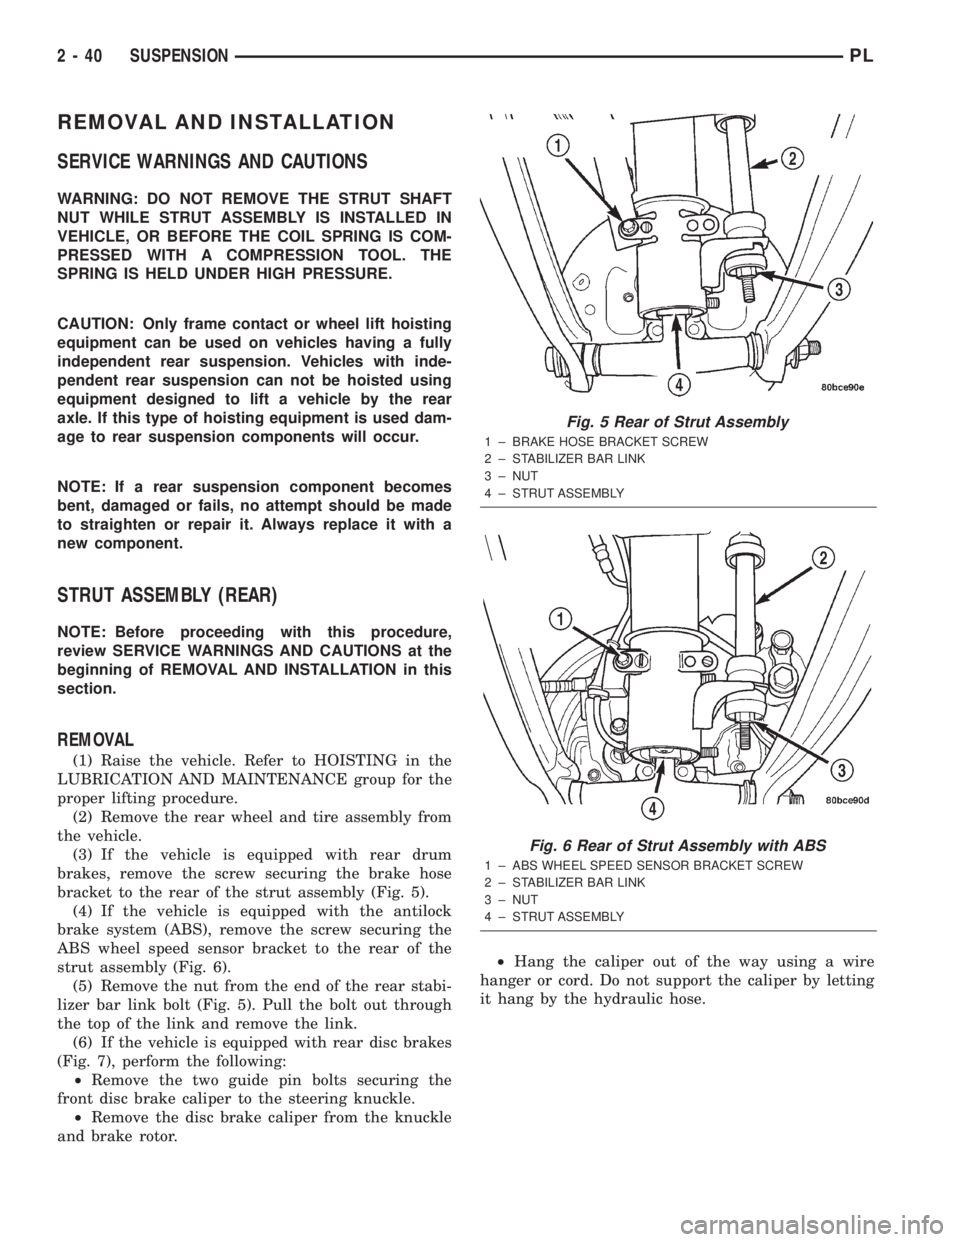
brakes, remove the screw securing the brake hose
bracket to the rear of the strut assembly (Fig. 5).
(4) If the vehicle is equipped with the antilock
brake system (ABS), remove the screw securing the
ABS wheel speed sensor bracket to the rear of the
strut assembly (Fig. 6).
(5) Remove the nut from the end of the rear stabi-
lizer bar link bolt (Fig. 5). Pull the bolt out through
the top of the link and remove the link.
(6) If the vehicle is equipped with rear disc brakes
(Fig. 7), perform the following:
²Remove the two guide pin bolts securing the
front disc brake caliper to the steering knuckle.
²Remove the disc brake caliper from the knuckle
and brake rotor.²Hang the caliper out of the way using a wire
hanger or cord. Do not support the caliper by letting
it hang by the hydraulic hose.
Fig. 5 Rear of Strut Assembly
1 ± BRAKE HOSE BRACKET SCREW
2 ± STABILIZER BAR LINK
3 ± NUT
4 ± STRUT ASSEMBLY
Fig. 6 Rear of Strut Assembly with ABS
1 ± ABS WHEEL SPEED SENSOR BRACKET SCREW
2 ± STABILIZER BAR LINK
3 ± NUT
4 ± STRUT ASSEMBLY
2 - 40 SUSPENSIONPL
Page 68 of 1285
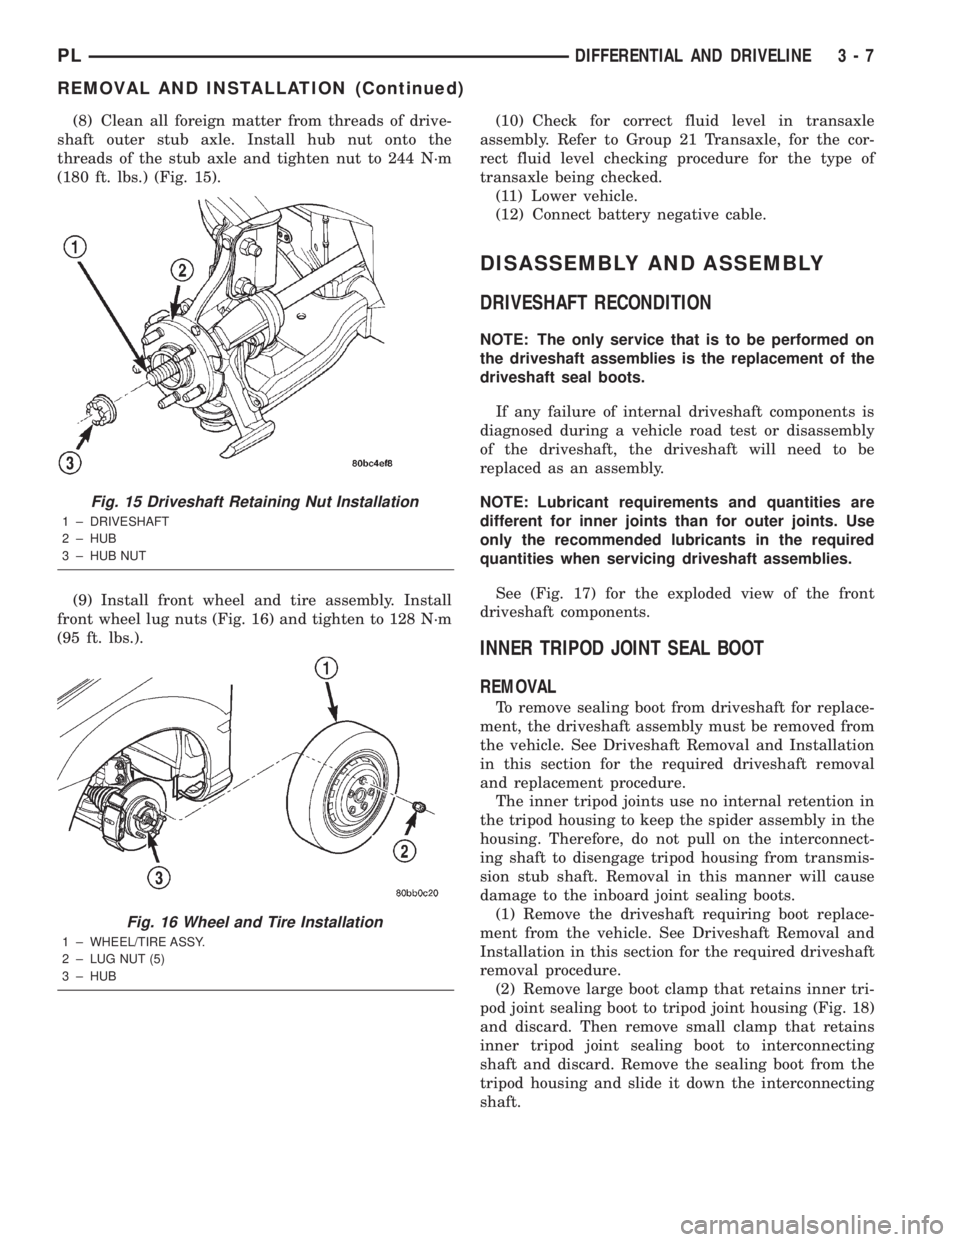
(8) Clean all foreign matter from threads of drive-
shaft outer stub axle. Install hub nut onto the
threads of the stub axle and tighten nut to 244 N´m
(180 ft. lbs.) (Fig. 15).
(9) Install front wheel and tire assembly. Install
front wheel lug nuts (Fig. 16) and tighten to 128 N´m
(95 ft. lbs.).(10) Check for correct fluid level in transaxle
assembly. Refer to Group 21 Transaxle, for the cor-
rect fluid level checking procedure for the type of
transaxle being checked.
(11) Lower vehicle.
(12) Connect battery negative cable.
DISASSEMBLY AND ASSEMBLY
DRIVESHAFT RECONDITION
NOTE: The only service that is to be performed on
the driveshaft assemblies is the replacement of the
driveshaft seal boots.
If any failure of internal driveshaft components is
diagnosed during a vehicle road test or disassembly
of the driveshaft, the driveshaft will need to be
replaced as an assembly.
NOTE: Lubricant requirements and quantities are
different for inner joints than for outer joints. Use
only the recommended lubricants in the required
quantities when servicing driveshaft assemblies.
See (Fig. 17) for the exploded view of the front
driveshaft components.
INNER TRIPOD JOINT SEAL BOOT
REMOVAL
To remove sealing boot from driveshaft for replace-
ment, the driveshaft assembly must be removed from
the vehicle. See Driveshaft Removal and Installation
in this section for the required driveshaft removal
and replacement procedure.
The inner tripod joints use no internal retention in
the tripod housing to keep the spider assembly in the
housing. Therefore, do not pull on the interconnect-
ing shaft to disengage tripod housing from transmis-
sion stub shaft. Removal in this manner will cause
damage to the inboard joint sealing boots.
(1) Remove the driveshaft requiring boot replace-
ment from the vehicle. See Driveshaft Removal and
Installation in this section for the required driveshaft
removal procedure.
(2) Remove large boot clamp that retains inner tri-
pod joint sealing boot to tripod joint housing (Fig. 18)
and discard. Then remove small clamp that retains
inner tripod joint sealing boot to interconnecting
shaft and discard. Remove the sealing boot from the
tripod housing and slide it down the interconnecting
shaft.
Fig. 15 Driveshaft Retaining Nut Installation
1 ± DRIVESHAFT
2 ± HUB
3 ± HUB NUT
Fig. 16 Wheel and Tire Installation
1 ± WHEEL/TIRE ASSY.
2 ± LUG NUT (5)
3 ± HUB
PLDIFFERENTIAL AND DRIVELINE 3 - 7
REMOVAL AND INSTALLATION (Continued)