2000 DODGE NEON catalytic converter
[x] Cancel search: catalytic converterPage 191 of 1285
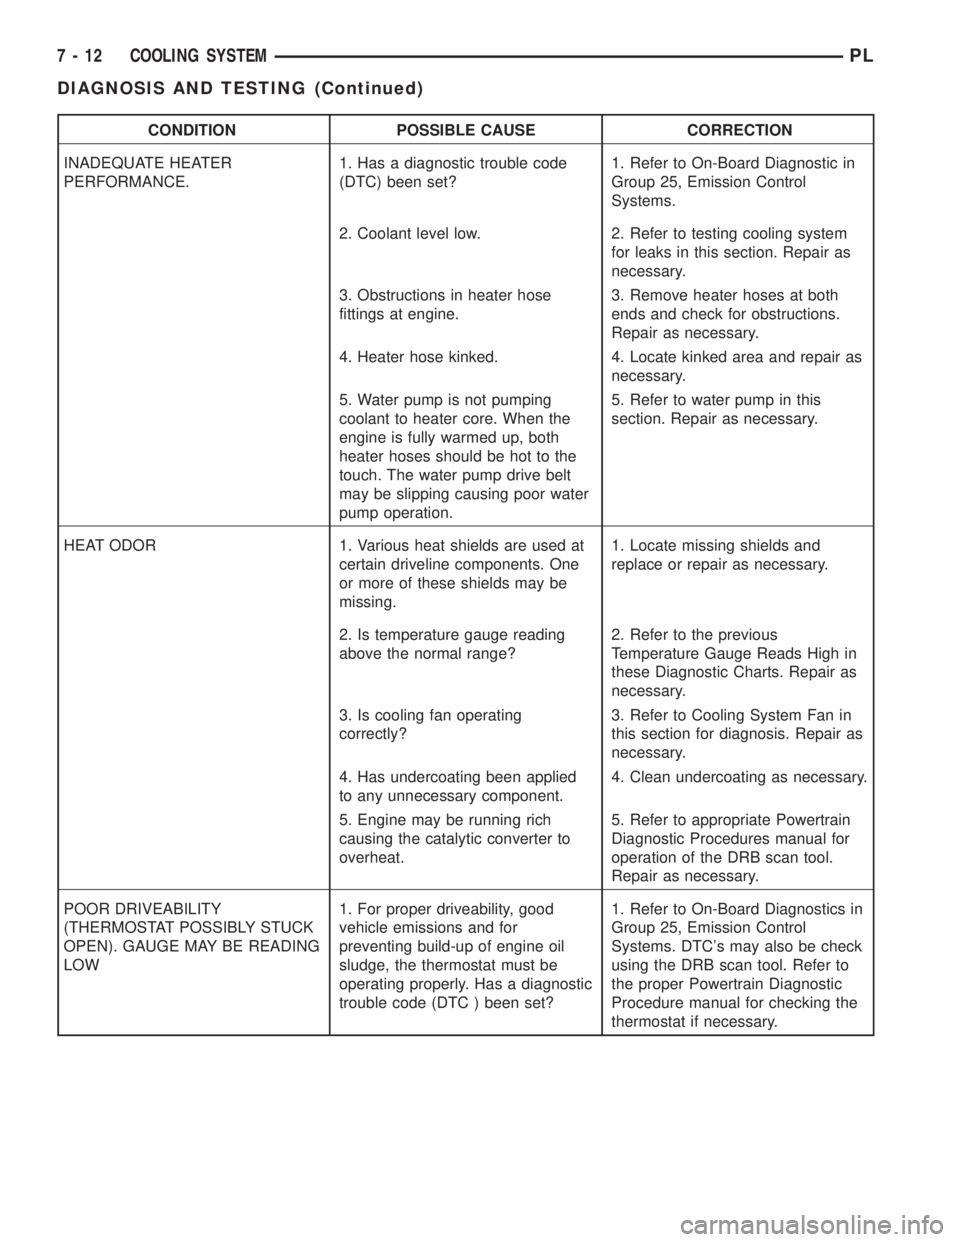
CONDITION POSSIBLE CAUSE CORRECTION
INADEQUATE HEATER
PERFORMANCE.1. Has a diagnostic trouble code
(DTC) been set?1. Refer to On-Board Diagnostic in
Group 25, Emission Control
Systems.
2. Coolant level low. 2. Refer to testing cooling system
for leaks in this section. Repair as
necessary.
3. Obstructions in heater hose
fittings at engine.3. Remove heater hoses at both
ends and check for obstructions.
Repair as necessary.
4. Heater hose kinked. 4. Locate kinked area and repair as
necessary.
5. Water pump is not pumping
coolant to heater core. When the
engine is fully warmed up, both
heater hoses should be hot to the
touch. The water pump drive belt
may be slipping causing poor water
pump operation.5. Refer to water pump in this
section. Repair as necessary.
HEAT ODOR 1. Various heat shields are used at
certain driveline components. One
or more of these shields may be
missing.1. Locate missing shields and
replace or repair as necessary.
2. Is temperature gauge reading
above the normal range?2. Refer to the previous
Temperature Gauge Reads High in
these Diagnostic Charts. Repair as
necessary.
3. Is cooling fan operating
correctly?3. Refer to Cooling System Fan in
this section for diagnosis. Repair as
necessary.
4. Has undercoating been applied
to any unnecessary component.4. Clean undercoating as necessary.
5. Engine may be running rich
causing the catalytic converter to
overheat.5. Refer to appropriate Powertrain
Diagnostic Procedures manual for
operation of the DRB scan tool.
Repair as necessary.
POOR DRIVEABILITY
(THERMOSTAT POSSIBLY STUCK
OPEN). GAUGE MAY BE READING
LOW1. For proper driveability, good
vehicle emissions and for
preventing build-up of engine oil
sludge, the thermostat must be
operating properly. Has a diagnostic
trouble code (DTC ) been set?1. Refer to On-Board Diagnostics in
Group 25, Emission Control
Systems. DTC's may also be check
using the DRB scan tool. Refer to
the proper Powertrain Diagnostic
Procedure manual for checking the
thermostat if necessary.
7 - 12 COOLING SYSTEMPL
DIAGNOSIS AND TESTING (Continued)
Page 798 of 1285
EXHAUST SYSTEM
TABLE OF CONTENTS
page page
DESCRIPTION AND OPERATION
EXHAUST SYSTEM........................1
EXHAUST FLEX-JOINT COUPLING............1
CATALYTIC CONVERTER....................1
EXHAUST HEAT SHIELDS..................3
DIAGNOSIS AND TESTING
EXHAUST SYSTEM DIAGNOSIS CHART.......4
REMOVAL AND INSTALLATION
EXHAUST PIPE AND MUFFLER..............4CATALYTIC CONVERTER....................7
CLEANING AND INSPECTION
EXHAUST SYSTEM........................8
ADJUSTMENTS
EXHAUST SYSTEM ALIGNMENT.............8
SPECIFICATIONS
TORQUE SPECIFICATION CHART.............8
DESCRIPTION AND OPERATION
EXHAUST SYSTEM
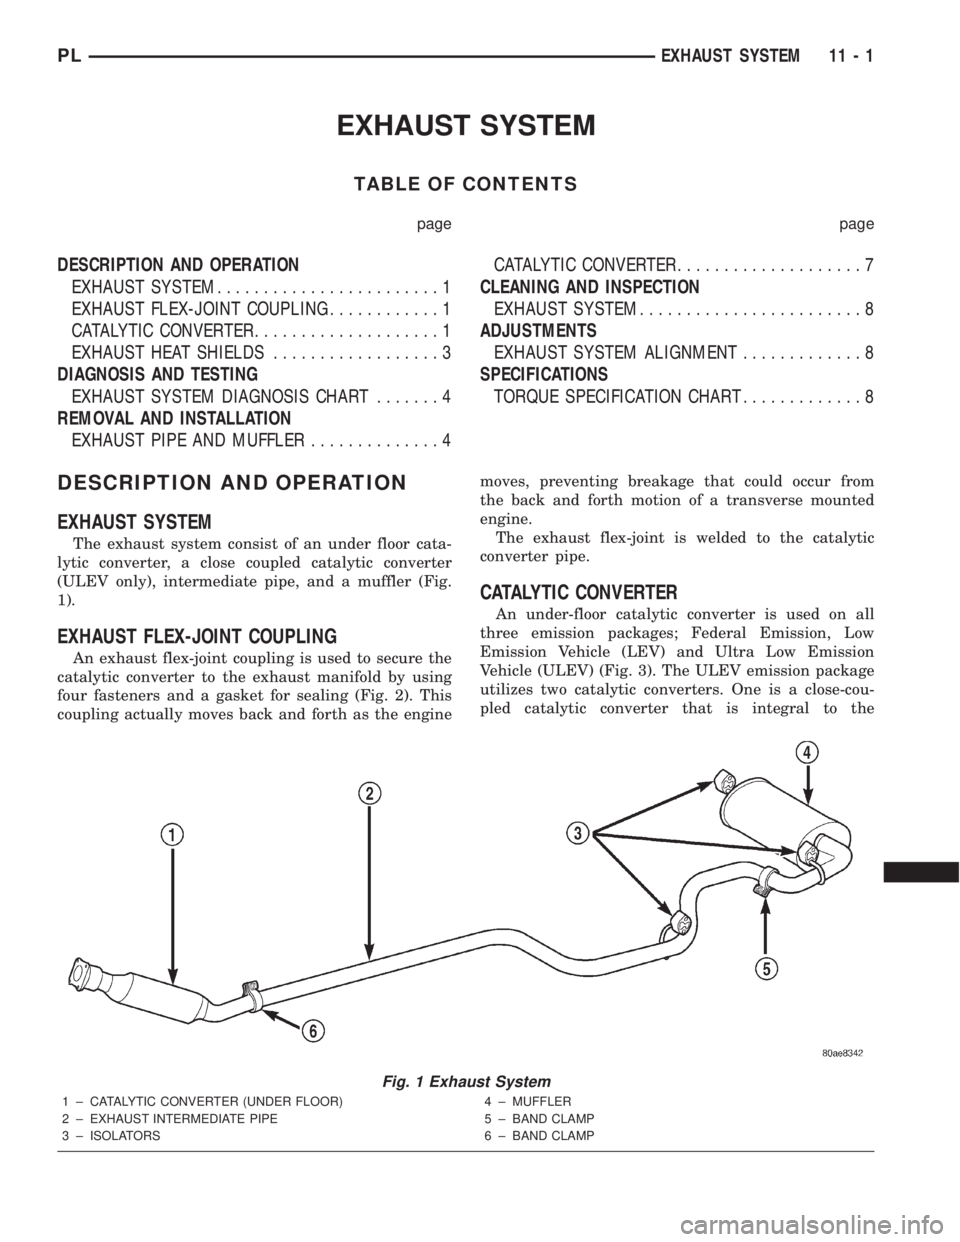
The exhaust system consist of an under floor cata-
lytic converter, a close coupled catalytic converter
(ULEV only), intermediate pipe, and a muffler (Fig.
1).
EXHAUST FLEX-JOINT COUPLING
An exhaust flex-joint coupling is used to secure the
catalytic converter to the exhaust manifold by using
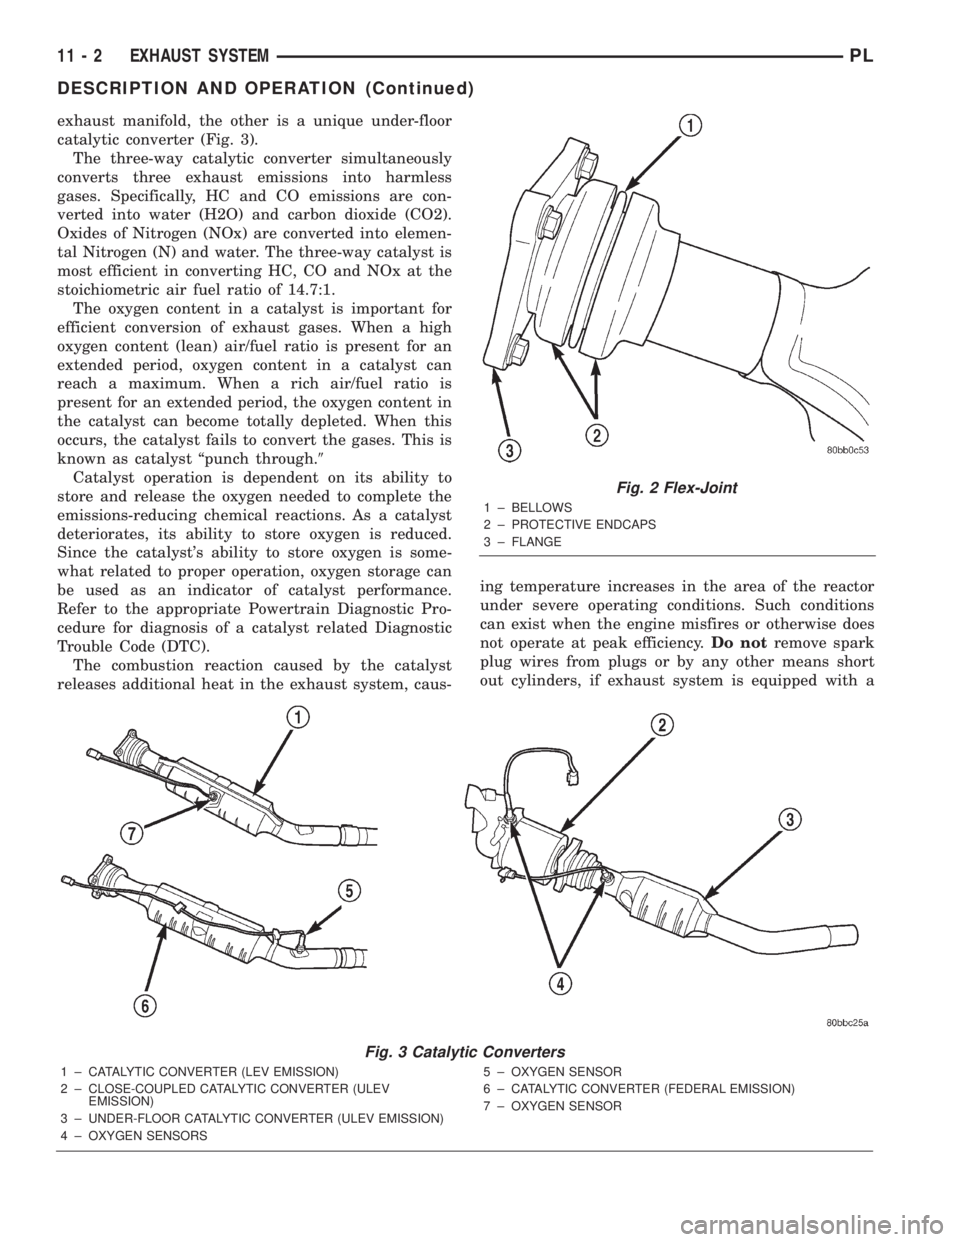
four fasteners and a gasket for sealing (Fig. 2). This
coupling actually moves back and forth as the enginemoves, preventing breakage that could occur from
the back and forth motion of a transverse mounted
engine.
The exhaust flex-joint is welded to the catalytic
converter pipe.
CATALYTIC CONVERTER
An under-floor catalytic converter is used on all
three emission packages; Federal Emission, Low
Emission Vehicle (LEV) and Ultra Low Emission
Vehicle (ULEV) (Fig. 3). The ULEV emission package
utilizes two catalytic converters. One is a close-cou-
pled catalytic converter that is integral to the
Fig. 1 Exhaust System
1 ± CATALYTIC CONVERTER (UNDER FLOOR)
2 ± EXHAUST INTERMEDIATE PIPE
3 ± ISOLATORS4 ± MUFFLER
5 ± BAND CLAMP
6 ± BAND CLAMP
PLEXHAUST SYSTEM 11 - 1
Page 799 of 1285
exhaust manifold, the other is a unique under-floor
catalytic converter (Fig. 3).
The three-way catalytic converter simultaneously
converts three exhaust emissions into harmless
gases. Specifically, HC and CO emissions are con-
verted into water (H2O) and carbon dioxide (CO2).
Oxides of Nitrogen (NOx) are converted into elemen-
tal Nitrogen (N) and water. The three-way catalyst is
most efficient in converting HC, CO and NOx at the
stoichiometric air fuel ratio of 14.7:1.
The oxygen content in a catalyst is important for
efficient conversion of exhaust gases. When a high
oxygen content (lean) air/fuel ratio is present for an
extended period, oxygen content in a catalyst can
reach a maximum. When a rich air/fuel ratio is
present for an extended period, the oxygen content in
the catalyst can become totally depleted. When this
occurs, the catalyst fails to convert the gases. This is
known as catalyst ªpunch through.9
Catalyst operation is dependent on its ability to
store and release the oxygen needed to complete the
emissions-reducing chemical reactions. As a catalyst
deteriorates, its ability to store oxygen is reduced.
Since the catalyst's ability to store oxygen is some-
what related to proper operation, oxygen storage can
be used as an indicator of catalyst performance.
Refer to the appropriate Powertrain Diagnostic Pro-
cedure for diagnosis of a catalyst related Diagnostic
Trouble Code (DTC).
The combustion reaction caused by the catalyst
releases additional heat in the exhaust system, caus-ing temperature increases in the area of the reactor
under severe operating conditions. Such conditions
can exist when the engine misfires or otherwise does
not operate at peak efficiency.Do notremove spark
plug wires from plugs or by any other means short
out cylinders, if exhaust system is equipped with a
Fig. 2 Flex-Joint
1 ± BELLOWS
2 ± PROTECTIVE ENDCAPS
3 ± FLANGE
Fig. 3 Catalytic Converters
1 ± CATALYTIC CONVERTER (LEV EMISSION)
2 ± CLOSE-COUPLED CATALYTIC CONVERTER (ULEV
EMISSION)
3 ± UNDER-FLOOR CATALYTIC CONVERTER (ULEV EMISSION)
4 ± OXYGEN SENSORS5 ± OXYGEN SENSOR
6 ± CATALYTIC CONVERTER (FEDERAL EMISSION)
7 ± OXYGEN SENSOR
11 - 2 EXHAUST SYSTEMPL
DESCRIPTION AND OPERATION (Continued)
Page 800 of 1285
catalytic converter. Failure of the catalytic converter
can occur due to temperature increases caused by
unburned fuel passing through the converter. This
deterioration of the catalyst core can result in exces-
sively high emission levels, noise complaints, and
exhaust restrictions.
The use of catalysts also involves some non-auto-
motive problems. Unleaded gasoline must be used to
avoid poisoning the catalyst core. Do not allow engine
to operate above 1200 RPM in neutral for extended
periods over 5 minutes. This condition may result in
excessive exhaust system/floor pan temperatures
because of no air movement under the vehicle.
There is no regularly scheduled maintenance on
any DaimlerChrysler catalytic converter. If damaged,
the converter must be replaced.
CAUTION: Due to exterior physical similarities of
some catalytic converters with pipe assemblies,
extreme care should be taken with replacement
parts.
EXHAUST HEAT SHIELDS
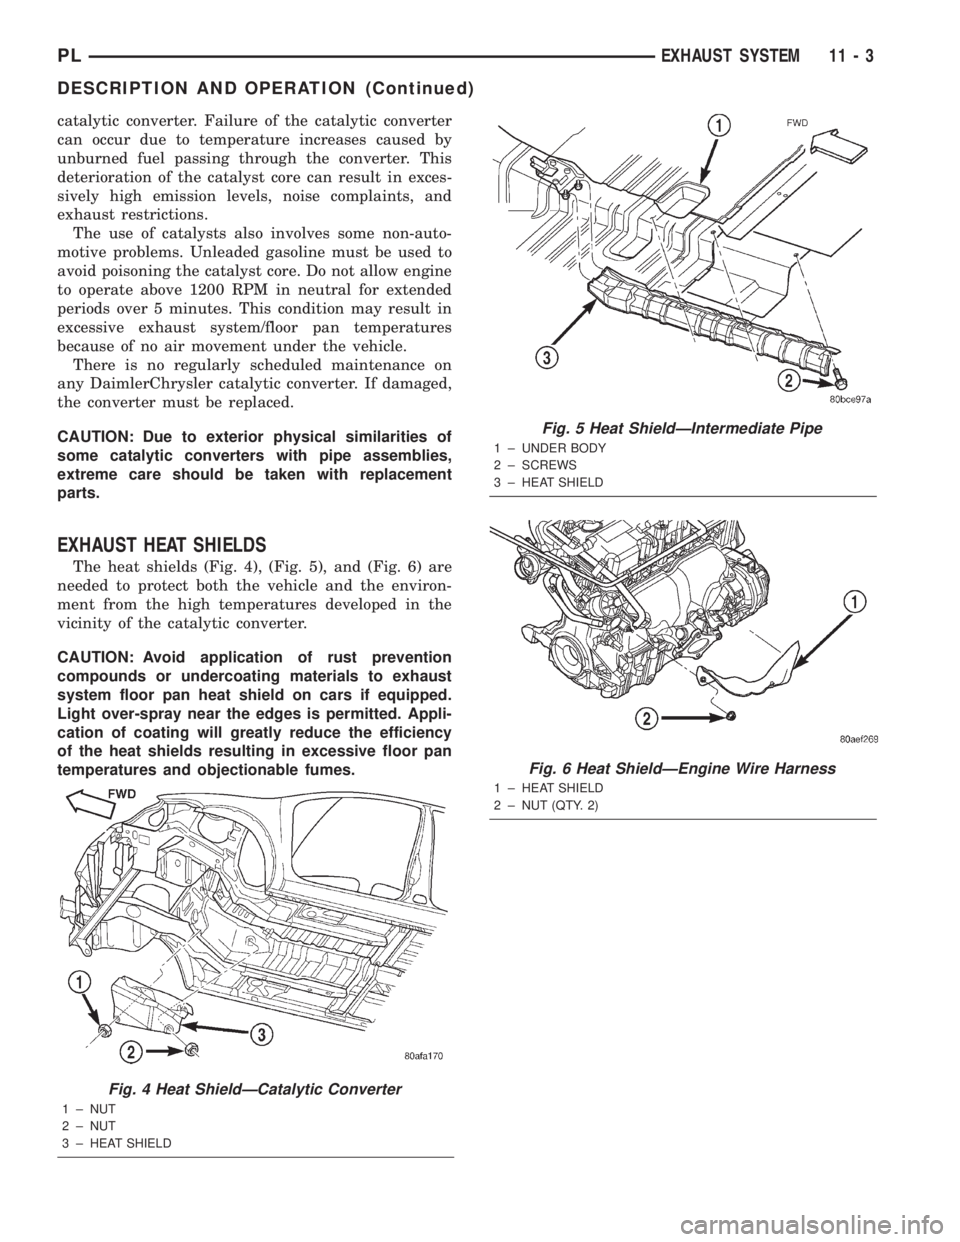
The heat shields (Fig. 4), (Fig. 5), and (Fig. 6) are
needed to protect both the vehicle and the environ-
ment from the high temperatures developed in the
vicinity of the catalytic converter.
CAUTION: Avoid application of rust prevention
compounds or undercoating materials to exhaust
system floor pan heat shield on cars if equipped.
Light over-spray near the edges is permitted. Appli-
cation of coating will greatly reduce the efficiency
of the heat shields resulting in excessive floor pan
temperatures and objectionable fumes.
Fig. 4 Heat ShieldÐCatalytic Converter
1 ± NUT
2 ± NUT
3 ± HEAT SHIELD
Fig. 5 Heat ShieldÐIntermediate Pipe
1 ± UNDER BODY
2 ± SCREWS
3 ± HEAT SHIELD
Fig. 6 Heat ShieldÐEngine Wire Harness
1 ± HEAT SHIELD
2 ± NUT (QTY. 2)
PLEXHAUST SYSTEM 11 - 3
DESCRIPTION AND OPERATION (Continued)
Page 801 of 1285
DIAGNOSIS AND TESTING
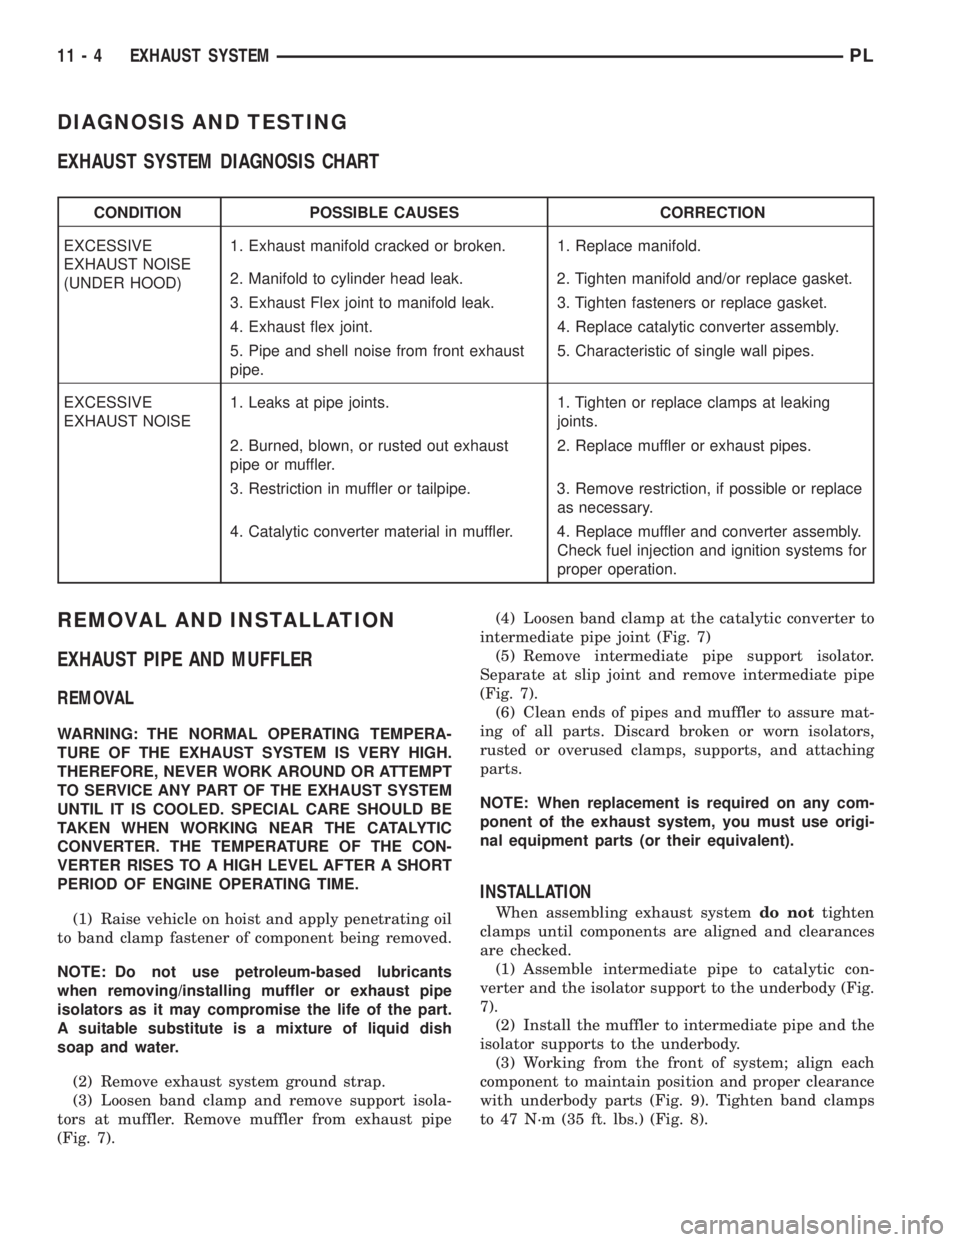
EXHAUST SYSTEM DIAGNOSIS CHART
CONDITION POSSIBLE CAUSES CORRECTION
EXCESSIVE
EXHAUST NOISE
(UNDER HOOD)1. Exhaust manifold cracked or broken. 1. Replace manifold.
2. Manifold to cylinder head leak. 2. Tighten manifold and/or replace gasket.
3. Exhaust Flex joint to manifold leak. 3. Tighten fasteners or replace gasket.
4. Exhaust flex joint. 4. Replace catalytic converter assembly.
5. Pipe and shell noise from front exhaust
pipe.5. Characteristic of single wall pipes.
EXCESSIVE
EXHAUST NOISE1. Leaks at pipe joints. 1. Tighten or replace clamps at leaking
joints.
2. Burned, blown, or rusted out exhaust
pipe or muffler.2. Replace muffler or exhaust pipes.
3. Restriction in muffler or tailpipe. 3. Remove restriction, if possible or replace
as necessary.
4. Catalytic converter material in muffler. 4. Replace muffler and converter assembly.
Check fuel injection and ignition systems for
proper operation.
REMOVAL AND INSTALLATION
EXHAUST PIPE AND MUFFLER
REMOVAL
WARNING: THE NORMAL OPERATING TEMPERA-
TURE OF THE EXHAUST SYSTEM IS VERY HIGH.
THEREFORE, NEVER WORK AROUND OR ATTEMPT
TO SERVICE ANY PART OF THE EXHAUST SYSTEM
UNTIL IT IS COOLED. SPECIAL CARE SHOULD BE
TAKEN WHEN WORKING NEAR THE CATALYTIC
CONVERTER. THE TEMPERATURE OF THE CON-
VERTER RISES TO A HIGH LEVEL AFTER A SHORT
PERIOD OF ENGINE OPERATING TIME.
(1) Raise vehicle on hoist and apply penetrating oil
to band clamp fastener of component being removed.
NOTE: Do not use petroleum-based lubricants
when removing/installing muffler or exhaust pipe
isolators as it may compromise the life of the part.
A suitable substitute is a mixture of liquid dish
soap and water.
(2) Remove exhaust system ground strap.
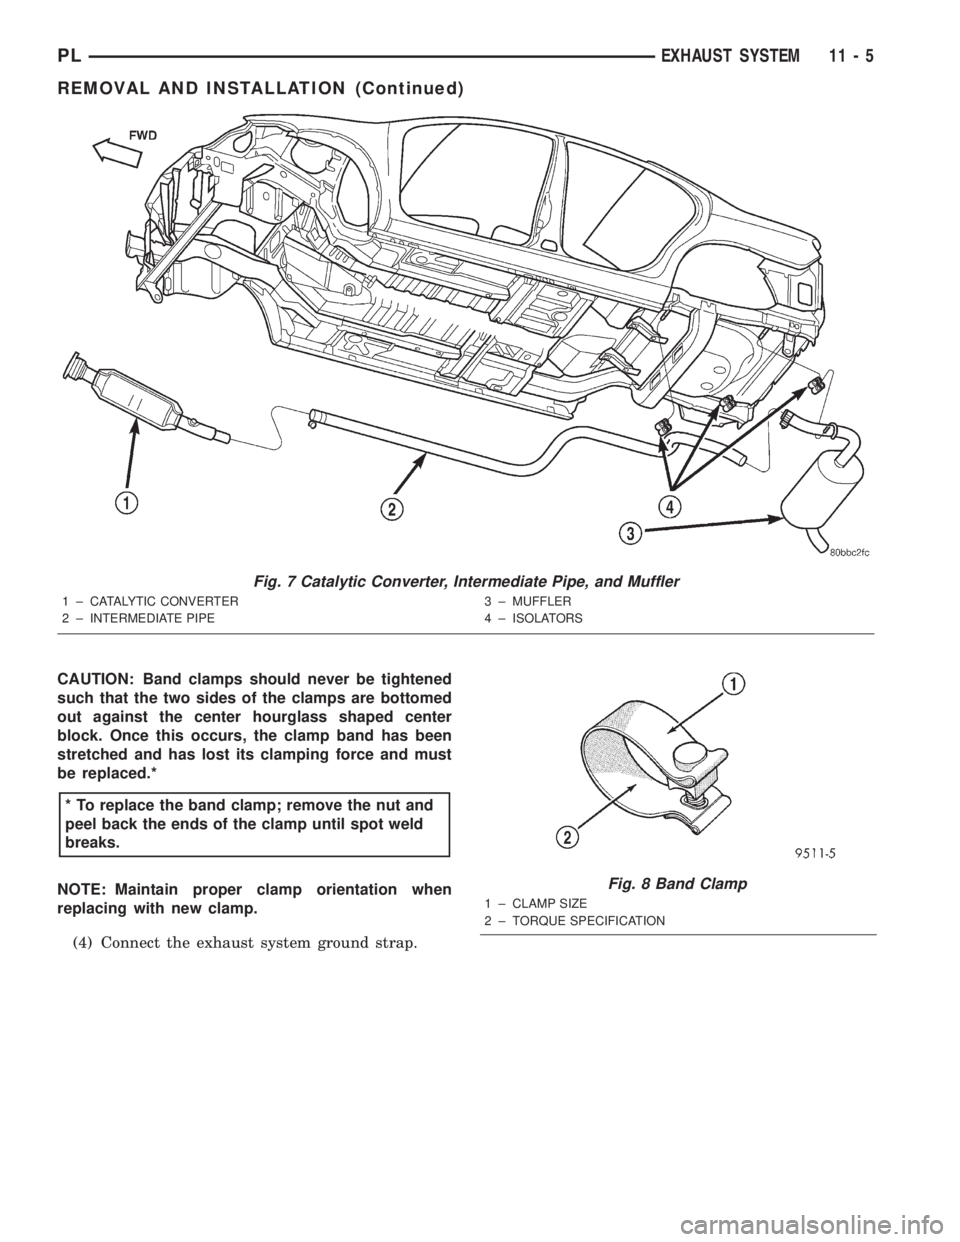
(3) Loosen band clamp and remove support isola-
tors at muffler. Remove muffler from exhaust pipe
(Fig. 7).(4) Loosen band clamp at the catalytic converter to
intermediate pipe joint (Fig. 7)
(5) Remove intermediate pipe support isolator.
Separate at slip joint and remove intermediate pipe
(Fig. 7).
(6) Clean ends of pipes and muffler to assure mat-
ing of all parts. Discard broken or worn isolators,
rusted or overused clamps, supports, and attaching
parts.
NOTE: When replacement is required on any com-
ponent of the exhaust system, you must use origi-
nal equipment parts (or their equivalent).
INSTALLATION
When assembling exhaust systemdo nottighten
clamps until components are aligned and clearances
are checked.
(1) Assemble intermediate pipe to catalytic con-
verter and the isolator support to the underbody (Fig.
7).
(2) Install the muffler to intermediate pipe and the
isolator supports to the underbody.
(3) Working from the front of system; align each
component to maintain position and proper clearance
with underbody parts (Fig. 9). Tighten band clamps
to 47 N´m (35 ft. lbs.) (Fig. 8).
11 - 4 EXHAUST SYSTEMPL
Page 802 of 1285
CAUTION: Band clamps should never be tightened
such that the two sides of the clamps are bottomed
out against the center hourglass shaped center
block. Once this occurs, the clamp band has been
stretched and has lost its clamping force and must
be replaced.*
NOTE: Maintain proper clamp orientation when
replacing with new clamp.
(4) Connect the exhaust system ground strap.
Fig. 7 Catalytic Converter, Intermediate Pipe, and Muffler
1 ± CATALYTIC CONVERTER
2 ± INTERMEDIATE PIPE3 ± MUFFLER
4 ± ISOLATORS
* To replace the band clamp; remove the nut and
peel back the ends of the clamp until spot weld
breaks.
Fig. 8 Band Clamp
1 ± CLAMP SIZE
2 ± TORQUE SPECIFICATION
PLEXHAUST SYSTEM 11 - 5
REMOVAL AND INSTALLATION (Continued)
Page 804 of 1285
CATALYTIC CONVERTER
REMOVAL
WARNING: THE NORMAL OPERATING TEMPERA-
TURE OF THE EXHAUST SYSTEM IS VERY HIGH.
THEREFORE, NEVER ATTEMPT TO SERVICE ANY
PART OF THE EXHAUST SYSTEM UNTIL IT IS
COOLED. SPECIAL CARE SHOULD BE TAKEN
WHEN WORKING NEAR THE CATALYTIC CON-
VERTER. THE TEMPERATURE OF THE CONVERTER
RISES TO A HIGH LEVEL AFTER A SHORT PERIOD
OF ENGINE OPERATION TIME.
NOTE: Vehicles equipped with the ULEV emission
package are equipped with an additional catalytic
converter that is integral to the exhaust manifold.
Refer to Exhaust Manifold in Group 9, Engine for
procedure.
(1) Remove muffler and exhaust pipe. Refer to pro-
cedure in this section.
(2) Disconnect downstream oxygen sensor electri-
cal connector.
(3) Remove exhaust manifold support bracket
(Federal and LEV only) (Fig. 10).
(4) Remove catalytic converter to exhaust manifold
attaching fasteners and remove converter from vehi-
cle (Fig. 11) or (Fig. 12).
(5) Remove and discard flange gasket.
NOTE: When replacement is required on any com-
ponent of the exhaust system, original equipment
parts (or equivalent) must be used.
INSTALLATION
NOTE: When assembling exhaust system do not
tighten clamps until all components are aligned and
clearances are checked.(1) Assemble catalytic converter to exhaust mani-
fold connection. Use a new flange gasket.
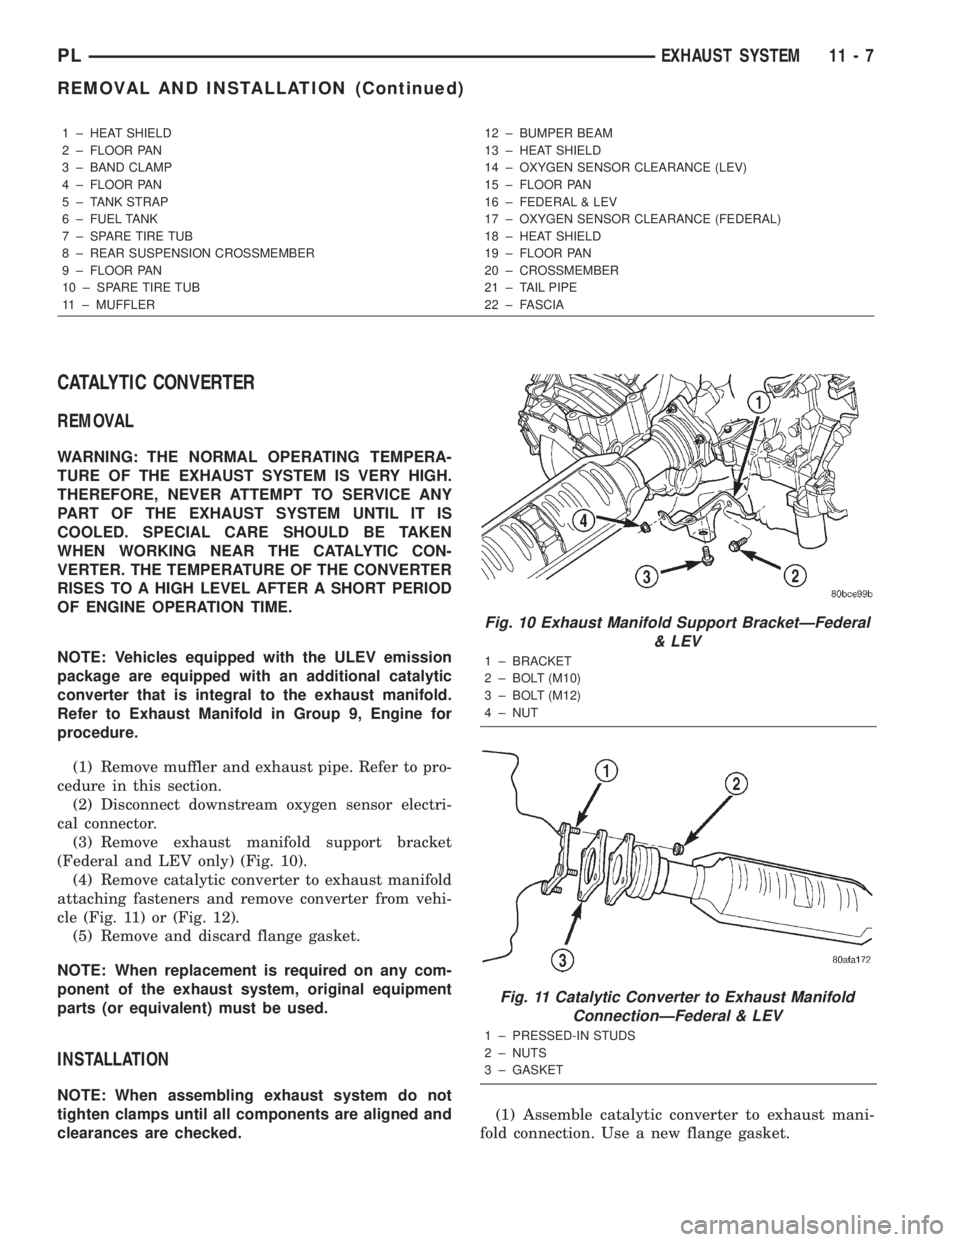
1 ± HEAT SHIELD
2 ± FLOOR PAN
3 ± BAND CLAMP
4 ± FLOOR PAN
5 ± TANK STRAP
6 ± FUEL TANK
7 ± SPARE TIRE TUB
8 ± REAR SUSPENSION CROSSMEMBER
9 ± FLOOR PAN
10 ± SPARE TIRE TUB
11 ± MUFFLER12 ± BUMPER BEAM
13 ± HEAT SHIELD
14 ± OXYGEN SENSOR CLEARANCE (LEV)
15 ± FLOOR PAN
16 ± FEDERAL & LEV
17 ± OXYGEN SENSOR CLEARANCE (FEDERAL)
18 ± HEAT SHIELD
19 ± FLOOR PAN
20 ± CROSSMEMBER
21 ± TAIL PIPE
22 ± FASCIA
Fig. 10 Exhaust Manifold Support BracketÐFederal
& LEV
1 ± BRACKET
2 ± BOLT (M10)
3 ± BOLT (M12)
4 ± NUT
Fig. 11 Catalytic Converter to Exhaust Manifold
ConnectionÐFederal & LEV
1 ± PRESSED-IN STUDS
2 ± NUTS
3 ± GASKET
PLEXHAUST SYSTEM 11 - 7
REMOVAL AND INSTALLATION (Continued)
Page 805 of 1285
(2) Install exhaust manifold support bracket (Fed-
eral and LEV only). Tighten M10 bolt to 54 N´m (40
ft. lbs.), M12 bolt to 95 N´m (70 ft. lbs.), and nut to
28 N´m (250 in. lbs.).
(3) Install bolt attaching manifold support bracket
to the heat shield (Federal and LEV only). Tighten
bolt to 28 N´m (250 in. lbs.).
(4) Assemble muffler and exhaust pipe to catalytic
converter. Install muffler and pipe support isolators
to the underbody.
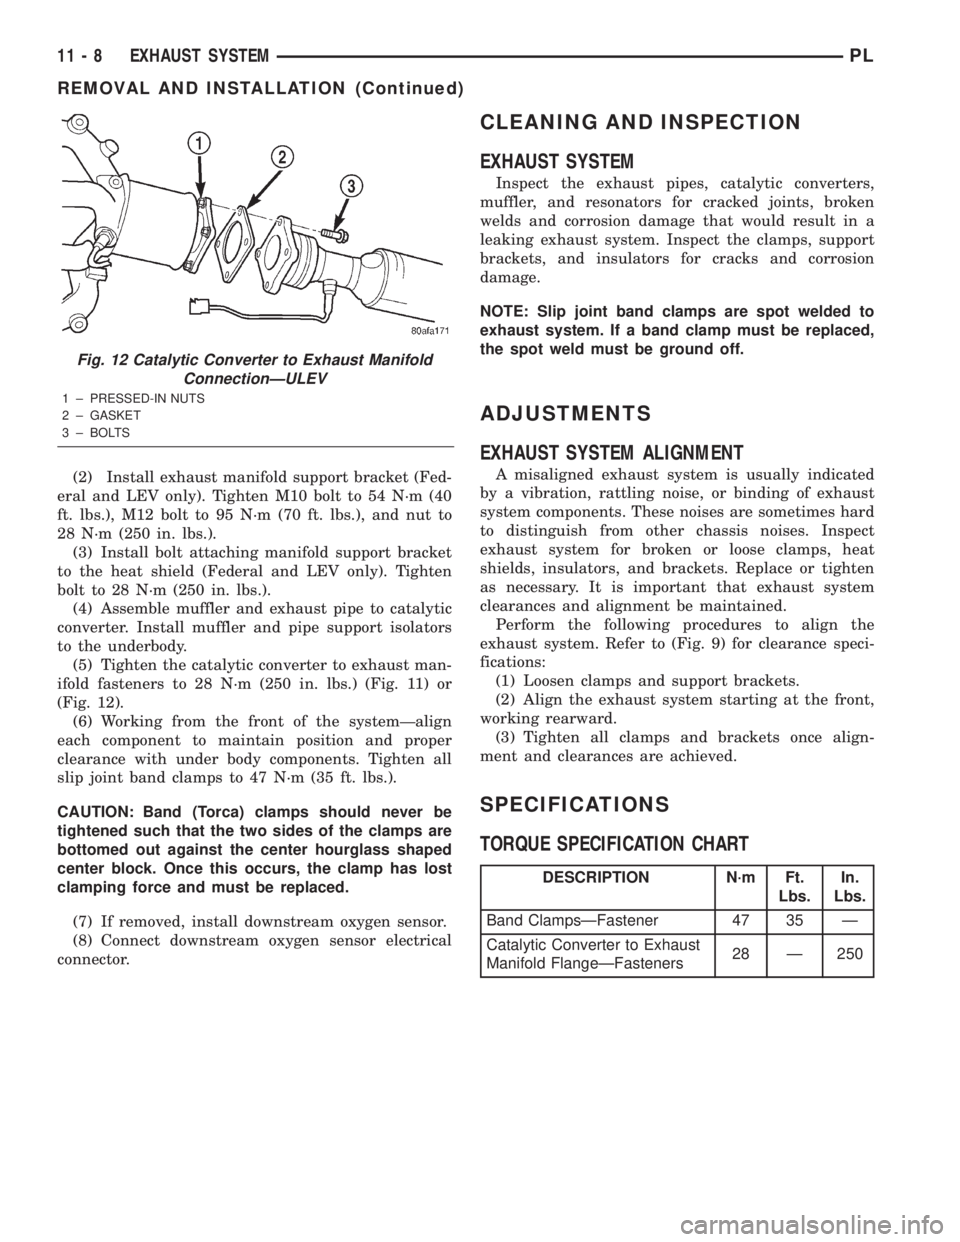
(5) Tighten the catalytic converter to exhaust man-
ifold fasteners to 28 N´m (250 in. lbs.) (Fig. 11) or
(Fig. 12).
(6) Working from the front of the systemÐalign
each component to maintain position and proper
clearance with under body components. Tighten all
slip joint band clamps to 47 N´m (35 ft. lbs.).
CAUTION: Band (Torca) clamps should never be
tightened such that the two sides of the clamps are
bottomed out against the center hourglass shaped
center block. Once this occurs, the clamp has lost
clamping force and must be replaced.
(7) If removed, install downstream oxygen sensor.
(8) Connect downstream oxygen sensor electrical
connector.
CLEANING AND INSPECTION
EXHAUST SYSTEM
Inspect the exhaust pipes, catalytic converters,
muffler, and resonators for cracked joints, broken
welds and corrosion damage that would result in a
leaking exhaust system. Inspect the clamps, support
brackets, and insulators for cracks and corrosion
damage.
NOTE: Slip joint band clamps are spot welded to
exhaust system. If a band clamp must be replaced,
the spot weld must be ground off.
ADJUSTMENTS
EXHAUST SYSTEM ALIGNMENT
A misaligned exhaust system is usually indicated
by a vibration, rattling noise, or binding of exhaust
system components. These noises are sometimes hard
to distinguish from other chassis noises. Inspect
exhaust system for broken or loose clamps, heat
shields, insulators, and brackets. Replace or tighten
as necessary. It is important that exhaust system
clearances and alignment be maintained.
Perform the following procedures to align the
exhaust system. Refer to (Fig. 9) for clearance speci-
fications:
(1) Loosen clamps and support brackets.
(2) Align the exhaust system starting at the front,
working rearward.
(3) Tighten all clamps and brackets once align-
ment and clearances are achieved.
SPECIFICATIONS
TORQUE SPECIFICATION CHART
Fig. 12 Catalytic Converter to Exhaust Manifold
ConnectionÐULEV
1 ± PRESSED-IN NUTS
2 ± GASKET
3 ± BOLTS
DESCRIPTION N´m Ft.
Lbs.In.
Lbs.
Band ClampsÐFastener 47 35 Ð
Catalytic Converter to Exhaust
Manifold FlangeÐFasteners28 Ð 250
11 - 8 EXHAUST SYSTEMPL
REMOVAL AND INSTALLATION (Continued)