Page 733 of 1456
8. Lateral Link
A: REMOVAL
H4M1067C
(1) Crossmember
(2) Adjusting bolt
(3) Stabilizer link
(4) Rear lateral link
(5) Bushing (C)
(6) Bushing (A)
(7) Front lateral link(8) Bushing (B)
(9) Washer
(10) Cap (Protection)
(11) Trailing link
(12) Self-locking nutTightening torque: N´m (kg-m, ft-lb)
T1:
44±6 (4.5±0.6, 32.5±4.3)
T2:98±15 (10.0±1.5, 72±11 )
T3:11 3±15 (11.5±1.5, 83±11
T4:137±20 (14.0±2.0, 101±14)
1) Loosen wheel nuts. Lift-up vehicle and remove
wheel.
2) Remove stabilizers link from lateral link.
3) Remove ABS sensor harness from trailing link.
(ABS equipped models.)
4) Remove bolt securing trailing link to housing.
B4M0573A
5) Remove bolts which secure lateral link assem-
bly to rear housing.
6) Remove crossmember reinforcement lower
from crossmember. (4 door model only)
29
[W8A0]4-1SERVICE PROCEDURE
8. Lateral Link
Page 737 of 1456
9. Rear Strut
A: REMOVAL
B4M0199B
(1) Strut mount cap
(2) Self-locking nut
(3) Strut mount
(4) Rubber seat upper
(5) Dust cover
(6) Coil spring(7) Helper
(8) Rubber seat lower
(9) Damper strutTightening torque: N´m (kg-m, ft-lb)
T1:
20±6 (2.0±0.6, 14.5±4.3)
T2:59±10 (6.0±1.0, 43±7)
T3:196+39/þ10(20.0+4.0/þ1.0,
145+29/þ7)
1) Depress brake pedal and secure it in that posi-
tion using a wooden block, etc.
2) Remove rear seat cushion and backrest.
(Sedan)
B4M0200A
3) Remove strut cap of rear quarter trim. (Wagon)
B4M0201A
4) Loosen rear wheel nuts.
5) Jack-up vehicle, support it with safety stands
(rigid racks) and remove rear wheels.
6) Remove brake hose clip.
33
[W9A0]4-1SERVICE PROCEDURE
9. Rear Strut
Page 739 of 1456
CAUTION:
ICheck that hose clip is positioned properly.
ICheck brake hose for twisting, or excessive
tension.
IModels equipped with ABS:
Do not subject ABS sensor harness to exces-
sive tension.
6) Be sure to bleed air from brake system.
7) Lower vehicle and tighten wheel nut.
Tightening torque:
88
±10 N´m (9±1 kg-m, 65±7 ft-lb)
8) Sedan:
Install rear seat backrest and rear seat cushion.
Wagon:
Install strut cap of rear quarter trim.
NOTE:
Check wheel alignment and adjust if necessary.
35
[W9E0]4-1SERVICE PROCEDURE
9. Rear Strut
Page 743 of 1456
C: INSTALLATION
1) To install, reverse the removal procedure.
NOTE:
IInstall bushing while aligning it with paint mark
on stabilizer.
IEnsure that bushing and stabilizer have the
same identification colors when installing.
G4M0519
2) Always tighten rubber bushing location when
wheels are in full contact with the ground and
vehicle is curb weight.
3) Tightening torque:
Stabilizer link to rear lateral link:
44
±6 N´m (4.5±0.6 kg-m, 32.5±4.3 ft-lb)
Stabilizer to stabilizer bracket:
25
±7 N´m (2.5±0.7 kg-m, 18.1±5.1 ft-lb)
39
[W11C0]4-1SERVICE PROCEDURE
11. Rear Stabilizer
Page 744 of 1456

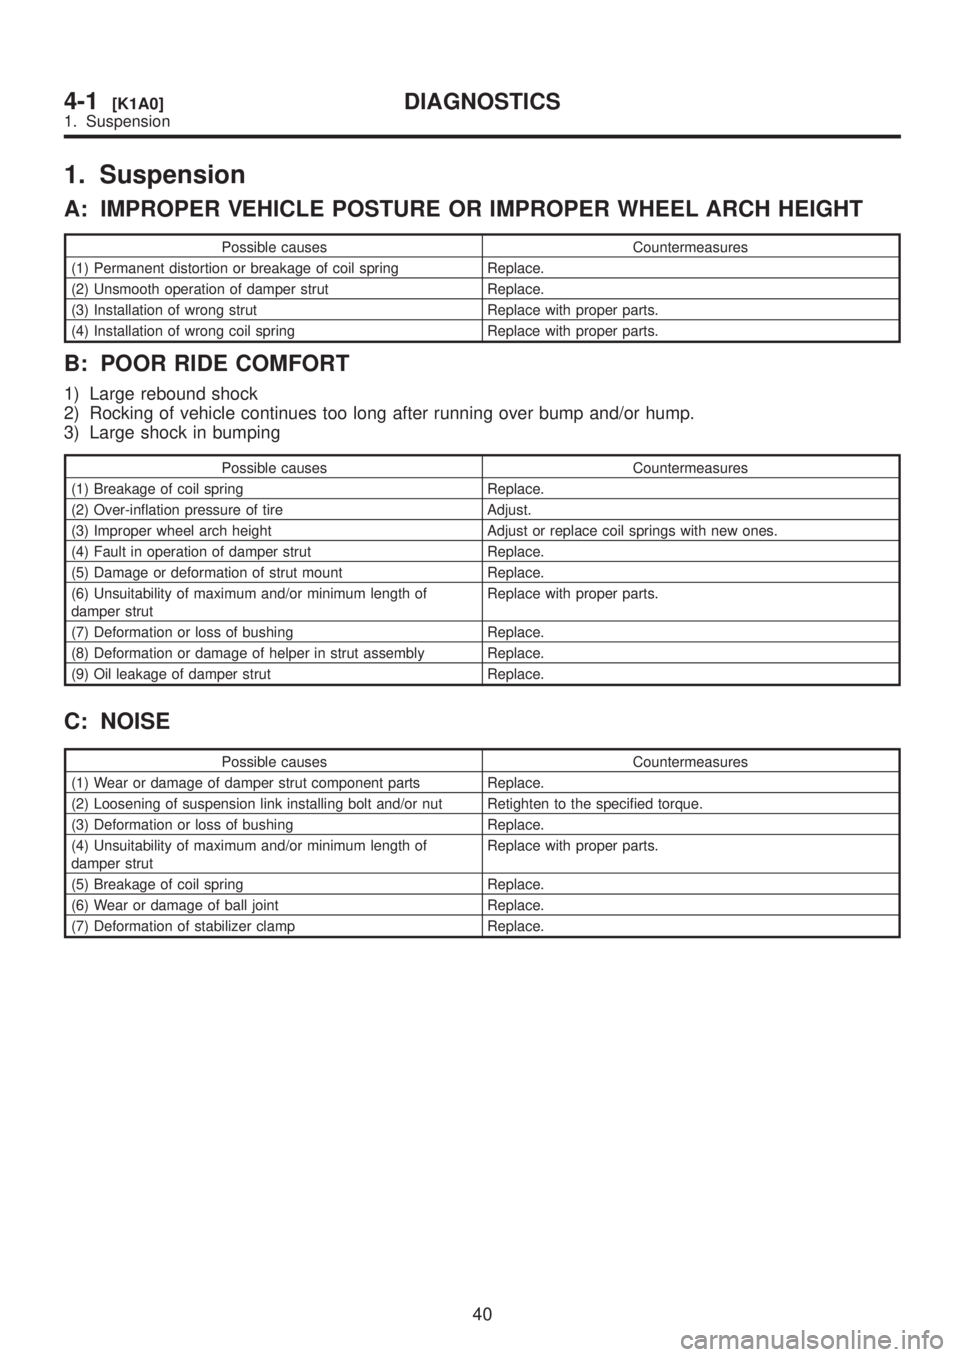
1. Suspension
A: IMPROPER VEHICLE POSTURE OR IMPROPER WHEEL ARCH HEIGHT
Possible causes Countermeasures
(1) Permanent distortion or breakage of coil spring Replace.
(2) Unsmooth operation of damper strut Replace.
(3) Installation of wrong strut Replace with proper parts.
(4) Installation of wrong coil spring Replace with proper parts.
B: POOR RIDE COMFORT
1) Large rebound shock
2) Rocking of vehicle continues too long after running over bump and/or hump.
3) Large shock in bumping
Possible causes Countermeasures
(1) Breakage of coil spring Replace.
(2) Over-inflation pressure of tire Adjust.
(3) Improper wheel arch height Adjust or replace coil springs with new ones.
(4) Fault in operation of damper strut Replace.
(5) Damage or deformation of strut mount Replace.
(6) Unsuitability of maximum and/or minimum length of
damper strutReplace with proper parts.
(7) Deformation or loss of bushing Replace.
(8) Deformation or damage of helper in strut assembly Replace.
(9) Oil leakage of damper strut Replace.
C: NOISE
Possible causes Countermeasures
(1) Wear or damage of damper strut component parts Replace.
(2) Loosening of suspension link installing bolt and/or nut Retighten to the specified torque.
(3) Deformation or loss of bushing Replace.
(4) Unsuitability of maximum and/or minimum length of
damper strutReplace with proper parts.
(5) Breakage of coil spring Replace.
(6) Wear or damage of ball joint Replace.
(7) Deformation of stabilizer clamp Replace.
40
4-1[K1A0]DIAGNOSTICS
1. Suspension
Page 751 of 1456
1. Front Axle
A: EXCEPT AWD AT MODEL
H4M0999B
(1) Spring pin
(2) Baffle plate (DOJ)
(3) Outer race (DOJ)
(4) Snap ring
(5) Inner race (DOJ)
(6) Ball
(7) Cage
(8) Circlip
(9) Boot band(10) Boot (DOJ)
(11) Boot (BJ)
(12) BJ ASSY
(13) Baffle plate
(14) Oil seal (IN)
(15) Snap ring
(16) Bearing
(17) Housing
(18) Oil seal (OUT)(19) Tone wheel
(20) Hub bolt
(21) Hub
(22) Axle nut
Tightening torque: N´m (kg-m, ft-lb)
T1:
13±3 (1.3±0.3, 9.4±2.2)
T2:186±20 (19±2, 137±14)
6
4-2[C1A0]COMPONENT PARTS
1. Front Axle
Page 752 of 1456
B: AWD AT MODEL
B4M0773B
(1) O-ring
(2) Baffle plate (SFJ)
(3) Spring pin
(4) Outer race (SFJ)
(5) Snap ring
(6) Trunnion
(7) Free ring
(8) Circlip
(9) Boot band(10) Boot band
(11) Boot (BJ)
(12) BJ ASSY
(13) Baffle plate
(14) Oil seal (IN)
(15) Snap ring
(16) Bearing
(17) Housing
(18) Oil seal (OUT)(19) Tone wheel
(20) Hub bolt
(21) Hub
(22) Axle nut
Tightening torque: N´m (kg-m, ft-lb)
T1:
13±3 (1.3±0.3, 9.4±2.2)
T2:186±20 (19±2, 137±14)
7
[C1B0]4-2COMPONENT PARTS
1. Front Axle
Page 753 of 1456
2. Rear Axle
H4M1000B
(1) Circlip (2200 cc AT vehicles)
(2) Baffle plate (DOJ)
(3) Outer race (DOJ)
(4) Snap ring
(5) Inner race
(6) Ball
(7) Cage
(8) Circlip
(9) Boot band(10) Boot (DOJ)
(11) Boot (BJ)
(12) BJ ASSY
(13) Oil seal (IN. No. 2)
(14) Oil seal (IN. No. 3)
(15) Housing
(16) Bearing
(17) Snap ring
(18) Oil seal (OUT)(19) Tone wheel
(20) Hub bolt
(21) Hub
(22) Axle nut
Tightening torque: N´m (kg-m, ft-lb)
T1:
13±3 (1.3±0.3, 9.4±2.2)
T2:186±20 (19±2, 137±14)
8
4-2[C200]COMPONENT PARTS
2. Rear Axle