Page 370 of 1456
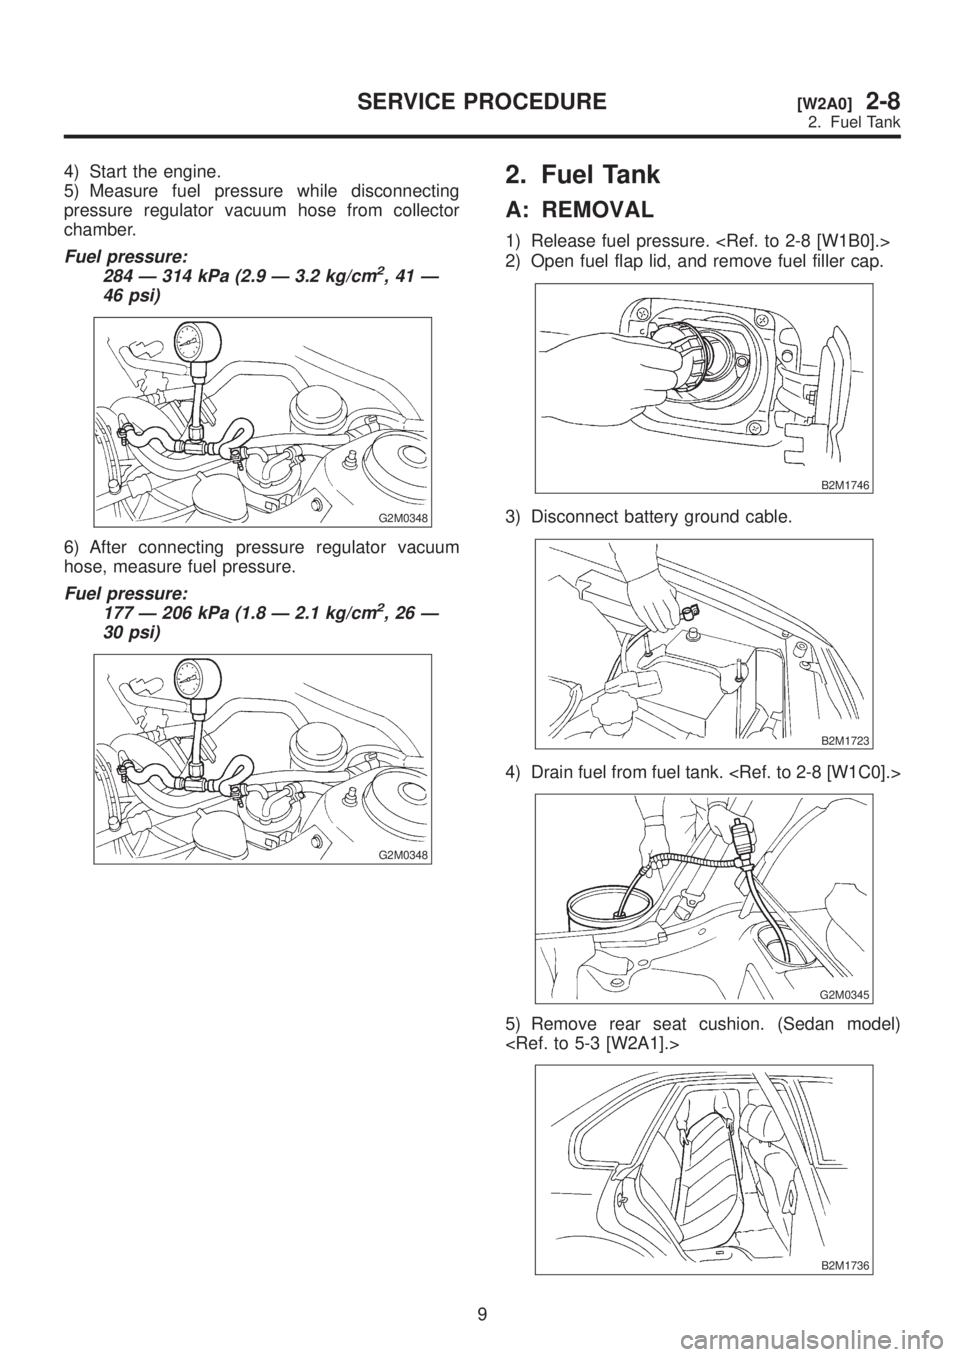
4) Start the engine.
5) Measure fuel pressure while disconnecting
pressure regulator vacuum hose from collector
chamber.
Fuel pressure:
284 Ð 314 kPa (2.9 Ð 3.2 kg/cm2,41Ð
46 psi)
G2M0348
6) After connecting pressure regulator vacuum
hose, measure fuel pressure.
Fuel pressure:
177 Ð 206 kPa (1.8 Ð 2.1 kg/cm2,26Ð
30 psi)
G2M0348
2. Fuel Tank
A: REMOVAL
1) Release fuel pressure.
2) Open fuel flap lid, and remove fuel filler cap.
B2M1746
3) Disconnect battery ground cable.
B2M1723
4) Drain fuel from fuel tank.
G2M0345
5) Remove rear seat cushion. (Sedan model)
B2M1736
9
[W2A0]2-8SERVICE PROCEDURE
2. Fuel Tank
Page 371 of 1456
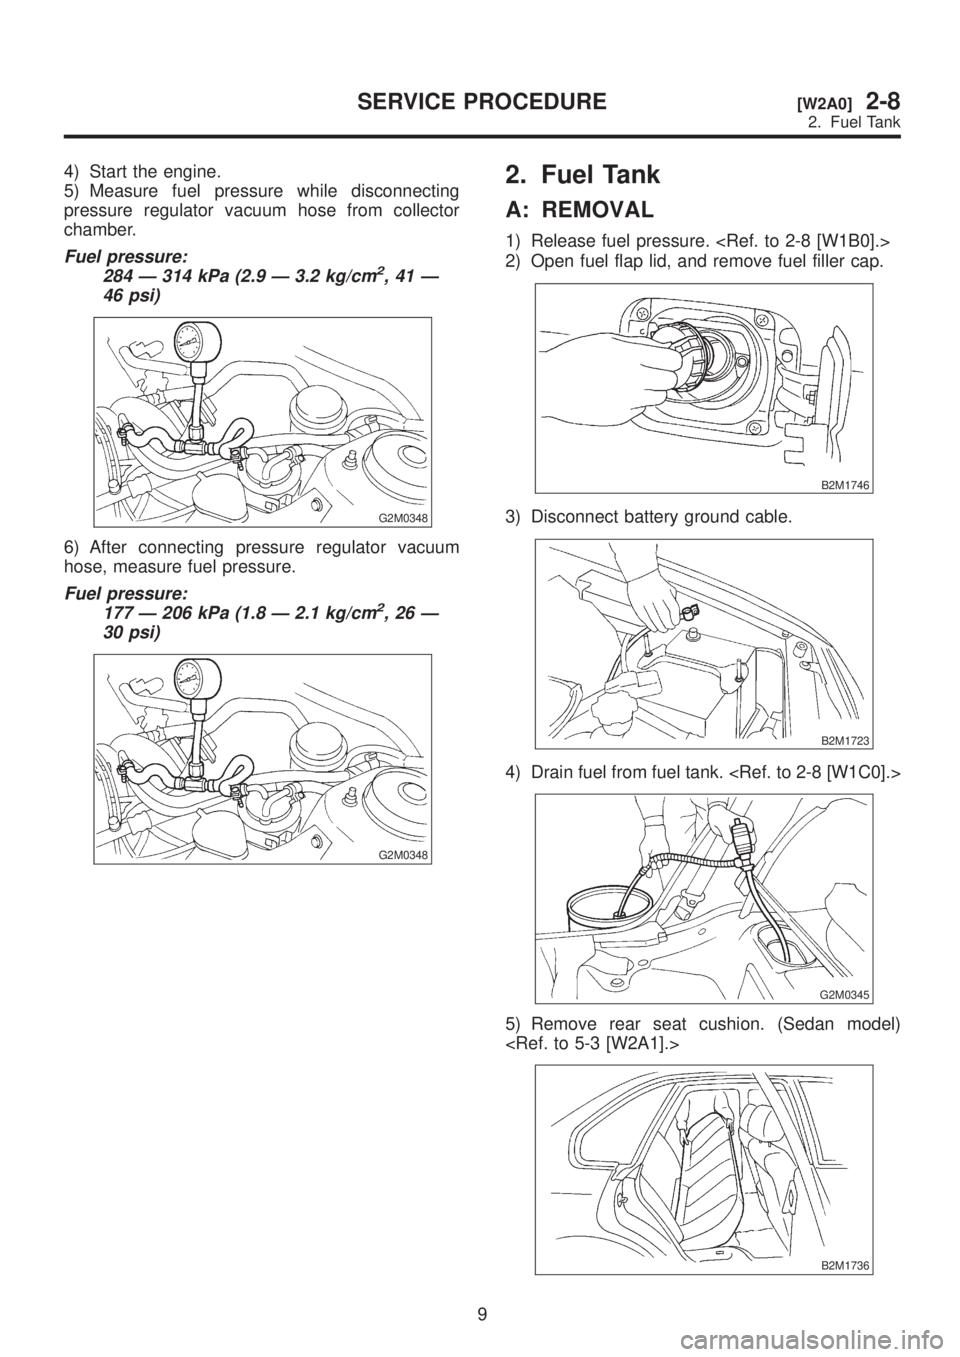
4) Start the engine.
5) Measure fuel pressure while disconnecting
pressure regulator vacuum hose from collector
chamber.
Fuel pressure:
284 Ð 314 kPa (2.9 Ð 3.2 kg/cm2,41Ð
46 psi)
G2M0348
6) After connecting pressure regulator vacuum
hose, measure fuel pressure.
Fuel pressure:
177 Ð 206 kPa (1.8 Ð 2.1 kg/cm2,26Ð
30 psi)
G2M0348
2. Fuel Tank
A: REMOVAL
1) Release fuel pressure.
2) Open fuel flap lid, and remove fuel filler cap.
B2M1746
3) Disconnect battery ground cable.
B2M1723
4) Drain fuel from fuel tank.
G2M0345
5) Remove rear seat cushion. (Sedan model)
B2M1736
9
[W2A0]2-8SERVICE PROCEDURE
2. Fuel Tank
Page 377 of 1456
18) Lower the vehicle.
19) Connect connectors to fuel tank harness, and
plug access hole with grommet.
B2M1738
20) Install rear seat cushion. (Sedan model)
to 5-3 [W2B1].>
B2M1736
21) Set rear seat cushion. (Wagon model)
B2M1737
22) Install fuel filler cap.
B2M1746
23) Install fuel pump, and connect connector and
fuel hoses.
B2M0047
24) Install fuel sub meter unit, and connect con-
nector and jet pump hose.
G2M0864
25) Connect battery ground cable.
B2M1723
15
[W2B0]2-8SERVICE PROCEDURE
2. Fuel Tank
Page 378 of 1456
3. Fuel Filler Pipe
A: REMOVAL
1) Release fuel pressure.
2) Open fuel flap lid, and remove fuel filler cap.
B2M1746
3) Disconnect battery ground cable.
B2M1723
4) Drain fuel from fuel tank.
G2M0345
5) Remove screws which install fuel filler pipe on
filler lid open.
B2M1747
6) Remove wheel nuts of rear right side.
7) Lift-up the vehicle.
8) Remove rear right side wheel.
B2M1748
9) Remove bolts which install protector cover on
body.
B2M1749
10) While releasing the under side of protector
cover from hook, remove it.
B2M1750A
11) Disconnect evaporation hoses from pipes.
B2M1751
16
2-8[W3A0]SERVICE PROCEDURE
3. Fuel Filler Pipe
Page 381 of 1456
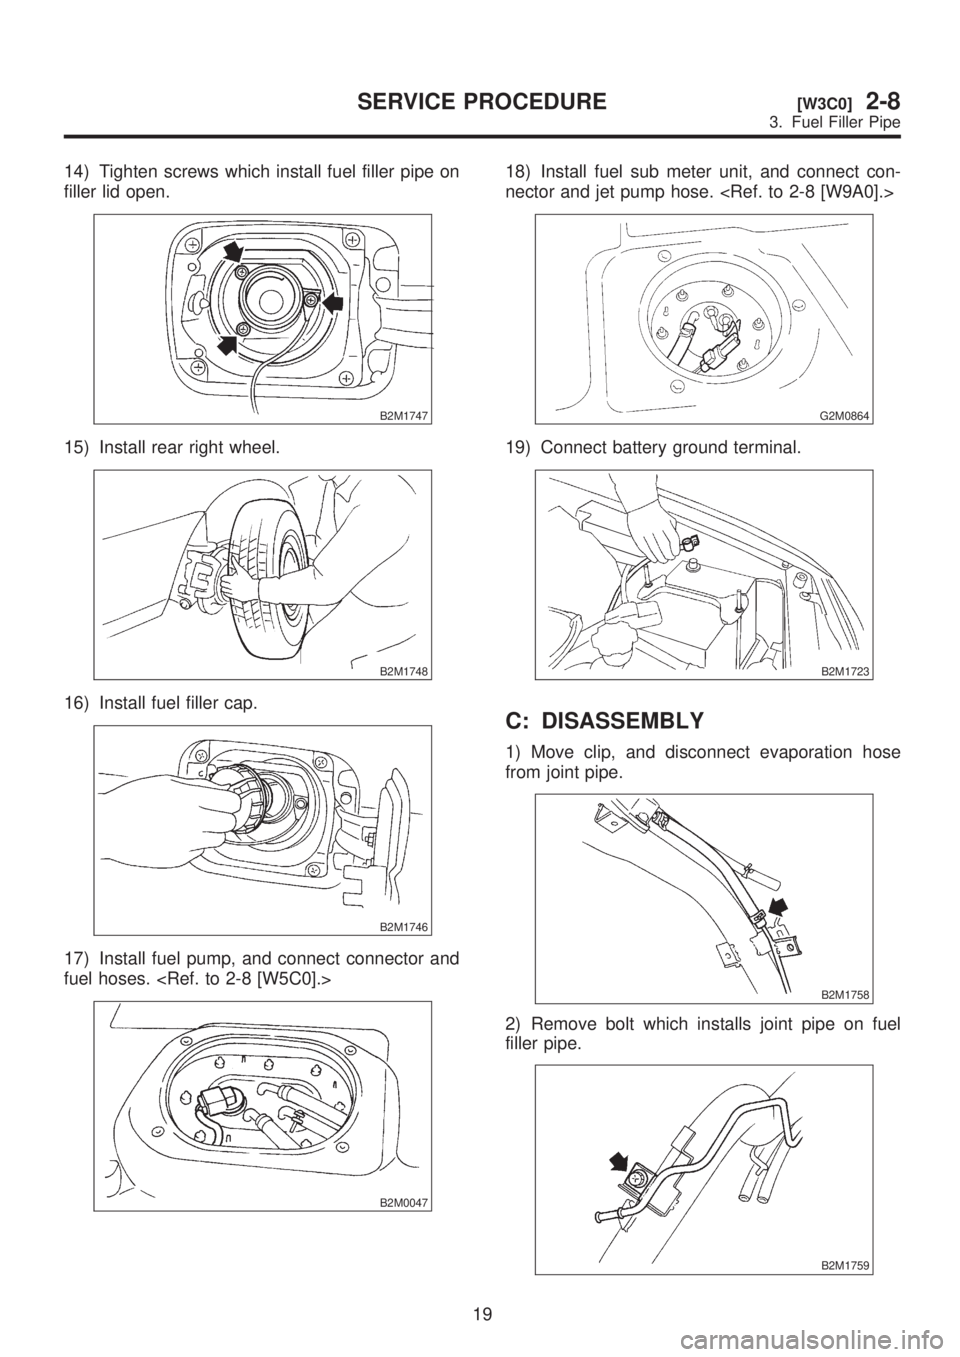
14) Tighten screws which install fuel filler pipe on
filler lid open.
B2M1747
15) Install rear right wheel.
B2M1748
16) Install fuel filler cap.
B2M1746
17) Install fuel pump, and connect connector and
fuel hoses.
B2M0047
18) Install fuel sub meter unit, and connect con-
nector and jet pump hose.
G2M0864
19) Connect battery ground terminal.
B2M1723
C: DISASSEMBLY
1) Move clip, and disconnect evaporation hose
from joint pipe.
B2M1758
2) Remove bolt which installs joint pipe on fuel
filler pipe.
B2M1759
19
[W3C0]2-8SERVICE PROCEDURE
3. Fuel Filler Pipe
Page 387 of 1456
B: INSTALLATION
Installation is in the reverse order of removal. Do
the following:
(1) Always use new gaskets.
(2) Ensure sealing portion is free from fuel or for-
eign particles before installation.
(3) Tighten nuts in numerical sequence shown in
Figure to specified torque.
Tightening torque:
4.4
±1.5 N´m (0.45±0.15 kg-m, 3.3±1.1 ft-lb)
G2M0346
7. Fuel Delivery, Return and
Evaporation Lines
A: REMOVAL
1) Release fuel pressure.
2) Remove fuel filler cap.
3) Remove inner trim, insulator and rear seat.
4) Remove fuel delivery pipes and hoses, fuel
return pipes and hoses, and evaporation pipes and
hoses.
B2M1763C
5) In engine compartment, detach fuel delivery
hose, return hose and evaporation hose.
S2M0090A
23
[W7A0]2-8SERVICE PROCEDURE
7. Fuel Delivery, Return and Evaporation Lines
Page 388 of 1456
B: INSTALLATION
Installation is in the reverse order of removal. Do
the following:
(1) Always use new gaskets.
(2) Ensure sealing portion is free from fuel or for-
eign particles before installation.
(3) Tighten nuts in numerical sequence shown in
Figure to specified torque.
Tightening torque:
4.4
±1.5 N´m (0.45±0.15 kg-m, 3.3±1.1 ft-lb)
G2M0346
7. Fuel Delivery, Return and
Evaporation Lines
A: REMOVAL
1) Release fuel pressure.
2) Remove fuel filler cap.
3) Remove inner trim, insulator and rear seat.
4) Remove fuel delivery pipes and hoses, fuel
return pipes and hoses, and evaporation pipes and
hoses.
B2M1763C
5) In engine compartment, detach fuel delivery
hose, return hose and evaporation hose.
S2M0090A
23
[W7A0]2-8SERVICE PROCEDURE
7. Fuel Delivery, Return and Evaporation Lines
Page 1226 of 1456
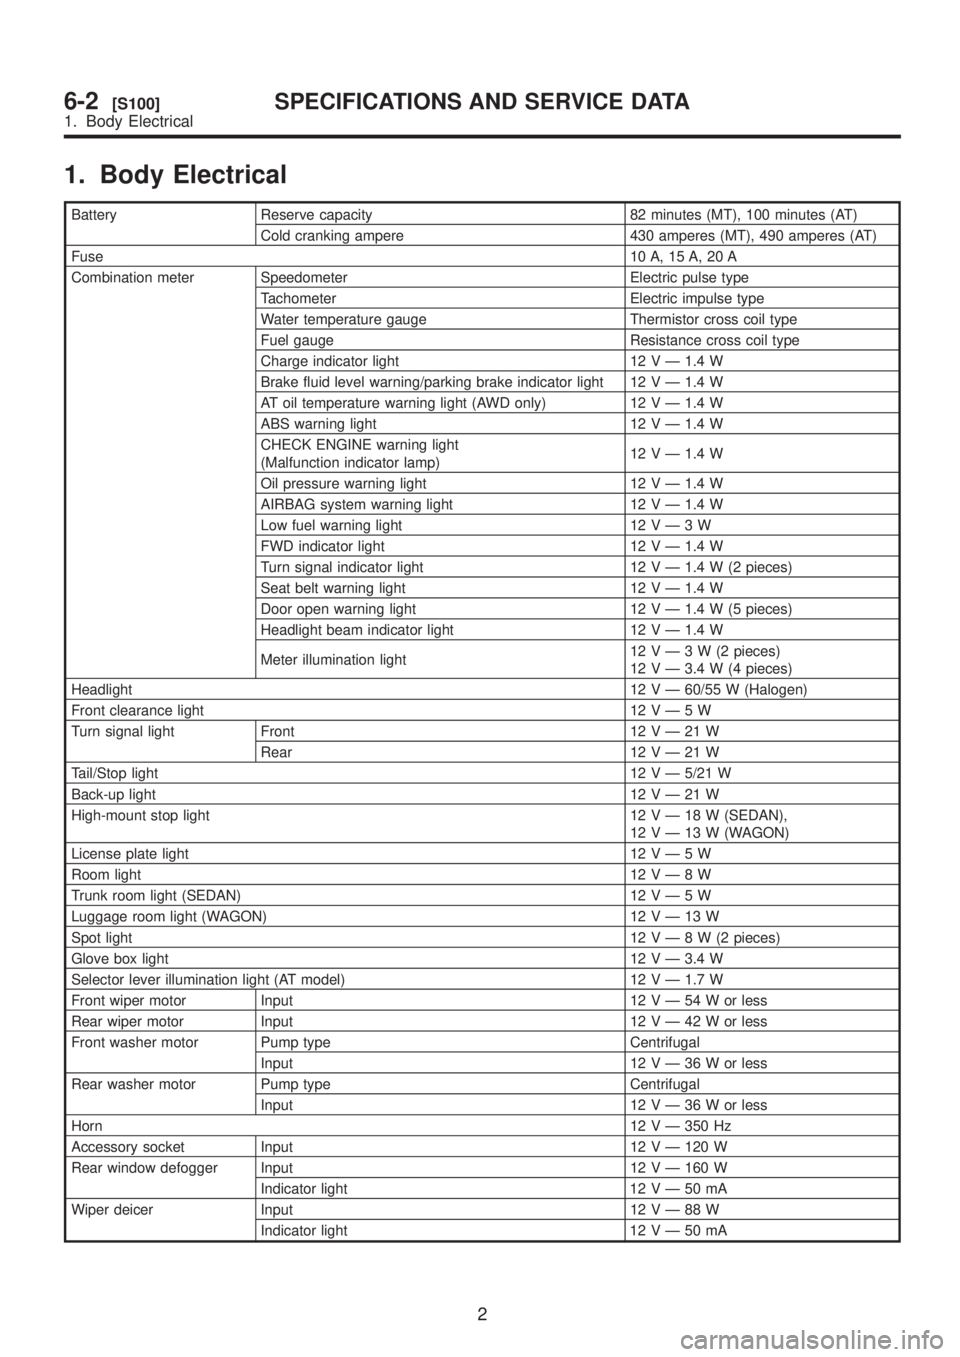
1. Body Electrical
Battery Reserve capacity 82 minutes (MT), 100 minutes (AT)
Cold cranking ampere 430 amperes (MT), 490 amperes (AT)
Fuse10 A, 15 A, 20 A
Combination meter Speedometer Electric pulse type
Tachometer Electric impulse type
Water temperature gauge Thermistor cross coil type
Fuel gauge Resistance cross coil type
Charge indicator light 12 V Ð 1.4 W
Brake fluid level warning/parking brake indicator light 12 V Ð 1.4 W
AT oil temperature warning light (AWD only) 12 V Ð 1.4 W
ABS warning light 12 V Ð 1.4 W
CHECK ENGINE warning light
(Malfunction indicator lamp)12 V Ð 1.4 W
Oil pressure warning light 12 V Ð 1.4 W
AIRBAG system warning light 12 V Ð 1.4 W
Low fuel warning light 12VÐ3W
FWD indicator light 12 V Ð 1.4 W
Turn signal indicator light 12 V Ð 1.4 W (2 pieces)
Seat belt warning light 12 V Ð 1.4 W
Door open warning light 12 V Ð 1.4 W (5 pieces)
Headlight beam indicator light 12 V Ð 1.4 W
Meter illumination light12VÐ3W(2pieces)
12 V Ð 3.4 W (4 pieces)
Headlight12 V Ð 60/55 W (Halogen)
Front clearance light 12VÐ5W
Turn signal light Front 12VÐ21W
Rear 12VÐ21W
Tail/Stop light12 V Ð 5/21 W
Back-up light12VÐ21W
High-mount stop light 12VÐ18W(SEDAN),
12VÐ13W(WAGON)
License plate light 12VÐ5W
Room light12VÐ8W
Trunk room light (SEDAN) 12VÐ5W
Luggage room light (WAGON) 12VÐ13W
Spot light12VÐ8W(2pieces)
Glove box light 12 V Ð 3.4 W
Selector lever illumination light (AT model) 12 V Ð 1.7 W
Front wiper motor Input 12VÐ54Worless
Rear wiper motor Input 12VÐ42Worless
Front washer motor Pump type Centrifugal
Input 12VÐ36Worless
Rear washer motor Pump type Centrifugal
Input 12VÐ36Worless
Horn12 V Ð 350 Hz
Accessory socket Input 12 V Ð 120 W
Rear window defogger Input 12 V Ð 160 W
Indicator light 12VÐ50mA
Wiper deicer Input 12VÐ88W
Indicator light 12VÐ50mA
2
6-2[S100]SPECIFICATIONS AND SERVICE DATA
1. Body Electrical