Page 936 of 1456
4. CONDITIONS FOR ABS SEQUENCE CONTROL
B4M1001A
NOTE:
IWhen select monitor is used, control operation
starts at point A. The patterns from IGN key ON to
the point A show that operation is started by diag-
nosis connector.
IHIGH means high voltage.
ILOW means low voltage.
59
[W15D4]4-4SERVICE PROCEDURE
15. ABS Control Module and Hydraulic Control Unit (ABSCM&H/U)
Page 997 of 1456
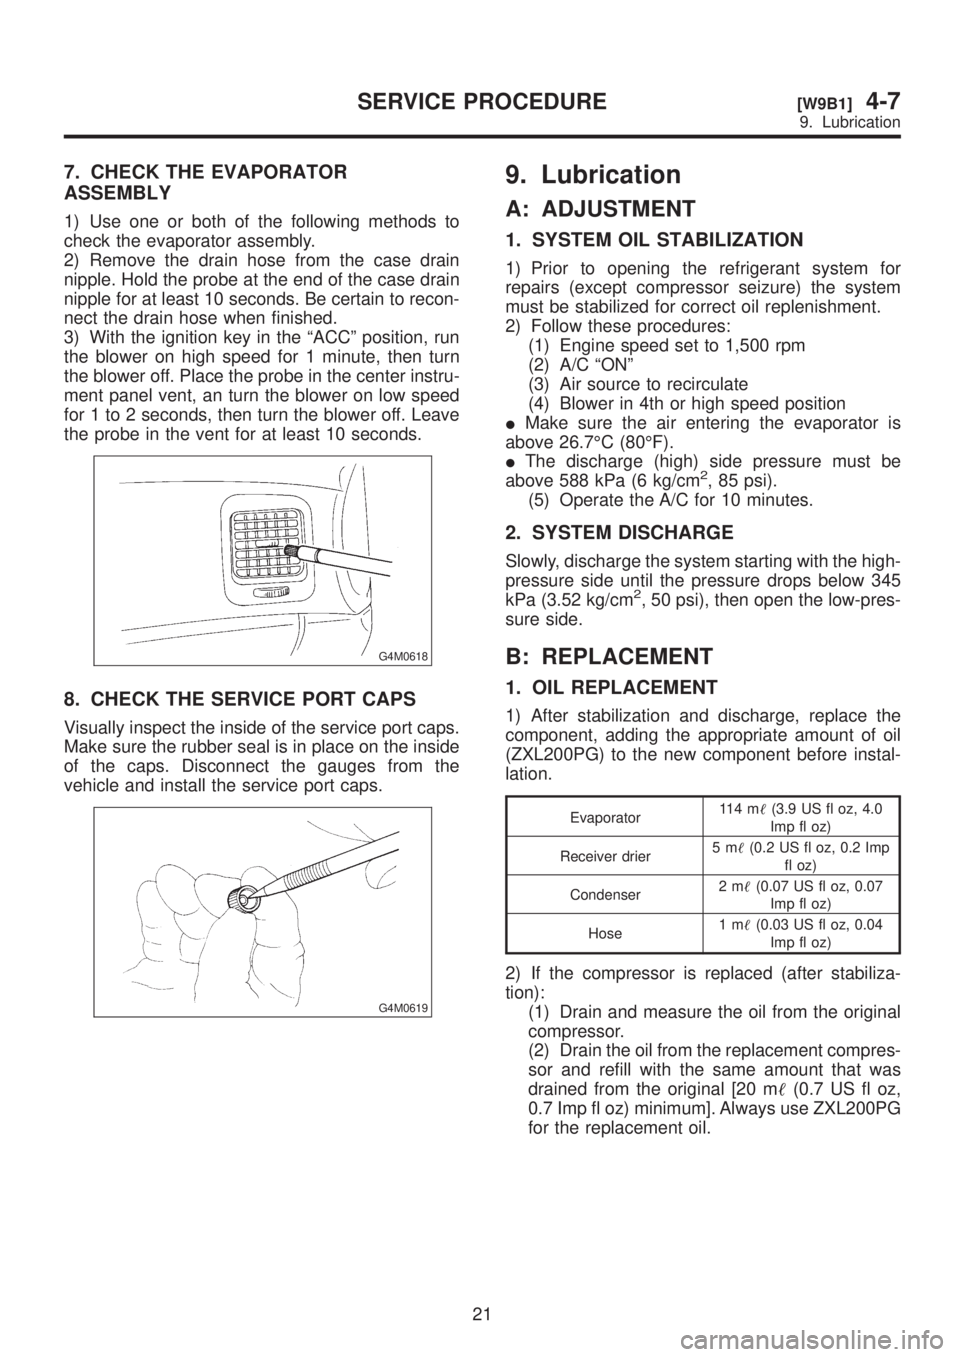
7. CHECK THE EVAPORATOR
ASSEMBLY
1) Use one or both of the following methods to
check the evaporator assembly.
2) Remove the drain hose from the case drain
nipple. Hold the probe at the end of the case drain
nipple for at least 10 seconds. Be certain to recon-
nect the drain hose when finished.
3) With the ignition key in the ªACCº position, run
the blower on high speed for 1 minute, then turn
the blower off. Place the probe in the center instru-
ment panel vent, an turn the blower on low speed
for 1 to 2 seconds, then turn the blower off. Leave
the probe in the vent for at least 10 seconds.
G4M0618
8. CHECK THE SERVICE PORT CAPS
Visually inspect the inside of the service port caps.
Make sure the rubber seal is in place on the inside
of the caps. Disconnect the gauges from the
vehicle and install the service port caps.
G4M0619
9. Lubrication
A: ADJUSTMENT
1. SYSTEM OIL STABILIZATION
1) Prior to opening the refrigerant system for
repairs (except compressor seizure) the system
must be stabilized for correct oil replenishment.
2) Follow these procedures:
(1) Engine speed set to 1,500 rpm
(2) A/C ªONº
(3) Air source to recirculate
(4) Blower in 4th or high speed position
IMake sure the air entering the evaporator is
above 26.7ÉC (80ÉF).
IThe discharge (high) side pressure must be
above 588 kPa (6 kg/cm
2, 85 psi).
(5) Operate the A/C for 10 minutes.
2. SYSTEM DISCHARGE
Slowly, discharge the system starting with the high-
pressure side until the pressure drops below 345
kPa (3.52 kg/cm
2, 50 psi), then open the low-pres-
sure side.
B: REPLACEMENT
1. OIL REPLACEMENT
1) After stabilization and discharge, replace the
component, adding the appropriate amount of oil
(ZXL200PG) to the new component before instal-
lation.
Evaporator11 4 m(3.9 US fl oz, 4.0
Imp fl oz)
Receiver drier5m(0.2 US fl oz, 0.2 Imp
fl oz)
Condenser2m(0.07 US fl oz, 0.07
Imp fl oz)
Hose1m(0.03 US fl oz, 0.04
Imp fl oz)
2) If the compressor is replaced (after stabiliza-
tion):
(1) Drain and measure the oil from the original
compressor.
(2) Drain the oil from the replacement compres-
sor and refill with the same amount that was
drained from the original [20 m(0.7 US fl oz,
0.7 Imp fl oz) minimum]. Always use ZXL200PG
for the replacement oil.
21
[W9B1]4-7SERVICE PROCEDURE
9. Lubrication
Page 998 of 1456
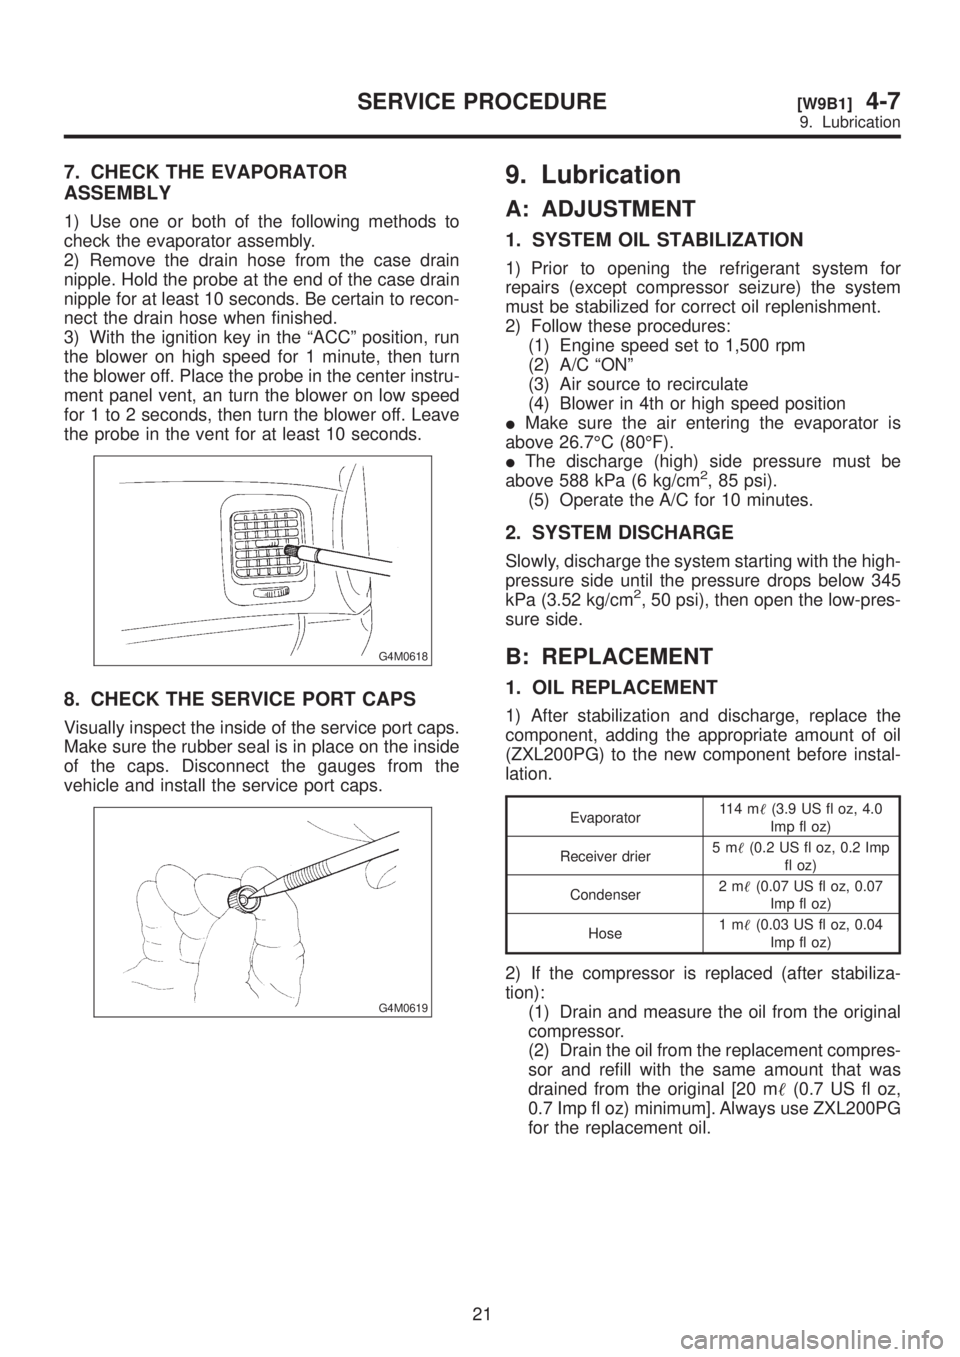
7. CHECK THE EVAPORATOR
ASSEMBLY
1) Use one or both of the following methods to
check the evaporator assembly.
2) Remove the drain hose from the case drain
nipple. Hold the probe at the end of the case drain
nipple for at least 10 seconds. Be certain to recon-
nect the drain hose when finished.
3) With the ignition key in the ªACCº position, run
the blower on high speed for 1 minute, then turn
the blower off. Place the probe in the center instru-
ment panel vent, an turn the blower on low speed
for 1 to 2 seconds, then turn the blower off. Leave
the probe in the vent for at least 10 seconds.
G4M0618
8. CHECK THE SERVICE PORT CAPS
Visually inspect the inside of the service port caps.
Make sure the rubber seal is in place on the inside
of the caps. Disconnect the gauges from the
vehicle and install the service port caps.
G4M0619
9. Lubrication
A: ADJUSTMENT
1. SYSTEM OIL STABILIZATION
1) Prior to opening the refrigerant system for
repairs (except compressor seizure) the system
must be stabilized for correct oil replenishment.
2) Follow these procedures:
(1) Engine speed set to 1,500 rpm
(2) A/C ªONº
(3) Air source to recirculate
(4) Blower in 4th or high speed position
IMake sure the air entering the evaporator is
above 26.7ÉC (80ÉF).
IThe discharge (high) side pressure must be
above 588 kPa (6 kg/cm
2, 85 psi).
(5) Operate the A/C for 10 minutes.
2. SYSTEM DISCHARGE
Slowly, discharge the system starting with the high-
pressure side until the pressure drops below 345
kPa (3.52 kg/cm
2, 50 psi), then open the low-pres-
sure side.
B: REPLACEMENT
1. OIL REPLACEMENT
1) After stabilization and discharge, replace the
component, adding the appropriate amount of oil
(ZXL200PG) to the new component before instal-
lation.
Evaporator11 4 m(3.9 US fl oz, 4.0
Imp fl oz)
Receiver drier5m(0.2 US fl oz, 0.2 Imp
fl oz)
Condenser2m(0.07 US fl oz, 0.07
Imp fl oz)
Hose1m(0.03 US fl oz, 0.04
Imp fl oz)
2) If the compressor is replaced (after stabiliza-
tion):
(1) Drain and measure the oil from the original
compressor.
(2) Drain the oil from the replacement compres-
sor and refill with the same amount that was
drained from the original [20 m(0.7 US fl oz,
0.7 Imp fl oz) minimum]. Always use ZXL200PG
for the replacement oil.
21
[W9B1]4-7SERVICE PROCEDURE
9. Lubrication
Page 1062 of 1456
2. Trunk Lid
A: REMOVAL AND INSTALLATION
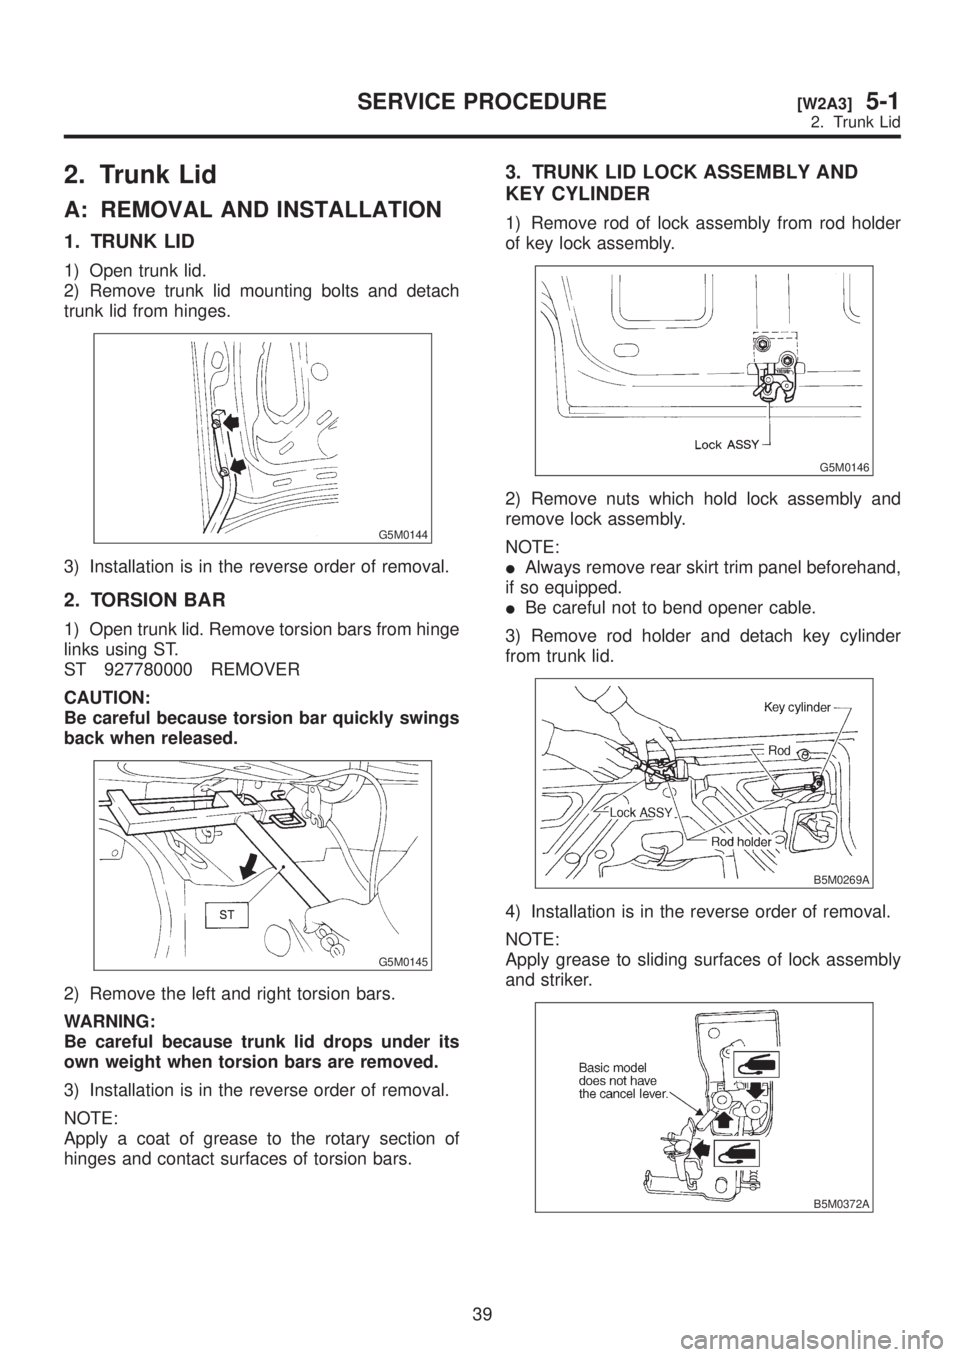
1. TRUNK LID
1) Open trunk lid.
2) Remove trunk lid mounting bolts and detach
trunk lid from hinges.
G5M0144
3) Installation is in the reverse order of removal.
2. TORSION BAR
1) Open trunk lid. Remove torsion bars from hinge
links using ST.
ST 927780000 REMOVER
CAUTION:
Be careful because torsion bar quickly swings
back when released.
G5M0145
2) Remove the left and right torsion bars.
WARNING:
Be careful because trunk lid drops under its
own weight when torsion bars are removed.
3) Installation is in the reverse order of removal.
NOTE:
Apply a coat of grease to the rotary section of
hinges and contact surfaces of torsion bars.
3. TRUNK LID LOCK ASSEMBLY AND
KEY CYLINDER
1) Remove rod of lock assembly from rod holder
of key lock assembly.
G5M0146
2) Remove nuts which hold lock assembly and
remove lock assembly.
NOTE:
IAlways remove rear skirt trim panel beforehand,
if so equipped.
IBe careful not to bend opener cable.
3) Remove rod holder and detach key cylinder
from trunk lid.
B5M0269A
4) Installation is in the reverse order of removal.
NOTE:
Apply grease to sliding surfaces of lock assembly
and striker.
B5M0372A
39
[W2A3]5-1SERVICE PROCEDURE
2. Trunk Lid
Page 1107 of 1456
6. Rear Gate and Glass
B5M0056B
(1) Rear gate
(2) Key cylinder
(3) Outer handle
(4) Door lock actuator
(5) Striker
(6) Latch
(7) Glass pin(8) Glass
(9) Buffer
(10) Stopper
(11) Gas stay
(12) Hinge
(13) Rear gate handleTightening torque: N´m (kg-m, ft-lb)
T1:
4.4±1.5 (0.45±0.15, 3.3±1.1)
T2:7.4±2.0 (0.75±0.2, 5.4±1.4)
T3:13±3 (1.3±0.3, 9.4±2.2)
T4:14±4 (1.4±0.4, 10.1±2.9)
T5:25±5 (2.5±0.5, 18.1±3.6)
8
5-2[C600]COMPONENT PARTS
6. Rear Gate and Glass
Page 1116 of 1456
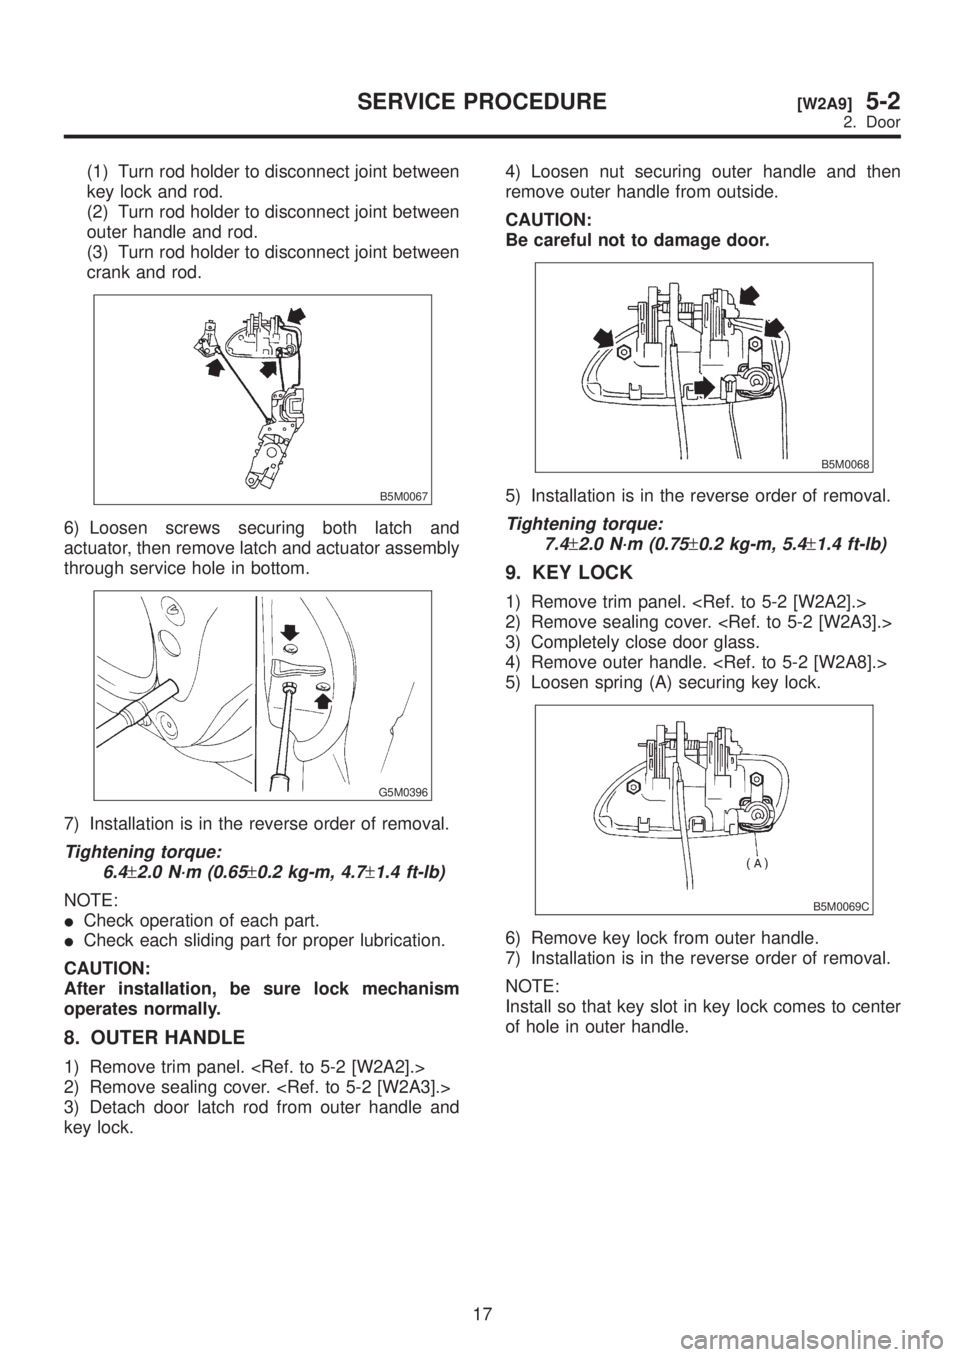
(1) Turn rod holder to disconnect joint between
key lock and rod.
(2) Turn rod holder to disconnect joint between
outer handle and rod.
(3) Turn rod holder to disconnect joint between
crank and rod.
B5M0067
6) Loosen screws securing both latch and
actuator, then remove latch and actuator assembly
through service hole in bottom.
G5M0396
7) Installation is in the reverse order of removal.
Tightening torque:
6.4
±2.0 N´m (0.65±0.2 kg-m, 4.7±1.4 ft-lb)
NOTE:
ICheck operation of each part.
ICheck each sliding part for proper lubrication.
CAUTION:
After installation, be sure lock mechanism
operates normally.
8. OUTER HANDLE
1) Remove trim panel.
2) Remove sealing cover.
3) Detach door latch rod from outer handle and
key lock.4) Loosen nut securing outer handle and then
remove outer handle from outside.
CAUTION:
Be careful not to damage door.
B5M0068
5) Installation is in the reverse order of removal.
Tightening torque:
7.4
±2.0 N´m (0.75±0.2 kg-m, 5.4±1.4 ft-lb)
9. KEY LOCK
1) Remove trim panel.
2) Remove sealing cover.
3) Completely close door glass.
4) Remove outer handle.
5) Loosen spring (A) securing key lock.
B5M0069C
6) Remove key lock from outer handle.
7) Installation is in the reverse order of removal.
NOTE:
Install so that key slot in key lock comes to center
of hole in outer handle.
17
[W2A9]5-2SERVICE PROCEDURE
2. Door
Page 1123 of 1456
5. REAR DOOR GLASS
Alignment of rear door glass is basically the same as for the front door glass. Due to slight difference in
adjustment dimensions for fore-aft, up-down, and in-out alignments, key points for rear door adjustment are
described.
B5M0078B
24
5-2[W2B5]SERVICE PROCEDURE
2. Door
Page 1126 of 1456
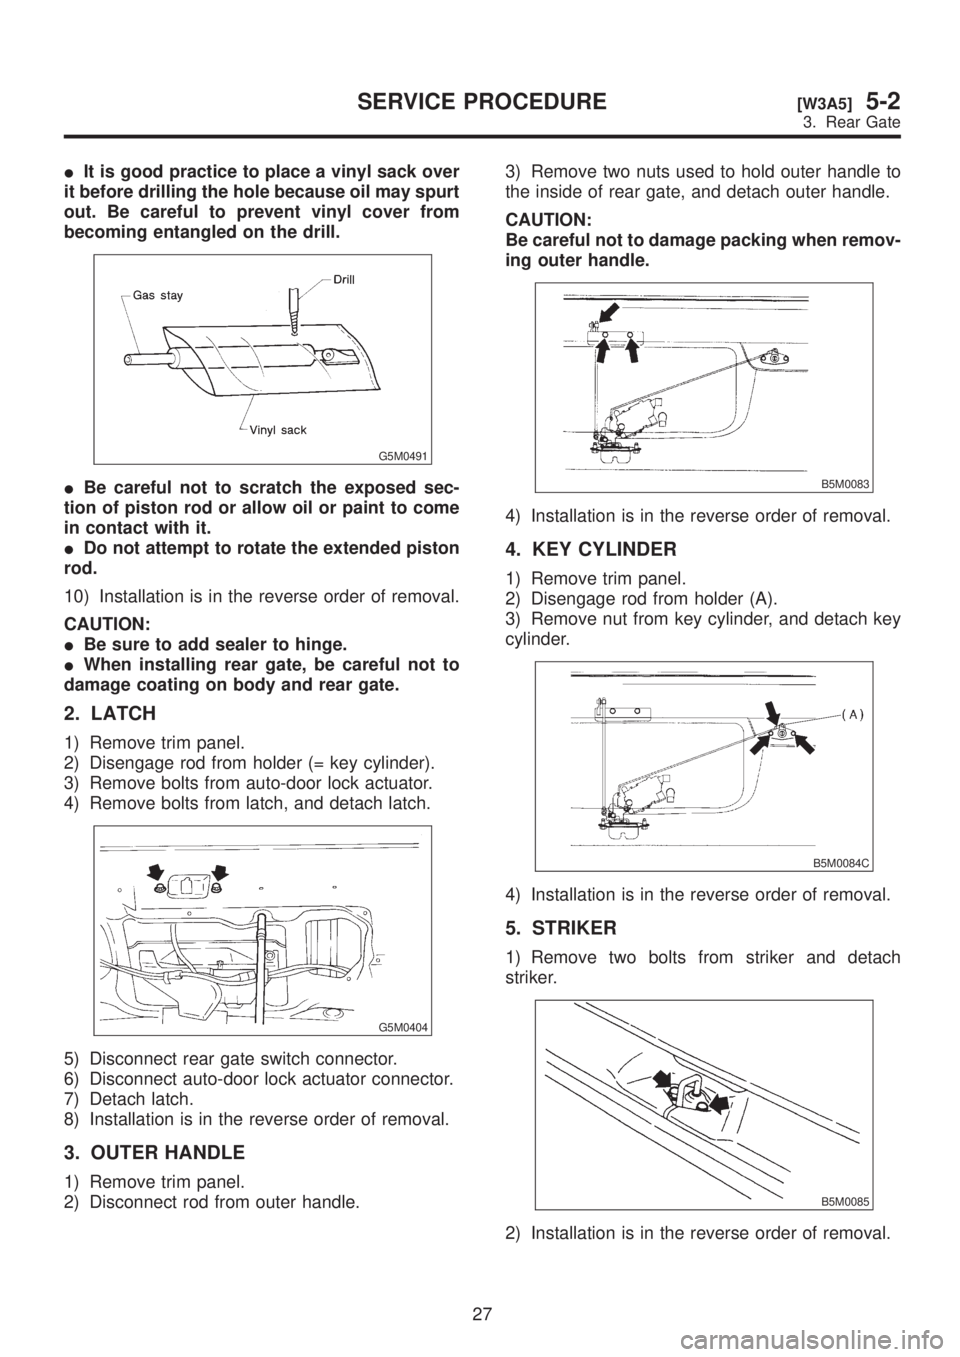
IIt is good practice to place a vinyl sack over
it before drilling the hole because oil may spurt
out. Be careful to prevent vinyl cover from
becoming entangled on the drill.
G5M0491
IBe careful not to scratch the exposed sec-
tion of piston rod or allow oil or paint to come
in contact with it.
IDo not attempt to rotate the extended piston
rod.
10) Installation is in the reverse order of removal.
CAUTION:
IBe sure to add sealer to hinge.
IWhen installing rear gate, be careful not to
damage coating on body and rear gate.
2. LATCH
1) Remove trim panel.
2) Disengage rod from holder (= key cylinder).
3) Remove bolts from auto-door lock actuator.
4) Remove bolts from latch, and detach latch.
G5M0404
5) Disconnect rear gate switch connector.
6) Disconnect auto-door lock actuator connector.
7) Detach latch.
8) Installation is in the reverse order of removal.
3. OUTER HANDLE
1) Remove trim panel.
2) Disconnect rod from outer handle.3) Remove two nuts used to hold outer handle to
the inside of rear gate, and detach outer handle.
CAUTION:
Be careful not to damage packing when remov-
ing outer handle.
B5M0083
4) Installation is in the reverse order of removal.
4. KEY CYLINDER
1) Remove trim panel.
2) Disengage rod from holder (A).
3) Remove nut from key cylinder, and detach key
cylinder.
B5M0084C
4) Installation is in the reverse order of removal.
5. STRIKER
1) Remove two bolts from striker and detach
striker.
B5M0085
2) Installation is in the reverse order of removal.
27
[W3A5]5-2SERVICE PROCEDURE
3. Rear Gate


