Page 417 of 1456

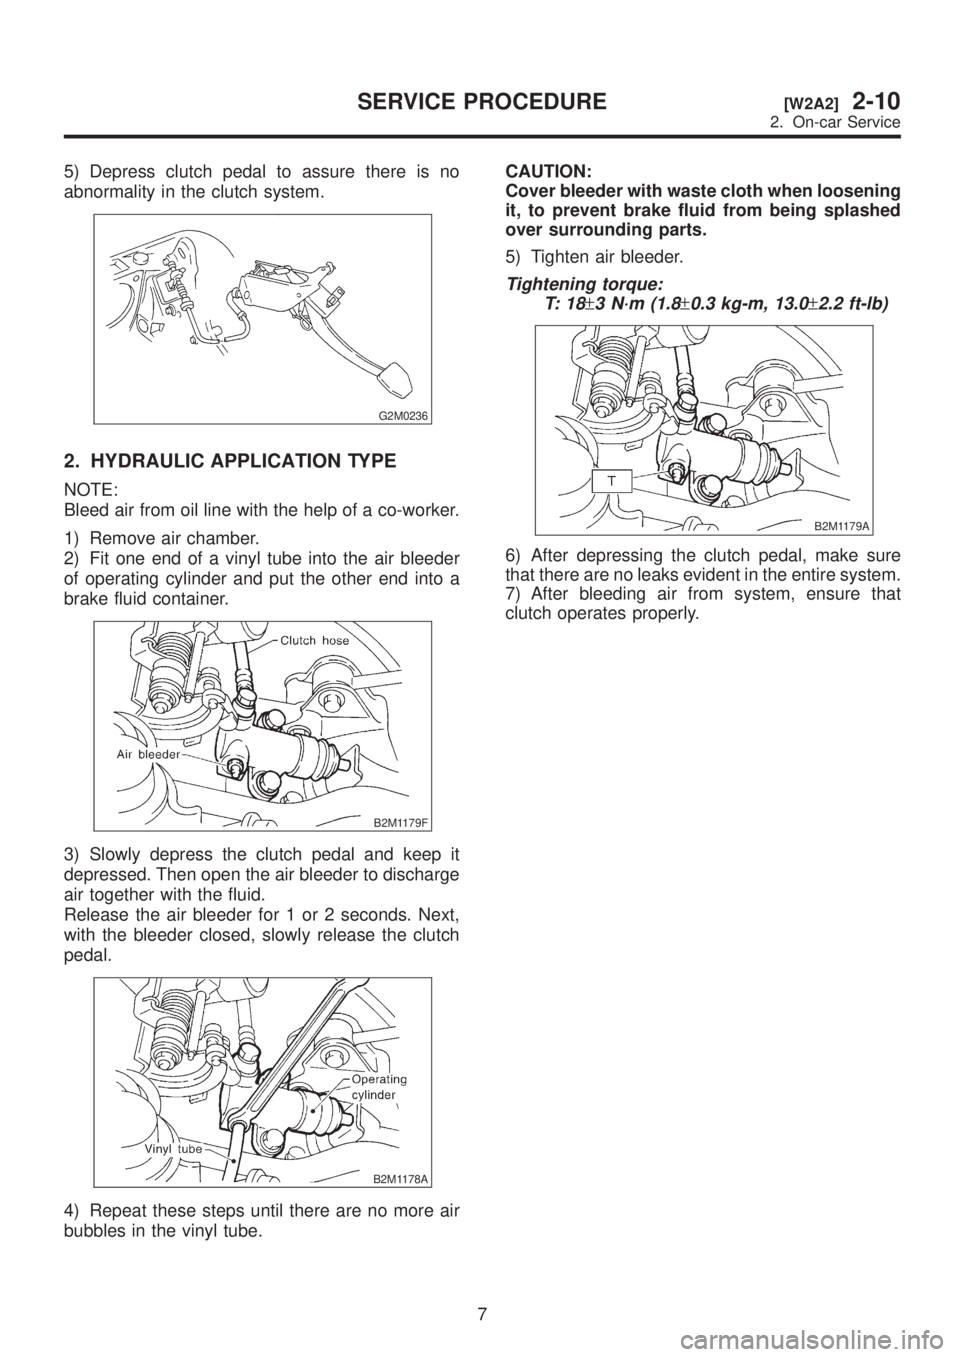
5) Depress clutch pedal to assure there is no
abnormality in the clutch system.
G2M0236
2. HYDRAULIC APPLICATION TYPE
NOTE:
Bleed air from oil line with the help of a co-worker.
1) Remove air chamber.
2) Fit one end of a vinyl tube into the air bleeder
of operating cylinder and put the other end into a
brake fluid container.
B2M1179F
3) Slowly depress the clutch pedal and keep it
depressed. Then open the air bleeder to discharge
air together with the fluid.
Release the air bleeder for 1 or 2 seconds. Next,
with the bleeder closed, slowly release the clutch
pedal.
B2M1178A
4) Repeat these steps until there are no more air
bubbles in the vinyl tube.CAUTION:
Cover bleeder with waste cloth when loosening
it, to prevent brake fluid from being splashed
over surrounding parts.
5) Tighten air bleeder.
Tightening torque:
T: 1 8
±3 N´m (1.8±0.3 kg-m, 13.0±2.2 ft-lb)
B2M1179A
6) After depressing the clutch pedal, make sure
that there are no leaks evident in the entire system.
7) After bleeding air from system, ensure that
clutch operates properly.
7
[W2A2]2-10SERVICE PROCEDURE
2. On-car Service
Page 652 of 1456
2. Rear Differential
A: SPECIFICATIONS
Type of gearHypoid
MT AT
2200 cc 2500 cc 2200 cc 2500 cc
Gear ratio (Number of gear teeth) 3.900 (39/10) 4.111 (37/9) 4.111 (37/9) 4.444 (40/9)
Oil capacity 0.8(0.8 US qt, 0.7 Imp qt)
Rear differential gear oil GL-5
B: IDENTIFICATION
When replacing a rear differential assembly, select
the correct one according to the following table.
CAUTION:
Using the different rear differential assembly
causes the drive line and tires to ªdragº or emit
abnormal noise when AWD is selected.
H3M1662A
Gear ratio Stamp or label on rear differential
2200 cc MT 3.900
B3M0124
2200 cc AT 4.111
H3M1159
3
[S2B0]3-4SPECIFICATIONS AND SERVICE DATA
2. Rear Differential
Page 735 of 1456
C: INSPECTION
Visually check lateral links for damage or bends.
D: ASSEMBLY
1) Using ST, press bushing into place.
CAUTION:
Select ST according to the type of bushings
used.
NOTE:
IUse the same ST as that used during disassem-
bly.
IIf it is difficult to press bushing into trailing link,
apply water-diluted TIRE LUBE to the inner surface
of ST as a lubricant. Specified lubricant:
Specified lubricant:
TIRE LUBE : water=1:3
G4M0533
2) Press ST plunger until bushing flange protrudes
beyond lateral link.
NOTE:
Use the same ST as that used during disassembly.
B4M0197A
3) Turn lateral link upside down. Press ST plunger
in the opposite direction that outlined in step 2)
until bushing is correctly positioned in trailing link.
NOTE:
Use the same ST as that used during disassembly.
B4M0198A
31
[W8D0]4-1SERVICE PROCEDURE
8. Lateral Link
Page 745 of 1456
1. Tire and Wheel Size
G4M0208
Tire size Rim size Rim offset
mm (in)P.C.D.
mm (in)
2200 cc modelFront and RearL
BRIGHTON
POSTP185/70R14 87S 14´5 1/2JJ 55 (2.17)
100 (3.94) dia. LS P195/60R15 87H 15´6JJ 55 (2.17)
T-type tire AWD T135/70D16 16´4T 50 (1.97)
2500 cc modelFront and RearGT P205/55R16 89H 16´6 1/2JJ 55 (2.17)
OUTBACK
SUSP205/70R15 95S 15´6JJ 55 (2.17)
T-type tireGT T135/70D16 16´4T 50 (1.97)
OUTBACK
SUST135/80R16 16´4T 50 (1.97)
NOTE: ªT-typeº tire for temporary use is supplied as a spare tire.
2. Tire Inflation Pressure
Tire sizeTire inflation pressure kPa (kg/cm
2, psi)
Light load Full load Trailler towing
Except OUTBACK and SUS modelP185/70R14 87S
P195/60R15 87H
P205/55R16 89HFt: 220 (2.2, 32)
Rr: 210 (2.1, 30)Ð
T135/70D16 420 (4.2, 60) Ð
OUTBACK and SUS modelP205/70R15 95SFt: 200 (2.0, 29)
Rr: 190 (1.9, 28)Ft: 200 (2.0, 29)
Rr: 220 (2.2, 32)
T135/80R16 420 (4.2, 60) Ð
2
4-2[S100]SPECIFICATIONS AND SERVICE DATA
1. Tire and Wheel Size
Page 746 of 1456
1. Tire and Wheel Size
G4M0208
Tire size Rim size Rim offset
mm (in)P.C.D.
mm (in)
2200 cc modelFront and RearL
BRIGHTON
POSTP185/70R14 87S 14´5 1/2JJ 55 (2.17)
100 (3.94) dia. LS P195/60R15 87H 15´6JJ 55 (2.17)
T-type tire AWD T135/70D16 16´4T 50 (1.97)
2500 cc modelFront and RearGT P205/55R16 89H 16´6 1/2JJ 55 (2.17)
OUTBACK
SUSP205/70R15 95S 15´6JJ 55 (2.17)
T-type tireGT T135/70D16 16´4T 50 (1.97)
OUTBACK
SUST135/80R16 16´4T 50 (1.97)
NOTE: ªT-typeº tire for temporary use is supplied as a spare tire.
2. Tire Inflation Pressure
Tire sizeTire inflation pressure kPa (kg/cm
2, psi)
Light load Full load Trailler towing
Except OUTBACK and SUS modelP185/70R14 87S
P195/60R15 87H
P205/55R16 89HFt: 220 (2.2, 32)
Rr: 210 (2.1, 30)Ð
T135/70D16 420 (4.2, 60) Ð
OUTBACK and SUS modelP205/70R15 95SFt: 200 (2.0, 29)
Rr: 190 (1.9, 28)Ft: 200 (2.0, 29)
Rr: 220 (2.2, 32)
T135/80R16 420 (4.2, 60) Ð
2
4-2[S100]SPECIFICATIONS AND SERVICE DATA
1. Tire and Wheel Size
Page 788 of 1456

8. Aluminum Wheel
A: INSPECTION
Inspection for aluminum wheels is basically the
same as the one for steel wheels. However, check
the rim flange for cracks or damage, and replace
(not repair) aluminum wheel if air leakage is found.
B: PRECAUTIONS
Aluminum wheels are easily scratched. To main-
tain their appearance and safety, do the following:
1) Do not damage aluminum wheels during
removal, disassembly, installation, wheel
balancing, etc. After removing aluminum wheels,
place them on a rubber mat, etc.
2) While vehicle is being driven, be careful not to
ride over sharp obstacles or allow aluminum
wheels to contact the shoulder of the road.
3) When installing tire chain, be sure to install it
properly not to have a slack; otherwise it may hit
wheel while driving.
4) When washing aluminum wheel, use neutral
synthetic detergent and water. Avoid using the
cleanser including abrasive, hard brushes or an
automatic car washer.
9. Wheel Balancing
1) Proper wheel balance may be lost if the tire is
repaired or if it wears. Check the tire for dynamic
balance, and repair as necessary.
2) To check for dynamic balance, use a dynamic
balancer. Drive in the balance weight on both the
top and rear sides of the rim.
3) Some types of balancer can cause damage to
the wheel. Use an appropriate balancer when
adjusting the wheel balance.
4) Use genuine balance weights.
CAUTION:
I55 g (1.94 oz) weight used with aluminum
wheel is not available.
IBalance weights are available for use with
any of 14- to 16-inch wheels.
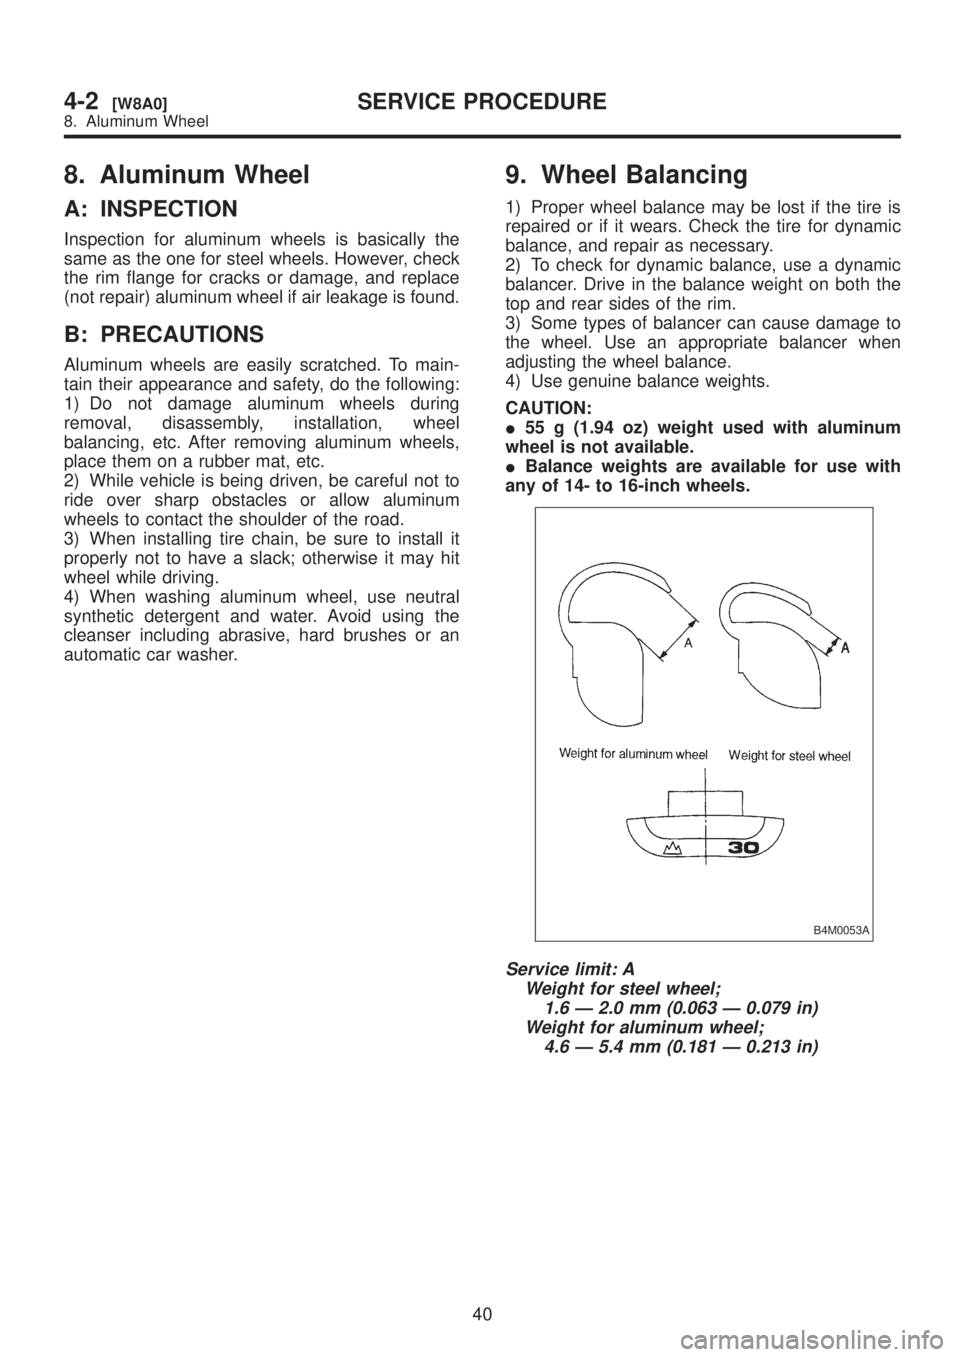
B4M0053A
Service limit: A
Weight for steel wheel;
1.6 Ð 2.0 mm (0.063 Ð 0.079 in)
Weight for aluminum wheel;
4.6 Ð 5.4 mm (0.181 Ð 0.213 in)
40
4-2[W8A0]SERVICE PROCEDURE
8. Aluminum Wheel
Page 789 of 1456

8. Aluminum Wheel
A: INSPECTION
Inspection for aluminum wheels is basically the
same as the one for steel wheels. However, check
the rim flange for cracks or damage, and replace
(not repair) aluminum wheel if air leakage is found.
B: PRECAUTIONS
Aluminum wheels are easily scratched. To main-
tain their appearance and safety, do the following:
1) Do not damage aluminum wheels during
removal, disassembly, installation, wheel
balancing, etc. After removing aluminum wheels,
place them on a rubber mat, etc.
2) While vehicle is being driven, be careful not to
ride over sharp obstacles or allow aluminum
wheels to contact the shoulder of the road.
3) When installing tire chain, be sure to install it
properly not to have a slack; otherwise it may hit
wheel while driving.
4) When washing aluminum wheel, use neutral
synthetic detergent and water. Avoid using the
cleanser including abrasive, hard brushes or an
automatic car washer.
9. Wheel Balancing
1) Proper wheel balance may be lost if the tire is
repaired or if it wears. Check the tire for dynamic
balance, and repair as necessary.
2) To check for dynamic balance, use a dynamic
balancer. Drive in the balance weight on both the
top and rear sides of the rim.
3) Some types of balancer can cause damage to
the wheel. Use an appropriate balancer when
adjusting the wheel balance.
4) Use genuine balance weights.
CAUTION:
I55 g (1.94 oz) weight used with aluminum
wheel is not available.
IBalance weights are available for use with
any of 14- to 16-inch wheels.
B4M0053A
Service limit: A
Weight for steel wheel;
1.6 Ð 2.0 mm (0.063 Ð 0.079 in)
Weight for aluminum wheel;
4.6 Ð 5.4 mm (0.181 Ð 0.213 in)
40
4-2[W8A0]SERVICE PROCEDURE
8. Aluminum Wheel
Page 792 of 1456
12. ªT-typeº Tire
ªT-typeº tire for temporary use is prepared as a
spare tire.
CAUTION:
IKeep the inflation pressure at 420 kPa (4.2
kg/cm
2, 60 psi) at all times.
IWhen the wear indicator appears on the
tread surface, replace the tire with a new one.
IDo not use a tire chain with the ªT-typeº tire.
Because of the smaller tire size, a tire chain will
not fit properly and will result in damage to the
vehicle and the tire.
IDo not drive at a speed greater than 80 km/h
(50 MPH).
IDrive as slowly as possible and avoid pass-
ing over bumps.
IReplace with a conventional tire as soon as
possible since this ªT-typeº tire is only for tem-
porary use.
42
4-2[W1200]SERVICE PROCEDURE
12. ªT-typeº Tire