Page 481 of 666
CAMSHAFT AND CAMSHAFT BEARING
SEM568AEM120
Unit: mm (in)
Standard Limit
Cam height (A)Intake 42.505 - 42.695 (1.673 - 1.681) Ð
Exhaust 40.905 - 41.095 (1.610 - 1.618) Ð
Wear limit of cam height Ð 0.2 (0.008)
Camshaft journal to bearing clearance 0.045 - 0.090 (0.0018 - 0.0035) 0.12 (0.0047)
Inner diameter of camshaft bearing#1 to #5
journals28.000 - 28.025 (1.1024 - 1.1033) Ð
Outer diameter of camshaft journal (D)#1 to #5
journals27.935 - 27.955 (1.0998 - 1.1006) Ð
Camshaft runout* Less than 0.02 (0.0008) 0.04 (0.0016)
Camshaft end play 0.070 - 0.148 (0.0028 - 0.0058) 0.2 (0.008)
Valve timing (Degree on crankshaft)a 216 Ð
b 232 Ð
cþ1 Ð
d53 Ð
e4 Ð
f32 Ð
* Total indicator reading
SERVICE DATA AND SPECIFICATIONS (SDS)KA24DE
Inspection and Adjustment (Cont'd)
EM-2053
Page 483 of 666

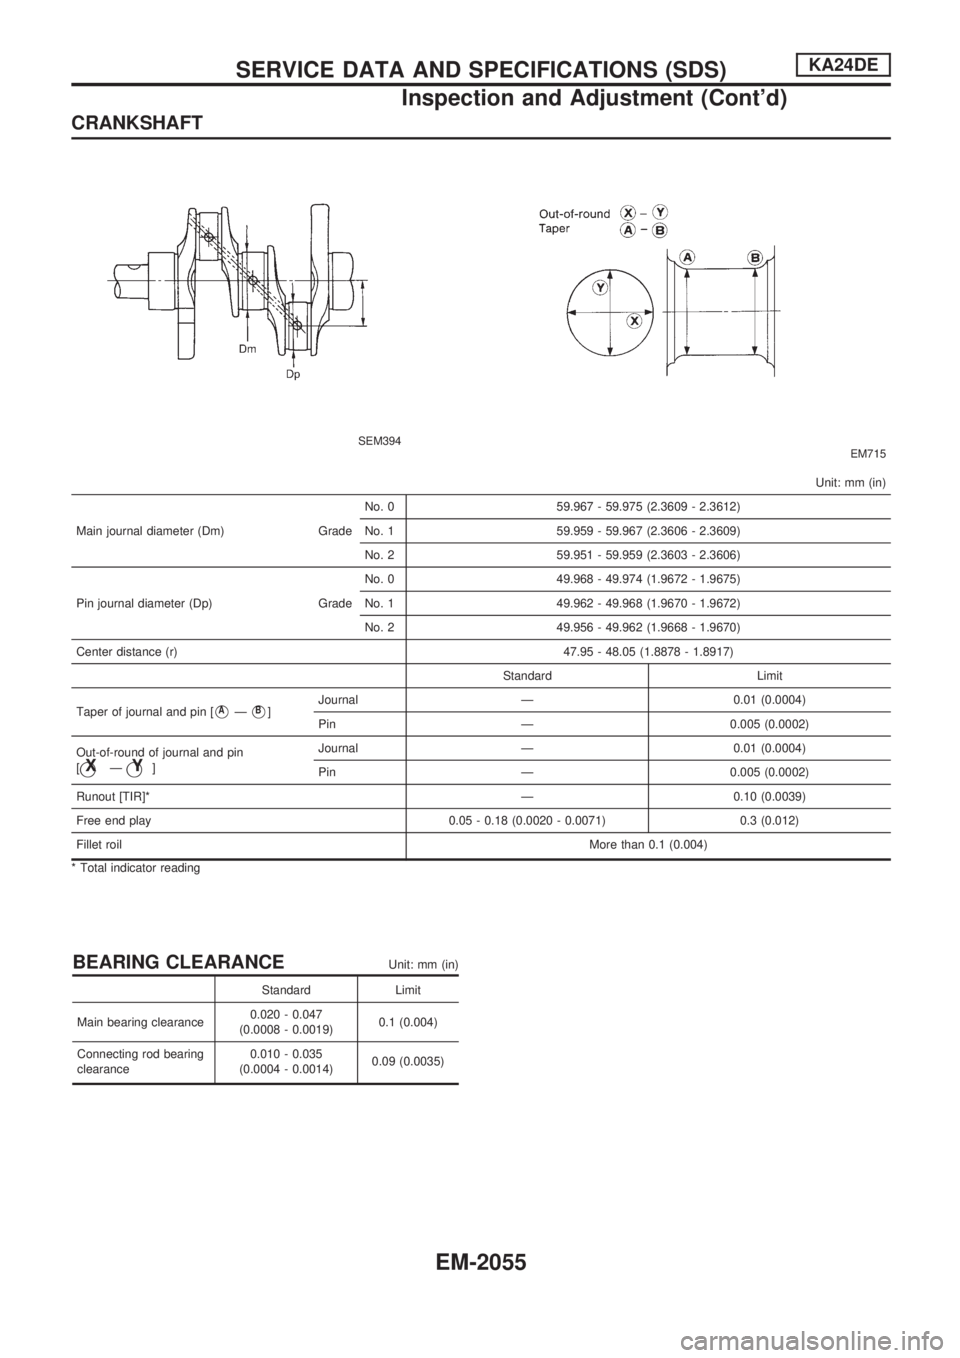
CRANKSHAFT
SEM394EM715
Unit: mm (in)
Main journal diameter (Dm) GradeNo. 0 59.967 - 59.975 (2.3609 - 2.3612)
No. 1 59.959 - 59.967 (2.3606 - 2.3609)
No. 2 59.951 - 59.959 (2.3603 - 2.3606)
Pin journal diameter (Dp) GradeNo. 0 49.968 - 49.974 (1.9672 - 1.9675)
No. 1 49.962 - 49.968 (1.9670 - 1.9672)
No. 2 49.956 - 49.962 (1.9668 - 1.9670)
Center distance (r) 47.95 - 48.05 (1.8878 - 1.8917)
Standard Limit
Taper of journal and pin [
VAÐVB]Journal Ð 0.01 (0.0004)
Pin Ð 0.005 (0.0002)
Out-of-round of journal and pin
[
jXÐjY]Journal Ð 0.01 (0.0004)
Pin Ð 0.005 (0.0002)
Runout [TIR]* Ð 0.10 (0.0039)
Free end play 0.05 - 0.18 (0.0020 - 0.0071) 0.3 (0.012)
Fillet roilMore than 0.1 (0.004)
* Total indicator reading
BEARING CLEARANCEUnit: mm (in)
Standard Limit
Main bearing clearance0.020 - 0.047
(0.0008 - 0.0019)0.1 (0.004)
Connecting rod bearing
clearance0.010 - 0.035
(0.0004 - 0.0014)0.09 (0.0035)
SERVICE DATA AND SPECIFICATIONS (SDS)KA24DE
Inspection and Adjustment (Cont'd)
EM-2055
Page 484 of 666

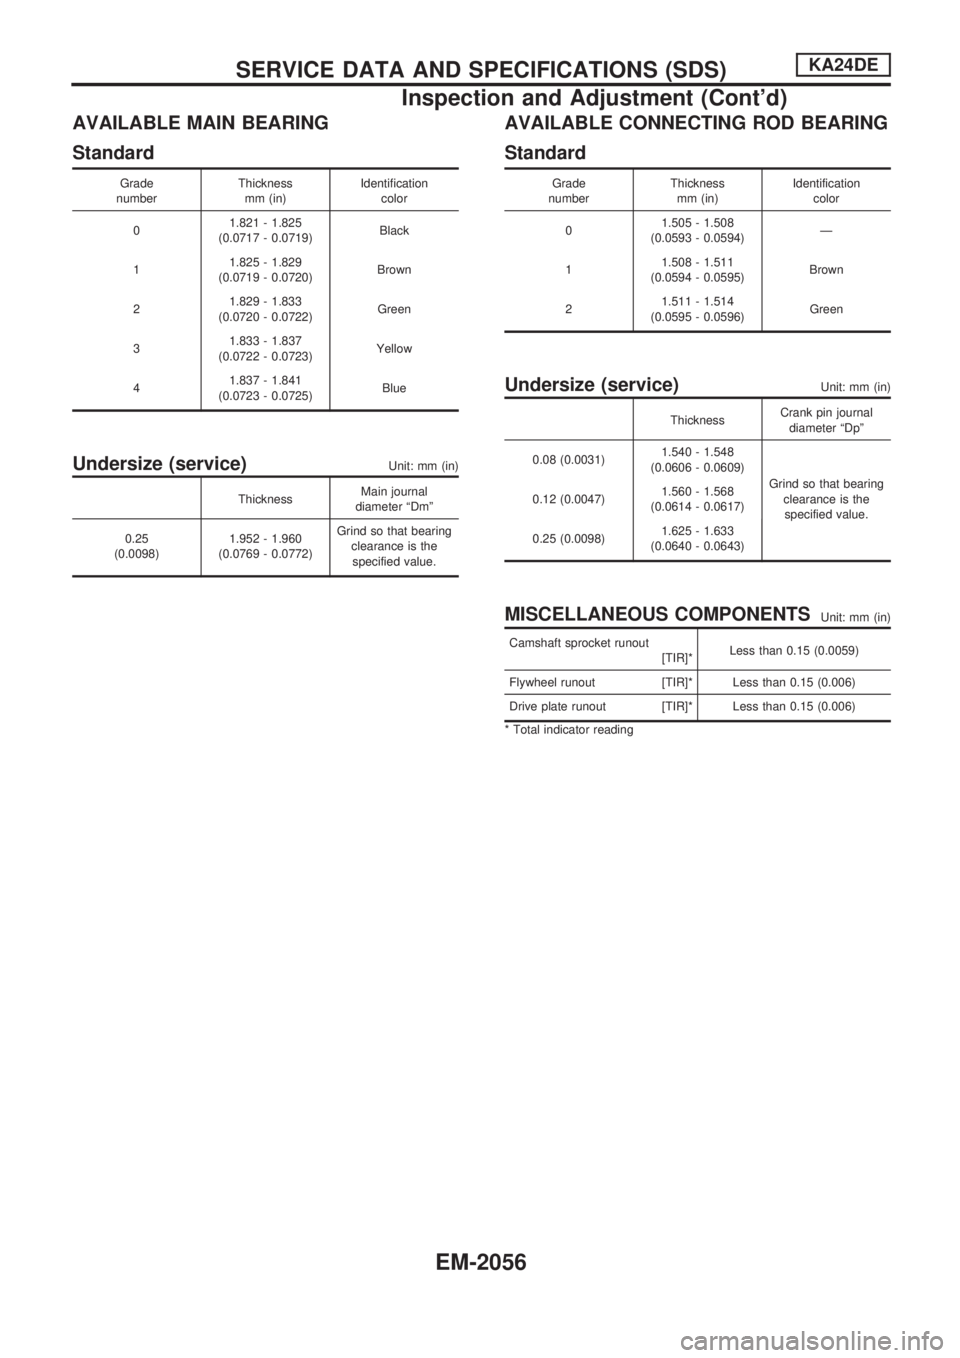
AVAILABLE MAIN BEARING
Standard
Grade
numberThickness
mm (in)Identification
color
01.821 - 1.825
(0.0717 - 0.0719)Black
11.825 - 1.829
(0.0719 - 0.0720)Brown
21.829 - 1.833
(0.0720 - 0.0722)Green
31.833 - 1.837
(0.0722 - 0.0723)Yellow
41.837 - 1.841
(0.0723 - 0.0725)Blue
Undersize (service)Unit: mm (in)
ThicknessMain journal
diameter ªDmº
0.25
(0.0098)1.952 - 1.960
(0.0769 - 0.0772)Grind so that bearing
clearance is the
specified value.
AVAILABLE CONNECTING ROD BEARING
Standard
Grade
numberThickness
mm (in)Identification
color
01.505 - 1.508
(0.0593 - 0.0594)Ð
11.508 - 1.511
(0.0594 - 0.0595)Brown
21.511 - 1.514
(0.0595 - 0.0596)Green
Undersize (service)Unit: mm (in)
ThicknessCrank pin journal
diameter ªDpº
0.08 (0.0031)1.540 - 1.548
(0.0606 - 0.0609)
Grind so that bearing
clearance is the
specified value. 0.12 (0.0047)1.560 - 1.568
(0.0614 - 0.0617)
0.25 (0.0098)1.625 - 1.633
(0.0640 - 0.0643)
MISCELLANEOUS COMPONENTSUnit: mm (in)
Camshaft sprocket runout
[TIR]*Less than 0.15 (0.0059)
Flywheel runout [TIR]* Less than 0.15 (0.006)
Drive plate runout [TIR]* Less than 0.15 (0.006)
* Total indicator reading
SERVICE DATA AND SPECIFICATIONS (SDS)KA24DE
Inspection and Adjustment (Cont'd)
EM-2056
Page 542 of 666
b. Confirm that discharge air comes out according to the air
distribution table at left.
Refer to ªDischarge Air Flowº (HA-15 in D22 Service Manual,
Publication No. SM8E-0D22E0E).
NOTE:
Confirm that the compressor clutch is engaged (visual
inspection) and intake door position is at FRESH when the
DEF
is selected.
Intake door position is checked in the next step.
If NG, go to trouble diagnosis procedure for mode door motor
(HA-2049).
If OK, continue with next check.
4. Check recirculation
a. Press RECswitch.
Recirculation indicator should illuminate.
b. Listen for intake door position change (you should hear
blower sound change slightly).
If NG, go to trouble diagnosis procedure for intake door motor
(HA-2060).
If OK, continue with next check.
RHA520G
RHA654FH
RHA521G
TROUBLE DIAGNOSESAUTO
Operational Check (Cont'd)
HA-2042
Page 617 of 666

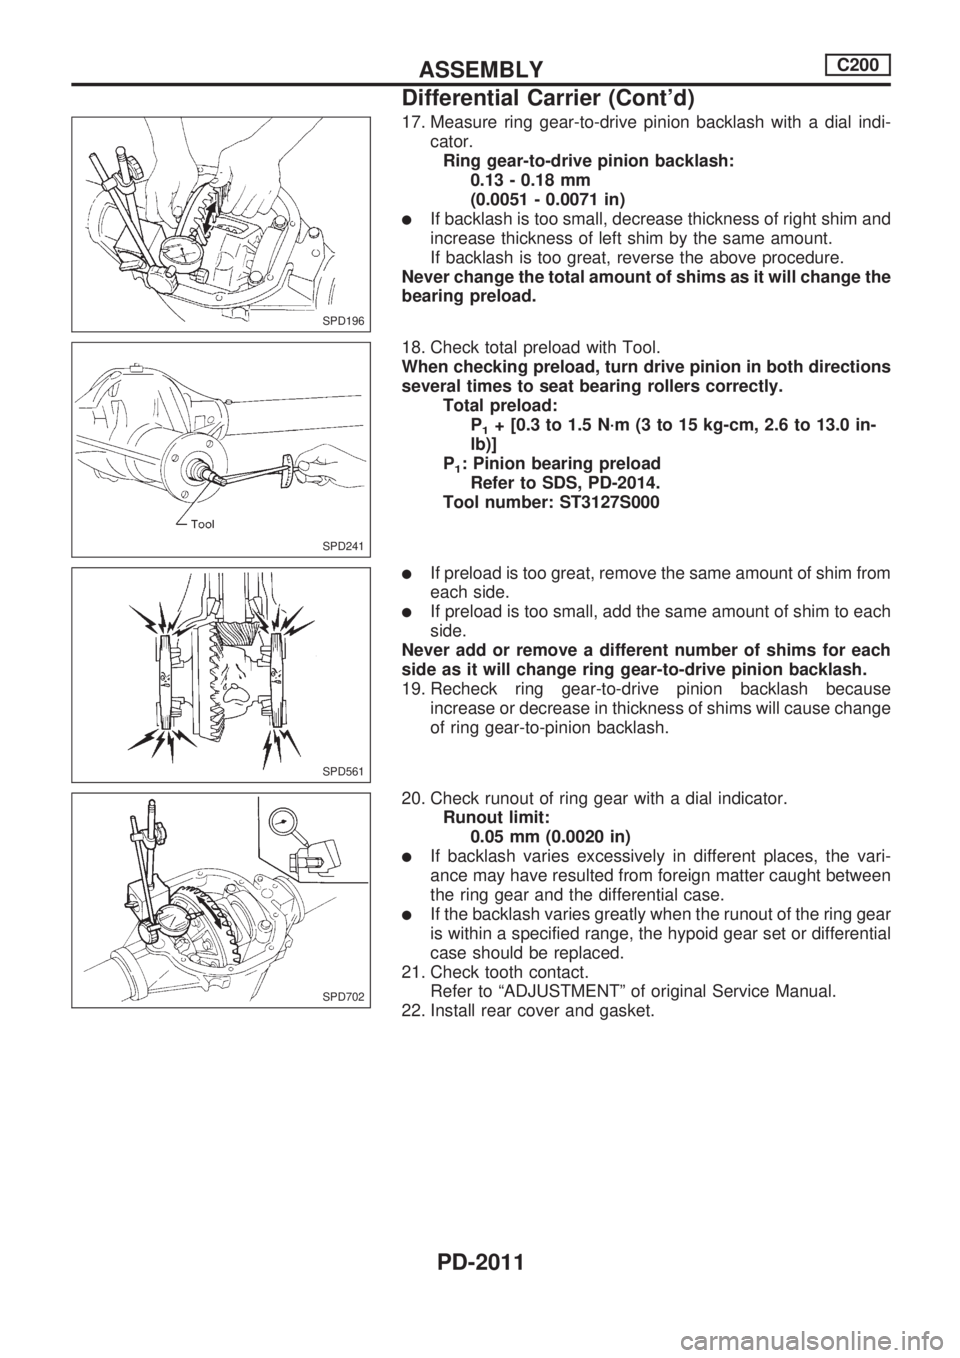
17. Measure ring gear-to-drive pinion backlash with a dial indi-
cator.
Ring gear-to-drive pinion backlash:
0.13 - 0.18 mm
(0.0051 - 0.0071 in)
lIf backlash is too small, decrease thickness of right shim and
increase thickness of left shim by the same amount.
If backlash is too great, reverse the above procedure.
Never change the total amount of shims as it will change the
bearing preload.
18. Check total preload with Tool.
When checking preload, turn drive pinion in both directions
several times to seat bearing rollers correctly.
Total preload:
P
1+ [0.3 to 1.5 N´m (3 to 15 kg-cm, 2.6 to 13.0 in-
lb)]
P
1: Pinion bearing preload
Refer to SDS, PD-2014.
Tool number: ST3127S000
lIf preload is too great, remove the same amount of shim from
each side.
lIf preload is too small, add the same amount of shim to each
side.
Never add or remove a different number of shims for each
side as it will change ring gear-to-drive pinion backlash.
19. Recheck ring gear-to-drive pinion backlash because
increase or decrease in thickness of shims will cause change
of ring gear-to-pinion backlash.
20. Check runout of ring gear with a dial indicator.
Runout limit:
0.05 mm (0.0020 in)
lIf backlash varies excessively in different places, the vari-
ance may have resulted from foreign matter caught between
the ring gear and the differential case.
lIf the backlash varies greatly when the runout of the ring gear
is within a specified range, the hypoid gear set or differential
case should be replaced.
21. Check tooth contact.
Refer to ªADJUSTMENTº of original Service Manual.
22. Install rear cover and gasket.
SPD196
SPD241
SPD561
SPD702
ASSEMBLYC200
Differential Carrier (Cont'd)
PD-2011