1999 DODGE NEON suspension
[x] Cancel search: suspensionPage 38 of 1200
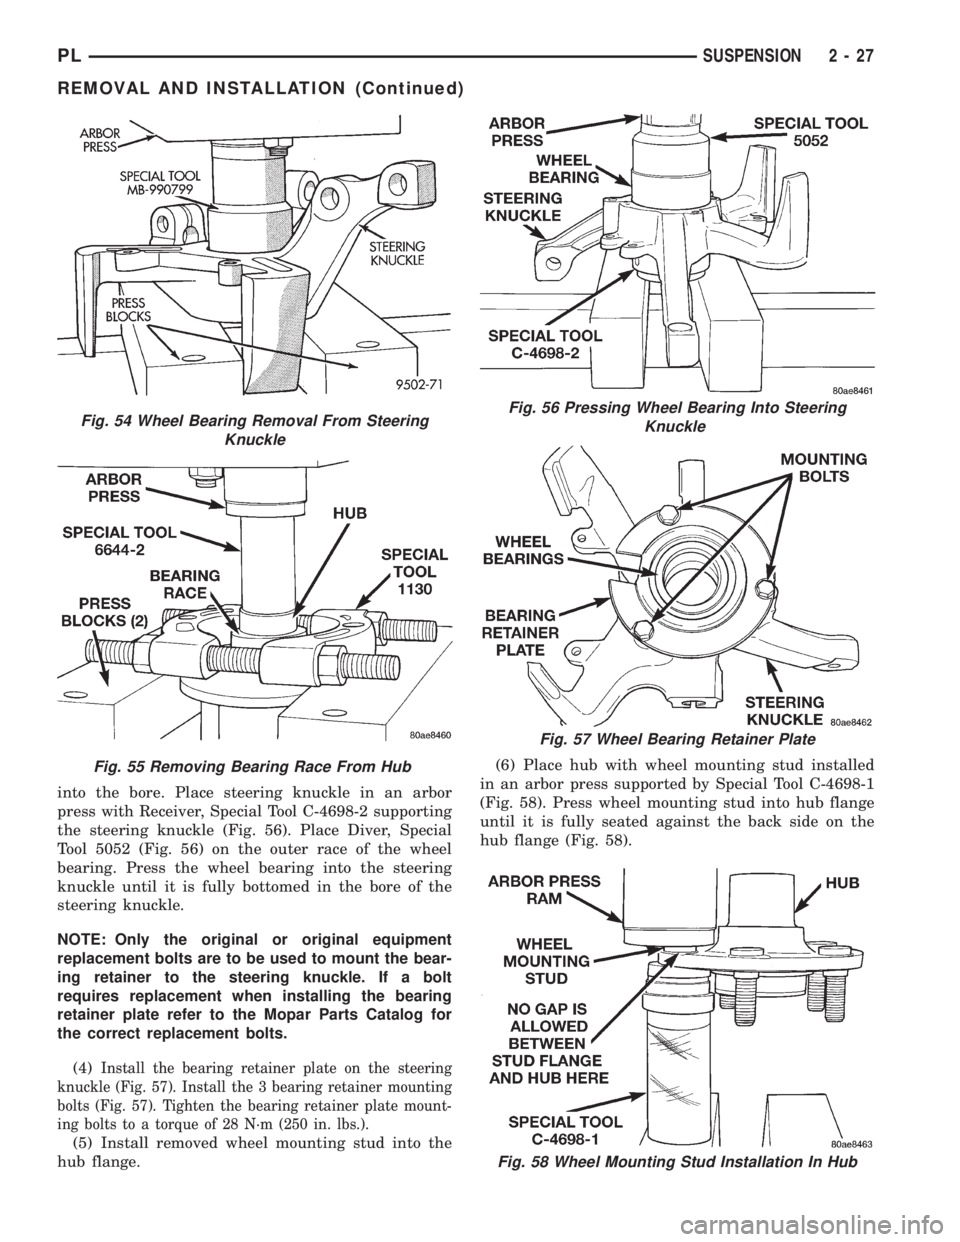
into the bore. Place steering knuckle in an arbor
press with Receiver, Special Tool C-4698-2 supporting
the steering knuckle (Fig. 56). Place Diver, Special
Tool 5052 (Fig. 56) on the outer race of the wheel
bearing. Press the wheel bearing into the steering
knuckle until it is fully bottomed in the bore of the
steering knuckle.
NOTE: Only the original or original equipment
replacement bolts are to be used to mount the bear-
ing retainer to the steering knuckle. If a bolt
requires replacement when installing the bearing
retainer plate refer to the Mopar Parts Catalog for
the correct replacement bolts.
(4)
Install the bearing retainer plate on the steering
knuckle (Fig. 57). Install the 3 bearing retainer mounting
bolts (Fig. 57). Tighten the bearing retainer plate mount-
ing bolts to a torque of 28 N´m (250 in. lbs.).
(5) Install removed wheel mounting stud into the
hub flange.(6) Place hub with wheel mounting stud installed
in an arbor press supported by Special Tool C-4698-1
(Fig. 58). Press wheel mounting stud into hub flange
until it is fully seated against the back side on the
hub flange (Fig. 58).
Fig. 58 Wheel Mounting Stud Installation In Hub
Fig. 54 Wheel Bearing Removal From Steering
Knuckle
Fig. 55 Removing Bearing Race From Hub
Fig. 56 Pressing Wheel Bearing Into Steering
Knuckle
Fig. 57 Wheel Bearing Retainer Plate
PLSUSPENSION 2 - 27
REMOVAL AND INSTALLATION (Continued)
Page 39 of 1200
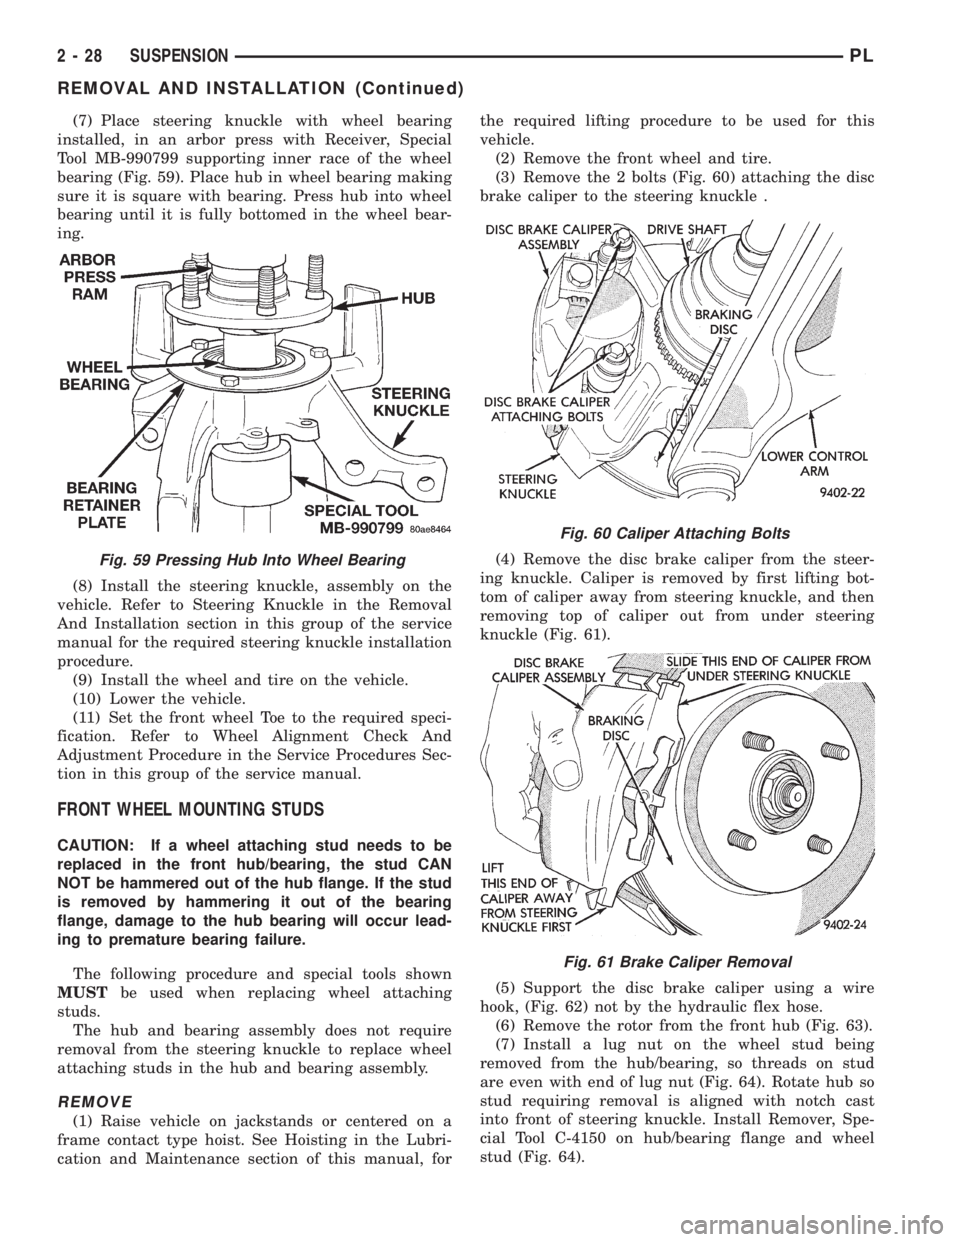
(7) Place steering knuckle with wheel bearing
installed, in an arbor press with Receiver, Special
Tool MB-990799 supporting inner race of the wheel
bearing (Fig. 59). Place hub in wheel bearing making
sure it is square with bearing. Press hub into wheel
bearing until it is fully bottomed in the wheel bear-
ing.
(8) Install the steering knuckle, assembly on the
vehicle. Refer to Steering Knuckle in the Removal
And Installation section in this group of the service
manual for the required steering knuckle installation
procedure.
(9) Install the wheel and tire on the vehicle.
(10) Lower the vehicle.
(11) Set the front wheel Toe to the required speci-
fication. Refer to Wheel Alignment Check And
Adjustment Procedure in the Service Procedures Sec-
tion in this group of the service manual.
FRONT WHEEL MOUNTING STUDS
CAUTION: If a wheel attaching stud needs to be
replaced in the front hub/bearing, the stud CAN
NOT be hammered out of the hub flange. If the stud
is removed by hammering it out of the bearing
flange, damage to the hub bearing will occur lead-
ing to premature bearing failure.
The following procedure and special tools shown
MUSTbe used when replacing wheel attaching
studs.
The hub and bearing assembly does not require
removal from the steering knuckle to replace wheel
attaching studs in the hub and bearing assembly.
REMOVE
(1) Raise vehicle on jackstands or centered on a
frame contact type hoist. See Hoisting in the Lubri-
cation and Maintenance section of this manual, forthe required lifting procedure to be used for this
vehicle.
(2) Remove the front wheel and tire.
(3) Remove the 2 bolts (Fig. 60) attaching the disc
brake caliper to the steering knuckle .
(4) Remove the disc brake caliper from the steer-
ing knuckle. Caliper is removed by first lifting bot-
tom of caliper away from steering knuckle, and then
removing top of caliper out from under steering
knuckle (Fig. 61).
(5) Support the disc brake caliper using a wire
hook, (Fig. 62) not by the hydraulic flex hose.
(6) Remove the rotor from the front hub (Fig. 63).
(7) Install a lug nut on the wheel stud being
removed from the hub/bearing, so threads on stud
are even with end of lug nut (Fig. 64). Rotate hub so
stud requiring removal is aligned with notch cast
into front of steering knuckle. Install Remover, Spe-
cial Tool C-4150 on hub/bearing flange and wheel
stud (Fig. 64).
Fig. 59 Pressing Hub Into Wheel Bearing
Fig. 60 Caliper Attaching Bolts
Fig. 61 Brake Caliper Removal
2 - 28 SUSPENSIONPL
REMOVAL AND INSTALLATION (Continued)
Page 40 of 1200
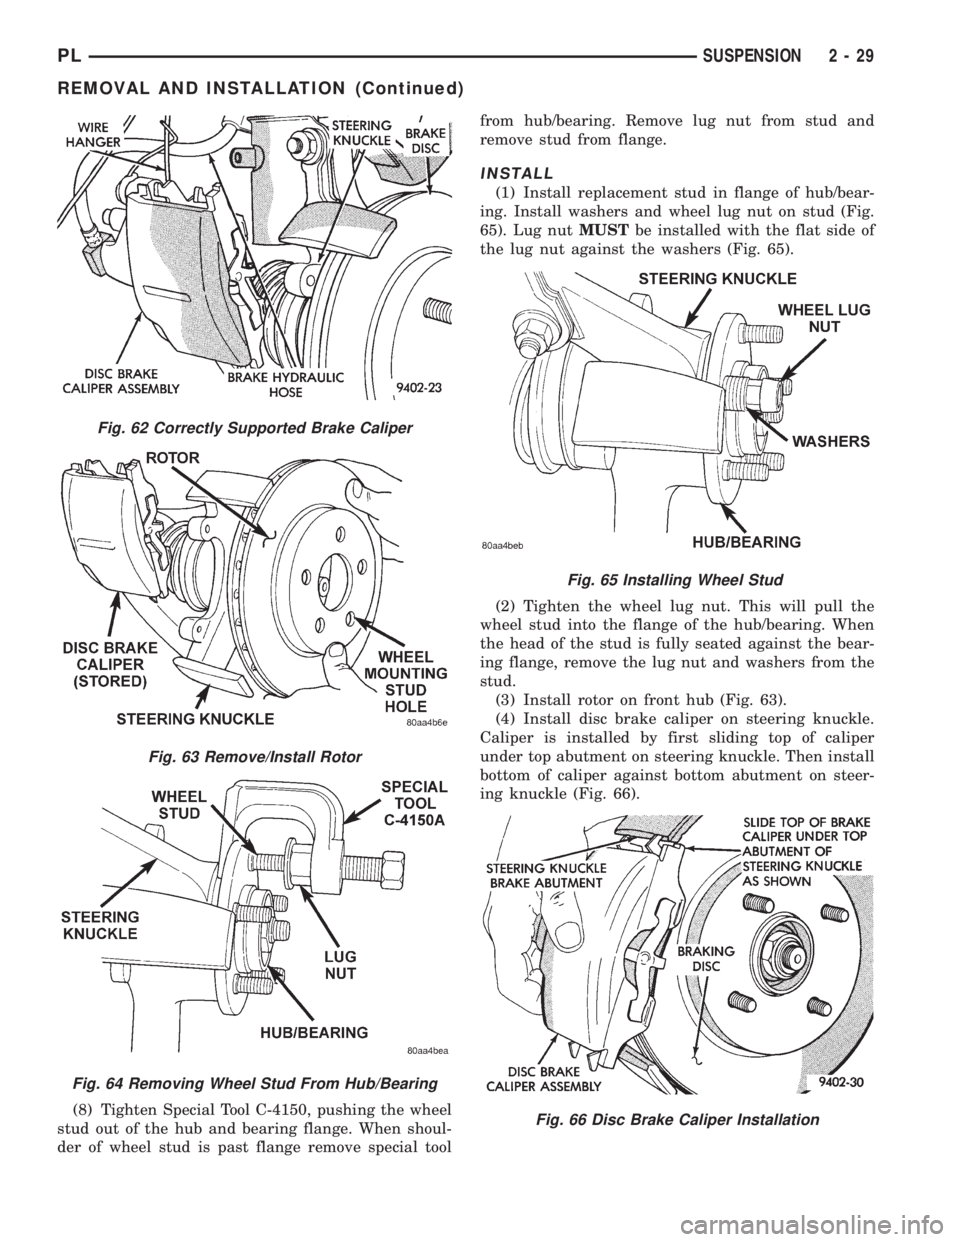
(8) Tighten Special Tool C-4150, pushing the wheel
stud out of the hub and bearing flange. When shoul-
der of wheel stud is past flange remove special toolfrom hub/bearing. Remove lug nut from stud and
remove stud from flange.
INSTALL
(1) Install replacement stud in flange of hub/bear-
ing. Install washers and wheel lug nut on stud (Fig.
65). Lug nutMUSTbe installed with the flat side of
the lug nut against the washers (Fig. 65).
(2) Tighten the wheel lug nut. This will pull the
wheel stud into the flange of the hub/bearing. When
the head of the stud is fully seated against the bear-
ing flange, remove the lug nut and washers from the
stud.
(3) Install rotor on front hub (Fig. 63).
(4) Install disc brake caliper on steering knuckle.
Caliper is installed by first sliding top of caliper
under top abutment on steering knuckle. Then install
bottom of caliper against bottom abutment on steer-
ing knuckle (Fig. 66).
Fig. 62 Correctly Supported Brake Caliper
Fig. 63 Remove/Install Rotor
Fig. 64 Removing Wheel Stud From Hub/Bearing
Fig. 65 Installing Wheel Stud
Fig. 66 Disc Brake Caliper Installation
PLSUSPENSION 2 - 29
REMOVAL AND INSTALLATION (Continued)
Page 41 of 1200
(5) Install the disc brake caliper to steering
knuckle attaching bolts (Fig. 61). Tighten the attach-
ing bolts to a torque of 31 N´m (23 ft. lbs.).
(6) Install front wheel and tire. Install front wheel
lug nuts and torque to 135 N´m
(7) (100 ft. lbs.).
(8) Lower vehicle.
DISASSEMBLY AND ASSEMBLY
McPHERSON STRUT
DISASSEMBLY
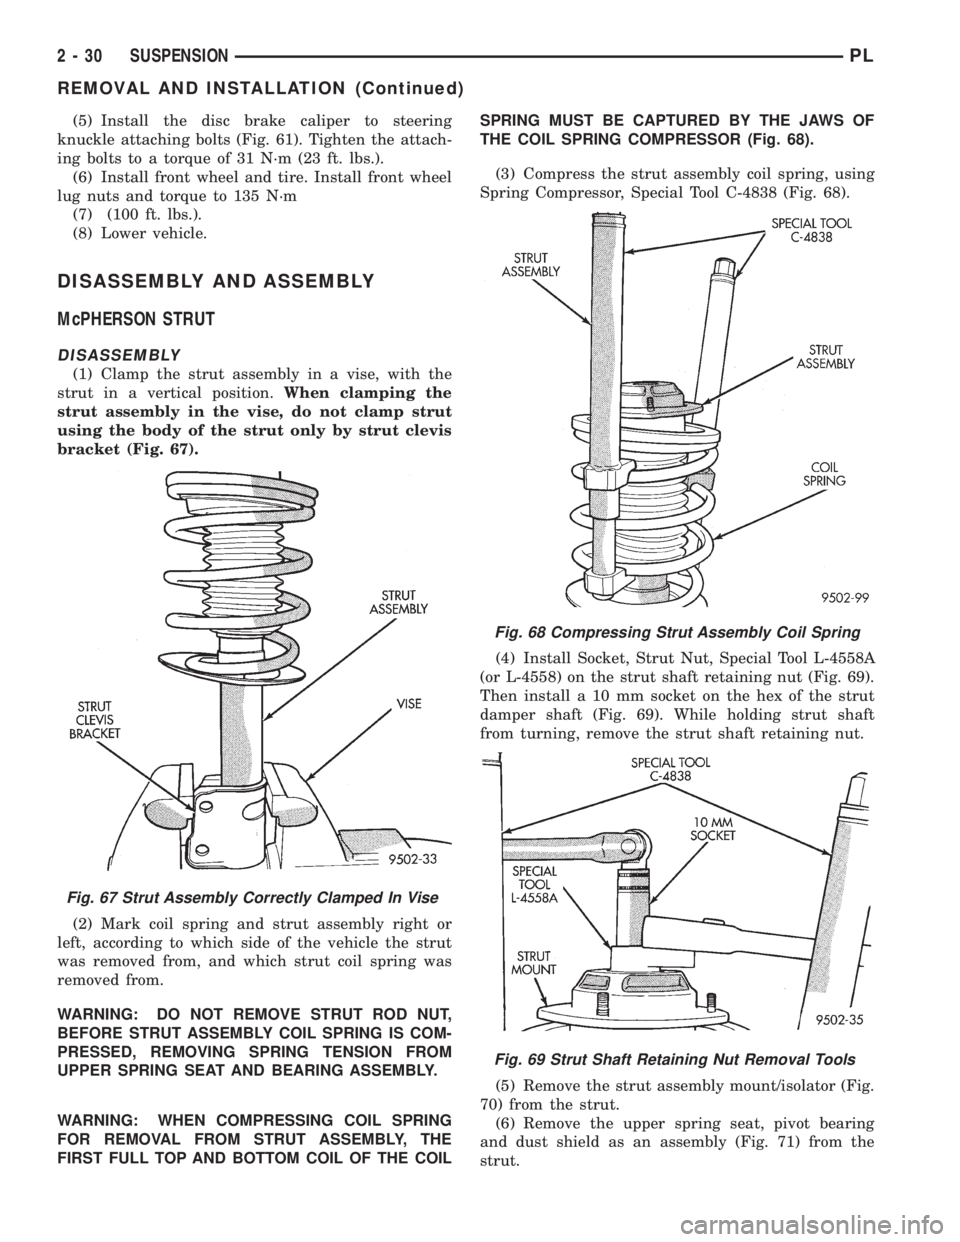
(1) Clamp the strut assembly in a vise, with the
strut in a vertical position.When clamping the
strut assembly in the vise, do not clamp strut
using the body of the strut only by strut clevis
bracket (Fig. 67).
(2) Mark coil spring and strut assembly right or
left, according to which side of the vehicle the strut
was removed from, and which strut coil spring was
removed from.
WARNING: DO NOT REMOVE STRUT ROD NUT,
BEFORE STRUT ASSEMBLY COIL SPRING IS COM-
PRESSED, REMOVING SPRING TENSION FROM
UPPER SPRING SEAT AND BEARING ASSEMBLY.
WARNING: WHEN COMPRESSING COIL SPRING
FOR REMOVAL FROM STRUT ASSEMBLY, THE
FIRST FULL TOP AND BOTTOM COIL OF THE COILSPRING MUST BE CAPTURED BY THE JAWS OF
THE COIL SPRING COMPRESSOR (Fig. 68).
(3) Compress the strut assembly coil spring, using
Spring Compressor, Special Tool C-4838 (Fig. 68).
(4) Install Socket, Strut Nut, Special Tool L-4558A
(or L-4558) on the strut shaft retaining nut (Fig. 69).
Then install a 10 mm socket on the hex of the strut
damper shaft (Fig. 69). While holding strut shaft
from turning, remove the strut shaft retaining nut.
(5) Remove the strut assembly mount/isolator (Fig.
70) from the strut.
(6) Remove the upper spring seat, pivot bearing
and dust shield as an assembly (Fig. 71) from the
strut.
Fig. 67 Strut Assembly Correctly Clamped In Vise
Fig. 68 Compressing Strut Assembly Coil Spring
Fig. 69 Strut Shaft Retaining Nut Removal Tools
2 - 30 SUSPENSIONPL
REMOVAL AND INSTALLATION (Continued)
Page 42 of 1200
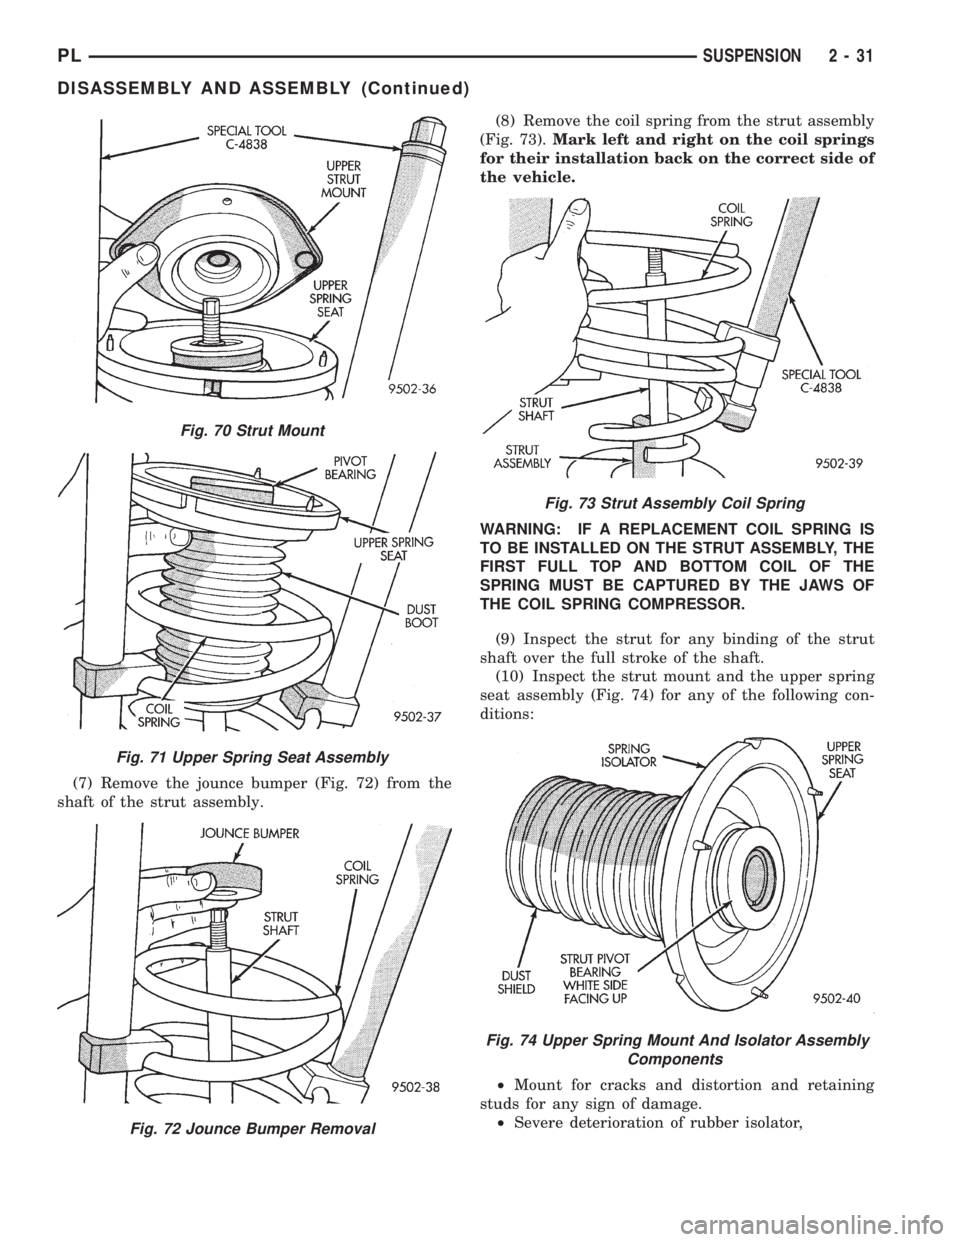
(7) Remove the jounce bumper (Fig. 72) from the
shaft of the strut assembly.(8) Remove the coil spring from the strut assembly
(Fig. 73).Mark left and right on the coil springs
for their installation back on the correct side of
the vehicle.
WARNING: IF A REPLACEMENT COIL SPRING IS
TO BE INSTALLED ON THE STRUT ASSEMBLY, THE
FIRST FULL TOP AND BOTTOM COIL OF THE
SPRING MUST BE CAPTURED BY THE JAWS OF
THE COIL SPRING COMPRESSOR.
(9) Inspect the strut for any binding of the strut
shaft over the full stroke of the shaft.
(10) Inspect the strut mount and the upper spring
seat assembly (Fig. 74) for any of the following con-
ditions:
²Mount for cracks and distortion and retaining
studs for any sign of damage.
²Severe deterioration of rubber isolator,
Fig. 70 Strut Mount
Fig. 71 Upper Spring Seat Assembly
Fig. 72 Jounce Bumper Removal
Fig. 73 Strut Assembly Coil Spring
Fig. 74 Upper Spring Mount And Isolator Assembly
Components
PLSUSPENSION 2 - 31
DISASSEMBLY AND ASSEMBLY (Continued)
Page 43 of 1200

²Binding strut assembly pivot bearing. If pivot
bearing is replaced it is to be installed with the white
side of bearing facing up (Fig. 74).
²Inspect dust shield for rips and/or deterioration.
²Inspect jounce bumper for cracks and signs of
deterioration.
(11) Replace any components of the strut assembly
found to be worn or defective during the inspection,
before assembling the strut.
ASSEMBLE
(1) Clamp the strut assembly in a vise, with the
strut in a vertical position.When clamping the
strut assembly in the vise, do not clamp strut
using the body of the strut only by strut clevis
bracket (Fig. 67).
(2) Install the compressed coil spring onto the
strut. Coil spring is to be installed with smaller coil
down, so spring correctly seats on strut assembly
(Fig. 73).
(3) Install jounce bumper on the strut shaft (Fig.
72).
(4) Install dust shield, pivot bearing and upper
spring seat as an assembly on the strut (Fig. 71).
(5) Position upper spring seat alignment notch
with clevis bracket on strut assembly.
(6) Install strut mount on strut assembly (Fig. 70)
and the strut mount retaining nut on the shaft of the
strut assembly.
WARNING: THE FOLLOWING 2 STEPS MUST BE
COMPLETELY DONE BEFORE SPRING COMPRES-
SOR, SPECIAL TOOL C-4838 IS RELEASED FROM
THE COIL SPRING.
(7) Install Socket, Strut Nut, Special Tool L-4558A
(or L-4558) on the strut shaft retaining nut (Fig. 69).
Then install a 10 mm socket through the center of
the socket and on the hex of the strut shaft (Fig. 69).
While holding strut shaft from turning, torque strut
shaft retaining nut to 75 N´m (55 ft. lbs.).
(8) Equally loosen both Spring Compressors, Spe-
cial Tool C-4838 until top coil of spring is fully seated
against upper spring seat and strut mount. Then
relieve all tension from spring compressors and
remove spring compressors from strut assembly
spring.
BALL JOINT
DISASSEMBLE
(1) Using a screw driver or other suitable tool, pry
seal boot off of ball joint assembly (Fig. 75).
(2) Position Receiving Cup, Special Tool 6758 to
support lower control arm while receiving ball joint
assembly (Fig. 76). Install Remover/Installer, Special
Tool 6804 in top of ball joint assembly (Fig. 76).(3) Using arbor press, press ball joint assembly
completely out of lower control arm.
ASSEMBLE
CAUTION: When installing ball joint in its mount-
ing hole in lower control arm, position ball joint so
notch in ball joint stud is facing the front lower con-
trol arm bushing. This will ease assembly of ball
joint to steering knuckle when attempting to install
pinch bolt.
(1) By hand, position ball joint assembly into ball
joint bore of lower control arm. Be sure ball joint
assembly is not cocked in the bore of the control arm,
this will cause binding of the ball joint assembly,
when being pressed into lower control arm.
(2) Position assembly in an arbor press with
Receiving Cup, Special Tool 6758 supporting lower
control arm (Fig. 77). Then install Remover/Installer,
Special Tool 6804 on the bottom of the ball joint
assembly (Fig. 77).
Fig. 75 Ball Joint Seal Boot Removal
Fig. 76 Removing Ball Joint From Lower Control
Arm
2 - 32 SUSPENSIONPL
DISASSEMBLY AND ASSEMBLY (Continued)
Page 44 of 1200
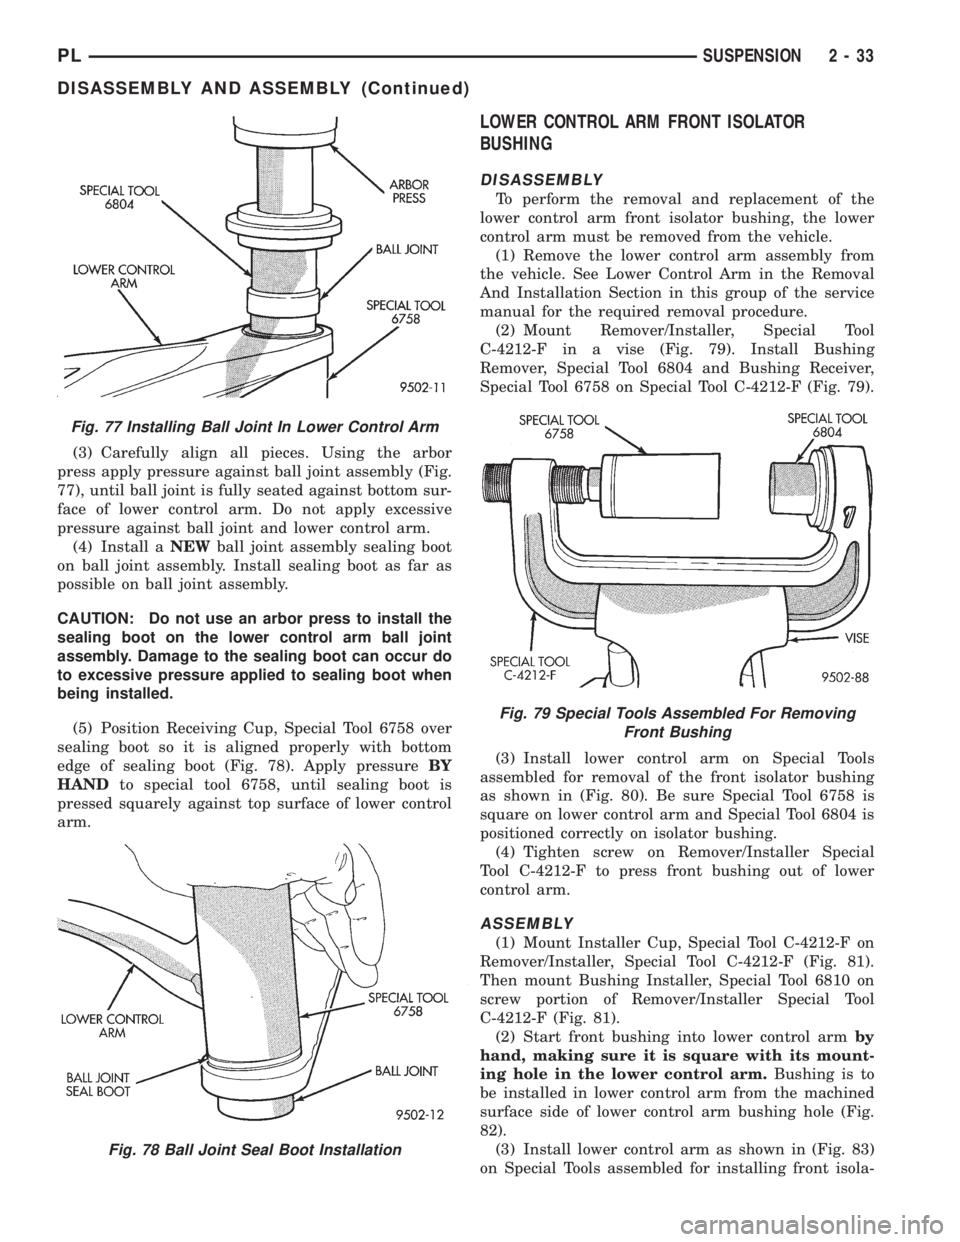
(3) Carefully align all pieces. Using the arbor
press apply pressure against ball joint assembly (Fig.
77), until ball joint is fully seated against bottom sur-
face of lower control arm. Do not apply excessive
pressure against ball joint and lower control arm.
(4) Install aNEWball joint assembly sealing boot
on ball joint assembly. Install sealing boot as far as
possible on ball joint assembly.
CAUTION: Do not use an arbor press to install the
sealing boot on the lower control arm ball joint
assembly. Damage to the sealing boot can occur do
to excessive pressure applied to sealing boot when
being installed.
(5) Position Receiving Cup, Special Tool 6758 over
sealing boot so it is aligned properly with bottom
edge of sealing boot (Fig. 78). Apply pressureBY
HANDto special tool 6758, until sealing boot is
pressed squarely against top surface of lower control
arm.
LOWER CONTROL ARM FRONT ISOLATOR
BUSHING
DISASSEMBLY
To perform the removal and replacement of the
lower control arm front isolator bushing, the lower
control arm must be removed from the vehicle.
(1) Remove the lower control arm assembly from
the vehicle. See Lower Control Arm in the Removal
And Installation Section in this group of the service
manual for the required removal procedure.
(2) Mount Remover/Installer, Special Tool
C-4212-F in a vise (Fig. 79). Install Bushing
Remover, Special Tool 6804 and Bushing Receiver,
Special Tool 6758 on Special Tool C-4212-F (Fig. 79).
(3) Install lower control arm on Special Tools
assembled for removal of the front isolator bushing
as shown in (Fig. 80). Be sure Special Tool 6758 is
square on lower control arm and Special Tool 6804 is
positioned correctly on isolator bushing.
(4) Tighten screw on Remover/Installer Special
Tool C-4212-F to press front bushing out of lower
control arm.
ASSEMBLY
(1) Mount Installer Cup, Special Tool C-4212-F on
Remover/Installer, Special Tool C-4212-F (Fig. 81).
Then mount Bushing Installer, Special Tool 6810 on
screw portion of Remover/Installer Special Tool
C-4212-F (Fig. 81).
(2) Start front bushing into lower control armby
hand, making sure it is square with its mount-
ing hole in the lower control arm.Bushing is to
be installed in lower control arm from the machined
surface side of lower control arm bushing hole (Fig.
82).
(3) Install lower control arm as shown in (Fig. 83)
on Special Tools assembled for installing front isola-
Fig. 77 Installing Ball Joint In Lower Control Arm
Fig. 78 Ball Joint Seal Boot Installation
Fig. 79 Special Tools Assembled For Removing
Front Bushing
PLSUSPENSION 2 - 33
DISASSEMBLY AND ASSEMBLY (Continued)
Page 45 of 1200
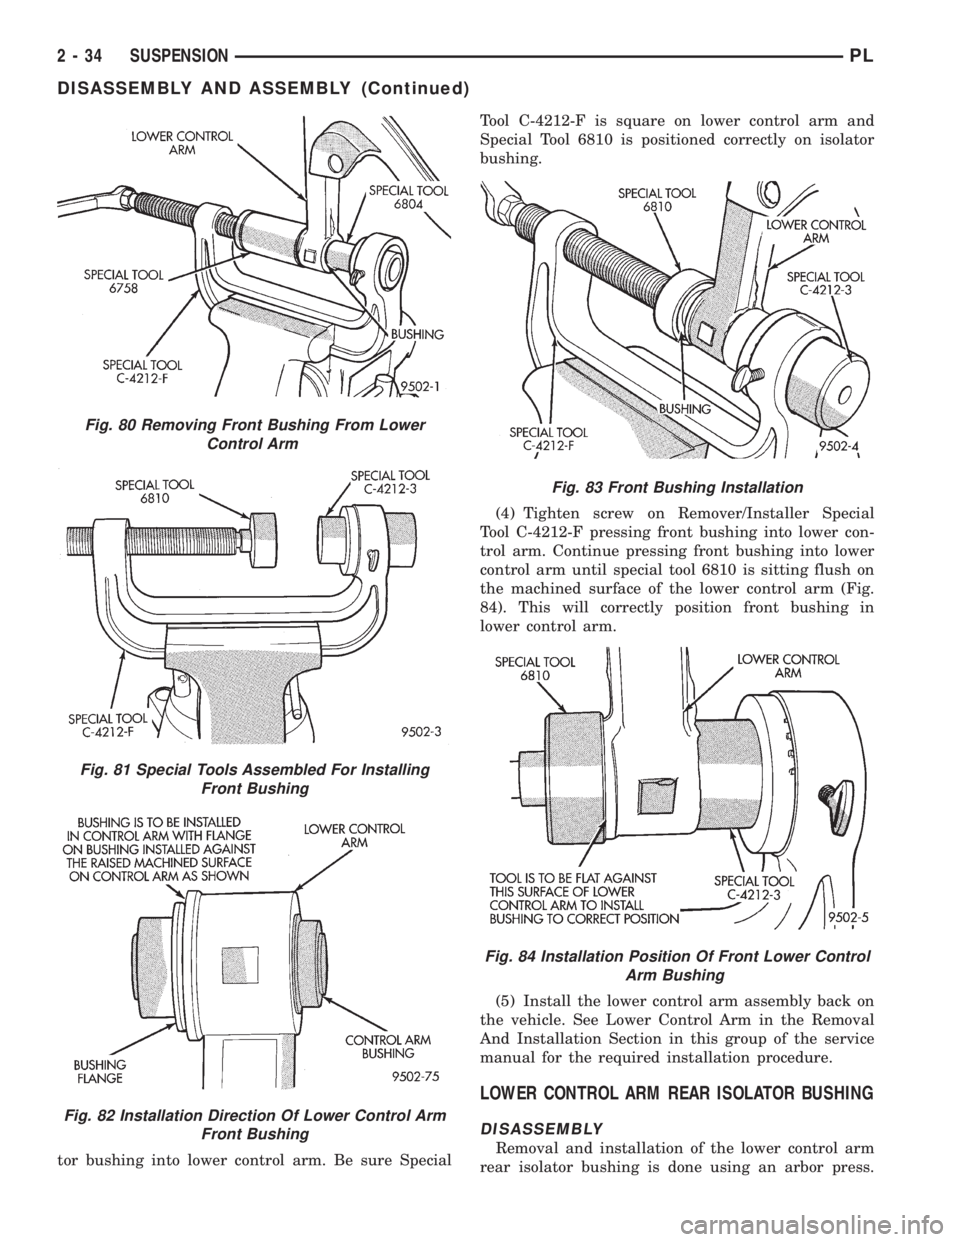
tor bushing into lower control arm. Be sure SpecialTool C-4212-F is square on lower control arm and
Special Tool 6810 is positioned correctly on isolator
bushing.
(4) Tighten screw on Remover/Installer Special
Tool C-4212-F pressing front bushing into lower con-
trol arm. Continue pressing front bushing into lower
control arm until special tool 6810 is sitting flush on
the machined surface of the lower control arm (Fig.
84). This will correctly position front bushing in
lower control arm.
(5) Install the lower control arm assembly back on
the vehicle. See Lower Control Arm in the Removal
And Installation Section in this group of the service
manual for the required installation procedure.
LOWER CONTROL ARM REAR ISOLATOR BUSHING
DISASSEMBLY
Removal and installation of the lower control arm
rear isolator bushing is done using an arbor press.
Fig. 80 Removing Front Bushing From Lower
Control Arm
Fig. 81 Special Tools Assembled For Installing
Front Bushing
Fig. 82 Installation Direction Of Lower Control Arm
Front Bushing
Fig. 83 Front Bushing Installation
Fig. 84 Installation Position Of Front Lower Control
Arm Bushing
2 - 34 SUSPENSIONPL
DISASSEMBLY AND ASSEMBLY (Continued)