1998 OPEL FRONTERA key
[x] Cancel search: keyPage 4809 of 6000
6E–152
ENGINE DRIVEABILITY AND EMISSIONS
MAF sensor – The system can go rich if the MAF
sensor signal indicates an engine airflow
measurement that is not correct. Disconnect the MAF
sensor to see if rich condition is corrected. If so,
replace MAF sensor.
Check for leaking fuel pressure regulator diaphragm by
checking vacuum line to regulator for the presence of
fuel. There should be no fuel in the vacuum line.
TP sensor – An intermittent TP sensor output will
cause the system to go rich, due to a false indication
of the engine accelerating.
Shorted Heated Oxygen Sensor (HO2S)– If the HO2S
is internally shorted, the HO2S voltage displayed on
Tech 2 will be over 1 volt. Try disconnecting the
affected HO2S with the key “ON,” engine “OFF.” If the
displayed HO2S voltage changes from over 1000 mV
to around 450mV, replace the HO2S. Silicon
contamination of the HO2S can cause a high HO2S
voltage to be indicated. This condition is indicated by
powdery white deposit on the portion of the HO2S
exposed to the exhaust stream. If contamination is
noticed, replace the affected HO2S.
Open HO2S Signal Circuit of Faulty HO2S– A poor
connection or open in the HO2S signal circuit can
cause the DTC to set during deceleration fuel mode.An HO2S which is faulty and not allowing a full voltage
switch between the rich and lean thresholds can also
cause the condition. Operate the vehicle while
monitoring the HO2S voltage with Tech 2. If the HO2S
is limited within a range between 300 mV to 600 mV,
check the HO2S signal circuit wiring and associated
terminal connections.
If none of the above conditions are present, replace the
affected HO2S.
Test Description
Number(s) below refer to the step number(s) on the
Diagnostic Chart.
3. DTC P0152 failing during deceleration fuel cutoff
mode operation may indicate a condition described
in the “Diagnostic Aids” above. If the DTC P0152
test passes while the Failure Records conditions are
being duplicated, an intermittent condition is
indicated.
Reviewing the Failure Records vehicle mileage since the
diagnostic test last failed may help determine how often
the condition that caused the DTC to be set occurs. This
may assist in diagnosing the condition.
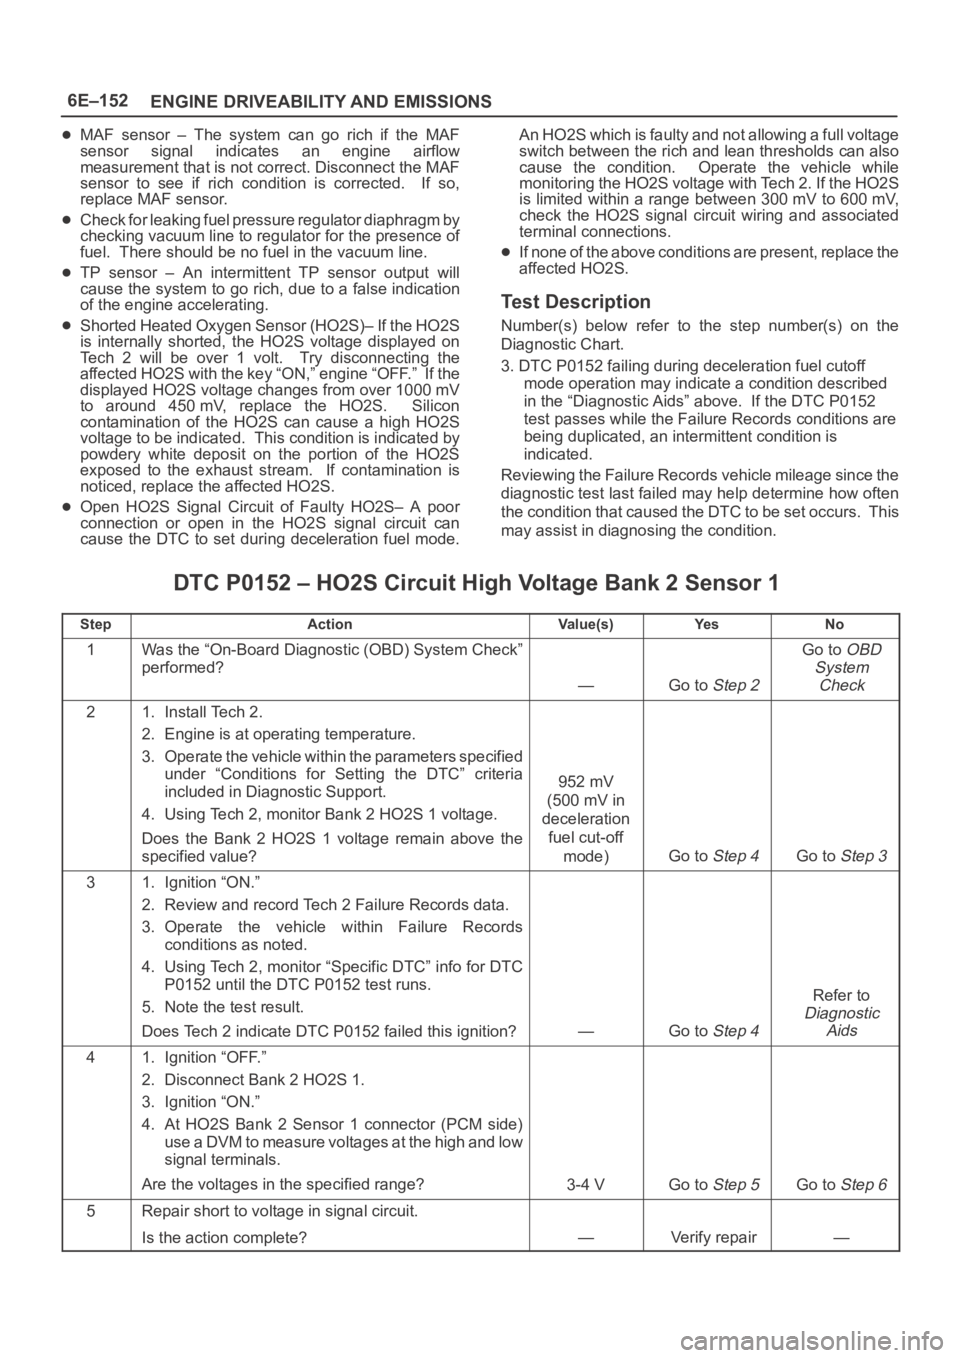
DTC P0152 – HO2S Circuit High Voltage Bank 2 Sensor 1
StepActionVa l u e ( s )Ye sNo
1Was the “On-Board Diagnostic (OBD) System Check”
performed?
—Go to Step 2
Go to OBD
System
Check
21. Install Tech 2.
2. Engine is at operating temperature.
3. Operate the vehicle within the parameters specified
under “Conditions for Setting the DTC” criteria
included in Diagnostic Support.
4. Using Tech 2, monitor Bank 2 HO2S 1 voltage.
Does the Bank 2 HO2S 1 voltage remain above the
specified value?
952 mV
(500 mV in
deceleration
fuel cut-off
mode)
Go to Step 4Go to Step 3
31. Ignition “ON.”
2. Review and record Tech 2 Failure Records data.
3. Operate the vehicle within Failure Records
conditions as noted.
4. Using Tech 2, monitor “Specific DTC” info for DTC
P0152 until the DTC P0152 test runs.
5. Note the test result.
Does Tech 2 indicate DTC P0152 failed this ignition?
—Go to Step 4
Refer to
Diagnostic
Aids
41. Ignition “OFF.”
2. Disconnect Bank 2 HO2S 1.
3. Ignition “ON.”
4. At HO2S Bank 2 Sensor 1 connector (PCM side)
use a DVM to measure voltages at the high and low
signal terminals.
Are the voltages in the specified range?
3-4 VGo to Step 5Go to Step 6
5Repair short to voltage in signal circuit.
Is the action complete?
—Verify repair—
Page 4936 of 6000
6E–279 ENGINE DRIVEABILITY AND EMISSIONS
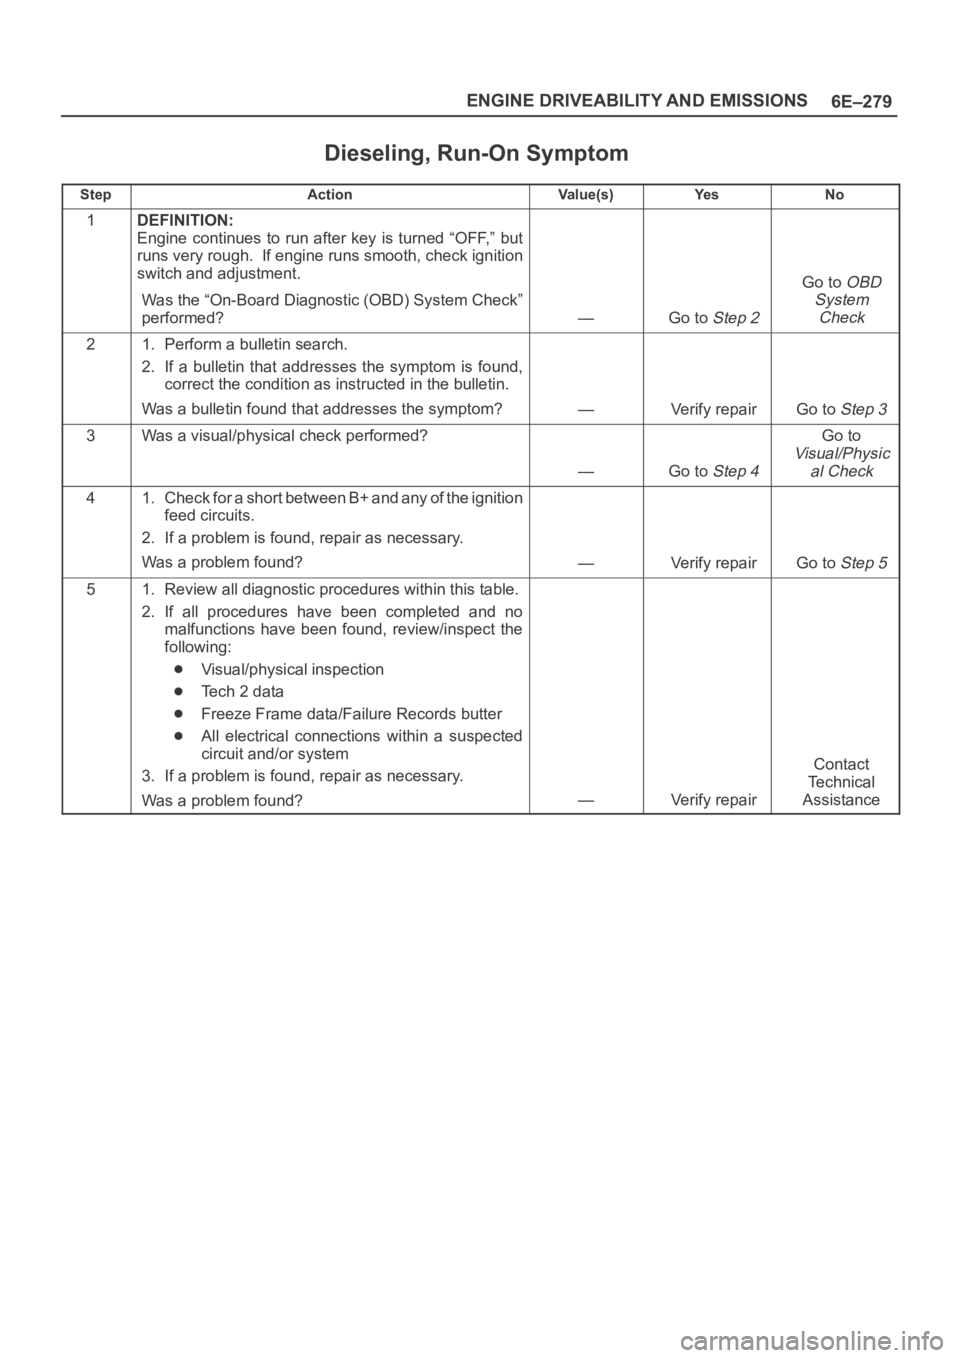
Dieseling, Run-On Symptom
StepActionVa l u e ( s )Ye sNo
1DEFINITION:
Engine continues to run after key is turned “OFF,” but
runs very rough. If engine runs smooth, check ignition
switch and adjustment.
Was the “On-Board Diagnostic (OBD) System Check”
performed?
—Go to Step 2
Go to OBD
System
Check
21. Perform a bulletin search.
2. If a bulletin that addresses the symptom is found,
correct the condition as instructed in the bulletin.
Was a bulletin found that addresses the symptom?
—Verify repairGo to Step 3
3Was a visual/physical check performed?
—Go to Step 4
Go to
Visual/Physic
al Check
41. Check for a short between B+ and any of the ignition
feed circuits.
2. If a problem is found, repair as necessary.
Was a problem found?
—Verify repairGo to Step 5
51. Review all diagnostic procedures within this table.
2. If all procedures have been completed and no
malfunctions have been found, review/inspect the
following:
Visual/physical inspection
Te c h 2 d a t a
Freeze Frame data/Failure Records butter
All electrical connections within a suspected
circuit and/or system
3. If a problem is found, repair as necessary.
Was a problem found?
—Verify repair
Contact
Te c h n i c a l
Assistance
Page 5000 of 6000
6E–343 ENGINE DRIVEABILITY AND EMISSIONS
constant measuring and adjusting of the air/fuel ratio, the
fuel injection system is called a “closed loop” system.
The PCM monitors signals from several sensors in order
to determine the fuel needs of the engine. Fuel is
delivered under one of several conditions called “modes.”
All modes are controlled by the PCM.
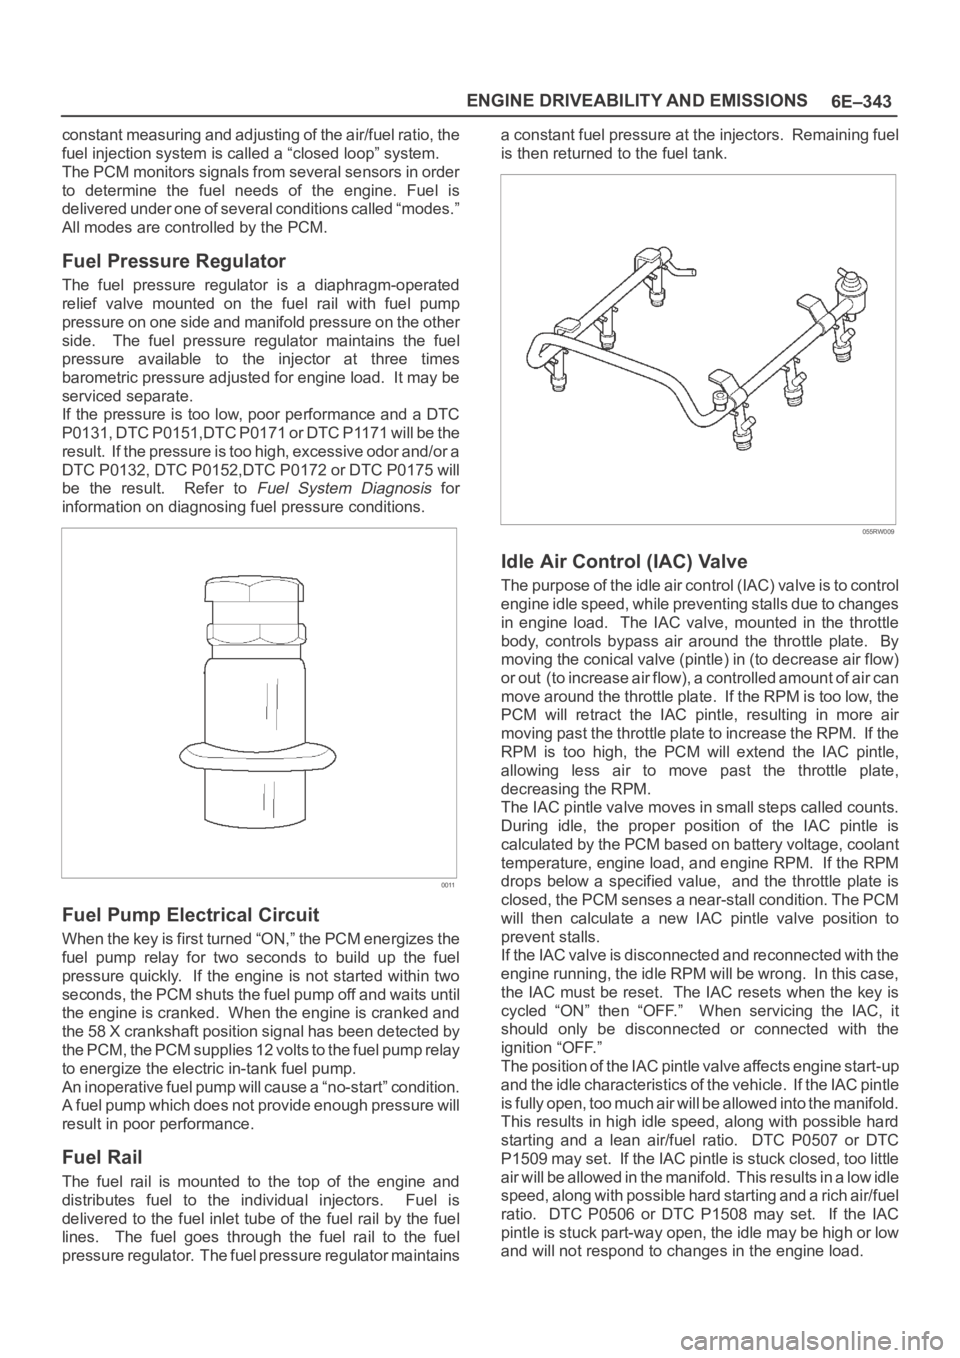
Fuel Pressure Regulator
The fuel pressure regulator is a diaphragm-operated
relief valve mounted on the fuel rail with fuel pump
pressure on one side and manifold pressure on the other
side. The fuel pressure regulator maintains the fuel
pressure available to the injector at three times
barometric pressure adjusted for engine load. It may be
serviced separate.
If the pressure is too low, poor performance and a DTC
P0131, DTC P0151,DTC P0171 or DTC P1171 will be the
result. If the pressure is too high, excessive odor and/or a
DTC P0132, DTC P0152,DTC P0172 or DTC P0175 will
be the result. Refer to
Fuel System Diagnosis for
information on diagnosing fuel pressure conditions.
0011
Fuel Pump Electrical Circuit
When the key is first turned “ON,” the PCM energizes the
fuel pump relay for two seconds to build up the fuel
pressure quickly. If the engine is not started within two
seconds, the PCM shuts the fuel pump off and waits until
the engine is cranked. When the engine is cranked and
the 58 X crankshaft position signal has been detected by
the PCM, the PCM supplies 12 volts to the fuel pump relay
to energize the electric in-tank fuel pump.
An inoperative fuel pump will cause a “no-start” condition.
A fuel pump which does not provide enough pressure will
result in poor performance.
Fuel Rail
The fuel rail is mounted to the top of the engine and
distributes fuel to the individual injectors. Fuel is
delivered to the fuel inlet tube of the fuel rail by the fuel
lines. The fuel goes through the fuel rail to the fuel
pressure regulator. The fuel pressure regulator maintainsa constant fuel pressure at the injectors. Remaining fuel
is then returned to the fuel tank.
055RW009
Idle Air Control (IAC) Valve
The purpose of the idle air control (IAC) valve is to control
engine idle speed, while preventing stalls due to changes
in engine load. The IAC valve, mounted in the throttle
body, controls bypass air around the throttle plate. By
moving the conical valve (pintle) in (to decrease air flow)
or out (to increase air flow), a controlled amount of air can
move around the throttle plate. If the RPM is too low, the
PCM will retract the IAC pintle, resulting in more air
moving past the throttle plate to increase the RPM. If the
RPM is too high, the PCM will extend the IAC pintle,
allowing less air to move past the throttle plate,
decreasing the RPM.
The IAC pintle valve moves in small steps called counts.
During idle, the proper position of the IAC pintle is
calculated by the PCM based on battery voltage, coolant
temperature, engine load, and engine RPM. If the RPM
drops below a specified value, and the throttle plate is
closed, the PCM senses a near-stall condition. The PCM
will then calculate a new IAC pintle valve position to
prevent stalls.
If the IAC valve is disconnected and reconnected with the
engine running, the idle RPM will be wrong. In this case,
the IAC must be reset. The IAC resets when the key is
cycled “ON” then “OFF.” When servicing the IAC, it
should only be disconnected or connected with the
ignition “OFF.”
The position of the IAC pintle valve affects engine start-up
and the idle characteristics of the vehicle. If the IAC pintle
is fully open, too much air will be allowed into the manifold.
This results in high idle speed, along with possible hard
starting and a lean air/fuel ratio. DTC P0507 or DTC
P1509 may set. If the IAC pintle is stuck closed, too little
air will be allowed in the manifold. This results in a low idle
speed, along with possible hard starting and a rich air/fuel
ratio. DTC P0506 or DTC P1508 may set. If the IAC
pintle is stuck part-way open, the idle may be high or low
and will not respond to changes in the engine load.
Page 5323 of 6000
6A – 50 ENGINE MECHANICAL
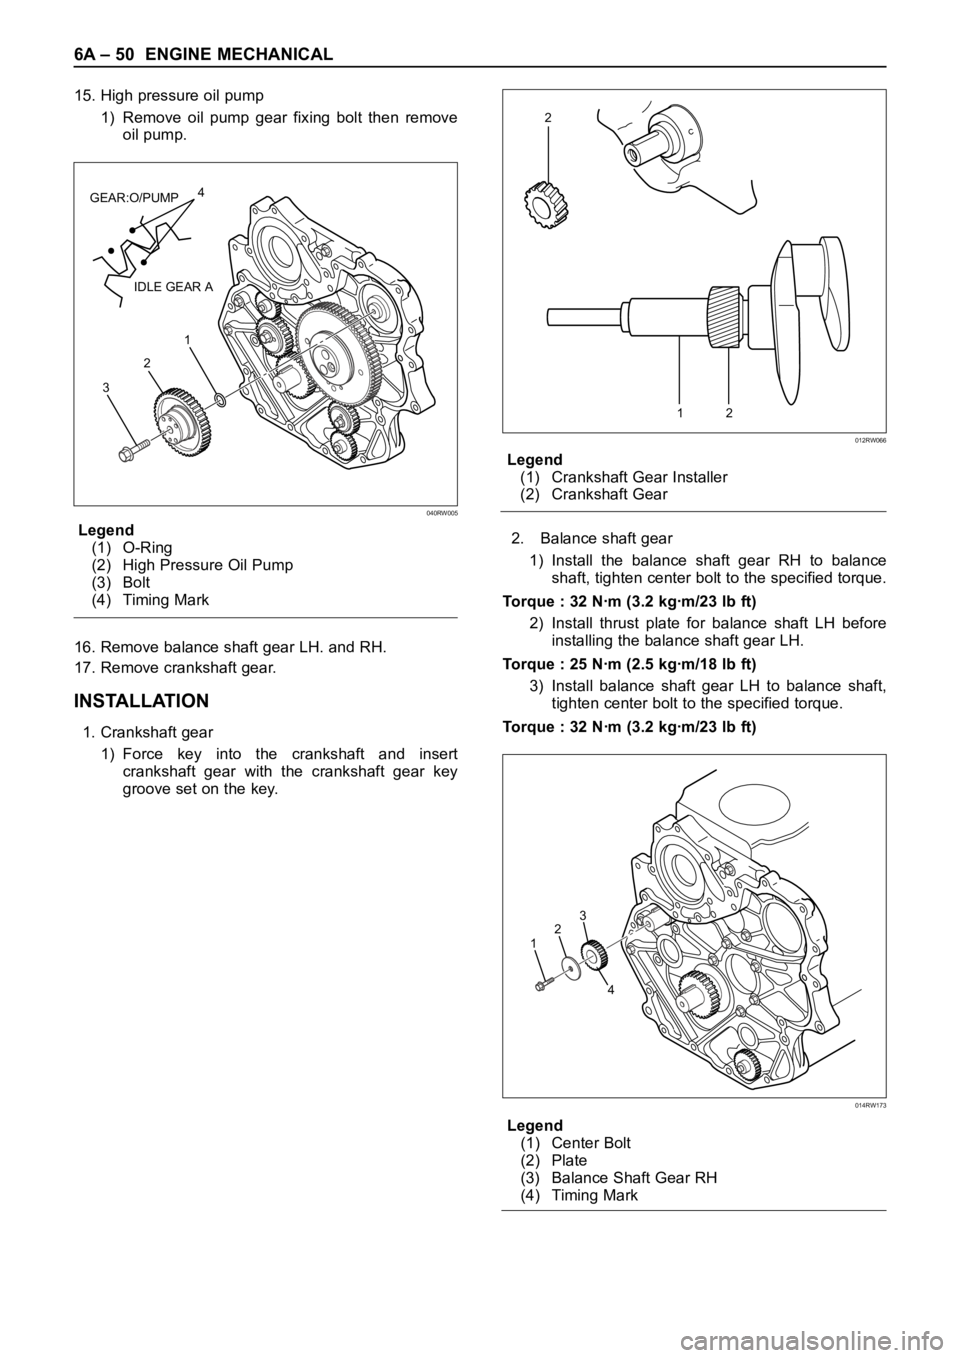
15. High pressure oil pump
1) Remove oil pump gear fixing bolt then remove
oil pump.
Legend
(1) O-Ring
(2) High Pressure Oil Pump
(3) Bolt
(4) Timing Mark
16. Remove balance shaft gear LH. and RH.
17. Remove crankshaft gear.
INSTALLATION
1. Crankshaft gear
1) Force key into the crankshaft and insert
crankshaft gear with the crankshaft gear key
groove set on the key.Legend
(1) Crankshaft Gear Installer
(2) Crankshaft Gear
2. Balance shaft gear
1) Install the balance shaft gear RH to balance
shaft, tighten center bolt to the specified torque.
Torque : 32 Nꞏm (3.2 kgꞏm/23 lb ft)
2) Install thrust plate for balance shaft LH before
installing the balance shaft gear LH.
Torque : 25 Nꞏm (2.5 kgꞏm/18 lb ft)
3) Install balance shaft gear LH to balance shaft,
tighten center bolt to the specified torque.
Torque : 32 Nꞏm (3.2 kgꞏm/23 lb ft)
Legend
(1) Center Bolt
(2) Plate
(3) Balance Shaft Gear RH
(4) Timing Mark
4
GEAR:O/PUMP
IDLE GEAR A
1
2
3
040RW005
12
2
012RW066
3
4 2
1
014RW173
Page 5327 of 6000
6A – 54 ENGINE MECHANICAL
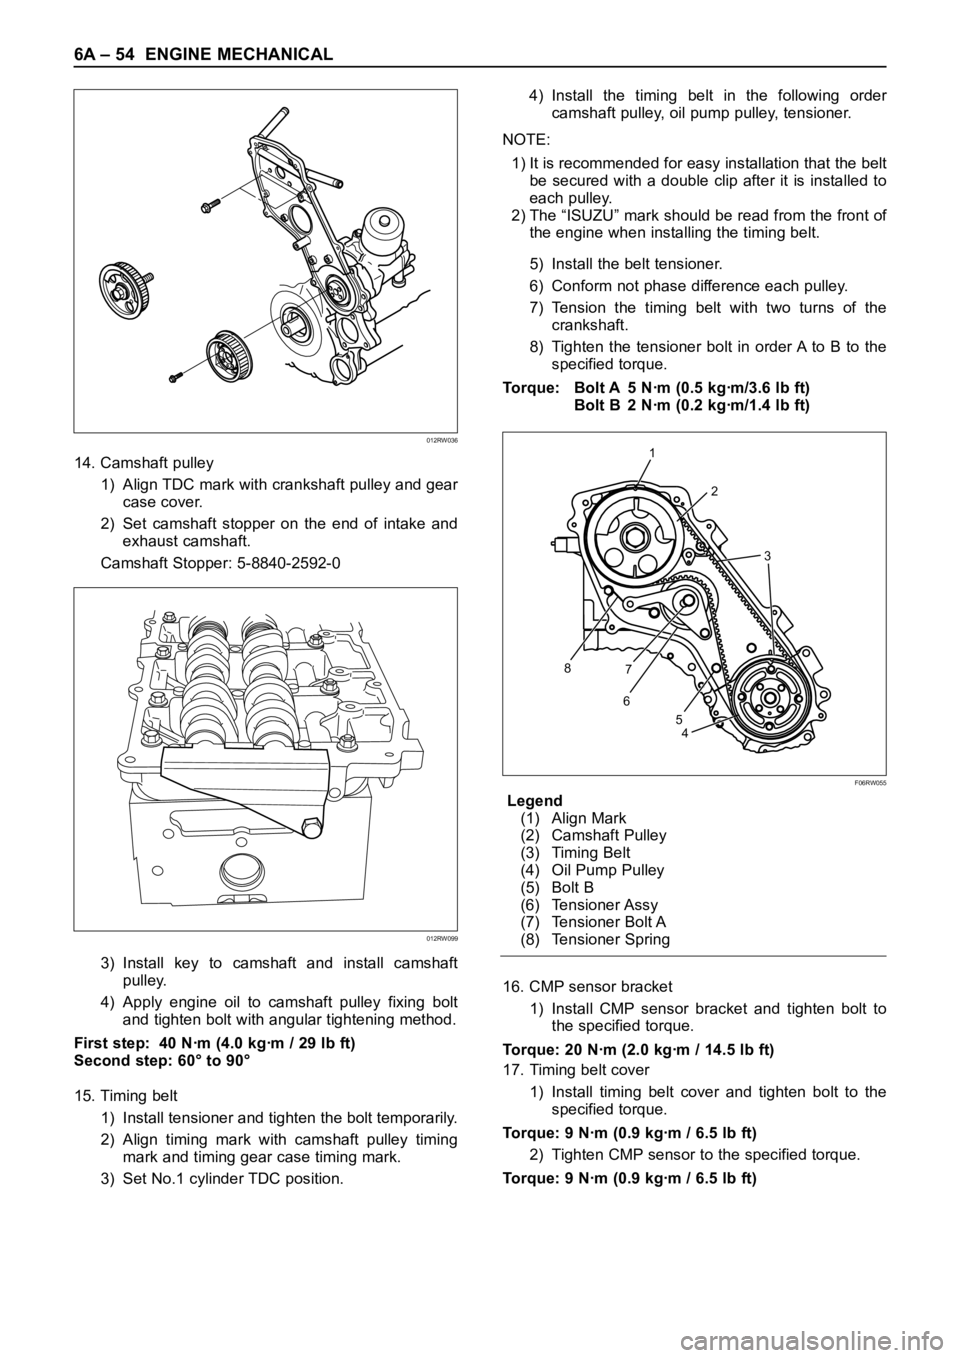
14. Camshaft pulley
1) Align TDC mark with crankshaft pulley and gear
case cover.
2) Set camshaft stopper on the end of intake and
exhaust camshaft.
Camshaft Stopper: 5-8840-2592-0
3) Install key to camshaft and install camshaft
pulley.
4) Apply engine oil to camshaft pulley fixing bolt
and tighten bolt with angular tightening method.
First step: 40 Nꞏm (4.0 kgꞏm / 29 lb ft)
Second step: 60° to 90°
15. Timing belt
1) Install tensioner and tighten the bolt temporarily.
2) Align timing mark with camshaft pulley timing
mark and timing gear case timing mark.
3) Set No.1 cylinder TDC position.4) Install the timing belt in the following order
camshaft pulley, oil pump pulley, tensioner.
NOTE:
1) It is recommended for easy installation that the belt
be secured with a double clip after it is installed to
each pulley.
2) The “ISUZU” mark should be read from the front of
the engine when installing the timing belt.
5) Install the belt tensioner.
6) Conform not phase difference each pulley.
7) Tension the timing belt with two turns of the
crankshaft.
8) Tighten the tensioner bolt in order A to B to the
specified torque.
Torque: Bolt A 5 Nꞏm (0.5 kgꞏm/3.6 lb ft)
Bolt B 2 Nꞏm (0.2 kgꞏm/1.4 lb ft)
Legend
(1) Align Mark
(2) Camshaft Pulley
(3) Timing Belt
(4) Oil Pump Pulley
(5) Bolt B
(6) Tensioner Assy
(7) Tensioner Bolt A
(8) Tensioner Spring
16. CMP sensor bracket
1) Install CMP sensor bracket and tighten bolt to
the specified torque.
Torque: 20 Nꞏm (2.0 kgꞏm / 14.5 lb ft)
17. Timing belt cover
1) Install timing belt cover and tighten bolt to the
specified torque.
Torque: 9 Nꞏm (0.9 kgꞏm / 6.5 lb ft)
2) Tighten CMP sensor to the specified torque.
Torque: 9 Nꞏm (0.9 kgꞏm / 6.5 lb ft)
012RW036
012RW099
1
2
3
8
67
4 5
F06RW055
Page 5328 of 6000
ENGINE MECHANICAL 6A – 55
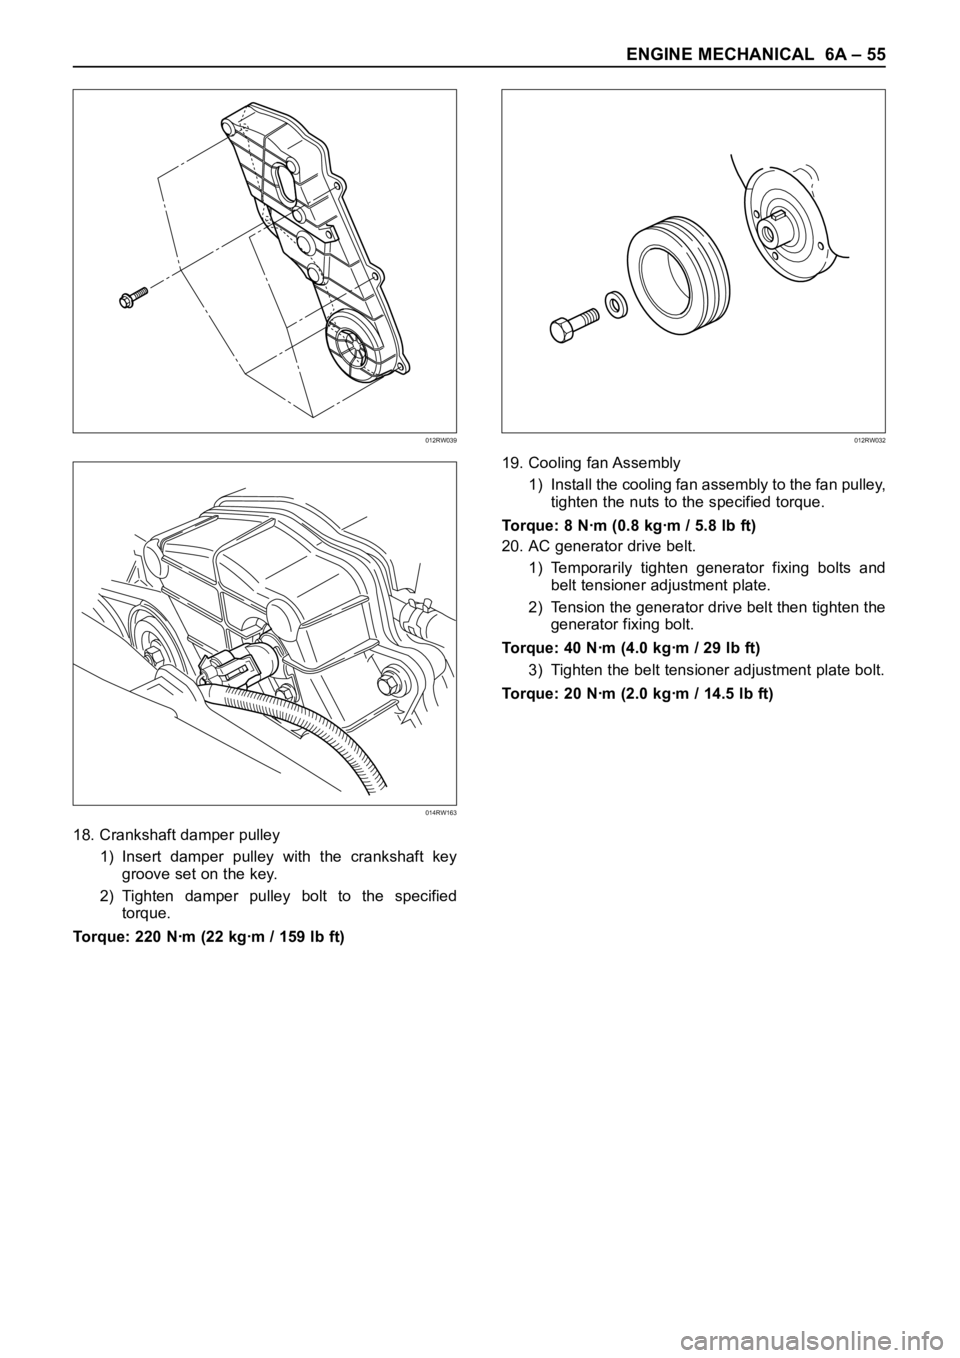
18. Crankshaft damper pulley
1) Insert damper pulley with the crankshaft key
groove set on the key.
2) Tighten damper pulley bolt to the specified
torque.
Torque: 220 Nꞏm (22 kgꞏm / 159 lb ft)19. Cooling fan Assembly
1) Install the cooling fan assembly to the fan pulley,
tighten the nuts to the specified torque.
Torque: 8 Nꞏm (0.8 kgꞏm / 5.8 lb ft)
20. AC generator drive belt.
1) Temporarily tighten generator fixing bolts and
belt tensioner adjustment plate.
2) Tension the generator drive belt then tighten the
generator fixing bolt.
Torque: 40 Nꞏm (4.0 kgꞏm / 29 lb ft)
3) Tighten the belt tensioner adjustment plate bolt.
Torque: 20 Nꞏm (2.0 kgꞏm / 14.5 lb ft)
012RW039
014RW163
012RW032
Page 5351 of 6000
6A – 78 ENGINE MECHANICAL
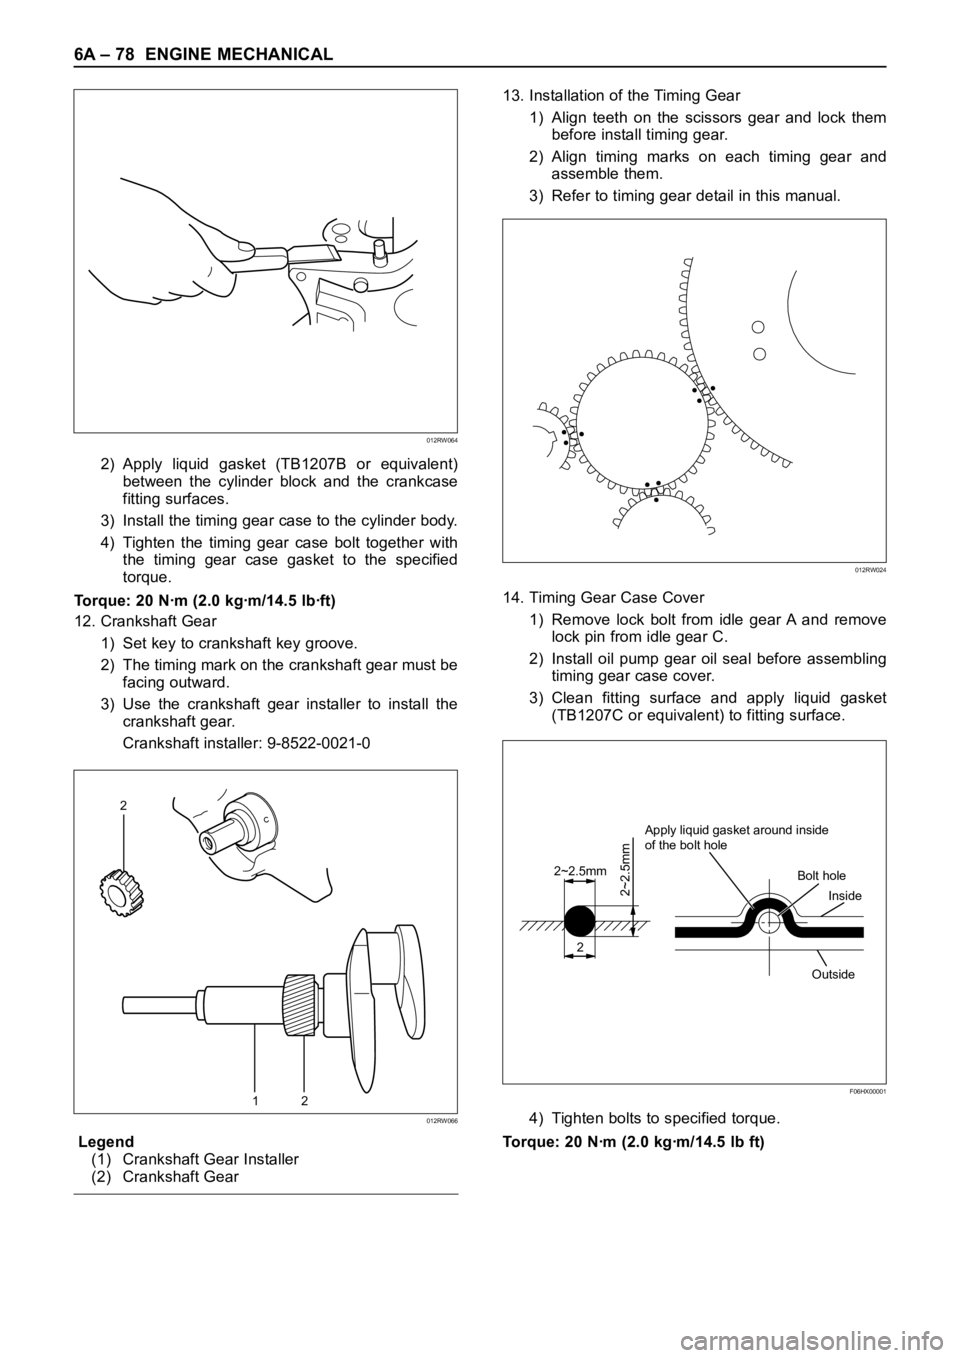
2) Apply liquid gasket (TB1207B or equivalent)
between the cylinder block and the crankcase
fitting surfaces.
3) Install the timing gear case to the cylinder body.
4) Tighten the timing gear case bolt together with
the timing gear case gasket to the specified
torque.
Torque: 20 Nꞏm (2.0 kgꞏm/14.5 lbꞏft)
12. Crankshaft Gear
1) Set key to crankshaft key groove.
2) The timing mark on the crankshaft gear must be
facing outward.
3) Use the crankshaft gear installer to install the
crankshaft gear.
Crankshaft installer: 9-8522-0021-0
Legend
(1) Crankshaft Gear Installer
(2) Crankshaft Gear13. Installation of the Timing Gear
1) Align teeth on the scissors gear and lock them
before install timing gear.
2) Align timing marks on each timing gear and
assemble them.
3) Refer to timing gear detail in this manual.
14. Timing Gear Case Cover
1) Remove lock bolt from idle gear A and remove
lock pin from idle gear C.
2) Install oil pump gear oil seal before assembling
timing gear case cover.
3) Clean fitting surface and apply liquid gasket
(TB1207C or equivalent) to fitting surface.
4) Tighten bolts to specified torque.
Torque: 20 Nꞏm (2.0 kgꞏm/14.5 lb ft)
12
2
012RW066
2
2~2.5mm
2~2.5mm
Apply liquid gasket around inside
of the bolt hole
Bolt hole
Inside
Outside
F06HX00001
012RW024
012RW064
Page 5365 of 6000
6A – 92 ENGINE MECHANICAL
NOTE: Check to see that the crankshaft turns
smoothly by rotating it manually.
4. Piston Assembly
1) Refer to “Piston and connecting rod” in this
manual.
5. Cylinder Block Side Cover Right and Left
6. Balance Shaft Right.
7. Timing Gear Case
1) Cut out the liquid gasket forced out from
between the contact surface of cylinder block
and crankshaft.
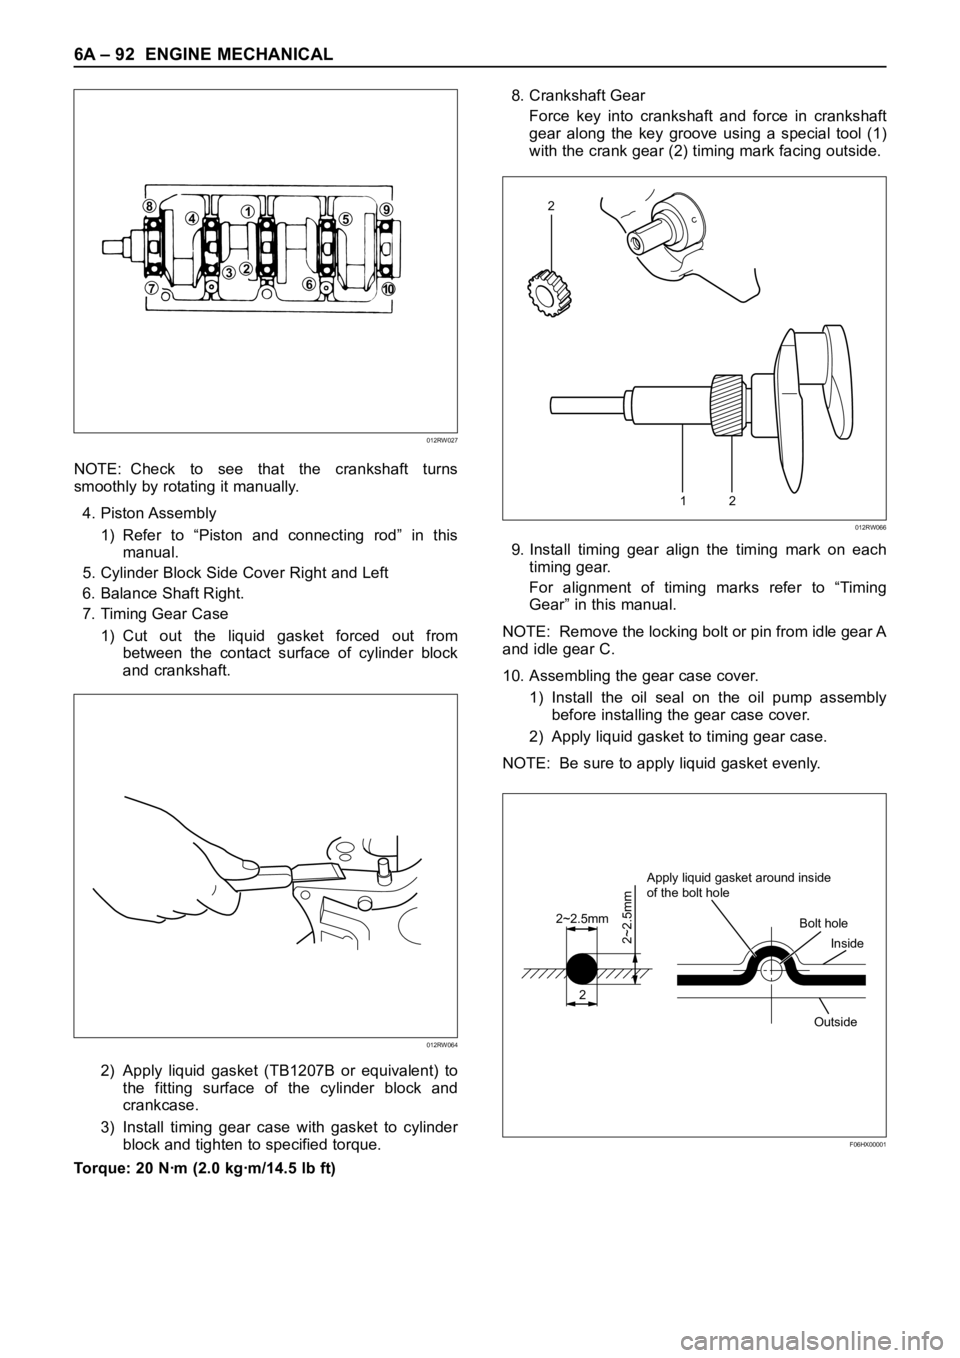
2) Apply liquid gasket (TB1207B or equivalent) to
the fitting surface of the cylinder block and
crankcase.
3) Install timing gear case with gasket to cylinder
block and tighten to specified torque.
Torque: 20 Nꞏm (2.0 kgꞏm/14.5 lb ft)8. Crankshaft Gear
Force key into crankshaft and force in crankshaft
gear along the key groove using a special tool (1)
with the crank gear (2) timing mark facing outside.
9. Install timing gear align the timing mark on each
timing gear.
For alignment of timing marks refer to “Timing
Gear” in this manual.
NOTE: Remove the locking bolt or pin from idle gear A
and idle gear C.
10. Assembling the gear case cover.
1) Install the oil seal on the oil pump assembly
before installing the gear case cover.
2) Apply liquid gasket to timing gear case.
NOTE: Be sure to apply liquid gasket evenly.
84159
610
237
012RW027
012RW064
12
2
012RW066
2
2~2.5mm
2~2.5mm
Apply liquid gasket around inside
of the bolt hole
Bolt hole
Inside
Outside
F06HX00001