Page 1619 of 3573

4JG2-NA/4JG2-TURBO ENGINE 6A2 Ð 17
2) Remove the injection pump rear bracket bolts 2 from
the injection pump bracket 3.
3) Remove the injection pump rear bracket bolts 4 and
the bracket 5 from the cylinder body.
4) Pull the injection pump along with the injection pump
timing gear free toward the rear of the engine.
NOTE:
Plug the injection pump delivery holder ports with the
shipping caps (or the equivalent) to prevent the entry of
foreign material.
13. Camshaft Timing Gear
1) Use a dial indicator to measure the camshaft end
play.
This must be done before removing the camshaft
gear.
If the camshaft end play exceeds the specified limit,
the thrust plate must be replaced.
2) Remove the camshaft timing gear bolt from the
camshaft.
NOTE:
Hold the camshaft stationaly to prevent the camshaft
from turning.
3) Use the universal puller 1 to pull out the camshaft
timing gear 2.
4) Remove the thrust plate 3.
14. Crank Shaft Gear
INSTALLATION
14. Crank Shaft Gear
1) Install the crankshaft gear.
2) Use the crankshaft gear installer 1 to install the
crankshaft gear 2.
The crankshaft gear timing mark ("X - X") must be
facing outward.
Crankshaft Gear Installer : 9-8522-0020-0
Standard
mm (in) Camshaft End Play
0.050-0.114 (0.0020-0.0044)Limit
0.2 (0.008)
Page 1623 of 3573
4JG2-NA/4JG2-TURBO ENGINE 6A2 Ð 21
VALVE STEM OIL SEAL & VALVE SPRING
REMOVAL
Preparation
·Disconnect battery ground cable.
1. Air cleaner Cover & Air Duct (4JG2-T Only)
·Disconnect air hoses.
·Release clips and bands and remove air cleaner
cover.
2. Intercooler Assembly (4JG2-T Only)
·(Refer to intercooler removal steps in this section)
3. Oil Level Gauge Tube
4. Cylinder Head Cover
5. Rocker Arm Shaft Assembly
·Loosen bolts and nuts of rocker arm shaft
·Bracket by turns and removal rocker
·Shaft asm.
6. Valve Spring
·Apply compressed air to cylinder from the glow
plug hole hold the valve in place.
·Using special tool, compress valve spring and
removal split collar.
Valve spring compressor: 9-8523-1423-0 (J-29760)
Page 1624 of 3573

6A2 Ð 22 4JG2-NA/4JG2-TURBO ENGINE
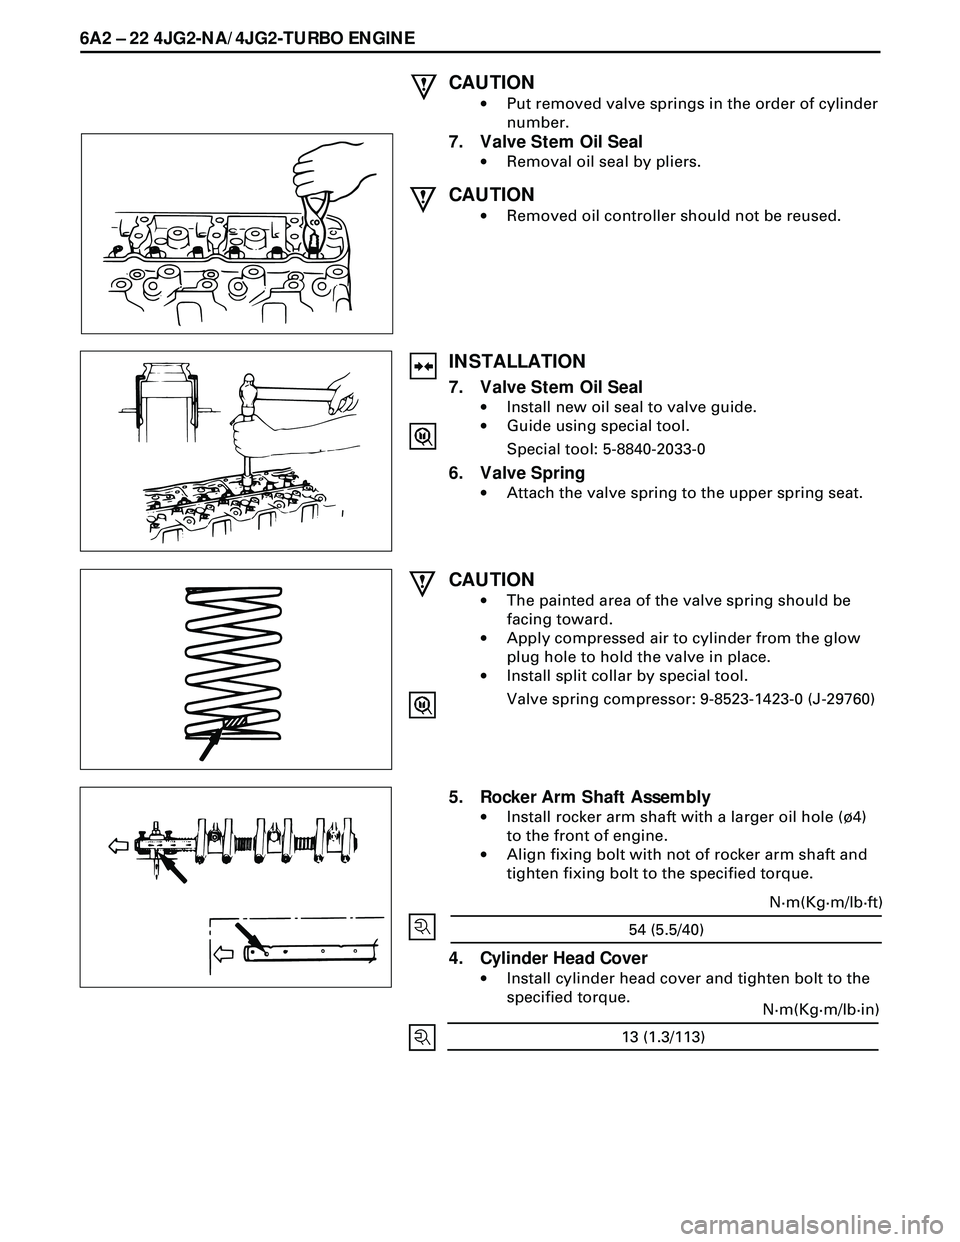
CAUTION
·Put removed valve springs in the order of cylinder
number.
7. Valve Stem Oil Seal
·Removal oil seal by pliers.
CAUTION
·Removed oil controller should not be reused.
CAUTION
·The painted area of the valve spring should be
facing toward.
·Apply compressed air to cylinder from the glow
plug hole to hold the valve in place.
·Install split collar by special tool.
Valve spring compressor: 9-8523-1423-0 (J-29760)
INSTALLATION
7. Valve Stem Oil Seal
·Install new oil seal to valve guide.
·Guide using special tool.
Special tool: 5-8840-2033-0
6. Valve Spring
·Attach the valve spring to the upper spring seat.
5. Rocker Arm Shaft Assembly
·Install rocker arm shaft with a larger oil hole (¿4)
to the front of engine.
·Align fixing bolt with not of rocker arm shaft and
tighten fixing bolt to the specified torque.
54 (5.5/40)
N·m(Kg·m/lb·ft)
4. Cylinder Head Cover
·Install cylinder head cover and tighten bolt to the
specified torque.
13 (1.3/113)
N·m(Kg·m/lb·in)
Page 1626 of 3573
6A2 Ð 24 4JG2-NA/4JG2-TURBO ENGINE
ROCKER ARM SHAFT ASSEMBLY
REMOVAL
Preparation
·Disconnect battery ground cable.
1. Air Cleaner Cover & Air Duct (4JG2-T Only)
·Disconnect air hoses.
·Release clips and bands and remove air cleaner
cover.
2. Intercooler Assembly (4JG2-T Only)
·Refer to intercooler removal steps in this section.
3. Oil Level Gauge Tube
4. Cylinder Head Cover
5. Rocker Arm Shaft Assembly
·Loosen bolts and nuts of rocker arm shaft bracket
by turns and remove rocker shaft asm.
Page 1629 of 3573

4JG2-NA/4JG2-TURBO ENGINE 6A 2Ð 27
REMOVAL
Preparation
·Remove battery. (two batteries for cold area)
·Disconnect window washer hose, and remove
engine hood.
·Drain coolant.
·Space stand and front right tire.
1. Radiator Hose : Upper
·Disconnect upper radiator hose from engine side.
2. Air Cleaner Cover & Air Duct
3. Intercooler Assembly (4JG2-T Only)
·(Refer to intercooler removal steps in this section)
4. Oil Level Gauge Guide Tube
5. P/S Pump
·Loosen P/S pump fixing bolts and adjusting bolt
and remove two drive belts.
·Remove two fixing bolts (front side). A fixing nut
(rear side) and support P/S pump asm with oil
hoses by tying to body side.
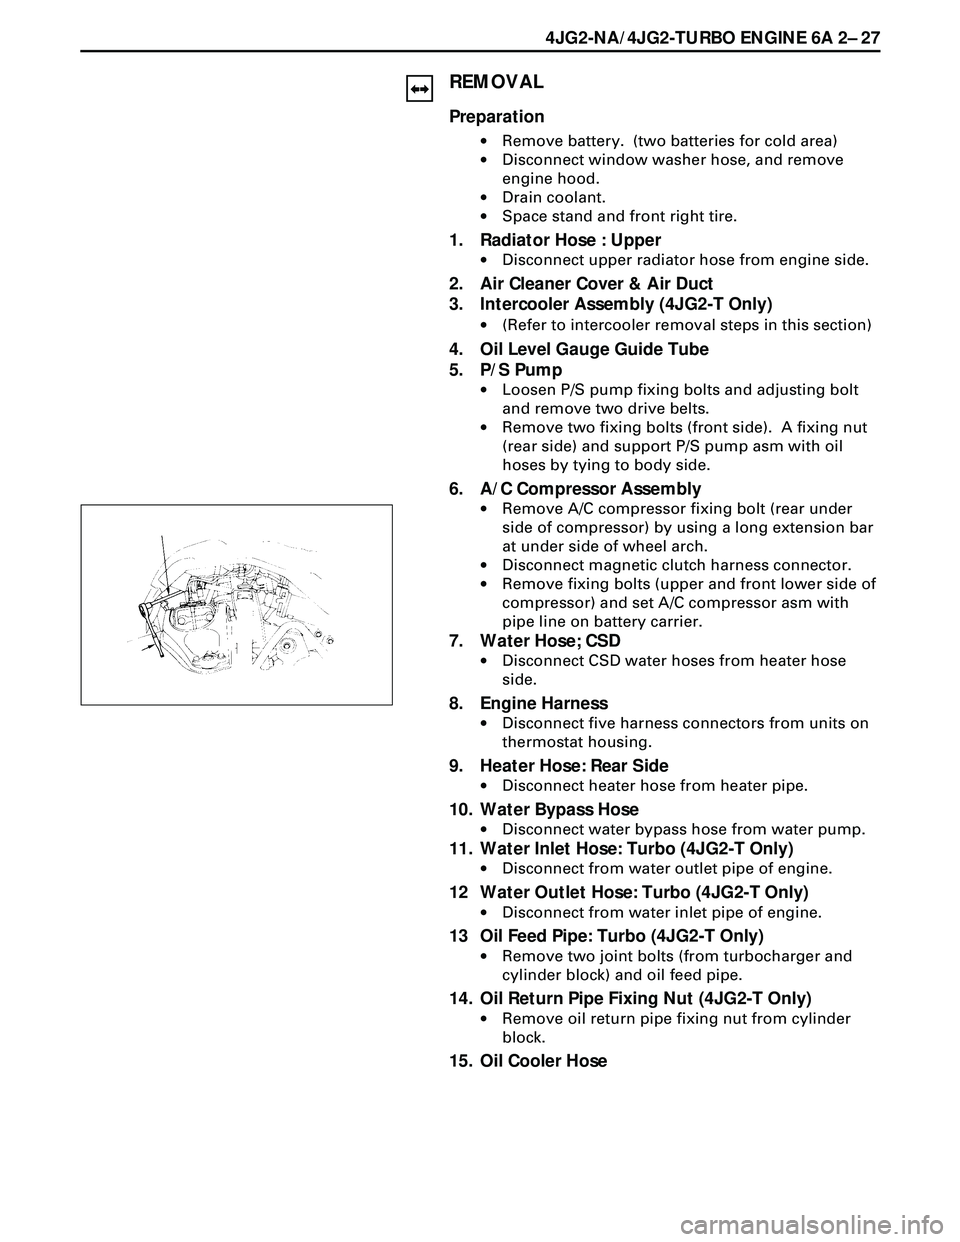
6. A/C Compressor Assembly
·Remove A/C compressor fixing bolt (rear under
side of compressor) by using a long extension bar
at under side of wheel arch.
·Disconnect magnetic clutch harness connector.
·Remove fixing bolts (upper and front lower side of
compressor) and set A/C compressor asm with
pipe line on battery carrier.
7. Water Hose; CSD
·Disconnect CSD water hoses from heater hose
side.
8. Engine Harness
·Disconnect five harness connectors from units on
thermostat housing.
9. Heater Hose: Rear Side
·Disconnect heater hose from heater pipe.
10. Water Bypass Hose
·Disconnect water bypass hose from water pump.
11. Water Inlet Hose: Turbo (4JG2-T Only)
·Disconnect from water outlet pipe of engine.
12 Water Outlet Hose: Turbo (4JG2-T Only)
·Disconnect from water inlet pipe of engine.
13 Oil Feed Pipe: Turbo (4JG2-T Only)
·Remove two joint bolts (from turbocharger and
cylinder block) and oil feed pipe.
14. Oil Return Pipe Fixing Nut (4JG2-T Only)
·Remove oil return pipe fixing nut from cylinder
block.
15. Oil Cooler Hose
Page 1630 of 3573

6A2 Ð 28 4JG2-NA/4JG2-TURBO ENGINE
16. Exh. Manifold; W/turbo (4JG2-T Only)
·Remove exh. manifold bracket fixing bolt from
exh. manifold.
·Remove exh. manifold fixing bolts and nuts from
cylinder head.
·After pulling out exh. manifold a little, remove oil
return pipe flange from stud bolt and remove exh.
manifold w/turbo.
17. Front Exhaust Pipe
18. Fuel Leak Off Hose
19. Cylinder Head Cover
20. Glow Plug Harness
21. Injection Pipe
·Loosen sleeve nuts on injection pump side.
·Disconnect sleeve nuts on injection pipe.
22. Fuel Leak Off Pipe
23. Rocker Arm Shaft Assembly
24. Push Rod
25. Cylinder Head W/inlet Manifold
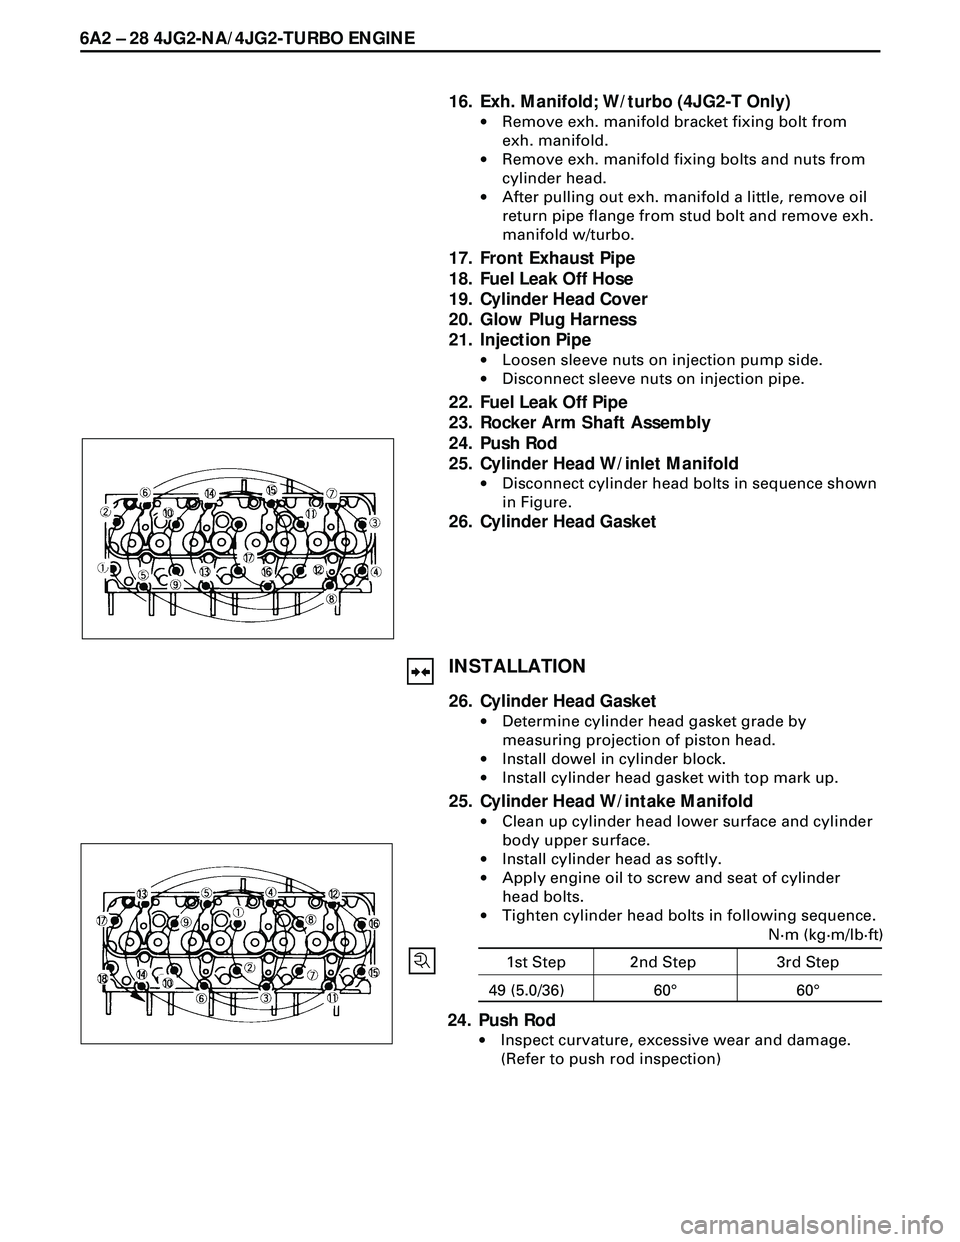
·Disconnect cylinder head bolts in sequence shown
in Figure.
26. Cylinder Head Gasket
INSTALLATION
26. Cylinder Head Gasket
·Determine cylinder head gasket grade by
measuring projection of piston head.
·Install dowel in cylinder block.
·Install cylinder head gasket with top mark up.
25. Cylinder Head W/intake Manifold
·Clean up cylinder head lower surface and cylinder
body upper surface.
·Install cylinder head as softly.
·Apply engine oil to screw and seat of cylinder
head bolts.
·Tighten cylinder head bolts in following sequence.
24. Push Rod
·Inspect curvature, excessive wear and damage.
(Refer to push rod inspection)
1st Step
N·m (kg·m/lb·ft)
49 (5.0/36)
2nd Step
60°3rd Step
60°
Page 1633 of 3573
4JG2-NA/4JG2-TURBO ENGINE 6A2 Ð 31
CRANKCASE
REMOVAL
Preparation
·Disconnect battery ground cable.
·Lift up car.
·Drain engine oil.
NOTE
·Install drain plug with new gasket.
1. Transmission Housing Bolt
·Remove six fixing bolts from under side of hous-
ing.
2. Oil Return Pipe: Turbo (4JG2 -T only)
·Remove return pipe fixing nuts and set return pipe
frange from stud on crankcase.
3. Oil Pipe Clip Bolt: Vaccum Pump
4. Oil Level Gauge Guide Tube
·Remove two guide tube stay fixing bolts.
·Disconnect blow by hose and remove oil level
gauge guide tube.
Page 1634 of 3573

6A2 Ð 32 4JG2-NA/4JG2-TURBO ENGINE
5. Vacuum Hose
6. Crankcase
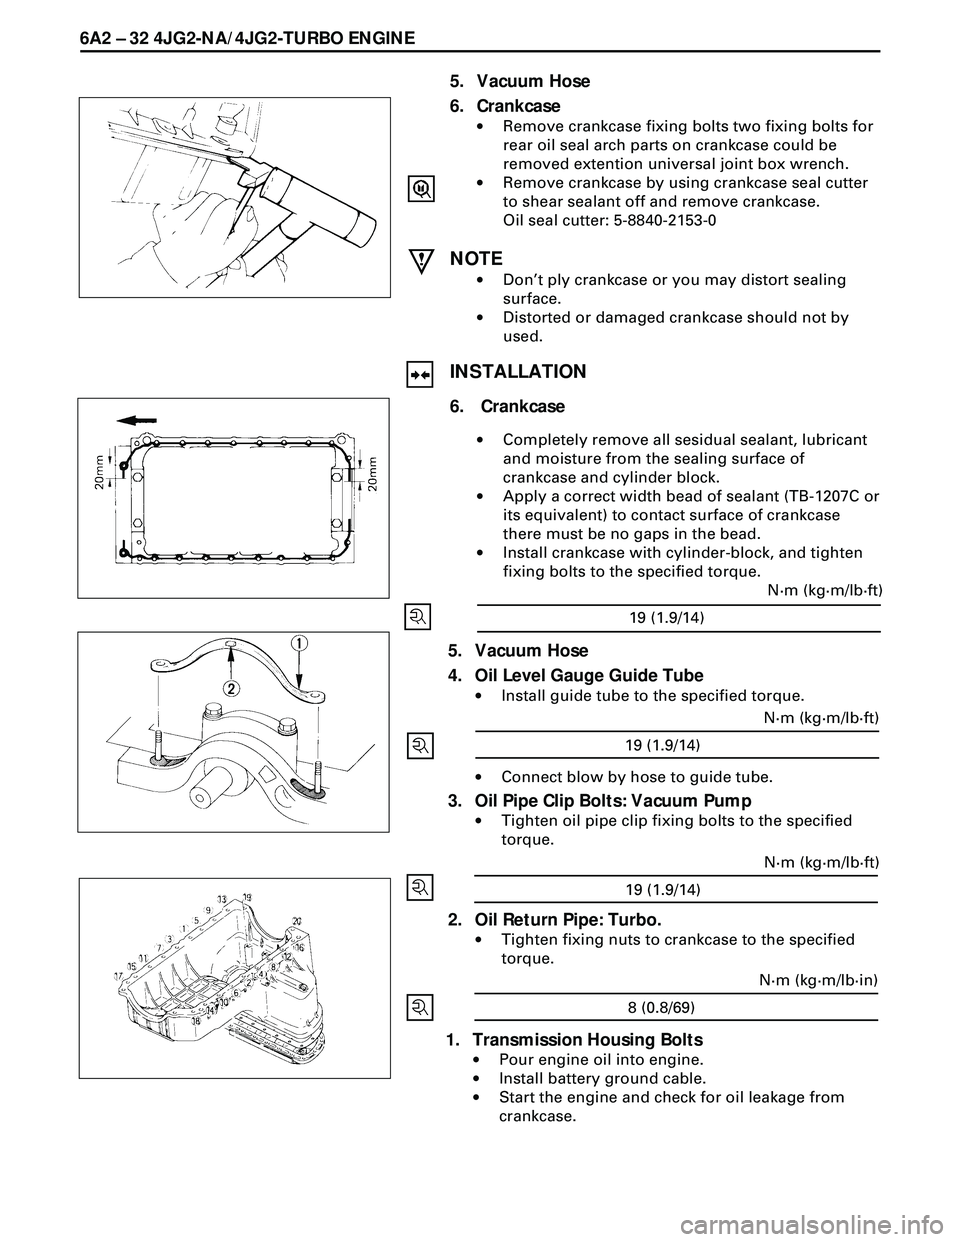
·Remove crankcase fixing bolts two fixing bolts for
rear oil seal arch parts on crankcase could be
removed extention universal joint box wrench.
·Remove crankcase by using crankcase seal cutter
to shear sealant off and remove crankcase.
Oil seal cutter: 5-8840-2153-0
NOTE
·DonÕt ply crankcase or you may distort sealing
surface.
·Distorted or damaged crankcase should not by
used.
INSTALLATION
6. Crankcase
·Completely remove all sesidual sealant, lubricant
and moisture from the sealing surface of
crankcase and cylinder block.
·Apply a correct width bead of sealant (TB-1207C or
its equivalent) to contact surface of crankcase
there must be no gaps in the bead.
·Install crankcase with cylinder-block, and tighten
fixing bolts to the specified torque.
5. Vacuum Hose
4. Oil Level Gauge Guide Tube
·Install guide tube to the specified torque.
·Connect blow by hose to guide tube.
3. Oil Pipe Clip Bolts: Vacuum Pump
·Tighten oil pipe clip fixing bolts to the specified
torque.
2. Oil Return Pipe: Turbo.
·Tighten fixing nuts to crankcase to the specified
torque.
1. Transmission Housing Bolts
·Pour engine oil into engine.
·Install battery ground cable.
·Start the engine and check for oil leakage from
crankcase.
19 (1.9/14)N·m (kg·m/lb·ft)
19 (1.9/14)N·m (kg·m/lb·ft)
19 (1.9/14)N·m (kg·m/lb·ft)
8 (0.8/69)N·m (kg·m/lb·in)