Page 1322 of 1807

EM0AN-03
S00635
Piston Ring (No.1 Compression)
Piston Ring (Side Rail and Expander)
� Snap RingPiston Ring (No.2 Compression)
� Snap RingPistonPiston Pin
� Connecting Rod Bushing
Connecting Rod
Connecting Rod Bearing
Connecting
Rod Cap
No.2 Water Bypass
Pipe with Hose
� Gasket
x 8
Flywheel (M/T)
Engine Coolant Drain Plug
Rear Oil Seal
Retainer
� Oil Seal
x 6x 8 �
Front Spacer
Rear Plate
Drive Plate (A/T)
Crankshaft Position Sensor
Cylinder Block� O-Ring
Water Pump
x 6
Generator
�
� Crankshaft
Front Oil Sealx 9 Oil Pump
Idler Pulley
� O-RingKnock Sensor 2
Fuel Pipe Supportx 6
Oil Nozzle
Knock
Sensor 1
LH Engine Mounting
Bracket and
Insulator Assembly
Crankshaft
� O-Ring
Oil Cooler
Oil Filter� Gasket � O-Ring
Oil Filter Bracket
� O-RingMain Bearing
Crankshaft Thrust
Washer
Main Bearing Cap
Turbo Oil
Outlet Pipe
� Gasket
No.1 Oil Pan
� Gasket
x 16x 6
x 5
x 14
� GasketRH Engine Mounting
Bracket and Insulator
Assembly
Oil Level Sensor
Oil Strainer
No.2 Oil Pan
Drain Plug
� Non-reusable part
� Precoated part
� Gasket
EM-70
- ENGINE MECHANICAL (2JZ-GTE)CYLINDER BLOCK
1175 Author�: Date�:
1997 SUPRA (RM502U)
CYLINDER BLOCK
COMPONENTS
Page 1323 of 1807

EM0AO-02
P02447
P04467
P12207Knock Sensor
Union for Oil Cooler HoseOil Pressure
Switch
SST
- ENGINE MECHANICAL (2JZ-GTE)CYLINDER BLOCK
EM-71
1176 Author�: Date�:
1997 SUPRA (RM502U)
DISASSEMBLY
1. M/T:
REMOVE FLYWHEEL
2. A/T:
REMOVE DRIVE PLATE
3. INSTALL ENGINE TO ENGINE STAND FOR
DISASSEMBLY
4. REMOVE GENERATOR
5. REMOVE TIMING BELT AND PULLEYS
(See page EM-15)
6. REMOVE CYLINDER HEAD (See page EM-29)
7. REMOVE OIL COOLER (See page LU-20)
8. REMOVE NO.2 WATER BYPASS PIPE WITH HOSE
Remove the 2 bolts, 2 nuts, water bypass pipe and gasket.
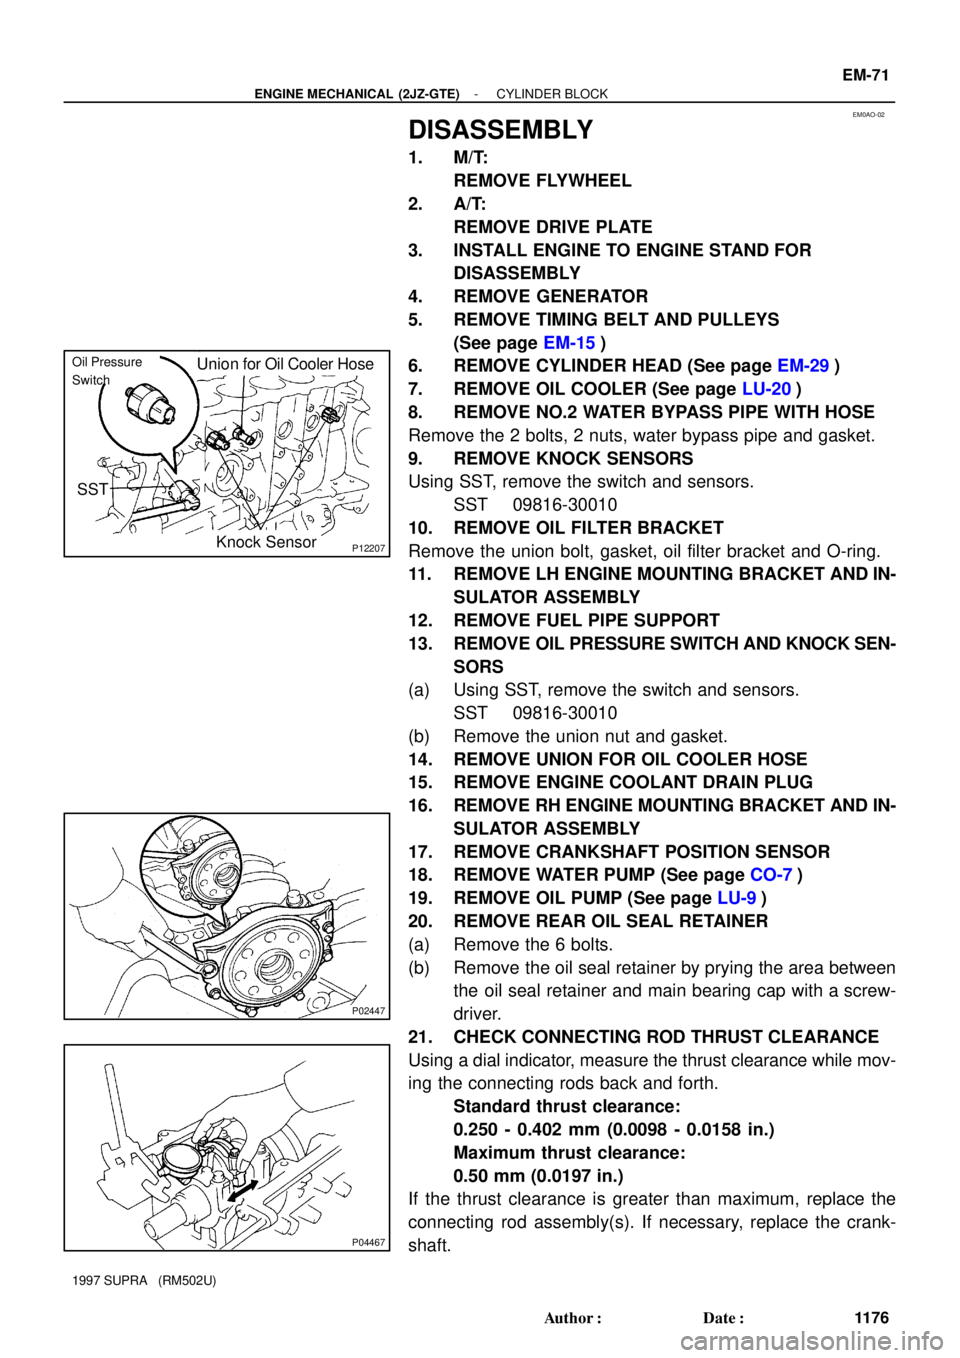
9. REMOVE KNOCK SENSORS
Using SST, remove the switch and sensors.
SST 09816-30010
10. REMOVE OIL FILTER BRACKET
Remove the union bolt, gasket, oil filter bracket and O-ring.
11. REMOVE LH ENGINE MOUNTING BRACKET AND IN-
SULATOR ASSEMBLY
12. REMOVE FUEL PIPE SUPPORT
13. REMOVE OIL PRESSURE SWITCH AND KNOCK SEN-
SORS
(a) Using SST, remove the switch and sensors.
SST 09816-30010
(b) Remove the union nut and gasket.
14. REMOVE UNION FOR OIL COOLER HOSE
15. REMOVE ENGINE COOLANT DRAIN PLUG
16. REMOVE RH ENGINE MOUNTING BRACKET AND IN-
SULATOR ASSEMBLY
17. REMOVE CRANKSHAFT POSITION SENSOR
18. REMOVE WATER PUMP (See page CO-7)
19. REMOVE OIL PUMP (See page LU-9)
20. REMOVE REAR OIL SEAL RETAINER
(a) Remove the 6 bolts.
(b) Remove the oil seal retainer by prying the area between
the oil seal retainer and main bearing cap with a screw-
driver.
21. CHECK CONNECTING ROD THRUST CLEARANCE
Using a dial indicator, measure the thrust clearance while mov-
ing the connecting rods back and forth.
Standard thrust clearance:
0.250 - 0.402 mm (0.0098 - 0.0158 in.)
Maximum thrust clearance:
0.50 mm (0.0197 in.)
If the thrust clearance is greater than maximum, replace the
connecting rod assembly(s). If necessary, replace the crank-
shaft.
Page 1345 of 1807

P10820
Adhesive
P13197
Oil Pressure
SwitchKnock Sensor
- ENGINE MECHANICAL (2JZ-GTE)CYLINDER BLOCK
EM-93
1198 Author�: Date�:
1997 SUPRA (RM502U)
22. INSTALL OIL PRESSURE SWITCH AND KNOCK SEN-
SORS
(a) Install the union nut with a new gasket.
SST 09816-30010
Torque: 55 N´m (550 kgf´cm, 41 ft´lbf)
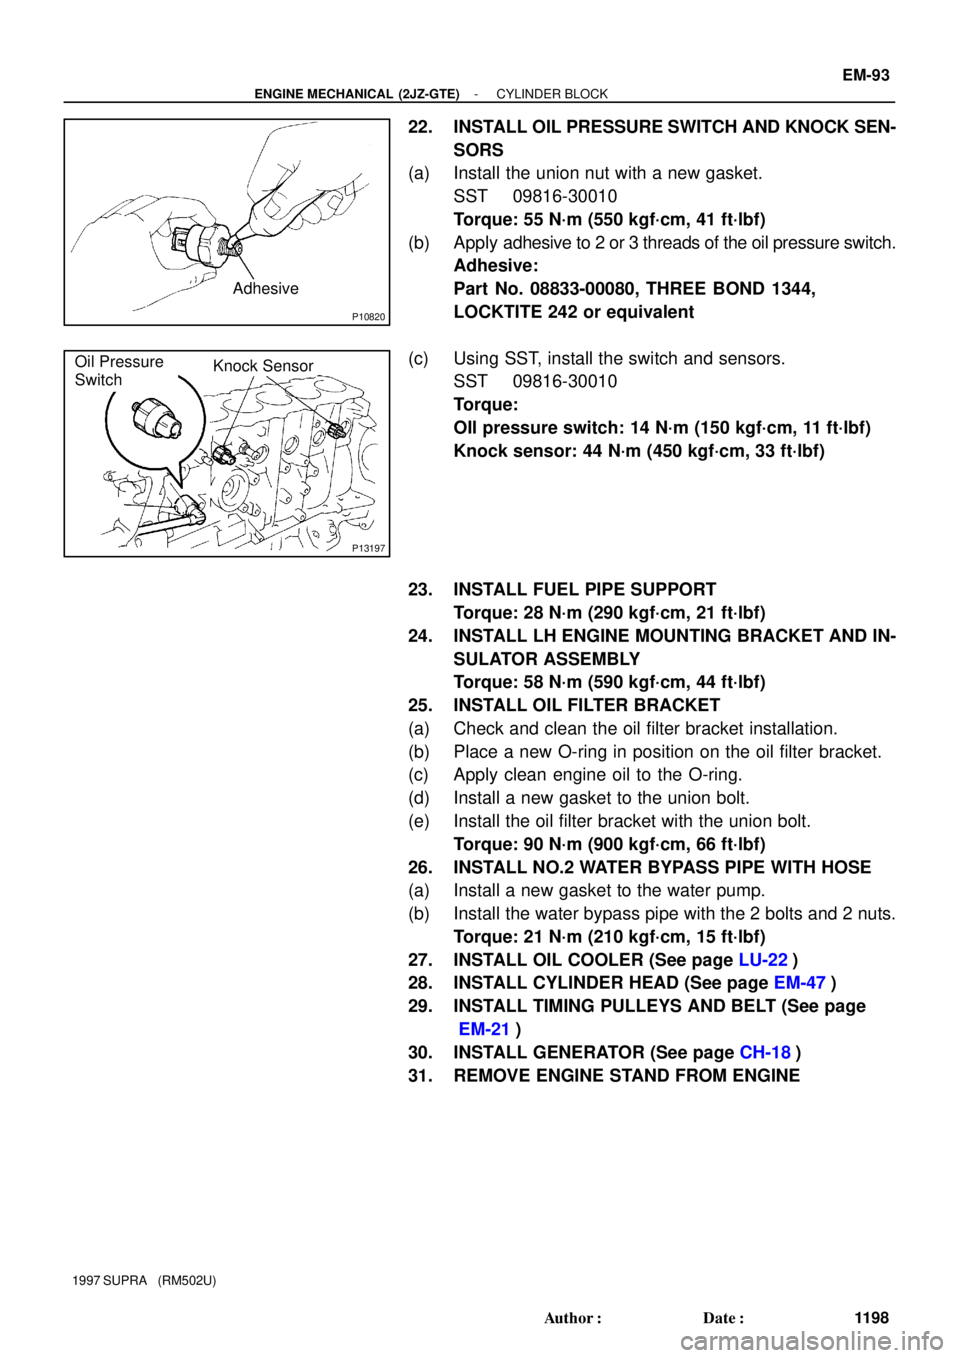
(b) Apply adhesive to 2 or 3 threads of the oil pressure switch.
Adhesive:
Part No. 08833-00080, THREE BOND 1344,
LOCKTITE 242 or equivalent
(c) Using SST, install the switch and sensors.
SST 09816-30010
Torque:
OIl pressure switch: 14 N´m (150 kgf´cm, 11 ft´lbf)
Knock sensor: 44 N´m (450 kgf´cm, 33 ft´lbf)
23. INSTALL FUEL PIPE SUPPORT
Torque: 28 N´m (290 kgf´cm, 21 ft´lbf)
24. INSTALL LH ENGINE MOUNTING BRACKET AND IN-
SULATOR ASSEMBLY
Torque: 58 N´m (590 kgf´cm, 44 ft´lbf)
25. INSTALL OIL FILTER BRACKET
(a) Check and clean the oil filter bracket installation.
(b) Place a new O-ring in position on the oil filter bracket.
(c) Apply clean engine oil to the O-ring.
(d) Install a new gasket to the union bolt.
(e) Install the oil filter bracket with the union bolt.
Torque: 90 N´m (900 kgf´cm, 66 ft´lbf)
26. INSTALL NO.2 WATER BYPASS PIPE WITH HOSE
(a) Install a new gasket to the water pump.
(b) Install the water bypass pipe with the 2 bolts and 2 nuts.
Torque: 21 N´m (210 kgf´cm, 15 ft´lbf)
27. INSTALL OIL COOLER (See page LU-22)
28. INSTALL CYLINDER HEAD (See page EM-47)
29. INSTALL TIMING PULLEYS AND BELT (See page
EM-21)
30. INSTALL GENERATOR (See page CH-18)
31. REMOVE ENGINE STAND FROM ENGINE
Page 1368 of 1807

B00319
Recommended Viscosity (SAE):
TEMPERATURE RANGE ANTICIPATED BEFORE NEXT OIL CHANGE °F
°C-20
-29 0
-1820
-740
460
1680
27100
38 10W-30
5W-30 PREFERRED
2JZ-GE
Z09522
Recommended Viscosity (SAE):
10W - 30
5W - 30
-20
-29 -18 -7 4 16 27
38 0 20 40 60 80 100
°C °F
TEMPERATURE RANGE ANTICIPATED BEFORE NEXT OIL CHANGE
2JZ-GTE
LU0JY-01
Z13413
2JZ-GTE
Z16754
2JZ-GTE M/T
P11837
- LUBRICATIONOIL AND FILTER
LU-1
1448 Author�: Date�:
1997 SUPRA (RM502U)
OIL AND FILTER
INSPECTION
1. CHECK OIL QUALITY
Check the oil for deterioration, entry of water, discoloring or thin-
ning.
If oil quality is visibly poor, replace the oil.
Oil grade (2JZ-GE):
API grade SH Energy-Conserving II or SJ, Energy-
Conserving or ILSAC multigrade engine oil.
SAE 5W-30 is the best choice for your vehicle, for
good fuel economy, and good starting in cold weath-
er.
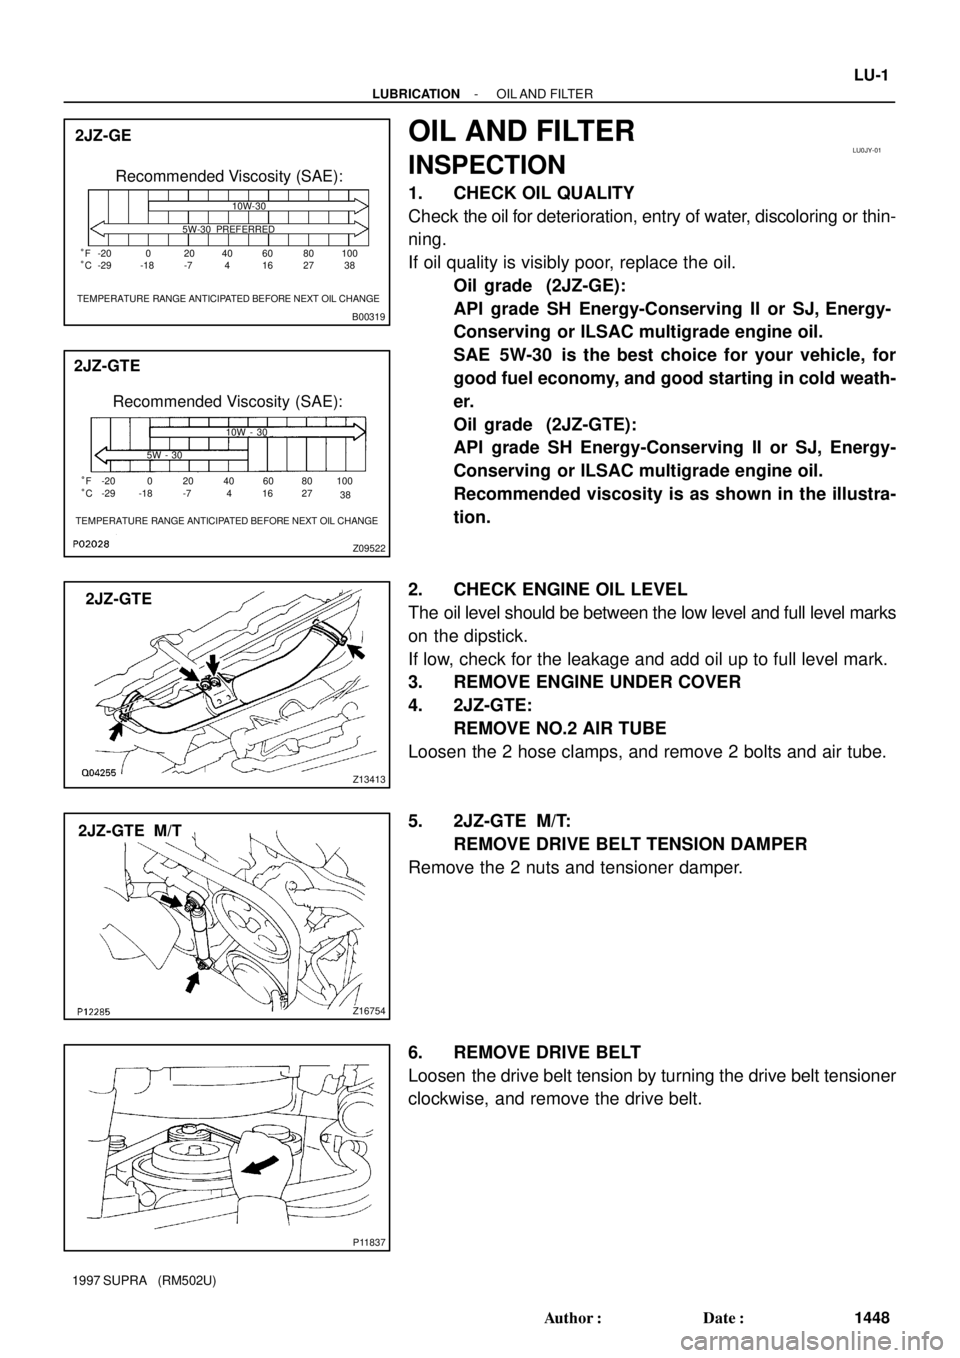
Oil grade (2JZ-GTE):
API grade SH Energy-Conserving II or SJ, Energy-
Conserving or ILSAC multigrade engine oil.
Recommended viscosity is as shown in the illustra-
tion.
2. CHECK ENGINE OIL LEVEL
The oil level should be between the low level and full level marks
on the dipstick.
If low, check for the leakage and add oil up to full level mark.
3. REMOVE ENGINE UNDER COVER
4. 2JZ-GTE:
REMOVE NO.2 AIR TUBE
Loosen the 2 hose clamps, and remove 2 bolts and air tube.
5. 2JZ-GTE M/T:
REMOVE DRIVE BELT TENSION DAMPER
Remove the 2 nuts and tensioner damper.
6. REMOVE DRIVE BELT
Loosen the drive belt tension by turning the drive belt tensioner
clockwise, and remove the drive belt.
Page 1369 of 1807

P12279
P12303
Oil Pressure
Switch
SST
P12301
Oil Pressure Gauge LU-2
- LUBRICATIONOIL AND FILTER
1449 Author�: Date�:
1997 SUPRA (RM502U)
7. DISCONNECT A/C COMPRESSOR FROM ENGINE
(a) Remove the 4 bolts and nut.
(b) Using a torx socket (E10), remove the stud bolt.
(c) Disconnect the compressor connector.
(d) Remove 4 bolts and pull the compressor downward.
8. REMOVE OIL PRESSURE SWITCH, AND INSTALL OIL
PRESSURE GAUGE
(a) Disconnect the oil pressure switch connector.
(b) Using SST, remove the oil pressure switch.
SST 09816-30010
(c) Install an oil pressure gauge.
9. REINSTALL A/C COMPRESSOR
(a) Temporarily install the A/C compressor with the 4 bolts.
(b) Connect the compressor connector.
(c) Install the compressor with the stud bolts, 4 bolts and nut.
Torque:
Stud bolt: 26 N´m (265 kgf´cm, 19 ft´lbf)
Bolt and nut: 52 N´m (530 kgf´cm, 38 ft´lbf)
10. REINSTALL DRIVE BELT
Install the drive belt by turning the drive belt tensioner clock-
wise.
11. WARM UP ENGINE
Allow the engine to warm up to normal operating temperature.
12. CHECK OIL PRESSURE
Oil pressure:
At idle
49 kPa (0.5 kgf/cm
2, 7.1 psi) or more
At 3,000 rpm (2JZ-GE) or 4,000 rpm (2JZ-GTE)
324 - 579 kPa
(3.3 - 5.9 kgf/cm
2, 47 - 84 psi)
13. REMOVE DRIVE BELT
14. DISCONNECT A/C COMPRESSOR FROM ENGINE
Page 1370 of 1807
S00888
Oil Pressure Switch Union Nut
Adhesive
- LUBRICATIONOIL AND FILTER
LU-3
1450 Author�: Date�:
1997 SUPRA (RM502U)
15. REMOVE OIL PRESSURE GAUGE, AND REINSTALL
OIL PRESSURE SWITCH
(a) Remove the oil pressure gauge.
(b) Tighten the union nut.
Torque: 60 N´m (600 kgf´cm, 44 ft´lbf)
(c) Apply adhesive to 2 or 3 thread of the oil pressure switch.
Adhesive:
Part No. 08833-00080, THREE BOND 1344,
LOCKTITE 242 or equivalent
(d) Using SST, install the oil pressure switch.
SST 09816-30010
Torque: 14 N´m (150 kgf´cm, 11 ft´lbf)
(e) Connect the oil pressure switch connector.
16. REINSTALL A/C COMPRESSOR
17. REINSTALL DRIVE BELT
18. START ENGINE AND CHECK FOR REAKS
19. 2JZ-GTE M/T:
INSTALL DRIVE BELT TENSIONER DAMPER
Torque: 20 N´m (200 kgf´cm, 14 ft´lbf)
20. 2JZ-GTE:
REINSTALL NO.2 AIR TUBE
21. REINSTALL ENGINE UNDER COVER
Page 1371 of 1807

LU0JZ-01
P12280
P12205
SST
Z04118
LU-4
- LUBRICATIONOIL AND FILTER
1451 Author�: Date�:
1997 SUPRA (RM502U)
REPLACEMENT
CAUTION:
�Prolonged and repeated contact with mineral oil will
result in the removal of natural fats from the skin,
leading to dryness, irritation and dermatitis. In addi-
tion, used engine oil contains potentially harmful
contaminants which may cause skin cancer.
�Exercise caution in order to minimize the length and
frequency of contact of your skin to used oil. Wear
protective clothing and gloves. Wash your skin thor-
oughly with soap and water, or use water-less hand
cleaner, to remove any used engine oil. Do not use
gasoline, thinners, or solvents.
�In order to preserve the environment, used oil and
used oil filters must be disposed of only at desig-
nated disposal sites.
1. DRAIN ENGINE OIL
(a) Remove the oil filler cap.
(b) Remove the oil drain plug, and drain the oil into a contain-
er.
2. REPLACE OIL FILTER
(a) Using SST, remove the oil filter.
SST 09228-07501
(b) Check and clean the oil filter installation surface.
(c) Apply clean engine oil to the gasket of a new oil filter.
Page 1372 of 1807

P12212
P12206
Additional
3/4 Turn
Z13415
w/ Oil filter
Changew/o Oil filter
ChangeDry fill
2JZ-GE
2JZ-GTE5.2 Iiters
(5.5 US qts,
4.6 Imp. qts)
5.0 Iiters
(5.3 US qts,
4.4 Imp. qts)
4.9 Iiters
(5.2 US qts,
4.3 Imp. qts)6.5 Iiters
(6.9 US qts,
5.7 Imp. qts)
4.7 Iiters
(5.0 US qts,
4.1 Imp. qts)6.5 Iiters
6.9 US qts,
5.7 Imp. qts)
- LUBRICATIONOIL AND FILTER
LU-5
1452 Author�: Date�:
1997 SUPRA (RM502U)
(d) Lightly screw the oil filter into place, and tighten it until the
gasket contacts the seat.
(e) Using SST, tighten it an additional 3/4 turn.
SST 09228-07501
3. REFILL WITH ENGINE OIL
(a) To wipe off oil that has dripped onto the engine under cov-
er, remove the 4 screws and bend the under cover down-
ward.
NOTICE:
�To avoid damaging the silencer, do not bend the en-
gine under cover more than 150 mm (5.91 in.).
�If oil gets on the silencer, wipe it off with a dry rag.
(b) Clean and install the oil drain plug with a new gasket.
Torque: 38 N´m (375 kgf´cm, 27 ft´lbf)
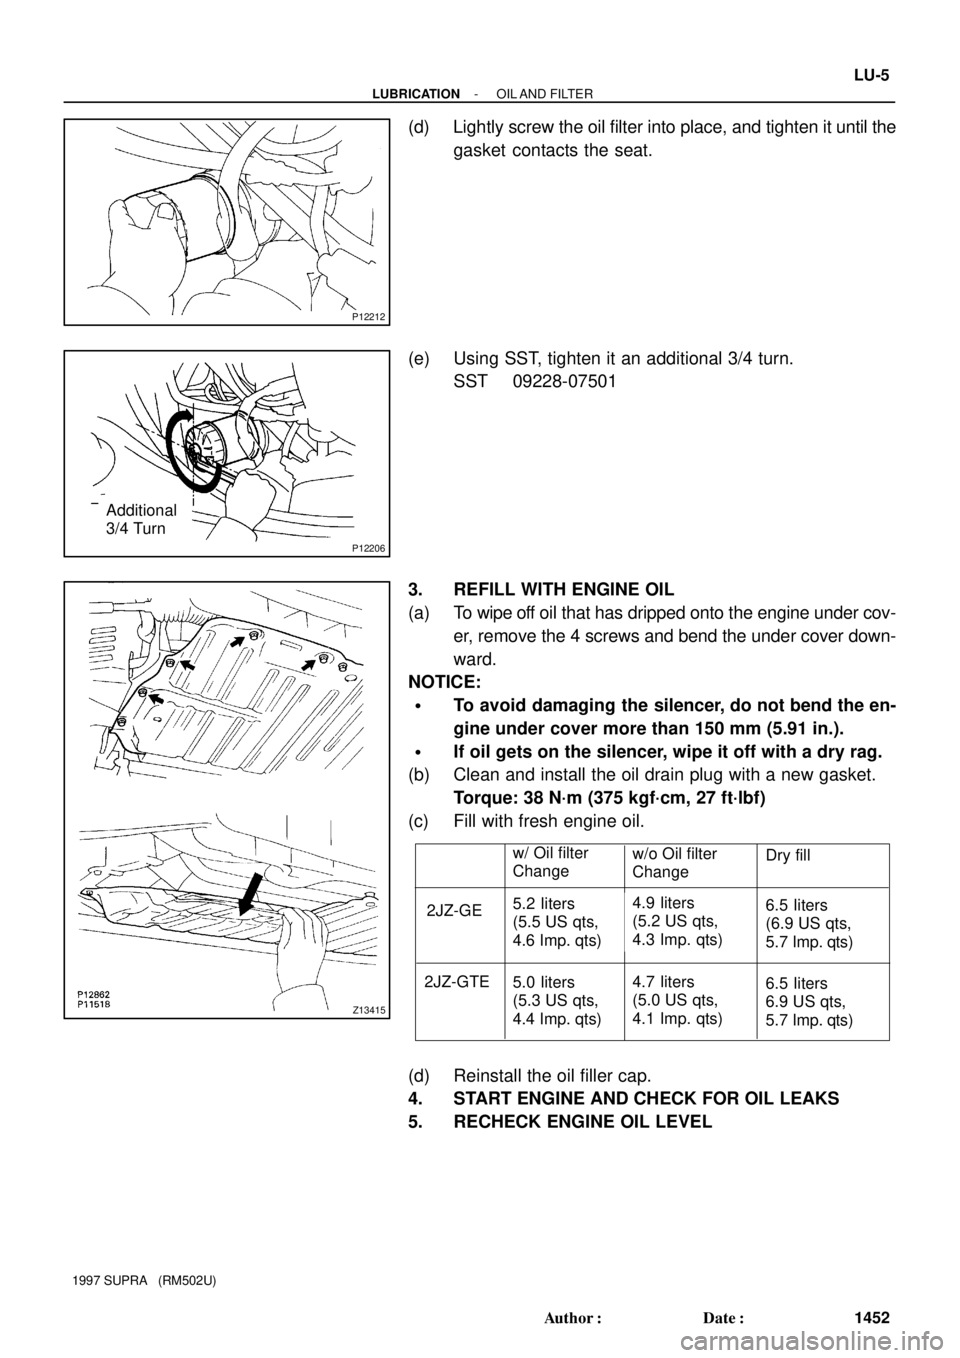
(c) Fill with fresh engine oil.
(d) Reinstall the oil filler cap.
4. START ENGINE AND CHECK FOR OIL LEAKS
5. RECHECK ENGINE OIL LEVEL