Page 1062 of 3342
G3M1052
11) Hold companion flange with ST and remove drive pin-
ion nut.
ST 498427200 FLANGE WRENCH
G3M0073
12) Extract the companion flange with a puller.
G3M0074
13) Press the end of drive pinion shaft and extract it
together with rear bearing cone, preload adjusting spacer
and washer.
NOTE:
Hold the drive pinion so as not to drop it.
ST 398467700 DRIFT
G3M0071
14) Draw out pinion mate shaft and remove pinion mate
gears, side gears and thrust washers.
NOTE:
The gears as well as thrust washers should be marked or
kept separated left and right, and front and rear.
G3M0072
15) Hold companion flange with ST and remove drive pin-
ion nut.
ST 498427200 FLANGE WRENCH
24
3-4SERVICE PROCEDURE
2. Rear Differential
Page 1063 of 3342
G3M0073
16) Extract the companion flange with a puller.
G3M0074
17) Press the end of drive pinion shaft and extract it
together with rear bearing cone, preload adjusting spacer
and washer.
NOTE:
Hold the drive pinion so as not to drop it.
ST 398467700 DRIFT
G3M0075
18) Remove rear bearing cone from drive pinion by sup-
porting cone with ST.
NOTE:
Place the replacer so that its center-recessed side faces
the pinion gear.
ST 498515500 REPLACER
G3M0076
19) Remove front oil seal from differential carrier using ST.
ST 398527700 PULLER ASSY
G3M0077
20) Remove pilot bearing together with front bearing cone
using ST.
ST 398467700 DRIFT
25
3-4SERVICE PROCEDURE
2. Rear Differential
Page 1064 of 3342
 When replacing bearings, tap front bearing cup and
rear bearing cup in this order out of case by using a brass
bar.
D: INSPECTION
Wash all the disassembled parts clean, and examine them
fo")
G3M0078
21) When replacing bearings, tap front bearing cup and
rear bearing cup in this order out of case by using a brass
bar.
D: INSPECTION
Wash all the disassembled parts clean, and examine them
for wear, damage, or other defects. Repair or replace
defective parts as necessary.
1) Crown gear and drive pinion
(1) If abnormal tooth contact is evident, find out the
cause and adjust to give correct tooth contact at
assembly. Replace the gear if excessively worn or inca-
pable of adjustment.
(2) If crack, score, or seizure is evident, replace as a
set. Slight damage of tooth can be corrected by oil
stone or the like.
2) Side gear and pinion mate gear
(1) Replace if crack, score, or other defects are evident
on tooth surface.
(2) Replace if thrust washer contacting surface is worn
or seized. Slight damage of the surface can be cor-
rected by oil stone or the like.
3) Bearing
Replace if seizure, peeling, wear, rust, dragging during
rotation, abnormal noise or other defect is evident.
4) Thrust washers of side gear and pinion mate gear
Replace if seizure, flaw, abnormal wear or other defect is
evident.
5) Oil seal
Replace if deformed or damaged, and at every disassem-
bling.
6) Differential carrier
Replace if the bearing bores are worn or damaged.
7) Differential case
Replace if its sliding surfaces are worn or cracked.
8) Companion flange
Replace if the oil seal lip contacting surfaces have flaws.
26
3-4SERVICE PROCEDURE
2. Rear Differential
Page 1065 of 3342
 Precautions for assembling
(1) Assemble in the reverse order of disassembling.
(2) Check and adjust each part during assembly.
(3) Keep the shims and washers in order, so that they
are")
E: ASSEMBLY
1) Precautions for assembling
(1) Assemble in the reverse order of disassembling.
(2) Check and adjust each part during assembly.
(3) Keep the shims and washers in order, so that they
are not misinstalled.
(4) Thoroughly clean the surfaces on which the shims,
washers and bearings are to be installed.
(5) Apply gear oil when installing the bearings and
thrust washers.
(6) Be careful not to mix up the right and left hand cups
of the bearings.
G3M0079
(7) Replace the oil seal with new one at every disas-
sembly. Apply chassis grease between the lips when
installing the oil seal.
G3M1037
2) Adjusting preload for front and rear bearings
Adjust the bearing preload with spacer and washer
between front and rear bearings. Pinion height adjusting
washer are not affected by this adjustment. The adjustment
must be carried out without oil seal inserted.
(1) Press rear bearing race into differential carrier with
ST1 and ST2.
ST1 398477701 HANDLE
ST2 398427703 DRIFT 2
G3M0081
(2) Insert ST1 into case with pinion height adjusting
washer and rear bearing cone fitted onto it.
CAUTION:
�Re-use the used washer if not deformed.
�Use a new rear bearing cone.
(3) Then install preload adjusting spacer and washer,
front bearing cone, ST2, companion flange, and washer
and drive pinion nut.
ST1 398507702 DUMMY SHAFT
ST2 398507703 DUMMY COLLAR
27
3-4SERVICE PROCEDURE
2. Rear Differential
Page 1066 of 3342
 Turn ST1 with hand to make it seated, and tighten
drive pinion nut while measuring the preload with spring
balance. Select preload adjusting washer and spacer
so that the specified preload")
G3M1038
(4) Turn ST1 with hand to make it seated, and tighten
drive pinion nut while measuring the preload with spring
balance. Select preload adjusting washer and spacer
so that the specified preload is obtained when nut is
tightened to the specified torque with ST2.
CAUTION:
Use a new lock nut.
NOTE:
�Be careful not to give excessive preload.
G3M0718
�When tightening the drive pinion nut, lock ST1 with ST2
as shown in the figure.
ST1 398507704 BLOCK
ST2 398507702 DUMMY SHAFT
ST3 498427200 FLANGE WRENCH
Tightening Torque:
181±15 N⋅m (18.5±1.5 kg-m, 134±11 ft-lb)
G3M0082
Front and rear bearing preload
For new bearing:
17.7—25.5 N (1.8—2.6 kg, 4.0—5.7 lb)
at companion flange bolt hole
�Preload adjusting washer lengthPart No. Length mm (in)
383705200
383715200
383725200
383735200
383745200
383755200
383765200
383775200
383785200
383795200
383805200
383815200
383825200
383835200
3838452002.59 (0.1020)
2.57 (0.1012)
2.55 (0.1004)
2.53 (0.0996)
2.51 (0.0988)
2.49 (0.0980)
2.47 (0.0972)
2.45 (0.0965)
2.43 (0.0957)
2.41 (0.0949)
2.39 (0.0941)
2.37 (0.0933)
2.35 (0.0925)
2.33 (0.0917)
2.31 (0.0909)
�Preload adjusting spacer length383695201
383695202
383695203
383695204
383695205
38369520656.2 (2.213)
56.4 (2.220)
56.6 (2.228)
56.8 (2.236)
57.0 (2.244)
57.2 (2.252)
28
3-4SERVICE PROCEDURE
2. Rear Differential
Page 1067 of 3342
 Adjusting drive pinion height
Adjust drive pinion height with shim installed between rear
bearing cone and the back of pinion gear.
(1) Install ST1, ST2 and ST3, as shown in the figure,
and")
G3M0083
3) Adjusting drive pinion height
Adjust drive pinion height with shim installed between rear
bearing cone and the back of pinion gear.
(1) Install ST1, ST2 and ST3, as shown in the figure,
and apply the specified preload on the bearings.
to 2).> Adjusting preload for front and rear bearings
NOTE:
At this time, install a pinion height adjusting shim which is
temporarily selected or the same as that used before.
G3M0263
(2) Measure the clearance N between the end of ST3
and the end surface of ST1 by using a thickness gauge.
NOTE:
Make sure there is no clearance between the case and
ST3.
ST1 398507702 DUMMY SHAFT
ST2 398507703 DUMMY COLLAR
ST3 398507701 DIFFERENTIAL CARRIER GAUGE
(3) Obtain the thickness of pinion height adjusting shim
to be inserted from the following formula, and replace
the temporarily installed shim with this one.
T=To+N�(Hx0.01) � 0.20 (mm)
Where:
T = Thickness of pinion height adjusting shim (mm)
To = Thickness of shim temporarily inserted (mm)
N = Reading of thickness gauge (mm)
H = Figure marked on drive pinion head
(Example of calculation)
To = 2.20 + 1.20 = 3.40 mm
N = 0.23 mmH=+1,
T = 3.40 + 0.23 � 0.01 � 0.20 = 3.42
Result: Thickness = 3.42 mm
Therefore use the shim 383605200.
�Pinion height adjusting shim thicknessPart No. Thickness mm (in)
383495200
383505200
383515200
383525200
383535200
383545200
383555200
383565200
383575200
383585200
383595200
383605200
383615200
383625200
383635200
383645200
383655200
383665200
383675200
3836852003.09 (0.1217)
3.12 (0.1228)
3.15 (0.1240)
3.18 (0.1252)
3.21 (0.1264)
3.24 (0.1276)
3.27 (0.1287)
3.30 (0.1299)
3.33 (0.1311)
3.36 (0.1323)
3.39 (0.1335)
3.42 (0.1346)
3.45 (0.1358)
3.48 (0.1370)
3.51 (0.1382)
3.54 (0.1394)
3.57 (0.1406)
3.60 (0.1417)
3.63 (0.1429)
3.66 (0.1441)
29
3-4SERVICE PROCEDURE
2. Rear Differential
Page 1068 of 3342
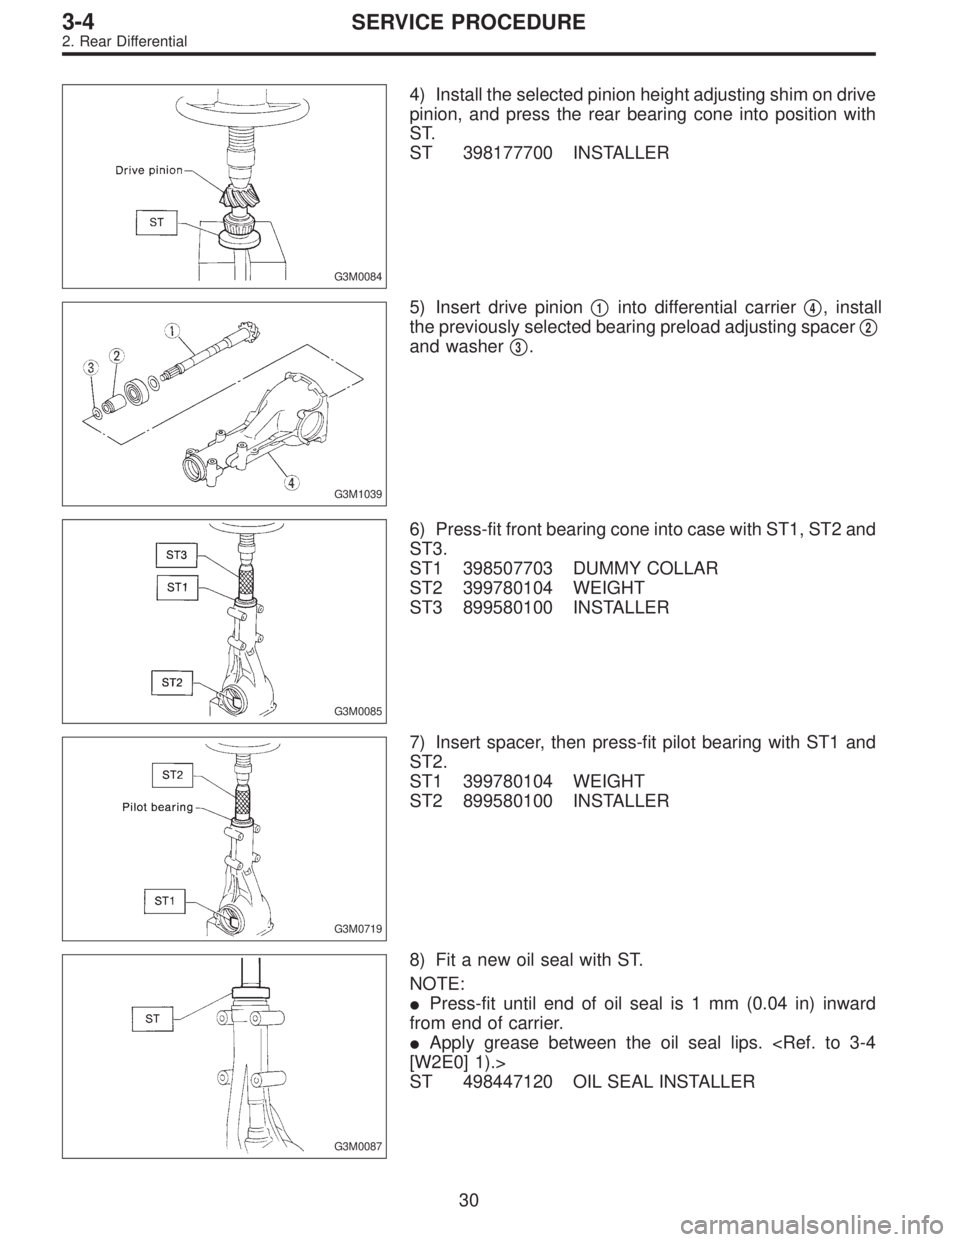
G3M0084
4) Install the selected pinion height adjusting shim on drive
pinion, and press the rear bearing cone into position with
ST.
ST 398177700 INSTALLER
G3M1039
5) Insert drive pinion�1into differential carrier�4, install
the previously selected bearing preload adjusting spacer�
2
and washer�3.
G3M0085
6) Press-fit front bearing cone into case with ST1, ST2 and
ST3.
ST1 398507703 DUMMY COLLAR
ST2 399780104 WEIGHT
ST3 899580100 INSTALLER
G3M0719
7) Insert spacer, then press-fit pilot bearing with ST1 and
ST2.
ST1 399780104 WEIGHT
ST2 899580100 INSTALLER
G3M0087
8) Fit a new oil seal with ST.
NOTE:
�Press-fit until end of oil seal is 1 mm (0.04 in) inward
from end of carrier.
�Apply grease between the oil seal lips.
[W2E0] 1).>
ST 498447120 OIL SEAL INSTALLER
30
3-4SERVICE PROCEDURE
2. Rear Differential
Page 1069 of 3342
G3M0720
9) Press-fit companion flange with ST1 and ST2.
CAUTION:
Be careful not to damage bearing.
ST1 899874100 INSTALLER
ST2 399780104 WEIGHT
G3M1052
10) Install self-locking nut. Then tighten it with ST.
ST 498427200 FLANGE WRENCH
Tightening torque:
181±15 N⋅m (18.5±1.5 kg-m, 134±11 ft-lb)
G3M0069
11) Install crown gear on differential case.
Tightening Torque:
103±10 N⋅m (10.5±1.0 kg-m, 76±7 ft-lb)
NOTE:
Tighten diagonally while tapping the bolt heads.
G3M1041
12) Before installing side bearing, measure the bearing
width by using a dial gauge, ST1 and ST2.
Standard bearing width:
20.00 mm (0.7874 in)
NOTE:
Set the dial gauge needle to zero, using a standard bear-
ing or block of specified height in advance.
ST1 398227700 WEIGHT
ST2 398237700 GAUGE
G3M0091
13) Press side bearing cone onto differential case with
ST1.
ST1 398487700 DRIFT
31
3-4SERVICE PROCEDURE
2. Rear Differential
 Hold companion flange with ST and remove drive pin-
ion nut.
ST 498427200 FLANGE WRENCH
G3M0073
12) Extract the companion flange with a puller.
G3M0074
13) Press the end of drive pinion sh")
 Extract the companion flange with a puller.
G3M0074
17) Press the end of drive pinion shaft and extract it
together with rear bearing cone, preload adjusting spacer
and washer.
NOTE:
Hold")
 Press-fit companion flange with ST1 and ST2.
CAUTION:
Be careful not to damage bearing.
ST1 899874100 INSTALLER
ST2 399780104 WEIGHT
G3M1052
10) Install self-locking nut. Then tighten it wi")