1997 SSANGYONG KORANDO ignition
[x] Cancel search: ignitionPage 1836 of 2053
SECTION 9R
BODY FRONT END
CAUTION: Disconnect the negative battery cable before removing or installing any electrical unit or when a
tool or equipment could easily come in contact with exposed electrical terminals. Disconnecting this cable
will help prevent personal injury and damage to the vehicle. The ignition must also be in LOCK unless
otherwise noted.
TABLE OF CONTENTS
Description and Operation...................................9R-2
Body Front End....................................................9R-2
Components Locator............................................9R-3
Body Front End....................................................9R-3
Repair Instructions................................................9R-4
On-Vehicle Service Unit Repair................................9R-4
Lubrication..........................................................9R-4
Fasteners ............................................................9R-4Anticorrosion Materials .........................................9R-4
Cowl Vent Grille...................................................9R-5
Hood...................................................................9R-5
Hood Hinges.......................................................9R-6
Hood Gas Spring.................................................9R-6
Specifications.......................................................9R-7
Fastener Tightening Specifications.......................9R-7
Page 1843 of 2053
SECTION 9S
BODY REAR END
CAUTION: Disconnect the negative battery cable before removing or installing any electrical unit or when a
tool or equipment could easily come in contact with exposed electrical terminals. Disconnecting this cable
will help prevent personal injury and damage to the vehicle. The ignition must also be in LOCK unless
otherwise noted.
TABLE OF CONTENTS
Description and Operation...................................9S-2
Fuel Filler Door.....................................................9S-2
Components Locator............................................9S-3
Lighting System..................................................9S-3
Repair Instructions................................................9S-4On-Vehicle Service Unit Repair................................9S-4
Fuel Filler Door.....................................................9S-4
Fuel Filler Door Remote Handle and Cable............9S-4
Specifications.......................................................9S-5
Fastener Tightening Specifications.......................9S-5
Page 1848 of 2053
SECTION 9T1
REMOTE KEYLESS ENTRY AND ANTI-THEFT
SYSTEM
CAUTION: Disconnect the negative battery cable before removing or installing any electrical unit or when a
tool or equipment could easily come in contact with exposed electrical terminals. Disconnecting this cable
will help prevent personal injury and damage to the vehicle. The ignition must also be in LOCK unless
otherwise noted.
TABLE OF CONTENTS
Description and Operation.................................9T1-2
Remote Keyless Entry and Anti-Theft System.....9T1-2
Components Locator..........................................9T1-3
REKES & STICS................................................9T1-3
Diagnostic Information and Procedure.............9T1-4
Input Memory....................................................9T1-5
Repair Instructions..............................................9T1-6
On-Vehicle Service Unit Repair..............................9T1-6Receiver............................................................9T1-6
Antenna.............................................................9T1-6
Stics..................................................................9T1-6
Schematic and Routing Diagrams.....................9T1-7
STICS - Stics Unit..............................................9T1-7
STICS - Door Contact Switch..............................9T1-8
STICS - Keyless, Key Reminder Switch, Siren,
Chime Bell Buzzer ..........................................9T1-9
Page 1849 of 2053
SSANGYONG MY2002
9T1-2 REMOTE KEYLESS ENTRY AND ANTI-THEFT SYSTEM
DESCRIPTION AND OPERATION
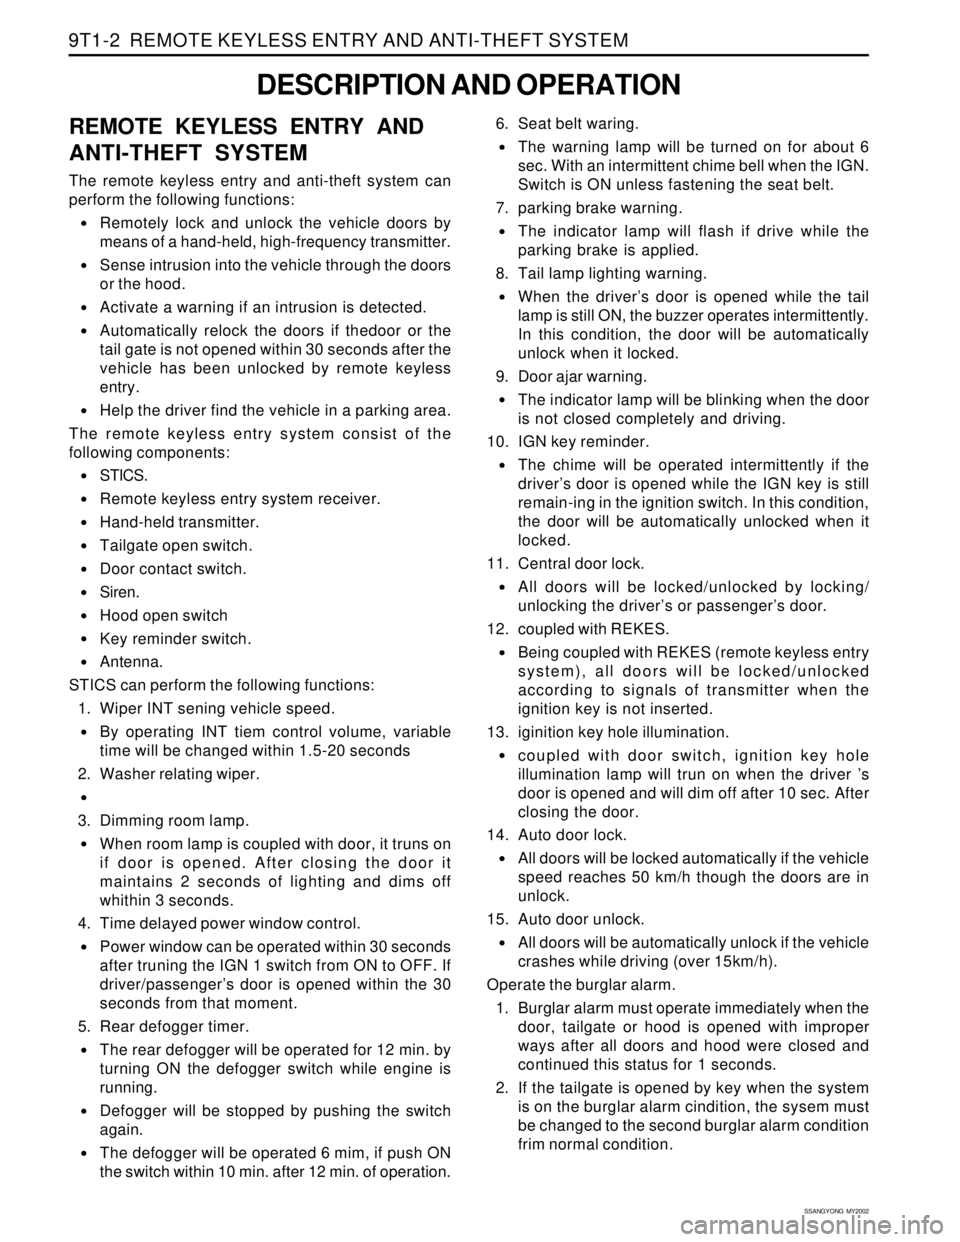
REMOTE KEYLESS ENTRY AND
ANTI-THEFT SYSTEM
The remote keyless entry and anti-theft system can
perform the following functions:
•Remotely lock and unlock the vehicle doors by
means of a hand-held, high-frequency transmitter.
Sense intrusion into the vehicle through the doors
or the hood.
Activate a warning if an intrusion is detected.
Automatically relock the doors if thedoor or the
tail gate is not opened within 30 seconds after the
vehicle has been unlocked by remote keyless
entry.
Help the driver find the vehicle in a parking area.
The remote keyless entry system consist of the
following components:
STICS.
Remote keyless entry system receiver.
Hand-held transmitter.
Tailgate open switch.
Door contact switch.
Siren.
Hood open switch
Key reminder switch.
Antenna.
STICS can perform the following functions:
1. Wiper INT sening vehicle speed.
By operating INT tiem control volume, variable
time will be changed within 1.5-20 seconds
2. Washer relating wiper.
3. Dimming room lamp.
When room lamp is coupled with door, it truns on
if door is opened. After closing the door it
maintains 2 seconds of lighting and dims off
whithin 3 seconds.
4. Time delayed power window control.
Power window can be operated within 30 seconds
after truning the IGN 1 switch from ON to OFF. If
driver/passenger’s door is opened within the 30
seconds from that moment.
5. Rear defogger timer.
The rear defogger will be operated for 12 min. by
turning ON the defogger switch while engine is
running.
Defogger will be stopped by pushing the switch
again.
The defogger will be operated 6 mim, if push ON
the switch within 10 min. after 12 min. of operation.6. Seat belt waring.
The warning lamp will be turned on for about 6
sec. With an intermittent chime bell when the IGN.
Switch is ON unless fastening the seat belt.
7. parking brake warning.
The indicator lamp will flash if drive while the
parking brake is applied.
8. Tail lamp lighting warning.
When the driver’s door is opened while the tail
lamp is still ON, the buzzer operates intermittently.
In this condition, the door will be automatically
unlock when it locked.
9. Door ajar warning.
The indicator lamp will be blinking when the door
is not closed completely and driving.
10. IGN key reminder.
The chime will be operated intermittently if the
driver’s door is opened while the IGN key is still
remain-ing in the ignition switch. In this condition,
the door will be automatically unlocked when it
locked.
11. Central door lock.
All doors will be locked/unlocked by locking/
unlocking the driver’s or passenger’s door.
12. coupled with REKES.
Being coupled with REKES (remote keyless entry
system), all doors will be locked/unlocked
according to signals of transmitter when the
ignition key is not inserted.
13. iginition key hole illumination.
coupled with door switch, ignition key hole
illumination lamp will trun on when the driver ’s
door is opened and will dim off after 10 sec. After
closing the door.
14. Auto door lock.
All doors will be locked automatically if the vehicle
speed reaches 50 km/h though the doors are in
unlock.
15. Auto door unlock.
All doors will be automatically unlock if the vehicle
crashes while driving (over 15km/h).
Operate the burglar alarm.
1. Burglar alarm must operate immediately when the
door, tailgate or hood is opened with improper
ways after all doors and hood were closed and
continued this status for 1 seconds.
2. If the tailgate is opened by key when the system
is on the burglar alarm cindition, the sysem must
be changed to the second burglar alarm condition
frim normal condition.
Page 1857 of 2053
SECTION 9T2
IMMOBILIZER SYSTEM
CAUTION: Disconnect the negative battery cable before removing or installing any electrical unit or when a
tool or equipment could easily come in contact with exposed electrical terminals. Disconnecting this cable
will help prevent personal injury and damage to the vehicle. The ignition must also be in LOCK unless
otherwise noted.
TABLE OF CONTENTS
Description and Operation.................................9T2-2
Components Locator..........................................9T2-3
Immobilizer System...........................................9T2-3
Repair Instructions..............................................9T2-4
On-Vehicle Service Unit Repair..............................9T2-4Immobilizer Antenna ..........................................9T2-4
Transponder Replacement.................................9T2-4
Schematic and Routing Diagrams.....................9T2-5
Immobilizer System (Diesel : Vod).....................9T2-5
Page 1858 of 2053
SSANGYONG MY2002
9T2-2 IMMOBILIZER SYSTEM
DESCRIPTION AND OPERATION
Immobilizer is a device disabling vehicle ignition unless
a speific key is used and designed to help prevent
vehicle theft.
Immobilizer is comprised of two devices, a key with
encoded transponder and engine control unit (ECU)
with the same encoding of the transponder. When a
key is inserted into the key hole to start vehicle and
turned to ‘ON’, the ECU reads and decodes the
transponder code and, if the same, starts the engine,
it is called immobilizer. It means immobilizer system
disables starting by stopping fuel supply if the code
in the transponder does not match the code stored in
ECU each other.
Notice:
If vehicle is equipped with immobilizer system and
the engine cranks normally but not start, check
immobilizer system first rather than ignition and
other electrical systems because it can be
disabled fuel supply of injectors by ECU due to
defective immobilizer system.
Programming of the immobilizer system will be
performed by authorized personnel only. If
following defective codes for immobilizer system
appear during diagnosis of vehicle with SCANNER,
ask immobilizer programming to authorized
personnel and actual programming should be
performed by authorized per-sonnel only.
Display of defectives relevant to immobilizer
system : SCANNER
1. No communication with transponder
2. No immobilizer programming
The transponder in the key can be damaged by
shocks of dropping or hitting other objectives, so
handle it with care.
Each supplied key has programming of code on
its own. Accordingly if ECU needs to be replaced,
replace the transponder in the key.
The vehicle equipped with immobilizer system will
never be started with remote ignition device, so
do not attempt to install it.
The immobilizer system will never be removed from
the vehicle. So never attempt to remove it to install
a remote ignition device or others.
If engine does not start during service, use every
key to start the engine and then check immobilizer
sys-tem finally.
Cases that requires immobilizer
programming
1. Replacement ECU
In this case, replace the every transponder of the
key at once.
2. Replacement of the transponder
3. Additional key for lost 1 or 2 keys
1) Clear all codes for current keys from the ECU
2) When using current key : clear code of the trans-
ponder and re-program it
3) Additional (purchased) key : perform programming
4. When lost all keys
1) Clear all memorized key codes from the ECU
2) Replace the key and key set
3) Immobilizer programming
Page 1864 of 2053
HOW TO USE ELECTRICAL WIRING DIAGRAM HOW TO USE ELECTRICAL WIRING DIAGRAM HOW TO USE ELECTRICAL WIRING DIAGRAM HOW TO USE ELECTRICAL WIRING DIAGRAM
HOW TO USE ELECTRICAL WIRING DIAGRAM
1-3 1-31-3 1-3
1-3
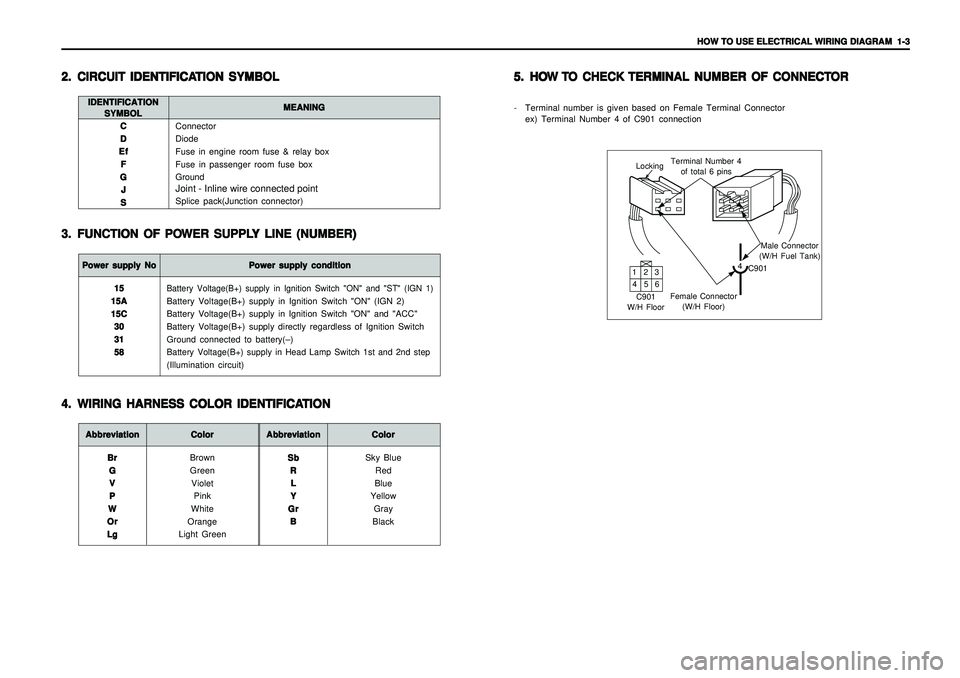
Connector
Diode
Fuse in engine room fuse & relay box
Fuse in passenger room fuse box
GroundJoint - Inline wire connected pointSplice pack(Junction connector) C CC C
C
D DD D
D
Ef EfEf Ef
Ef
F FF F
F
G GG G
G
J JJ J
J
S SS S
S
2. 2.2. 2.
2.
CIRCUIT IDENTIFICA CIRCUIT IDENTIFICACIRCUIT IDENTIFICA CIRCUIT IDENTIFICA
CIRCUIT IDENTIFICA
TION SYMBOL TION SYMBOLTION SYMBOL TION SYMBOL
TION SYMBOL
3. 3.3. 3.
3.
FUNCTION OF PO FUNCTION OF POFUNCTION OF PO FUNCTION OF PO
FUNCTION OF PO
WER SUPPL WER SUPPLWER SUPPL WER SUPPL
WER SUPPL
Y LINE (NUMBER) Y LINE (NUMBER)Y LINE (NUMBER) Y LINE (NUMBER)
Y LINE (NUMBER)
IDENTIFICATION IDENTIFICATIONIDENTIFICATION IDENTIFICATION
IDENTIFICATION
SYMBOL SYMBOLSYMBOL SYMBOL
SYMBOLMEANING MEANINGMEANING MEANING
MEANINGPower supply No Power supply NoPower supply No Power supply No
Power supply No
Power supply condition Power supply conditionPower supply condition Power supply condition
Power supply condition
Battery Voltage(B+) supply in Ignition Switch "ON" and "ST" (IGN 1)Battery Voltage(B+) supply in Ignition Switch "ON" (IGN 2)
Battery Voltage(B+) supply in Ignition Switch "ON" and "ACC"
Battery Voltage(B+) supply directly regardless of Ignition Switch
Ground connected to battery(–)Battery Voltage(B+) supply in Head Lamp Switch 1st and 2nd step(Illumination circuit) 15 1515 15
15
15A 15A15A 15A
15A
15C 15C15C 15C
15C
30 3030 30
30
31 3131 31
31
58 5858 58
58
Abbreviation AbbreviationAbbreviation Abbreviation
Abbreviation
Color ColorColor Color
Color
Brown
Green
Violet
Pink
White
Orange
Light Green Br BrBr Br
Br
G GG G
G
V VV V
V
P PP P
P
W WW W
W
Or OrOr Or
Or
Lg LgLg Lg
Lg
Abbreviation AbbreviationAbbreviation Abbreviation
Abbreviation
Color ColorColor Color
Color
Sky Blue
Red
Blue
Yellow
Gray
Black Sb SbSb Sb
Sb
R RR R
R
L LL L
L
Y YY Y
Y
Gr GrGr Gr
Gr
B BB B
B
4. 4.4. 4.
4.
WIRING HARNESS COLOR IDENTIFICA WIRING HARNESS COLOR IDENTIFICAWIRING HARNESS COLOR IDENTIFICA WIRING HARNESS COLOR IDENTIFICA
WIRING HARNESS COLOR IDENTIFICA
TION TIONTION TION
TION5. 5.5. 5.
5.
HO HOHO HO
HO
W W W W
W
T TT T
T
O CHECK O CHECK O CHECK O CHECK
O CHECK
TERMINAL NUMBER OF CONNECT TERMINAL NUMBER OF CONNECTTERMINAL NUMBER OF CONNECT TERMINAL NUMBER OF CONNECT
TERMINAL NUMBER OF CONNECT
OR OROR OR
OR
- Terminal number is given based on Female Terminal Connector
ex) Terminal Number 4 of C901 connection
LockingTerminal Number 4
of total 6 pins
Male Connector
(W/H Fuel Tank)
4
C901
Female Connector
(W/H Floor) C901
W/H Floor132
465
Page 1865 of 2053
HOW TO USE ELECTRICAL WIRING DIAGRAM HOW TO USE ELECTRICAL WIRING DIAGRAM HOW TO USE ELECTRICAL WIRING DIAGRAM HOW TO USE ELECTRICAL WIRING DIAGRAM
HOW TO USE ELECTRICAL WIRING DIAGRAM
1-3 1-31-3 1-3
1-3
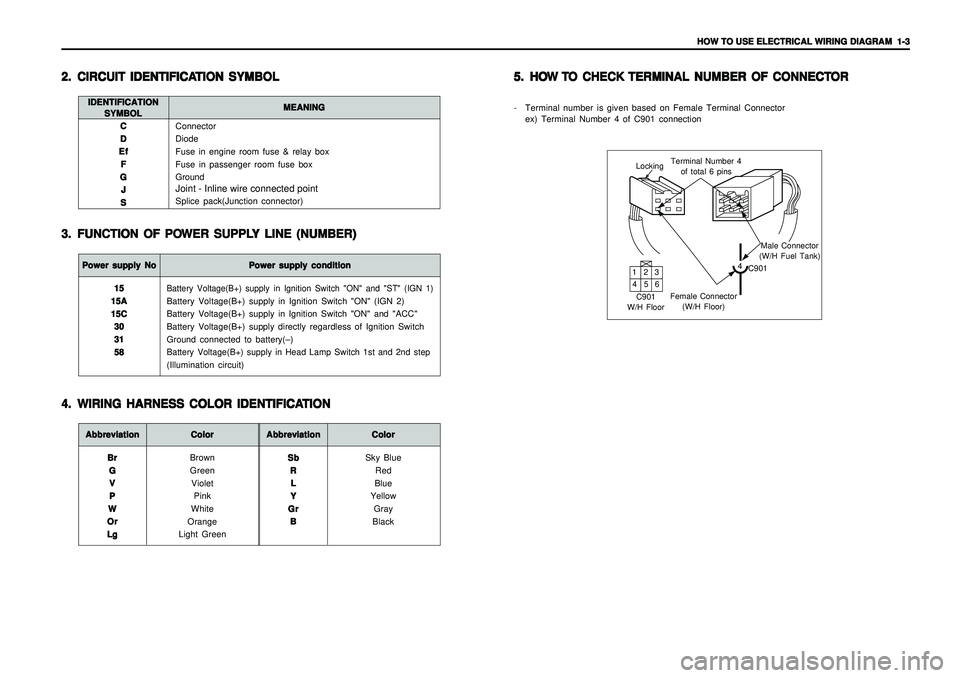
Connector
Diode
Fuse in engine room fuse & relay box
Fuse in passenger room fuse box
GroundJoint - Inline wire connected pointSplice pack(Junction connector) C CC C
C
D DD D
D
Ef EfEf Ef
Ef
F FF F
F
G GG G
G
J JJ J
J
S SS S
S
2. 2.2. 2.
2.
CIRCUIT IDENTIFICA CIRCUIT IDENTIFICACIRCUIT IDENTIFICA CIRCUIT IDENTIFICA
CIRCUIT IDENTIFICA
TION SYMBOL TION SYMBOLTION SYMBOL TION SYMBOL
TION SYMBOL
3. 3.3. 3.
3.
FUNCTION OF PO FUNCTION OF POFUNCTION OF PO FUNCTION OF PO
FUNCTION OF PO
WER SUPPL WER SUPPLWER SUPPL WER SUPPL
WER SUPPL
Y LINE (NUMBER) Y LINE (NUMBER)Y LINE (NUMBER) Y LINE (NUMBER)
Y LINE (NUMBER)
IDENTIFICATION IDENTIFICATIONIDENTIFICATION IDENTIFICATION
IDENTIFICATION
SYMBOL SYMBOLSYMBOL SYMBOL
SYMBOLMEANING MEANINGMEANING MEANING
MEANINGPower supply No Power supply NoPower supply No Power supply No
Power supply No
Power supply condition Power supply conditionPower supply condition Power supply condition
Power supply condition
Battery Voltage(B+) supply in Ignition Switch "ON" and "ST" (IGN 1)Battery Voltage(B+) supply in Ignition Switch "ON" (IGN 2)
Battery Voltage(B+) supply in Ignition Switch "ON" and "ACC"
Battery Voltage(B+) supply directly regardless of Ignition Switch
Ground connected to battery(–)Battery Voltage(B+) supply in Head Lamp Switch 1st and 2nd step(Illumination circuit) 15 1515 15
15
15A 15A15A 15A
15A
15C 15C15C 15C
15C
30 3030 30
30
31 3131 31
31
58 5858 58
58
Abbreviation AbbreviationAbbreviation Abbreviation
Abbreviation
Color ColorColor Color
Color
Brown
Green
Violet
Pink
White
Orange
Light Green Br BrBr Br
Br
G GG G
G
V VV V
V
P PP P
P
W WW W
W
Or OrOr Or
Or
Lg LgLg Lg
Lg
Abbreviation AbbreviationAbbreviation Abbreviation
Abbreviation
Color ColorColor Color
Color
Sky Blue
Red
Blue
Yellow
Gray
Black Sb SbSb Sb
Sb
R RR R
R
L LL L
L
Y YY Y
Y
Gr GrGr Gr
Gr
B BB B
B
4. 4.4. 4.
4.
WIRING HARNESS COLOR IDENTIFICA WIRING HARNESS COLOR IDENTIFICAWIRING HARNESS COLOR IDENTIFICA WIRING HARNESS COLOR IDENTIFICA
WIRING HARNESS COLOR IDENTIFICA
TION TIONTION TION
TION5. 5.5. 5.
5.
HO HOHO HO
HO
W W W W
W
T TT T
T
O CHECK O CHECK O CHECK O CHECK
O CHECK
TERMINAL NUMBER OF CONNECT TERMINAL NUMBER OF CONNECTTERMINAL NUMBER OF CONNECT TERMINAL NUMBER OF CONNECT
TERMINAL NUMBER OF CONNECT
OR OROR OR
OR
- Terminal number is given based on Female Terminal Connector
ex) Terminal Number 4 of C901 connection
LockingTerminal Number 4
of total 6 pins
Male Connector
(W/H Fuel Tank)
4
C901
Female Connector
(W/H Floor) C901
W/H Floor132
465