1997 SSANGYONG KORANDO sensor
[x] Cancel search: sensorPage 1723 of 2053
SSANGYONG MY2002
9E-6 INSTRUMENTATION, DRIVER INFORMATION
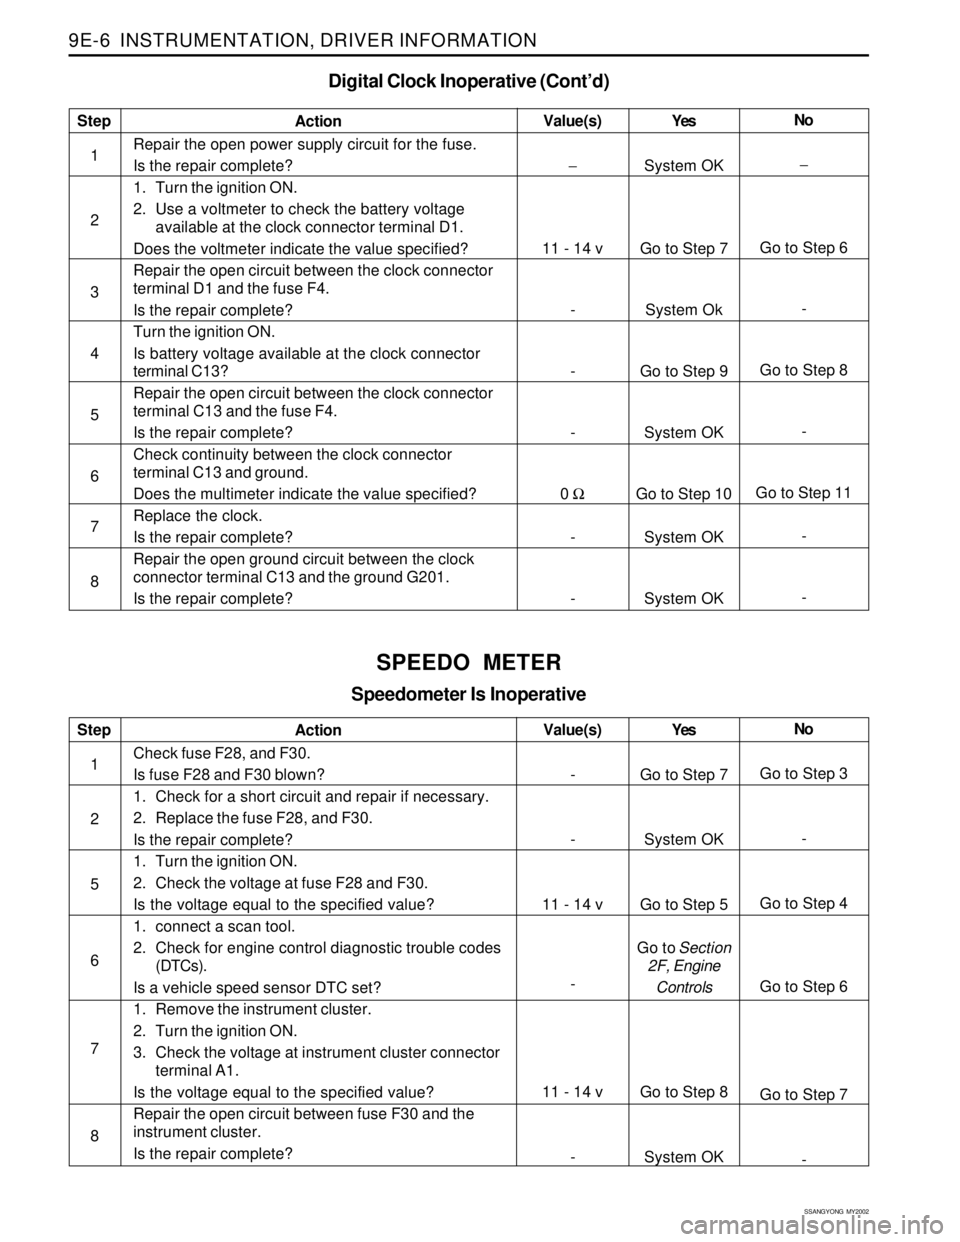
Digital Clock Inoperative (Cont’d)
Step
1
2
3
4
5
6
7
8Action
Repair the open power supply circuit for the fuse.
Is the repair complete?
1. Turn the ignition ON.
2. Use a voltmeter to check the battery voltage
available at the clock connector terminal D1.
Does the voltmeter indicate the value specified?
Repair the open circuit between the clock connector
terminal D1 and the fuse F4.
Is the repair complete?
Turn the ignition ON.
Is battery voltage available at the clock connector
terminal C13?
Repair the open circuit between the clock connector
terminal C13 and the fuse F4.
Is the repair complete?
Check continuity between the clock connector
terminal C13 and ground.
Does the multimeter indicate the value specified?
Replace the clock.
Is the repair complete?
Repair the open ground circuit between the clock
connector terminal C13 and the ground G201.
Is the repair complete?Yes
System OK
Go to Step 7
System Ok
Go to Step 9
System OK
Go to Step 10
System OK
System OKNo
−
Go to Step 6
-
Go to Step 8
-
Go to Step 11
-
- Value(s)
−
11 - 14 v
-
-
-
0 Ω
-
-
SPEEDO METER
Speedometer Is Inoperative
Step
1
2
5
6
7
8Action
Check fuse F28, and F30.
Is fuse F28 and F30 blown?
1. Check for a short circuit and repair if necessary.
2. Replace the fuse F28, and F30.
Is the repair complete?
1. Turn the ignition ON.
2. Check the voltage at fuse F28 and F30.
Is the voltage equal to the specified value?
1. connect a scan tool.
2. Check for engine control diagnostic trouble codes
(DTCs).
Is a vehicle speed sensor DTC set?
1. Remove the instrument cluster.
2. Turn the ignition ON.
3. Check the voltage at instrument cluster connector
terminal A1.
Is the voltage equal to the specified value?
Repair the open circuit between fuse F30 and the
instrument cluster.
Is the repair complete?Yes
Go to Step 7
System OK
Go to Step 5
Go to Section
2F, Engine
Controls
Go to Step 8
System OKNo
Go to Step 3
-
Go to Step 4
Go to Step 6
Go to Step 7
- Value(s)
-
-
11 - 14 v
-
11 - 14 v
-
Page 1724 of 2053
INSTRUMENTATION, DRIVER INFORMATION 9E-7
SSANGYONG MY2002
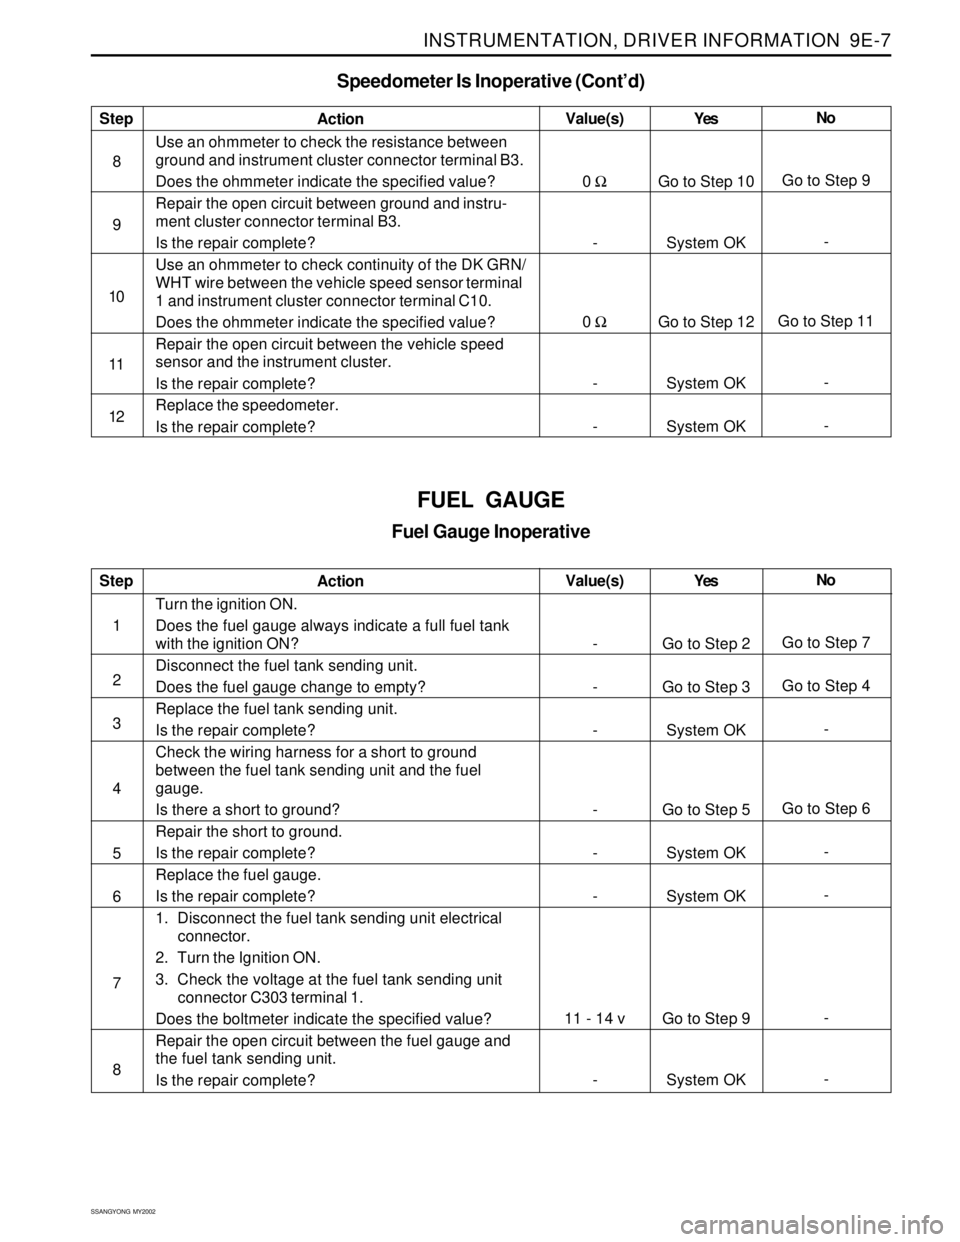
FUEL GAUGE
Fuel Gauge Inoperative
Step
1
2
3
4
5
6
7
8Action
Turn the ignition ON.
Does the fuel gauge always indicate a full fuel tank
with the ignition ON?
Disconnect the fuel tank sending unit.
Does the fuel gauge change to empty?
Replace the fuel tank sending unit.
Is the repair complete?
Check the wiring harness for a short to ground
between the fuel tank sending unit and the fuel
gauge.
Is there a short to ground?
Repair the short to ground.
Is the repair complete?
Replace the fuel gauge.
Is the repair complete?
1. Disconnect the fuel tank sending unit electrical
connector.
2. Turn the Ignition ON.
3. Check the voltage at the fuel tank sending unit
connector C303 terminal 1.
Does the boltmeter indicate the specified value?
Repair the open circuit between the fuel gauge and
the fuel tank sending unit.
Is the repair complete?Yes
Go to Step 2
Go to Step 3
System OK
Go to Step 5
System OK
System OK
Go to Step 9
System OKNo
Go to Step 7
Go to Step 4
-
Go to Step 6
-
-
-
- Value(s)
-
-
-
-
-
-
11 - 14 v
-
Speedometer Is Inoperative (Cont’d)
Step
8
9
10
11
12Action
Use an ohmmeter to check the resistance between
ground and instrument cluster connector terminal B3.
Does the ohmmeter indicate the specified value?
Repair the open circuit between ground and instru-
ment cluster connector terminal B3.
Is the repair complete?
Use an ohmmeter to check continuity of the DK GRN/
WHT wire between the vehicle speed sensor terminal
1 and instrument cluster connector terminal C10.
Does the ohmmeter indicate the specified value?
Repair the open circuit between the vehicle speed
sensor and the instrument cluster.
Is the repair complete?
Replace the speedometer.
Is the repair complete?Yes
Go to Step 10
System OK
Go to Step 12
System OK
System OKNo
Go to Step 9
-
Go to Step 11
-
- Value(s)
0 Ω
-
0 Ω
-
-
Page 1725 of 2053

SSANGYONG MY2002
9E-8 INSTRUMENTATION, DRIVER INFORMATION
TEMPERATURE GAUGE
Temperature Gauge Inoperative, Other Gauges OK
Step
1
2
3
4
5
6
7
8
9Action
Allow the engine to cool to room temperature.
With the ignition ON, does the temperature gauge
always read at the high end of the scale?
Disconnect the coolant temperature sensor electrical
connector.
Does the termperature gauge indicator drop to the
low end of the scale?
Replace the coolant temperature sensor.
Is the repair complete?
Check for a short to ground between the coolant
temperature sensor and the temperature gauge.
Is there a short to ground?
Repair the short to ground.
Is the repair complete?
Replace the temperature gauge.
Is the repair complete?
1. Disconnect the coolant temperature sensor.
2. Turn the ignition ON.
3. Check the voltage at the coolant temperature
sensor connector.
Does the the voltage equal the value specified?
Check for an open circuit between the coolant tem-
perature sensor and the temperature gauge.
Is the repair complete?
Repair the open circuit between the coolant tempera-
ture sensor and the temperature gauge.
Is the repair complete?Yes
Go to Step 7
Go to Step 3
System OK
Go to Step 5
System OK
System OK
Go to Step 10
Go to Step 8
System OKNo
Go to Step 2
Go to Step 4
-
Go to Step 6
-
-
Go to Step 8
Go to Step 6
- Value(s)
-
-
-
-
-
-
11 - 14 v
-
-
Fuel Gauge Inoperative (Cont’d)
Step
1
2
3Action
Check continuity between the fuel tank sending unit
connector C303 terminal 3, and groun.
Does the multimeter indicate the specified value?
Repair the open circuit or poor ground connection.
Is the repair complete?
1. With the fuel tank sending unit electrical connector
C303 disconnected, attach a jumper between
ground and C303 terminal 1.
2. Turn the ignition ON.
Does the fuel gauge move to full?Yes
Go to Step 11
System OK
Go to Step 3No
Go to Step 10
-
Go to Step 6 Value(s)
0 Ω
-
-
Page 1852 of 2053

REMOTE KEYLESS ENTRY AND ANTI-THEFT SYSTEM 9T1-5
SSANGYONG MY2002
KAA9T020
KAA9T030
INPUT MEMORY
When the REKES transmitter is lost
1. Connect the battery terminal No. 3 and REKES
terminal No. 4 which are on the diagnosis socket
under the dash board with service lead wire.
2. push the lock or unlock button on the REKES
transmitter.
3. Input memory and close all doors.
4. Check the operation of door locking system by
pushing the lock or unlock button on the REKES
transmitter.
When the transmitter is faulty
1. Connect the battery terminal No. 3 and REKES
terminal No. 4 which are on the diagnosis socket
under the dash board with service lead wire.
2. Set the input switch of the REKES receiver onto
the No. 1 or No. 2 position and push the lock or
unlock button on the REKES transmitter.
3. Set the input switch of the REKES receiver onto
the central position and close all doors.
4. Check the operation of door locking system by
pushing the lock or unlock button on the REKES
transmitter.
Step Required ConditionActionRemark Valve (s)
Wiper motor
parking 3 times,
washer switch
once, wiper relay
twice
Buzzer once
Buzzer once
Buzzer once
Buzzer once Wiper auto switch
ALT ‘L’
Volume variable switch
Defogger switch
Speed sensor signal
Operation of IGN and
related devices
Operation of IGN and
starting and related
devices14
15
16
17
18
KAA9T100
Page 1868 of 2053
2-4 2-4 2-4 2-4
2-4
ELECTRICAL WIRING DIAGRAMS ELECTRICAL WIRING DIAGRAMSELECTRICAL WIRING DIAGRAMS ELECTRICAL WIRING DIAGRAMS
ELECTRICAL WIRING DIAGRAMS
Engine Room Fuse Box - W/H Main
Engine Room Fuse Box - W/H Main
Engine Room Fuse Box - W/H Main
Engine Room FuseBox - W/H Main
Engine Room Fuse Box - W/H Engine Room
Engine Room Fuse Box - W/H Engine Room
Engine Room Fuse Box - W/H Engine Room
Engine Room Fuse Box - W/H Engine Room
W/H Engine Room - W/H Pre - Heating
W/H Engine Room - W/H Alternator
W/H Engine Room - W/H Alternator
W/H Engine Room - W/H Wheel G. sensor
W/H Engine Room - W/H Main
W/H Engine Room - W/H Main
W/H Engine Control - W/H ECM Main
W/H Engine Control - W/H ECM Main
W/H Main - W/H Fuel Cut Solenoid
W/H Main - W/H Roof
W/H Main - W/H Air Bag
W/H Main - W/H Air Bag
W/H Main - W/H SDM
W/H Main - W/H Air Conditioner
W/H Main - W/H ECM Main
W/H Main - W/H Transmission
W/H Main - W/H Transmission
W/H Main - W/H Transmission
W/H Main - W/H Fuel Pump
W/H Main - W/H Fuel Pump
W/H Main - W/H Fuel Pump
W/H Main - W/H Seat Heater
W/H Main - W/H Main
W/H Main - W/H FRT LH Door
W/H FRT LH Door - W/H Speaker
W/H Main - W/H FRT RH Door
W/H FRT RH Door - W/H Speaker
G201W/H Main Upper Front Left Leg Room
G202W/H Main Upper Front Left Leg Room
G203W/H Main Left Upper Center Facia
G204W/H Main Left Lower Center Facia
G205W/H Main Center "A" Pillar Front Right
G301W/H Main Below Front Left seat
G302W/H Main Below Center Console
G303W/H Main Below Front Right seat
G401W/H Main Inside Lower Trim Rear Left Quater
Engine Room Fuse Box
Engine Room Fuse Box
Engine Room Fuse Box
Engine Room Fuse Box
Engine Room Fuse Box
Engine Room Fuse Box
Engine Room Fuse Box
Engine Room Fuse Box
Bhind Battery
Below Air Cleaner
Below Air Cleaner
Upper Front Right Control Arm
Next to Hydraulic Unit
Next to Hydraulic Unit
Behind Hydraulic Unit
Behind Hydraulic Unit
Next to Engine Room Fuse Box
Inside Left Cluster
Above FRT LH Seat Under Cover
Above FRT LH Seat Under Cover
Lower Rear Center Facia
Upper Evaporator
Lower "A" Piller(Upper ECM)
Upper Transfer Case
Upper Transfer Case
Upper Transfer Case
Upper Transfer Case
Upper Transfer Case
Upper Transfer Case
Below FRT LH Seat
Below Center Console
Upper Fuse Box
(Passenger Room)
Inside FRT LH Door Trim
Behind Front Right Panel
Inside FRT RH Door Trim
2. 2.2. 2.
2.
CONNECT CONNECTCONNECT CONNECT
CONNECT
OR, OR,OR, OR,
OR,
GR GR GR GR
GR
OUND AND SPLICE PA OUND AND SPLICE PAOUND AND SPLICE PA OUND AND SPLICE PA
OUND AND SPLICE PA
CK INFORMA CK INFORMACK INFORMA CK INFORMA
CK INFORMA
TION TIONTION TION
TION1) 1)1) 1)
1)
CONNECTOR CONNECTORCONNECTOR CONNECTOR
CONNECTORConnector Number Connector NumberConnector Number Connector Number
Connector Number
(Pin Number, Color) (Pin Number, Color)(Pin Number, Color) (Pin Number, Color)
(Pin Number, Color)Connecting Connecting Connecting Connecting
Connecting
Wiring Harness Wiring HarnessWiring Harness Wiring Harness
Wiring Harness
Connector Position Connector PositionConnector Position Connector Position
Connector Position
C101 (19Pin, White)
C102 (4Pin, Colorless)
C103 (22Pin, White)
C104 (8Pin, Colorless)
C105 (10Pin, White)
C106 (3Pin, Black)
C107 (20Pin, White)
C108 (6Pin, Colorless)
C109 (1Pin, Black)
C110 (2Pin, Black)
C110 (4Pin, Black)
C111 (3Pin, Black)
C112 (6Pin, Black)
C113 (12Pin, Black)
C114 (6Pin, Gray)
C115 (40Pin, Black)
C116 (3Pin, Black)
C201 (8Pin, White)
C202 (4Pin, White)
C203 (2Pin, Black)
C204 (4Pin, Colorless)
C205 (17Pin, White)
C206 (6Pin, Black)
C301 (2Pin, Black)
C301 (16Pin, Black)
C302 (10Pin, Black)
C303 (3Pin, Black)
C303 (4Pin, Black)
C303 (6Pin, Black)
C304 (10Pin, White)
C305 (14Pin, White)
C351 (22Pin, White)
C352 (2Pin, Black)
C361 (22Pin, Blue)
C362 (2Pin, Black)
2) 2)2) 2)
2)
SPLICE PACK SPLICE PACKSPLICE PACK SPLICE PACK
SPLICE PACK
S201
S202
S203
S204
S205Splice Pack Position Splice Pack PositionSplice Pack Position Splice Pack Position
Splice Pack Position Wiring WiringWiring Wiring
Wiring
Harness HarnessHarness Harness
Harness Color ColorColor Color
Color Splice Pack Splice PackSplice Pack Splice Pack
Splice Pack
Number NumberNumber Number
Number
Colorless
Black
Colorless
Colorless
ColorlessW/H Main
W/H Main
W/H Main
W/H Main
W/H MainUpper Fuse Box(Passenger Room)
Behind Cluster
Behind 4WD Switch
Behind Audio
Behind Front Right Kick Panel
Remark RemarkRemark Remark
Remark
Diesel only
Gasoline
Diesel
Gasoline
Gasoline
Diesel
Gasoline
Manual T/M
Automatic T/M
Diesel
Diesel
Gasoline
GSL : EURO IIIBehind Left Tail Lamp
Behind Left Tail Lamp
Inside Rear Bumper
Inside Tail Gate
Connector Number Connector NumberConnector Number Connector Number
Connector Number
(Pin Number, Color) (Pin Number, Color)(Pin Number, Color) (Pin Number, Color)
(Pin Number, Color)Connecting Connecting Connecting Connecting
Connecting
Wiring Harness Wiring HarnessWiring Harness Wiring Harness
Wiring Harness
Connector Position Connector PositionConnector Position Connector Position
Connector Position
C401 (2Pin, Black)
C402 (12Pin, Black)
C403 (3Pin, Black)
C404 (2Pin, Black)W/H Tail Gate - W/H Main
W/H Tail Gate - W/H Main
W/H Rear Bumper - W/H Main
W/H Tail Gate - W/H HMSL
Remark RemarkRemark Remark
Remark
3) 3)3) 3)
3)
GROUND GROUNDGROUND GROUND
GROUND
G101
G102
G103Ground Position Ground PositionGround Position Ground Position
Ground Position
Wiring Harness Wiring HarnessWiring Harness Wiring Harness
Wiring Harness Number NumberNumber Number
Number
Ground GroundGround Ground
Ground
W/H Engine Room
Battery
W/H Engine RoomLeft Fender Next to Battery
Center Engine Block
Right Fender Engine Room
Pin PinPin Pin
Pin
Number NumberNumber Number
Number
8
20
14
14
8
Page 1870 of 2053
2-6 2-6 2-6 2-6
2-6
ELECTRICAL WIRING DIAGRAMS ELECTRICAL WIRING DIAGRAMSELECTRICAL WIRING DIAGRAMS ELECTRICAL WIRING DIAGRAMS
ELECTRICAL WIRING DIAGRAMS3. 3.3. 3.
3.
WIRING HARNESS & CONNECT WIRING HARNESS & CONNECTWIRING HARNESS & CONNECT WIRING HARNESS & CONNECT
WIRING HARNESS & CONNECT
OR & GR OR & GROR & GR OR & GR
OR & GR
OUND LOCA OUND LOCAOUND LOCA OUND LOCA
OUND LOCA
TION TIONTION TION
TION1) 1)1) 1)
1)
W/H ENGINE ROOM W/H ENGINE ROOMW/H ENGINE ROOM W/H ENGINE ROOM
W/H ENGINE ROOM
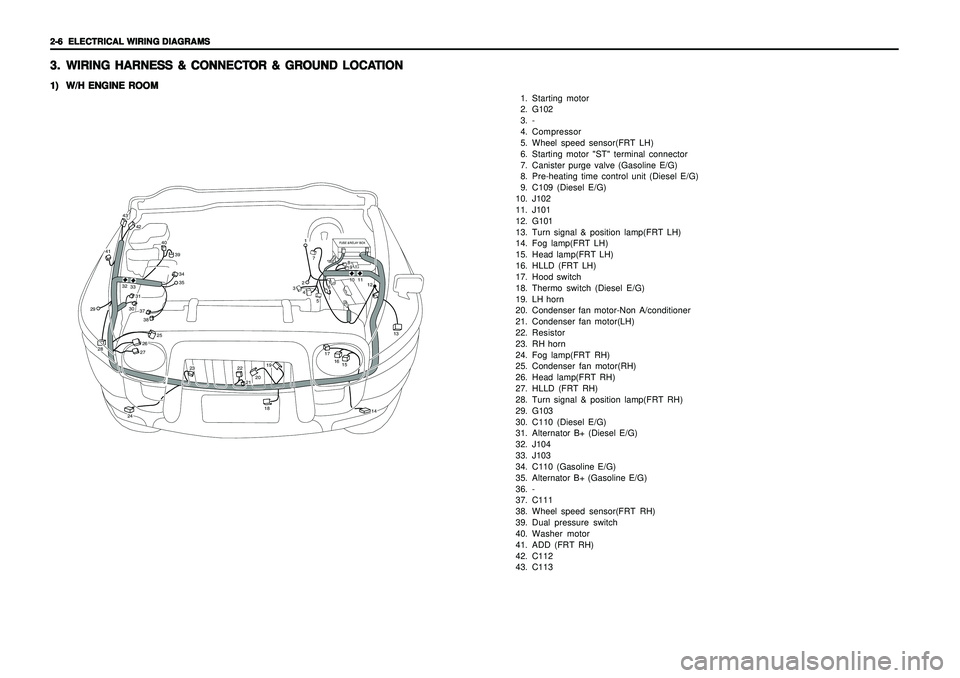
1. Starting motor
2. G102
3. -
4. Compressor
5. Wheel speed sensor(FRT LH)
6. Starting motor "ST" terminal connector
7. Canister purge valve (Gasoline E/G)
8. Pre-heating time control unit (Diesel E/G)
9. C109 (Diesel E/G)
10. J102
11. J101
12. G101
13. Turn signal & position lamp(FRT LH)
14. Fog lamp(FRT LH)
15. Head lamp(FRT LH)
16. HLLD (FRT LH)
17. Hood switch
18. Thermo switch (Diesel E/G)
19. LH horn
20. Condenser fan motor-Non A/conditioner
21. Condenser fan motor(LH)
22. Resistor
23. RH horn
24. Fog lamp(FRT RH)
25. Condenser fan motor(RH)
26. Head lamp(FRT RH)
27. HLLD (FRT RH)
28. Turn signal & position lamp(FRT RH)
29. G103
30. C110 (Diesel E/G)
31. Alternator B+ (Diesel E/G)
32. J104
33. J103
34. C110 (Gasoline E/G)
35. Alternator B+ (Gasoline E/G)
36. -
37. C111
38. Wheel speed sensor(FRT RH)
39. Dual pressure switch
40. Washer motor
41. ADD (FRT RH)
42. C112
43. C113
FUSE &RELAY BOX
42
43
41
40
393435
37303138
2928
25
26
24
23
2221201918
17
1516
13
12111089
7
6
5
4321
14
27
3233
Page 1871 of 2053
ELECTRICAL WIRING DIAGRAMS ELECTRICAL WIRING DIAGRAMSELECTRICAL WIRING DIAGRAMS ELECTRICAL WIRING DIAGRAMS
ELECTRICAL WIRING DIAGRAMS
2-7 2-7 2-7 2-7
2-7
2) 2)2) 2)
2)
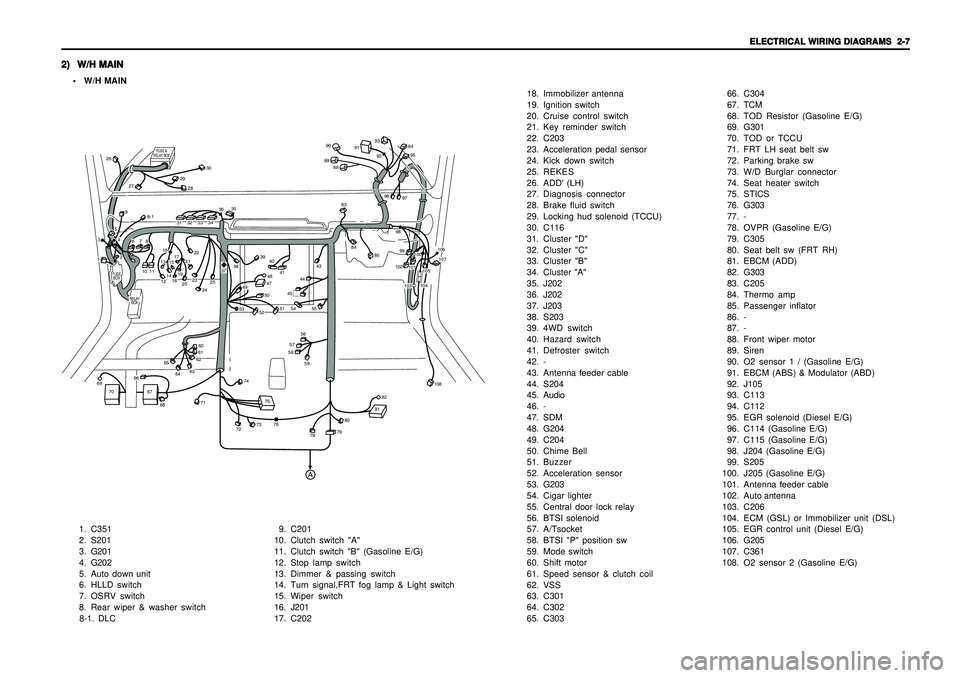
W/H MAIN W/H MAINW/H MAIN W/H MAIN
W/H MAIN• W/H MAIN
1. C351
2. S201
3. G201
4. G202
5. Auto down unit
6. HLLD switch
7. OSRV switch
8. Rear wiper & washer switch
8-1. DLC9. C201
10. Clutch switch "A"
11. Clutch switch "B" (Gasoline E/G)
12. Stop lamp switch
13. Dimmer & passing switch
14. Turn signal,FRT fog lamp & Light switch
15. Wiper switch
16. J201
17. C20218. Immobilizer antenna
19. Ignition switch
20. Cruise control switch
21. Key reminder switch
22. C203
23. Acceleration pedal sensor
24. Kick down switch
25. REKES
26. ADD' (LH)
27. Diagnosis connector
28. Brake fluid switch
29. Locking hud solenoid (TCCU)
30. C116
31. Cluster "D"
32. Cluster "C"
33. Cluster "B"
34. Cluster "A"
35. J202
36. J202
37. J203
38. S203
39. 4WD switch
40. Hazard switch
41. Defroster switch
42. -
43. Antenna feeder cable
44. S204
45. Audio
46. -
47. SDM
48. G204
49. C204
50. Chime Bell
51. Buzzer
52. Acceleration sensor
53. G203
54. Cigar lighter
55. Central door lock relay
56. BTSI solenoid
57. A/Tsocket
58. BTSI "P" position sw
59. Mode switch
60. Shift motor
61. Speed sensor & clutch coil
62. VSS
63. C301
64. C302
65. C30366. C304
67. TCM
68. TOD Resistor (Gasoline E/G)
69. G301
70. TOD or TCCU
71. FRT LH seat belt sw
72. Parking brake sw
73. W/D Burglar connector
74. Seat heater switch
75. STICS
76. G303
77. -
78. OVPR (Gasoline E/G)
79. C305
80. Seat belt sw (FRT RH)
81. EBCM (ADD)
82. G303
83. C205
84. Thermo amp
85. Passenger inflator
86. -
87. -
88. Front wiper motor
89. Siren
90. O2 sensor 1 / (Gasoline E/G)
91. EBCM (ABS) & Modulator (ABD)
92. J105
93. C113
94. C112
95. EGR solenoid (Diesel E/G)
96. C114 (Gasoline E/G)
97. C115 (Gasoline E/G)
98. J204 (Gasoline E/G)
99. S205
100.J205 (Gasoline E/G)
101.Antenna feeder cable
102.Auto antenna
103.C206
104.ECM (GSL) or Immobilizer unit (DSL)
105.EGR control unit (Diesel E/G)
106. G205
107.C361
108. O2 sensor 2 (Gasoline E/G)
FUSE
BOX
RELAY
BOX
FUSE &
RELAY BOX
A
1011
12131415171618192021222829
30
26
27
31323334
35
3637
38
394041
43
83888990
91
93
9495
9296
979899102
101100
106107
104105
103
108
84
85
44
8-1
4748
49
50
51
52
53
45
55
54565758
60616263
6465
66
67
68
71
72
73
74
7576
78
7980
8182
69
70
59
232425
13
4259678
Page 1872 of 2053
2-8 2-8 2-8 2-8
2-8
ELECTRICAL WIRING DIAGRAMS ELECTRICAL WIRING DIAGRAMSELECTRICAL WIRING DIAGRAMS ELECTRICAL WIRING DIAGRAMS
ELECTRICAL WIRING DIAGRAMS
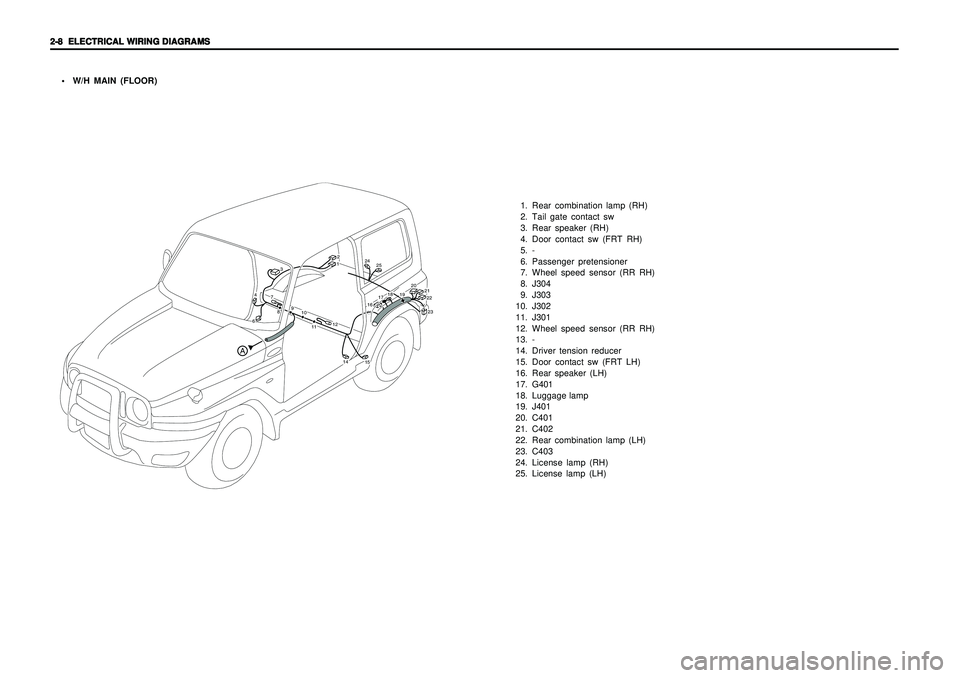
W/H MAIN (FLOOR)
1. Rear combination lamp (RH)
2. Tail gate contact sw
3. Rear speaker (RH)
4. Door contact sw (FRT RH)
5. -
6. Passenger pretensioner
7. Wheel speed sensor (RR RH)
8. J304
9. J303
10. J302
11. J301
12. Wheel speed sensor (RR RH)
13. -
14. Driver tension reducer
15. Door contact sw (FRT LH)
16. Rear speaker (LH)
17. G401
18. Luggage lamp
19. J401
20. C401
21. C402
22. Rear combination lamp (LH)
23. C403
24. License lamp (RH)
25. License lamp (LH)
A
1011
12
15
14
161718
19
20
212223
12
24
25
3
46
78
9