1997 SSANGYONG KORANDO timing belt
[x] Cancel search: timing beltPage 9 of 2053

GENERAL INFORMATION 0B -- 9
D AEW OO M Y_2000
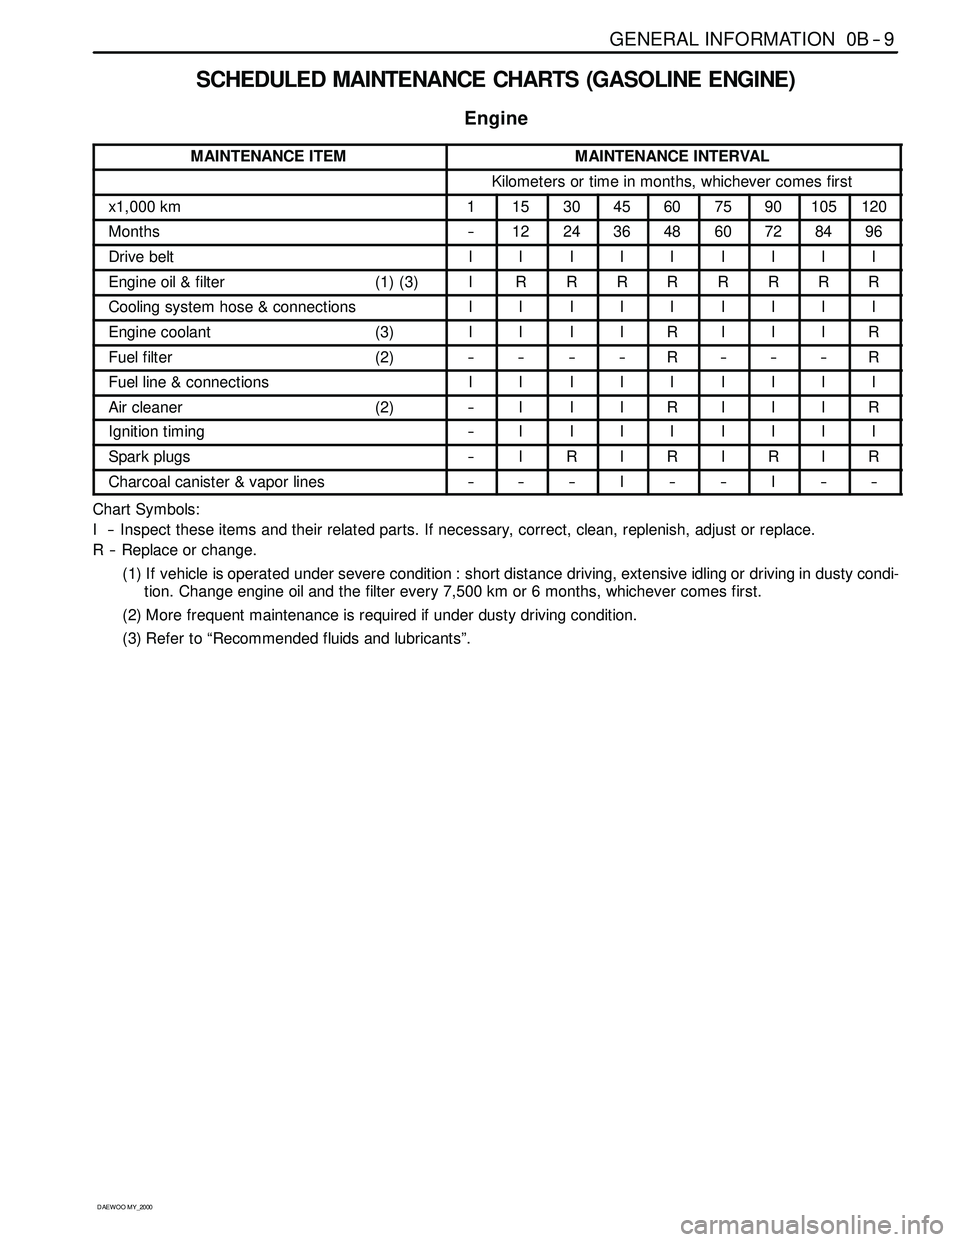
SCHEDULED MAINTENANCE CHARTS (GASOLINE ENGINE)
Engine
MAINTENANCE ITEMMAINTENANCE INTERVAL
Kilometers or time in months, whichever comes first
x1,000 km1153045607590105120
Months--1224364860728496
Drive beltIIIIIIIII
Engine oil & filter (1) (3)IRRRRRRRR
Cooling system hose & connectionsIIIIIIIII
Engine coolant (3)IIIIRIIIR
Fuel filter (2)--------R------R
Fuel line & connectionsIIIIIIIII
Air cleaner (2)--IIIRIIIR
Ignition timing--IIIIIIII
Spark plugs--IRIRIRIR
Charcoal canister & vapor lines------I----I----
Chart Symbols:
I -- Inspect these items and their related parts. If necessary, correct, clean, replenish, adjust or replace.
R -- Replace or change.
(1) If vehicle is operated under severe condition : short distance driving, extensive idling or driving in dusty condi-
tion. Change engine oil and the filter every 7,500 km or 6 months, whichever comes first.
(2) More frequent maintenance is required if under dusty driving condition.
(3) Refer to “Recommended fluids and lubricants”.
Page 11 of 2053

GENERAL INFORMATION 0B -- 11
D AEW OO M Y_2000
SCHEDULED MAINTENANCE CHARTS (DIESEL ENGINE)
Engine
MAINTENANCE ITEMMAINTENANCE INTERVAL
Kilometers or time in months, whichever comes first
x1,000 km1102030405060708090100
Months--6121824303642485460
Drive beltIIIIIIIIIII
Engine oil & fillter (1) (3)RRRRRRRRRRR
Cooling system hose & connections----IIIIIIIII
Engine coolant (3)----I------R------I
Fuel filter (2)--------R--------R--
Fuel line & connectionsIIIIIIIIIII
Glow plug----I--I--I--R--I
Pre -- fuel filter--IIRIIIIIII
Air cleaner (2)--IIIIIRIIRI
Ignition timing (see NOTE 1)--IIIIIIIIII
NOTE 1 : Injection Timing :
Adjust as required :
-- When excessive smoke is visible (black or white)
-- Poor performance/economy
Chart Symbols:
I -- Inspect these items and their related parts. If necessary, correct, clean, replenish, adjust or replace.
R -- Replace or change.
(1) If vehicle is operated under severe condition : short distance driving, extensive idling or driving in dusty condi-
tion, change engine oil every 5,000km or 3 months, whichever comes first.
(2) More frequent maintenance is required if under dusty driving conditing.
(3) Refer to “Recommended fluids and lubricants”.
Page 33 of 2053

D AEW OO M Y_2000
SECTION 1B1
M162 ENGINE MECHANICAL
CAUTION: Disconnect the negative battery cable before removing or installing any electrical unit or when a
tool or equipment could easily come in contact with exposed electrical terminals. Disconnecting this cable
will help prevent personal injury and damage to the vehicle. The ignition must also be in LOCK unless other -
wise noted.
TABLE OF CONTENTS
Specifications 1B1 -- 2............................
Fastener Tightening Specifications 1B1 -- 2..........
Special Tools 1B1 -- 4.............................
Special Tools Table 1B1-- 4.......................
Maintenance and Repair 1B1 -- 7...................
On-- Vehicle Service 1B1-- 7.........................
Engine Assembly 1B1-- 7.........................
Crankcase Ventilation System 1B1-- 14.............
Generator 1B1-- 16..............................
Engine Mount 1B1-- 17...........................
Poly V-- Belt 1B1 -- 18.............................
Tensioning Device 1B1-- 20.......................
Poly V-- Belt Inspection 1B1-- 21...................
Cylinder Head Cover 1B1-- 24.....................
Cylinder Head Front Cover 1B1 -- 26...............
Cylinder Head 1B1-- 28...........................
Timing Gear Case Cover 1B1-- 31.................
Crankshaft Sealing Rear Cover 1B1-- 33...........
Belt Pulley and Vibration Damper 1B1-- 35..........
Crankshaft Front Radial Seal 1B1-- 38.............
Crankshaft Rear Radial Seal 1B1-- 40..............
Crankshaft 1B1-- 41.............................
Flywheel / Driven Plate 1B1 -- 47...................
Camshaft Adjuster 1B1-- 50.......................
Camshaft Sprocket Bolt 1B1-- 52..................
Camshaft 1B1-- 54..............................
Camshaft Timing Position 1B1 -- 59................Valve Spring 1B1 -- 62............................
Valve Stem Seal 1B1-- 66........................
Chain Tensioner 1B1-- 67.........................
Timing Chain 1B1-- 70............................
Tensioning Rail 1B1-- 75..........................
Cylinder Head Guide Rail 1B1-- 76.................
Crankcase Guide Rail 1B1-- 77....................
Crankshaft Sprocket 1B1-- 78.....................
Piston 1B1-- 80..................................
Connecting Rod 1B1-- 83.........................
Piston Ring 1B1 -- 85.............................
Engine Oil Specification 1B1-- 87..................
Oil Pan 1B1-- 88.................................
Engine Oil and Oil Filter Element 1B1-- 90..........
Oil Filter 1B1-- 92................................
Oil Pump 1B1-- 94...............................
Oil Pressure Relief Valve 1B1-- 96.................
Oil Non-Return Valve 1B1-- 97....................
Oil Dipstick Guide Tube 1B1-- 98..................
Unit Repair 1B1 -- 99..............................
Oil Gallery in Crankcase 1B1 -- 99..................
Oil Gallery in Cylinder Head 1B1-- 101..............
Core Plugs in Crankcase 1B1-- 104................
Cylinder Bore 1B1-- 106..........................
Crankcase Mating Surface 1B1-- 108..............
Cylinder Head Mating Surface 1B1-- 110...........
Page 63 of 2053

M162 ENGINE MECHANICAL 1B1 -- 31
D AEW OO M Y_2000
TIMING GEAR CASE COVER
Preceding Work: Removal of cylinder head front cover
Removal of generator bracket
Removal of tensioning device
Removal of belt pulley and vibration damper
1 Bolt (M8 x 60, 3 pieces)
22.5-- 27.5 NSm (16.6-- 20.3 lb-ft) .............
2 A/C Bracket
3 Bolt (M8 x 65, 3 pieces)
22.5-- 27.5 NSm (16.6-- 20.3 lb-ft) .............
4 Bolt (M8 x 40, 1 piece)
22.5-- 27.5 NSm (16.6-- 20.3 lb-ft) .............5 Bolt (M8 x 60, 1 piece)
22.5-- 27.5 NSm (16.6--20.3 lb-ft) .............
6Seal
7 Timing Gear Case Cover
8RollPin
9 Bolt (M6 x 22, 6 pieces)
9--11 NSm (80-- 97 lb-in) .....................
Page 294 of 2053

D AEW OO M Y_2000
SECTION 1B2
M161 ENGINE MECHANICAL
CAUTION: Disconnect the negative battery cable before removing or installing any electrical unit or when a
tool or equipment could easily come in contact with exposed electrical terminals. Disconnecting this cable
will help prevent personal injury and damage to the vehicle. The ignition must also be in LOCK unless other -
wise noted.
TABLE OF CONTENTS
Specifications 1B2 -- 2............................
Fastener Tightening Specifications 1B2 -- 2..........
Special Tools 1B2 -- 4.............................
Special Tools Table 1B2-- 4.......................
Maintenance and Repair 1B2 -- 7...................
On-- Vehicle Service 1B2-- 7.........................
Engine Assembly 1B2-- 7.........................
Crankcase Ventilation System 1B2-- 14.............
Generator 1B2-- 18..............................
Engine Mount 1B2-- 19...........................
Poly V-- Belt 1B2 -- 20.............................
Tensioning Device 1B2-- 22.......................
Tensioning Device Shock Absorber 1B2-- 23........
Poly V-- Belt Inspection 1B2-- 24...................
Cylinder Head Cover 1B2-- 26.....................
Cylinder Head Front Cover 1B2 -- 28...............
Cylinder Head 1B2-- 30...........................
Timing Gear Case Cover 1B2-- 34.................
Crankshaft Sealing Rear Cover 1B2-- 37...........
Belt Pulley and Vibration Damper 1B2-- 39..........
Crankshaft Front Radial Seal 1B2-- 42.............
Crankshaft Rear Radial Seal 1B2-- 44..............
Crankshaft 1B2-- 45.............................
Flywheel / Driven Plate 1B2 -- 51...................
Camshaft Adjuster 1B2-- 54.......................Camshaft Sprocket Bolt 1B2-- 57..................
Camshaft 1B2-- 58..............................
Camshaft Timing Position 1B2 -- 61................
Valve Spring 1B2 -- 63............................
Valve Stem Seal 1B2-- 67........................
Chain Tensioner 1B2-- 68.........................
Timing Chain 1B2-- 72............................
Tensioning Rail 1B2-- 77..........................
Cylinder Head Guide Rail 1B2-- 78.................
Crankcase Guide Rail 1B2-- 80....................
Crankshaft Sprocket 1B2-- 81.....................
Piston 1B2-- 83..................................
Connecting Rod 1B2-- 86.........................
Piston Ring 1B2 -- 88.............................
Oil Pan 1B2-- 90.................................
Engine Oil and Oil Filter Element 1B2-- 92..........
Oil Pump 1B2-- 95...............................
Oil Pressure Relief Valve 1B2-- 97.................
Oil Non-Return Valve 1B2-- 98....................
Oil Dipstick Guide Tube 1B2-- 99..................
Unit Repair 1B2 -- 100............................
Core Plugs in Crankcase 1B2-- 100................
Cylinder Bore 1B2-- 102..........................
Crankcase Mating Surface 1B2-- 104..............
Cylinder Head Mating Surface 1B2-- 106...........
Page 328 of 2053

M161 ENGINE MECHANICAL 1B2 -- 35
D AEW OO M Y_2000
Tools Required
116 589 20 33 00 Sliding Hammer
116 589 01 34 00 Threaded Pin
Removal & Installation Procedure
1. Remove the power steering belt pulley and A/C com-
pressor bracket.
2. Remove the oil line from power steering pump.
3. Rotate the crankshaft so that the piston of number,
cylinder is at ATDC20°.
4. Put the alignment marks (arrows) on the timing chain
and camshaft sprocket.
5. Remove the chain tensioner.
Installation Notice
Tightening Torque
72 -- 88 NSm (53 -- 65 lb-ft)
6. Remove the intake and exhaust camshaft sprocket
(remove the camshaft adjuster assembly in E23 en-
gine).
Installation Notice
Ti
ghteningTo rque
1st step: 18 -- 22 NSm
(13 -- 16 lb-ft)
TighteningTorque
2nd step: 60°±5°
Notice:The flange bolt is designed to be used only
once, so always replace with new one.
7. Remove the guide rail pin using the sliding hammer
116 589 20 33 00 (02) and the threaded pin 116 589
01 34 00 (03).
Notice:Apply the sealant on guide rail pin when installa-
tion.
Page 329 of 2053

1B2 -- 36 M161 ENGINE MECHANICAL
D AEW OO M Y_2000
8. Unscrew the bolts (A).
Installation Notice
Tightening Torque
22.5 -- 27.5 NSm
(16.6 -- 20.3 lb-ft)
9. Remove the belt pulley and vibration damper.
Installation Notice (Center Bolt)
Ti
ghteningTo rque
1st step: 200 + 20NSm
(148 + 15 lb-ft)
TighteningTorque
2nd step: 90°+10°
10. Unscrew the bolts (1, 2) on timing gear case cover
and remove the timing gear case cover.
Installation Notice
Tightening Torque
22.5 -- 27.5 NSm
(16.6 -- 20.3 lb-ft)
Notice:Be careful not to damage the cylinder head gas-
ket.
11. Remove the radial shaft seal.
Notice:Installation note replace the seal with new one.
12. Clean the timing gear case cover and crankcase
sealing surface.
13. Replace the O -- ring with new one and apply the
sealant on the sealing surface.
Notice:Be careful not to stain the oil chamber of chain
tensioner with the sealant.
14. Installation should follow the removal precedure in
the reverse order.
15. Warm up the engine and check for oil leaks.
Page 551 of 2053

D AEW OO M Y_2000
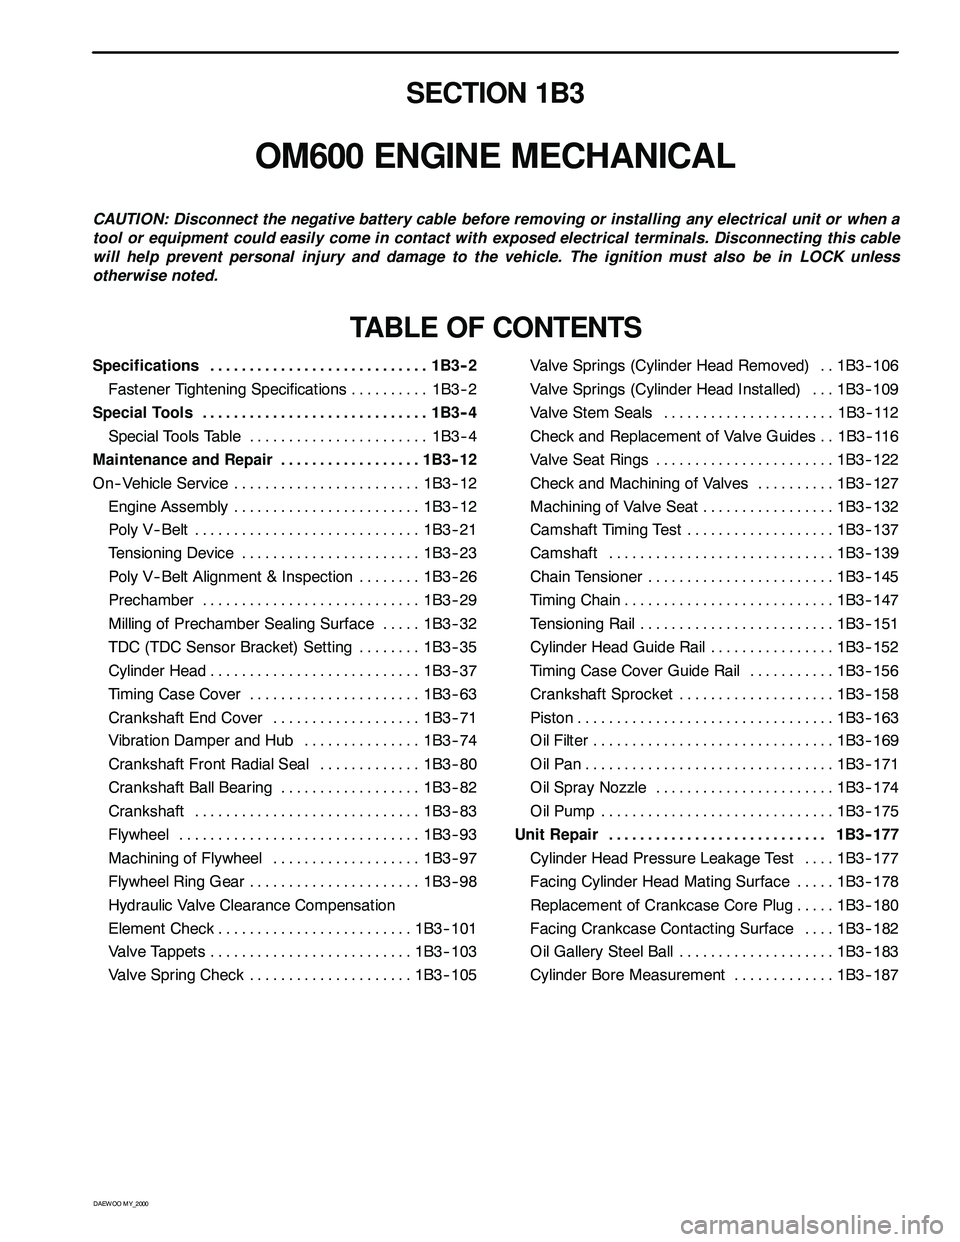
SECTION 1B3
OM600 ENGINE MECHANICAL
CAUTION: Disconnect the negative battery cable before removing or installing any electrical unit or when a
tool or equipment could easily come in contact with exposed electrical terminals. Disconnecting this cable
will help prevent personal injury and damage to the vehicle. The ignition must also be in LOCK unless
otherwise noted.
TABLE OF CONTENTS
Specifications 1B3 -- 2............................
Fastener Tightening Specifications 1B3 -- 2..........
Special Tools 1B3 -- 4.............................
Special Tools Table 1B3-- 4.......................
Maintenance and Repair 1B3 -- 12..................
On-- Vehicle Service 1B3-- 12........................
Engine Assembly 1B3-- 12........................
Poly V-- Belt 1B3 -- 21.............................
Tensioning Device 1B3-- 23.......................
Poly V-- Belt Alignment & Inspection 1B3-- 26........
Prechamber 1B3-- 29............................
Milling of Prechamber Sealing Surface 1B3 -- 32.....
TDC (TDC Sensor Bracket) Setting 1B3 -- 35........
Cylinder Head 1B3-- 37...........................
Timing Case Cover 1B3 -- 63......................
Crankshaft End Cover 1B3-- 71...................
Vibration Damper and Hub 1B3-- 74...............
Crankshaft Front Radial Seal 1B3-- 80.............
Crankshaft Ball Bearing 1B3-- 82..................
Crankshaft 1B3-- 83.............................
Flywheel 1B3 -- 93...............................
Machining of Flywheel 1B3-- 97...................
Flywheel Ring Gear 1B3 -- 98......................
Hydraulic Valve Clearance Compensation
Element Check 1B3-- 101.........................
Valve Tappets 1B3-- 103..........................
Valve Spring Check 1B3-- 105.....................Valve Springs (Cylinder Head Removed) 1B3-- 106..
Valve Springs (Cylinder Head Installed) 1B3-- 109...
Valve Stem Seals 1B3-- 112......................
Check and Replacement of Valve Guides 1B3-- 116..
Valve Seat Rings 1B3-- 122.......................
Check and Machining of Valves 1B3-- 127..........
Machining of Valve Seat 1B3-- 132.................
Camshaft Timing Test 1B3-- 137...................
Camshaft 1B3-- 139.............................
Chain Tensioner 1B3-- 145........................
Timing Chain 1B3-- 147...........................
Tensioning Rail 1B3-- 151.........................
Cylinder Head Guide Rail 1B3-- 152................
Timing Case Cover Guide Rail 1B3-- 156...........
Crankshaft Sprocket 1B3-- 158....................
Piston 1B3-- 163.................................
Oil Filter 1B3-- 169...............................
Oil Pan 1B3-- 171................................
Oil Spray Nozzle 1B3-- 174.......................
Oil Pump 1B3-- 175..............................
Unit Repair 1B3 -- 177............................
Cylinder Head Pressure Leakage Test 1B3-- 177....
Facing Cylinder Head Mating Surface 1B3 -- 178.....
Replacement of Crankcase Core Plug 1B3-- 180.....
Facing Crankcase Contacting Surface 1B3 -- 182....
Oil Gallery Steel Ball 1B3-- 183....................
Cylinder Bore Measurement 1B3-- 187.............