1997 SSANGYONG KORANDO fuse
[x] Cancel search: fusePage 603 of 2053

1B3 -- 54 OM600 ENGINE MECHANICAL
D AEW OO M Y_2000
8. Connect the vacuum lines to the vacuum pump.
9. Install the fuel filter and connect the pipe.
Tightening Torque25 N∙m (18 lb-ft)
Notice
Be careful not to be confused the connections and
hoses.
10. Connect the fuel pipe to the injection pump.
11. Install the sliding rail(24) and insert the sliding rail
pins(25, 26).
Notice
Apply sealing compound on the each collar of the
sliding rail pins.
Sliding Hammer 116 589 20 33 00
Threaded Pin 116 589 02 34 00
Page 926 of 2053

SSAMGYONG MY2002
4A-6 HYDRAULIC BRAKES
Action
1. Turn the ignition ON.
2. Apply the parking brake.
Does the BRAKE warning lamp turn on?
Check fuse F30.
Is fuse F30 blown?
Check for a short circuit and repair it, if necessary.
Replace fuse F30.
1. Turn the ignition ON.
2. Check the voltage at F30.
Is the voltage equal to the specified value?
Repair the power supply to fuse F30.
Is the repair complete?
1. Disconnect terminal A1 of the instrument cluster.
2. Turn the ignition ON.
3. Use a voltmeter to check the voltage at terminal A1.
Is the voltage equal to the specified value?
Repair the open circuit between terminal A1 of the
instrument cluster and fuse F30.
Is the repair complete?
1. Reconnect terminal A1 of the instrument cluster.
Turn the ignition ON.
2. Use a voltmeter to backprobe terminal D10 of the
instrument cluster.
Is the voltage equal to the specified value?
1. Remove the BRAKE warning lamp from its socket.
2. Test the Brake warning lamp.
Is the BRAKEwarning lamp OK?
Replace the instrument cluster.
Is the repair complete?
Replace the BRAKE warning lamp.
Is the repair complete?
1. Disconnect terminal C10 of the STICS.
2. Connect a jumper wire between terminal C10 and
ground.
3. Turn the ignition ON.
Is the BRAKE warning lamp on?
Replace the STICS.
Is the repair complete?
1. Disconnect the STICS connector.
2. Connect a jump wire between terminal C19 and
ground.
3. Turn the ignition ON.
Is the BRAKE warning lamp on?
Replace the brake warning lamp switch.
Is the repair complete?
Repair the open circuit between the brake warning
lamp switch and terminal C19 of the STICS
BRAKE LAMP WARNING CIRCUIT (Cont’d)
Yes
Go To Step 31
Go To Step 17
System OK
Go To Step 20
System OK
Go To Step 22
System OK
Go To Step 26
Go To Step 24
System OK
System OK
Go To Step 27
System OK
Go To Step 29
System OK
System OKNO
Go To Step 16
Go To Step 18
-
Go To Step 19
-
Go To Step 21
-
Go To Step 23
Go To Step 25
-
-
Go To Step 28
-
Go To Step 30
-
-Step
15
16
17
18
19
20
21
22
23
24
25
26
27
28
29
30Value
-
-
-
11 - 14 v
-
11 - 14 v
-
11 - 14 v
-
-
-
-
-
-
-
-
Page 986 of 2053

EBCM Connection Fact View.............................4E-95
EBCM Connector...............................................4E-95
Hydraulic Modulator Connector..........................4E-96
Repair Instructions..............................................4E-99
On-Vehicle Service...............................................4E-99
Service Precautions...........................................4E-99
ABS 5.3 Assembly..........................................4E-100
ABS/TCS Unit..................................................4E-100
Front Wheel Speed Sensor..............................4E-101Rear Wheel Speed Sensor...............................4E-101
Acceleration Sensor .........................................4E-102
System Fuse...................................................4E-102
Indicators........................................................4E-102
Unit Repair........................................................4E-103
ABS Front Tooth Wheel....................................4E-103
Special Tools and Equipment..........................4E-104
Special Tools Table..........................................4E-104
Page 987 of 2053

ABS AND TCS 4F-3
SSANGYONG MY2002
GENERAL DESCRIPTION AND SYSTEM OPERATION
BASIC KNOWLEDGE REQUIRED
Before using this section, it is important that you have
a basic knowledge of the following items. Without this
knowledge, it will be difficult to use the diagnostic
procedures contained in this section.
•Basic Electrical Circuits - You should understand
the basic theory of electricity and know the meaning
of voltage, current (amps), and resistance (ohms).
You should understand what happens in a circuit
with an open or shorted wire. You should be able to
read and understand a wiring diagram.
Use of Circuit Testing Tools - You should know
how to use a test light and how to bypass
components to test circuits using fused jumper
wires. You should be familiar with a digital
multimeter. You should be able to measure voltage,
resistance, and current, and be familiar with the
controls and how to use them correctly.
ABS SYSTEM COMPONENTS
The ABS 5.3 Antilock Braking System (ABS) consists
of a conventional hydraulic brake system plus antilock
components. The conventional brake system includes
a vacuum booster, master cylinder, front disc brakes,
rear disc brakes, interconnecting hydraulic brake pipes
and hoses, brake fluid level switch and the BRAKE
indicator.
The ABS components include a hydraulic unit, an elec-
tronic brake control module (EBCM), two system fuses,
four wheel speed sensors (one at each wheel), intercon-
necting wiring, the ABS indicator, the EBD indicator
and the TCS indicator. See “ABS Component Locator”
in this section for the general layout of this system.
The hydraulic unit with the attached EBCM is located
between the surge tank and the bulkhead on the left
side of the vehicle.
The basic hydraulic unit configuration consists of hy-
draulic check valves, two solenoid valves for each
wheel, a hydraulic pump, and two accumulators. The
hydraulic unit controls hydraulic pressure to the front
calipers and rear calipers by modulating hydraulic
pressure to prevent wheel lockup.
Units equipped with TCS add two more valves for each
drive wheel for the purpose of applying the brake to a
wheel that is slipping. This is done with pressure from
the hydraulic pump in the unit. There is also a TCS
indicator lamp on the instrument panel to alert the driver
to the fact that the TCS system is active. The
components identified in the drawing are those added
to the basic ABS 5.3 system to provide traction control.
Nothing in the hydraulic unit or the EBCM is serviceable.
In the event of any failure, the entire ABS unit withattached EBCM must be replaced. For more
information, refer to “Base Braking Mode” and
“Antilock Braking Mode” in this section.
TRACTION CONTROL SYSTEM
(TCS) DESCRIPTION
General Information
The traction control system (TCS) is a traction system
by means of brake intervention only, available in a low
speed range (< 60kph).
It workes on µ - split roads with sidewise different friction
coefficients.
The spinning driven wheel is braked and the drive
torque can be transferred to the wheel on the high-µ
side. During TCS active, the TCS information lamp is
blinking.
The temperature of the brakes is calculated by a mathe-
matical model and TCS is switched passive if the calcu-
lated temperature is greater than a threshold value (500
°C).
TCS is permitted again, when the calculated tempera-
ture is less than 350 °C.
Control Algorithm
The input signals for the control algorithm are the
filtered wheel speed signals from the ABS speed
processing.
With the speed difference of the driven wheels, the
control deviation is calculated.
If the control deviation exceeds a certain threshold
value, the wheel with the greater slip is braked actively.
The threshold value depends on the vehicle speed:
It is reduced with increasing vehicle speed down to a
constant value.
KAA4F010
Page 1001 of 2053

SSANGYONG MY2002
4F-18 ABS AND TCS
ABS INDICATOR LAMP INOPERATIVE
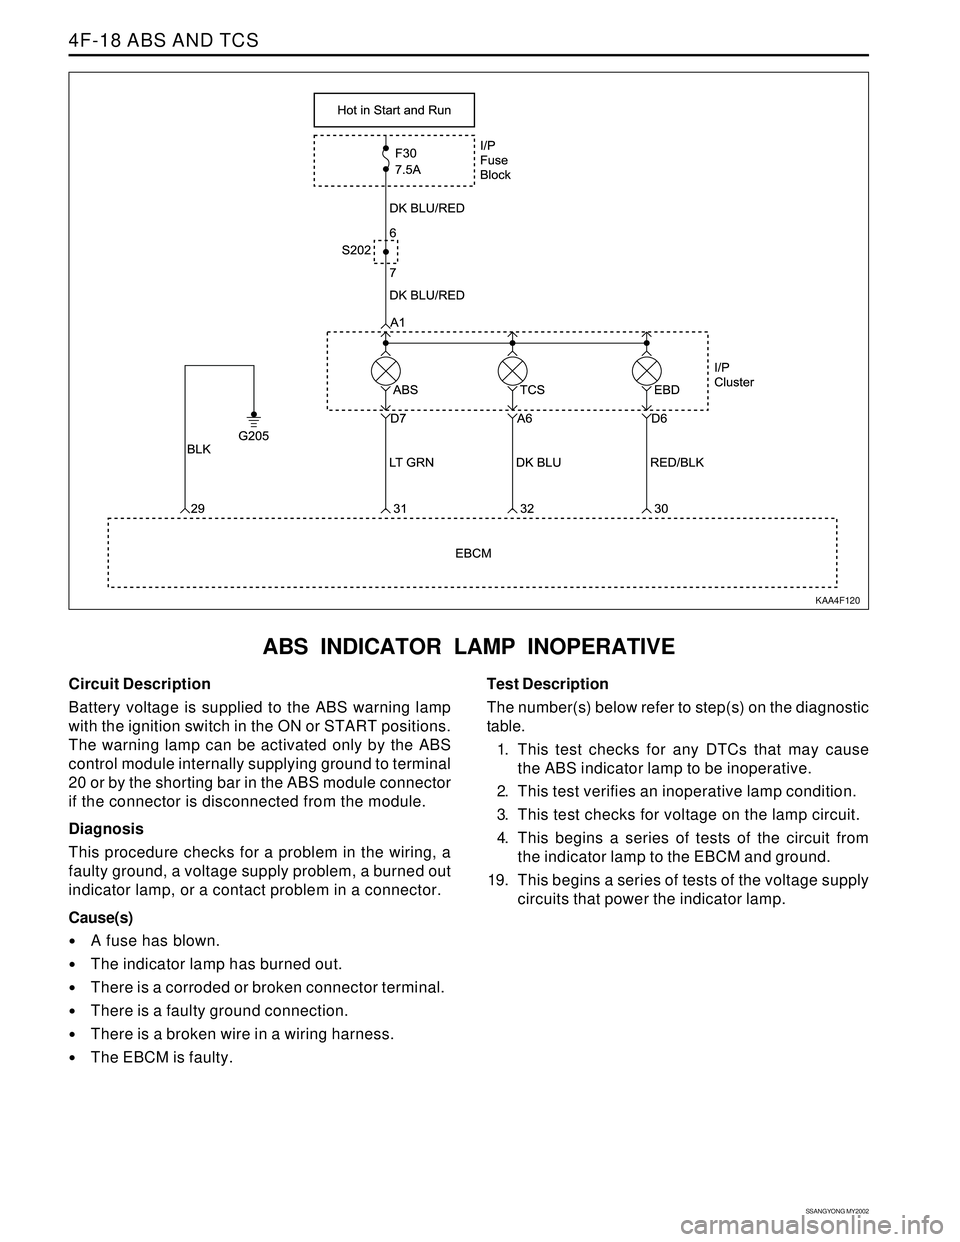
KAA4F120
Circuit Description
Battery voltage is supplied to the ABS warning lamp
with the ignition switch in the ON or START positions.
The warning lamp can be activated only by the ABS
control module internally supplying ground to terminal
20 or by the shorting bar in the ABS module connector
if the connector is disconnected from the module.
Diagnosis
This procedure checks for a problem in the wiring, a
faulty ground, a voltage supply problem, a burned out
indicator lamp, or a contact problem in a connector.
Cause(s)
A fuse has blown.
The indicator lamp has burned out.
There is a corroded or broken connector terminal.
There is a faulty ground connection.
There is a broken wire in a wiring harness.
The EBCM is faulty.Test Description
The number(s) below refer to step(s) on the diagnostic
table.
1. This test checks for any DTCs that may cause
the ABS indicator lamp to be inoperative.
2. This test verifies an inoperative lamp condition.
3. This test checks for voltage on the lamp circuit.
4. This begins a series of tests of the circuit from
the indicator lamp to the EBCM and ground.
19. This begins a series of tests of the voltage supply
circuits that power the indicator lamp.
Page 1003 of 2053

SSANGYONG MY2002
4F-20 ABS AND TCS
Go to Step 15
System OK
Go to Step 17
System OK
System OK
Go to Step 20
System OK
Go to Step 22
System OK
System OK Value(s) Step
14
15
16
17
18
19
20
21
22
23
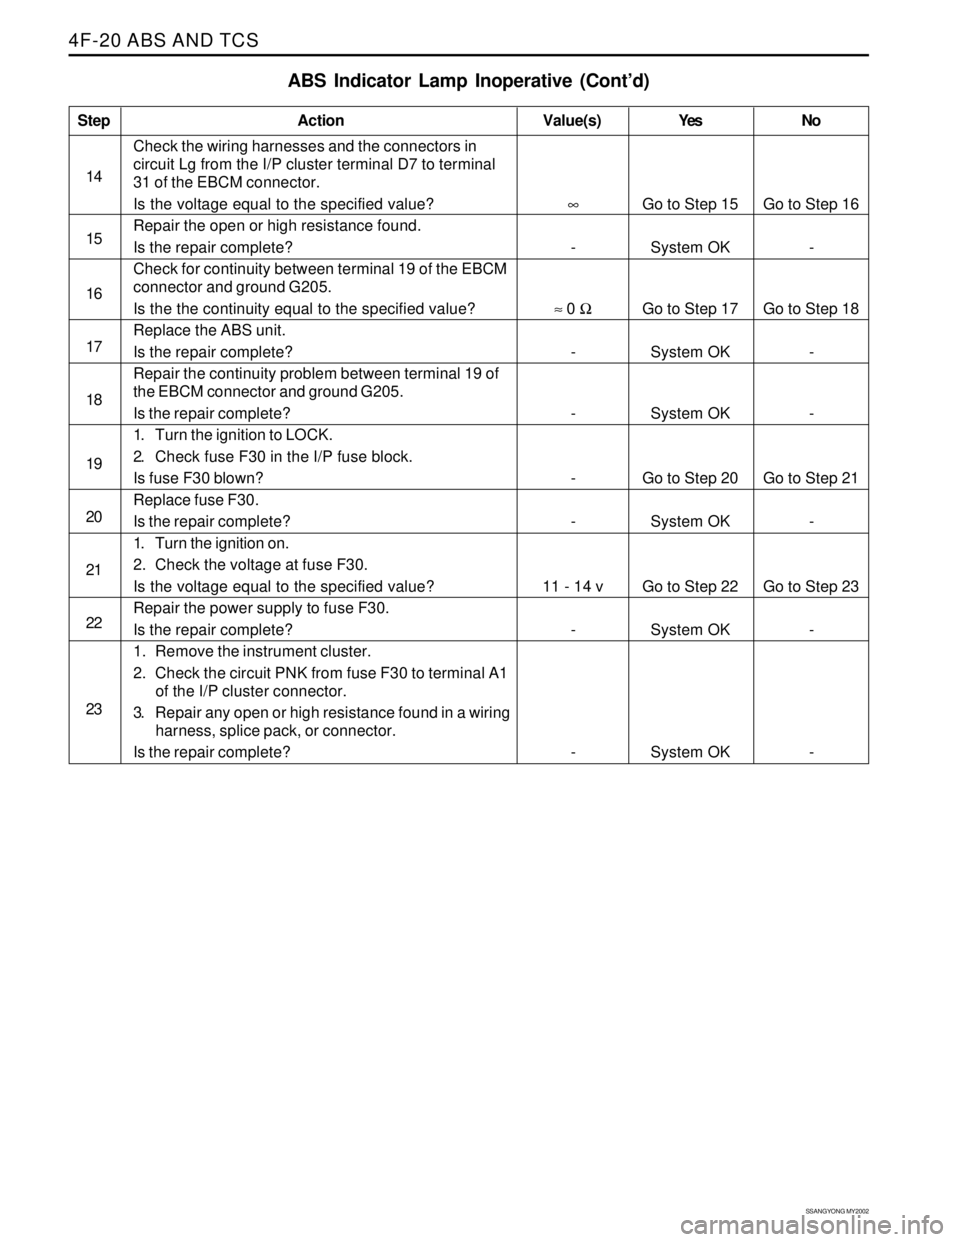
ABS Indicator Lamp Inoperative (Cont’d)
Action Yes No
Check the wiring harnesses and the connectors in
circuit Lg from the I/P cluster terminal D7 to terminal
31 of the EBCM connector.
Is the voltage equal to the specified value?
Repair the open or high resistance found.
Is the repair complete?
Check for continuity between terminal 19 of the EBCM
connector and ground G205.
Is the the continuity equal to the specified value?
Replace the ABS unit.
Is the repair complete?
Repair the continuity problem between terminal 19 of
the EBCM connector and ground G205.
Is the repair complete?
1. Turn the ignition to LOCK.
2. Check fuse F30 in the I/P fuse block.
Is fuse F30 blown?
Replace fuse F30.
Is the repair complete?
1. Turn the ignition on.
2. Check the voltage at fuse F30.
Is the voltage equal to the specified value?
Repair the power supply to fuse F30.
Is the repair complete?
1. Remove the instrument cluster.
2. Check the circuit PNK from fuse F30 to terminal A1
of the I/P cluster connector.
3. Repair any open or high resistance found in a wiring
harness, splice pack, or connector.
Is the repair complete?
∞
-
≈ 0 Ω
-
-
-
-
11 - 14 v
-
-Go to Step 16
-
Go to Step 18
-
-
Go to Step 21
-
Go to Step 23
-
-
Page 1005 of 2053

SSANGYONG MY2002
4F-22 ABS AND TCS
TRACTION CONTROL SYSTEM (TCS) INDICATOR LAMP INOPERATIVE
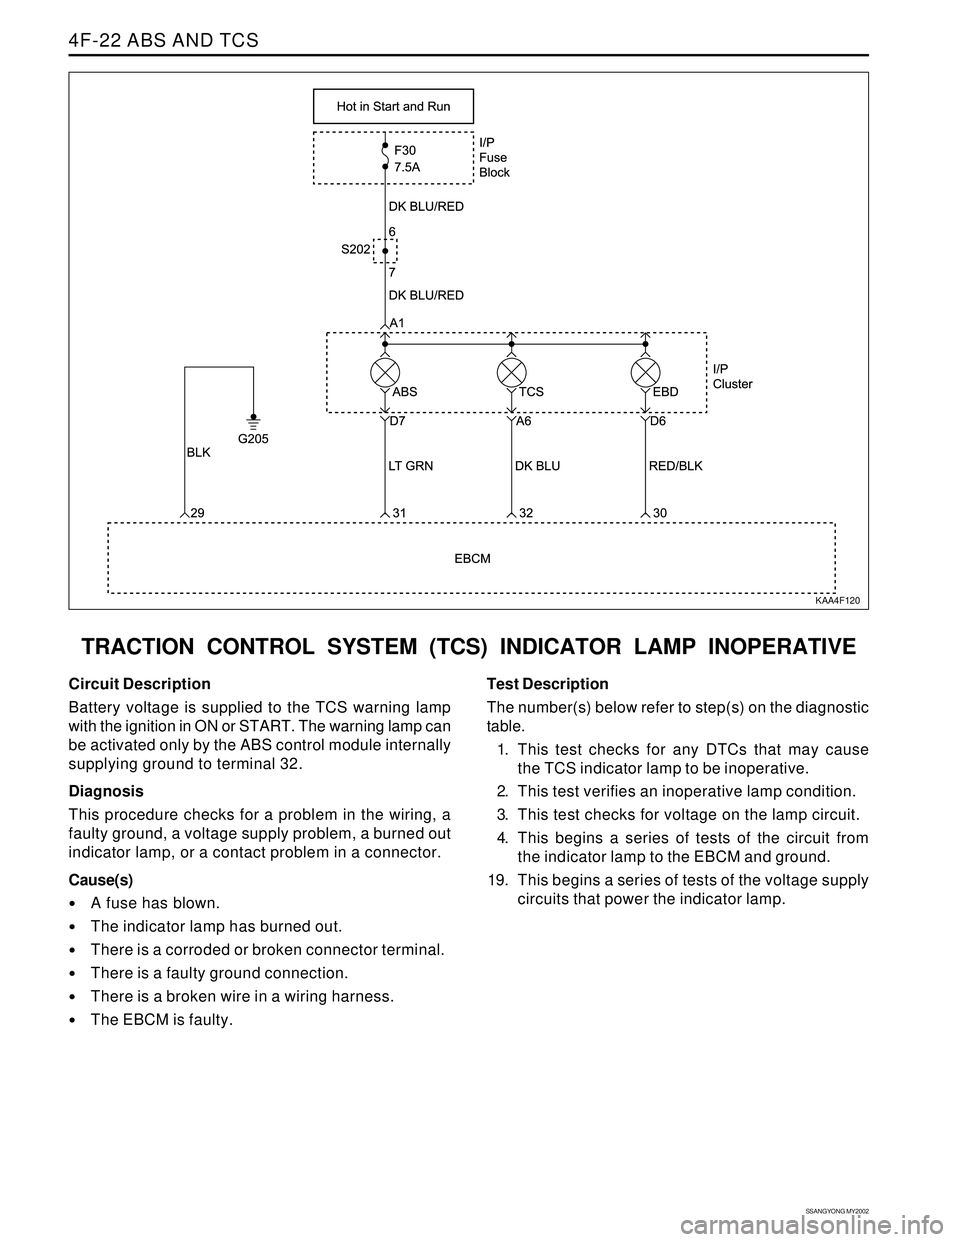
KAA4F120
Circuit Description
Battery voltage is supplied to the TCS warning lamp
with the ignition in ON or START. The warning lamp can
be activated only by the ABS control module internally
supplying ground to terminal 32.
Diagnosis
This procedure checks for a problem in the wiring, a
faulty ground, a voltage supply problem, a burned out
indicator lamp, or a contact problem in a connector.
Cause(s)
A fuse has blown.
The indicator lamp has burned out.
There is a corroded or broken connector terminal.
There is a faulty ground connection.
There is a broken wire in a wiring harness.
The EBCM is faulty.Test Description
The number(s) below refer to step(s) on the diagnostic
table.
1. This test checks for any DTCs that may cause
the TCS indicator lamp to be inoperative.
2. This test verifies an inoperative lamp condition.
3. This test checks for voltage on the lamp circuit.
4. This begins a series of tests of the circuit from
the indicator lamp to the EBCM and ground.
19. This begins a series of tests of the voltage supply
circuits that power the indicator lamp.
Page 1007 of 2053

SSANGYONG MY2002
4F-24 ABS AND TCS
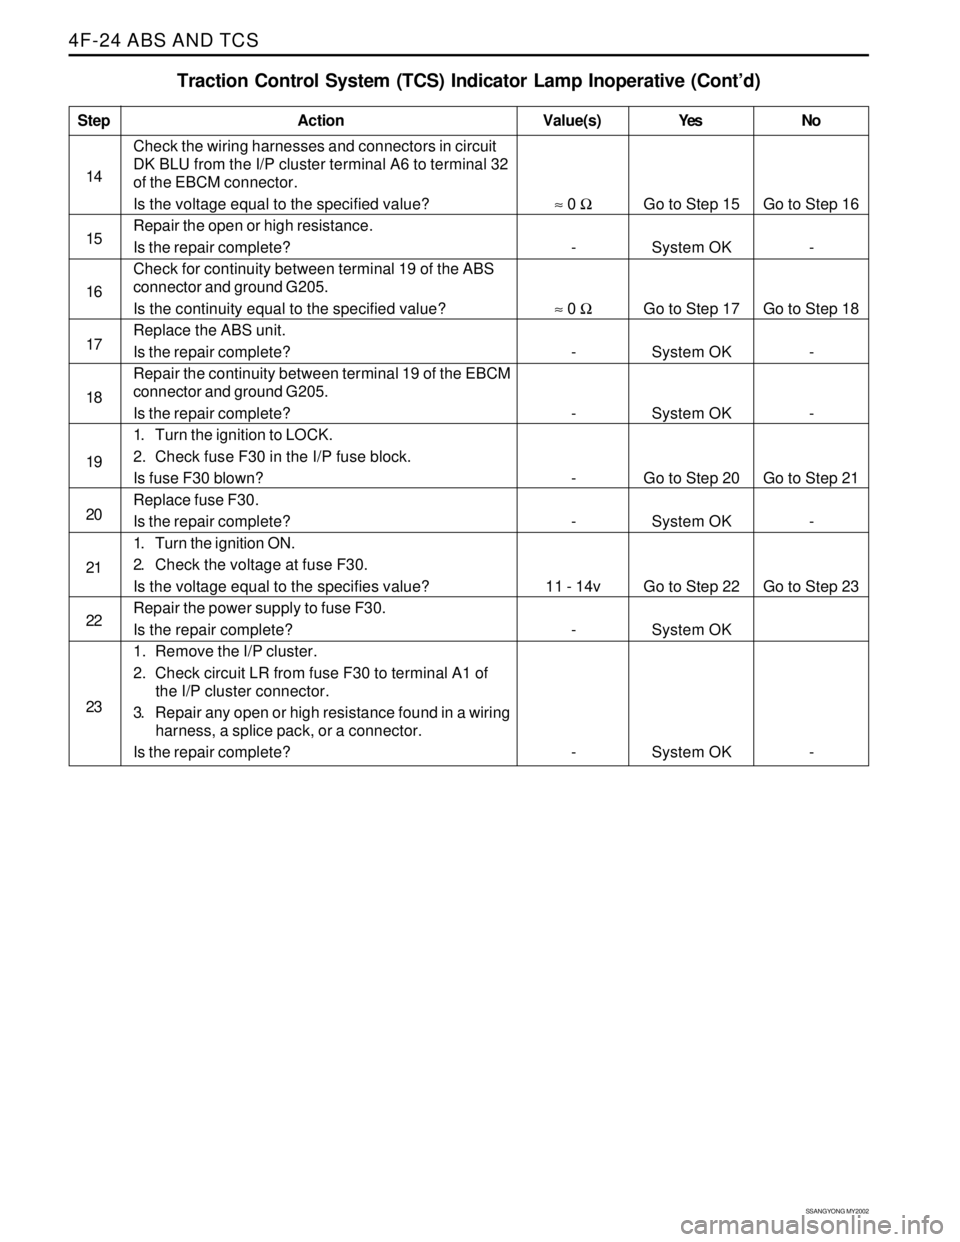
Check the wiring harnesses and connectors in circuit
DK BLU from the I/P cluster terminal A6 to terminal 32
of the EBCM connector.
Is the voltage equal to the specified value?
Repair the open or high resistance.
Is the repair complete?
Check for continuity between terminal 19 of the ABS
connector and ground G205.
Is the continuity equal to the specified value?
Replace the ABS unit.
Is the repair complete?
Repair the continuity between terminal 19 of the EBCM
connector and ground G205.
Is the repair complete?
1. Turn the ignition to LOCK.
2. Check fuse F30 in the I/P fuse block.
Is fuse F30 blown?
Replace fuse F30.
Is the repair complete?
1. Turn the ignition ON.
2. Check the voltage at fuse F30.
Is the voltage equal to the specifies value?
Repair the power supply to fuse F30.
Is the repair complete?
1. Remove the I/P cluster.
2. Check circuit LR from fuse F30 to terminal A1 of
the I/P cluster connector.
3. Repair any open or high resistance found in a wiring
harness, a splice pack, or a connector.
Is the repair complete? Step
14
15
16
17
18
19
20
21
22
23
Traction Control System (TCS) Indicator Lamp Inoperative (Cont’d)
Action Yes NoValue(s)
≈ 0 Ω
-
≈ 0 Ω
-
-
-
-
11 - 14v
-
-Go to Step 15
System OK
Go to Step 17
System OK
System OK
Go to Step 20
System OK
Go to Step 22
System OK
System OKGo to Step 16
-
Go to Step 18
-
-
Go to Step 21
-
Go to Step 23
-