1997 SSANGYONG KORANDO belt
[x] Cancel search: beltPage 1466 of 2053
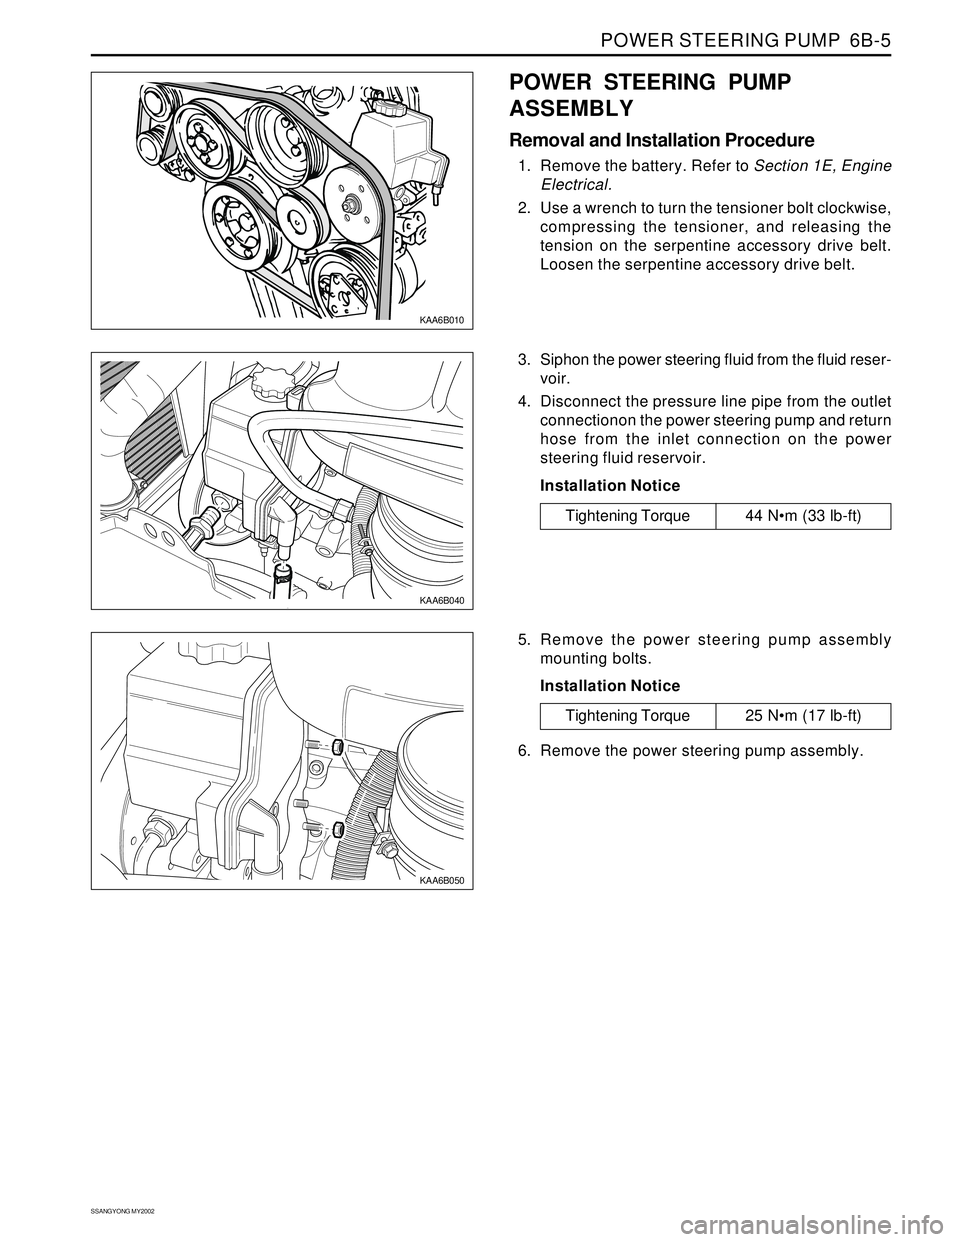
POWER STEERING PUMP 6B-5
SSANGYONG MY2002
KAA6B050
5. Remove the power steering pump assembly
mounting bolts.
Installation Notice
KAA6B040
3. Siphon the power steering fluid from the fluid reser-
voir.
4. Disconnect the pressure line pipe from the outlet
connectionon the power steering pump and return
hose from the inlet connection on the power
steering fluid reservoir.
Installation Notice
Tightening Torque 44 Nm (33 lb-ft)
KAA6B010
POWER STEERING PUMP
ASSEMBLY
Removal and Installation Procedure
1. Remove the battery. Refer to Section 1E, Engine
Electrical.
2. Use a wrench to turn the tensioner bolt clockwise,
compressing the tensioner, and releasing the
tension on the serpentine accessory drive belt.
Loosen the serpentine accessory drive belt.
Tightening Torque 25 Nm (17 lb-ft)
6. Remove the power steering pump assembly.
Page 1473 of 2053
POWER STEERING GEAR 6C-5
SSANGYONG MY2002
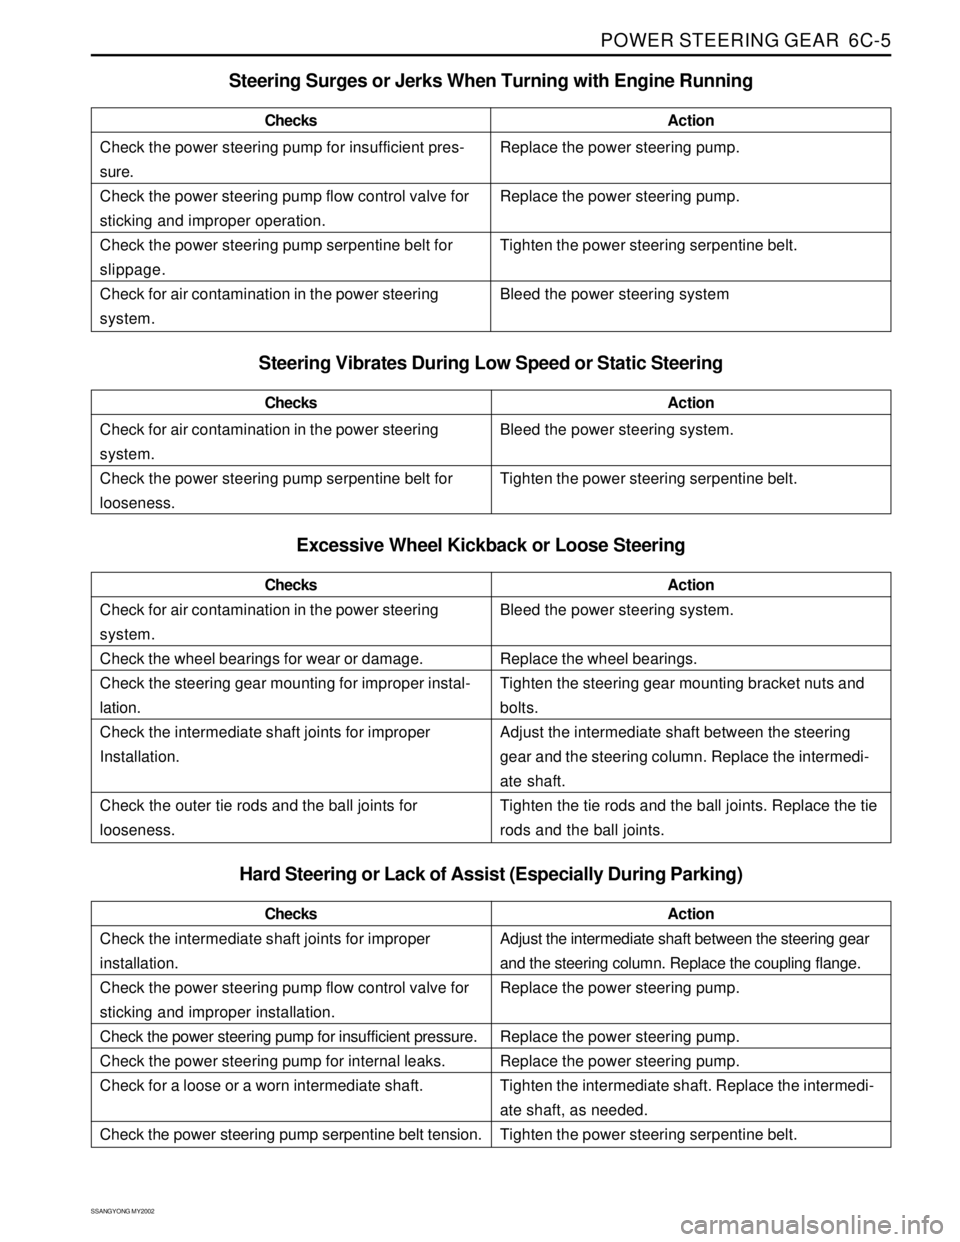
Check the power steering pump for insufficient pres-
sure.
Check the power steering pump flow control valve for
sticking and improper operation.
Check the power steering pump serpentine belt for
slippage.
Check for air contamination in the power steering
system.ChecksActionReplace the power steering pump.
Replace the power steering pump.
Tighten the power steering serpentine belt.
Bleed the power steering system
Steering Surges or Jerks When Turning with Engine Running
Check for air contamination in the power steering
system.
Check the power steering pump serpentine belt for
looseness.ChecksActionBleed the power steering system.
Tighten the power steering serpentine belt.
Steering Vibrates During Low Speed or Static Steering
Excessive Wheel Kickback or Loose Steering
Check for air contamination in the power steering
system.
Check the wheel bearings for wear or damage.
Check the steering gear mounting for improper instal-
lation.
Check the intermediate shaft joints for improper
Installation.
Check the outer tie rods and the ball joints for
looseness.ChecksActionBleed the power steering system.
Replace the wheel bearings.
Tighten the steering gear mounting bracket nuts and
bolts.
Adjust the intermediate shaft between the steering
gear and the steering column. Replace the intermedi-
ate shaft.
Tighten the tie rods and the ball joints. Replace the tie
rods and the ball joints.
Hard Steering or Lack of Assist (Especially During Parking)
Check the intermediate shaft joints for improper
installation.
Check the power steering pump flow control valve for
sticking and improper installation.
Check the power steering pump for insufficient pressure.
Check the power steering pump for internal leaks.
Check for a loose or a worn intermediate shaft.
Check the power steering pump serpentine belt tension.ChecksActionAdjust the intermediate shaft between the steering gear
and the steering column. Replace the coupling flange.
Replace the power steering pump.
Replace the power steering pump.
Replace the power steering pump.
Tighten the intermediate shaft. Replace the intermedi-
ate shaft, as needed.
Tighten the power steering serpentine belt.
Page 1505 of 2053
SSANGYONG MY2002
7A-4 HEATING AND VENTILATION SYSTEM
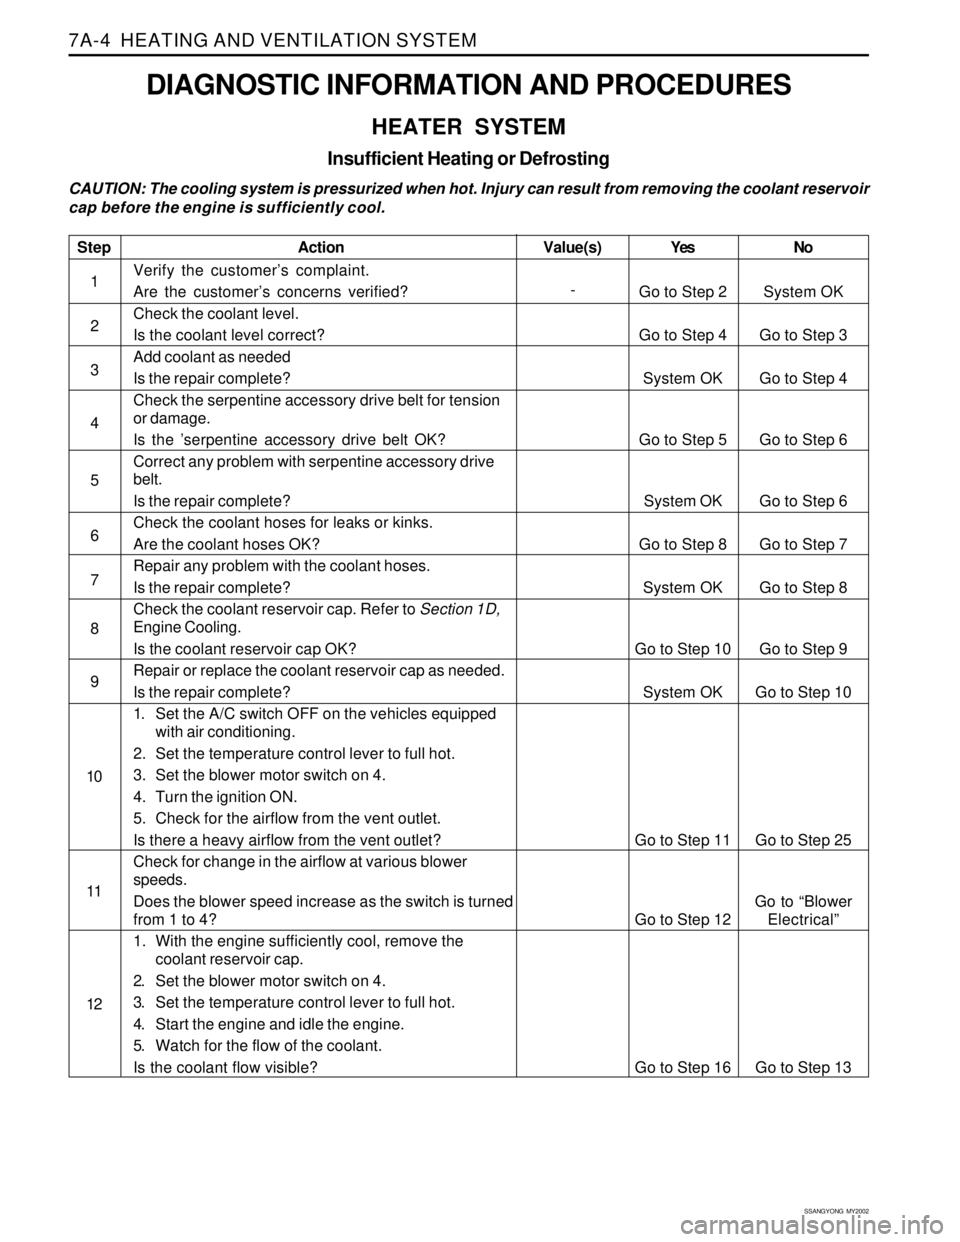
DIAGNOSTIC INFORMATION AND PROCEDURES
HEATER SYSTEM
Insufficient Heating or Defrosting
CAUTION: The cooling system is pressurized when hot. Injury can result from removing the coolant reservoir
cap before the engine is sufficiently cool.
Step
1
2
3
4
5
6
7
8
9
10
11
12
Action
Verify the customer’s complaint.
Are the customer’s concerns verified?
Check the coolant level.
Is the coolant level correct?
Add coolant as needed
Is the repair complete?
Check the serpentine accessory drive belt for tension
or damage.
Is the ’serpentine accessory drive belt OK?
Correct any problem with serpentine accessory drive
belt.
Is the repair complete?
Check the coolant hoses for leaks or kinks.
Are the coolant hoses OK?
Repair any problem with the coolant hoses.
Is the repair complete?
Check the coolant reservoir cap. Refer to Section 1D,
Engine Cooling.
Is the coolant reservoir cap OK?
Repair or replace the coolant reservoir cap as needed.
Is the repair complete?
1. Set the A/C switch OFF on the vehicles equipped
with air conditioning.
2. Set the temperature control lever to full hot.
3. Set the blower motor switch on 4.
4. Turn the ignition ON.
5. Check for the airflow from the vent outlet.
Is there a heavy airflow from the vent outlet?
Check for change in the airflow at various blower
speeds.
Does the blower speed increase as the switch is turned
from 1 to 4?
1. With the engine sufficiently cool, remove the
coolant reservoir cap.
2. Set the blower motor switch on 4.
3. Set the temperature control lever to full hot.
4. Start the engine and idle the engine.
5. Watch for the flow of the coolant.
Is the coolant flow visible?Yes
Go to Step 2
Go to Step 4
System OK
Go to Step 5
System OK
Go to Step 8
System OK
Go to Step 10
System OK
Go to Step 11
Go to Step 12
Go to Step 16No
System OK
Go to Step 3
Go to Step 4
Go to Step 6
Go to Step 6
Go to Step 7
Go to Step 8
Go to Step 9
Go to Step 10
Go to Step 25
Go to “Blower
Electrical”
Go to Step 13 Value(s)
-
Page 1533 of 2053
SSANGYONG MY2002
7C-4 MANUAL & SEMIAUTO-HVAC
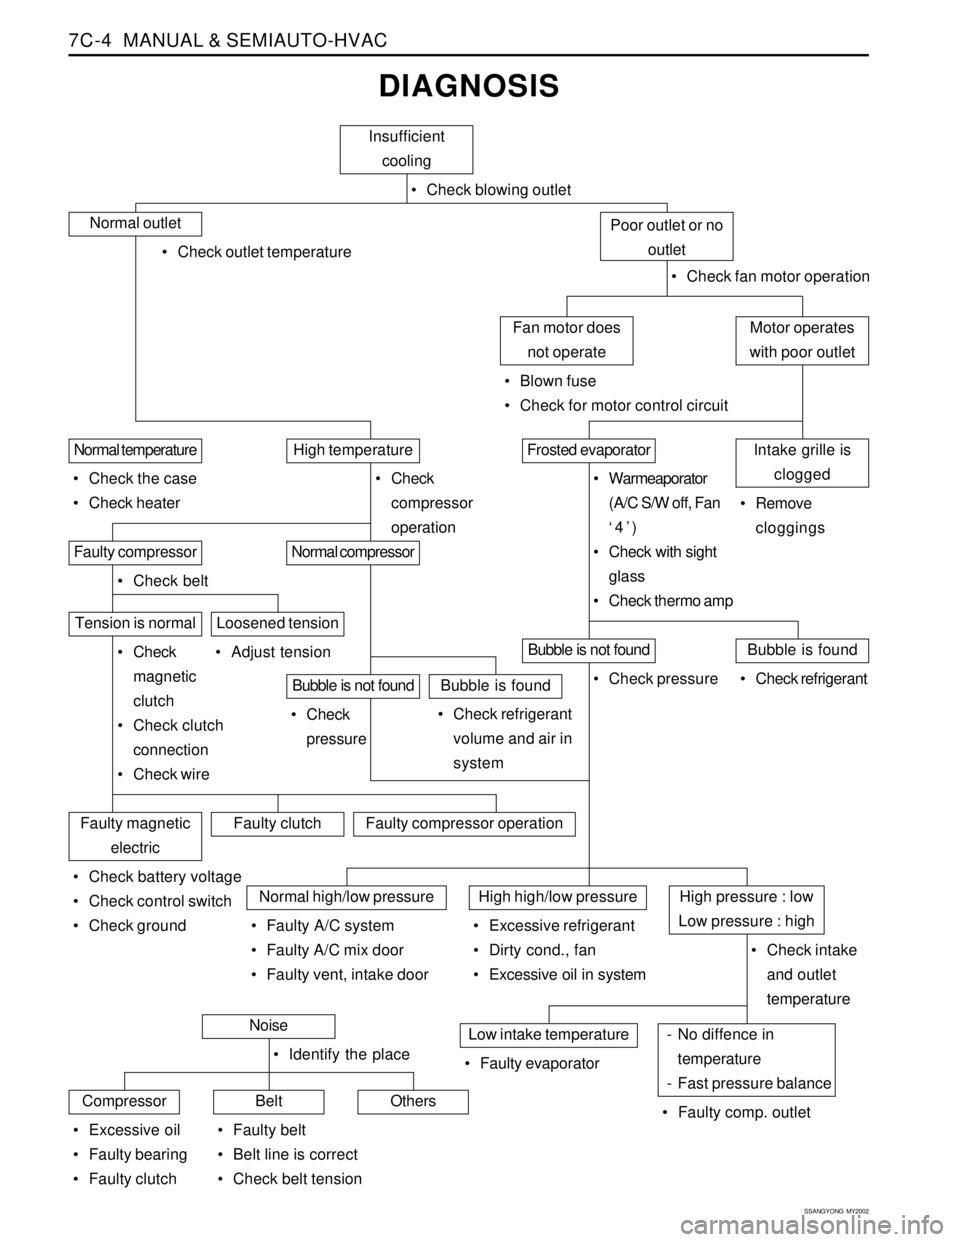
DIAGNOSIS
Insufficient
cooling
Check blowing outlet
Normal outlet
Check outlet temperature
Check fan motor operation
Motor operates
with poor outletFan motor does
not operate
Blown fuse
Check for motor control circuit
Poor outlet or no
outlet
Intake grille is
cloggedFrosted evaporatorHigh temperatureNormal temperature
Check the case
Check heater Check
compressor
operation Warmeaporator
(A/C S/W off, Fan
‘4’)
Check with sight
glass
Check thermo amp Remove
cloggings
Normal compressorFaulty compressor
Check belt
Tension is normal
Check
magnetic
clutch
Check clutch
connection
Check wire Adjust tension
Bubble is not foundBubble is found
Check refrigerant
volume and air in
system Check
pressure
Loosened tension
Bubble is not foundBubble is found
Check refrigerant Check pressure
Faulty magnetic
electricFaulty clutchFaulty compressor operation
Check battery voltage
Check control switch
Check ground
Normal high/low pressureHigh high/low pressureHigh pressure : low
Low pressure : high
Check intake
and outlet
temperature Faulty A/C system
Faulty A/C mix door
Faulty vent, intake door Excessive refrigerant
Dirty cond., fan
Excessive oil in system
- No diffence in
temperature
- Fast pressure balanceLow intake temperature
Faulty comp. outlet Faulty evaporatorNoise
CompressorBeltOthers
Excessive oil
Faulty bearing
Faulty clutch Identify the place
Faulty belt
Belt line is correct
Check belt tension
Page 1536 of 2053
MANUAL & SEMIAUTO-HVAC 7C-7
SSANGYONG MY2002
DIAGNOSIS USING THE MANIFOLD GAUGE
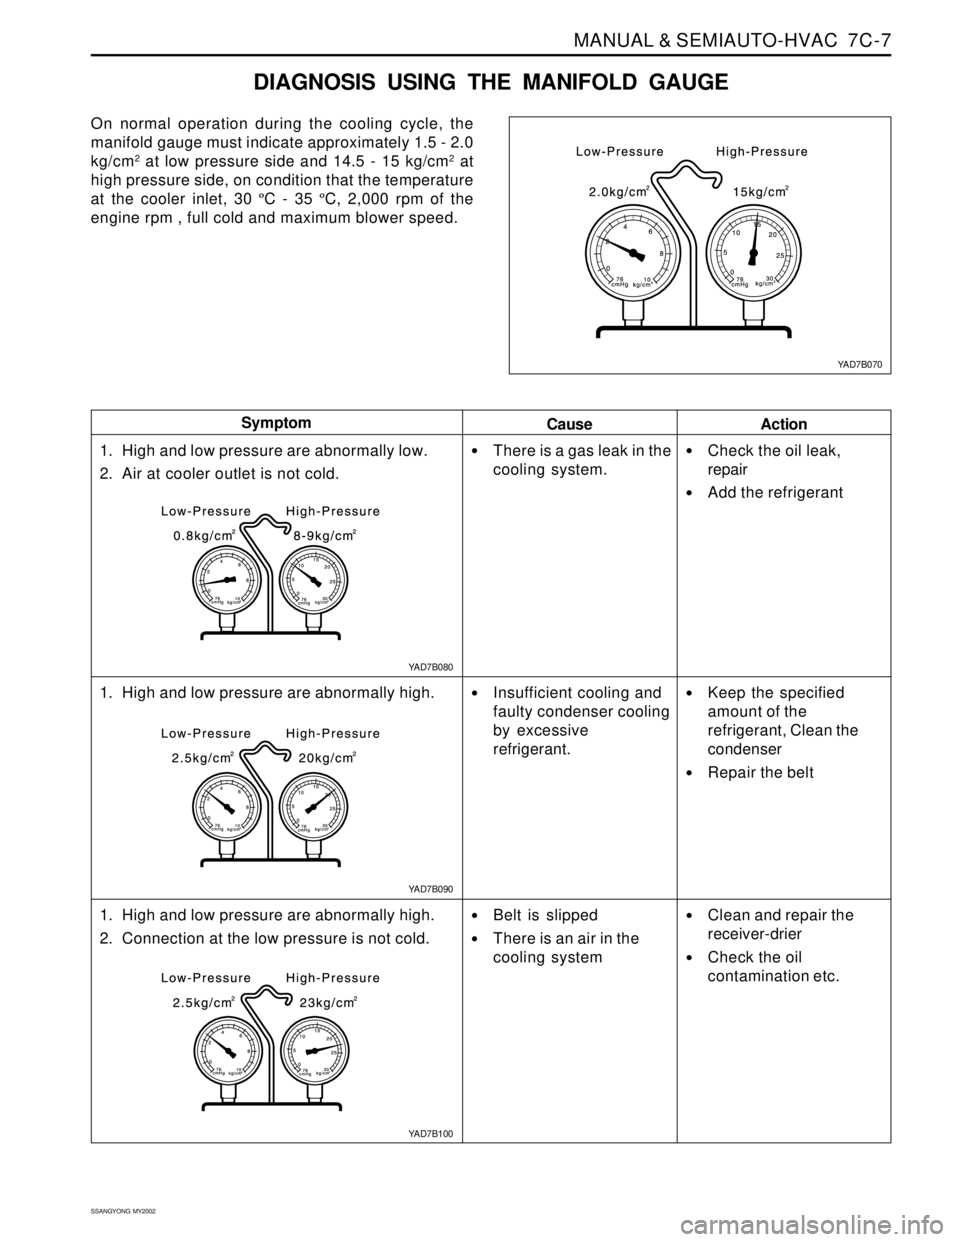
On normal operation during the cooling cycle, the
manifold gauge must indicate approximately 1.5 - 2.0
kg/cm
2 at low pressure side and 14.5 - 15 kg/cm2 at
high pressure side, on condition that the temperature
at the cooler inlet, 30 ºC - 35 ºC, 2,000 rpm of the
engine rpm , full cold and maximum blower speed.
Cause Symptom
Action
1. High and low pressure are abnormally low.
2. Air at cooler outlet is not cold.
1. High and low pressure are abnormally high.
1. High and low pressure are abnormally high.
2. Connection at the low pressure is not cold.
There is a gas leak in the
cooling system.
Insufficient cooling and
faulty condenser cooling
by excessive
refrigerant.
Belt is slipped
There is an air in the
cooling system
Check the oil leak,
repair
Add the refrigerant
Keep the specified
amount of the
refrigerant, Clean the
condenser
Repair the belt
Clean and repair the
receiver-drier
Check the oil
contamination etc.
YAD7B070
YAD7B080
YAD7B100 YAD7B090
Page 1577 of 2053
SECTION 8A
SEAT BELTS
CAUTION: Disconnect the negative battery cable before removing or installing any electrical unit or when a
tool or equipment could easily come in contact with exposed electrical terminals. Disconnecting this cable
will help prevent personal injury and damage to the vehicle. The ignition must be in B unless otherwise
noted.
TABLE OF CONTENTS
Description and Operation...................................8A-2
Driver Seat Belt Warning......................................8A-2
Three-Point Front Seat Belt With Pretensioner.......8A-2
Three-Point Rear Outboard Seat Belt....................8A-2
Two-Point Lap Rear Center Seat Belt....................8A-2
Operational and Functional Checks......................8A-2
Child Seat Tether Anchor.....................................8A-2
Component Locator.............................................8A-3
Front Seat Belt.....................................................8A-3
Rear Seat Belt.....................................................8A-4Repair Procedures...............................................8A-5
On-Vehicle Service.................................................8A-5
Three-Point Front Seat Belt With Pretensioner.......8A-5
Front Seat Belt Height Adjuster............................8A-6
Three-Point Rear Outboard Seat Belt....................8A-6
Two-Point Lap Rear Center Seat Belt....................8A-7
Child Seat Tether Anchor.....................................8A-7
Specifications.......................................................8A-8
Fastener Tightening Specifications.......................8A-8
Schematic and Routing Diagrams.......................8A-9
Seat Belt & Tension Reducer...............................8A-9
Page 1578 of 2053
SSANGYONG MY2002
8A-2 SEAT BELTS
DESCRIPTION AND OPERATION
DRIVER SEAT BELT WARNING
The driver’s seat belt incorporates a seat belt warning
lamp in the instrument cluster to remind the driver if
the seat belt is not fastened when the ignition is turned
ON. The warning lamp blinks for eight seconds with
chime and goes out.
THREE-POINT FRONT SEAT BELT
WITH PRETENSIONER
The front seat belt contains an electronically controlled
pyrotechnic retractor, pretensioner, which reduces seat
belt slack when it activated in a head-on or angled
front collision. The front seat belt must be replaced
after an accident that causes its activation. At normal
condition the driver’s seat belt operates as emergency
locking retractor (ELR).
Emergency Locking Retractor (ELR)
The ELR seat belt is always unlocked, allowing the
passenger freedom of movement, except in
emergencies such as rapid deceleration, rapid
acceleration, or hard cornering maneuvers.
THREE-POINT REAR OUTBOARD
SEAT BELT
The rear outboard seating position uses the emergency
locking retractor (ELR). Refer to Three-point front seat
belt with pretensioner in this section for details.
TWO-POINT LAP REAR CENTER
SEAT BELT
The two-point lap rear center seat belt is a single contin-
uous length of webbing. The webbing is routed from
the anchor through plate and into a single retractor.
OPERATIONAL AND FUNCTIONAL
CHECKS
Caution:
Keep sharp objects and potentially damaged ob
jects away from seat belts.
Avoid bending or damaging any portion of
buckle or the latch plate
Do not breach or dye the belt webbing. Use only
mild soap and water in order to clean the belts.
When installing the seat belt anchor bolts and
screws, start the bolts and screws by hand in or-
der to prevent cross-threading.
Do not attempt any repairs on the retractor mech-
anisms or covers. Replace any defective assem-
blies with new assemblies.
Replace any belts that are cut or damaged in any
way.
1. Inspect all seat anchor bolts and screws in order to
verify that they are secure.
2. Inspect the seat belt buckle. The buckle must lock
and unlock easily.
3. After inserting the latch into the buckle, tug sharply
on the belt. The buckle must remain locked.
4. Fully extend the shoulder belt portion to make sure
that there is no twisting or tears in the belt.
5. Let the shoulder belt retract fully. The belt should
retract easily.
CHILD SEAT TETHER ANCHOR
There are three child seat tether anchors to hold the
child seat firmly. One is located rear center of ceiling
and two are located on the rear corner of floor.
Page 1579 of 2053
SEAT BELTS 8A-3
SSANGYONG MY2002
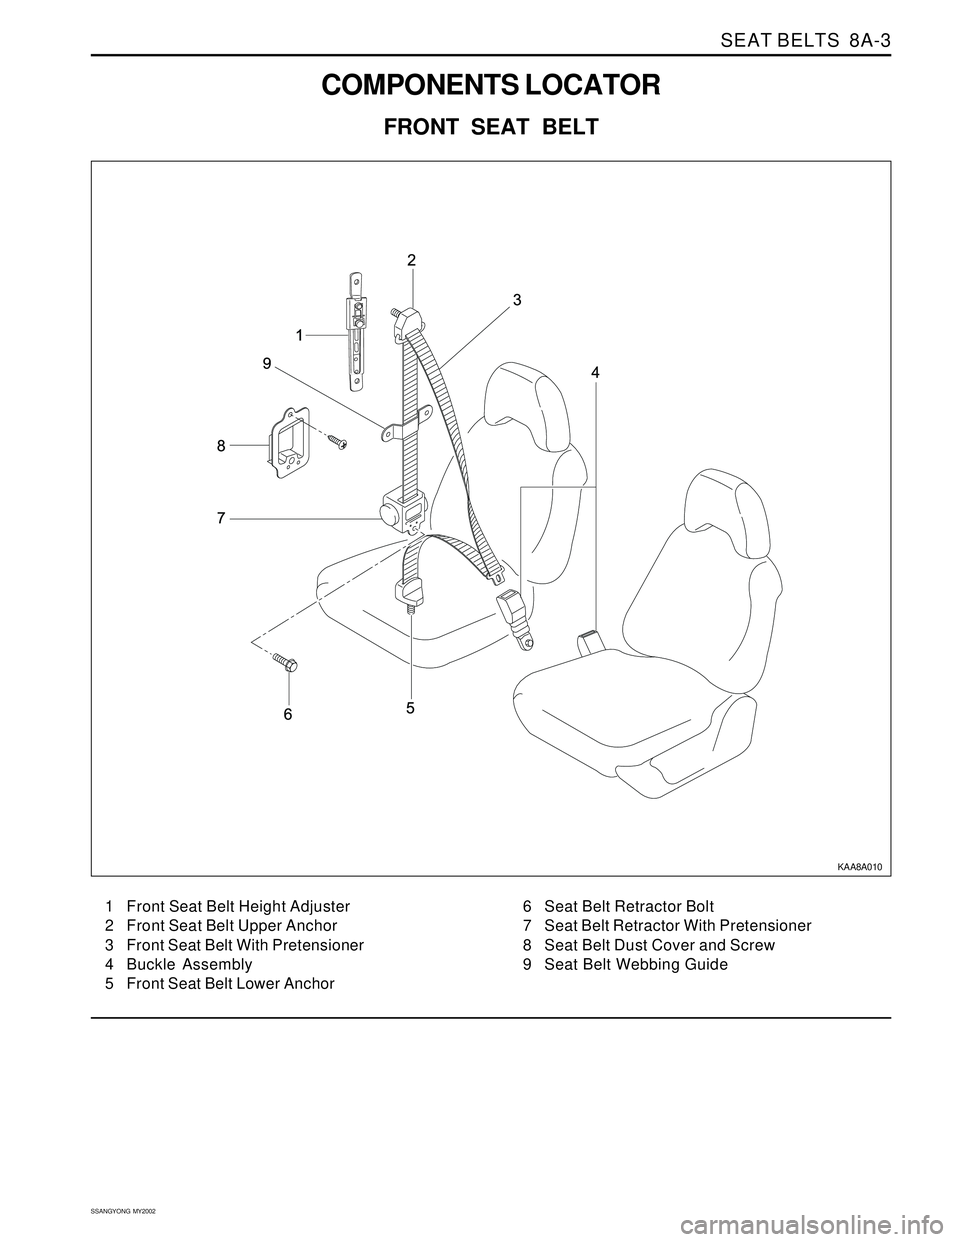
COMPONENTS LOCATOR
FRONT SEAT BELT
1 Front Seat Belt Height Adjuster
2 Front Seat Belt Upper Anchor
3 Front Seat Belt With Pretensioner
4 Buckle Assembly
5 Front Seat Belt Lower Anchor6 Seat Belt Retractor Bolt
7 Seat Belt Retractor With Pretensioner
8 Seat Belt Dust Cover and Screw
9 Seat Belt Webbing Guide
KAA8A010