1997 SSANGYONG KORANDO reset
[x] Cancel search: resetPage 1019 of 2053
SSANGYONG MY2002
4F-36 ABS AND TCS
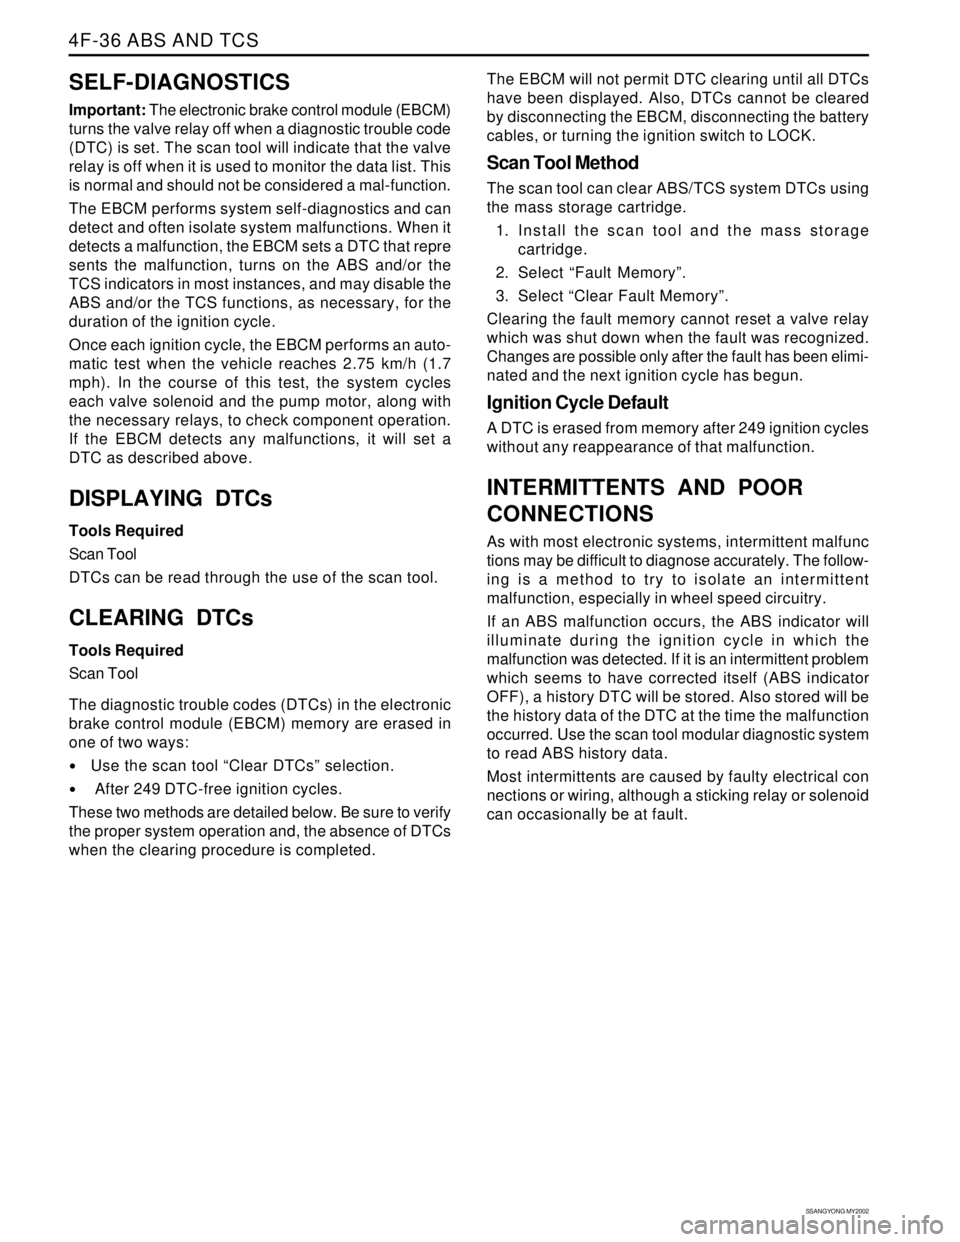
SELF-DIAGNOSTICS
Important: The electronic brake control module (EBCM)
turns the valve relay off when a diagnostic trouble code
(DTC) is set. The scan tool will indicate that the valve
relay is off when it is used to monitor the data list. This
is normal and should not be considered a mal-function.
The EBCM performs system self-diagnostics and can
detect and often isolate system malfunctions. When it
detects a malfunction, the EBCM sets a DTC that repre
sents the malfunction, turns on the ABS and/or the
TCS indicators in most instances, and may disable the
ABS and/or the TCS functions, as necessary, for the
duration of the ignition cycle.
Once each ignition cycle, the EBCM performs an auto-
matic test when the vehicle reaches 2.75 km/h (1.7
mph). In the course of this test, the system cycles
each valve solenoid and the pump motor, along with
the necessary relays, to check component operation.
If the EBCM detects any malfunctions, it will set a
DTC as described above.
DISPLAYING DTCs
Tools Required
Scan Tool
DTCs can be read through the use of the scan tool.
CLEARING DTCs
Tools Required
Scan Tool
The diagnostic trouble codes (DTCs) in the electronic
brake control module (EBCM) memory are erased in
one of two ways:
Use the scan tool “Clear DTCs” selection.
After 249 DTC-free ignition cycles.
These two methods are detailed below. Be sure to verify
the proper system operation and, the absence of DTCs
when the clearing procedure is completed.The EBCM will not permit DTC clearing until all DTCs
have been displayed. Also, DTCs cannot be cleared
by disconnecting the EBCM, disconnecting the battery
cables, or turning the ignition switch to LOCK.
Scan Tool Method
The scan tool can clear ABS/TCS system DTCs using
the mass storage cartridge.
1. Install the scan tool and the mass storage
cartridge.
2. Select “Fault Memory”.
3. Select “Clear Fault Memory”.
Clearing the fault memory cannot reset a valve relay
which was shut down when the fault was recognized.
Changes are possible only after the fault has been elimi-
nated and the next ignition cycle has begun.
Ignition Cycle Default
A DTC is erased from memory after 249 ignition cycles
without any reappearance of that malfunction.
INTERMITTENTS AND POOR
CONNECTIONS
As with most electronic systems, intermittent malfunc
tions may be difficult to diagnose accurately. The follow-
ing is a method to try to isolate an intermittent
malfunction, especially in wheel speed circuitry.
If an ABS malfunction occurs, the ABS indicator will
illuminate during the ignition cycle in which the
malfunction was detected. If it is an intermittent problem
which seems to have corrected itself (ABS indicator
OFF), a history DTC will be stored. Also stored will be
the history data of the DTC at the time the malfunction
occurred. Use the scan tool modular diagnostic system
to read ABS history data.
Most intermittents are caused by faulty electrical con
nections or wiring, although a sticking relay or solenoid
can occasionally be at fault.
Page 1038 of 2053
ABS AND TCS 4F-55
SSANGYONG MY2002
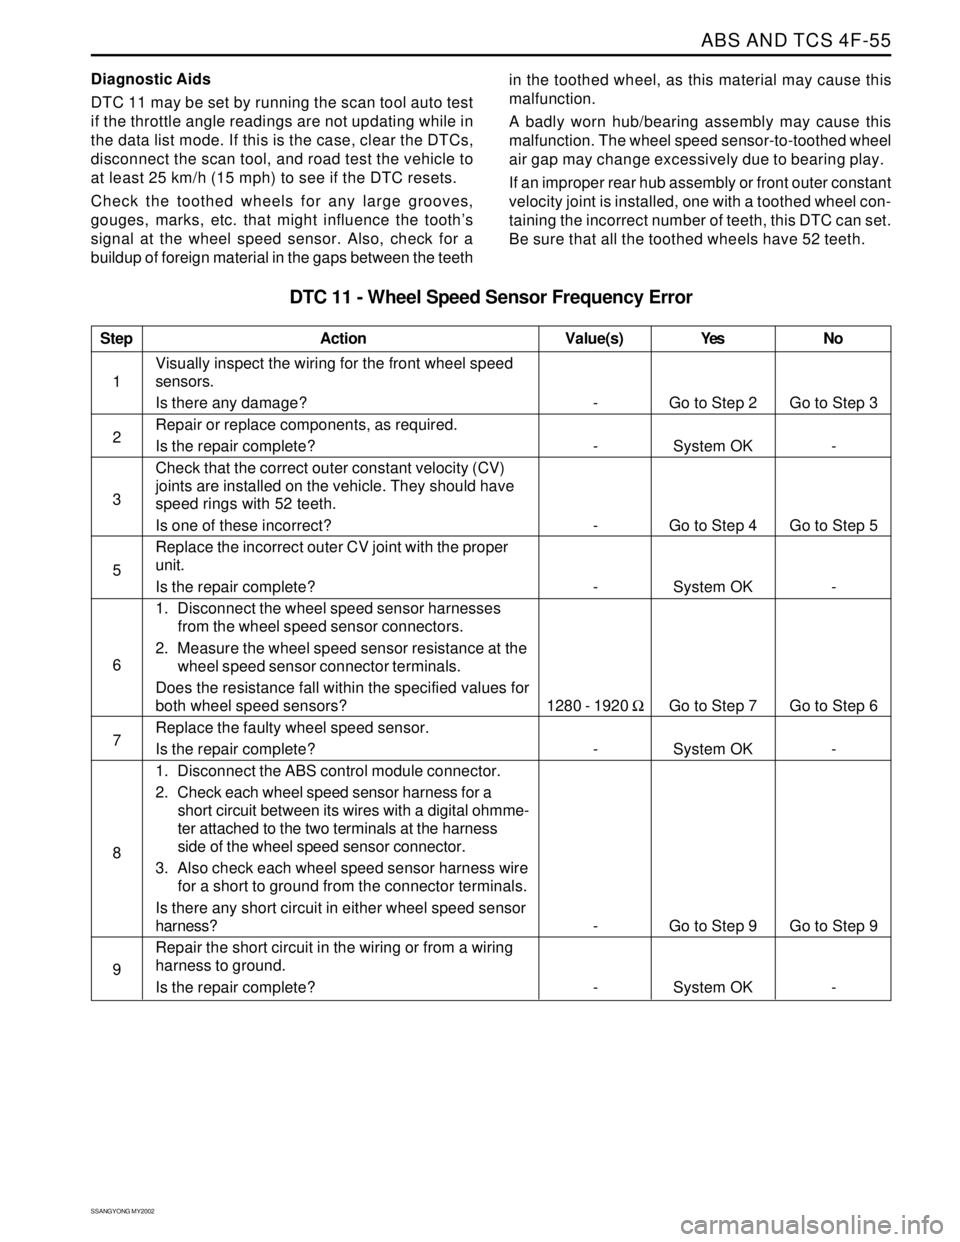
Diagnostic Aids
DTC 11 may be set by running the scan tool auto test
if the throttle angle readings are not updating while in
the data list mode. If this is the case, clear the DTCs,
disconnect the scan tool, and road test the vehicle to
at least 25 km/h (15 mph) to see if the DTC resets.
Check the toothed wheels for any large grooves,
gouges, marks, etc. that might influence the tooth’s
signal at the wheel speed sensor. Also, check for a
buildup of foreign material in the gaps between the teethin the toothed wheel, as this material may cause this
malfunction.
A badly worn hub/bearing assembly may cause this
malfunction. The wheel speed sensor-to-toothed wheel
air gap may change excessively due to bearing play.
If an improper rear hub assembly or front outer constant
velocity joint is installed, one with a toothed wheel con-
taining the incorrect number of teeth, this DTC can set.
Be sure that all the toothed wheels have 52 teeth.
Step
1
2
3
5
6
7
8
9
DTC 11 - Wheel Speed Sensor Frequency Error
Action
Go to Step 2
System OK
Go to Step 4
System OK
Go to Step 7
System OK
Go to Step 9
System OKGo to Step 3
-
Go to Step 5
-
Go to Step 6
-
Go to Step 9
- -
-
-
-
1280 - 1920 Ω
-
-
-
Visually inspect the wiring for the front wheel speed
sensors.
Is there any damage?
Repair or replace components, as required.
Is the repair complete?
Check that the correct outer constant velocity (CV)
joints are installed on the vehicle. They should have
speed rings with 52 teeth.
Is one of these incorrect?
Replace the incorrect outer CV joint with the proper
unit.
Is the repair complete?
1. Disconnect the wheel speed sensor harnesses
from the wheel speed sensor connectors.
2. Measure the wheel speed sensor resistance at the
wheel speed sensor connector terminals.
Does the resistance fall within the specified values for
both wheel speed sensors?
Replace the faulty wheel speed sensor.
Is the repair complete?
1. Disconnect the ABS control module connector.
2. Check each wheel speed sensor harness for a
short circuit between its wires with a digital ohmme-
ter attached to the two terminals at the harness
side of the wheel speed sensor connector.
3. Also check each wheel speed sensor harness wire
for a short to ground from the connector terminals.
Is there any short circuit in either wheel speed sensor
harness?
Repair the short circuit in the wiring or from a wiring
harness to ground.
Is the repair complete?
Value(s) Yes No
Page 1068 of 2053
ABS AND TCS 4F-85
SSANGYONG MY2002
Step
4
5
6
7
8
9
10
11
12
13
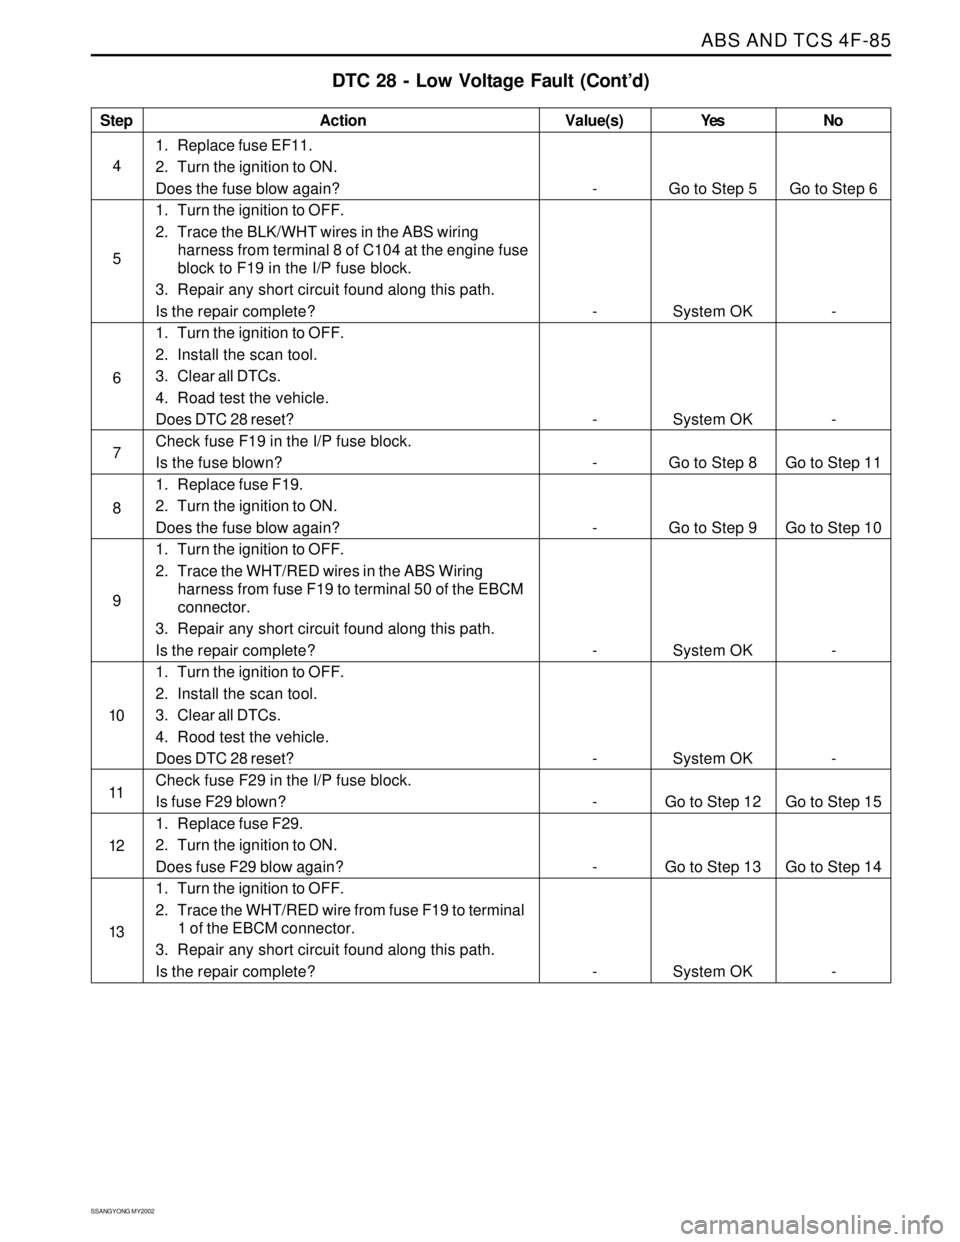
DTC 28 - Low Voltage Fault (Cont’d)
Action
Go to Step 5
System OK
System OK
Go to Step 8
Go to Step 9
System OK
System OK
Go to Step 12
Go to Step 13
System OKGo to Step 6
-
-
Go to Step 11
Go to Step 10
-
-
Go to Step 15
Go to Step 14
- -
-
-
-
-
-
-
-
-
-
1. Replace fuse EF11.
2. Turn the ignition to ON.
Does the fuse blow again?
1. Turn the ignition to OFF.
2. Trace the BLK/WHT wires in the ABS wiring
harness from terminal 8 of C104 at the engine fuse
block to F19 in the I/P fuse block.
3. Repair any short circuit found along this path.
Is the repair complete?
1. Turn the ignition to OFF.
2. Install the scan tool.
3. Clear all DTCs.
4. Road test the vehicle.
Does DTC 28 reset?
Check fuse F19 in the I/P fuse block.
Is the fuse blown?
1. Replace fuse F19.
2. Turn the ignition to ON.
Does the fuse blow again?
1. Turn the ignition to OFF.
2. Trace the WHT/RED wires in the ABS Wiring
harness from fuse F19 to terminal 50 of the EBCM
connector.
3. Repair any short circuit found along this path.
Is the repair complete?
1. Turn the ignition to OFF.
2. Install the scan tool.
3. Clear all DTCs.
4. Rood test the vehicle.
Does DTC 28 reset?
Check fuse F29 in the I/P fuse block.
Is fuse F29 blown?
1. Replace fuse F29.
2. Turn the ignition to ON.
Does fuse F29 blow again?
1. Turn the ignition to OFF.
2. Trace the WHT/RED wire from fuse F19 to terminal
1 of the EBCM connector.
3. Repair any short circuit found along this path.
Is the repair complete?
Value(s) Yes No
Page 1069 of 2053
SSANGYONG MY2002
4F-86 ABS AND TCS
Step
14
15
16
17
18
19
20
21
22
23
24
25
26
27
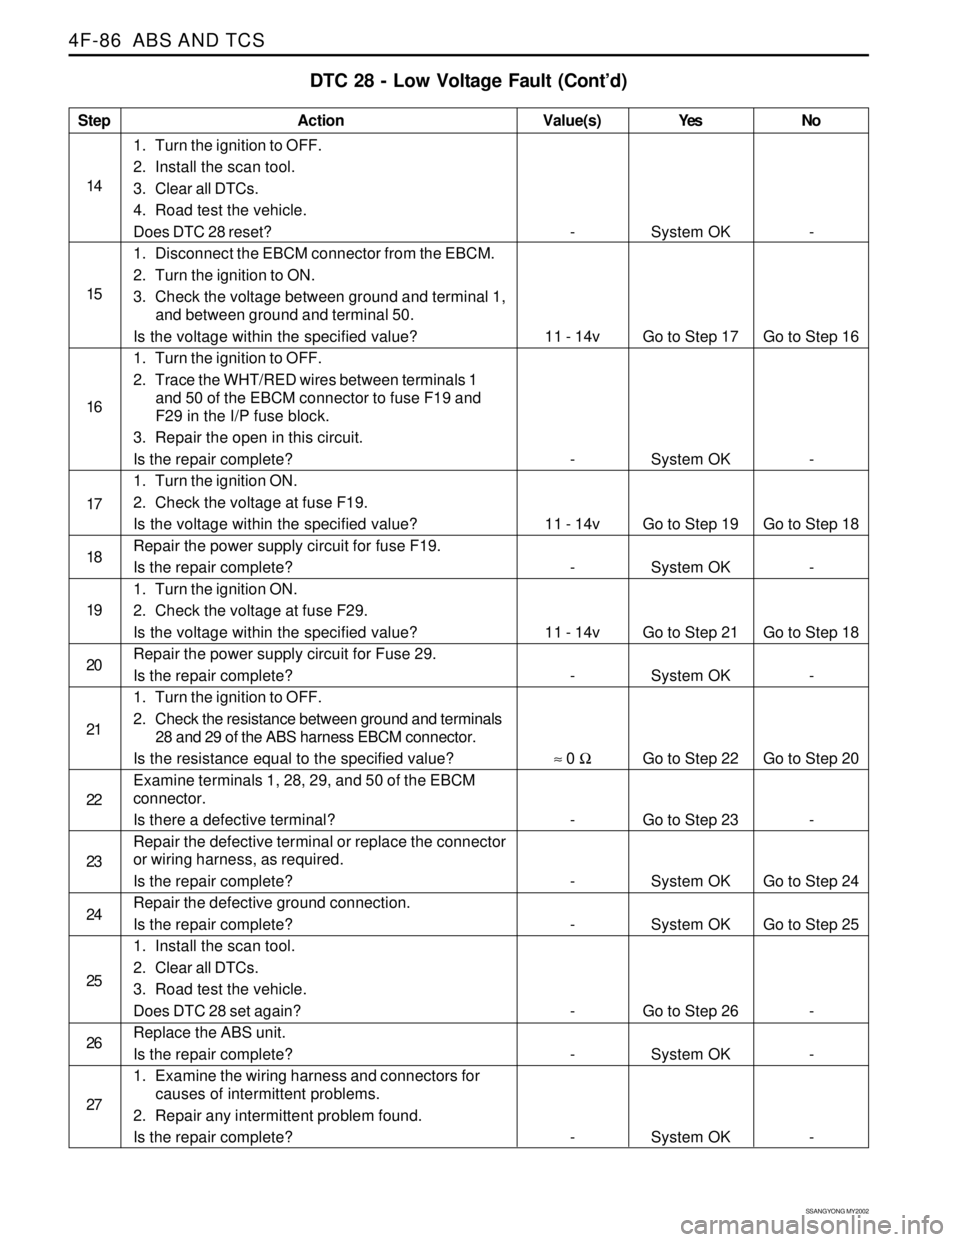
DTC 28 - Low Voltage Fault (Cont’d)
Action
System OK
Go to Step 17
System OK
Go to Step 19
System OK
Go to Step 21
System OK
Go to Step 22
Go to Step 23
System OK
System OK
Go to Step 26
System OK
System OK-
Go to Step 16
-
Go to Step 18
-
Go to Step 18
-
Go to Step 20
-
Go to Step 24
Go to Step 25
-
-
- -
11 - 14v
-
11 - 14v
-
11 - 14v
-
≈ 0 Ω
-
-
-
-
-
-
1. Turn the ignition to OFF.
2. Install the scan tool.
3. Clear all DTCs.
4. Road test the vehicle.
Does DTC 28 reset?
1. Disconnect the EBCM connector from the EBCM.
2. Turn the ignition to ON.
3. Check the voltage between ground and terminal 1,
and between ground and terminal 50.
Is the voltage within the specified value?
1. Turn the ignition to OFF.
2. Trace the WHT/RED wires between terminals 1
and 50 of the EBCM connector to fuse F19 and
F29 in the I/P fuse block.
3. Repair the open in this circuit.
Is the repair complete?
1. Turn the ignition ON.
2. Check the voltage at fuse F19.
Is the voltage within the specified value?
Repair the power supply circuit for fuse F19.
Is the repair complete?
1. Turn the ignition ON.
2. Check the voltage at fuse F29.
Is the voltage within the specified value?
Repair the power supply circuit for Fuse 29.
Is the repair complete?
1. Turn the ignition to OFF.
2. Check the resistance between ground and terminals
28 and 29 of the ABS harness EBCM connector.
Is the resistance equal to the specified value?
Examine terminals 1, 28, 29, and 50 of the EBCM
connector.
Is there a defective terminal?
Repair the defective terminal or replace the connector
or wiring harness, as required.
Is the repair complete?
Repair the defective ground connection.
Is the repair complete?
1. Install the scan tool.
2. Clear all DTCs.
3. Road test the vehicle.
Does DTC 28 set again?
Replace the ABS unit.
Is the repair complete?
1. Examine the wiring harness and connectors for
causes of intermittent problems.
2. Repair any intermittent problem found.
Is the repair complete?
Value(s) Yes No
Page 1381 of 2053
TRANSFER CASE 5D1-11
SSANGYONG MY2002
DIAGNOSIS
While the transfer case control unit (TCCU) is active it
periodically monitors its inputs and outputs. If a fault
is detected the 4WD CHECK lamp is illuminated and a
fault code is stored in the TCCU memory.
When requested, fault codes are downloaded to scan
tool through a diagnostic connector (K-line) serial com
munication.
SELF-DIAGNOSTIC TESTS
TCCU Internal Function
When the ignition is turned on the TCCU tests its read
only memory (ROM) and random access memory
(RAM). If there is a fault, the TCCU immediately resets
itself and re-tests the ROM and RAM. If the fault
persists the TCCU continues to reset and re-test until
the fault is corrected or the ignition is turned off. All
TCCU functions are inhibited until the fault is corrected.
The 4WD CHECK lamp is not illuminated if there is a
ROM or RAM fault.
If the ROM/RAM passes the electronically erasable
programmable read only memory (EEPROM) is tested.
If there is a fault the 4WD CHECK lamp is illuminated
and the TCCU continues to operate using the default
calibration data stored in ROM. Fault codes are not
stored when there is an EEPROM fault.
An EEPROM fault can only be cleared by cycling
ignition OFF-ON.
Shift Motor Assembly Test
If the TCCU detects a shift motor or position encoder
fault continuously for one second the 4WD CHECK
lamp is turned on and the appropriate fault code is
stored in memory.
1. A shift motor fault when the motor is off is defined
as follows:
Motor HI-LO circuits are shorted to ground.
Motor LO-HI circuits are shorted to ground.
Motor circuits are open.
2. A shift motor fault when the motor is energized is
defined as follows:
Motor HI-LO circuits are shorted to ground.
Motor LO-HI circuits are shorted to ground.
Motor HI-LO circuits are shorted to motor LO
HI circuits.
Motor circuits are open.
3. A position encoder fault is defined as follows:
Any position code which does not correspond
to the valid 9 codes.
A short to ground on any of the encoder lines.
4. If no shifts are in progress when a failure occurs
the TCCU will not respond to any shift commands.5. If a shift command has been received but not
acted upon when a failure occurred the TCCU
would cancel the command and not respond to
any subsequent shift commands.
6. If a shift command is in progress when an invalid
position code is confirmed it will be halted and
the TCCU will turn the motor toward the high
position. Afterwards the TCCU will not respond to
any shift commands.
7. If the shift motor or position encoder assembly
failures, other than a motor failure which occurs
when the motor is energized, recovers continuously
for one second the TCCU will function normally.
The 4WD CHECK lamp is turned off but the fault
code will remain in memory.
8. A motor failure (i.e. open or short circuit) which
occurs when the motor is energized can only be
cleared by cycling the ignition OFF-ON.
Front Speed Sensor Test
If a front speed sensor fault is detected continuously
for 0.5 second the 4WD CHECK lamp is illuminated.
The TCCU then responds as follows:
1. If the system is in high range the TCCU uses the
rear speed sensor to determine the EMC touch off
level and wheel slip control is suspended.
2. If the system is in low range, the EMC duty cycle
is set to maximum, independent of vehicle speed,
until the system is shifted out of low range.
3. All electric shift activity is halted until the Ignition
is cycled. If a shift is in progress it will be
completed.
If the front speed sensor recovers continuously for O.5
second the TCCU will function normally. The 4WD
CHECK lamp is turned off but the fault code will remain
in memory.
Rear Speed Sensor Test
If a rear speed sensor fault is detected continuously
for 0.5 second the 4WD CHECK lamp is illuminated.
The TCCU then responds as follows:
1. If the system is in high range the TCCU uses the
front speed sensor to determine the EMC touch
off level and wheel slip control is suspended.
2. If the system is in low range, the EMC duty cycle
is set to maximum independent of vehicle speed
until the system is shifted out of low range.
3. All electric shift activity is halted until the Ignition
is cycled. If a shift is in progress it will be
completed.
4. If the rear speed sensor recovers continuously for
0.5 second the TCCU will function normally. The
4WD CHECK lamp is turned off but the fault code
will remain in memory.
Page 1446 of 2053
SSANGYONG MY2002
6A-4 POWER STEERING SYSTEM
KAA6A020
DIAGNOSTIC INFORMATION AND PROCEDURES
POWER STEERING SYSTEM
PRESSURE TEST
Tools Required
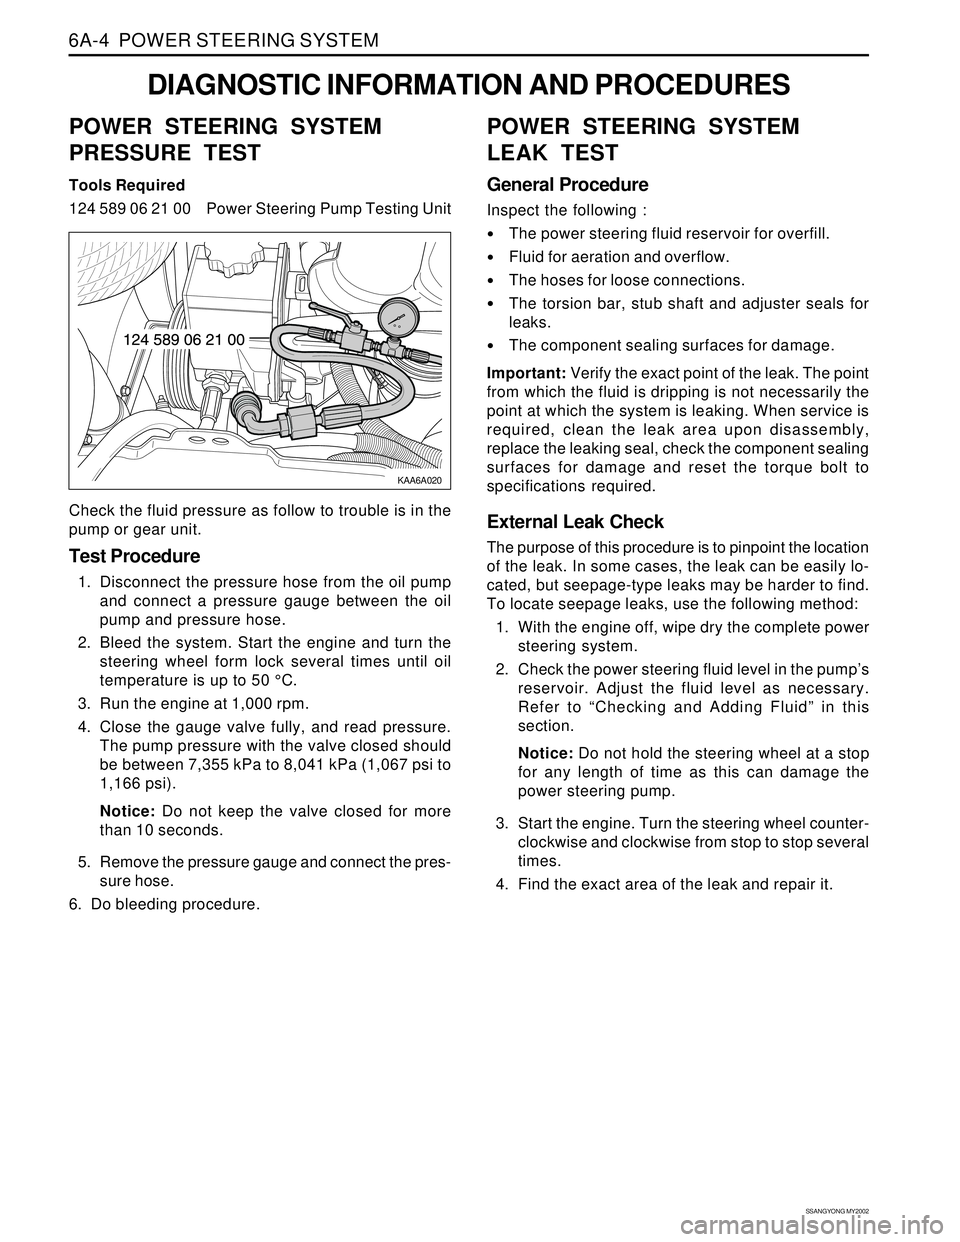
124 589 06 21 00 Power Steering Pump Testing Unit
Check the fluid pressure as follow to trouble is in the
pump or gear unit.
Test Procedure
1. Disconnect the pressure hose from the oil pump
and connect a pressure gauge between the oil
pump and pressure hose.
2. Bleed the system. Start the engine and turn the
steering wheel form lock several times until oil
temperature is up to 50 °C.
3. Run the engine at 1,000 rpm.
4. Close the gauge valve fully, and read pressure.
The pump pressure with the valve closed should
be between 7,355 kPa to 8,041 kPa (1,067 psi to
1,166 psi).
Notice: Do not keep the valve closed for more
than 10 seconds.
5. Remove the pressure gauge and connect the pres-
sure hose.
6. Do bleeding procedure.
POWER STEERING SYSTEM
LEAK TEST
General Procedure
Inspect the following :
The power steering fluid reservoir for overfill.
Fluid for aeration and overflow.
The hoses for loose connections.
The torsion bar, stub shaft and adjuster seals for
leaks.
The component sealing surfaces for damage.
Important: Verify the exact point of the leak. The point
from which the fluid is dripping is not necessarily the
point at which the system is leaking. When service is
required, clean the leak area upon disassembly,
replace the leaking seal, check the component sealing
surfaces for damage and reset the torque bolt to
specifications required.
External Leak Check
The purpose of this procedure is to pinpoint the location
of the leak. In some cases, the leak can be easily lo-
cated, but seepage-type leaks may be harder to find.
To locate seepage leaks, use the following method:
1. With the engine off, wipe dry the complete power
steering system.
2. Check the power steering fluid level in the pump’s
reservoir. Adjust the fluid level as necessary.
Refer to “Checking and Adding Fluid” in this
section.
Notice: Do not hold the steering wheel at a stop
for any length of time as this can damage the
power steering pump.
3. Start the engine. Turn the steering wheel counter-
clockwise and clockwise from stop to stop several
times.
4. Find the exact area of the leak and repair it.
Page 1455 of 2053
SSANGYONG MY2002
6A-4 POWER STEERING SYSTEM
KAA6A020
DIAGNOSTIC INFORMATION AND PROCEDURES
POWER STEERING SYSTEM
PRESSURE TEST
Tools Required
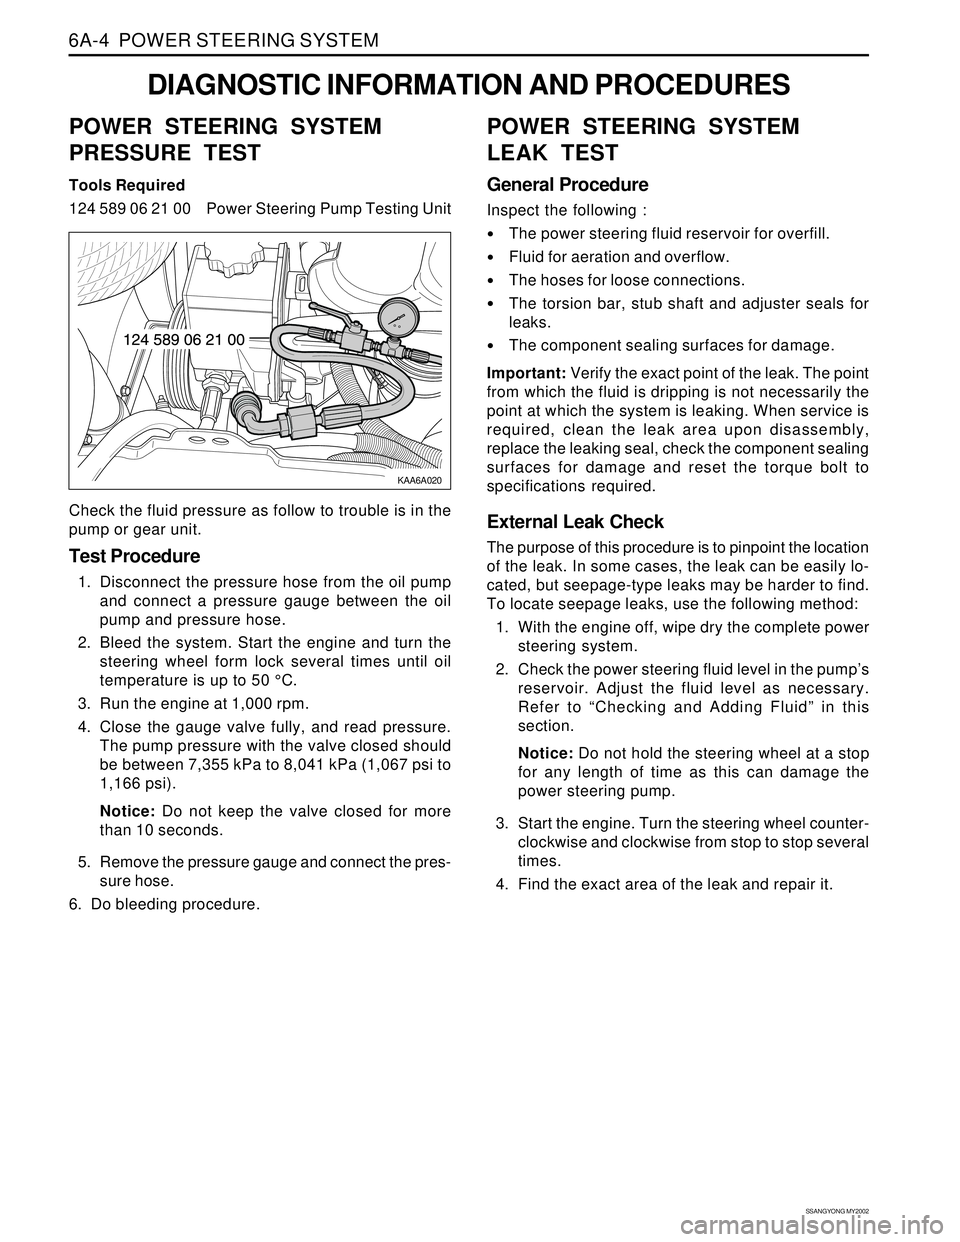
124 589 06 21 00 Power Steering Pump Testing Unit
Check the fluid pressure as follow to trouble is in the
pump or gear unit.
Test Procedure
1. Disconnect the pressure hose from the oil pump
and connect a pressure gauge between the oil
pump and pressure hose.
2. Bleed the system. Start the engine and turn the
steering wheel form lock several times until oil
temperature is up to 50 °C.
3. Run the engine at 1,000 rpm.
4. Close the gauge valve fully, and read pressure.
The pump pressure with the valve closed should
be between 7,355 kPa to 8,041 kPa (1,067 psi to
1,166 psi).
Notice: Do not keep the valve closed for more
than 10 seconds.
5. Remove the pressure gauge and connect the pres-
sure hose.
6. Do bleeding procedure.
POWER STEERING SYSTEM
LEAK TEST
General Procedure
Inspect the following :
The power steering fluid reservoir for overfill.
Fluid for aeration and overflow.
The hoses for loose connections.
The torsion bar, stub shaft and adjuster seals for
leaks.
The component sealing surfaces for damage.
Important: Verify the exact point of the leak. The point
from which the fluid is dripping is not necessarily the
point at which the system is leaking. When service is
required, clean the leak area upon disassembly,
replace the leaking seal, check the component sealing
surfaces for damage and reset the torque bolt to
specifications required.
External Leak Check
The purpose of this procedure is to pinpoint the location
of the leak. In some cases, the leak can be easily lo-
cated, but seepage-type leaks may be harder to find.
To locate seepage leaks, use the following method:
1. With the engine off, wipe dry the complete power
steering system.
2. Check the power steering fluid level in the pump’s
reservoir. Adjust the fluid level as necessary.
Refer to “Checking and Adding Fluid” in this
section.
Notice: Do not hold the steering wheel at a stop
for any length of time as this can damage the
power steering pump.
3. Start the engine. Turn the steering wheel counter-
clockwise and clockwise from stop to stop several
times.
4. Find the exact area of the leak and repair it.
Page 1491 of 2053
POWER STEERING AND COLUMN 6E-5
SSANGYONG MY2002
Check the lock cylinder for damage.
Check the ignition switch for lack of free movement.
Check the steering column housing for binding or
damage.ChecksActionReplace the lock cylinder.
Lubricate the ignition switch.
Remove the steering shaft and clear the steering
column housing. Replace the steering column housing
as needed.
Lock System Will Not Lock
High Lock Effort
Check the lock cylinder for damage.
Check the ignition switch for lack of free movement.
Check for extreme misalignment of the housing to the
cover.
Check for a bent ignition switch mounting bracket.ChecksActionReplace the lock cylinder.
Lubricate the ignition switch.
Realign the cover on the housing. Replace the cover
as needed.
Replace the ignition switch mounting bracket.
STEERING COLUMN DIAGNOSIS
Lock System
Lock System Will Not Unlock
Check the lock cylinder for damage.
Check the ignition switch for lack of free movement.
Check the steering column housing for binding or
damage.ChecksActionReplace the lock cylinder.
Lubricate the ignition switch.
Remove the steering shaft and clear the steering
column housing. Replace the steering column housing
as needed.
High Lock Effort
Check to see that the ignition switch is set correctly.
Check the lock cylinder for damage.ChecksActionReset the ignition switch.
Replace the lock cylinder. Reset the ignition switch.
Check the steering gear-to-column joints for improper
installation.
Check the steering shaft bearing for wear or damage.
Check the spherical joint for lack of lubrication.
Check the steering shaft for lack of lubrication.
Check the shaft lock snap ring for improper seating.ChecksActionTighten the steering shaft universal joint pinch bolts.
Replace the steering shaft joints as needed.
Replace the steering shaft bearing.
Lubricate the spherical joint.
Lubricate the steering shaft bearing.
Adjust the shaft lock snap ring.
Replace the shaft lock snap ring as needed.
Column
Noise in the Column