Page 1910 of 4133
Fig. 341: Identifying An tenna Extension Lead
7. Route tieout to CAN bus adapter (5) from adapter wiring harness (4) as shown in figure toward rear on
middle tunnel.
Fig. 342: Identifying CAN Bus Adap ter And Adapter Wiring Harness
8. Position CAN bus adapter mount on ce nter console brace as shown in figure and mark holes (arrows).
9. Drill 6.2 mm dia. mounting holes
Fig. 343: Identifying Mark Holes
10. Fasten CAN bus adapter (5) with self-tappin
g screws from CAN bus adapter parts kit.
2001 Mercedes-Benz ML320
1998-2005 ACCESSORIES & BODY, CAB Electr ical System - Body - 163 Chassis
me
Saturday, October 02, 2010 3:30:13 PMPage 415 © 2006 Mitchell Repair Information Company, LLC.
Page 1938 of 4133
Fig. 396: Identifying D-Network Cell Phone Components
Removal
1Disconnect ground cable
of battery
AR54.10-P-0003A
2Remove radio
3Remove stowage
compartment below radio
4Remove stowage
compartment in center
armrest
5Remove wooden cover
from shift lever
6Remove cover below
right instrument panel
7Remove A-pillar paneling
at top right
8Tie out D-net antenna
lead Tied back in radio
shaft.
Install
9Install holder on
telephone console AZ82.70-P-0001-01A
10Installing hands free AZ82.70-P-0001-02A
2001 Mercedes-Benz ML320
1998-2005 ACCESSORIES & BODY, CAB Electrical System - Body - 163 Chassis
me
Saturday, October 02, 2010 3:30:14 PMPage 443 © 2006 Mitchell Repair Information Company, LLC.
Page 1940 of 4133
Fig. 397: Identifying D-Network Cell Phone Components
Removal
1Disconnect ground cable
of battery
AR54.10-P-0003A
2Remove radio
3Remove stowage
compartment below radio
4Remove stowage
compartment in center
armrest
5Remove wooden cover
from shift lever
6Remove cover below
instrument panel on right
7Remove automatic A/C
control panel
8Remove A-pillar paneling
at top right
9Tie out D-network
antenna lead Tied back in radio
shaft.
Installation
10Install holder on AZ82.70-P-0001-01A
2001 Mercedes-Benz ML320
1998-2005 ACCESSORIES & BODY, CAB Electrical System - Body - 163 Chassis
me
Saturday, October 02, 2010 3:30:14 PMPage 445 © 2006 Mitchell Repair Information Company, LLC.
Page 1942 of 4133
RETROFIT D-NETWORK CELL PHONE - AZ82.70-P-0001GH
MODEL 163 as of 1.10.01
for D-net portable CTEL only
System illustration for installation
Fig. 398: Identifying D
-Network Cell Phone Components
B6 788 03 52Hands-free unit holder1
B6 788 03 53Loudspeaker mount1
A163 540 02 13Antenna lead (adapter lead on
Audio 30 APS radio)1
A000 989 92 71Special glueas required
Remove
1Disconnect ground cable
of battery
AR54.10-P-0003A
2Remove radio or
COMAND
3Remove stowage
compartment below radio
4Remove cover from radio
2001 Mercedes-Benz ML320
1998-2005 ACCESSORIES & BODY, CAB Electrical System - Body - 163 Chassis
me
Saturday, October 02, 2010 3:30:14 PMPage 447 © 2006 Mitchell Repair Information Company, LLC.
Page 1944 of 4133
RETROFIT PERMANENTLY INSTALLED GSM NETWORK CAR PHONE - AZ82.70-P-0002A
MODEL 163 up to 30.11.99
Nokia 6081 permanently installed telephone
Fig. 399: Identifying Permanently Installed GSM Network Car Phone Components
B6 787 58 15Telephone bracket, Nokia
5110/61101
B6 787 58 13Telephone bracket, Nokia 62101
B6 787 58 17Telephone bracket, Nokia
6310/631 0i1
B6 787 58 14Telephone bracket, Siemens
S/C/M351
B6 787 58 12Telephone bracket, Siemens SL451
B6 788 01 28Kathrein radiator-type antennaas required
Removal
1Disconnect ground cable of
battery
AR54.10-P-0003A
2Remove radio
3Remove stowage compartment No longer required.
2001 Mercedes-Benz ML320
1998-2005 ACCESSORIES & BODY, CAB Electrical System - Body - 163 Chassis
me
Saturday, October 02, 2010 3:30:14 PMPage 449 © 2006 Mitchell Repair Information Company, LLC.
Page 1945 of 4133

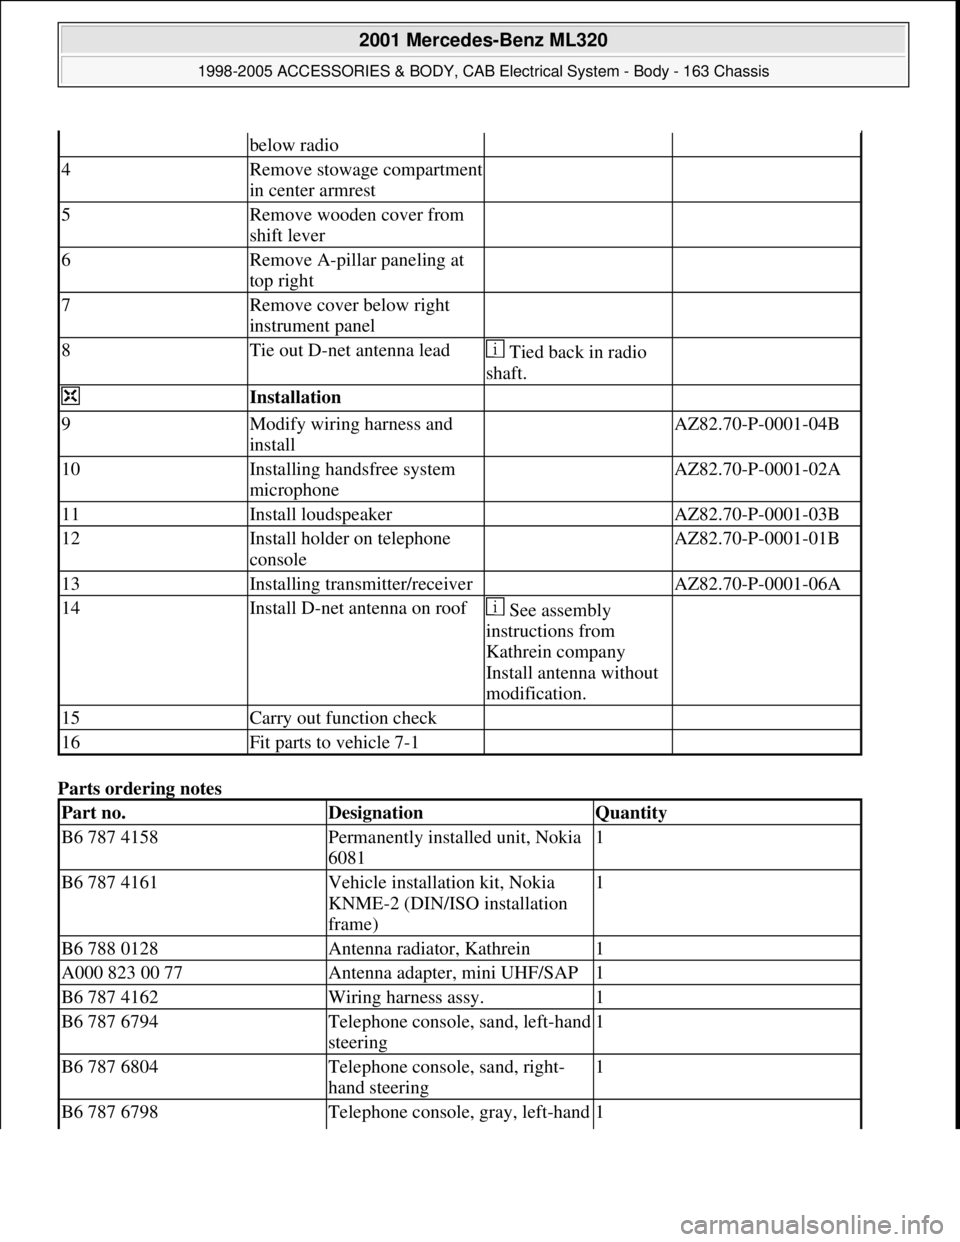
Parts ordering notes
below radio
4Remove stowage compartment
in center armrest
5Remove wooden cover from
shift lever
6Remove A-pillar paneling at
top right
7Remove cover below right
instrument panel
8Tie out D-net antenna lead Tied back in radio
shaft.
Installation
9Modify wiring harness and
install AZ82.70-P-0001-04B
10Installing handsfree system
microphone AZ82.70-P-0001-02A
11Install loudspeaker AZ82.70-P-0001-03B
12Install holder on telephone
console AZ82.70-P-0001-01B
13Installing transmitter/receiver AZ82.70-P-0001-06A
14Install D-net antenna on roof See assembly
instructions from
Kathrein company
Install antenna without
modification.
15Carry out function check
16Fit parts to vehicle 7-1
Part no.DesignationQuantity
B6 787 4158Permanently installed unit, Nokia
60811
B6 787 4161Vehicle installation kit, Nokia
KNME-2 (DIN/ISO installation
frame)1
B6 788 0128Antenna radiator, Kathrein1
A000 823 00 77Antenna adapter, mini UHF/SAP1
B6 787 4162Wiring harness assy.1
B6 787 6794Telephone console, sand, left-hand
steering1
B6 787 6804Telephone console, sand, right-
hand steering1
B6 787 6798Telephone console, gray, left-hand 1
2001 Mercedes-Benz ML320
1998-2005 ACCESSORIES & BODY, CAB Electrical System - Body - 163 Chassis
me
Saturday, October 02, 2010 3:30:14 PMPage 450 © 2006 Mitchell Repair Information Company, LLC.
Page 1946 of 4133
RETROFIT PERMANENTLY INSTALLED GSM NETWORK CAR PHONE - AZ82.70-P-0002C
MODEL 163 as of 1.12.99 up to 31.8.00
fixed installation Nokia 6090 CTEL
Fig. 400: Identifying Permanently Installed GSM Network Car Phone Components
steering
B6 787 6808Telephone console, gray, right-
hand steering1
Group 82 (see EPC)Packard connector housing1
Group 82 (see EPC)Packard terminals5
N914 127 004 204Sheet metal screw2
A002 994 11 45Clip fastener2
A000 989 92 71Special glue1
Removal
1Disconnect ground cable of
battery
AR54.10-P-0003A
2Remove radio
3Remove stowage compartment
below radio No longer required.
2001 Mercedes-Benz ML320
1998-2005 ACCESSORIES & BODY, CAB Electrical System - Body - 163 Chassis
me
Saturday, October 02, 2010 3:30:14 PMPage 451 © 2006 Mitchell Repair Information Company, LLC.
Page 1947 of 4133

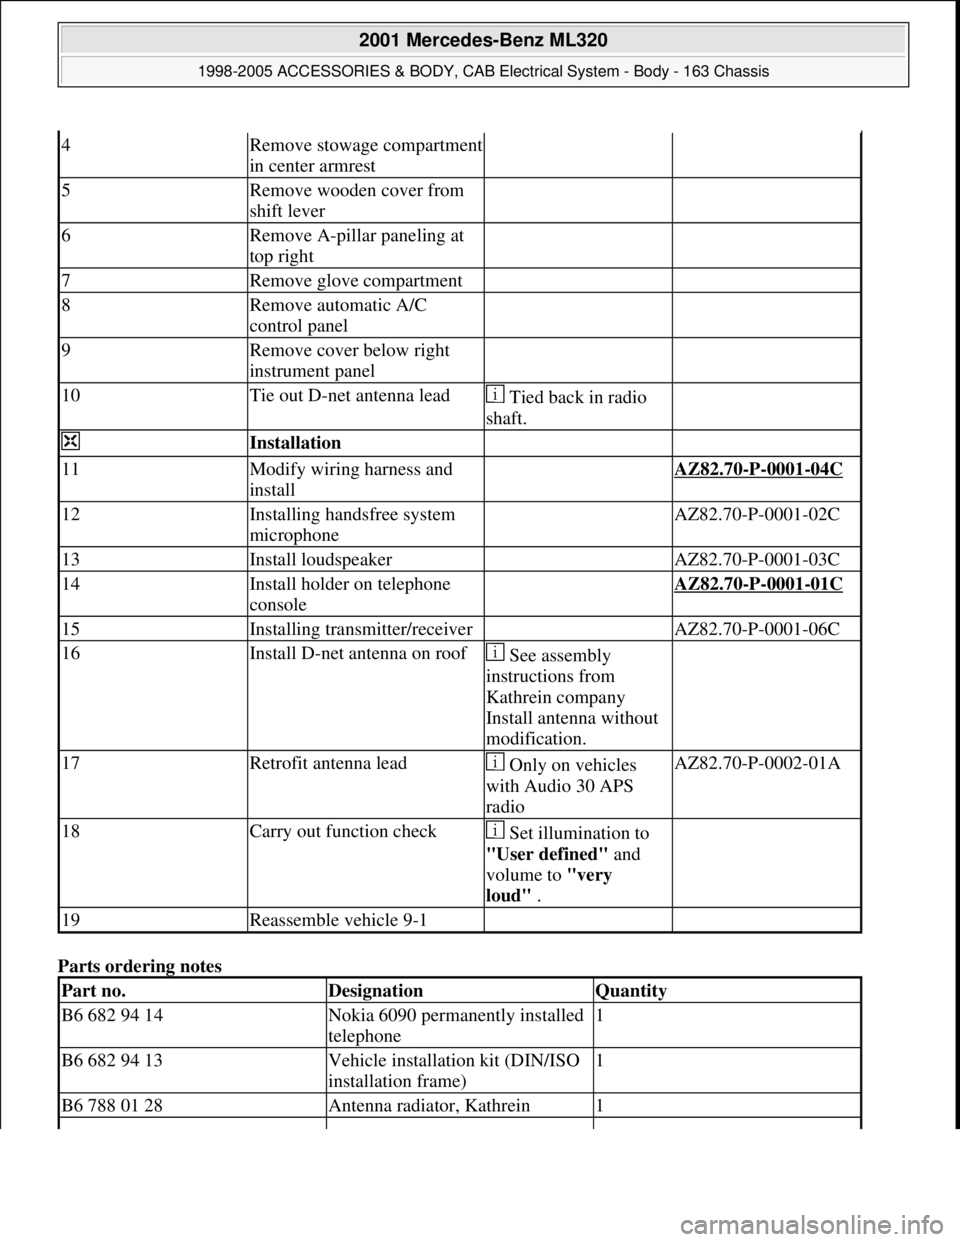
Parts ordering notes
4Remove stowage compartment
in center armrest
5Remove wooden cover from
shift lever
6Remove A-pillar paneling at
top right
7Remove glove compartment
8Remove automatic A/C
control panel
9Remove cover below right
instrument panel
10Tie out D-net antenna lead Tied back in radio
shaft.
Installation
11Modify wiring harness and
install AZ82.70-P-0001-04C
12Installing handsfree system
microphone AZ82.70-P-0001-02C
13Install loudspeaker AZ82.70-P-0001-03C
14Install holder on telephone
console AZ82.70-P-0001-01C
15Installing transmitter/receiver AZ82.70-P-0001-06C
16Install D-net antenna on roof See assembly
instructions from
Kathrein company
Install antenna without
modification.
17Retrofit antenna lead Only on vehicles
with Audio 30 APS
radioAZ82.70-P-0002-01A
18Carry out function check Set illumination to
"User defined" and
volume to "very
loud" .
19Reassemble vehicle 9-1
Part no.DesignationQuantity
B6 682 94 14Nokia 6090 permanently installed
telephone1
B6 682 94 13Vehicle installation kit (DIN/ISO
installation frame)1
B6 788 01 28Antenna radiator, Kathrein1
2001 Mercedes-Benz ML320
1998-2005 ACCESSORIES & BODY, CAB Electrical System - Body - 163 Chassis
me
Saturday, October 02, 2010 3:30:14 PMPage 452 © 2006 Mitchell Repair Information Company, LLC.