Page 161 of 1503
Relay an d Contro l Uni t Location s
Front Compartmen t
RADIATOR FA N HIG H RELA Y
UNDER-HOO D
RELAY BO X A
RADIATO R FA N LO W RELA Y
CONDENSE R FA NRELA Y
REVERS E LOCKOU T RELA Y (M/T )
WINDSHIEL D WIPE R
INTERMITTEN T RELA Y
WINDSHIEL D WIPE R
HIG H RELA Y
UNDER-HOO D
RELAY BO X B
WINDSHIEL D WIPE RLOW RELA Y
RIGHT HEADLIGH T RETRACTO R RELA Y
Wir e colors : BLU/GRN ,
BRN/WHT , BLU/RED ,
GRN/YEL , an d BL K
HEADLIGH T RELA Y
LEFT HEADLIGH T RETRACTO R RELA Y
Wir e colors : BLU/BLK ,
WHT/BLK , GRN/RED ,
BLU, and BL K
HOR N RELA YA/C COMPRESSO RCLUTCH RELA Y
POWER AMPLIFIE R RELA Y
BLOWE R MOTO R HIG H RELA Y
RIGH T HEADLIGH T RETRACTO R
CUT RELA Y
LEFT HEADLIGH TRETRACTO R CU T RELA Y
BLOWE R MOTO RRELAY
ABS MODULATO RASSEMBLY
WINDSHIEL D WASHE R
MOTO R RELA Y
DIMME R RELA Y
POWER WINDO W
RELAY
TAILLIGH T RELA Y
UNDER-HOO D FUSE/RELA Y BO X
ProCarManuals.com
Page 193 of 1503

Radiator
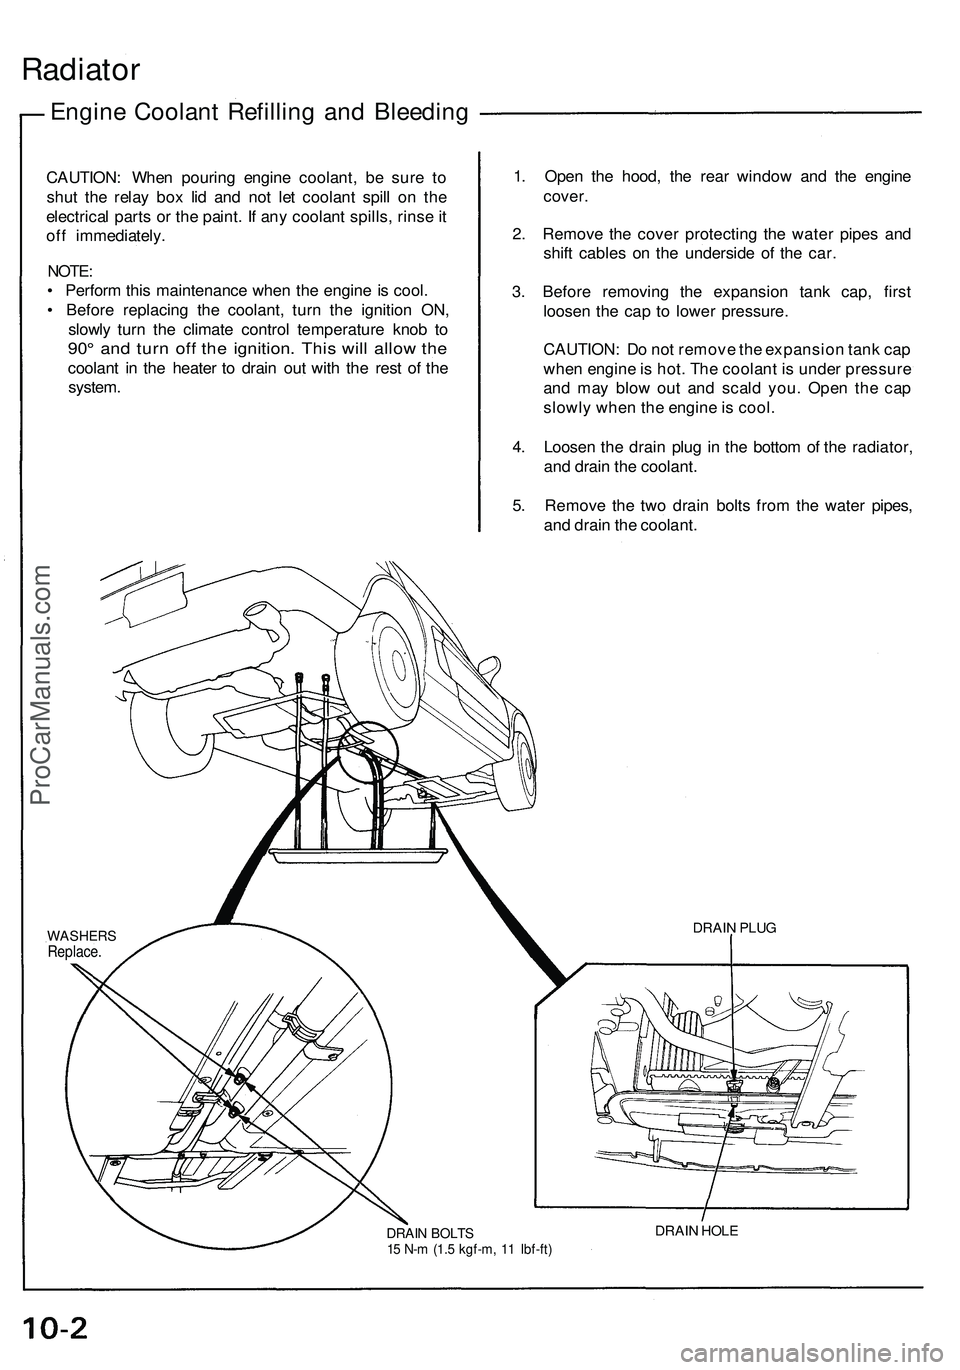
Engine Coolant Refilling and Bleeding
CAUTION: When pouring engine coolant, be sure to
shut the relay box lid and not let coolant spill on the
electrical parts or the paint. If any coolant spills, rinse it
off immediately.
NOTE:
• Perform this maintenance when the engine is cool.
• Before replacing the coolant, turn the ignition ON,
slowly turn the climate control temperature knob to
90° and turn off the ignition. This will allow the
coolant in the heater to drain out with the rest of the
system.
1. Open the hood, the rear window and the engine
cover.
2. Remove the cover protecting the water pipes and
shift cables on the underside of the car.
3. Before removing the expansion tank cap, first
loosen the cap to lower pressure.
CAUTION: Do not remove the expansion tank cap
when engine is hot. The coolant is under pressure
and may blow out and scald you. Open the cap
slowly when the engine is cool.
4. Loosen the drain plug in the bottom of the radiator,
and drain the coolant.
5. Remove the two drain bolts from the water pipes,
and drain the coolant.
DRAIN BOLTS
15 N-m (1.5 kgf-m, 11 Ibf-ft)
DRAIN HOLE
DRAIN PLUG
WASHERS
Replace.ProCarManuals.com
Page 195 of 1503
Radiator
10. Afte r tightenin g al l th e bleedin g bolt s and plug , fil l
th e expansio n tan k wit h coolan t u p t o th e MA X line .
11 . Loose n th e therm o cove r blee d bol t t o remov e an y
remainin g air .
12 . Whe n bleedin g i s completed , retighte n th e therm o
cove r blee d bol t an d fil l th e expansio n tan k u p t o
0. 5 (0.5 3 US qt , 0.4 4 Imp qt ) o r 3 0 m m (1. 2 in)
ove r th e MA X line . 1
3 . Instal l th e expansio n tan k cap , an d tur n it 6 0 degree s
(where i t engage s th e firs t loc k ta b o f fille r neck) .
14. Star t th e engine , an d le t i t ru n unti l warme d u p (unti l
th e thermosta t open s an d th e radiato r coolin g fa n
runs) .
15. Tur n of f th e engine . Chec k th e expansio n tan k and ,
i f needed , ad d coolan t t o brin g i t u p t o th e MA X
line.
16. Tighte n th e expansio n tan k ca p securely .
17 . Reinstal l th e cove r o n th e car' s underside .
ProCarManuals.com
Page 412 of 1503
21. Disconnect the engine wire harness connectors.
22. Remove the battery cable from the main fuse box.
24. Disconnect the two connectors from the emission
control box, then remove the control box.
• Do not disconnect the vacuum hoses.
Removal (cont'd)
Engine Removal/Installation
23. Disconnect the throttle body 6P connector, and
remove the ground cable and starter cable.
25. Remove the radiator hoses and heater hose.ProCarManuals.com
Page 439 of 1503

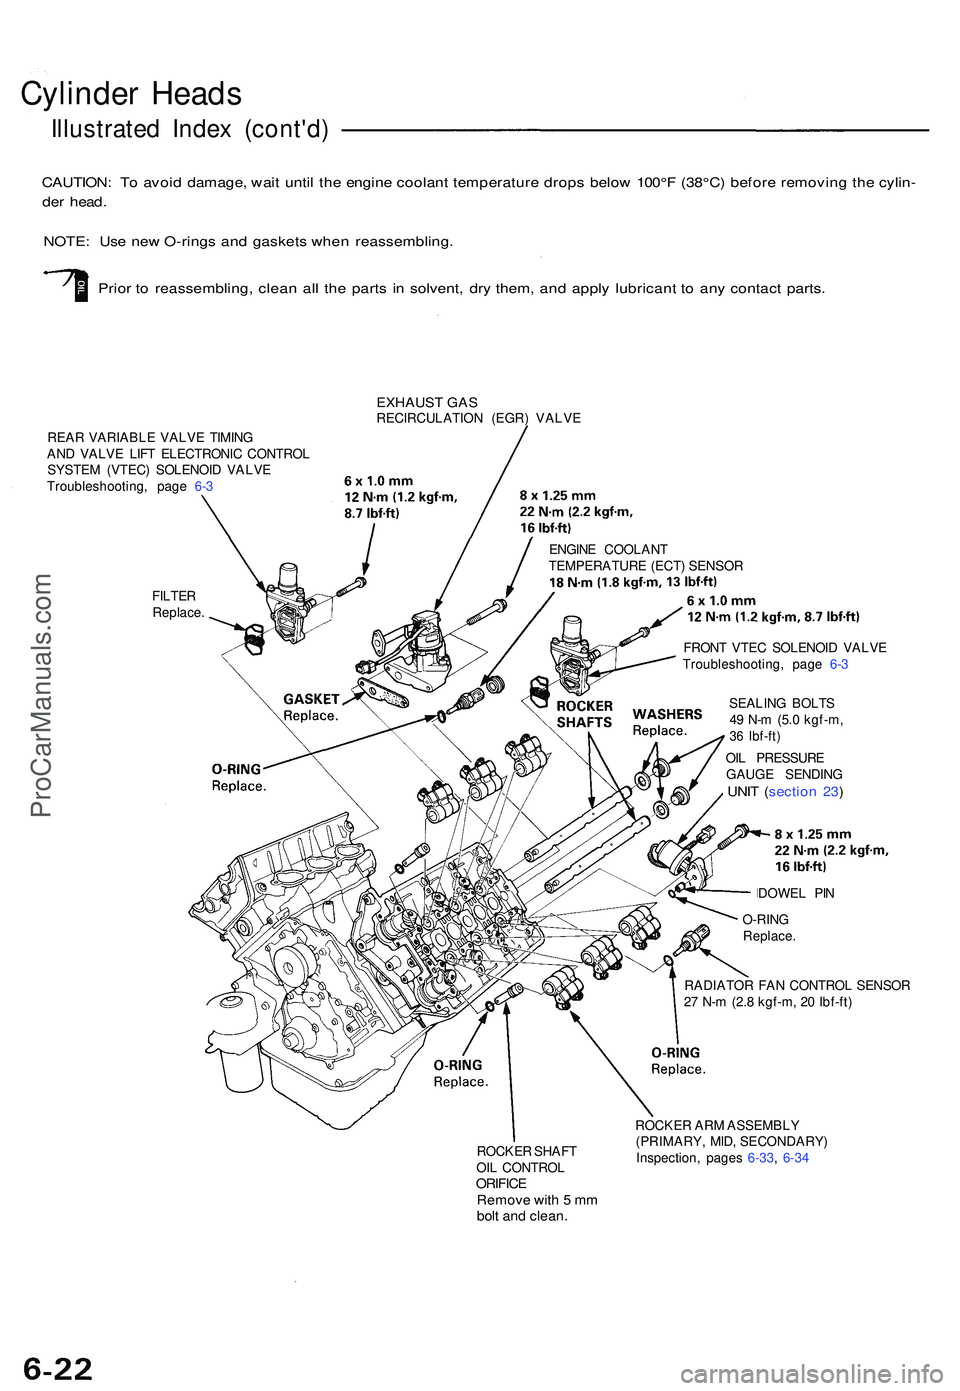
Cylinder Head s
Illustrate d Inde x (cont'd )
CAUTION : T o avoi d damage , wai t unti l th e engin e coolan t temperatur e drop s belo w 10 0°F (3 8°C) befor e removin g th e cylin -
de r head .
NOTE : Us e ne w O-ring s an d gasket s whe n reassembling .
Prio r t o reassembling , clea n al l th e part s i n solvent , dr y them , an d appl y lubrican t t o an y contac t parts .
EXHAUS T GA SRECIRCULATIO N (EGR ) VALV E
REA R VARIABL E VALV E TIMIN G
AN D VALV E LIF T ELECTRONI C CONTRO L
SYSTE M (VTEC ) SOLENOI D VALV E
Troubleshooting , pag e 6- 3
FILTE R
Replace . ENGIN
E COOLAN T
TEMPERATUR E (ECT ) SENSO R
FRON T VTE C SOLENOI D VALV E
Troubleshooting , pag e 6- 3
SEALIN G BOLT S
4 9 N- m (5. 0 kgf-m ,
36 Ibf-ft )
OIL PRESSUR E
GAUG E SENDIN G
UNIT ( sectio n 23 )
DOWE L PI N
O-RIN G
Replace .
RADIATOR FAN CONTRO L SENSO R
2 7 N- m (2. 8 kgf-m , 2 0 Ibf-ft )
ROCKE R SHAF T
OI L CONTRO L
ORIFICERemov e wit h 5 m mbol t an d clean .
ROCKE R AR M ASSEMBL Y
(PRIMARY , MID , SECONDARY )
Inspection , page s 6-33 , 6-3 4
ProCarManuals.com
Page 518 of 1503
Cooling
Illustrate d Inde x
Syste m is unde r hig h pressur e whe n th e
engin e i s hot . T o avoi d dange r o f releasin g scaldin g
engin e coolant , remov e th e ca p onl y whe n th e engin e i s
cool .
Tota l Coolin g Syste m Capacity : Includin g expansio n
tank 2. 1 (2. 2 U S qt , 1. 8 Im p qt )
M/T : 16. 0 (17. 0 US qt , 14. 1 Imp qt )
A/T : 16. 5 (17. 4 US qt , 14. 5 Imp qt )
NOTE :
• Chec k al l coolin g syste m hose s fo r damage ,
leak s o r deterioratio n an d replac e i f necessary .
• Chec k al l hos e clamp s an d retighte n i f
necessary .
• Us e ne w O-ring s whe n reassembling .
RADIATOREngine coolan t refillin g an d
bleeding , pag e 10- 5
Leak test , pag e 10- 8
Inspec t soldere d joint s an d
seam s fo r leaks .
Blo w ou t dir t fro m betwee n
cor e fin s wit h compresse d air .
I f insects , etc. , ar e cloggin g
radiator , was h the m of f wit h
low-pressur e water .
Radiator , Wate r Pipe s an d Hoses :
ProCarManuals.com
Page 520 of 1503
Radiator
Replacemen t
1. Remov e th e spar e tire .
2 . Drai n th e radiato r (se e pag e 10- 5 thr u 10-7 ).
3 . Disconnec t th e fa n moto r connecto r an d th e
resisto r connector .
4 . Remov e th e uppe r an d lowe r hose s fro m th e
radiator .
5 . Remov e th e bracke t an d th e radiator . Instal
l th e radiato r i n th e revers e orde r o f removal :
NOTE:
• Se t th e uppe r an d lowe r cushion s securely .
• Fil l th e radiato r an d blee d th e ai r (se e pag e 10- 5
thr u 10-7 ).
6 x 1. 0 m m9.8 N- m (1. 0 kgf-m , 7. 2 Ibf-ft )
RADIATO R BRACKE T
UPPE R CUSHION S
RESISTO R CONNECTO R
FA N MOTO R
CONNECTO R
RESISTO R CONNECTO R
LOWE R CUSHION S
FAN MOTO R
CONNECTO R
UPPE R HOS E
LOWER HOS E
ProCarManuals.com
Page 521 of 1503

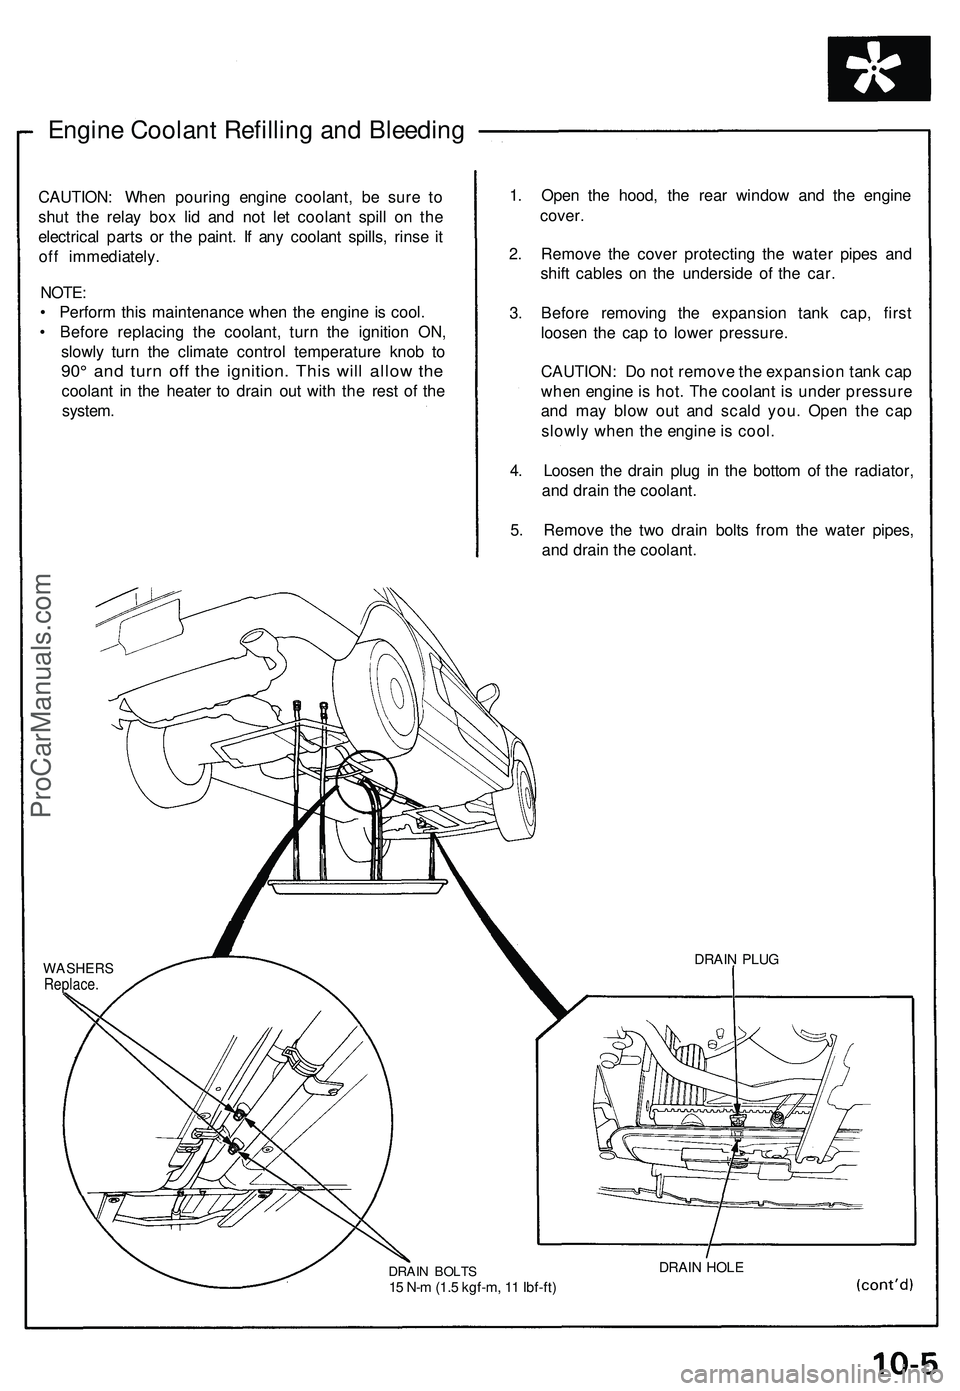
Engine Coolant Refilling and Bleeding
CAUTION: When pouring engine coolant, be sure to
shut the relay box lid and not let coolant spill on the
electrical parts or the paint. If any coolant spills, rinse it
off immediately.
NOTE:
• Perform this maintenance when the engine is cool.
• Before replacing the coolant, turn the ignition ON,
slowly turn the climate control temperature knob to
90° and turn off the ignition. This will allow the
coolant in the heater to drain out with the rest of the
system.
1. Open the hood, the rear window and the engine
cover.
2. Remove the cover protecting the water pipes and
shift cables on the underside of the car.
3. Before removing the expansion tank cap, first
loosen the cap to lower pressure.
CAUTION: Do not remove the expansion tank cap
when engine is hot. The coolant is under pressure
and may blow out and scald you. Open the cap
slowly when the engine is cool.
4. Loosen the drain plug in the bottom of the radiator,
and drain the coolant.
5. Remove the two drain bolts from the water pipes,
and drain the coolant.
WASHERS
Replace.
DRAIN BOLTS
15 N-m (1.5 kgf-m, 11 Ibf-ft)
DRAIN HOLE
DRAIN PLUGProCarManuals.com