Page 1354 of 1503
Ceiling/Courtesy/Trunk Light s
Componen t Locatio n Inde x
CEILIN G LIGH T (*' )
Test , pag e 23-20 4
Replacement , pag e 23-20 5
CEILIN G LIGH T (Coupe )Test, pag e 23-20 3
Replacement , pag e 23-20 5 PASSENGER'
S DOO R
COURTES Y LIGH T
Test/Replacement , pag e 23-20 6
PASSENGER' S DOO R SWITC H
Test , pag e 23-20 6
DRIVER' S DOO R
COURTES Y LIGH TTest/Replacement , pag e 23-20 6
DRIVER' S DOO R SWITC H
Test , pag e 23-20 6 TRUN
K LATC H SWITC H
Test/Replacement , pag e 23-20 7
TRUN K LIGH T
Test/Replacement , pag e 23-20 7
*1: NSX- T (ope n top ) onl y
ProCarManuals.com
Page 1355 of 1503
Ceiling Light Test
Coupe:
Check for continuity between the terminals in each switch
position according to the table.
(cont'd)
DOOR
ON
OFF
Terminal
Position
D
A
(A')
B
(B')
E
F
C
(C')
G
ON
ON
SW2
SW1ProCarManuals.com
Page 1356 of 1503
Ceiling/Courtesy/Trunk Lights
Ceiling Light Test (cont'd)
NSX-T (open top):
Check for continuity between the terminals in each switch
position according to the table.
OFF
DOOR
ON
B or E
C or H
B C A
A
D
Terminal
PositionProCarManuals.com
Page 1357 of 1503
Ceiling Light Replacement
Coupe:
1. Turn the light switch OFF.
2. Pry off the lens.
3. Remove the two bolts and the housing.
4. Disconnect the 4P connector from the housing.
4P
CONNECTOR
HOUSING
BULBS (5Wx2)
LENS
NSX-T (open top):
1. Turn the lights switch OFF.
2. Pry off the lens.
3. Remove the two screws and the housing.
4. Disconnect the 3P connector from the housing.
HOUSING
3P CONNECTOR
BULB (8 W)
LENSProCarManuals.com
Page 1358 of 1503

Ceiling/Courtesy/Trunk Light s
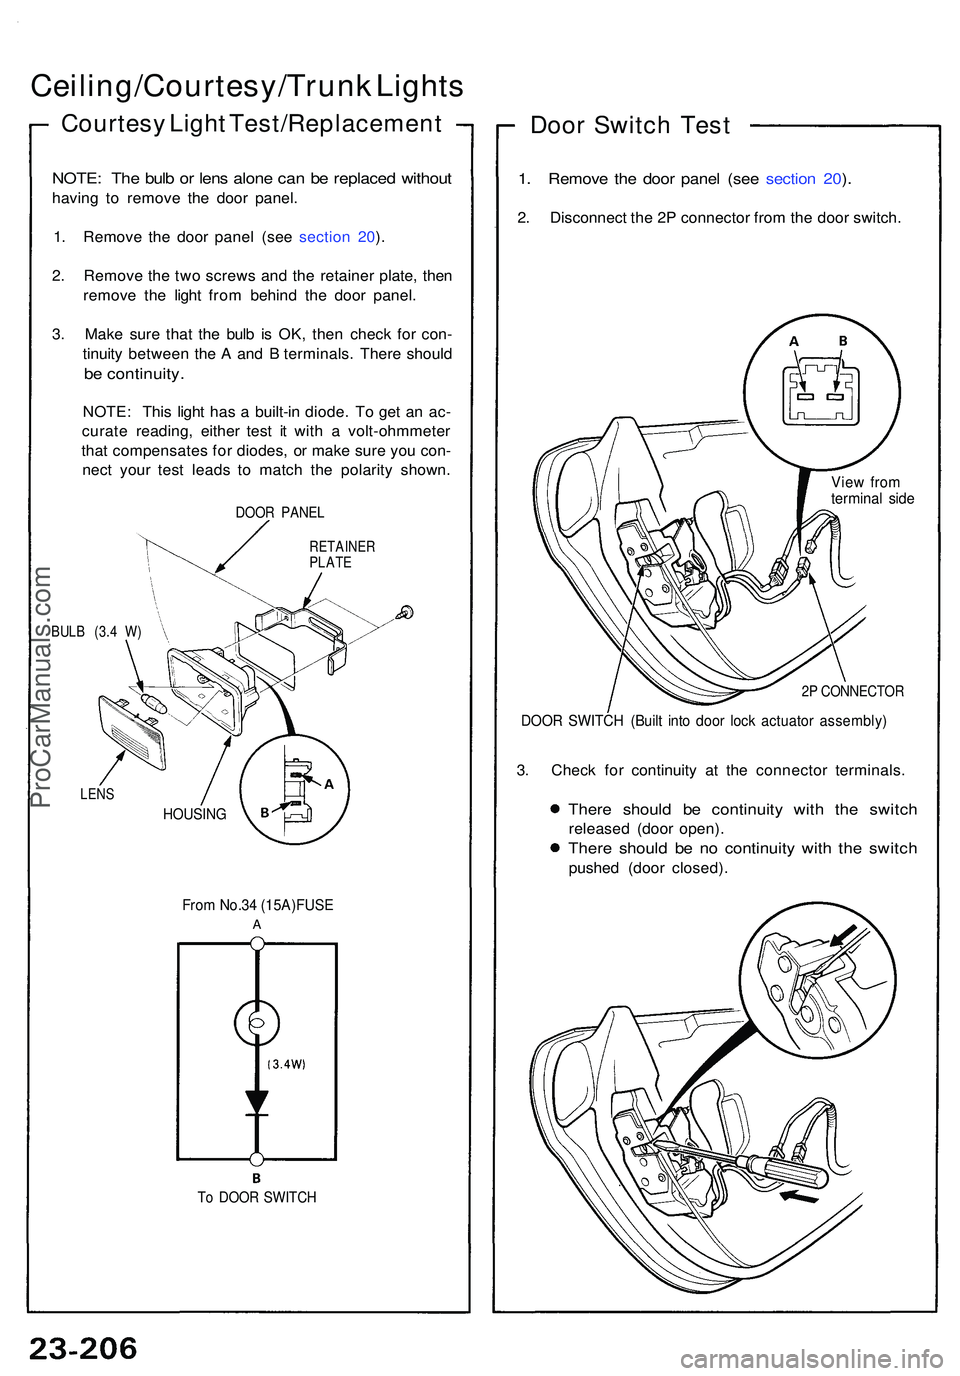
Courtes y Ligh t Test/Replacemen t
NOTE: Th e bul b o r len s alon e ca n b e replace d withou t
having t o remov e th e doo r panel .
1 . Remov e th e doo r pane l (se e sectio n 20 ).
2 . Remov e th e tw o screw s an d th e retaine r plate , the n
remov e th e ligh t fro m behin d th e doo r panel .
3 . Mak e sur e tha t th e bul b i s OK , the n chec k fo r con -
tinuit y betwee n th e A an d B terminals . Ther e shoul d
be continuity .
NOTE: Thi s ligh t ha s a built-i n diode . T o ge t a n ac -
curat e reading , eithe r tes t i t wit h a volt-ohmmete r
tha t compensate s fo r diodes , o r mak e sur e yo u con -
nec t you r tes t lead s t o matc h th e polarit y shown .
DOOR PANE L
RETAINE RPLATE
BULB (3. 4 W )
LEN S
From No.3 4 (15A)FUS E
A
Door Switc h Tes t
1. Remov e th e doo r pane l (se e sectio n 20 ).
2 . Disconnec t th e 2 P connecto r fro m th e doo r switch .
View fro mtermina l sid e
2P CONNECTO R
DOOR SWITC H (Buil t int o doo r loc k actuato r assembly )
3. Chec k fo r continuit y a t th e connecto r terminals .
There shoul d b e continuit y wit h th e switc h
release d (doo r open) .
There shoul d b e n o continuit y wit h th e switc h
pushed (doo r closed) .
HOUSING
To DOO R SWITC H
ProCarManuals.com
Page 1360 of 1503
Back-up Light s
Componen t Locatio n Inde x
A/T GEAR POSITIO N SWITC H
(Back-u p ligh t switch )
Test , pag e 23-16 2
UNDER-DAS H
FUS E BO X
BACK-U P LIGH T SWITC H (M/T )
Test , pag e 23-21 0
BACK-UP LIGHT S
Bul b replacement , pag e 23-19 8
ProCarManuals.com
Page 1361 of 1503

Back-up Light s
Test
Manua l Transmission :
1. I f onl y on e back-u p ligh t doe s no t g o on , chec k tha t
bul b i n th e taillight .
2. I f neithe r back-u p ligh t goe s on , chec k th e No . 5(1 5
A) fus e i n th e under-das h fus e box .
3 . I f th e fus e an d bulb s ar e OK , disconnec t th e connec -
to r fro m th e back-u p ligh t switc h o n th e transmis -
sion housing .
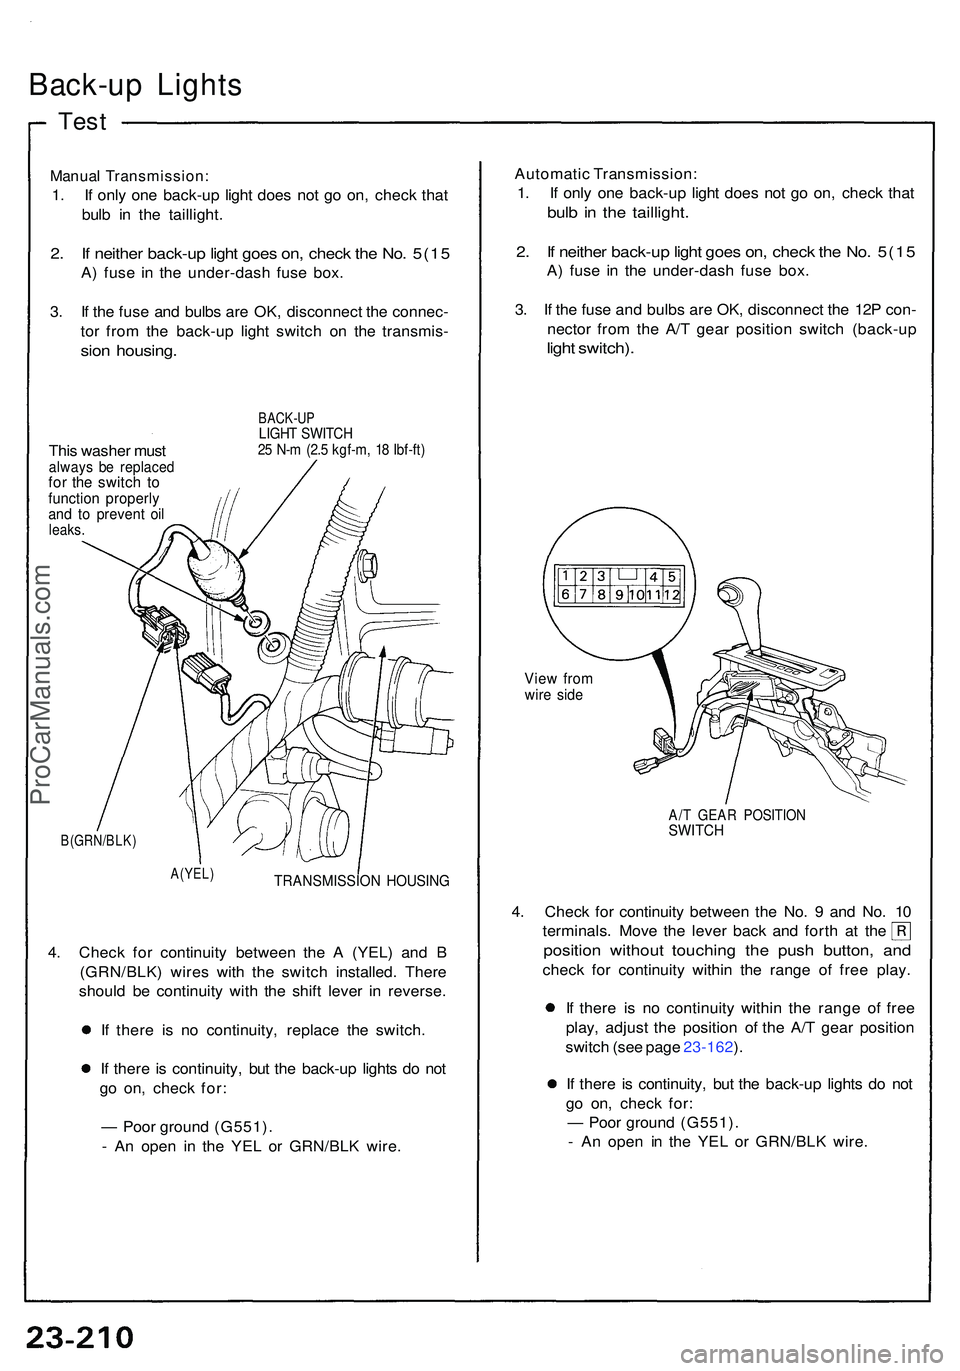
This washe r mus talway s b e replace dfor th e switc h t ofunctio n properl yand t o preven t oi lleaks .
BACK-U PLIGHT SWITC H25 N- m (2. 5 kgf-m , 1 8 Ibf-ft )
B(GRN/BLK )
A(YEL )
TRANSMISSIO N HOUSIN G
4. Chec k fo r continuit y betwee n th e A (YEL ) an d B
(GRN/BLK ) wire s wit h th e switc h installed . Ther e
shoul d b e continuit y wit h th e shif t leve r i n reverse .
I f ther e i s n o continuity , replac e th e switch .
I f ther e i s continuity , bu t th e back-u p light s d o no t
g o on , chec k for :
— Poo r groun d (G551) .
- A n ope n i n th e YE L o r GRN/BL K wire . Automati
c Transmission :
1 . I f onl y on e back-u p ligh t doe s no t g o on , chec k tha t
bulb i n th e taillight .
2. I f neithe r back-u p ligh t goe s on , chec k th e No . 5(1 5
A) fus e i n th e under-das h fus e box .
3 . I f th e fus e an d bulb s ar e OK , disconnec t th e 12 P con -
necto r fro m th e A/ T gea r positio n switc h (back-u p
light switch) .
View fro mwire sid e
A/T GEA R POSITIO NSWITCH
4. Chec k fo r continuit y betwee n th e No . 9 an d No . 1 0
terminals . Mov e th e leve r bac k an d fort h a t th e
positio n withou t touchin g th e pus h button , an d
chec k fo r continuit y withi n th e rang e o f fre e play .
I f ther e i s n o continuit y withi n th e rang e o f fre e
play, adjus t th e positio n o f th e A/ T gea r positio n
switc h (se e pag e 23-162 ).
I f ther e i s continuity , bu t th e back-u p light s d o no t
g o on , chec k for :
— Poo r groun d (G551) .
- A n ope n i n th e YE L o r GRN/BL K wire .
ProCarManuals.com
Page 1362 of 1503
Brake Light s
Componen t Locatio n Inde x
BRAK E SWITC HTest, pag e 23-21 3
HIGH MOUN T BRAK E LIGH T (LED )
• LE D Replacement , pag e 23-21 4
• Replacement , pag e 23-21 4
• Test , pag e 23-21 3
RIGH T TAILLIGH T
• Bul b Replacement , pag e 23-19 8• Failur e Senso r Test , pag e 23-15 5
LEF T TAILLIGH T
• Bul b Replacement , pag e 23-19 8
• Failur e Senso r Test , pag e 23-15 5
ProCarManuals.com