Page 1363 of 1503

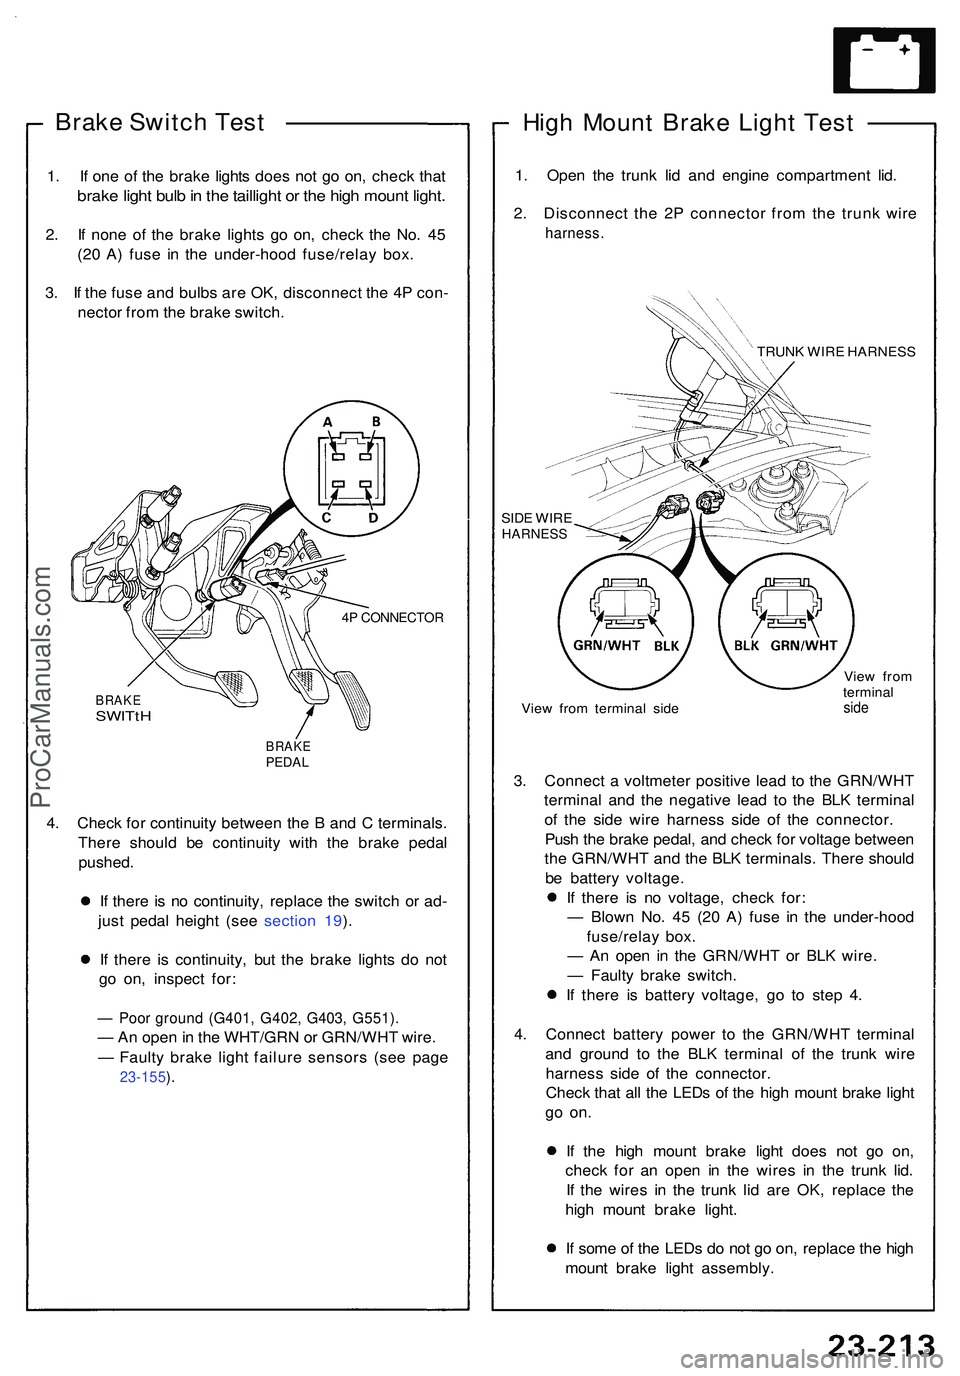
Brake Switc h Tes t
1. I f on e o f th e brak e light s doe s no t g o on , chec k tha t
brak e ligh t bul b in th e tailligh t o r th e hig h moun t light .
2. I f non e o f th e brak e light s g o on , chec k th e No . 4 5
(2 0 A ) fus e i n th e under-hoo d fuse/rela y box .
3 . I f th e fus e an d bulb s ar e OK , disconnec t th e 4 P con -
necto r fro m th e brak e switch .
4P CONNECTO R
BRAKESWITtH
BRAK EPEDAL
4. Chec k fo r continuit y betwee n th e B an d C terminals .
Ther e shoul d b e continuit y wit h th e brak e peda l
pushed .
I f ther e i s n o continuity , replac e th e switc h o r ad -
jus t peda l heigh t (se e sectio n 19 ).
I f ther e i s continuity , bu t th e brak e light s d o no t
g o on , inspec t for :
— Poo r groun d (G401 , G402 , G403 , G551) .
— An ope n in th e WHT/GR N o r GRN/WH T wire .
— Fault y brak e ligh t failur e sensor s (se e pag e
23-155 ).
Hig h Moun t Brak e Ligh t Tes t
1. Ope n th e trun k li d an d engin e compartmen t lid .
2 . Disconnec t th e 2 P connecto r fro m th e trun k wir e
harness .
TRUNK WIR E HARNES S
SID E WIR E
HARNES S
View fro m termina l sid e Vie
w fro m
termina lside
3. Connec t a voltmete r positiv e lea d t o th e GRN/WH T
termina l an d th e negativ e lea d t o th e BL K termina l
o f th e sid e wir e harnes s sid e o f th e connector .
Pus h th e brak e pedal , an d chec k fo r voltag e betwee n
th e GRN/WH T an d th e BL K terminals . Ther e shoul d
b e batter y voltage .
I f ther e i s n o voltage , chec k for :
— Blow n No . 4 5 (2 0 A ) fus e i n th e under-hoo d
fuse/rela y box .
— A n ope n i n th e GRN/WH T o r BL K wire .
— Fault y brak e switch .
I f ther e i s batter y voltage , g o t o ste p 4 .
4 . Connec t batter y powe r t o th e GRN/WH T termina l
an d groun d t o th e BL K termina l o f th e trun k wir e
harnes s sid e o f th e connector .
Chec k tha t al l th e LED s o f th e hig h moun t brak e ligh t
go on .
If th e hig h moun t brak e ligh t doe s no t g o on ,
chec k fo r a n ope n i n th e wire s i n th e trun k lid .
I f th e wire s i n th e trun k li d ar e OK , replac e th e
hig h moun t brak e light .
I f som e o f th e LED s d o no t g o on , replac e th e hig h
moun t brak e ligh t assembly .
ProCarManuals.com
Page 1364 of 1503
Brake Lights
High Mount Brake Light Replacement
CAUTION: Be careful not to damage the high mount
brake light, rear spoiler, and trunk lid.
1. Open the trunk lid.
2. Remove the caps and five screws from the rear
spoiler.
REAR
SPOILER
SCREW
CAP
3. Carefully pall the high mount brake light out of the
rear spoiler, then disconnect the 2P connector from
the high mount brake light.
REAR SPOILER
2P CONNECTOR
HIGH MOUNT BRAKE LIGHT
(LED)
Rear Spoiler Replacement
CAUTION: Be careful not to damage the high mount
brake light, rear spoiler, and trunk lid.
1. Open the trunk lid.
2. Remove the six mounting nuts.
REAR
SPOILER
3. Carefully lift the rear spoiler assembly off the rear
trunk lid.
REAR SPOILER
2P CONNECTOR (Trunk sub-harness side)
4. Disconnect the 2P connector from the trunk sub-
harness.ProCarManuals.com
Page 1365 of 1503
Side Marker/Tur n Signal/Hazar d Flashe r Syste m
Componen t Locatio n Inde x
SRS component s ar e locate d in thi s area . Revie w th e SR S componen t locations , precautions , an d procedure s in th e SR S
sectio n 24 befor e performin g repair s o r service .
HEADLIGH T SWITC H
Test , pag e 23-18 3
Replacement , pag e 23-18 4
TUR N SIGNAL/HAZAR D RELA Y
Inpu t Test , pag e 23-22 0
UNDER-DAS H FUS E BO X TUR
N SIGNA L INDICATO R LIGHT S
(I n th e gaug e assembly )
Bul b Location , pag e 23-12 8 HAZAR
D WARNIN G SWITC H
Removal , pag e 23-22 2
Test , pag e 23-22 3
• TUR N SIGNA L SWITC H
Test , pag e 23-18 3
Replacement , pag e 23-18 4
• TUR N SIGNA L CANCE L UNI T
Inpu t Test , pag e 23-22 1
SID E MARKE R FLASHE R CIRCUI T
(I n th e integrate d contro l unit )
Inpu t Test , pag e 23-17 0
ProCarManuals.com
Page 1368 of 1503

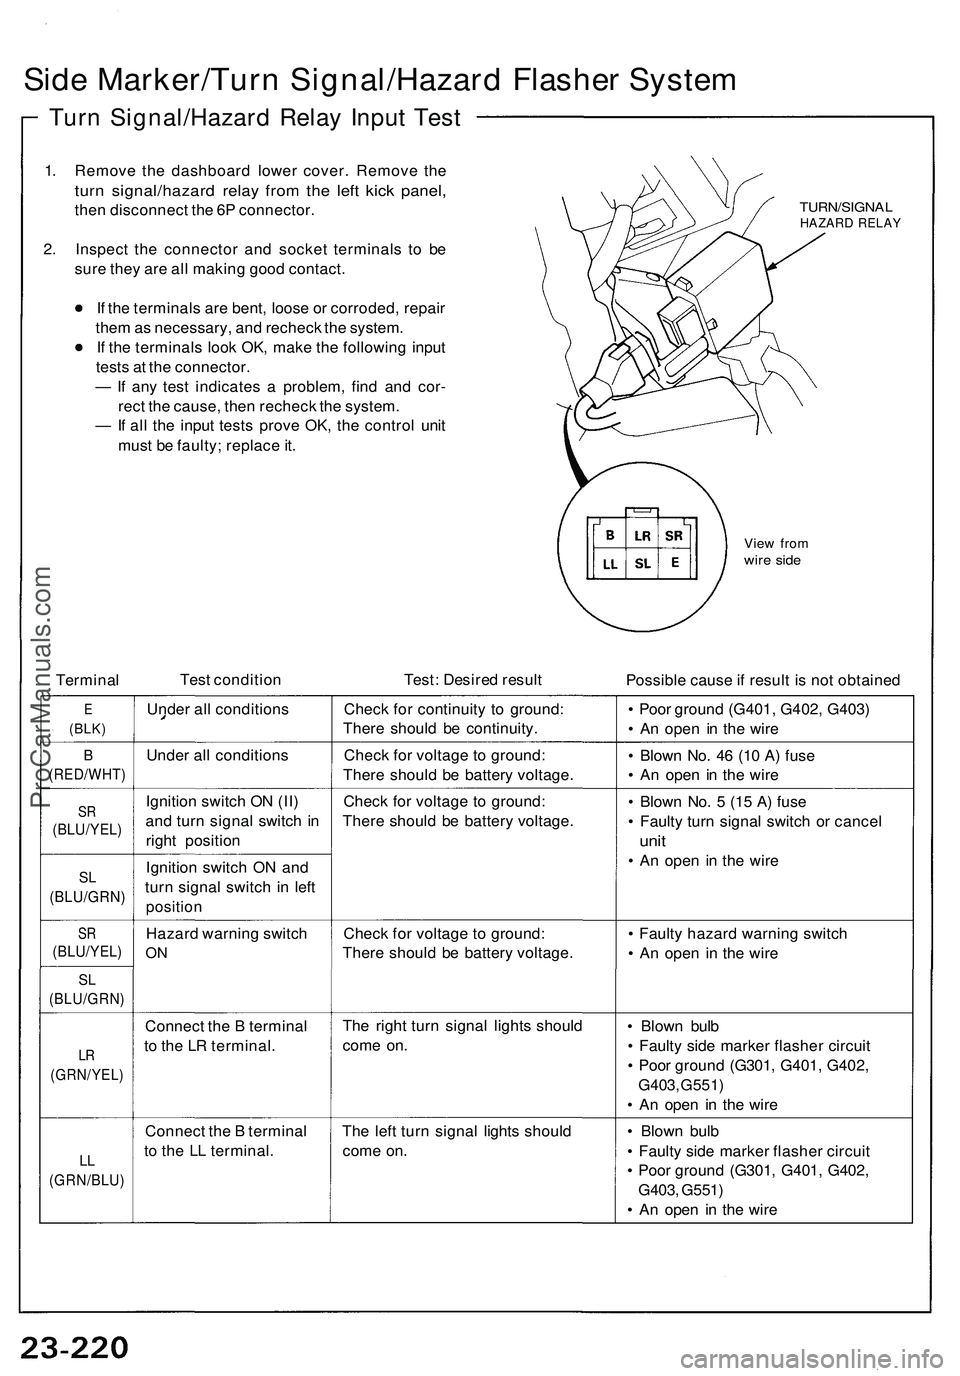
Side Marker/Turn Signal/Hazard Flasher System
Turn Signal/Hazard Relay Input Test
1. Remove the dashboard lower cover. Remove the
turn signal/hazard relay from the left kick panel,
then disconnect the 6P connector.
2. Inspect the connector and socket terminals to be
sure they are all making good contact.
If the terminals are bent, loose or corroded, repair
them as necessary, and recheck the system.
If the terminals look OK, make the following input
tests at the connector.
— If any test indicates a problem, find and cor-
rect the cause, then recheck the system.
— If all the input tests prove OK, the control unit
must be faulty; replace it.
TURN/SIGNAL
HAZARD RELAY
View from
wire side
Terminal
Test condition
Test: Desired result
Possible cause if result is not obtained
E
(BLK)
Under all conditions
Check for continuity to ground:
There should be continuity.
• Poor ground (G401, G402, G403)
• An open in the wire
B
(RED/WHT)
Under all conditions
Check for voltage to ground:
There should be battery voltage.
• Blown No. 46 (10 A) fuse
• An open in the wire
SR
(BLU/YEL)
Ignition switch ON (II)
and turn signal switch in
right position
Check for voltage to ground:
There should be battery voltage.
SL
(BLU/GRN)
Ignition switch ON and
turn signal switch in left
position
• Blown No. 5 (15 A) fuse
• Faulty turn signal switch or cancel
unit
• An open in the wire
SR
(BLU/YEL)
Hazard warning switch
ON
Check for voltage to ground:
There should be battery voltage.
SL
(BLU/GRN)
LR
(GRN/YEL)
Connect the B terminal
to the LR terminal.
The right turn signal lights should
come on.
• Blown bulb
• Faulty side marker flasher circuit
• Poor ground (G301, G401, G402,
G403, G551)
• An open in the wire
LL
(GRN/BLU)
Connect the B terminal
to the LL terminal.
The left turn signal lights should
come on.
• Blown bulb
• Faulty side marker flasher circuit
• Poor ground (G301, G401, G402,
G403, G551)
• An open in the wire
• Faulty hazard warning switch
• An open in the wireProCarManuals.com
Page 1369 of 1503

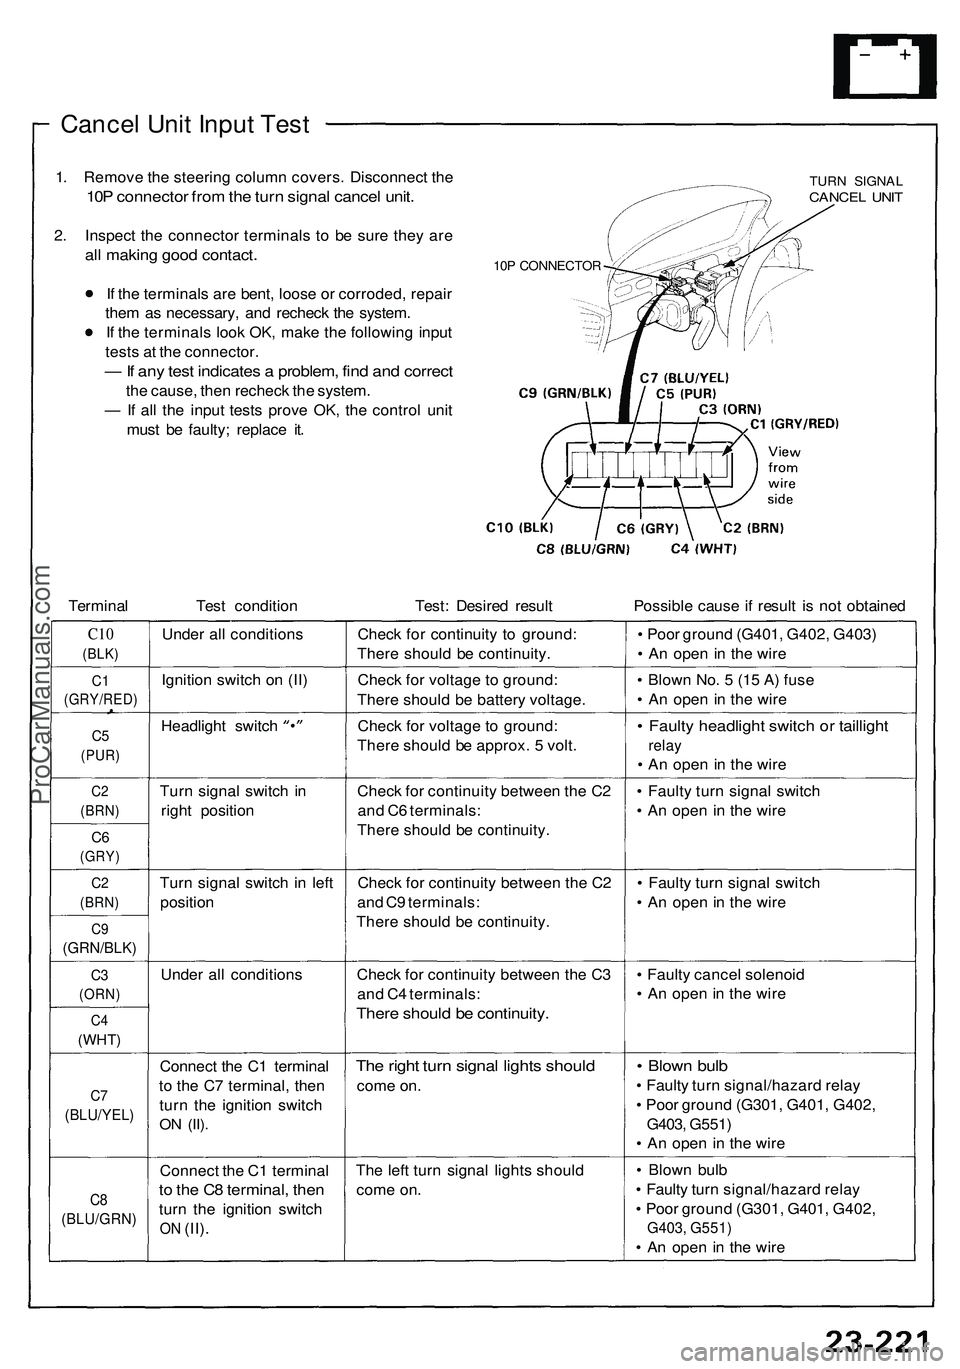
Cancel Unit Input Test
1. Remove the steering column covers. Disconnect the
10P connector from the turn signal cancel unit.
2. Inspect the connector terminals to be sure they are
all making good contact.
If the terminals are bent, loose or corroded, repair
them as necessary, and recheck the system.
If the terminals look OK, make the following input
tests at the connector.
— If any test indicates a problem, find and correct
the cause, then recheck the system.
— If all the input tests prove OK, the control unit
must be faulty; replace it.
10P CONNECTOR
TURN SIGNAL
CANCEL UNIT
Terminal
Test condition
Test: Desired result
Possible cause if result is not obtained
C10
(BLK)
Under all conditions
Check for continuity to ground:
There should be continuity.
• Poor ground (G401, G402, G403)
• An open in the wire
C1
(GRY/RED)
Ignition switch on (II)
Check for voltage to ground:
There should be battery voltage.
• Blown No. 5 (15 A) fuse
• An open in the wire
C5
(PUR)
Headlight switch
Check for voltage to ground:
There should be approx. 5 volt.
• Faulty headlight switch or taillight
relay
• An open in the wire
C2
(BRN)
Turn signal switch in
right position
C6
(GRY)
Check for continuity between the C2
and C6 terminals:
There should be continuity.
• Faulty turn signal switch
• An open in the wire
C2
(BRN)
Turn signal switch in left
position
C9
(GRN/BLK)
Check for continuity between the C2
and C9 terminals:
There should be continuity.
• Faulty turn signal switch
• An open in the wire
C3
(ORN)
Under all conditions
C4
(WHT)
Check for continuity between the C3
and C4 terminals:
There should be continuity.
• Faulty cancel solenoid
• An open in the wire
C7
(BLU/YEL)
Connect the C1 terminal
to the C7 terminal, then
turn the ignition switch
ON
(II).
The right turn signal lights should
come on.
• Blown bulb
• Faulty turn signal/hazard relay
• Poor ground (G301, G401, G402,
G403, G551)
• An open in the wire
C8
(BLU/GRN)
Connect the C1 terminal
to the C8 terminal, then
turn the ignition switch
ON
(II).
The left turn signal lights should
come on.
• Blown bulb
• Faulty turn signal/hazard relay
• Poor ground (G301, G401, G402,
G403, G551)
• An open in the wireProCarManuals.com
Page 1373 of 1503
Dash Light s Brightnes s Contro l
Componen t Locatio n Inde x ——————
TRANSMISSIO NCONTROL MODUL E (TCM )
DASH LIGHT S BRIGHTNES S
CONTROL UNI TInpu t Test , pag e 23-22 6
COMBINATIO N LIGH T SWITC H
Test , pag e 23-18 3
Replacement , pag e 23-18 4
HEADLIGH T RETRACTO RSWITCH DAS
H LIGHT S BRIGHTNES S
CONTROLLERTest, pag e 23-22 8
Removal , pag e 23-22 7
ProCarManuals.com
Page 1374 of 1503

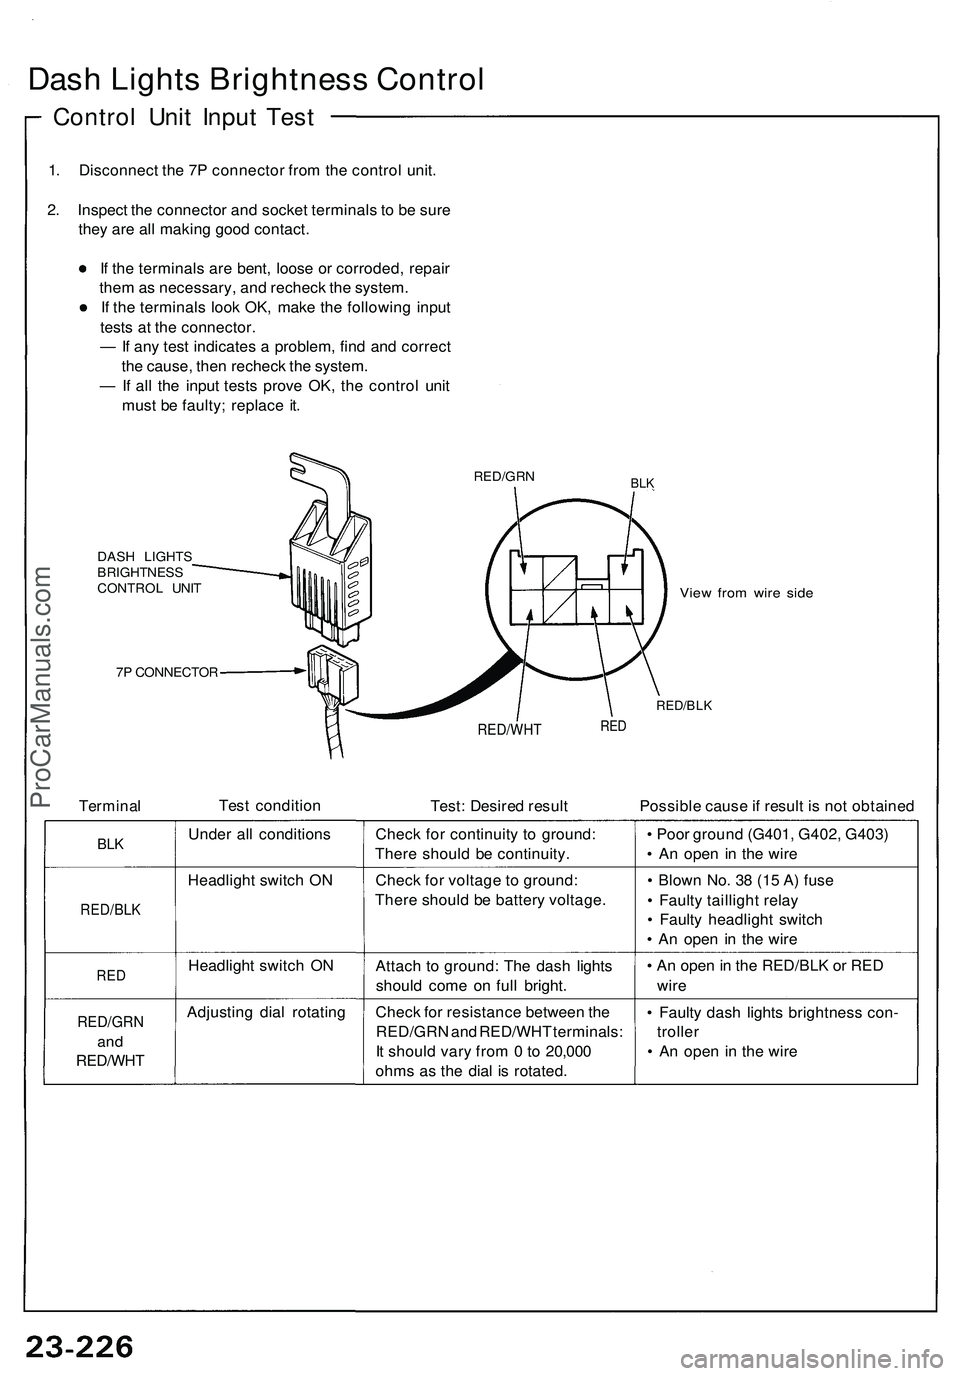
Dash Lights Brightness Control
Control Unit Input Test
1. Disconnect the 7P connector from the control unit.
2. Inspect the connector and socket terminals to be sure
they are all making good contact.
If the terminals are bent, loose or corroded, repair
them as necessary, and recheck the system.
If the terminals look OK, make the following input
tests at the connector.
— If any test indicates a problem, find and correct
the cause, then recheck the system.
— If all the input tests prove OK, the control unit
must be faulty; replace it.
BLK
DASH LIGHTS
BRIGHTNESS
CONTROL UNIT
7P CONNECTOR
View from wire side
RED/BLK
Terminal
Test condition
RED/WHT
Test: Desired result
RED
Possible cause if result is not obtained
BLK
RED/BLK
RED
RED/GRN
and
RED/WHT
Under all conditions
Headlight switch ON
Headlight switch ON
Adjusting dial rotating
Check for continuity to ground:
There should be continuity.
Check for voltage to ground:
There should be battery voltage.
Attach to ground: The dash lights
should come on full bright.
Check for resistance between the
RED/GRN and RED/WHT terminals:
It should vary from 0 to 20,000
ohms as the dial is rotated.
• Poor ground (G401, G402, G403)
• An open in the wire
• Blown No. 38 (15 A) fuse
• Faulty taillight relay
• Faulty headlight switch
• An open in the wire
• An open in the RED/BLK or RED
wire
• Faulty dash lights brightness con-
troller
• An open in the wire
RED/GRNProCarManuals.com
Page 1375 of 1503
Controller Remova l
SRS component s ar e locate d in thi s area . Revie w th e SR S
componen t locations , precautions , an d procedure s i n th e
SR S sectio n 24 befor e performin g repair s o r service .
1 . Remov e th e dashboar d lowe r cover , an d disconnec t
the connectors .
2. Remov e th e dashboar d lowe r pad .
DASHBOAR D LOWE RCOVER
3. Remov e th e til t cover .
DASHBOAR D LOWE RPAD
TIL T COVE R
4. Remov e th e steerin g colum n covers .
UPPER COVE R
LOWER COVE R
5P CONNECTO R
10 P CONNECTO RDAS
H LIGHT S BRIGHTNES S
CONTROLLE R
6. Remov e th e si x screws , the n remov e th e instrumen t
pane l tri m fro m th e dashboard .
INSTRUMEN T PANE L TRI M
DAS H LIGHT S BRIGHTNES S
CONTROLLE R
7. Remov e tw o screws , the n remov e th e das h light s
brightnes s controlle r fro m th e instrumen t pane l trim .
5
. Disconnec t th e 5 P an d 10 P connector s fro m eac h
switch .
TCS SWITC H
ProCarManuals.com