Page 229 of 2890
2-7
R1oBOO]
ON-BOARD
DIAGNOSTICS
II
SYSTEM
10
.
Diagnostics
Chart
with
Trouble
Code
OBD
(FBI)
P0440
H2M1365
BQ
:
DTC
P0440
-
EVAPORATIVE
EMISSION
CONTROL
SYSTEM
MALFUNCTION
(EVAP)
-
DTC
DETECTING
CONDITION
:
Two
consecutive
trips
with
fault
TROUBLE
SYMPTOM
:
Gasoline
smell
10BQ1
Check
any
other
OTC
(besides
OTC
P0440)
on
display
.
10B02
Check
fuel
filler
capand
fuel
filler
pipe
.
10B03Check
vent
control
solenoid
valve
.
10B04
Check
purge
control
solenoid
valve
.
10805
Check
pressure
control
solenoid
valve
.
10B06
Check
evaporative
emission
control
system
line
.
CAUTION
:
After
repair
or
replacement
of
faulty
parts,
conduct
CLEAR
MEMORY
and
INSPECTION
MODES
.
c
Ref
.
to
2-7
[T3D0]
and
[T3E0]
.*2
and
*4
>
18
Page 230 of 2890
ON-BOARD
DIAGNOSTICS
II
SYSTEM
ITyoso2i
2-7
10
.
DiagnosticsChart
with
Trouble
Code
WIRING
DIAGRAM
:
Main
relay
0
0
847
884
77
ECM
V
897
R69
S
.M
.J
.
~°c~
Vent
control
solenoid
valve
R68
R57R15
Pressure
control
862F45
SBF-2
O~C)-
B
~E
822
O
E4
Purge
control
solenoid
valve
--{~J
solenoid
valve
B84R68
R69
R57847
822
E4
1
U
49
10
11
1
1314
1
16
1
234
171
1
811
9
12012112212
1113
63
1
36
44
444
M56
5678
49
1
63
55116
68
/Ul
1
3
9101112
9
19
~Lltu
~
4L_L51bIJ~l
13141516
B2M1017
10BQ1
I
CHECK
ANY
OTHER
DTC
(BESIDES
DTC
P0440)
ON
DISPLAY
.
Is
there
any
other
DTC
on
display?
Inspect
the
relevant
DTC
using
"10
.
Diagnostics
Chart
with
Trouble
Code,
2-7
[T10A0]"*7
.
No
:
Go
to
step
101302
.
FILLER
PIPE
.
FILLER
CAPAND
FUEL
1)
Turn
ignition
switch
to
OFF
.
2)
Open
the
fuelflap
.
CHECK
:
Is
the
fuel
filler
cap
tightened
securely?
Tighten
fuel
filler
cap
securely
.
o
:
Go
to
next
CHECK
.
19
Page 231 of 2890
2-7
RyoBOS1
ON-BOARD
DIAGNOSTICS
II
SYSTEM
10
.
Diagnostics
Chart
with
Trouble
Code
J
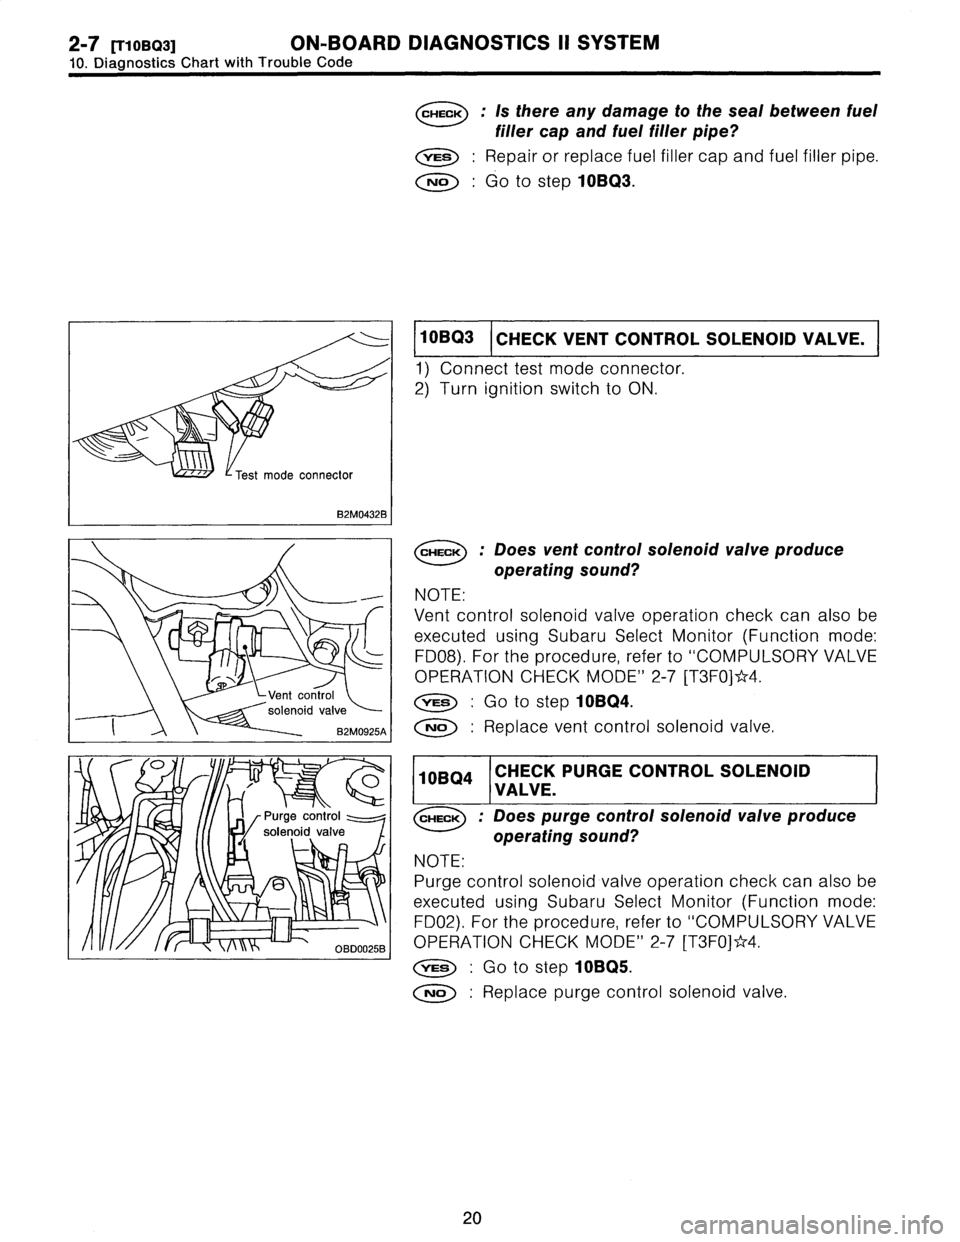
-Test
mode
connector
B2M0432B
--
Vent
control
solenoid
valve
82M0925A
o
Pur
e
control
z----_
11
r
1
4
,1
~
~
solenoidvalve
L
OBD0025B
I
CHECK
:
Is
there
any
damage
to
the
seal
between
fuel
filler
cap
and
fuel
filler
pipe?
Repair
or
replace
fuel
filler
cap
and
fuel
filler
pipe
.
No
:
Go
to
step
111011303
.
CHECK
VENT
CONTROL
SOLENOID
VALVE
.
1)
Connect
test
mode
connector
.
2)
Turn
ignition
switch
to
ON
.
CHECK
:
Does
vent
control
solenoid
valve
produce
*
Go
to
step
10BQ4
.
No
:
Replace
vent
control
solenoid
valve
.
operating
sound?
NOTE
:
Vent
control
solenoid
valve
operation
check
can
also
be
executed
using
Subaru
Select
Monitor
(Function
mode
:
FD08)
.
For
the
procedure,
referto
"COMPULSORY
VALVE
OPERATION
CHECK
MODE"
2-7
[T3F0]
4
.
10B04
CHECK
I
VA
L
VE
.
PURGE
CONTROL
SOLENOID
Does
purge
control
solenoid
valve
produce
operating
sound?
NOTE
:
Purge
control
solenoid
valve
operation
check
can
also
be
executed
using
Subaru
Select
Monitor
(Function
mode
:
FD02)
.
For
the
procedure,
referto
"COMPULSORY
VALVE
OPERATION
CHECK
MODE"
2-7
[T3F0]*4
.
YES
:
Go
to
step
10BQ5
.
No
:
Replace
purge
control
solenoid
valve
.
20
Page 241 of 2890
2-7
[T10BS1)
ON-BOARD
DIAGNOSTICS
II
SYSTEM
10
.
Diagnostics
Chart
with
Trouble
Code
Data
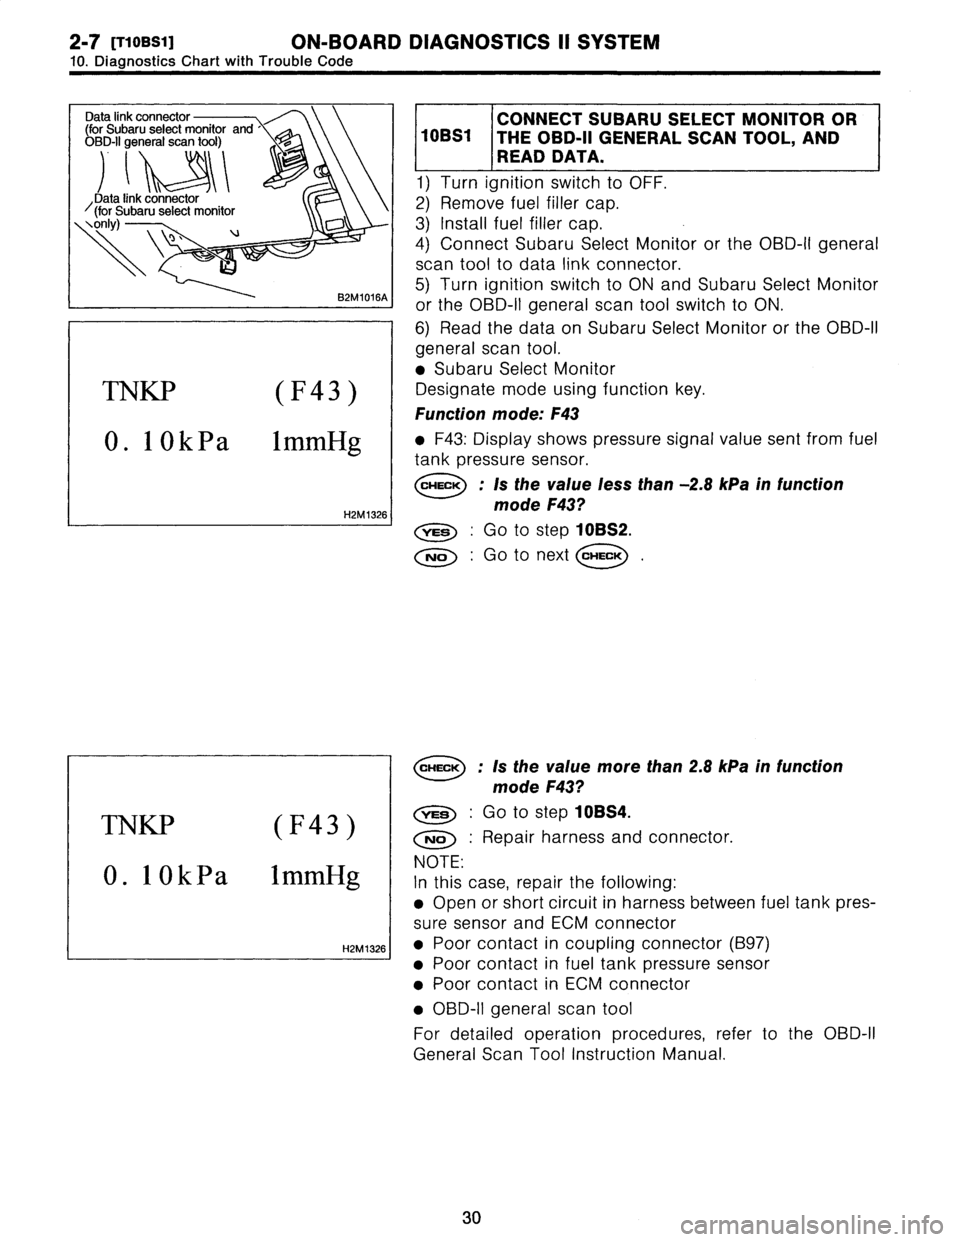
link
connector
(for
Subaru
select
monitor
and
OBD-II
general
scan
tool)
)
'
~
'~A~
~
Data
link
connector
(for
Subaru
select
monitor
only)
82M1016A]
TNKP
(F43)
0
.
10
k
P
a
1
mmHg
H2M
1326
TNKP
(F43)
0
.
10
k
P
a
1
mmHg
H2M1326
CONNECT
SUBARU
SELECT
MONITOR
OR
10BS1
THE
OBD-II
GENERALSCAN
TOOL,
AND
READ
DATA
.
1)
Turn
ignition
switch
to
OFF
.
2)
Remove
fuel
filler
cap
.
3)
Install
fuel
filler
cap
.
4)
Connect
Subaru
Select
Monitor
or
the
OBD-II
general
scan
toolto
data
link
connector
.
5)
Turn
ignition
switchto
ON
and
Subaru
Select
Monitor
or
the
OBD-II
general
scan
tool
switch
to
ON
.
6)
Read
the
data
onSubaru
Select
Monitoror
the
OBD-II
general
scan
tool
.
o
Subaru
Select
Monitor
Designate
mode
using
functionkey
.
Function
mode
:
F43
o
F43
:
Display
shows
pressure
signal
value
sent
from
fuel
tank
pressure
sensor
.
CHECK
:
Is
the
value
less
than-2
.8
kPa
in
function
mode
F43?
,rES
:
Go
to
step
10BS2
.
No
:
Go
to
next
CHECK
CHECK
:
Is
the
value
more
than2
.8
kPa
in
function
mode
F43?
,rES
:
Go
to
step
10BS4
.
No
:
Repair
harness
and
connector
.
NOTE
:
In
this
case,
repair
the
following
:
9
Open
or
short
circuit
in
harness
between
fuel
tank
p
sure
sensor
and
ECM
connector
"
Poor
contact
in
coupling
connector
(B97)
"
Poor
contact
in
fuel
tank
pressure
sensor
"
Poor
contact
in
ECM
connector
"
OBD-II
general
scan
tool
For
detailed
operation
procedures,
referto
the
OB
General
Scan
Tool
Instruction
Manual
.
30
res-
D-II
Page 246 of 2890
ON-BOARD
DIAGNOSTICS
II
SYSTEM
[TloBSa1
2-7
10
.
DiagnosticsChart
with
Trouble
Code
TNKP
(F43)
0
.
10
k
P
a
1
mmHg
H2M1326
5)
Disconnect
connector
from
fuel
tank
pressure
sensor
.
6)
Remove
fuel
filler
cap
.
7)
Install
fuel
filler
cap
.
8)
Turn
ignition
switchto
ON
and
Subaru
Select
Monitor
or
theOBD-II
general
scan
tool
switch
to
ON
.
9)
Read
data
onSubaru
select
monitor
or
the
OBD-II
gen-
eral
scan
tool
.
e
Subaru
Select
Monitor
Designate
mode
using
function
key
.
Function
mode
:
F43
CHECK
:
Is
the
value
more
than2
.8
kPa
in
function
mode
F43?
,rES
:
Repair
short
circuit
in
harnessbetween
ECM
and
fuel
tank
pressure
sensor
connector
.
No
:
Replace
fuel
tankpressure
sensor
.
~
OBD-II
general
scan
tool
For
detailed
operation
procedures,
referto
the
OBD-II
General
Scan
Tool
Instruction
Manual
.
35
Page 293 of 2890
B2M0955A
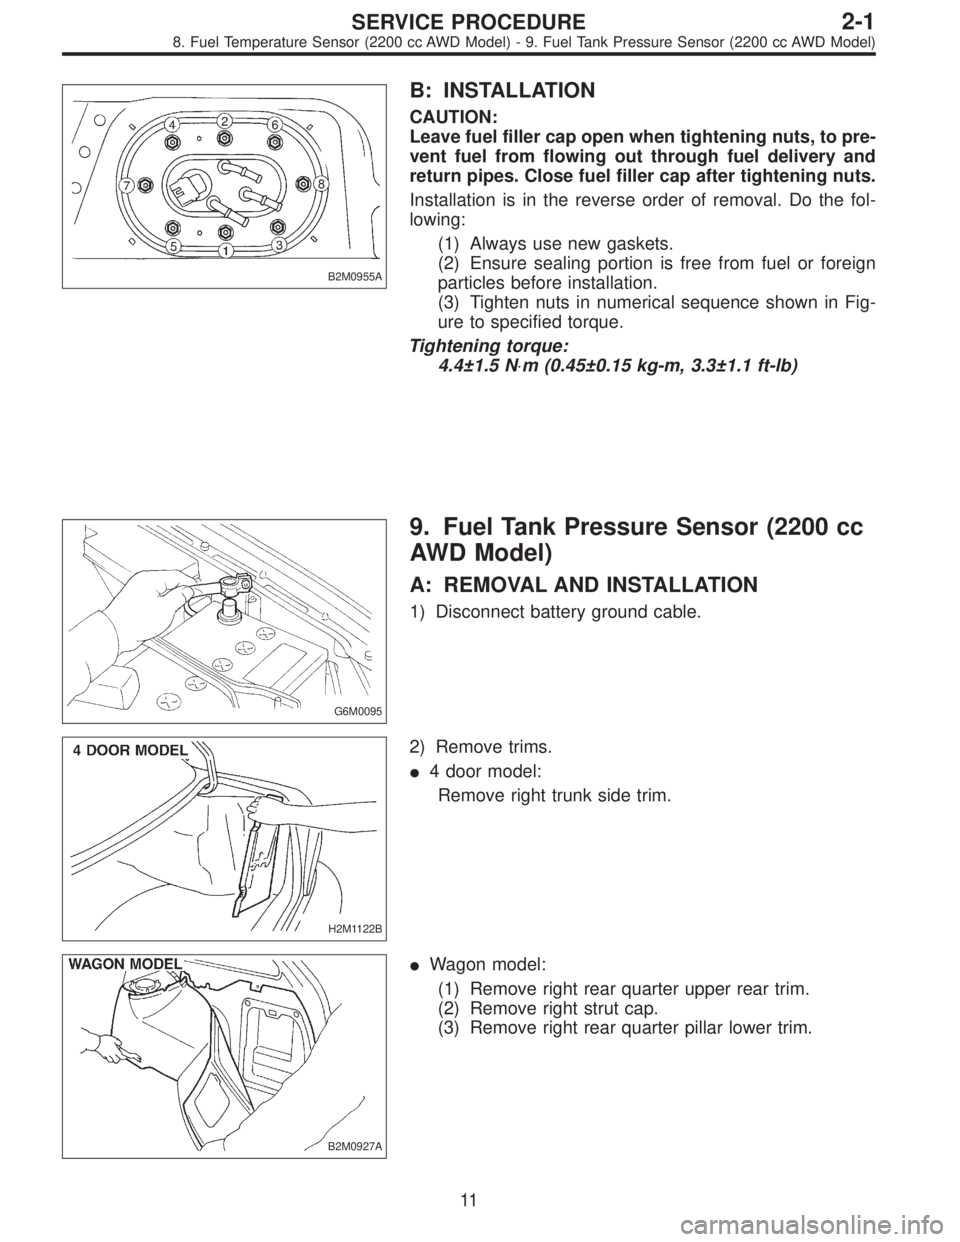
B: INSTALLATION
CAUTION:
Leave fuel filler cap open when tightening nuts, to pre-
vent fuel from flowing out through fuel delivery and
return pipes. Close fuel filler cap after tightening nuts.
Installation is in the reverse order of removal. Do the fol-
lowing:
(1) Always use new gaskets.
(2) Ensure sealing portion is free from fuel or foreign
particles before installation.
(3) Tighten nuts in numerical sequence shown in Fig-
ure to specified torque.
Tightening torque:
4.4±1.5 N⋅m (0.45±0.15 kg-m, 3.3±1.1 ft-lb)
G6M0095
9. Fuel Tank Pressure Sensor (2200 cc
AWD Model)
A: REMOVAL AND INSTALLATION
1) Disconnect battery ground cable.
H2M1122B
2) Remove trims.
�4 door model:
Remove right trunk side trim.
B2M0927A
�Wagon model:
(1) Remove right rear quarter upper rear trim.
(2) Remove right strut cap.
(3) Remove right rear quarter pillar lower trim.
11
2-1SERVICE PROCEDURE
8. Fuel Temperature Sensor (2200 cc AWD Model) - 9. Fuel Tank Pressure Sensor (2200 cc AWD Model)
Page 294 of 2890
B2M0955A
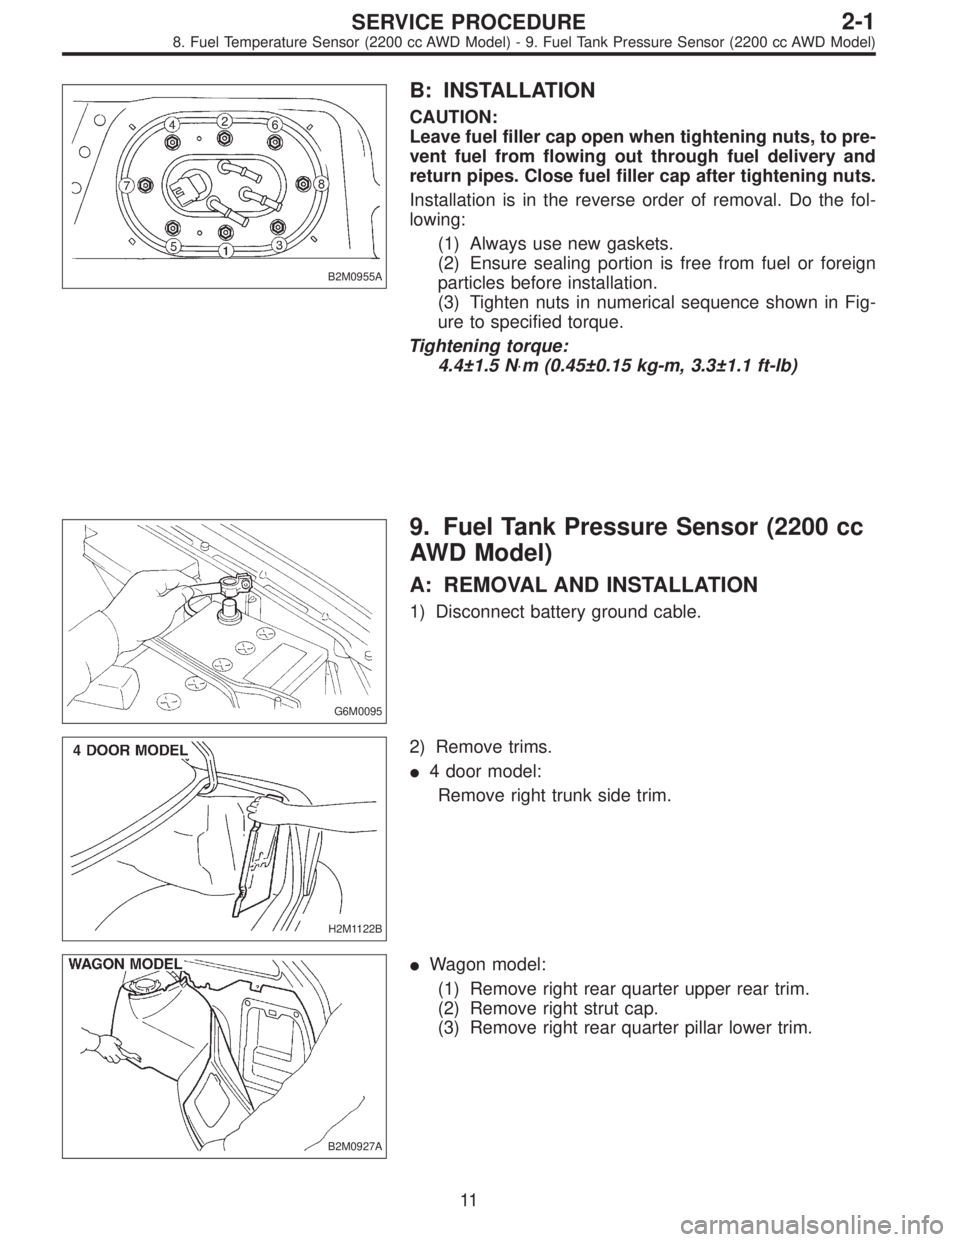
B: INSTALLATION
CAUTION:
Leave fuel filler cap open when tightening nuts, to pre-
vent fuel from flowing out through fuel delivery and
return pipes. Close fuel filler cap after tightening nuts.
Installation is in the reverse order of removal. Do the fol-
lowing:
(1) Always use new gaskets.
(2) Ensure sealing portion is free from fuel or foreign
particles before installation.
(3) Tighten nuts in numerical sequence shown in Fig-
ure to specified torque.
Tightening torque:
4.4±1.5 N⋅m (0.45±0.15 kg-m, 3.3±1.1 ft-lb)
G6M0095
9. Fuel Tank Pressure Sensor (2200 cc
AWD Model)
A: REMOVAL AND INSTALLATION
1) Disconnect battery ground cable.
H2M1122B
2) Remove trims.
�4 door model:
Remove right trunk side trim.
B2M0927A
�Wagon model:
(1) Remove right rear quarter upper rear trim.
(2) Remove right strut cap.
(3) Remove right rear quarter pillar lower trim.
11
2-1SERVICE PROCEDURE
8. Fuel Temperature Sensor (2200 cc AWD Model) - 9. Fuel Tank Pressure Sensor (2200 cc AWD Model)
Page 300 of 2890
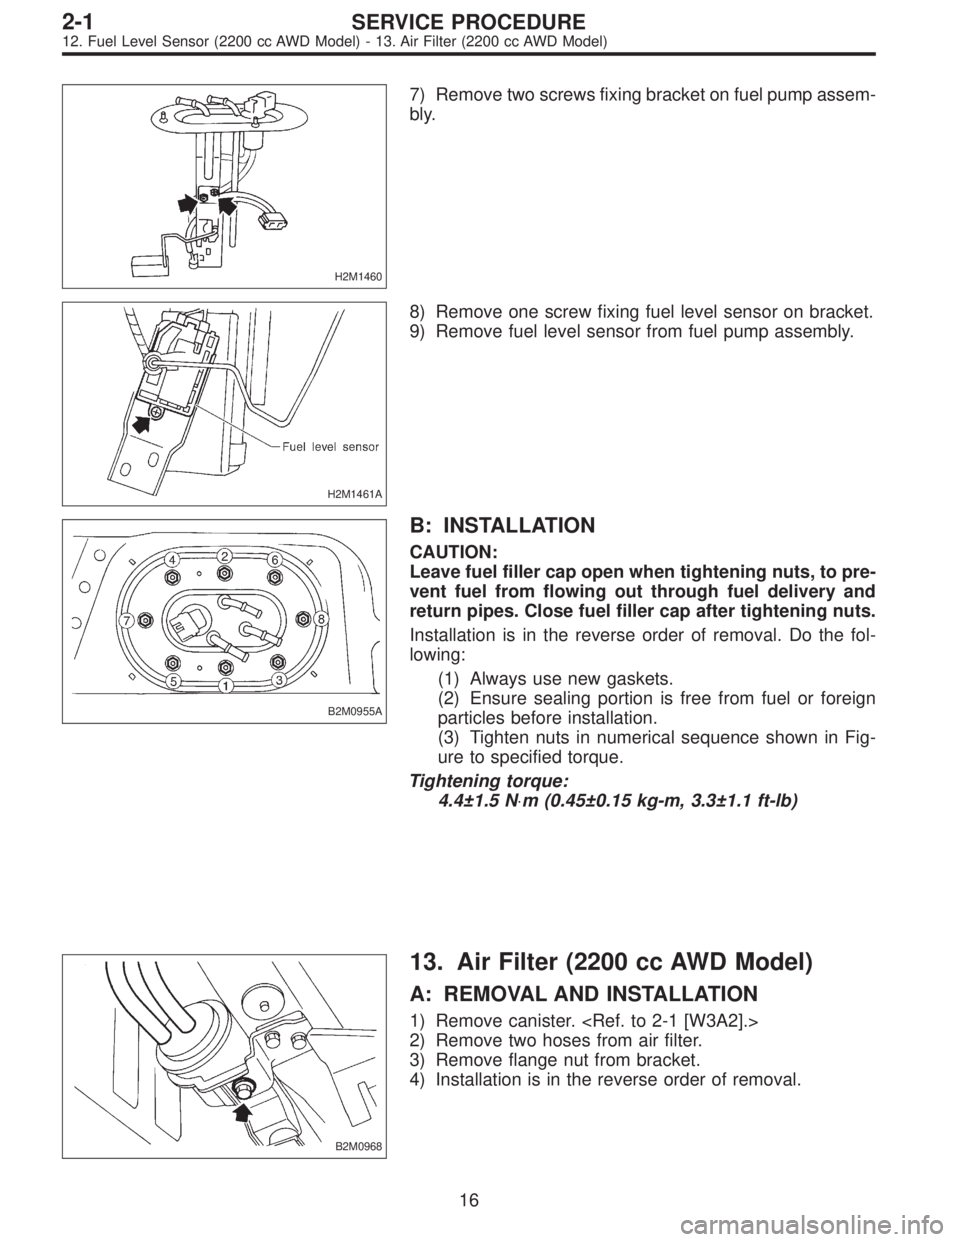
H2M1460
7) Remove two screws fixing bracket on fuel pump assem-
bly.
H2M1461A
8) Remove one screw fixing fuel level sensor on bracket.
9) Remove fuel level sensor from fuel pump assembly.
B2M0955A
B: INSTALLATION
CAUTION:
Leave fuel filler cap open when tightening nuts, to pre-
vent fuel from flowing out through fuel delivery and
return pipes. Close fuel filler cap after tightening nuts.
Installation is in the reverse order of removal. Do the fol-
lowing:
(1) Always use new gaskets.
(2) Ensure sealing portion is free from fuel or foreign
particles before installation.
(3) Tighten nuts in numerical sequence shown in Fig-
ure to specified torque.
Tightening torque:
4.4±1.5 N⋅m (0.45±0.15 kg-m, 3.3±1.1 ft-lb)
B2M0968
13. Air Filter (2200 cc AWD Model)
A: REMOVAL AND INSTALLATION
1) Remove canister.
2) Remove two hoses from air filter.
3) Remove flange nut from bracket.
4) Installation is in the reverse order of removal.
16
2-1SERVICE PROCEDURE
12. Fuel Level Sensor (2200 cc AWD Model) - 13. Air Filter (2200 cc AWD Model)