Page 889 of 2890
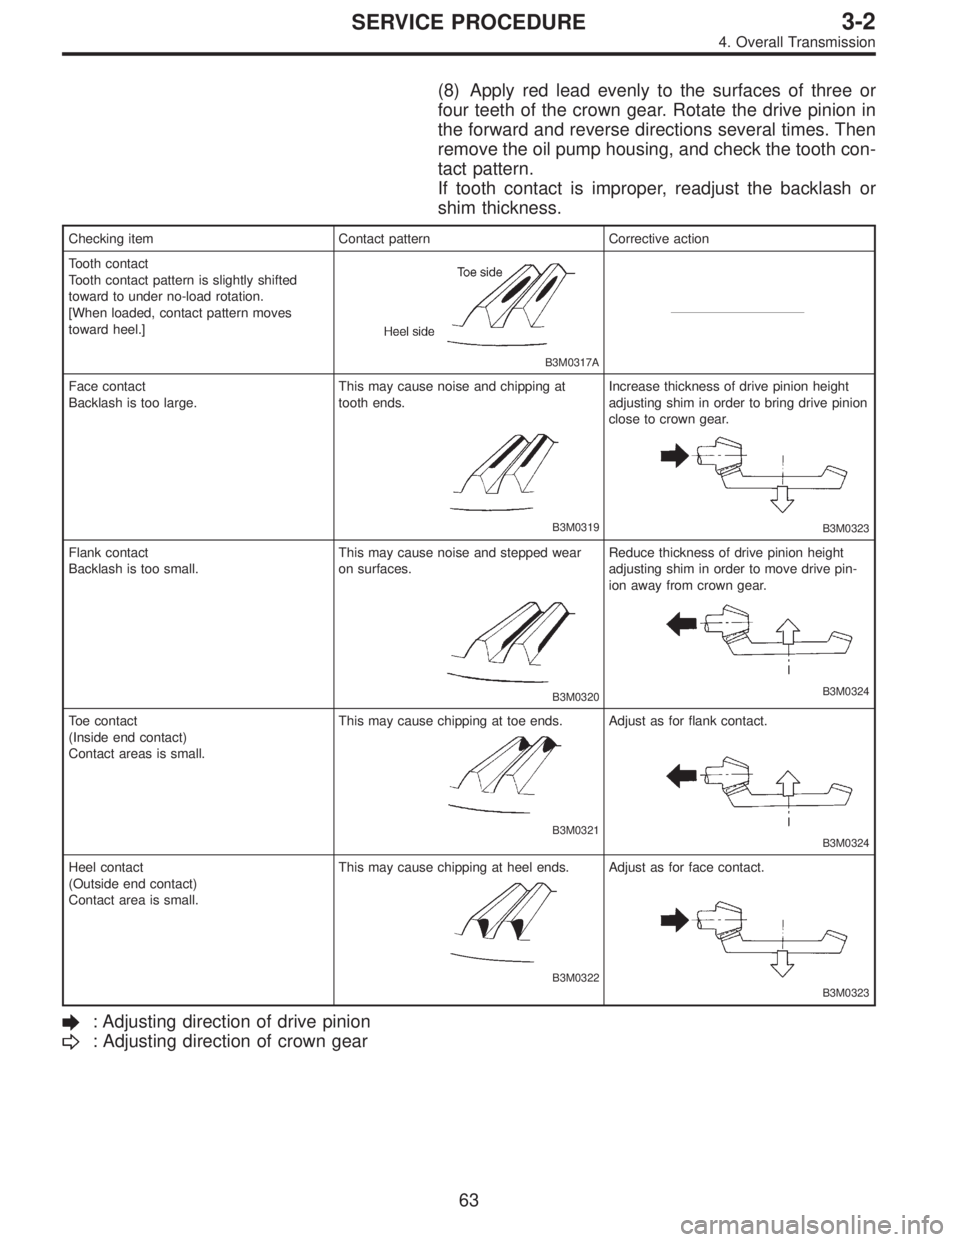
(8) Apply red lead evenly to the surfaces of three or
four teeth of the crown gear. Rotate the drive pinion in
the forward and reverse directions several times. Then
remove the oil pump housing, and check the tooth con-
tact pattern.
If tooth contact is improper, readjust the backlash or
shim thickness.
Checking item Contact pattern Corrective action
Tooth contact
Tooth contact pattern is slightly shifted
toward to under no-load rotation.
[When loaded, contact pattern moves
toward heel.]
B3M0317A
Face contact
Backlash is too large.This may cause noise and chipping at
tooth ends.
B3M0319
Increase thickness of drive pinion height
adjusting shim in order to bring drive pinion
close to crown gear.
B3M0323
Flank contact
Backlash is too small.This may cause noise and stepped wear
on surfaces.
B3M0320
Reduce thickness of drive pinion height
adjusting shim in order to move drive pin-
ion away from crown gear.
B3M0324
Toe contact
(Inside end contact)
Contact areas is small.This may cause chipping at toe ends.
B3M0321
Adjust as for flank contact.
B3M0324
Heel contact
(Outside end contact)
Contact area is small.This may cause chipping at heel ends.
B3M0322
Adjust as for face contact.
B3M0323
: Adjusting direction of drive pinion
: Adjusting direction of crown gear
63
3-2SERVICE PROCEDURE
4. Overall Transmission
Page 898 of 2890
(2) Measure the distance from the oil pump housing
mating surface to the top surface of the oil pump cover
with needle bearing, and to the thrust surface of the
reverse clutch.
G3M0420
(3) Equation for calculation
�Total end play
Unit: mm
C = (L + 0.4)�
C : Clearance between concave portion of high clutch
and end of clutch drum support
L : Length from case mating surface to concave portion
of high clutch
0.4 : Gasket thickness
�: Height from housing mating surface to upper surface
of clutch drum support
Select suitable bearing race from
among those listed in this table
so that clearance C is in the 0.25—
0.55 mm (0.0098—0.0217 in) range.Part No. Thickness mm (in)
803031021
803031022
803031023
803031024
803031025
803031026
8030310270.8 (0.031)
1.0 (0.039)
1.2 (0.047)
1.4 (0.055)
1.6 (0.063)
1.8 (0.071)
2.0 (0.079)
72
3-2SERVICE PROCEDURE
4. Overall Transmission
Page 899 of 2890

�Reverse clutch end play
Unit: mm
C = (M + 0.4)m
C : Clearance between oil pump housing hose and end
of reverse clutch
M : Distance from case mating surface to upper surface
of reverse clutch
0.4 : Gasket thickness
m : Height from housing mating surface to thrust-receiv-
ing area of reverse clutch
Select suitable thrust washer from
among those listed in this table so that
clearance C is in the 0.55—0.90 mm
(0.0217—0.0354 in) range.Part No. Thickness mm (in)
31299AA000
31299AA010
31299AA020
31299AA030
31299AA040
31299AA050
31299AA0600.7 (0.028)
0.9 (0.035)
1.1 (0.043)
1.3 (0.051)
1.5 (0.059)
1.7 (0.067)
1.9 (0.075)
G3M0423
24) Install the oil pump housing assembly.
(1) After completing end play adjustment, insert the
bearing race in the recess of the high clutch. Attach the
thrust washer and thrust needle bearing to the oil pump
cover with vaseline.
(2) After correctly installing the gasket to the case mat-
ing surface, carefully install the oil pump housing
assembly. Be careful to avoid hitting the drive pinion
against the inside of the case.
CAUTION:
�Be careful not to damage the seal ring.
�Be sure to use a new gasket.
G3M0423
(3) Install both parts with dowel pins aligned. Make
sure no clearance exists at the mating surface.
NOTE:
Any clearance suggests a damaged seal ring.
73
3-2SERVICE PROCEDURE
4. Overall Transmission
Page 904 of 2890

G3M0431
(2) Measure the distance“�”from the transmission
case mating surface to the reduction drive gear end
surface with ST1 and ST2. (On FWD models, measure
distance from end of case to end of bearing.)
Unit: mm
�= Measured value50
ST1 398643600 GAUGE
ST2 499577000 GAUGE
(3) Calculation equation:
Unit: mm
T = (L + 0.4)�
T : Clearance between end of reduction drive gear
and end of rear drive shaft. (Clearance between
end of reduction drive gear and end of bearing on
FWD model)
L : Distance from end of extension case to end of
rear drive shaft. (Distance from end of case to
point at bearing location)
0.4: Gasket thickness
�: Height from end of transmission case to end of
reduction drive gear. (Height from end of case to
end of bearing on FWD models)
Select suitable thrust needle bearing from among those
listed in the following table to adjust clearance in the
0.05—0.20 mm (0.0020—0.0079 in) range.
�AWD: Thrust needle bearingPart No. Thickness mm (in)
806536020
806535030
806535040
806535050
806535060
806535070
8065350903.8 (0.150)
4.0 (0.157)
4.2 (0.165)
4.4 (0.173)
4.6 (0.181)
4.8 (0.189)
5.0 (0.197)
�FWD: Reduction gear shimPart No. Thickness mm (in)
31288AA000 0.15 (0.0059)
Select from one to five shims so that clearance is within
specifications.
78
3-2SERVICE PROCEDURE
4. Overall Transmission
Page 918 of 2890

G3M0450
2) Selection of oil pump components (rotor, vanes, control
piston and cam ring)
(1) Using a micrometer, measure the height of the
rotor, vanes, control piston and cam ring in at least four
positions. (Measure the height at one place for each of
the nine vanes.)
NOTE:
�Remove the control piston seals when measuring.
�Remove the friction ring from the cam ring when mea-
suring.
G3M0451
(2) Using a depth gauge, measure the depth of the oil
pump housing from the contact/sliding surface of the
above mentioned component parts in the same manner
as above.
G3M0452
(3) Make sure that the clearances are within the speci-
fied wear limits. If the wear limit is exceeded, select
pump components so that the standard clearance can
be obtained.
Unit: mm (in)
Part name Wear limit Standard value
Rotor, control piston,
vanes0.054
(0.0021)0.030—0.044
(0.0012—0.0017)
Cam ring0.034
(0.0013)0.010—0.024
(0.0004—0.0009)
NOTE:
Select vanes which are the same height as the rotor.
G3M0453
C: ASSEMBLY
1) Coat both the O-ring and friction ring with vaseline and
attach to the cam ring. Then fit them into the oil pump
housing.
91
3-2SERVICE PROCEDURE
7. Oil Pump Assembly
Page 964 of 2890

Pinion height adjusting shim thicknessPart No. Thickness
383495200 3.09 mm (0.1217 in)
383505200 3.12 mm (0.1228 in)
383515200 3.15 mm (0.1240 in)
383525200 3.18 mm (0.1252 in)
383535200 3.21 mm (0.1264 in)
383545200 3.24 mm (0.1276 in)
383555200 3.27 mm (0.1287 in)
383565200 3.30 mm (0.1299 in)
383575200 3.33 mm (0.1311 in)
383585200 3.36 mm (0.1323 in)
383595200 3.39 mm (0.1335 in)
383605200 3.42 mm (0.1346 in)
383615200 3.45 mm (0.1358 in)
383625200 3.48 mm (0.1370 in)
383635200 3.51 mm (0.1382 in)
383645200 3.54 mm (0.1394 in)
383655200 3.57 mm (0.1406 in)
383665200 3.60 mm (0.1417 in)
383675200 3.63 mm (0.1429 in)
383685200 3.66 mm (0.1441 in)
Side bearing standard width—20.00 mm (0.7874 in)
Side bearing retainer shim thicknessPart No. Thickness
383475201 0.20 mm (0.0079 in)
383475202 0.25 mm (0.0098 in)
383475203 0.30 mm (0.0118 in)
383475204 0.40 mm (0.0157 in)
383475205 0.50 mm (0.0197 in)
Crown gear to drive pinion backlash
Limit0.10—0.20 mm (0.0039—0.0079 in)
Crown gear runout on its back surface 0.05 mm (0.0020 in)
Oil capacity0.8�(0.8 US qt, 0.7 Imp qt)
5
3-4SPECIFICATIONS AND SERVICE DATA
1. AWD System
Page 967 of 2890
3. Rear Differential Assembly
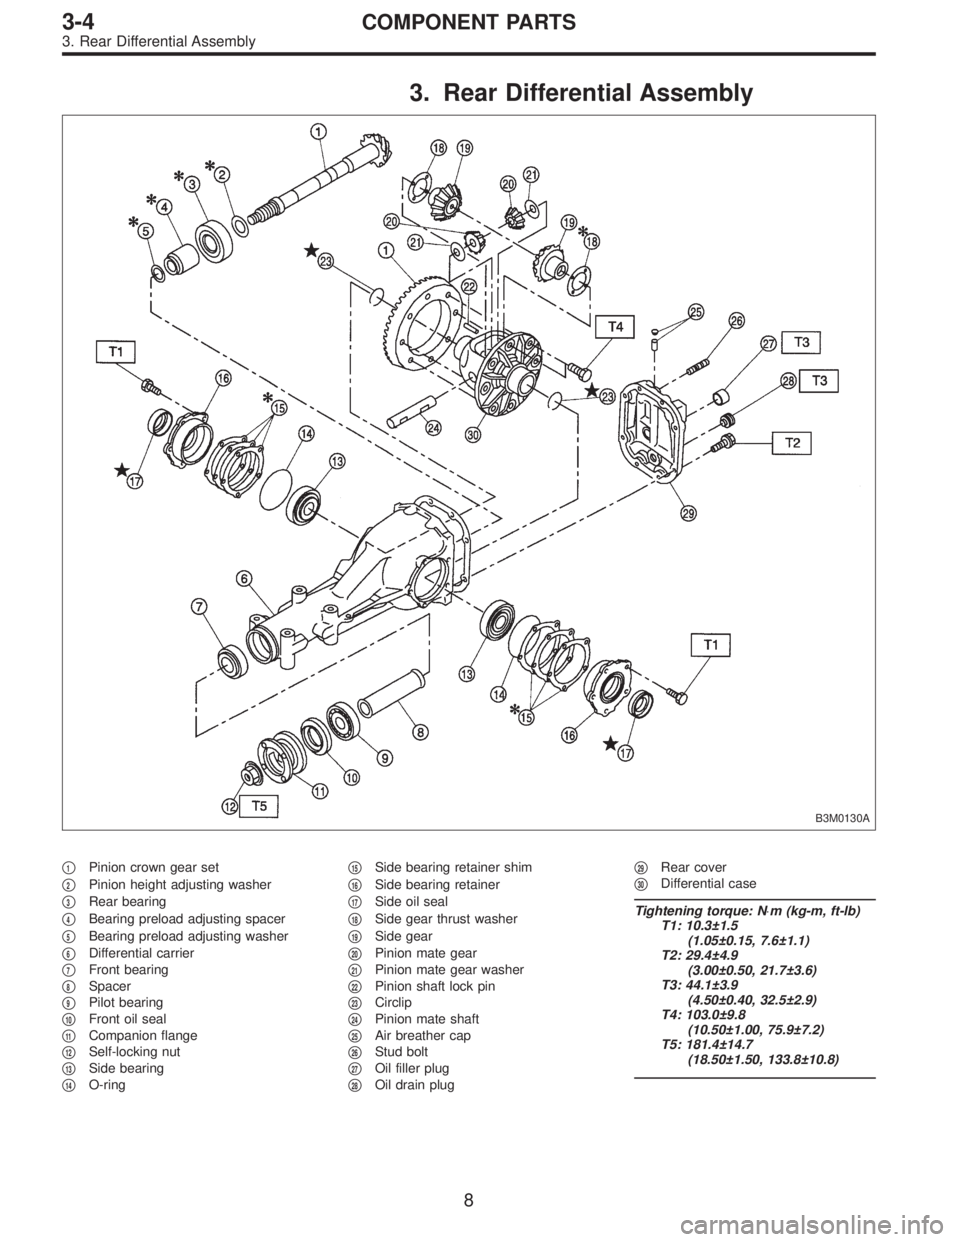
B3M0130A
�1Pinion crown gear set
�
2Pinion height adjusting washer
�
3Rear bearing
�
4Bearing preload adjusting spacer
�
5Bearing preload adjusting washer
�
6Differential carrier
�
7Front bearing
�
8Spacer
�
9Pilot bearing
�
10Front oil seal
�
11Companion flange
�
12Self-locking nut
�
13Side bearing
�
14O-ring�
15Side bearing retainer shim
�
16Side bearing retainer
�
17Side oil seal
�
18Side gear thrust washer
�
19Side gear
�
20Pinion mate gear
�
21Pinion mate gear washer
�
22Pinion shaft lock pin
�
23Circlip
�
24Pinion mate shaft
�
25Air breather cap
�
26Stud bolt
�
27Oil filler plug
�
28Oil drain plug�
29Rear cover
�
30Differential case
Tightening torque: N⋅m (kg-m, ft-lb)
T1: 10.3±1.5
(1.05±0.15, 7.6±1.1)
T2: 29.4±4.9
(3.00±0.50, 21.7±3.6)
T3: 44.1±3.9
(4.50±0.40, 32.5±2.9)
T4: 103.0±9.8
(10.50±1.00, 75.9±7.2)
T5: 181.4±14.7
(18.50±1.50, 133.8±10.8)
8
3-4COMPONENT PARTS
3. Rear Differential Assembly
Page 986 of 2890
E: ASSEMBLY
1) Precautions for assembling
(1) Assemble in the reverse order of disassembling.
(2) Check and adjust each part during assembly.
(3) Keep the shims and washers in order, so that they
are not misinstalled.
(4) Thoroughly clean the surfaces on which the shims,
washers and bearings are to be installed.
(5) Apply gear oil when installing the bearings and
thrust washers.
(6) Be careful not to mix up the right and left hand cups
of the bearings.
G3M0079
(7) Replace the oil seal with new one at every disas-
sembly. Apply chassis grease between the lips when
installing the oil seal.
G3M1037
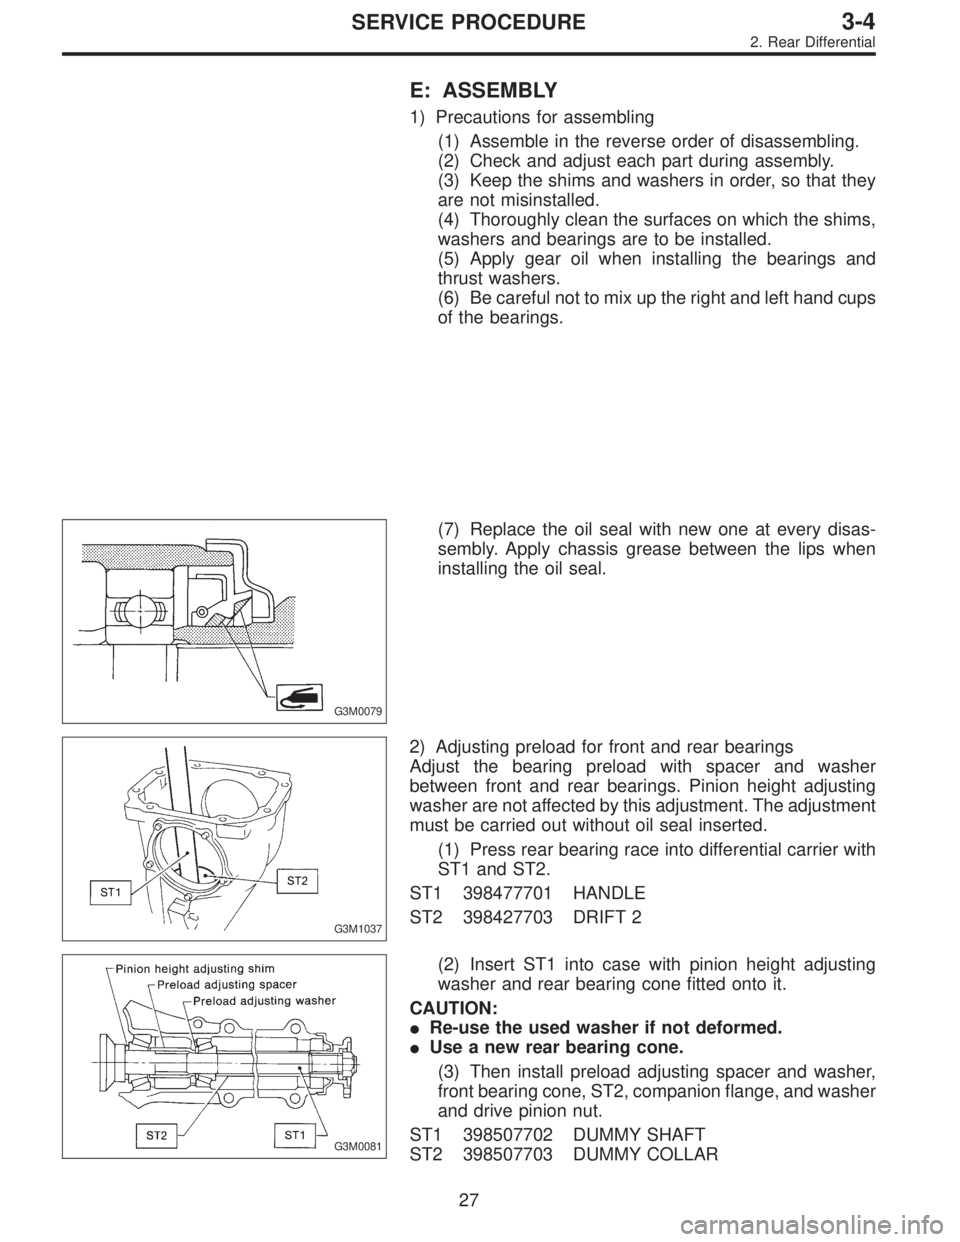
2) Adjusting preload for front and rear bearings
Adjust the bearing preload with spacer and washer
between front and rear bearings. Pinion height adjusting
washer are not affected by this adjustment. The adjustment
must be carried out without oil seal inserted.
(1) Press rear bearing race into differential carrier with
ST1 and ST2.
ST1 398477701 HANDLE
ST2 398427703 DRIFT 2
G3M0081
(2) Insert ST1 into case with pinion height adjusting
washer and rear bearing cone fitted onto it.
CAUTION:
�Re-use the used washer if not deformed.
�Use a new rear bearing cone.
(3) Then install preload adjusting spacer and washer,
front bearing cone, ST2, companion flange, and washer
and drive pinion nut.
ST1 398507702 DUMMY SHAFT
ST2 398507703 DUMMY COLLAR
27
3-4SERVICE PROCEDURE
2. Rear Differential