Page 1275 of 2890
G4M0444
7) Remove tone wheel while removing hub from housing
and hub assembly.
CAUTION:
Be careful not to damage teeth faces of tone wheel
during removal.
2. REAR ABS SENSOR
1) Remove rear seat and disconnect rear ABS sensor con-
nector.
2) Remove rear sensor harness bracket from rear trailing
link and bracket.
G4M0445
3) Remove rear ABS sensor from rear back plate.
4) Remove rear tone wheel while removing hub from
housing and hub assembly.
CAUTION:
�Be careful not to damage pole piece located at tip of
the sensor and teeth faces during removal.
�Do not pull sensor harness during removal.
B: INSPECTION
1. ABS SENSOR
1) Check pole piece of ABS sensor for foreign particles or
damage. If necessary, clean pole piece or replace ABS
sensor.
68
4-4SERVICE PROCEDURE
14. ABS Sensor
Page 1276 of 2890
B4M0248
2) Measure ABS sensor resistance.
ABS sensor Terminal No. Standard
Front - LH 1 and 2
1.0±0.2 kΩ Front - RH 1 and 2
Rear - LH 1 and 2
Rear - RH 1 and 2
CAUTION:
If resistance is outside the standard value, replace
ABS sensor with new one.
NOTE:
Check ABS sensor cable for discontinuity. If necessary,
replace with a new one.
G4M0448
2. TONE WHEEL
1) Check tone wheel’s teeth (44 pieces) for cracks or
dents. If necessary, replace tone wheel with a new one.
2) Clearances (sensor gaps) should be measured one by
one to ensure tone wheel and speed sensor are installed
correctly.
ABS sensor clearance:
Front
0.9—1.4 mm (0.035—0.055 in)
Rear
0.7—1.2 mm (0.028—0.047 in)
NOTE:
�If clearance is narrow, adjust by using spacer (Part No.
26755AA000).
�If clearance is wide, check the outputted voltage then
replace ABS sensor or tone wheel if the outputted voltage
is outside the specification.
69
4-4SERVICE PROCEDURE
14. ABS Sensor
Page 1277 of 2890
B4M0118B
3. OUTPUT VOLTAGE
Output voltage can be checked by the following method.
Install resistor and condenser, then rotate wheel about 2.75
km/h (2 MPH) or equivalent.
NOTE:
Regarding terminal No., please refer to item 1. ABS SEN-
SOR.
C: INSTALLATION
1. FRONT ABS SENSOR
1) Install tone wheel on hub, then install housing on hub
assembly.
G4M0443
2) Temporarily install front ABS sensor on housing.
CAUTION:
Be careful not to strike ABS sensor’s pole piece and
tone wheel’s teeth against adjacent metal parts during
installation.
3) Install front drive shaft to hub spline.
[W1E0].>
70
4-4SERVICE PROCEDURE
14. ABS Sensor
Page 1278 of 2890
G4M0451
4) Install front ABS sensor on strut and wheel apron
bracket.
Tightening torque:
32±10 N⋅m (3.3±1.0 kg-m, 24±7 ft-lb)
5) Place a thickness gauge between ABS sensor’s pole
piece and tone wheel’s tooth face. After standard clearance
is obtained over the entire perimeter, tighten ABS sensor
on housing to specified torque.
ABS sensor standard clearance:
0.9—1.4 mm (0.035—0.055 in)
Tightening torque:
32±10 N⋅m (3.3±1.0 kg-m, 24±7 ft-lb)
CAUTION:
Check the marks on the harness to make sure that no
distortion exists. (RH: white, LH: yellow)
NOTE:
If the clearance is outside specifications, readjust.
2. REAR ABS SENSOR
1) Install rear tone wheel on hub, then rear housing on
hub.
G4M0445
2) Temporarily install rear ABS sensor on back plate.
CAUTION:
Be careful not to strike ABS sensor’s pole piece and
tone wheel’s teeth against adjacent metal parts during
installation.
71
4-4SERVICE PROCEDURE
14. ABS Sensor
Page 1279 of 2890
3) Install rear drive shaft to rear housing and rear differen-
tial spindle.
G4M0453
4) Install rear sensor harness on rear trailing link.
Tightening torque:
32±10 N⋅m (3.3±1.0 kg-m, 24±7 ft-lb)
5) Place a thickness gauge between ABS sensor’s pole
piece and tone wheel’s tooth face. After standard clearance
is obtained over the entire perimeter, tighten ABS sensor
on back plate to specified torque.
ABS sensor standard clearance:
0.7—1.2 mm (0.028—0.047 in)
Tightening torque:
32±10 N⋅m (3.3±1.0 kg-m, 24±7 ft-lb)
CAUTION:
Check the marks on the harness to make sure that no
distortion exists. (RH: white, LH: yellow)
NOTE:
If the clearance is outside specifications, readjust.
72
4-4SERVICE PROCEDURE
14. ABS Sensor
Page 1283 of 2890

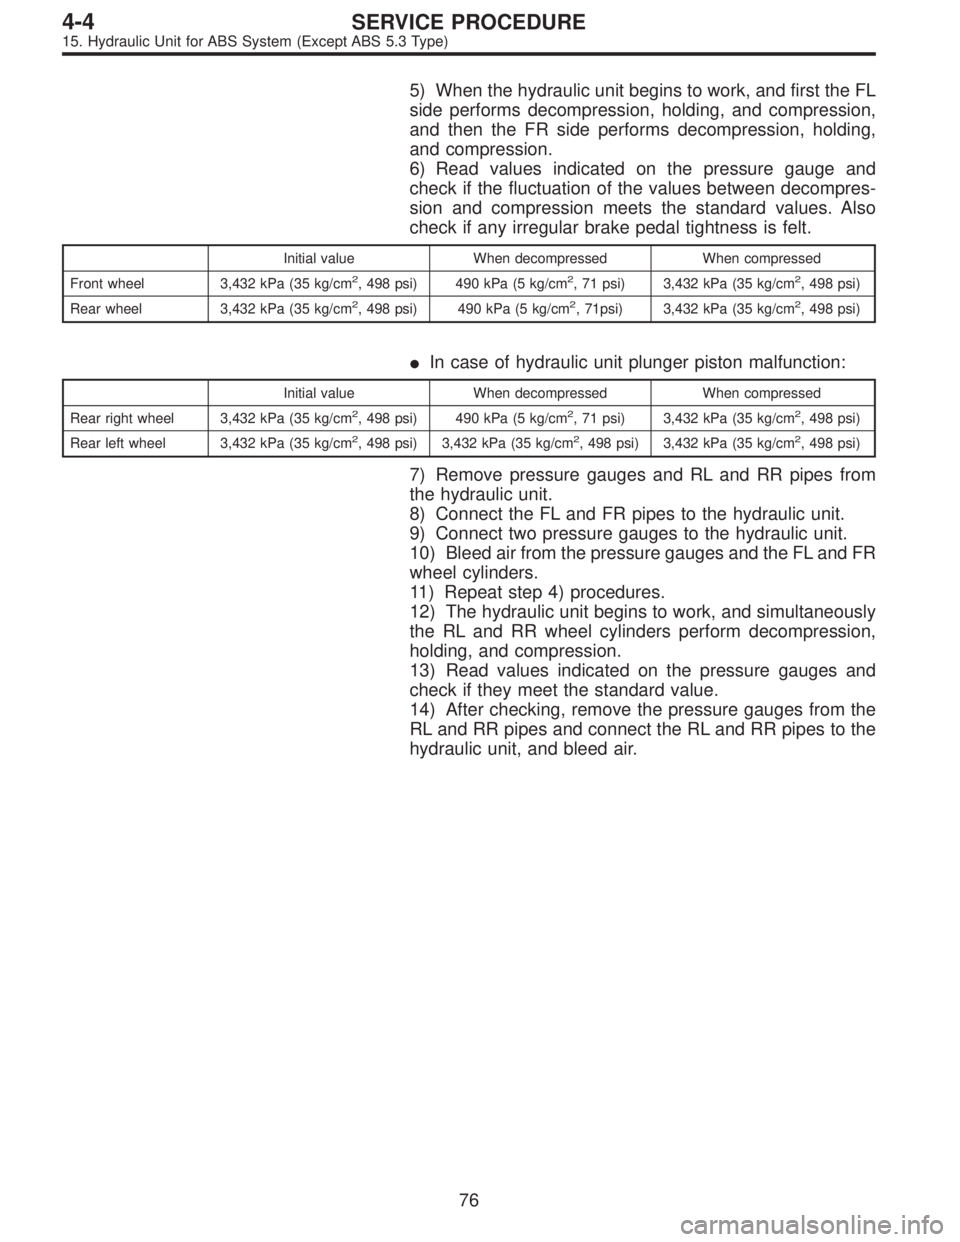
5) When the hydraulic unit begins to work, and first the FL
side performs decompression, holding, and compression,
and then the FR side performs decompression, holding,
and compression.
6) Read values indicated on the pressure gauge and
check if the fluctuation of the values between decompres-
sion and compression meets the standard values. Also
check if any irregular brake pedal tightness is felt.
Initial value When decompressed When compressed
Front wheel 3,432 kPa (35 kg/cm
2, 498 psi) 490 kPa (5 kg/cm2, 71 psi) 3,432 kPa (35 kg/cm2, 498 psi)
Rear wheel 3,432 kPa (35 kg/cm
2, 498 psi) 490 kPa (5 kg/cm2, 71psi) 3,432 kPa (35 kg/cm2, 498 psi)
�In case of hydraulic unit plunger piston malfunction:
Initial value When decompressed When compressed
Rear right wheel 3,432 kPa (35 kg/cm
2, 498 psi) 490 kPa (5 kg/cm2, 71 psi) 3,432 kPa (35 kg/cm2, 498 psi)
Rear left wheel 3,432 kPa (35 kg/cm
2, 498 psi) 3,432 kPa (35 kg/cm2, 498 psi) 3,432 kPa (35 kg/cm2, 498 psi)
7) Remove pressure gauges and RL and RR pipes from
the hydraulic unit.
8) Connect the FL and FR pipes to the hydraulic unit.
9) Connect two pressure gauges to the hydraulic unit.
10) Bleed air from the pressure gauges and the FL and FR
wheel cylinders.
11) Repeat step 4) procedures.
12) The hydraulic unit begins to work, and simultaneously
the RL and RR wheel cylinders perform decompression,
holding, and compression.
13) Read values indicated on the pressure gauges and
check if they meet the standard value.
14) After checking, remove the pressure gauges from the
RL and RR pipes and connect the RL and RR pipes to the
hydraulic unit, and bleed air.
76
4-4SERVICE PROCEDURE
15. Hydraulic Unit for ABS System (Except ABS 5.3 Type)
Page 1284 of 2890

G4M0462
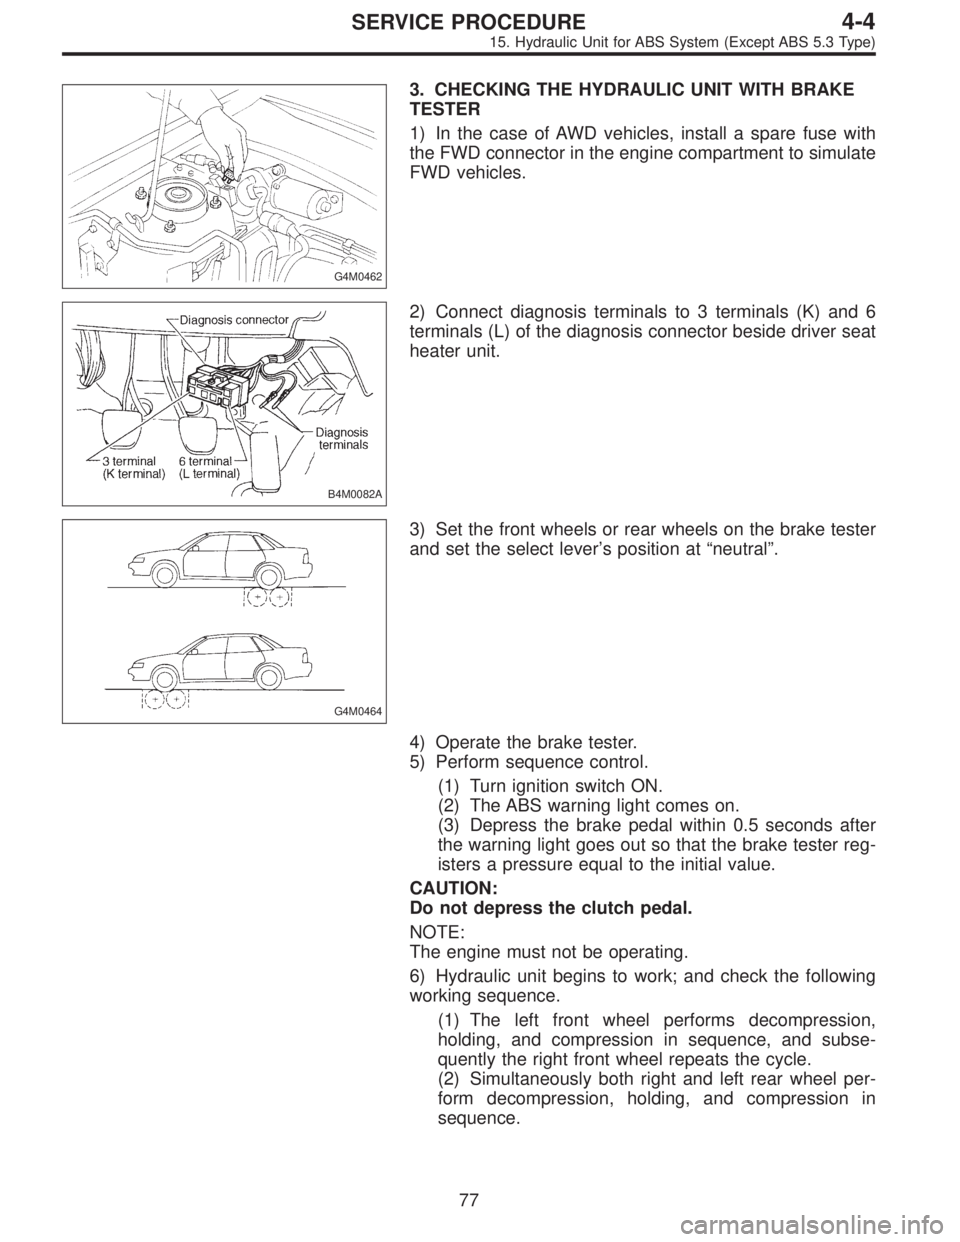
3. CHECKING THE HYDRAULIC UNIT WITH BRAKE
TESTER
1) In the case of AWD vehicles, install a spare fuse with
the FWD connector in the engine compartment to simulate
FWD vehicles.
B4M0082A
2) Connect diagnosis terminals to 3 terminals (K) and 6
terminals (L) of the diagnosis connector beside driver seat
heater unit.
G4M0464
3) Set the front wheels or rear wheels on the brake tester
and set the select lever’s position at“neutral”.
4) Operate the brake tester.
5) Perform sequence control.
(1) Turn ignition switch ON.
(2) The ABS warning light comes on.
(3) Depress the brake pedal within 0.5 seconds after
the warning light goes out so that the brake tester reg-
isters a pressure equal to the initial value.
CAUTION:
Do not depress the clutch pedal.
NOTE:
The engine must not be operating.
6) Hydraulic unit begins to work; and check the following
working sequence.
(1) The left front wheel performs decompression,
holding, and compression in sequence, and subse-
quently the right front wheel repeats the cycle.
(2) Simultaneously both right and left rear wheel per-
form decompression, holding, and compression in
sequence.
77
4-4SERVICE PROCEDURE
15. Hydraulic Unit for ABS System (Except ABS 5.3 Type)
Page 1285 of 2890

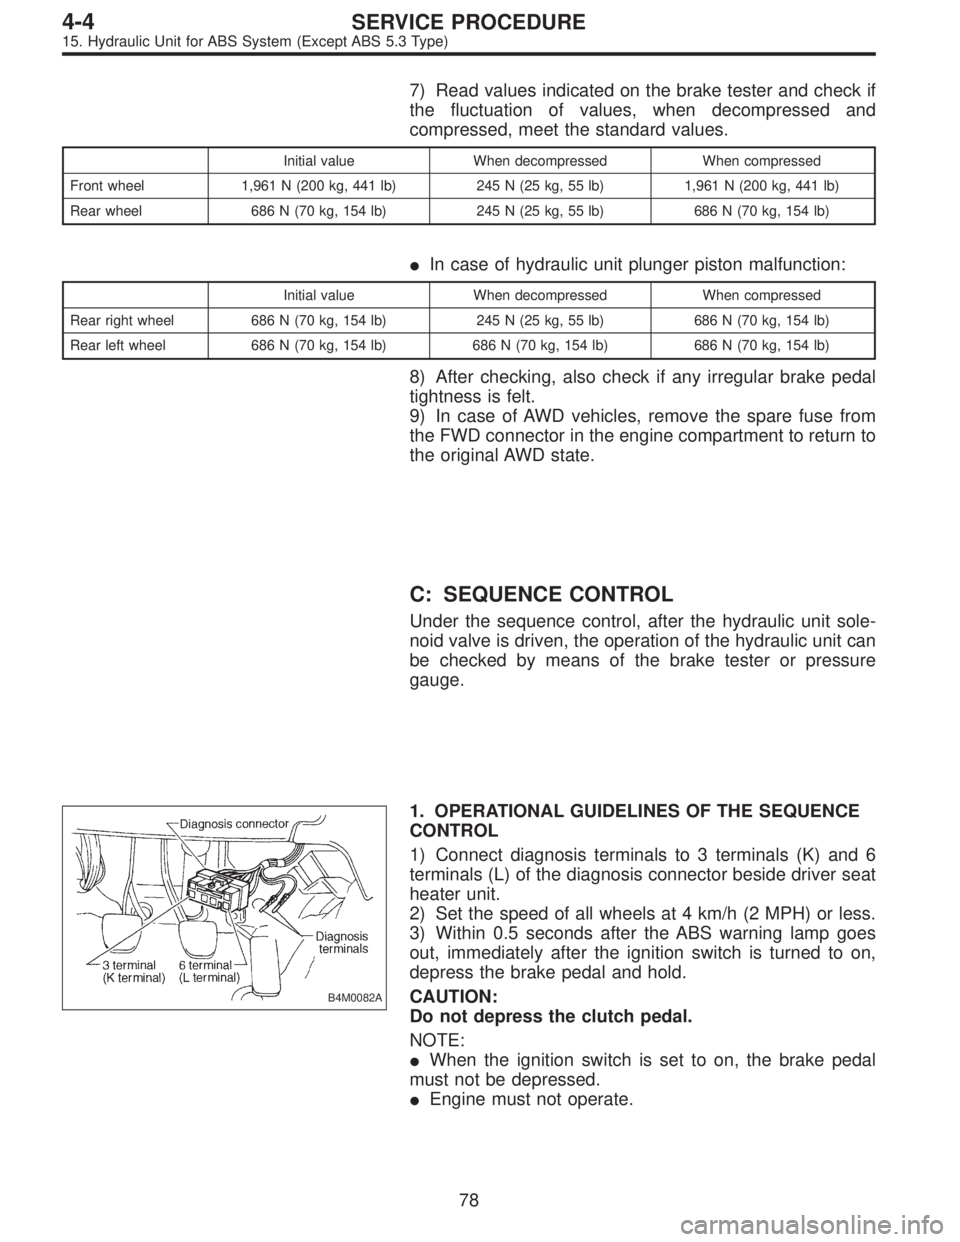
7) Read values indicated on the brake tester and check if
the fluctuation of values, when decompressed and
compressed, meet the standard values.
Initial value When decompressed When compressed
Front wheel 1,961 N (200 kg, 441 lb) 245 N (25 kg, 55 lb) 1,961 N (200 kg, 441 lb)
Rear wheel 686 N (70 kg, 154 lb) 245 N (25 kg, 55 lb) 686 N (70 kg, 154 lb)
�In case of hydraulic unit plunger piston malfunction:
Initial value When decompressed When compressed
Rear right wheel 686 N (70 kg, 154 lb) 245 N (25 kg, 55 lb) 686 N (70 kg, 154 lb)
Rear left wheel 686 N (70 kg, 154 lb) 686 N (70 kg, 154 lb) 686 N (70 kg, 154 lb)
8) After checking, also check if any irregular brake pedal
tightness is felt.
9) In case of AWD vehicles, remove the spare fuse from
the FWD connector in the engine compartment to return to
the original AWD state.
C: SEQUENCE CONTROL
Under the sequence control, after the hydraulic unit sole-
noid valve is driven, the operation of the hydraulic unit can
be checked by means of the brake tester or pressure
gauge.
B4M0082A
1. OPERATIONAL GUIDELINES OF THE SEQUENCE
CONTROL
1) Connect diagnosis terminals to 3 terminals (K) and 6
terminals (L) of the diagnosis connector beside driver seat
heater unit.
2) Set the speed of all wheels at 4 km/h (2 MPH) or less.
3) Within 0.5 seconds after the ABS warning lamp goes
out, immediately after the ignition switch is turned to on,
depress the brake pedal and hold.
CAUTION:
Do not depress the clutch pedal.
NOTE:
�When the ignition switch is set to on, the brake pedal
must not be depressed.
�Engine must not operate.
78
4-4SERVICE PROCEDURE
15. Hydraulic Unit for ABS System (Except ABS 5.3 Type)