Page 1485 of 1954

Heater Uni t
Replacemen t (cont'd )
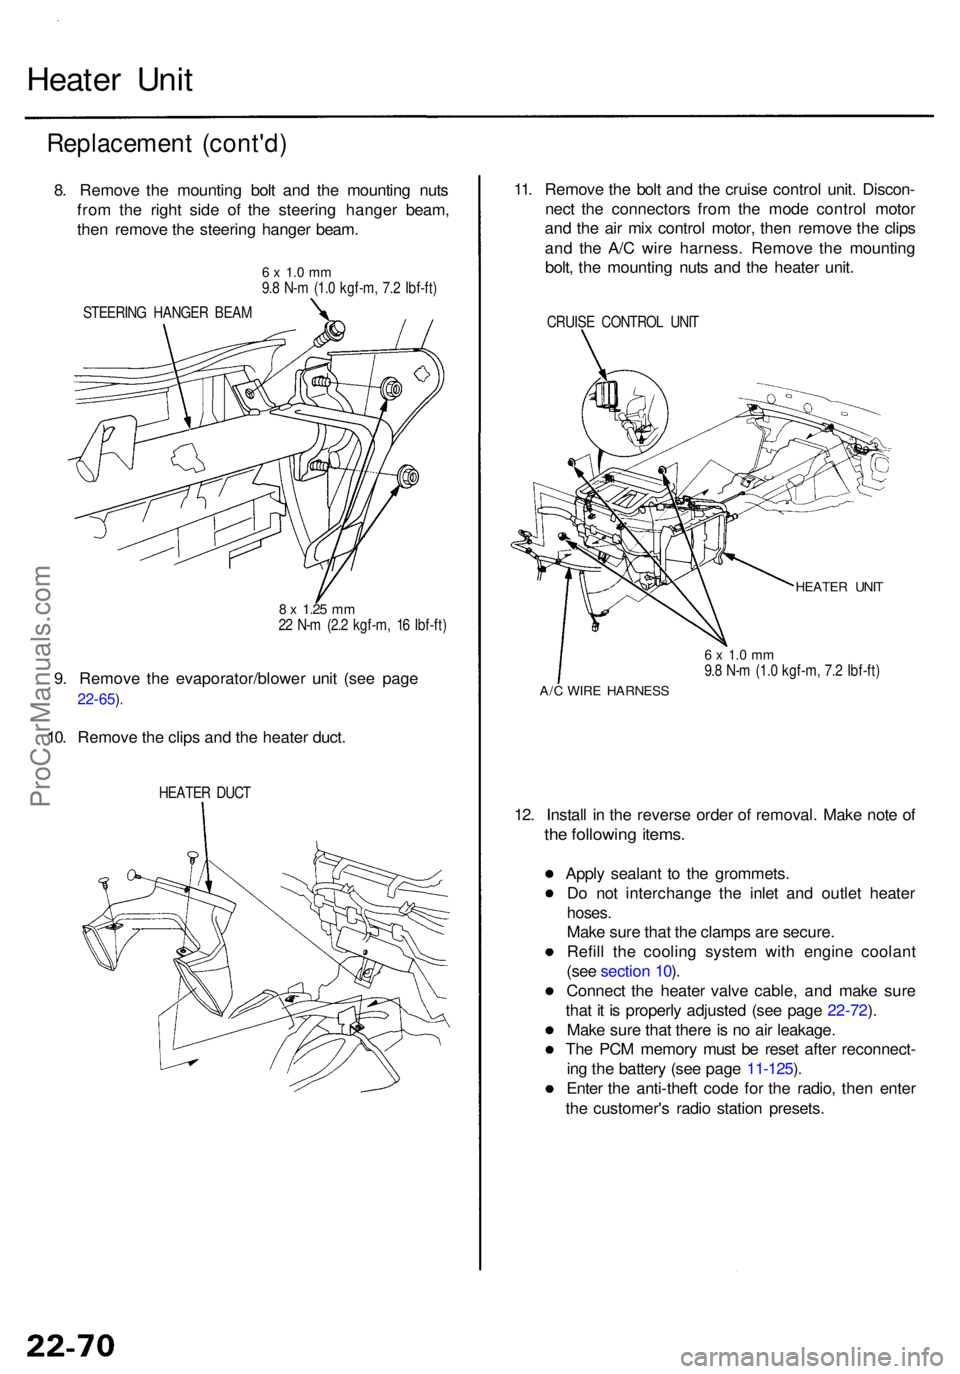
8. Remov e th e mountin g bol t an d th e mountin g nut s
fro m th e righ t sid e o f th e steerin g hange r beam ,
the n remov e th e steerin g hange r beam .
6 x 1. 0 m m9.8 N- m (1. 0 kgf-m , 7. 2 Ibf-ft )
STEERIN G HANGE R BEA M
8 x 1.2 5 mm22 N- m (2. 2 kgf-m , 1 6 Ibf-ft )
9. Remov e th e evaporator/blowe r uni t (se e pag e
22-65 ).
10. Remov e th e clip s an d th e heate r duct .
HEATE R DUC T
11. Remov e th e bol t an d th e cruis e contro l unit . Discon -
nec t th e connector s fro m th e mod e contro l moto r
an d th e ai r mi x contro l motor , the n remov e th e clip s
an d th e A/ C wir e harness . Remov e th e mountin g
bolt , th e mountin g nut s an d th e heate r unit .
CRUIS E CONTRO L UNI T
HEATE R UNI T
6 x 1. 0 m m9.8 N- m (1. 0 kgf-m , 7. 2 Ibf-ft )
A/C WIR E HARNES S
12. Instal l i n th e revers e orde r o f removal . Mak e not e o f
the followin g items .
Apply sealan t t o th e grommets .
D o no t interchang e th e inle t an d outle t heate r
hoses.
Make sur e tha t th e clamp s ar e secure .
Refil l th e coolin g syste m wit h engin e coolan t
(se e sectio n 10 ).
Connec t th e heate r valv e cable , an d mak e sur e
tha t i t i s properl y adjuste d (se e pag e 22-72 ).
Mak e sur e tha t ther e is n o ai r leakage .
Th e PC M memor y mus t b e rese t afte r reconnect -
in g th e batter y (se e pag e 11-125 ).
Ente r th e anti-thef t cod e fo r th e radio , the n ente r
th e customer' s radi o statio n presets .
ProCarManuals.com
Page 1486 of 1954
Overhaul
1. Remove the self-tapping screws and the vent/defroster
duct.
2. Remove the self-tapping screws and the pipe clamps.
3. Remove the self-tapping screws and the core clamp.
4. Pull out the heater core
NOTE: Be careful not to bend the inlet and outlet
pipes during heater core removal.
5. Assemble in the reverse order of disassembly.
VENT/DEFROSTER DUCT
CORE CLAMP
HEATER CORE
PIPE CLAMPSProCarManuals.com
Page 1487 of 1954

Temperature Contro l
Adjustmen t
Heater valv e side :
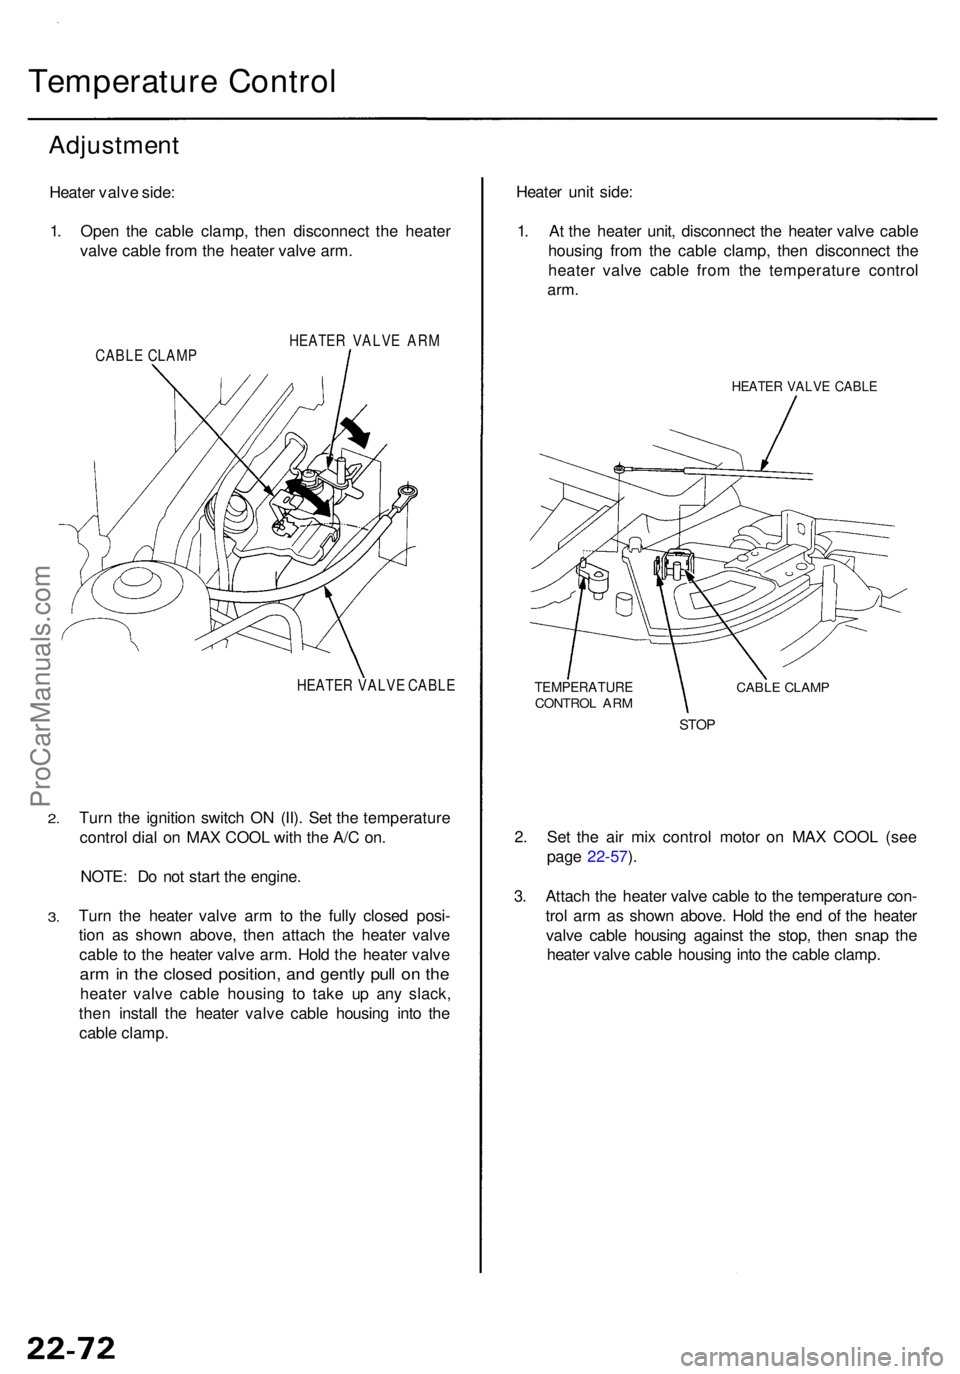
1 . Ope n th e cabl e clamp , the n disconnec t th e heate r
valv e cabl e fro m th e heate r valv e arm .
CABL E CLAM P HEATE
R VALV E AR M
HEATE R VALV E CABL E
2.
3.
Tur n th e ignitio n switc h O N (II) . Se t th e temperatur e
contro l dia l o n MA X COO L wit h th e A/ C on .
NOTE : D o no t star t th e engine .
Tur n th e heate r valv e ar m to th e full y close d posi -
tio n a s show n above , the n attac h th e heate r valv e
cabl e t o th e heate r valv e arm . Hol d th e heate r valv e
arm in th e close d position , an d gentl y pul l o n th e
heate r valv e cabl e housin g t o tak e u p an y slack ,
the n instal l th e heate r valv e cabl e housin g int o th e
cabl e clamp . Heate
r uni t side :
1 . A t th e heate r unit , disconnec t th e heate r valv e cabl e
housin g fro m th e cabl e clamp , the n disconnec t th e
heate r valv e cabl e fro m th e temperatur e contro l
arm.
HEATE R VALV E CABL E
TEMPERATUR ECONTROL AR MCABL E CLAM P
STOP
2. Se t th e ai r mi x contro l moto r o n MA X COO L (se e
pag e 22-57 ).
3 . Attac h th e heate r valv e cabl e to th e temperatur e con -
tro l ar m a s show n above . Hol d th e en d o f th e heate r
valv e cabl e housin g agains t th e stop , the n sna p th e
heate r valv e cabl e housin g int o th e cabl e clamp .
ProCarManuals.com
Page 1586 of 1954

Description
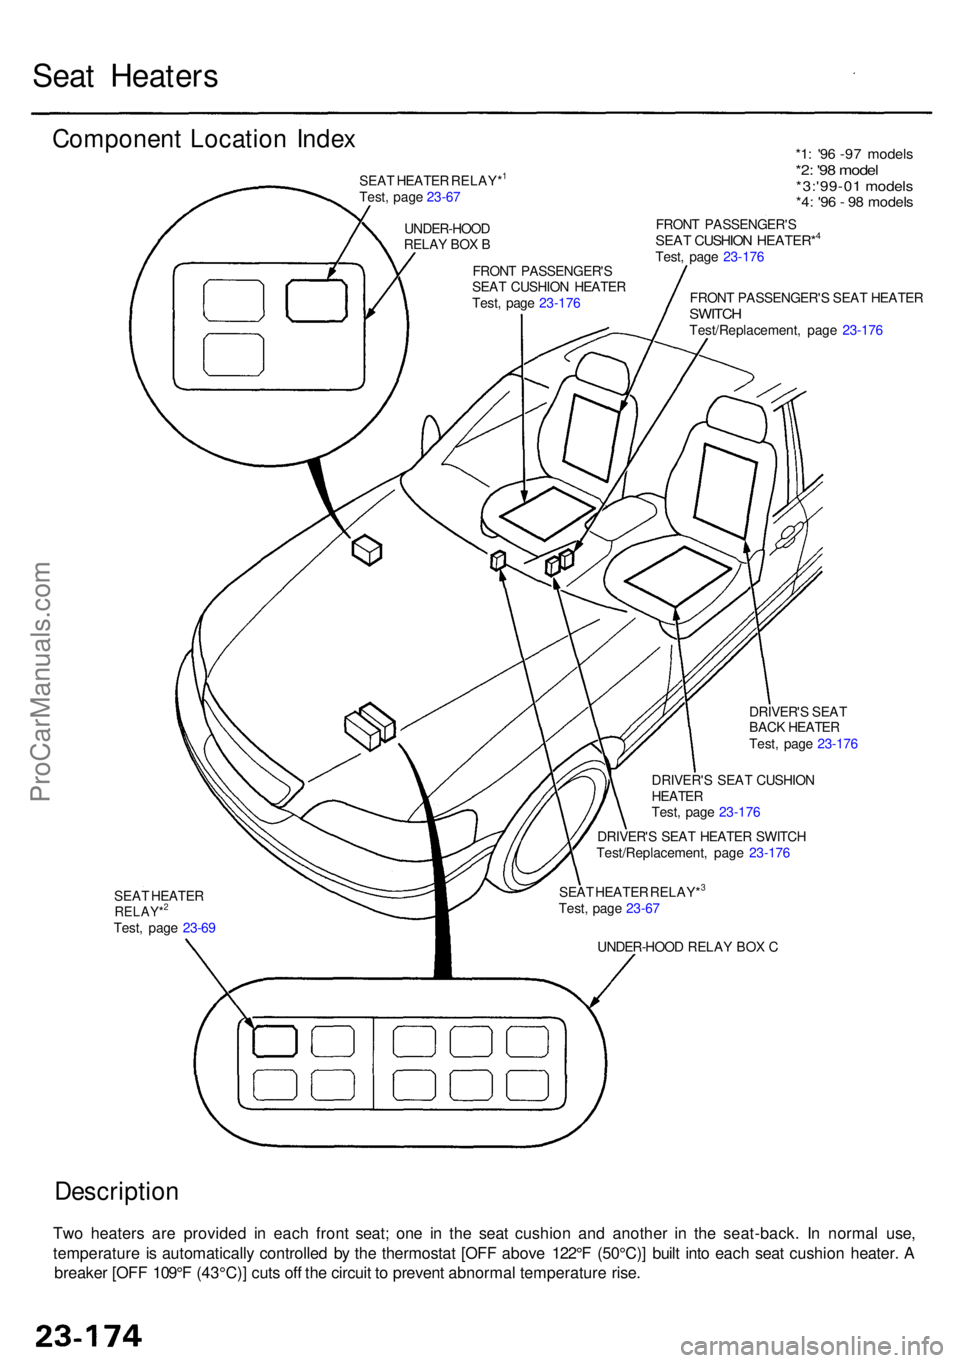
Two heater s ar e provide d i n eac h fron t seat ; on e i n th e sea t cushio n an d anothe r i n th e seat-back . I n norma l use ,
temperatur e i s automaticall y controlle d b y th e thermosta t [OF F abov e 122° F (50°C) ] buil t int o eac h sea t cushio n heater . A
breake r [OF F 109° F (43°C) ] cut s of f th e circui t t o preven t abnorma l temperatur e rise .
SEA T HEATE RRELAY*2
Test, pag e 23-6 9
UNDER-HOOD RELA Y BO X C
SEA
T HEATE R RELAY*
3
Test , pag e 23-67
DRIVER'
S SEA T HEATE R SWITC H
Test/Replacement , pag e 23-17 6
DRIVER'
S SEA T CUSHIO N
HEATERTest, pag e 23-17 6
DRIVER'
S SEA T
BAC K HEATE R
Test , pag e 23-17 6
FRON
T PASSENGER' S SEA T HEATE R
SWITCHTest/Replacement , pag e 23-17 6
FRON
T PASSENGER' S
SEAT CUSHIO N HEATER*4
Test , pag e 23-17 6
FRON T PASSENGER' S
SEA T CUSHIO N HEATE R
Test , pag e 23-17 6
UNDER-HOO
D
RELA Y BO X B
SEA
T HEATE R RELAY*
1
Test , pag e 23-67
*1 : '9 6 -9 7 model s*2: '9 8 mode l*3:'99-0 1 model s*4: '9 6 - 9 8 model s
Componen t Locatio n Inde x
Seat Heater s
ProCarManuals.com
Page 1587 of 1954
Seat Heater s
Switch Test/Replacement
1. Remov e th e A/T gea r positio n indicato r tri m (se e
sectio n 20 ).
2 . Disconnec t th e 6 P connecto r fro m th e switch , an d
remov e th e switc h fro m th e A/ T gea r positio n
indicator trim .
DRIVER' S SEA T
HEATE R SWITC H BULB
S (0.5 6 W x 3)
6 P CONNECTO R
FRON T PASSENGER' S
SEA T HEATE R SWITC H
3. Chec k fo r continuit y betwee n th e terminal s i n eac h
switc h positio n accordin g to th e table .
2. Chec k fo r continuit y betwee n th e No . 1 an d No . 4
terminals , an d No . 3 an d No . 4 terminals .
There shoul d b e continuity .
Heater Tes t
1. Carefull y remov e th e driver' s an d fron t passenger' s
sea t (se e sectio n 20 ).
Driver' s seat :
Fron t passenger' s seat :
Termina l sid e o f
mal e terminal s
Termina l sid e o f
mal e terminal s
ProCarManuals.com
Page:
< prev 1-8 9-16 17-24