Page 1654 of 1954
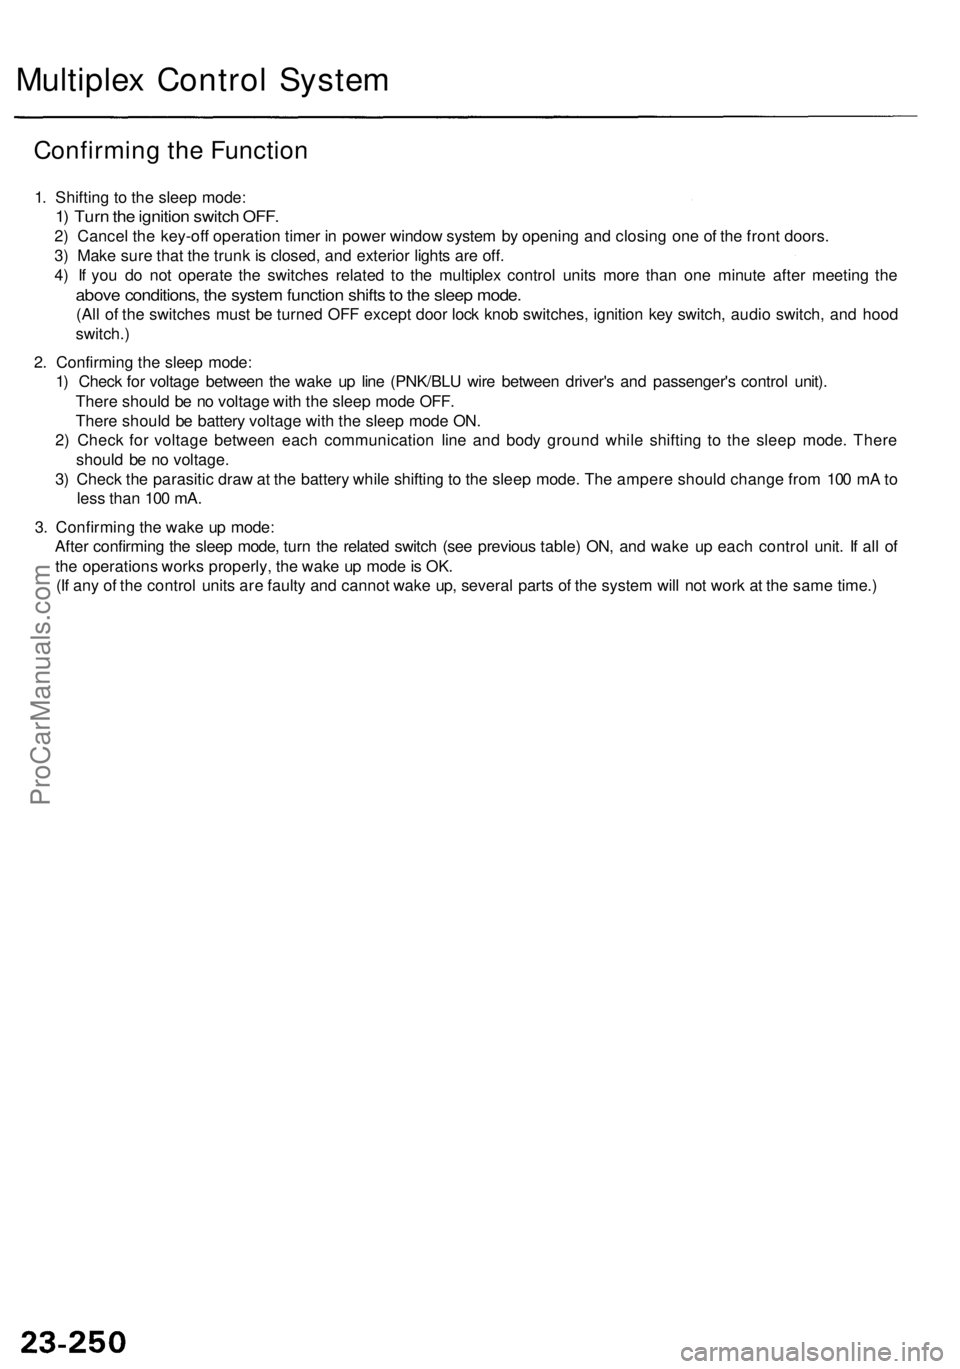
Confirming the Function
1. Shifting to the sleep mode:
1) Turn the ignition switch OFF.
2) Cancel the key-off operation timer in power window system by opening and closing one of the front doors.
3) Make sure that the trunk is closed, and exterior lights are off.
4) If you do not operate the switches related to the multiplex control units more than one minute after meeting the
above conditions, the system function shifts to the sleep mode.
(All of the switches must be turned OFF except door lock knob switches, ignition key switch, audio switch, and hood
switch.)
2. Confirming the sleep mode:
1) Check for voltage between the wake up line (PNK/BLU wire between driver's and passenger's control unit).
There should be no voltage with the sleep mode OFF.
There should be battery voltage with the sleep mode ON.
2) Check for voltage between each communication line and body ground while shifting to the sleep mode. There
should be no voltage.
3) Check the parasitic draw at the battery while shifting to the sleep mode. The ampere should change from 100 mA to
less than 100 mA.
3. Confirming the wake up mode:
After confirming the sleep mode, turn the related switch (see previous table) ON, and wake up each control unit. If all of
the operations works properly, the wake up mode is OK.
(If any of the control units are faulty and cannot wake up, several parts of the system will not work at the same time.)
Multiplex Control SystemProCarManuals.com
Page 1656 of 1954
Multiplex Contro l Syste m
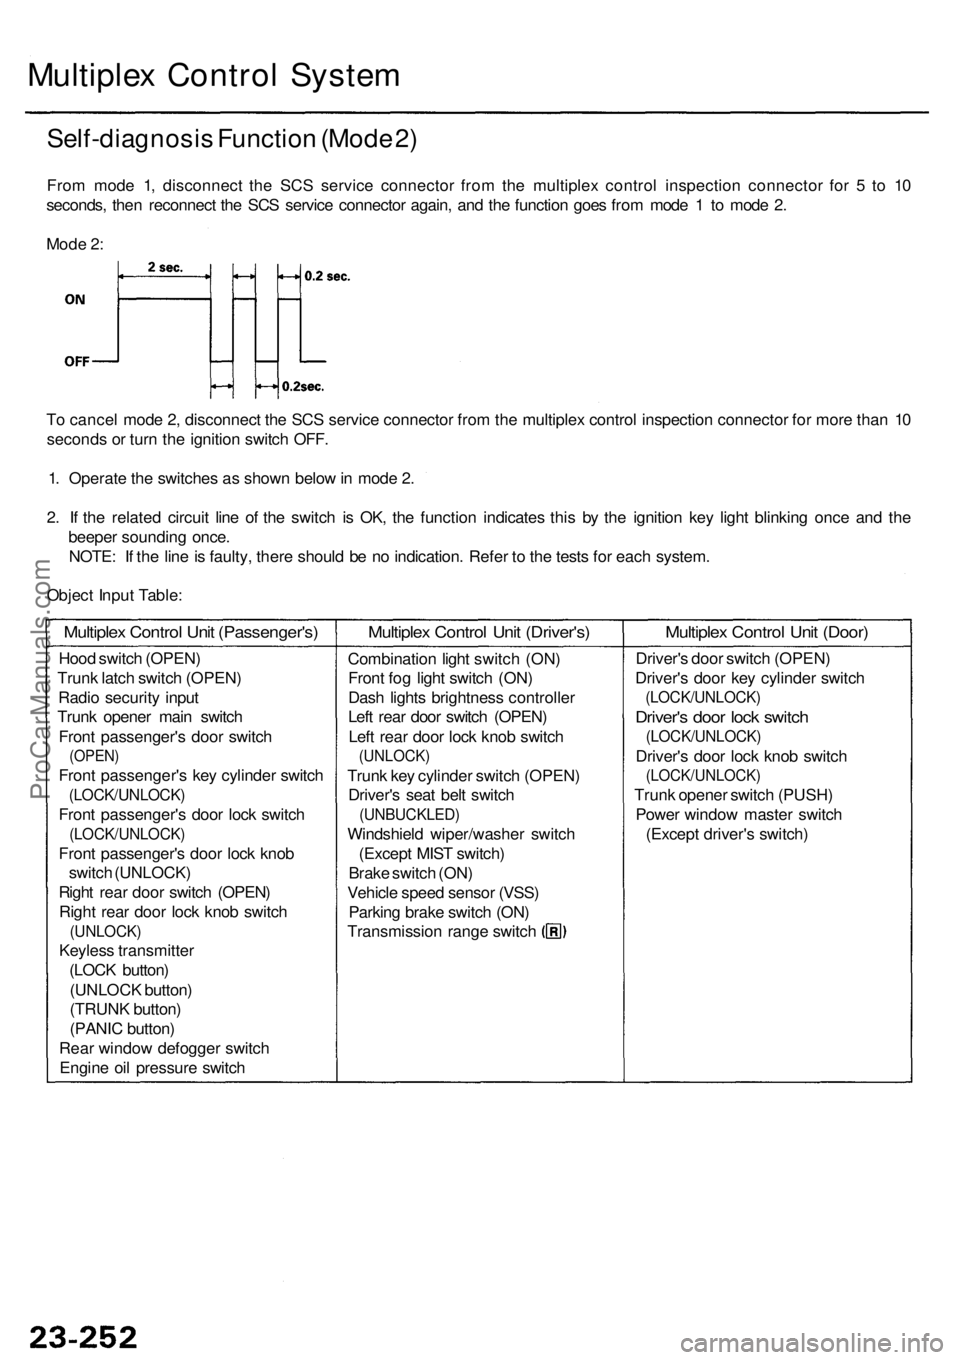
Self-diagnosi s Functio n (Mod e 2 )
Fro m mod e 1 , disconnec t th e SC S servic e connecto r fro m th e multiple x contro l inspectio n connecto r fo r 5 to 1 0
seconds , the n reconnec t th e SC S servic e connecto r again , an d th e functio n goe s fro m mod e 1 to mod e 2 .
T o cance l mod e 2 , disconnec t th e SC S servic e connecto r fro m th e multiple x contro l inspectio n connecto r fo r mor e tha n 1 0
second s o r tur n th e ignitio n switc h OFF .
1 . Operat e th e switche s a s show n belo w in mod e 2 .
2 . I f th e relate d circui t lin e o f th e switc h i s OK , th e functio n indicate s thi s b y th e ignitio n ke y ligh t blinkin g onc e an d th e
beepe r soundin g once .
NOTE : I f th e lin e is faulty , ther e shoul d b e n o indication . Refe r t o th e test s fo r eac h system .
Objec t Inpu t Table :
Mod
e 2 :
Hoo d switc h (OPEN )
Trun k latc h switc h (OPEN )
Radi o securit y inpu t
Trun k opene r mai n switc h
Fron t passenger' s doo r switc h
(OPEN )
Front passenger' s ke y cylinde r switc h
(LOCK/UNLOCK )
Front passenger' s doo r loc k switc h
(LOCK/UNLOCK )
Front passenger' s doo r loc k kno b
switc h (UNLOCK )
Righ t rea r doo r switc h (OPEN )
Righ t rea r doo r loc k kno b switc h
(UNLOCK )
Keyless transmitte r
(LOC K button )
(UNLOC K button )
(TRUN K button )
(PANI C button )
Rea r windo w defogge r switc h
Engin e oi l pressur e switc h
Multiple x Contro l Uni t (Passenger's )Multiplex Contro l Uni t (Driver's )
Combinatio n ligh t switc h (ON )
Fron t fo g ligh t switc h (ON )
Das h light s brightnes s controlle r
Lef t rea r doo r switc h (OPEN )
Lef t rea r doo r loc k kno b switc h
(UNLOCK )
Trunk ke y cylinde r switc h (OPEN )
Driver' s sea t bel t switc h
(UNBUCKLED )
Windshield wiper/washe r switc h
(Excep t MIS T switch )
Brak e switc h (ON )
Vehicl e spee d senso r (VSS )
Parkin g brak e switc h (ON )
Transmissio n rang e switc h
Multiple x Contro l Uni t (Door )
Driver' s doo r switc h (OPEN )
Driver' s doo r ke y cylinde r switc h
(LOCK/UNLOCK )
Driver's doo r loc k switc h
(LOCK/UNLOCK )
Driver's doo r loc k kno b switc h
(LOCK/UNLOCK )
Trunk opene r switc h (PUSH )
Powe r windo w maste r switc h
(Excep t driver' s switch )
ProCarManuals.com
Page 1657 of 1954
Integrated Contro l
Ignition Ke y Ligh t Replacemen t
1. Remove the dashboard lower cover (see
section 20 ).
2 . Remov e th e colum n cover s (se e sectio n 17 ).
3 . Tur n th e bul b socke t 45 ° counterclockwis e t o remov e
it fro m th e ke y ligh t housing .
BULB (1. 4 W )
KE Y LIGH THOUSIN G
BULBSOCKE T
ProCarManuals.com
Page 1675 of 1954
Power Doo r Lock s
Componen t Locatio n Inde x
TRANSMITTER *
Test , pag e 23-28 2
Codes Inpu t Procedure ,page 23-29 2
UNLOC K
BUTTO N LOC
K BUTTO N
TRUN K BUTTO N
PANI C BUTTO N
DRIVER' S DOO R
LOC K SWITCH *
Test/Replacement , pag e 23-29 5
DRIVER' S DOO R LOC K ACTUATO R
Test , pag e 23-29 3
Replacement , sectio n 2 0DRIVER' S DOO R
KE Y CYLINDE R SWITCH *
Test , pag e 23-29 5
DRIVER' S DOO R LOCK *
KNO B SWITC H
Test , pag e 23-29 3
LEFT REA R DOO R LOC K ACTUATO R
Test, pag e 23-29 4Replacement , sectio n 2 0
LEF T REA R DOO R LOC K
KNOB SWITCH *Test, pag e 23-29 4
*: Yo u can also tes t th e switc h b y usin g th e self-diagnosi s functio n (mod e 2) . (Se e pag e 23-252 .)
TRUN K LI D OPENE RSOLENOI D
ProCarManuals.com
Page 1677 of 1954
Power Doo r Lock s
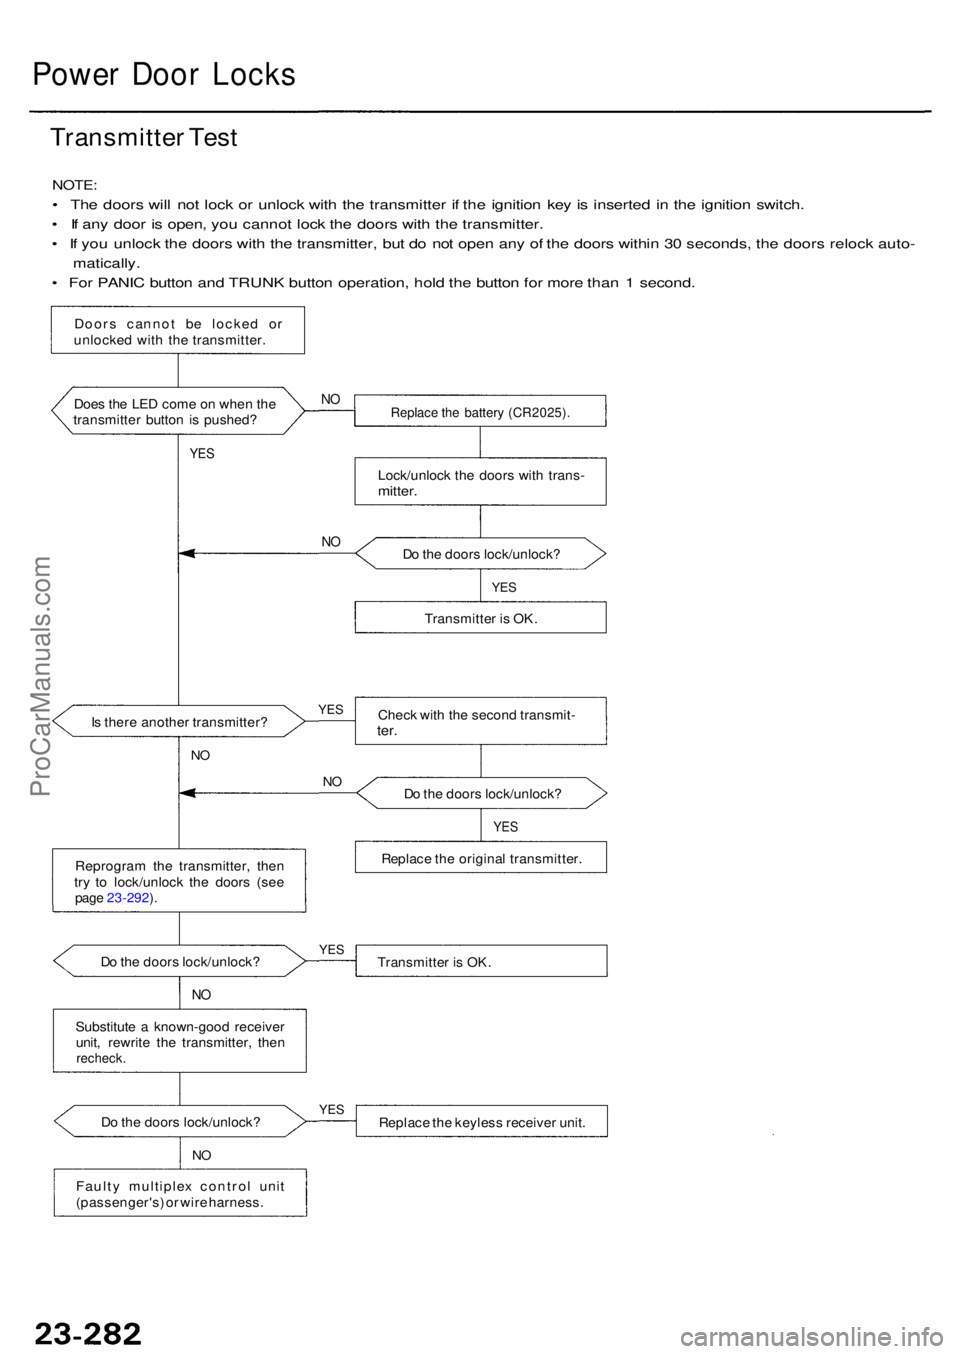
Transmitte r Tes t
NOTE :
• Th e door s wil l no t loc k o r unloc k wit h th e transmitte r i f th e ignitio n ke y i s inserte d i n th e ignitio n switch .
• I f an y doo r i s open , yo u canno t loc k th e door s wit h th e transmitter .
• I f yo u unloc k th e door s wit h th e transmitter , bu t d o no t ope n an y o f th e door s withi n 3 0 seconds , th e door s reloc k auto -
matically .
• Fo r PANI C butto n an d TRUN K butto n operation , hol d th e butto n fo r mor e tha n 1 second .
Doors canno t b e locke d o r
unlocke d wit h th e transmitter .
1Does th e LE D com e o n whe n th e
transmitte r butto n i s pushed ?Replace th e batter y (CR2025) .
Lock/unlock th e door s wit h trans -mitter.
NO
YE S
NODo th e door s lock/unlock ?
Transmitte r i s OK .
YES
Chec k wit h th e secon d transmit -ter.
Do th e door s lock/unlock ?
YES
Replac e th e origina l transmitter .
Transmitte r i s OK .
YES
NO
N
O
Reprogra m th e transmitter , the n
tr y t o lock/unloc k th e door s (se e
page 23-292 ).
D o th e door s lock/unlock ?
NO
Is ther e anothe r transmitter ?
Substitut e a known-goo d receive r
unit , rewrit e th e transmitter , the n
recheck .
Do th e door s lock/unlock ?
Fault y multiple x contro l uni t
(passenger's ) o r wir e harness .
NO
YE SReplac e th e keyles s receive r unit .
YES
ProCarManuals.com
Page 1679 of 1954
Power Doo r Lock s
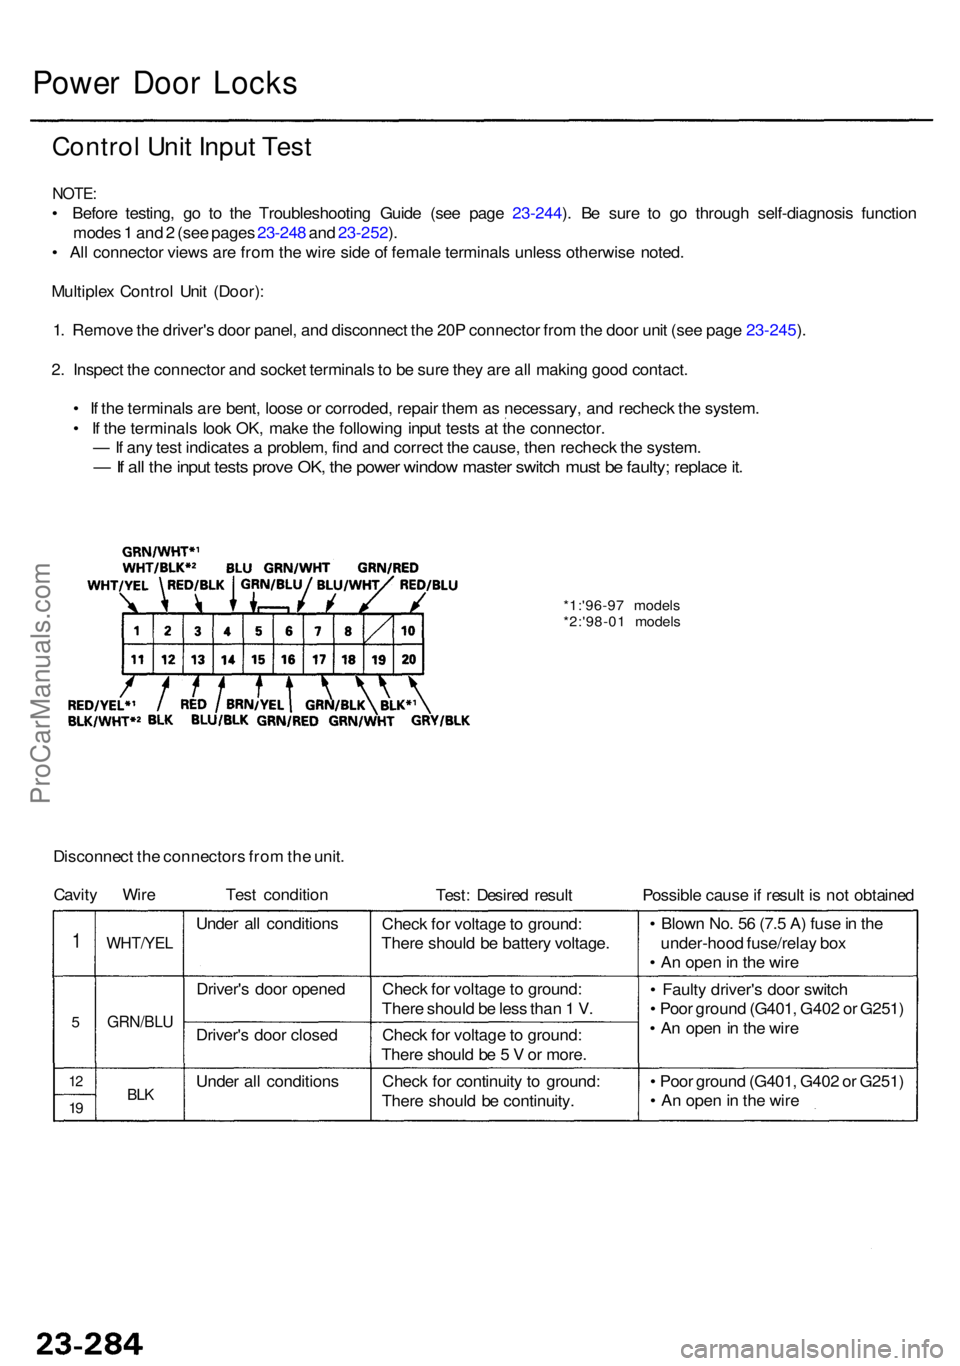
Contro l Uni t Inpu t Tes t
NOTE :
• Befor e testing , g o t o th e Troubleshootin g Guid e (se e pag e 23-244 ). B e sur e t o g o throug h self-diagnosi s functio n
mode s 1 an d 2 (se e page s 23-24 8 an d 23-252 ).
• Al l connecto r view s ar e fro m th e wir e sid e o f femal e terminal s unles s otherwis e noted .
Multiple x Contro l Uni t (Door) :
1 . Remov e th e driver' s doo r panel , an d disconnec t th e 20 P connecto r fro m th e doo r uni t (se e pag e 23-245 ).
2 . Inspec t th e connecto r an d socke t terminal s to b e sur e the y ar e al l makin g goo d contact .
• I f th e terminal s ar e bent , loos e o r corroded , repai r the m as necessary , an d rechec k th e system .
• I f th e terminal s loo k OK , mak e th e followin g inpu t test s a t th e connector .
— If an y tes t indicate s a problem , fin d an d correc t th e cause , the n rechec k th e system .
— If al l th e inpu t test s prov e OK , th e powe r windo w maste r switc h mus t b e faulty ; replac e it .
*1:'96-9 7 model s
*2:'98-0 1 model s
Cavity
Test: Desire d resul t Possible caus e if resul t i s no t obtaine d
1
5
12
19
WHT/YE L
GRN/BLU
BLK
Unde r al l condition s
Driver' s doo r opene d
Driver' s doo r close d
Unde r al l condition sChec
k fo r voltag e to ground :
Ther e shoul d b e batter y voltage .
Chec k fo r voltag e to ground :
Ther e shoul d b e les s tha n 1 V .
Chec k fo r voltag e to ground :
Ther e shoul d b e 5 V or more .
Chec k fo r continuit y t o ground :
Ther e shoul d b e continuity . •
Blow n No . 5 6 (7. 5 A ) fus e in th e
under-hoo d fuse/rela y bo x
• A n ope n in th e wir e
• Fault y driver' s doo r switc h
• Poo r groun d (G401 , G40 2 o r G251 )
• A n ope n in th e wir e
• Poo r groun d (G401 , G40 2 o r G251 )
• A n ope n in th e wir e
Disconnec
t th e connector s fro m th e unit .
Wir e Test conditio n
ProCarManuals.com
Page 1681 of 1954
Power Doo r Lock s
Contro l Uni t Inpu t Tes t (cont'd )
NOTE:
• Befor e testing , g o t o th e Troubleshootin g Guid e (se e pag e 23-244 ). B e sur e t o g o throug h self-diagnosi s functio n
mode s 1 an d 2 (se e page s 23-24 8 an d 23-252 ).
• Al l connecto r view s ar e fro m th e wir e sid e o f femal e terminal s unles s otherwis e noted .
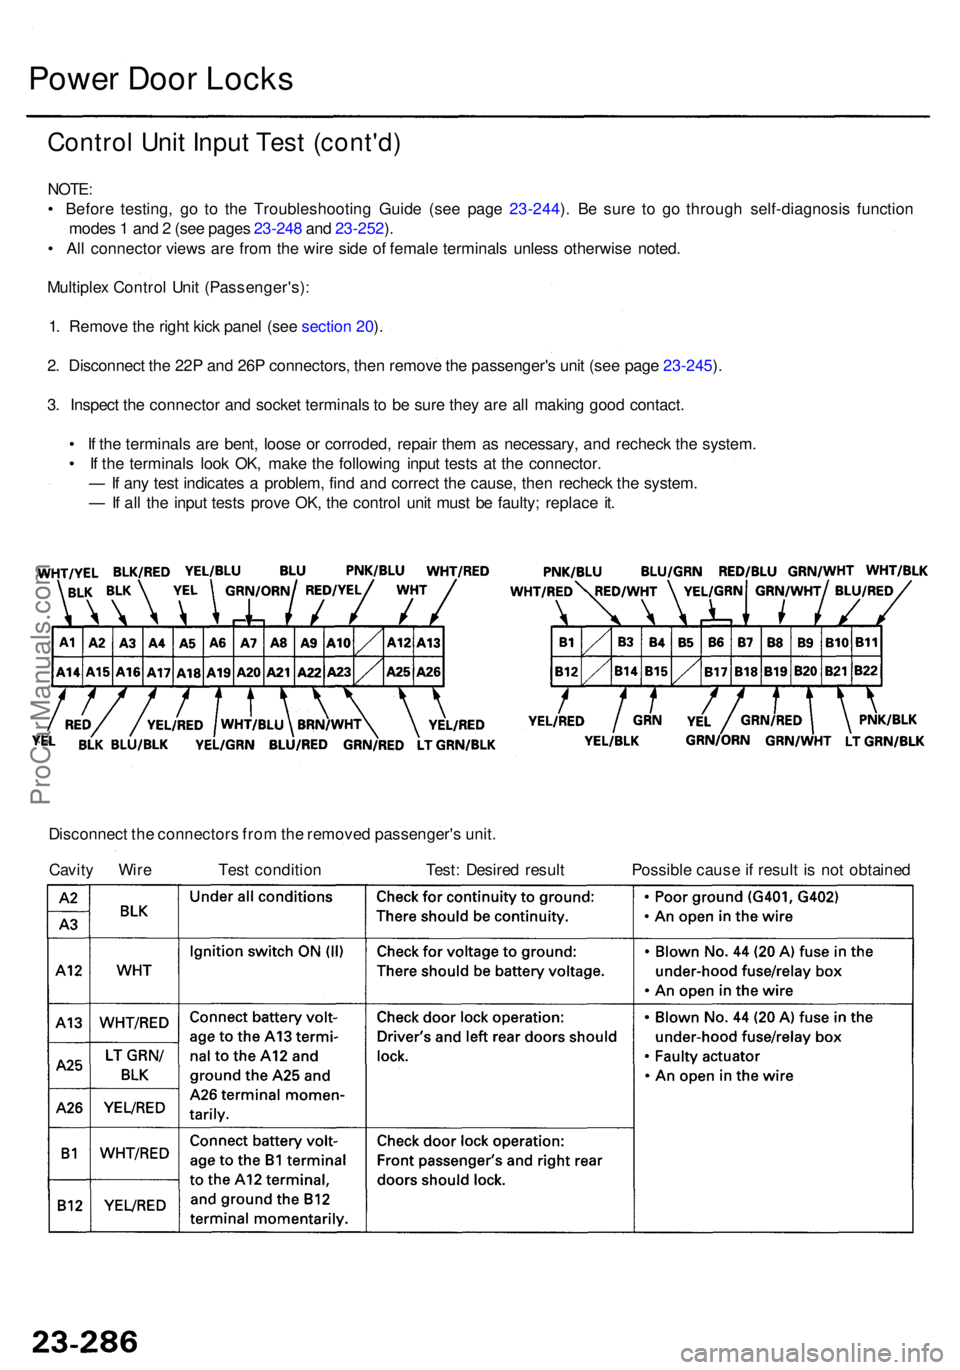
Multiple x Contro l Uni t (Passenger's) :
1 . Remov e th e righ t kic k pane l (se e sectio n 20 ).
2 . Disconnec t th e 22 P an d 26 P connectors , the n remov e th e passenger' s uni t (se e pag e 23-245 ).
3 . Inspec t th e connecto r an d socke t terminal s t o b e sur e the y ar e al l makin g goo d contact .
• I f th e terminal s ar e bent , loos e o r corroded , repai r the m a s necessary , an d rechec k th e system .
• I f th e terminal s loo k OK , mak e th e followin g inpu t test s a t th e connector .
— If an y tes t indicate s a problem , fin d an d correc t th e cause , the n rechec k th e system .
— If al l th e inpu t test s prov e OK , th e contro l uni t mus t b e faulty ; replac e it .
Disconnec t th e connector s fro m th e remove d passenger' s unit .
Cavit y Wir e Tes t conditio n Test : Desire d resul t Possibl e caus e if resul t i s no t obtaine d
ProCarManuals.com
Page 1683 of 1954
Power Doo r Lock s
Contro l Uni t Inpu t Tes t (cont'd )
NOTE:
• Befor e testing , g o t o th e Troubleshootin g Guid e (se e pag e 23-244 ). B e sur e t o g o throug h self-diagnosi s functio n
mode s 1 an d 2 (se e page s 23-24 8 an d 23-252 ).
• Al l connecto r view s ar e fro m th e wir e sid e o f femal e terminal s unles s otherwis e noted .
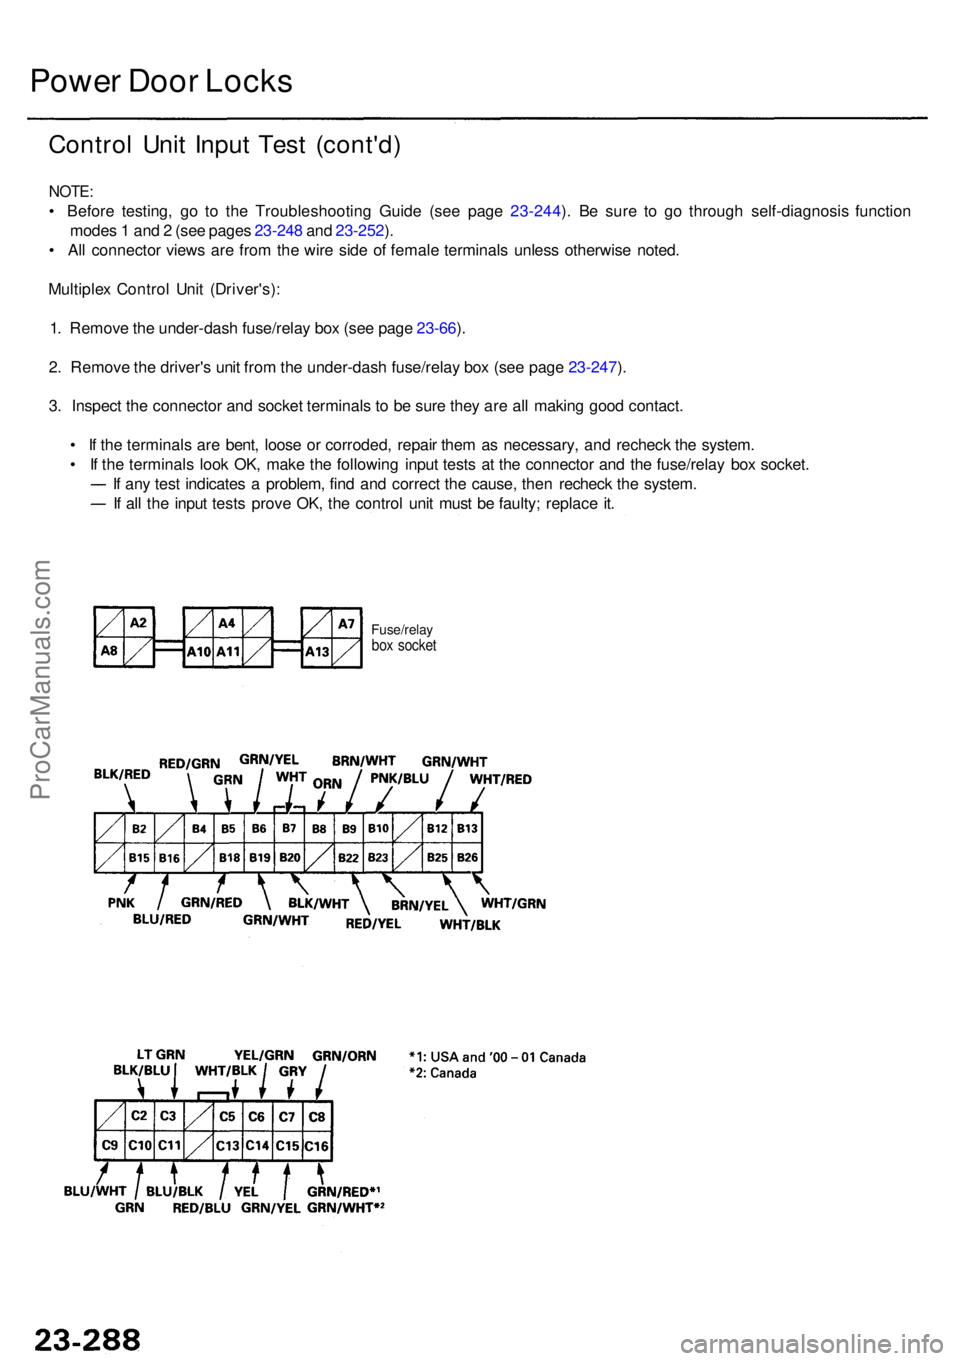
Multiple x Contro l Uni t (Driver's) :
1 . Remov e th e under-das h fuse/rela y bo x (se e pag e 23-66 ).
2 . Remov e th e driver' s uni t fro m th e under-das h fuse/rela y bo x (se e pag e 23-247 ).
3 . Inspec t th e connecto r an d socke t terminal s t o b e sur e the y ar e al l makin g goo d contact .
• I f th e terminal s ar e bent , loos e o r corroded , repai r the m a s necessary , an d rechec k th e system .
• I f th e terminal s loo k OK , mak e th e followin g inpu t test s a t th e connecto r an d th e fuse/rela y bo x socket .
I f an y tes t indicate s a problem , fin d an d correc t th e cause , the n rechec k th e system .
I f al l th e inpu t test s prov e OK , th e contro l uni t mus t b e faulty ; replac e it .
Fuse/rela ybox socke t
ProCarManuals.com