Page 1292 of 1954
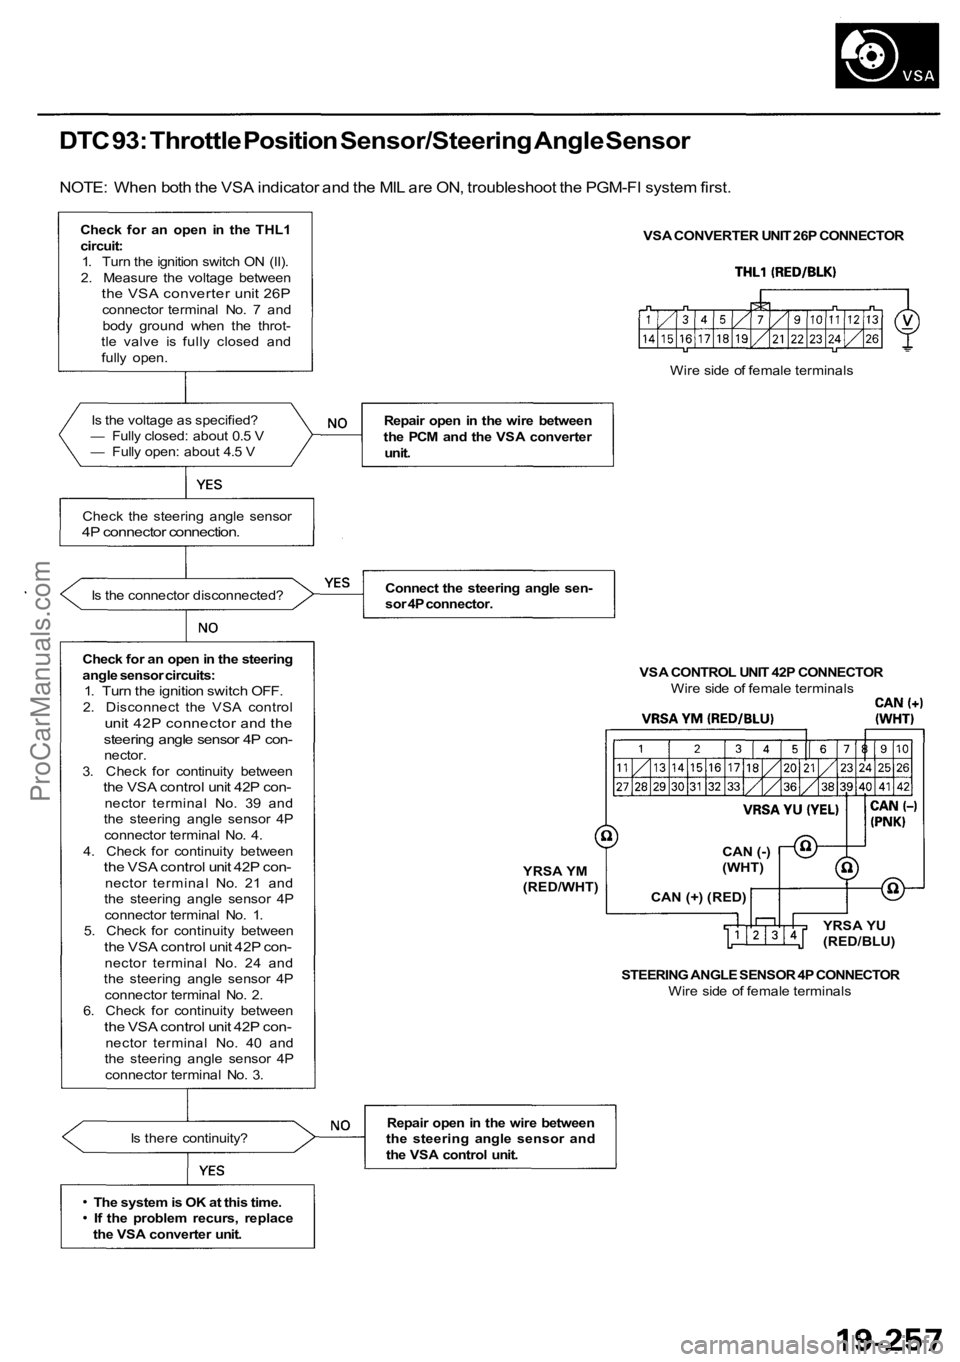
DTC 93: Throttle Position Sensor/Steering Angle Sensor
NOTE: When both the VSA indicator and the MIL are ON, troubleshoot the PGM-FI system first.
Check for an open in the THL1circuit:1. Turn the ignition switch ON (II).
2. Measure the voltage between
the VSA converter unit 26Pconnector terminal No. 7 and body ground when the throt-
tle valve is fully closed and
fully open.
Is the voltage as specified?
— Fully closed: about 0.5 V
— Fully open: about 4.5 V
Check the steering angle sensor
4P connector connection.
Is the connector disconnected?
Check for an open in the steering
angle sensor circuits:
1. Turn the ignition switch OFF.2. Disconnect the VSA controlunit 42P connector and thesteering angle sensor 4P con-nector.
3. Check for continuity between
the VSA control unit 42P con-nector terminal No. 39 and
the steering angle sensor 4P
connector terminal No. 4.
4. Check for continuity between
the VSA control unit 42P con-nector t e r m i n a l No. 21 and
the steering angle sensor 4P
connector terminal No. 1.
5. Check for continuity between
the VSA control unit 42P con-nector terminal No. 24 and
the steering angle sensor 4P
connector terminal No. 2.
6. Check for continuity between
the VSA control unit 42P con-nector terminal No. 40 and
the steering angle sensor 4P
connector terminal No. 3.
Is there continuity?
The system is OK at this time. If the problem recurs, replace
the VSA converter unit. VSA CONVERTER UNIT 26P CONNECTOR
Repair open in the wire between
the PCM and the VSA converter unit.
Connect the steering angle sen-
sor 4P connector. VSA CONTROL UNIT 42P CONNECTORWire side of female terminals
STEERING ANGLE SENSOR 4P CONNECTOR Wire side of female terminals
Repair open in the wire between
the steering angle sensor and
the VSA control unit. Wire side of female terminals
YRSA YM
(RED/WHT) CAN (-)
(WHT)
CAN (+) (RED) YRSA YU
(RED/BLU)
ProCarManuals.com
Page 1293 of 1954
Troubleshooting
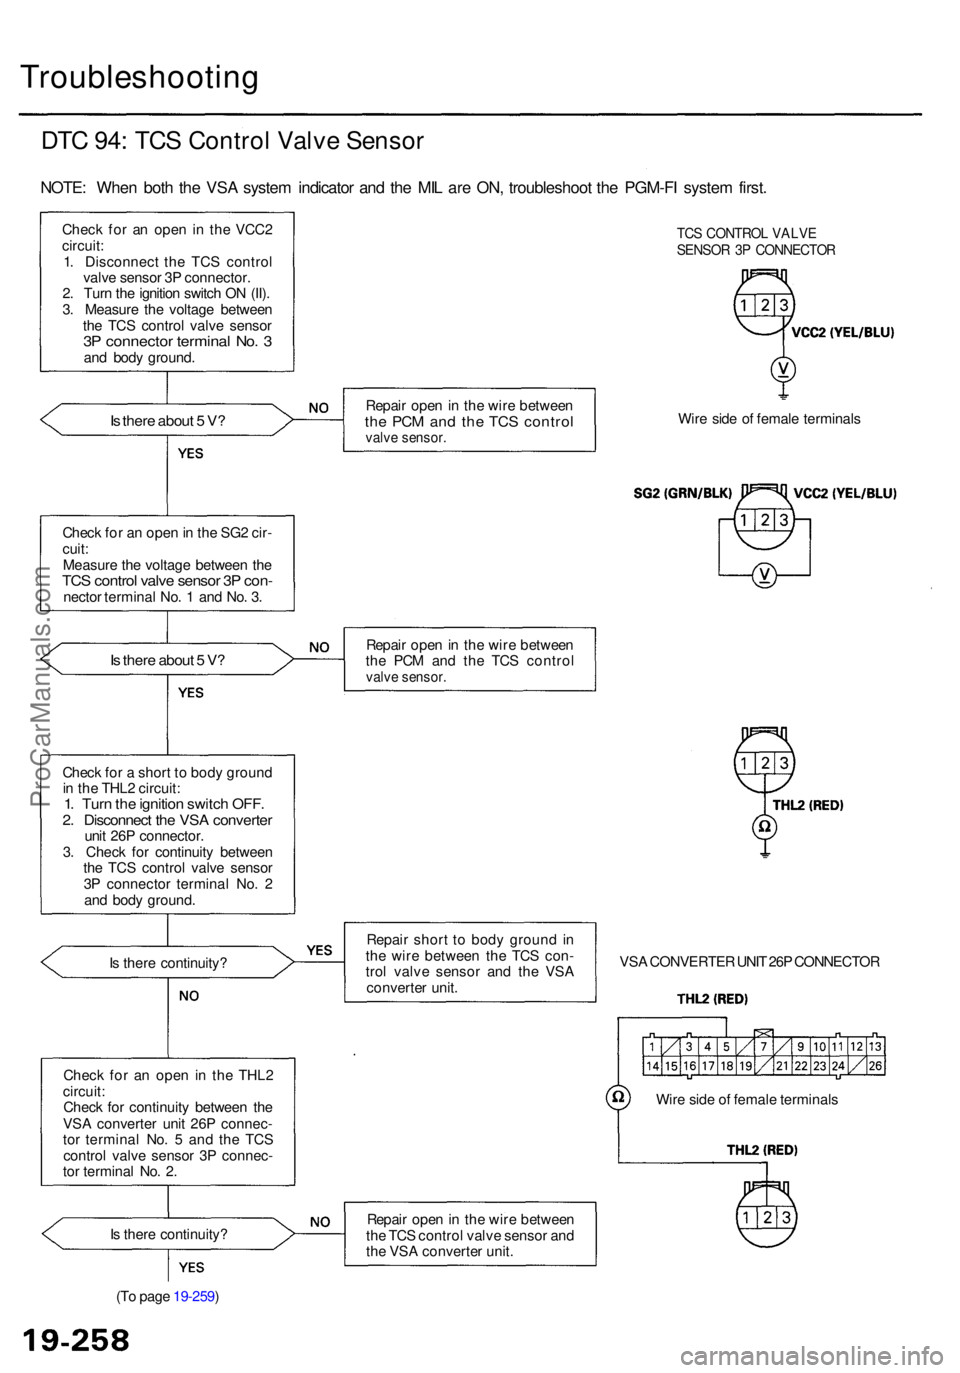
DTC 94 : TC S Contro l Valv e Senso r
NOTE: Whe n bot h th e VS A syste m indicato r an d th e MI L ar e ON , troubleshoo t th e PGM-F I syste m first .
Chec k fo r a n ope n in th e VCC 2
circuit :
1 . Disconnec t th e TC S contro l
valv e senso r 3 P connector .
2 . Tur n th e ignitio n switc h O N (II) .
3 . Measur e th e voltag e betwee n
th e TC S contro l valv e senso r
3P connecto r termina l No . 3an d bod y ground .
Is ther e abou t 5 V ?
Chec k fo r a n ope n in th e SG 2 cir -
cuit :
Measur e th e voltag e betwee n th e
TC S contro l valv e senso r 3 P con -necto r termina l No . 1 an d No . 3 .
Is ther e abou t 5 V ?
Chec k fo r a shor t t o bod y groun d
i n th e THL 2 circuit :
1. Tur n th e ignitio n switc h OFF .2. Disconnec t th e VS A converte runit 26 P connector .
3 . Chec k fo r continuit y betwee n
th e TC S contro l valv e senso r
3 P connecto r termina l No . 2
an d bod y ground .
I s ther e continuity ?
Chec k fo r a n ope n i n th e THL 2
circuit :
Chec k fo r continuit y betwee n th e
VS A converte r uni t 26 P connec -
to r termina l No . 5 an d th e TC S
contro l valv e senso r 3 P connec -
to r termina l No . 2 .
I s ther e continuity ?
(T o pag e 19-259 )
TCS CONTRO L VALV ESENSO R 3 P CONNECTO R
Repair ope n in th e wir e betwee nthe PC M an d th e TC S contro lvalve sensor .
Wire sid e o f femal e terminal s
Repai r ope n in th e wir e betwee n
th e PC M an d th e TC S contro l
valve sensor .
Repair shor t t o bod y groun d in
th e wir e betwee n th e TC S con -
tro l valv e senso r an d th e VS A
converte r unit . VS
A CONVERTE R UNI T 26 P CONNECTO R
Wir e sid e o f femal e terminal s
Repai r ope n in th e wir e betwee n
th e TC S contro l valv e senso r an d
th e VS A converte r unit .
ProCarManuals.com
Page 1294 of 1954
(From pag e 19-258 )
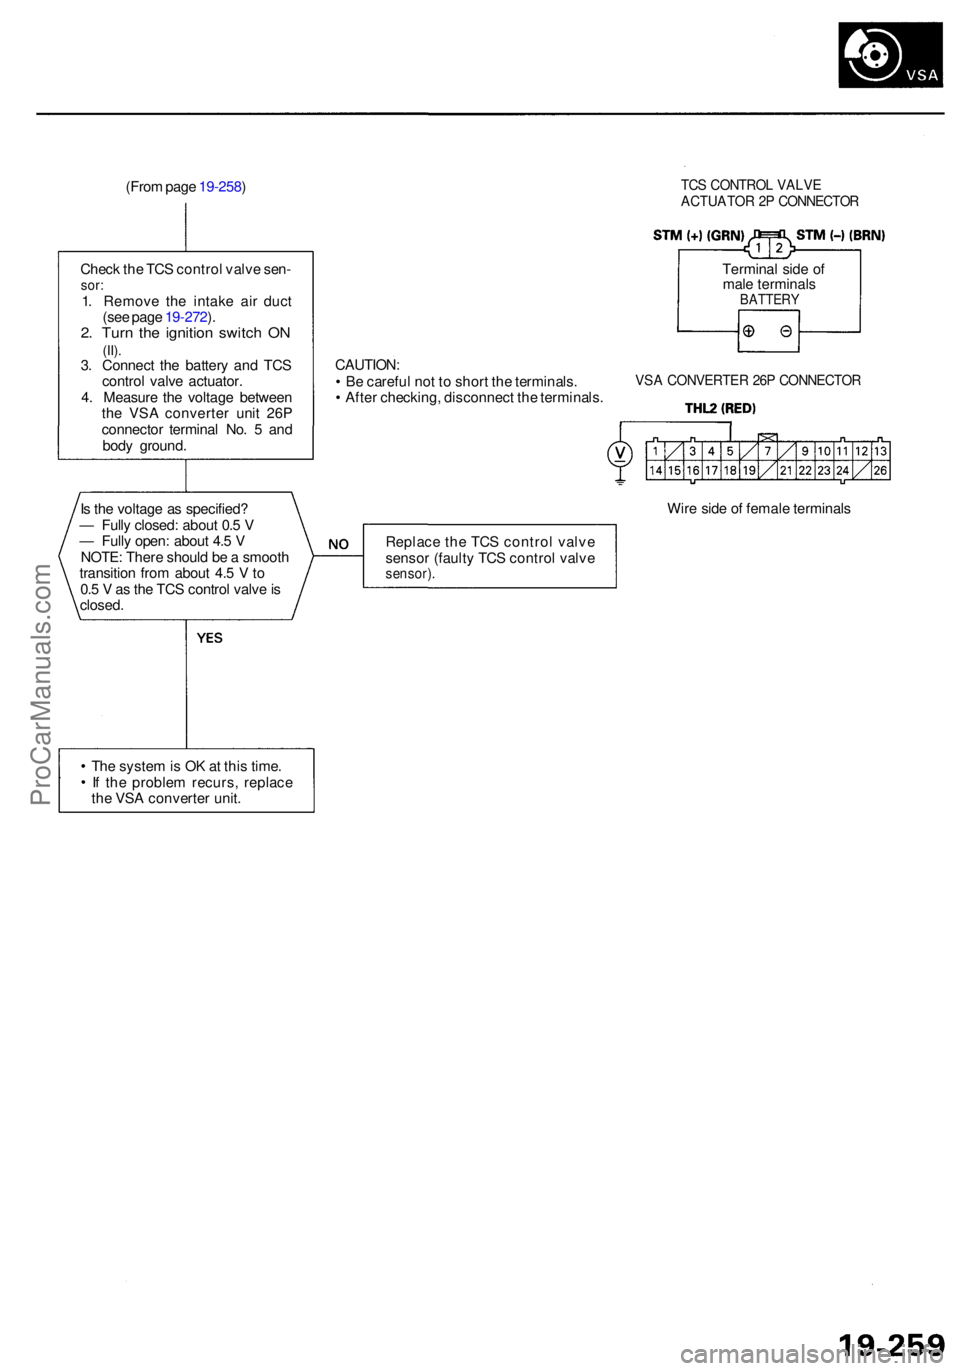
Chec k th e TC S contro l valv e sen -
sor:1. Remov e th e intak e ai r duc t
(se e pag e 19-272 ).
2 . Tur n th e ignitio n switc h O N(II).3. Connec t th e batter y an d TC S
contro l valv e actuator .
4 . Measur e th e voltag e betwee n
th e VS A converte r uni t 26 P
connecto r termina l No . 5 an d
bod y ground .
TCS CONTRO L VALV E
ACTUATO R 2 P CONNECTO R
Terminal sid e o f
mal e terminal s
BATTER Y
CAUTION :
• B e carefu l no t t o shor t th e terminals .
• Afte r checking , disconnec t th e terminals .VSA CONVERTE R 26 P CONNECTO R
Is th e voltag e a s specified ?
— Full y closed : abou t 0. 5 V
— Full y open : abou t 4. 5 V
NOTE : Ther e shoul d b e a smoot h
transitio n fro m abou t 4. 5 V to
0. 5 V as th e TC S contro l valv e is
closed . Wir
e sid e o f femal e terminal s
Replac e th e TC S contro l valv e
senso r (fault y TC S contro l valv e
sensor) .
The syste m is O K a t thi s time .
I f th e proble m recurs , replac e
th e VS A converte r unit .
ProCarManuals.com
Page 1302 of 1954
Steering Angl e Senso r
Replacemen t
CAUTION: D o no t damag e o r dro p th e steerin g angl e senso r a s it i s sensitive .
1 . Remov e th e combinatio n switc h (se e sectio n 17 ).
2 . Remov e th e circli p an d screw , the n remov e th e steerin g angl e senso r fro m th e combinatio n switch .
3 . Instal l i n th e revers e orde r o f removal .
CAUTION : D o no t appl y an y greas e o r oi l t o th e steerin g angl e sensor .
4 . Perfor m th e steerin g angl e senso r neutra l positio n memorizin g procedur e (se e pag e 19-268 ).
SCREW S
STEERIN G ANGL E SENSO R
COMBINATIO N SWITC H
CANCEL CA M
WAV E WASHE R
SPRIN G
JOINTLOWE R COVE R
CIRCLI P
NOTE: Whe n reassembling , align the tab s o f th e join t an dcance l ca m to th e sli t o f th e steerin g angl e sensor .
ProCarManuals.com
Page 1304 of 1954
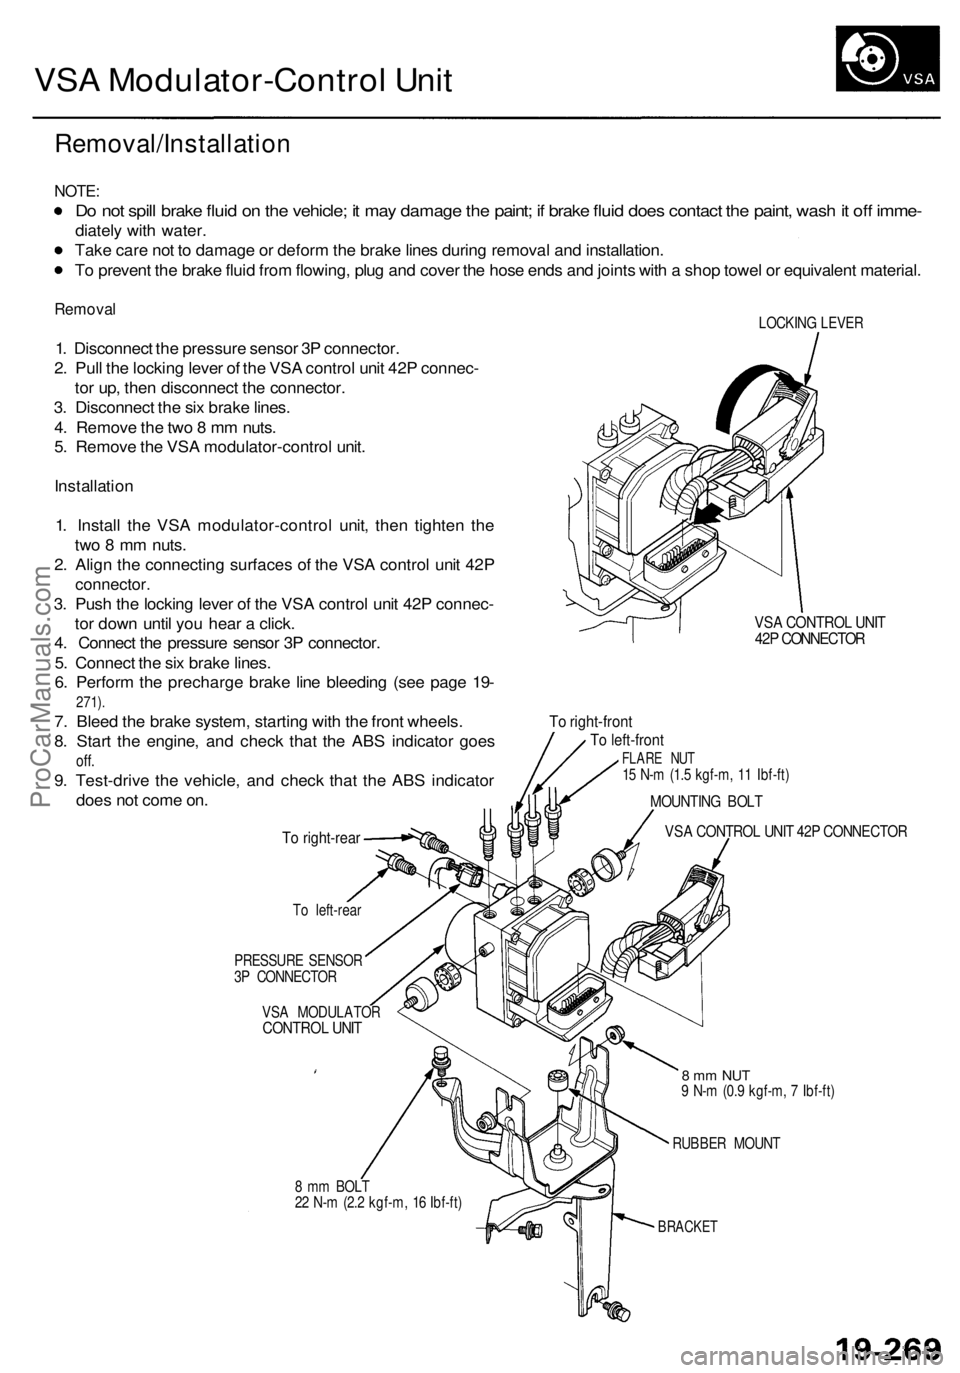
VSA Modulator-Control Unit
Removal/Installation
NOTE:
Do not spill brake fluid on the vehicle; it may damage the paint; if brake fluid does contact the paint, wash it off imme-
diately with water.
Take care not to damage or deform the brake lines during removal and installation.
To prevent the brake fluid from flowing, plug and cover the hose ends and joints with a shop towel or equivalent material.
Removal
1. Disconnect the pressure sensor 3P connector.
2. Pull the locking lever of the VSA control unit 42P connec-
tor up, then disconnect the connector.
3. Disconnect the six brake lines.
4. Remove the two 8 mm nuts.
5. Remove the VSA modulator-control unit.
Installation
1. Install the VSA modulator-control unit, then tighten the
two 8 mm nuts.
2. Align the connecting surfaces of the VSA control unit 42P
connector.
3. Push the locking lever of the VSA control unit 42P connec-
tor down until you hear a click.
4. Connect the pressure sensor 3P connector.
5. Connect the six brake lines.
6. Perform the precharge brake line bleeding (see page 19-
271).
7. Bleed the brake system, starting with the front wheels.
8. Start the engine, and check that the ABS indicator goes
off.
9. Test-drive the vehicle, and check that the ABS indicator
does not come on.
To right-rear
To left-rear
PRESSURE SENSOR
3P CONNECTOR
VSA MODULATOR
CONTROL UNIT
LOCKING LEVER
VSA CONTROL UNIT
42P CONNECTOR
To right-front
To left-front
FLARE NUT
15 N-m (1.5 kgf-m, 11 Ibf-ft)
MOUNTING BOLT
VSA CONTROL UNIT 42P CONNECTOR
8 mm BOLT
22 N-m (2.2 kgf-m, 16 Ibf-ft)
8 mm NUT
9 N-m (0.9 kgf-m, 7 Ibf-ft)
RUBBER MOUNT
BRACKETProCarManuals.com
Page 1307 of 1954
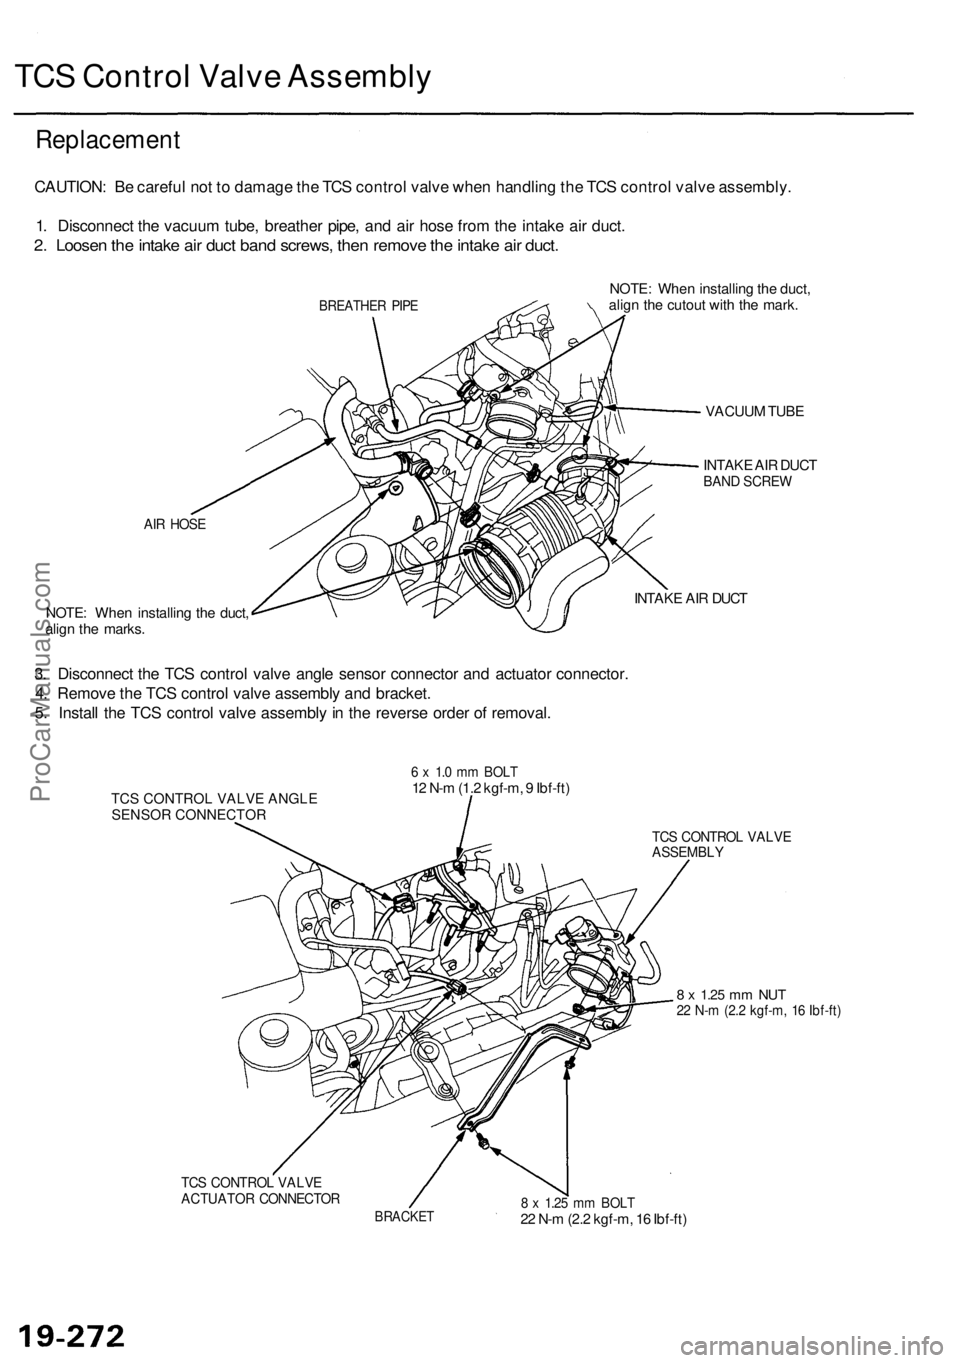
TCS Contro l Valv e Assembl y
Replacemen t
CAUTION: B e carefu l no t t o damag e th e TC S contro l valv e whe n handlin g th e TC S contro l valv e assembly .
1 . Disconnec t th e vacuu m tube , breathe r pipe , an d ai r hos e fro m th e intak e ai r duct .
2. Loose n th e intak e ai r duc t ban d screws , the n remov e th e intak e ai r duct .
BREATHE R PIP E
AIR HOS E
NOTE : Whe n installin g th e duct ,
alig n th e marks . NOTE
: Whe n installin g th e duct ,
alig n th e cutou t wit h th e mark .
VACUU M TUB E
INTAK E AI R DUC T
BAND SCRE W
INTAKE AI R DUC T
3. Disconnec t th e TC S contro l valv e angl e senso r connecto r an d actuato r connector .
4 . Remov e th e TC S contro l valv e assembl y an d bracket .
5 . Instal l th e TC S contro l valv e assembl y in th e revers e orde r o f removal .
TCS CONTROL VALVE ANGLE
SENSOR CONNECTOR
6 x 1. 0 m m BOL T12 N- m (1. 2 kgf-m , 9 Ibf-ft )
TCS CONTRO L VALV EACTUATO R CONNECTO R
TCS CONTRO L VALV EASSEMBL Y
8 x 1.2 5 mm NU T22 N- m (2. 2 kgf-m , 1 6 Ibf-ft )
BRACKE T8 x 1.2 5 m m BOL T22 N- m (2. 2 kgf-m , 1 6 Ibf-ft )
ProCarManuals.com
Page 1309 of 1954
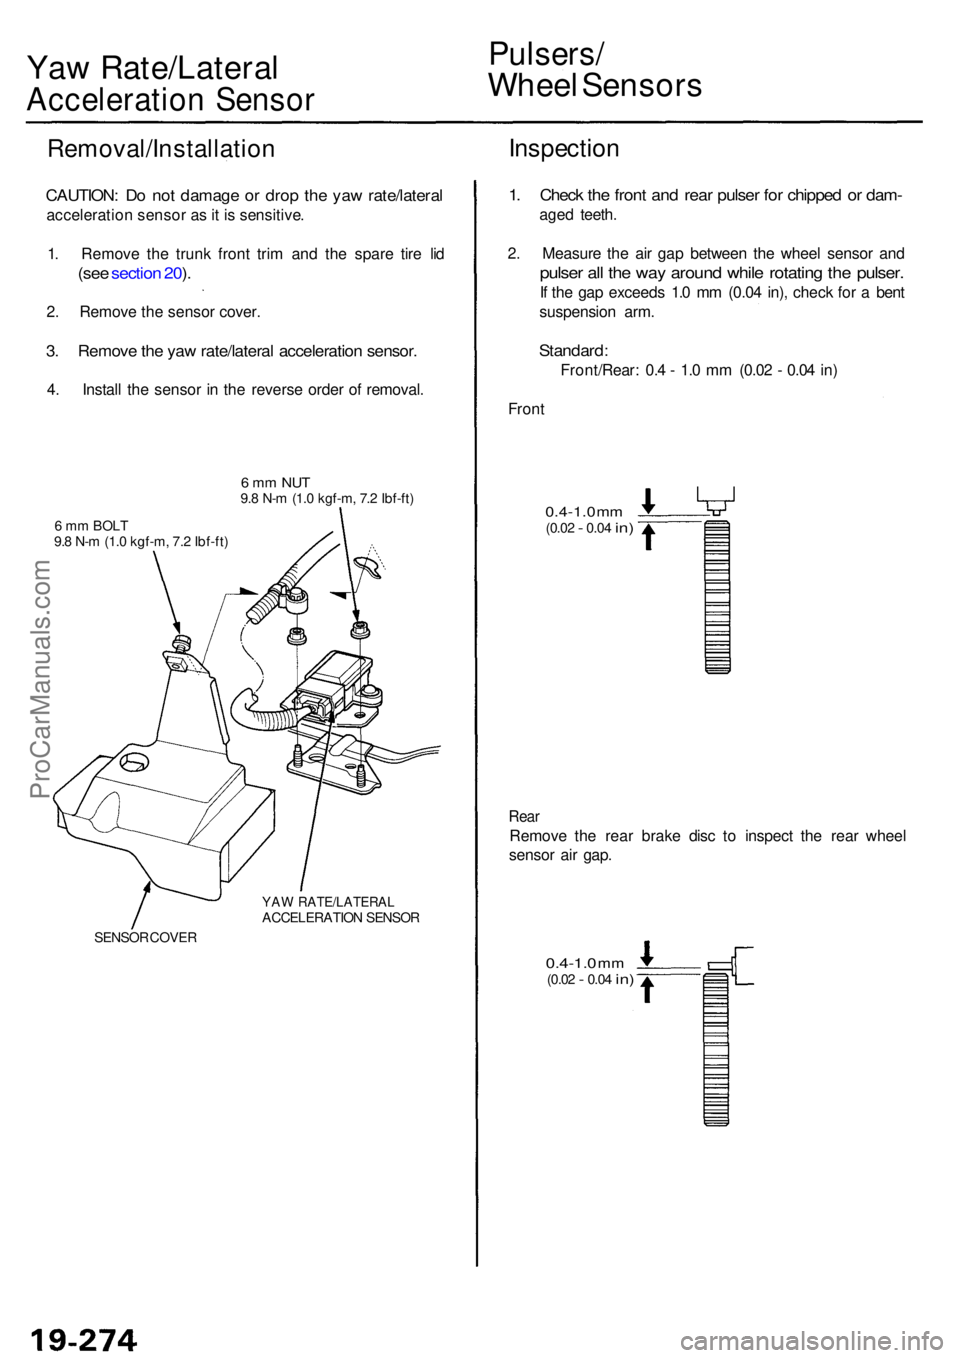
Yaw Rate/Latera l
Acceleration Senso r
Pulsers /
Wheel Sensor s
Removal/Installatio n
CAUTION: D o no t damag e o r dro p th e ya w rate/latera l
acceleratio n senso r a s it i s sensitive .
1 . Remov e th e trun k fron t tri m an d th e spar e tir e li d
(se e sectio n 20 ).
2 . Remov e th e senso r cover .
3. Remov e th e ya w rate/latera l acceleratio n sensor .
4. Instal l th e senso r i n th e revers e orde r o f removal .
6 m m NU T9.8 N- m (1. 0 kgf-m , 7. 2 Ibf-ft )
6 m m BOL T
9. 8 N- m (1. 0 kgf-m , 7. 2 Ibf-ft )
YAW RATE/LATERA LACCELERATION SENSO R
SENSO R COVE R
Inspectio n
1. Chec k th e fron t an d rea r pulse r fo r chippe d o r dam -
aged teeth .
2 . Measur e th e ai r ga p betwee n th e whee l senso r an d
pulse r al l th e wa y aroun d whil e rotatin g th e pulser .
If th e ga p exceed s 1. 0 m m (0.0 4 in) , chec k fo r a ben t
suspensio n arm .
Standard :
Front/Rear : 0. 4 - 1. 0 m m (0.0 2 - 0.0 4 in )
Fron t
0.4-1. 0 m m(0.0 2 - 0.04 in)
Rea r
Remov e th e rea r brak e dis c t o inspec t th e rea r whee l
senso r ai r gap .
0.4-1. 0 mm(0.0 2 - 0.04 in)
ProCarManuals.com
Page 1310 of 1954
Wheel Senso r Replacemen t
Install th e sensor s carefull y to avoi d twistin g wires .
Front
6 m m BOL T
9. 8 N- m (1. 0 kgf-m , 7. 2 Ibf-ft )
WHEE L SENSO R
Rear
6 m m BOL T
9. 8 N- m (1. 0 kgf-m , 7. 2 Ibf-ft )
WHEE L SENSO R
ProCarManuals.com