1996 ACURA RL KA9 wheel
[x] Cancel search: wheelPage 356 of 1954

Cruise Control
Control Unit Input Test (cont'd)
Cavity Wire
Test condition
Test: Desired result
Possible cause if result is not obtained
3
13
7
6
14
12
2
5
10
9
11
1
BLK
LT GRN
LT GRN/BLK
LT GRN/RED
PNK
BLU/WHT
GRY
GRN/WHT
BLU/YEL
BRN
BRN/BLK
BRN/WHT
Under all conditions
Ignition switch ON (II) and
main switch ON
Resume button pushed
Cancel button pushed
Set button pushed
Cancel button pushed
Shift lever in , or
Ignition switch ON (II), and
main switch ON; raise the
front of the vehicle, and rotate
one wheel slowly while
holding the other wheel.
Ignition switch ON (II), main
switch ON; brake pedal
pressed, then released
Brake pedal pressed then
released
Ignition switch ON (II)
Under all conditions
Under all conditions
Under all conditions
Check for continuity to ground:
There should be continuity.
Check for voltage to ground:
There should be battery voltage.
Check for voltage to ground:
There should be battery voltage.
When testing terminal No. 7, there
should be no voltage on terminal No. 6.
Check for voltage to ground:
There should be battery voltage.
When testing terminal No. 7, there
should be voltage on terminal No. 6.
Check for voltage to ground:
There should be battery voltage.
When testing terminal No. 6, there
should be no voltage on terminal No. 7.
Check for voltage to ground:
There should be battery voltage.
When testing terminal No. 6, there
should be voltage on terminal No. 7.
Check for continuity to ground:
There should be continuity.
NOTE: There should be no continuity
when the shift lever is in other positions.
Check for voltage between the
BLU/ WHT and BLK terminals:
There should be cycle 0 - 5 V or
battery voltage.
Check for voltage to ground:
There should be 0 V with the pedal
pressed, and battery voltage with
the pedal released.
Check for voltage to ground:
There should be battery voltage with
the pedal pressed, and 0 V with the
pedal released.
Attach to ground:
The cruise light in the gauge assembly
should come on.
Check for resistance to ground:
There should be 80 -120
Check for resistance to ground:
There should be 70 -110
Check for resistance to ground:
There should be 40 - 60
• Poor ground (G401, G402)
• An open in the wire
• Blown No. 20 (20 A) fuse in the
under-dash fuse/relay box
• Faulty main switch
• An open in the wire
• Blown No. 39 (15 A) fuse in the
under-hood fuse/relay box
• Faulty horn relay
• Faulty set/resume/cancel switch
• Faulty cable reel
• An open in the wire
• Short between LT GRN/BLK and
LT GRN/RED wires
• Blown No. 39 (15 A) fuse in the
under-hood fuse/relay box
• Faulty horn relay
• Faulty set/resume/cancel switch
• Faulty cable reel
• An open in the wire
• Blown No. 39 (15 A) fuse in the
under-hood fuse/relay box
• Faulty horn relay
• Faulty set/resume/cancel switch
• Faulty cable reel
• An open in the wire
• Short between LT GRN/BLK and
LT GRN/RED wires
• Blown No. 39 (15 A) fuse in the
under-hood fuse/relay box
• Faulty horn relay
• Faulty set/resume/cancel switch
• Faulty cable reel
• An open in the wire
• Faulty A/T gear position switch
• Poor ground (G401, G402)
• An open in the wire
• Faulty vehicle speed sensor (VSS)
• An open in the wire
• Short to ground
• Blown No. 39 (15 A) fuse in the
under-hood fuse/relay box
• Faulty brake switch
• An open in the wire
• Blown No. 39 (15 A) fuse in the
under-hood fuse/relay box
• Faulty brake switch
• An open in the wire
• Blown bulb
• Faulty gauge circuit
• An open in the wire
• Faulty actuator solenoid
• An open in the wireProCarManuals.com
Page 357 of 1954
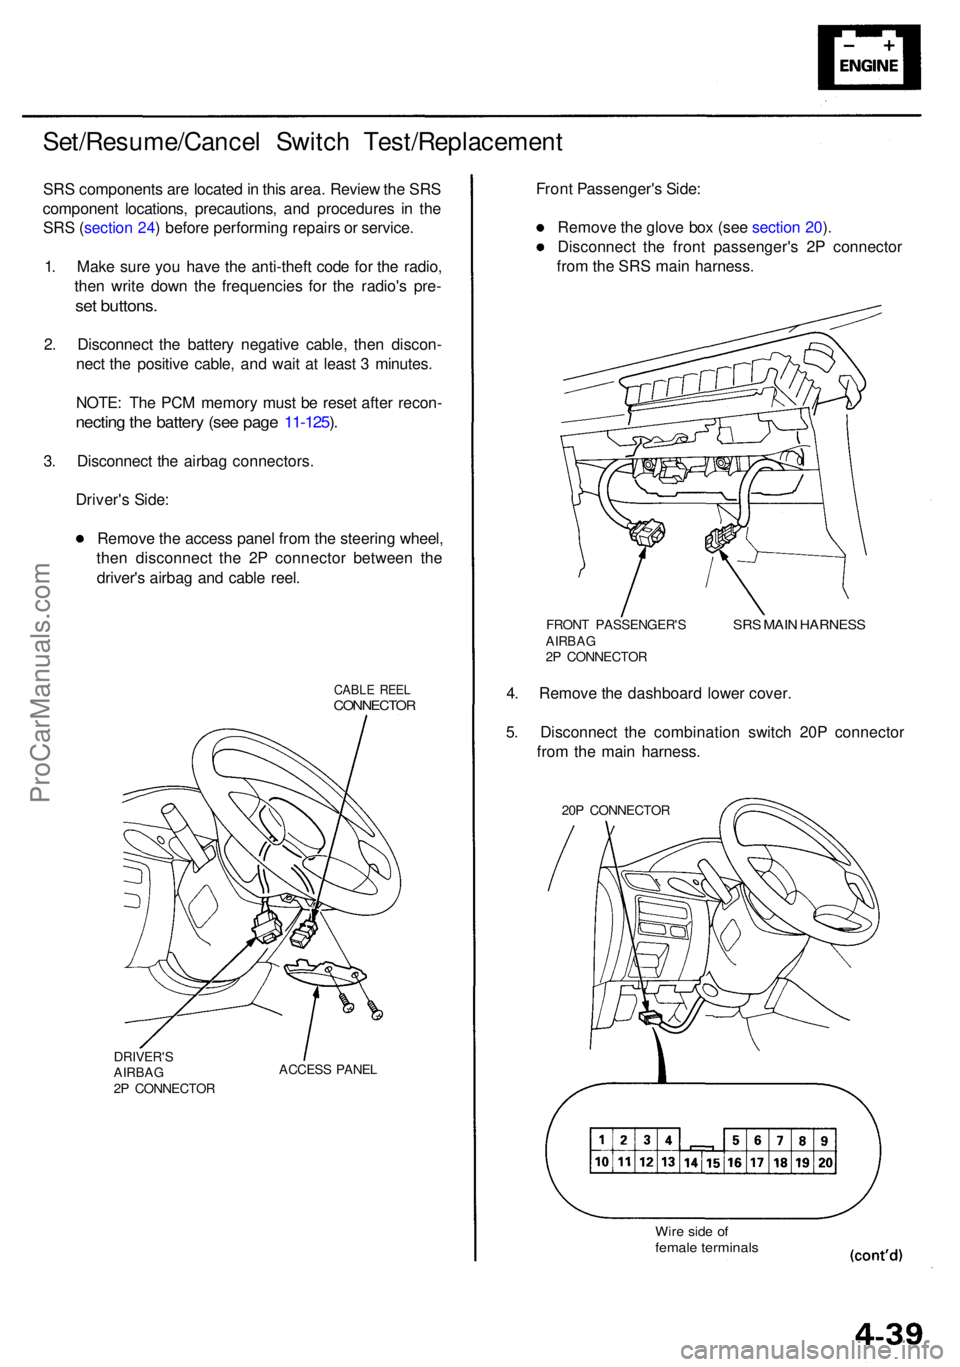
Set/Resume/Cancel Switc h Test/Replacemen t
SRS component s ar e locate d in thi s area . Revie w th e SR S
componen t locations , precautions , an d procedure s i n th e
SR S (sectio n 24 ) befor e performin g repair s o r service .
1 . Mak e sur e yo u hav e th e anti-thef t cod e fo r th e radio ,
the n writ e dow n th e frequencie s fo r th e radio' s pre -
set buttons .
2. Disconnec t th e batter y negativ e cable , the n discon -
nec t th e positiv e cable , an d wai t a t leas t 3 minutes .
NOTE : Th e PC M memor y mus t b e rese t afte r recon -
necting th e batter y (se e pag e 11-125 ).
3 . Disconnec t th e airba g connectors .
Driver' s Side :
Remov e th e acces s pane l fro m th e steerin g wheel ,
the n disconnec t th e 2 P connecto r betwee n th e
driver' s airba g an d cabl e reel .
CABL E REE LCONNECTO R
DRIVER'SAIRBAG2P CONNECTO RACCES
S PANE L
Front Passenger' s Side :
Remov e th e glov e bo x (se e sectio n 20 ).
Disconnec t th e fron t passenger' s 2 P connecto r
fro m th e SR S mai n harness .
FRONT PASSENGER' SAIRBAG2P CONNECTO R
SRS MAI N HARNES S
4. Remov e th e dashboar d lowe r cover .
5 . Disconnec t th e combinatio n switc h 20 P connecto r
fro m th e mai n harness .
20P CONNECTO R
Wire sid e o ffemal e terminal s
ProCarManuals.com
Page 370 of 1954
Engine Removal/Installatio n
Removal (cont'd )
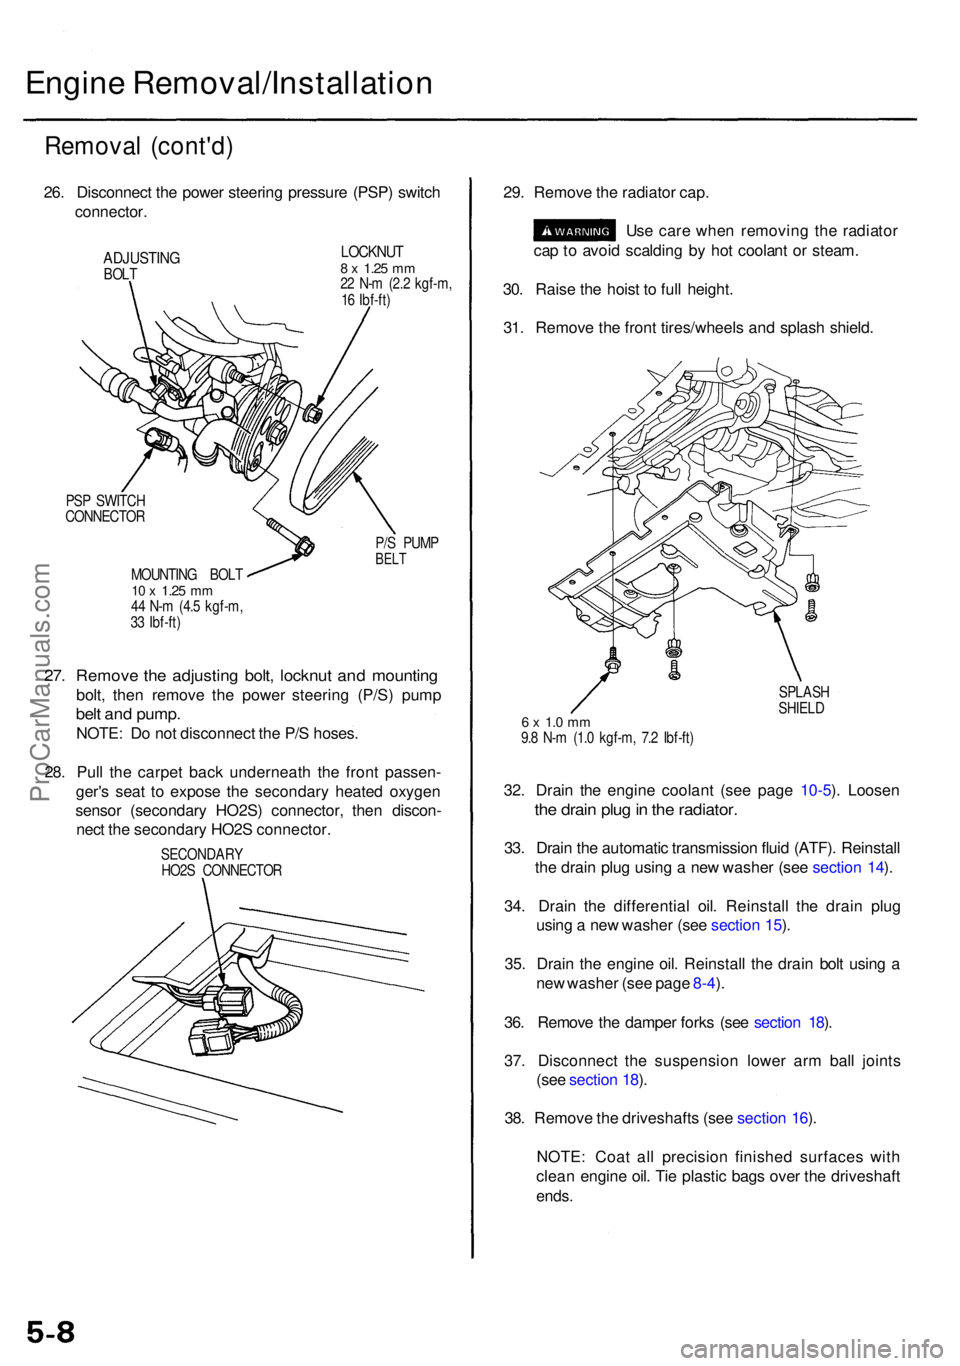
26. Disconnec t th e powe r steerin g pressur e (PSP ) switc h
connector .
ADJUSTIN GBOLT
LOCKNU T8 x 1.2 5 mm22 N- m (2. 2 kgf-m ,
1 6 Ibf-ft )
PS P SWITC H
CONNECTO R
P/S PUM P
BELTMOUNTIN G BOL T10 x 1.2 5 mm44 N- m (4. 5 kgf-m ,
3 3 Ibf-ft )
27. Remov e th e adjustin g bolt , locknu t an d mountin g
bolt, the n remov e th e powe r steerin g (P/S ) pum p
belt an d pump .
NOTE: D o no t disconnec t th e P/ S hoses .
28 . Pul l th e carpe t bac k underneat h th e fron t passen -
ger' s sea t t o expos e th e secondar y heate d oxyge n
senso r (secondar y HO2S ) connector , the n discon -
nec t th e secondar y HO2 S connector . 29
. Remov e th e radiato r cap .
Us e car e whe n removin g th e radiato r
ca p to avoi d scaldin g b y ho t coolan t o r steam .
30 . Rais e th e hois t t o ful l height .
31 . Remov e th e fron t tires/wheel s an d splas h shield .
SPLAS H
SHIEL D
6 x 1. 0 m m9.8 N- m (1. 0 kgf-m , 7. 2 Ibf-ft )
32. Drai n th e engin e coolan t (se e pag e 10-5 ). Loose n
the drai n plu g in th e radiator .
33. Drai n th e automati c transmissio n flui d (ATF) . Reinstal l
th e drai n plu g usin g a ne w washe r (se e sectio n 14 ).
34 . Drai n th e differentia l oil . Reinstal l th e drai n plu g
usin g a ne w washer (see sectio n 15 ).
35 . Drai n th e engin e oil . Reinstal l th e drai n bol t usin g a
ne w washe r (se e pag e 8-4 ).
36 . Remov e th e dampe r fork s (se e sectio n 18 ).
37 . Disconnec t th e suspensio n lowe r ar m bal l joint s
(se e sectio n 18 ).
38 . Remov e th e driveshaft s (se e sectio n 16 ).
NOTE : Coa t al l precisio n finishe d surface s wit h
clea n engin e oil . Ti e plasti c bag s ove r th e driveshaf t
ends.
SECONDAR Y
HO2 S CONNECTO R
ProCarManuals.com
Page 470 of 1954
Oil Pa n
Remova l
Engine remova l i s no t require d i n thi s procedure .
• Mak e sur e jack s an d safet y stand s ar e place d properl y
(se e sectio n 1 ).
• Appl y th e parkin g brak e an d bloc k th e rea r wheel s s o
th e vehicl e wil l no t rol l of f stand s whil e yo u ar e
workin g unde r it .
CAUTION :
• Us e fende r cover s t o avoi d damagin g painte d sur -
faces .
• Unplu g th e wirin g connector s carefull y whil e holdin g
th e connecto r portio n to avoi d damaging .
• Mar k al l wirin g an d hose s t o avoi d misconnection .
Also , b e sur e tha t the y d o no t contac t othe r wirin g
o r hose s o r interfer e wit h othe r parts .
1 . Loose n th e idle r pulle y cente r nu t an d adjustin g bolt ,
the n remov e th e ai r conditionin g (A/C ) compresso r
bel t (se e pag e 5-7 ).
2 . Disconnec t th e powe r steerin g pressur e (PSP )
switc h connector , the n remov e th e powe r steerin g
pum p bel t an d pum p (se e pag e 5-8 ).
3 . Remov e th e lef t an d righ t sid e exhaus t manifol d
covers (se e pag e 9-4 ).
4 . Rais e th e hois t t o ful l height .
5 . Remov e th e fron t tires/wheel s an d splas h shiel d
(se e pag e 5-8 ).
6 . Remov e th e dampe r fork s (se e sectio n 18 ).
7 . Disconnec t th e suspensio n lowe r ar m bal l joint s
with the specia l tool . Refe r t o sectio n 1 8 fo r th e
prope r procedure .
8 . Remov e th e driveshaft s an d intermediat e shaf t (se e
sectio n 16 ).
9 . Drai n th e differentia l oil . Reinstal l th e drai n plu g usin g
a ne w washe r (se e sectio n 15 ).
10 . Drai n th e engin e oil . Reinstal l th e drai n bol t usin g a
ne w washe r (se e pag e 8-4 ).
11 . Disconnec t th e vehicl e spee d senso r (VSS ) connec -
tor , the n remov e th e VSS/powe r steerin g spee d
senso r (se e pag e 5-9 ).
D o no t disconnec t th e flui d hoses .
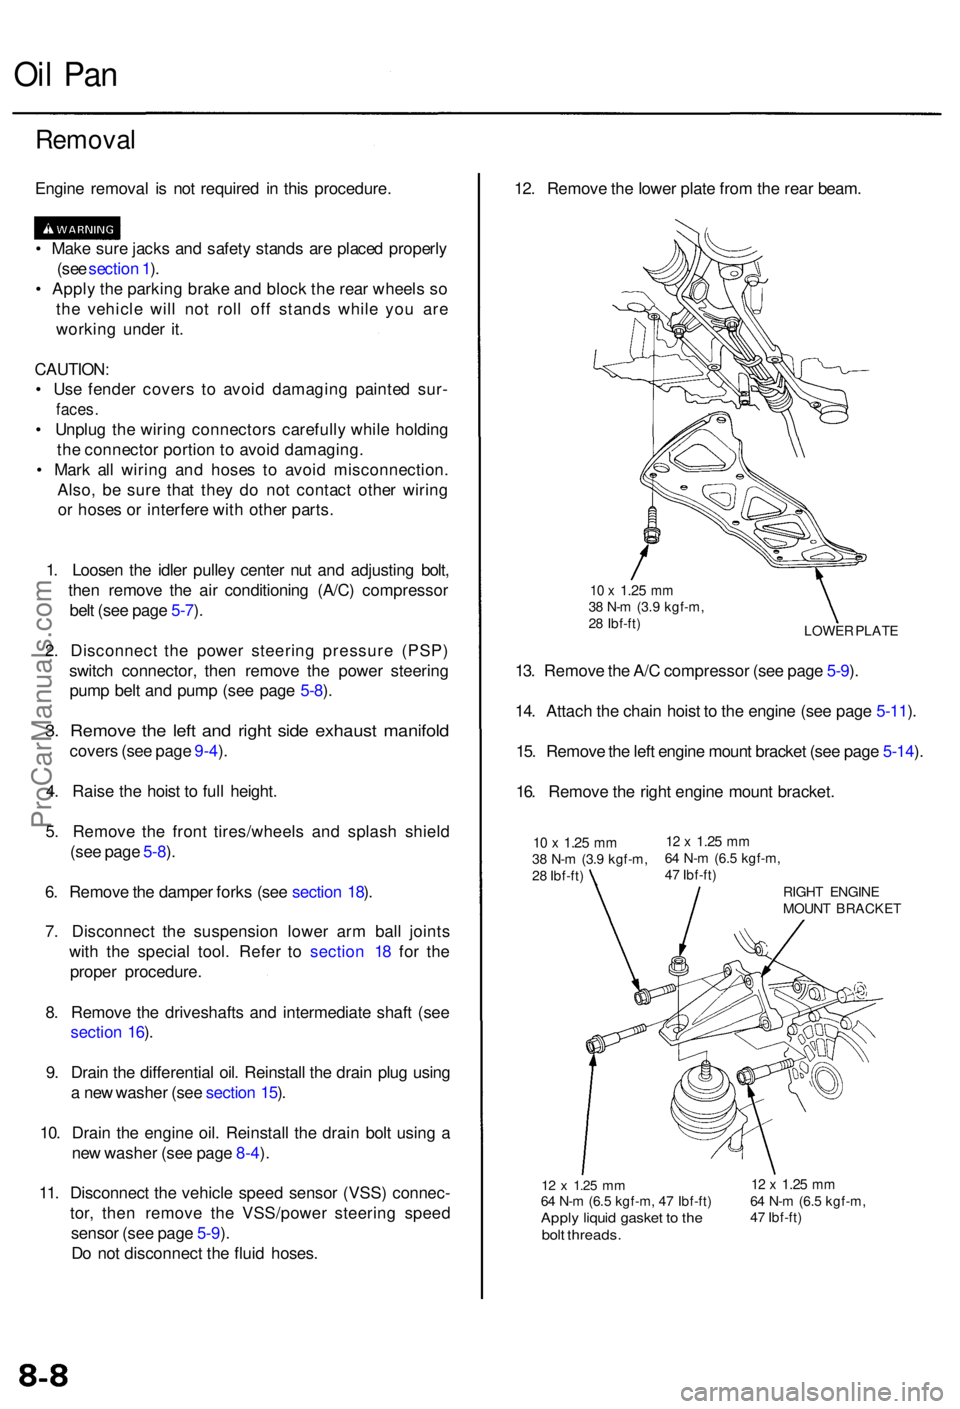
12 x 1.2 5 mm64 N- m (6. 5 kgf-m , 4 7 Ibf-ft )Apply liqui d gaske t t o th ebol t threads .
12 x 1.2 5 mm64 N- m (6. 5 kgf-m ,
4 7 Ibf-ft )
12. Remov e th e lowe r plat e fro m th e rea r beam .
LOWE R PLAT E
10 x 1.2 5 mm38 N- m (3. 9 kgf-m ,
2 8 Ibf-ft )
13. Remov e th e A/ C compresso r (se e pag e 5-9 ).
14 . Attac h th e chai n hois t t o th e engin e (se e pag e 5-11 ).
15 . Remov e th e lef t engin e moun t bracke t (se e pag e 5-14 ).
16 . Remov e th e righ t engin e moun t bracket .
10 x 1.2 5 mm38 N- m (3. 9 kgf-m ,
2 8 Ibf-ft )12 x 1.2 5 mm64 N- m (6. 5 kgf-m ,
4 7 Ibf-ft )
RIGHT ENGIN E
MOUN T BRACKE T
ProCarManuals.com
Page 712 of 1954

Description
The automatic transmission is a combination of a 3-element torque converter and a dual-shaft electronically controlled
automatic transmission which provides 4 speeds forward and 1 reverse. The entire unit is positioned in line with the engine.
Torque Converter, Gears and Clutches
The torque converter consists of a pump, turbine and stator, assembled in a single unit. They are connected to the engine
crankshaft so they turn together as a unit as the engine turns. Around the outside of the drive plate is a ring gear which
meshes with the starter pinion when the engine is being started.
The entire torque converter assembly serves as a flywheel while transmitting power to the transmission mainshaft.
The transmission has two parallel shafts: the mainshaft and the countershaft. The mainshaft is in line with the engine
crankshaft. The mainshaft includes the 1st, 4th and 2nd clutches and gears for 4th, 1st, 2nd and reverse (3rd gear is integral
with the mainshaft). The countershaft includes the 3rd, 1st-hold and reverse clutches, and gears for 3rd, 4th, 1st, 2nd,
reverse and park. The secondary drive gear is integrated with the countershaft. The gears on the mainshaft are in constant
mesh with those on the countershaft. When certain combinations of gears in the transmission are engaged by clutches,
power is transmitted from the mainshaft to the countershaft to provide , , , and positions.
Electronic Control
The electronic control system consists of a Powertrain Control Module (PCM), sensors, a A/T clutch pressure control solenoid
and four solenoid valves. Shifting and lock-up are electronically controlled for comfortable driving under all conditions.
The PCM is located below the dashboard, under the front lower panel on the passenger's side.
Hydraulic Control
The lower valve body assembly includes the main valve body, the secondary valve body, the throttle valve body, the
solenoid, the shift solenoid valves and the ATF passage body. They are bolted on the lower part of the transmission hous-
ing. Other valve bodies, the regulator valve body, the ATF pump body and the accumulator body, are bolted to the torque
converter housing.
The main valve body contains the manual valve, the 1-2 shift valve, the 2-3 shift valve, the 3-4 shift valve, the 4-3 kick-down
valve and the main orifice control valve. The secondary valve body contains the 3-4 orifice control valve, the 4-3 shift timing
valve, the line pressure control valve, the modulator valve and the accumulator pistons. The throttle valve body includes
the throttle valve which is bolted onto the secondary valve body. The A/T clutch pressure control solenoid is joined to the
throttle valve body. The regulator valve body contains the regulator valve, the lock-up shift valve and the cooler relief valve.
Fluid from the regulator passes through the manual valve to the various control valves. The ATF pump body contains the
lock-up timing valve, the lock-up control valve and the relief valve. The torque converter check valve is located in the torque
converter housing under the ATF pump body. The accumulator body contains the accumulator pistons. The reverse accu-
mulator and the 1st-hold accumulator pistons are assembled in the rear cover.
The 1st, 1st-hold, 2nd and reverse clutches receive fluid from their respective feed pipes, and the 3rd and 4th clutches
receive fluid from the internal hydraulic circuit.
Shift Control Mechanism
Input from various sensors located throughout the vehicle determines which shift solenoid valve the PCM will activate.
Activating a shift solenoid valve changes modulator pressure, causing a shift valve to move. This pressurizes a line to one
of the clutches, engaging the clutch and its corresponding gear.
Lock-up Mechanism
In position, in 2nd, 3rd, and 4th, and position in 3rd, pressurized fluid is drained from the back of the torque con-
verter through a fluid passage, causing the lock-up piston to be held against the torque converter cover. As this takes
place, the mainshaft rotates at the same speed as the engine crankshaft. Together with hydraulic control, the PCM opti-
mizes the timing of the lock-up mechanism. The lock-up valves control the range of lock-up according to torque converter
clutch (lock-up control) solenoid valves A and B, and throttle valve. When torque converter clutch (lock-up control)
solenoid valves A and B activate, modulator pressure changes. The torque converter clutch (lock-up control) solenoid
valves A and B are mounted on the torque converter housing, and are controlled by the PCM.ProCarManuals.com
Page 713 of 1954

Description
(cont'd)
Gear Selectio n
The shif t leve r ha s seve n positions : PARK , REVERSE , NEUTRAL , 1s t throug h 4t h gea r ranges , 1s t throug h
3rd gea r ranges , 2n d gea r an d 1s t gear .
Positio n Description
PARK
REVERS E
NEUTRAL
DRIVE
(1st throug h 4th )
DRIV E
(1st throug h 3rd )
SECON D
FIRST
Front wheel s locked ; par k paw l engage d wit h par k gea r o n countershaft . Al l clutche s released .
Reverse ; revers e clutc h engaged .
Al l clutche s released .
Genera l driving ; start s of f i n 1st , shift s automaticall y t o 2nd , 3rd , the n 4th , dependin g o n vehicl e
spee d an d throttl e position . Downshift s throug h 3rd , 2n d an d 1s t o n deceleratio n t o stop . Th e lock -
up mechanis m come s int o operatio n i n positio n i n 2nd , 3r d an d 4t h gear .
Us e fo r rapi d acceleratio n a t highwa y speed s an d genera l driving ; up-hil l an d down-hil l driving ; start s
of f i n 1st , shift s automaticall y t o 2nd , the n 3rd , dependin g o n vehicl e spee d an d throttl e position .
Downshift s throug h 2n d t o 1s t o n deceleratio n t o stop . Th e lock-u p mechanis m come s int o operatio n
i n 3r d speed .
Us e fo r engin e brakin g o r bette r tractio n startin g of f o n loos e o r slipper y surfaces ; stay s i n 2n d
gear , doe s no t shif t u p o r down .
Us e fo r engin e braking ; stay s i n 1s t gear , doe s no t shif t up .
Startin g i s possible only i n an d position s throug h th e us e o f a slide-type , neutral-safet y switch .
Automati c Transaxl e (A/T ) Gea r Positio n Indicato r
Th e A/ T gea r positio n indicato r i n th e instrumen t pane l show s whic h gea r ha s bee n selecte d withou t havin g t o loo k dow n
a t th e console .
ProCarManuals.com
Page 715 of 1954
Description
Clutches
The four-spee d automati c transmissio n use s hydraulically-actuate d clutche s t o engag e o r disengag e th e transmissio n gears .
Whe n th e hydrauli c pressur e i s introduce d int o th e clutc h drum , th e clutc h pisto n moves . Thi s presse s th e frictio n disc s
an d stee l plate s together , lockin g the m s o the y don' t slip . Powe r i s the n transmitte d throug h th e engage d clutc h pac k t o it s
hub-mounte d gear . Likewise , whe n th e hydrauli c pressur e is ble d fro m th e clutc h pack , th e pisto n release s th e frictio n disc s
an d stee l plates , an d the y ar e fre e t o slid e pas t eac h other . Thi s allow s th e gea r t o spi n independentl y o f it s shaft , transmit -
ting n o power .
1st Clutc h
Th e 1s t clutc h engages/disengage s 1s t gear , an d i s locate d a t th e middl e o f th e mainshaft . Th e 1s t clutc h is joine d back-to -
bac k t o th e 4t h clutch . Th e 1s t clutc h i s supplie d hydrauli c pressur e b y it s AT F fee d pip e withi n th e mainshaft .
1st-hol d Clutc h
The 1st-hol d clutc h engages/disengage s Ist-hold , positio n o r position , an d i s locate d a t th e middl e o f th e counter -
shaft . Th e Ist-hol d clutc h i s supplie d hydrauli c pressur e b y it s AT F fee d pip e withi n th e countershaft .
2n d Clutc h
Th e 2n d clutc h engages/disengage s 2n d gear , an d i s locate d o n th e rea r en d o f th e mainshaft . Th e 2n d clutc h i s supplie d
hydrauli c pressur e b y it s AT F fee d pip e withi n th e mainshaft .
3r d Clutc h
Th e 3r d clutc h engages/disengage s 3r d gear , an d i s locate d a t th e en d o f th e countershaft , opposit e th e rea r cover . Th e
3r d clutc h i s supplie d hydrauli c pressur e b y a circui t connecte d t o th e interna l hydrauli c circuit .
4th Clutc h
The 4t h clutc h engages/disengage s 4t h gear , an d i s locate d a t th e middl e o f th e mainshaft . Th e 4t h clutc h i s joine d back -
to-bac k t o th e 1s t clutch . Th e 4t h clutc h i s supplie d hydrauli c pressur e b y a circui t connecte d t o th e interna l hydrauli c cir -
cuit .
Revers e Clutc h
The revers e clutc h engages/disengage s revers e gear , an d i s locate d o n th e rea r en d o f th e countershaft . Th e revers e clutc h i s
supplie d hydrauli c pressur e b y it s AT F fee d pip e withi n th e countershaft .
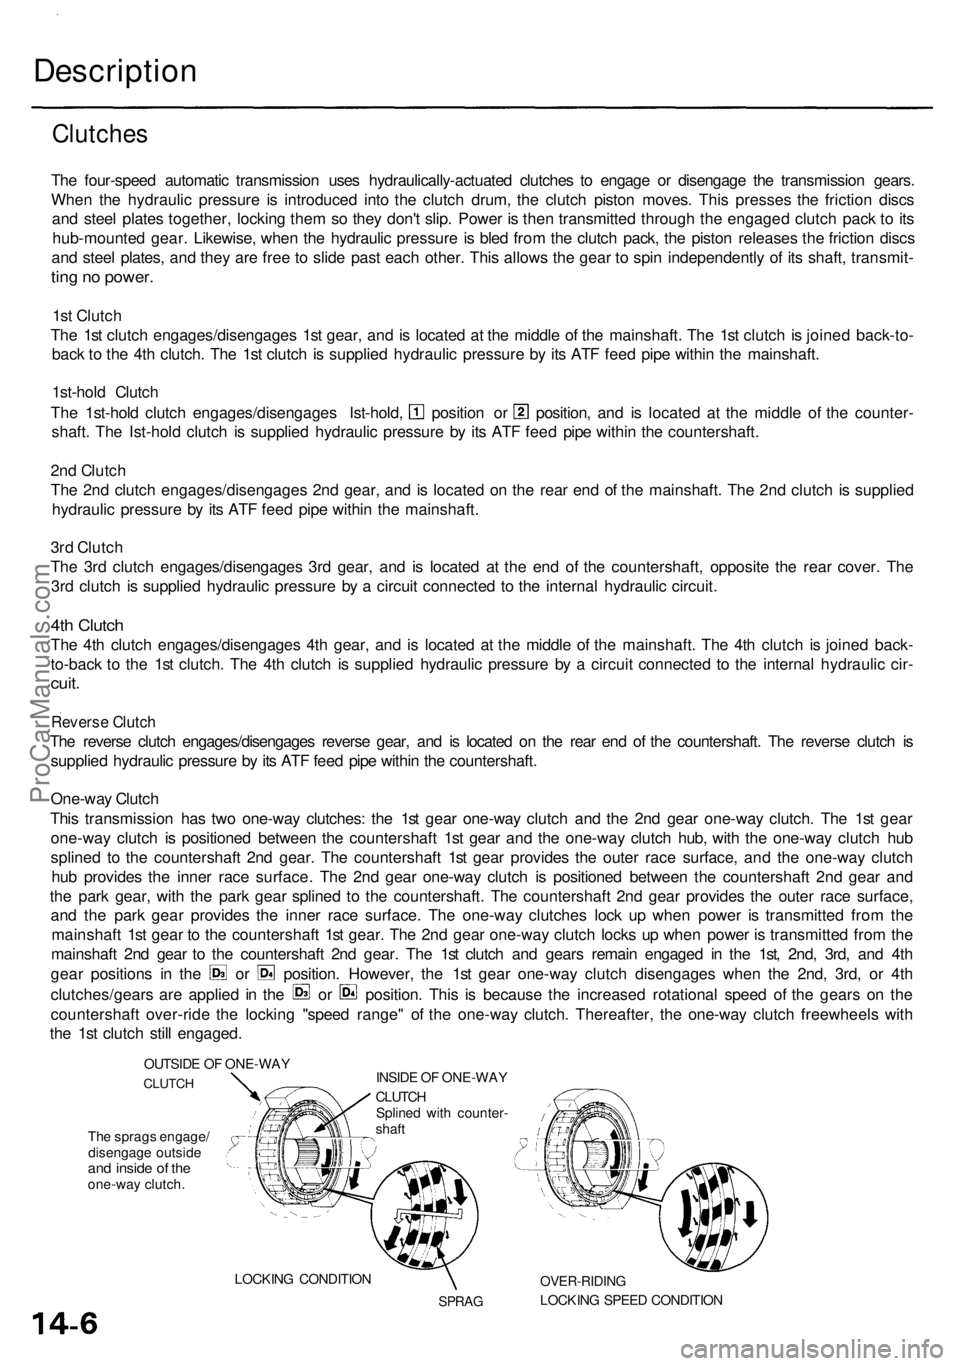
One-wa y Clutc h
Thi s transmissio n ha s tw o one-wa y clutches : th e 1s t gea r one-wa y clutc h an d th e 2n d gea r one-wa y clutch . Th e 1s t gea r
one-wa y clutc h i s positione d betwee n th e countershaf t 1s t gea r an d th e one-wa y clutc h hub , wit h th e one-wa y clutc h hu b
spline d t o th e countershaf t 2n d gear . Th e countershaf t 1s t gea r provide s th e oute r rac e surface , an d th e one-wa y clutc h
hu b provide s th e inne r rac e surface . Th e 2n d gea r one-wa y clutc h i s positione d betwee n th e countershaf t 2n d gea r an d
th e par k gear , wit h th e par k gea r spline d t o th e countershaft . Th e countershaf t 2n d gea r provide s th e oute r rac e surface ,
an d th e par k gea r provide s th e inne r rac e surface . Th e one-wa y clutche s loc k u p whe n powe r i s transmitte d fro m th e
mainshaf t 1s t gea r t o th e countershaf t 1s t gear . Th e 2n d gea r one-wa y clutc h lock s u p whe n powe r i s transmitte d fro m th e
mainshaf t 2n d gea r t o th e countershaf t 2n d gear . Th e 1s t clutc h an d gear s remai n engage d i n th e 1st , 2nd , 3rd , an d 4t h
gea r position s i n th e o r position . However , th e 1s t gea r one-wa y clutc h disengage s whe n th e 2nd , 3rd , o r 4t h
clutches/gear s ar e applie d i n th e o r position . Thi s i s becaus e th e increase d rotationa l spee d o f th e gear s o n th e
countershaf t over-rid e th e lockin g "spee d range " o f th e one-wa y clutch . Thereafter , th e one-wa y clutc h freewheel s wit h
th e 1s t clutc h stil l engaged .
OUTSIDE O F ONE-WA Y
CLUTCH
The sprag s engage /
disengag e outsid e
and insid e o f th eone-wa y clutch . INSID
E O F ONE-WA Y
CLUTCH
Spline d wit h counter -
shaf t
LOCKIN G CONDITIO N
SPRAG
OVER-RIDIN G
LOCKING SPEE D CONDITIO N
ProCarManuals.com
Page 720 of 1954
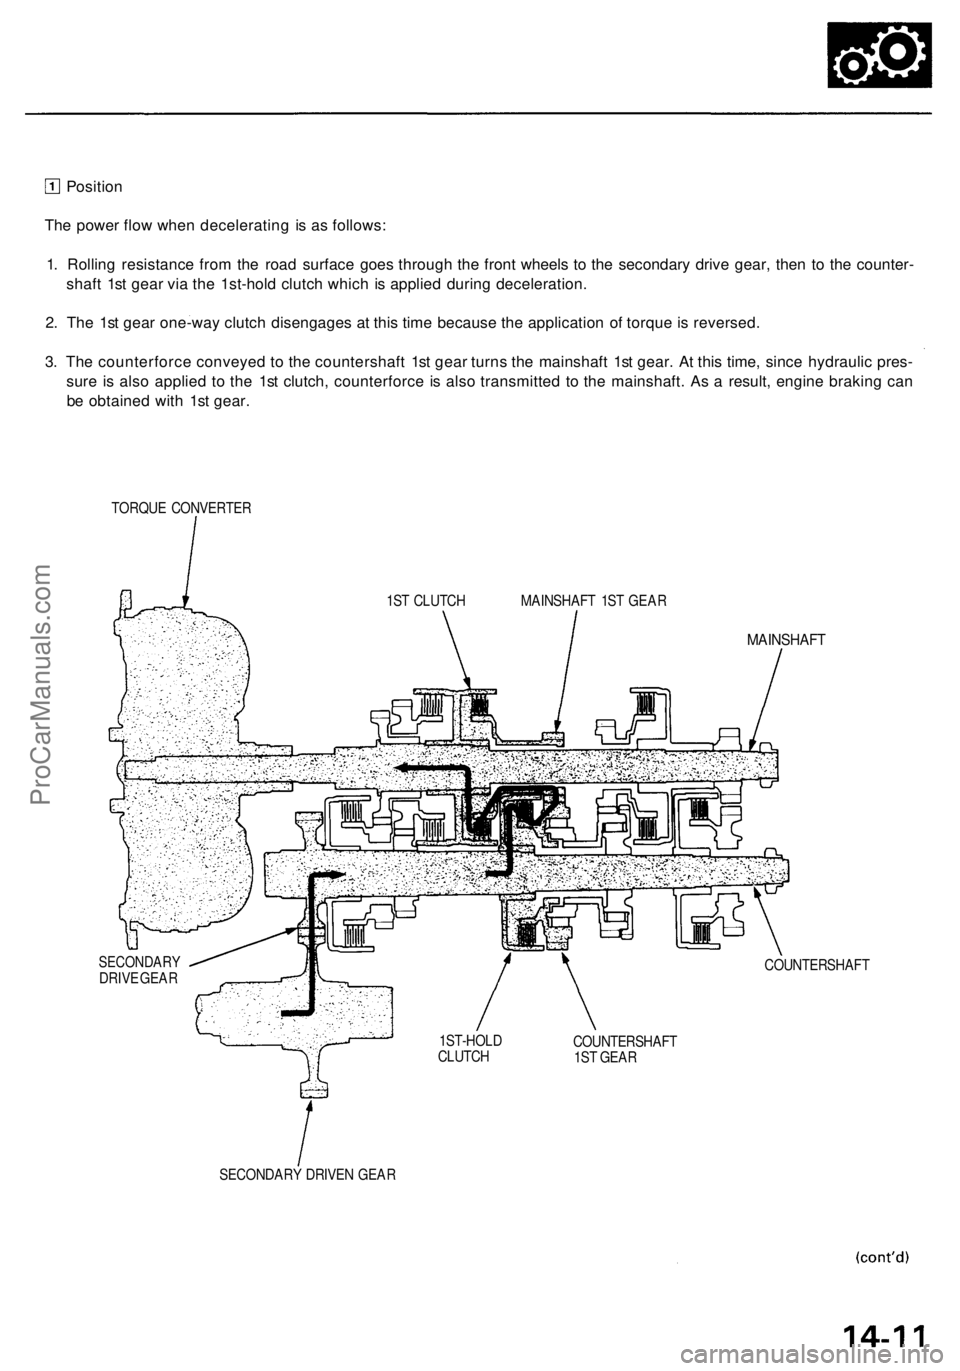
Position
The power flow when decelerating is as follows:
1. Rolling resistance from the road surface goes through the front wheels to the secondary drive gear, then to the counter-
shaft 1st gear via the 1st-hold clutch which is applied during deceleration.
2. The 1st gear one-way clutch disengages at this time because the application of torque is reversed.
3. The counterforce conveyed to the countershaft 1st gear turns the mainshaft 1st gear. At this time, since hydraulic pres-
sure is also applied to the 1st clutch, counterforce is also transmitted to the mainshaft. As a result, engine braking can
be obtained with 1st gear.
TORQUE CONVERTER
1ST CLUTCH MAINSHAFT 1ST GEAR
MAINSHAFT
SECONDARY
DRIVE GEAR
COUNTERSHAFT
COUNTERSHAFT
1ST GEAR
SECONDARY DRIVEN GEAR
1ST-HOLD
CLUTCHProCarManuals.com