1996 ACURA RL KA9 ECU
[x] Cancel search: ECUPage 1807 of 1954
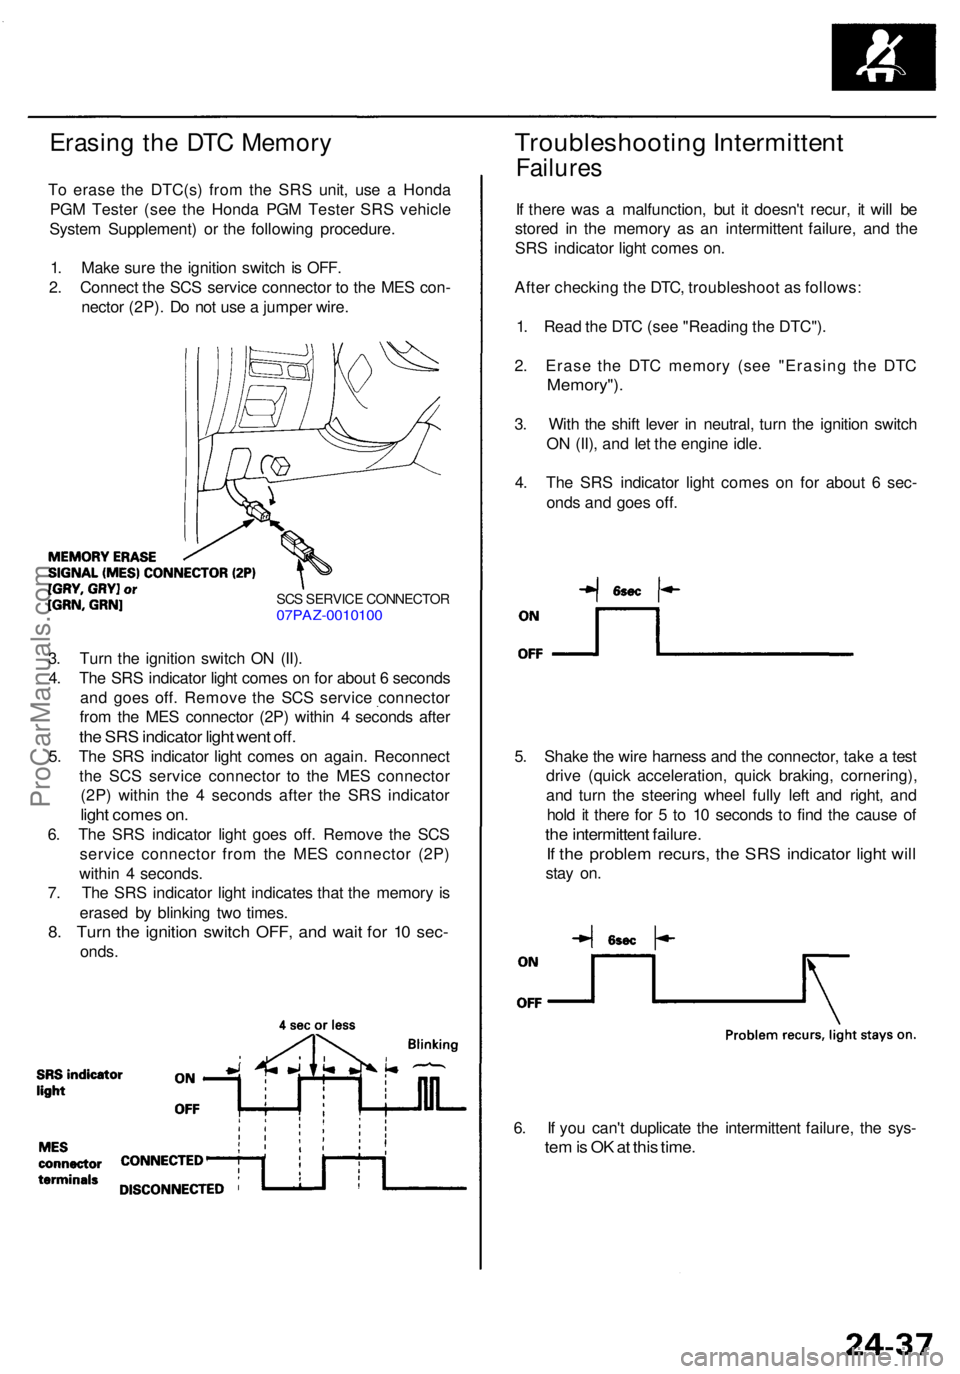
Erasing th e DT C Memor y
To eras e th e DTC(s ) fro m th e SR S unit , us e a Hond a
PG M Teste r (se e th e Hond a PG M Teste r SR S vehicl e
Syste m Supplement ) o r th e followin g procedure .
1 . Mak e sur e th e ignitio n switc h is OFF .
2 . Connec t th e SC S servic e connecto r t o th e ME S con -
necto r (2P) . D o no t us e a jumpe r wire .
Troubleshootin g Intermitten t
Failures
If ther e wa s a malfunction , bu t i t doesn' t recur , i t wil l b e
store d i n th e memor y a s a n intermitten t failure , an d th e
SR S indicato r ligh t come s on .
Afte r checkin g th e DTC , troubleshoo t a s follows :
1 . Rea d th e DT C (se e "Readin g th e DTC") .
2 . Eras e th e DT C memor y (se e "Erasin g th e DT C
Memory") .
3. Wit h th e shif t leve r i n neutral , tur n th e ignitio n switc h
O N (II) , an d le t th e engin e idle .
4 . Th e SR S indicato r ligh t come s o n fo r abou t 6 sec -
ond s an d goe s off .
5 . Shak e th e wir e harnes s an d th e connector , tak e a tes t
driv e (quic k acceleration , quic k braking , cornering) ,
an d tur n th e steerin g whee l full y lef t an d right , an d
hol d i t ther e fo r 5 to 1 0 second s t o fin d th e caus e o f
the intermitten t failure .
If th e proble m recurs , th e SR S indicato r ligh t wil l
stay on .
6 . I f yo u can' t duplicat e th e intermitten t failure , th e sys -
tem is O K a t thi s time .
3. Tur n th e ignitio n switc h O N (II) .
4 . Th e SR S indicato r ligh t come s o n fo r abou t 6 second s
an d goe s off . Remov e th e SC S servic e connecto r
fro m th e ME S connecto r (2P ) withi n 4 second s afte r
the SR S indicato r ligh t wen t off .
5. Th e SR S indicato r ligh t come s o n again . Reconnec t
th e SC S servic e connecto r t o th e ME S connecto r
(2P ) withi n th e 4 second s afte r th e SR S indicato r
light come s on .
6. Th e SR S indicato r ligh t goe s off . Remov e th e SC S
servic e connecto r fro m th e ME S connecto r (2P )
withi n 4 seconds .
7 . Th e SR S indicato r ligh t indicate s tha t th e memor y i s
erase d b y blinkin g tw o times .
8. Tur n th e ignitio n switc h OFF , an d wai t fo r 1 0 sec -
onds .
SCS SERVIC E CONNECTO R07PAZ-001010 0
ProCarManuals.com
Page 1858 of 1954
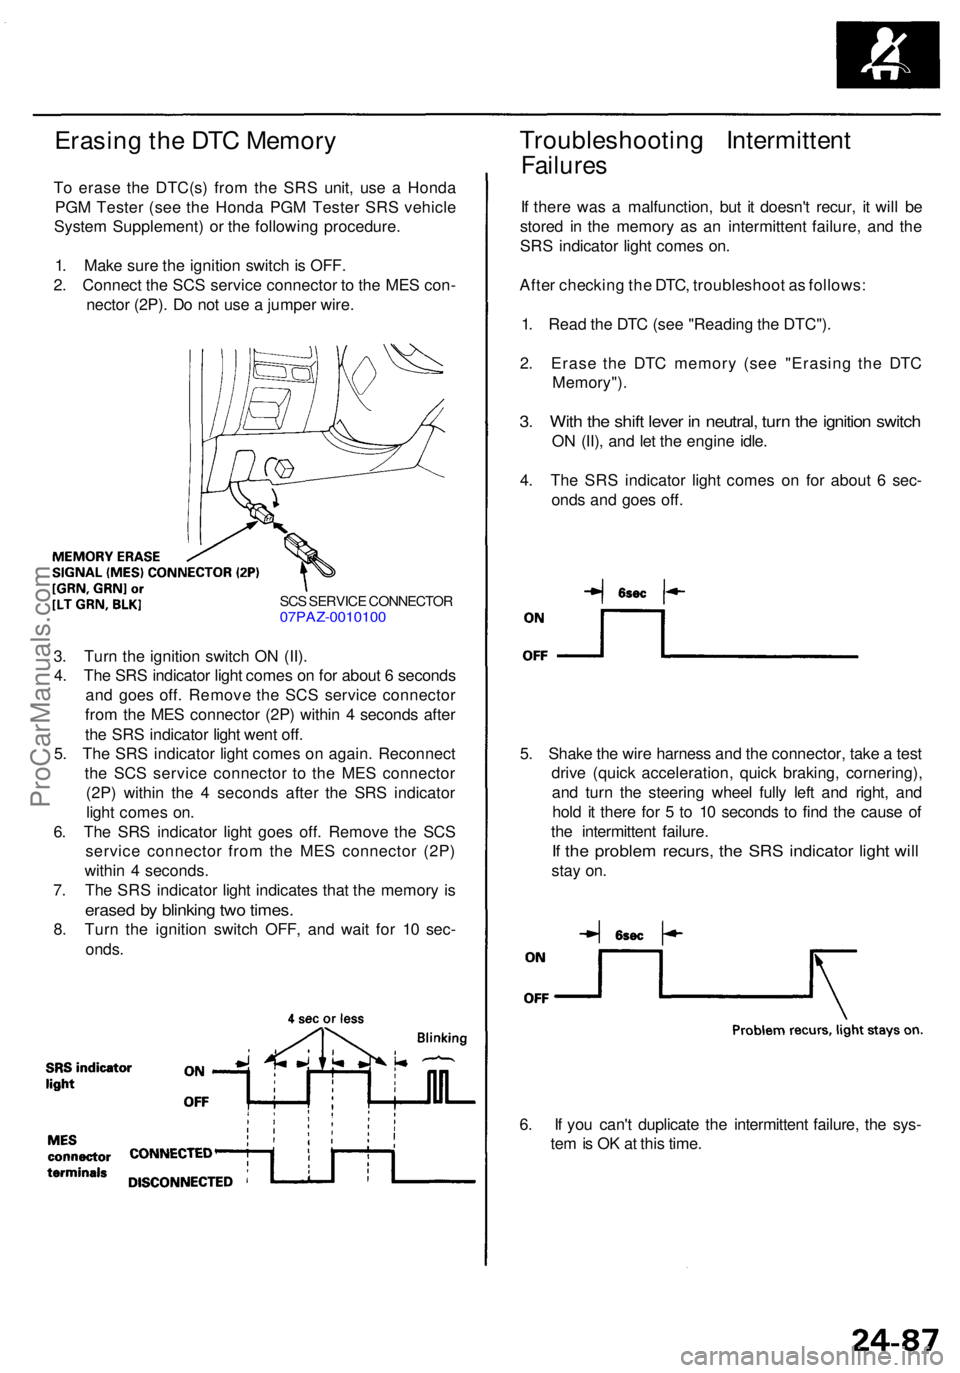
Erasing th e DT C Memor y
To eras e th e DTC(s ) fro m th e SR S unit , us e a Hond a
PG M Teste r (se e th e Hond a PG M Teste r SR S vehicl e
Syste m Supplement ) o r th e followin g procedure .
1 . Mak e sur e th e ignitio n switc h is OFF .
2 . Connec t th e SC S servic e connecto r t o th e ME S con -
necto r (2P) . D o no t us e a jumpe r wire .
Troubleshootin g Intermitten t
Failures
If ther e wa s a malfunction , bu t i t doesn' t recur , i t wil l b e
store d i n th e memor y a s a n intermitten t failure , an d th e
SR S indicato r ligh t come s on .
Afte r checkin g th e DTC , troubleshoo t a s follows :
1 . Rea d th e DT C (se e "Readin g th e DTC") .
2 . Eras e th e DT C memor y (se e "Erasin g th e DT C
Memory") .
3. Wit h th e shif t leve r i n neutral , tur n th e ignitio n switc h
ON (II) , an d le t th e engine idle.
4 . Th e SR S indicato r ligh t come s o n fo r abou t 6 sec -
ond s an d goe s off .
SCS SERVIC E CONNECTO R07PAZ-001010 0
3. Tur n th e ignitio n switc h O N (II) .
4 . Th e SR S indicato r ligh t come s o n fo r abou t 6 second s
an d goe s off . Remov e th e SC S servic e connecto r
fro m th e ME S connecto r (2P ) withi n 4 second s afte r
th e SR S indicato r ligh t wen t off .
5 . Th e SR S indicato r ligh t come s o n again . Reconnec t
th e SC S servic e connecto r t o th e ME S connecto r
(2P ) withi n th e 4 second s afte r th e SR S indicato r
ligh t come s on .
6 . Th e SR S indicato r ligh t goe s off . Remov e th e SC S
servic e connecto r fro m th e ME S connecto r (2P )
withi n 4 seconds .
7 . Th e SR S indicato r ligh t indicate s tha t th e memor y i s
erase d b y blinkin g tw o times .
8. Tur n th e ignitio n switc h OFF , an d wai t fo r 1 0 sec -
onds . 5
. Shak e th e wir e harnes s an d th e connector , tak e a tes t
driv e (quic k acceleration , quic k braking , cornering) ,
an d tur n th e steerin g whee l full y lef t an d right , an d
hol d i t ther e fo r 5 to 1 0 second s t o fin d th e caus e o f
th e intermitten t failure .
If th e proble m recurs , th e SR S indicato r ligh t wil l
stay on .
6 . I f yo u can' t duplicat e th e intermitten t failure , th e sys -
te m is O K a t thi s time .
ProCarManuals.com
Page 1916 of 1954
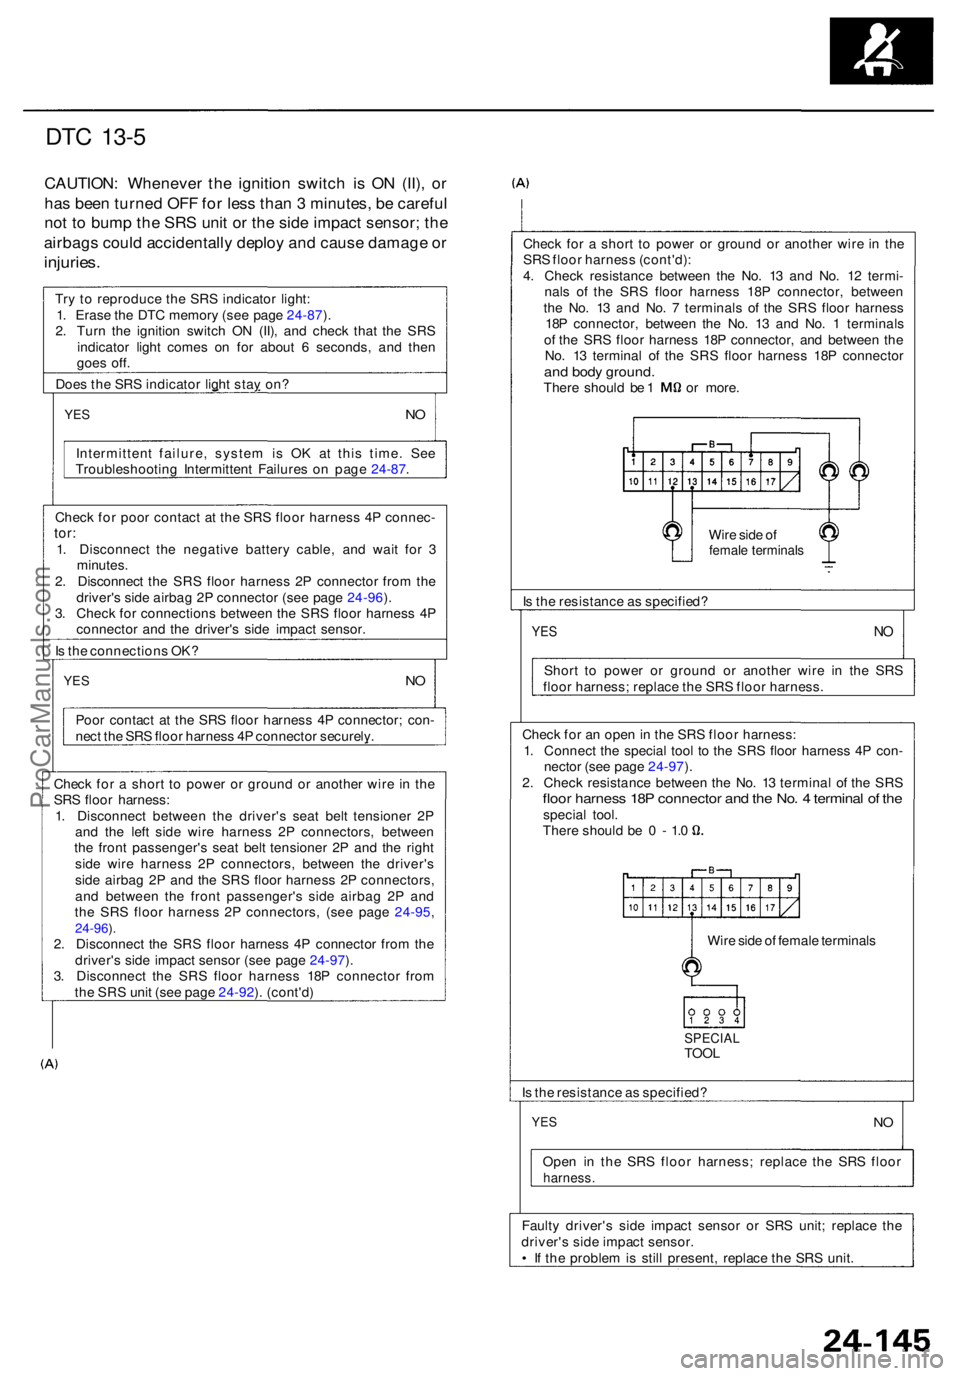
DTC 13- 5
CAUTION : Wheneve r th e ignitio n switc h i s O N (II) , o r
ha s bee n turne d OF F fo r les s tha n 3 minutes , b e carefu l
no t t o bum p th e SR S uni t o r th e sid e impac t sensor ; th e
airbag s coul d accidentall y deplo y an d caus e damag e o r
injuries .
Does th e SR S indicato r ligh t sta y on ?
YESNO
Intermitten t failure , syste m i s O K a t thi s time . Se e
Troubleshootin g Intermitten t Failure s o n pag e 24-87 .
I s th e connection s OK ?
YESNO
Poo r contac t a t th e SR S floo r harnes s 4 P connector ; con -
nec t th e SR S floo r harnes s 4 P connecto r securely . Chec
k fo r a shor t t o powe r o r groun d o r anothe r wir e i n th e
SR S floo r harnes s (cont'd) :
4 . Chec k resistanc e betwee n th e No . 1 3 an d No . 1 2 termi -
nal s o f th e SR S floo r harnes s 18 P connector , betwee n
th e No . 1 3 an d No . 7 terminal s o f th e SR S floo r harnes s
18 P connector , betwee n th e No . 1 3 an d No . 1 terminal s
o f th e SR S floo r harnes s 18 P connector , an d betwee n th e
No . 1 3 termina l o f th e SR S floo r harnes s 18 P connecto r
and bod y ground .There shoul d b e 1 o r more .
I s th e resistanc e a s specified ?
YESNO
Shor t t o powe r o r groun d o r anothe r wir e i n th e SR S
floo r harness ; replac e th e SR S floo r harness .
Chec k fo r a n ope n in th e SR S floo r harness :
1 . Connec t th e specia l too l t o th e SR S floo r harnes s 4 P con -
necto r (se e pag e 24-97 ).
2 . Chec k resistanc e betwee n th e No . 1 3 termina l o f th e SR S
floor harnes s 18 P connecto r an d th e No . 4 termina l o f th especia l tool .Ther e shoul d b e 0 - 1.0
Wire sid e o f femal e terminal s
I s th e resistanc e a s specified ?Wir
e sid e o f
femal e terminal s
Try t o reproduc e th e SR S indicato r light :
1 . Eras e th e DT C memor y (se e pag e 24-87 ).
2 . Tur n th e ignitio n switc h O N (II) , an d chec k tha t th e SR S
indicato r ligh t come s o n fo r abou t 6 seconds , an d the n
goe s off .
Chec k fo r poo r contac t a t th e SR S floo r harnes s 4 P connec -
tor:1. Disconnec t th e negativ e batter y cable , an d wai t fo r 3
minutes .
2 . Disconnec t th e SR S floo r harnes s 2 P connecto r fro m th e
driver' s sid e airba g 2 P connecto r (se e pag e 24-96 ).
3 . Chec k fo r connection s betwee n th e SR S floo r harnes s 4 P
connecto r an d th e driver' s sid e impac t sensor .
SPECIA LTOOL
Chec k fo r a shor t t o powe r o r groun d o r anothe r wir e i n th e
SR S floo r harness :
1 . Disconnec t betwee n th e driver' s sea t bel t tensione r 2 P
an d th e lef t sid e wir e harnes s 2 P connectors , betwee n
th e fron t passenger' s sea t bel t tensione r 2 P an d th e righ t
sid e wir e harnes s 2 P connectors , betwee n th e driver' s
sid e airba g 2 P an d th e SR S floo r harnes s 2 P connectors ,
an d betwee n th e fron t passenger' s sid e airba g 2 P an d
th e SR S floo r harnes s 2 P connectors , (se e pag e 24-95 ,
24-96).2 . Disconnec t th e SR S floo r harnes s 4 P connecto r fro m th e
driver' s sid e impac t senso r (se e pag e 24-97 ).
3 . Disconnec t th e SR S floo r harnes s 18 P connecto r fro m
th e SR S uni t (se e pag e 24-92 ). (cont'd )
Faulty driver' s sid e impac t senso r o r SR S unit ; replac e th e
driver' s sid e impac t sensor .
• I f th e proble m is stil l present , replac e th e SR S unit .
Ope
n i n th e SR S floo r harness ; replac e th e SR S floo r
harness .
YESNO
ProCarManuals.com
Page 1933 of 1954
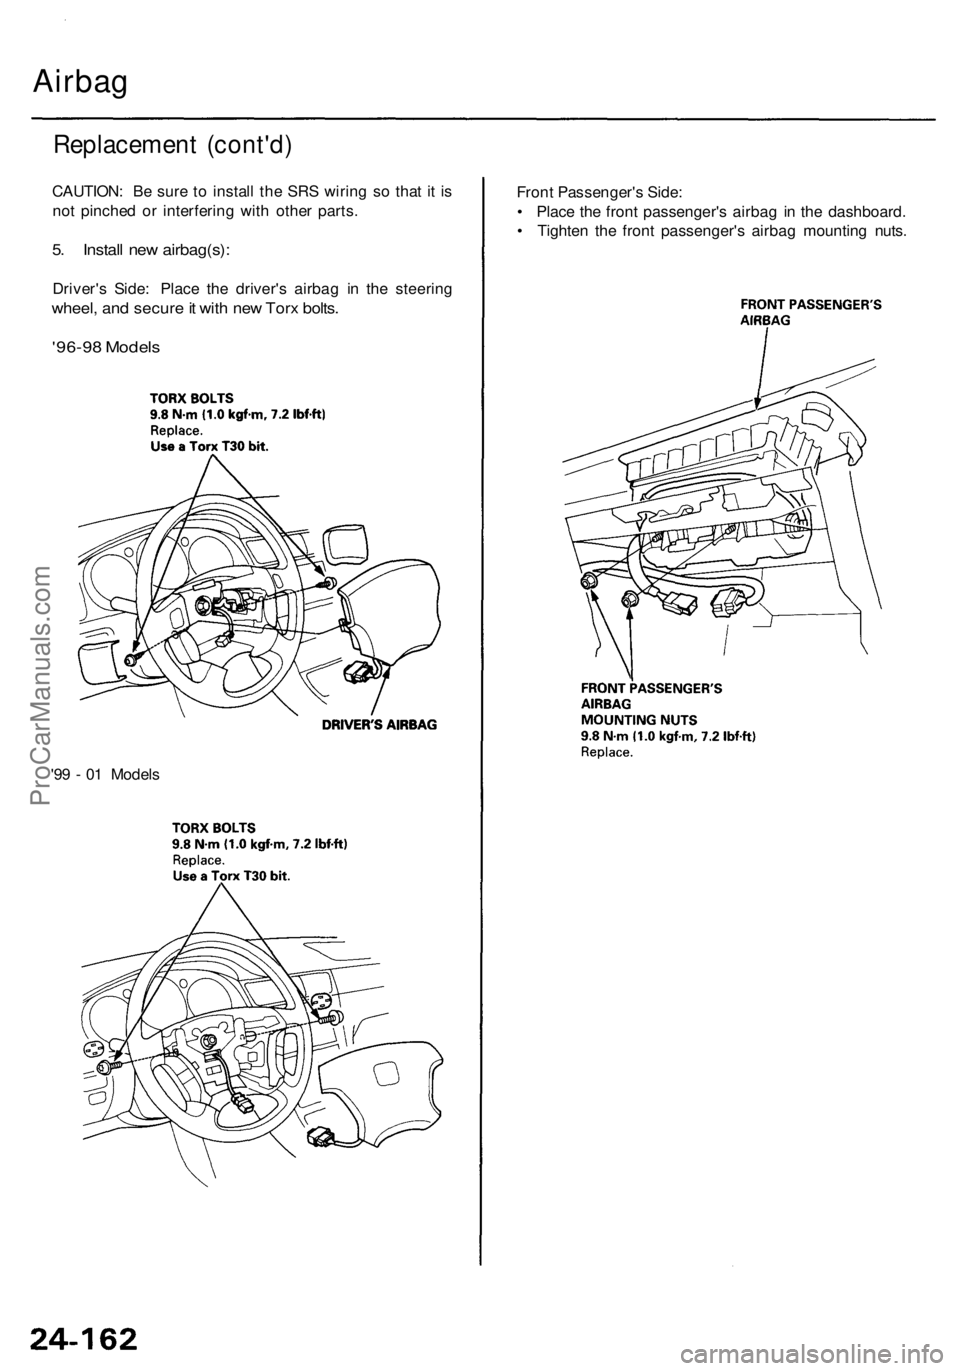
Airbag
Replacement (cont'd)
CAUTION: Be sure to install the SRS wiring so that it is
not pinched or interfering with other parts.
5. Install new airbag(s):
Driver's Side: Place the driver's airbag in the steering
wheel, and secure it with new Torx bolts.
'96-98 Models
Front Passenger's Side:
• Place the front passenger's airbag in the dashboard.
• Tighten the front passenger's airbag mounting nuts.
'99 - 01 ModelsProCarManuals.com
Page 1939 of 1954
Disposal
Before scrappin g an y airbag s o r sea t bel t tensioner s
(including those i n a whol e vehicl e t o b e scrapped) , th e
airbag s mus t b e deploye d an d th e sea t bel t tensioner s
mus t b e triggered . I f th e vehicl e i s stil l withi n th e war -
rant y period , befor e deployin g th e airbag s o r triggerin g
th e sea t bel t tensioners , th e Acur a Part s an d Servic e
Manage r mus t giv e approva l and/o r specia l instruction .
Onl y afte r th e airbag s hav e bee n deploye d o r a sea t bel t
tensione r i s triggere d (a s th e resul t o f vehicl e collision ,
fo r example) , ca n the y b e scrapped .
I f th e airbag s o r th e sea t bel t tensioner s appea r intac t
(no t deploye d o r triggered) , trea t the m wit h extrem e
caution . Follo w th e procedure .
Deploying th e Airbags : In-vehicl e
NOTE: I f a n SR S vehicl e i s t o b e entirel y scrapped , it s
airbag s shoul d b e deploye d whil e stil l i n th e vehicle . Th e
airbag s shoul d no t b e considere d a s salvageabl e part s
an d shoul d neve r b e installe d in anothe r vehicle .
Confirm tha t eac h airba g is securel y mount -
ed ; otherwise , sever e persona l injur y coul d resul t fro m
deployment .
1 . Disconnec t bot h th e negativ e cabl e an d positiv e
cabl e fro m th e battery .
2 . Confir m tha t th e specia l too l i s functionin g properl y
b y followin g th e chec k procedur e o n th e too l labe l
o r th e procedur e o n pag e 24-171 .
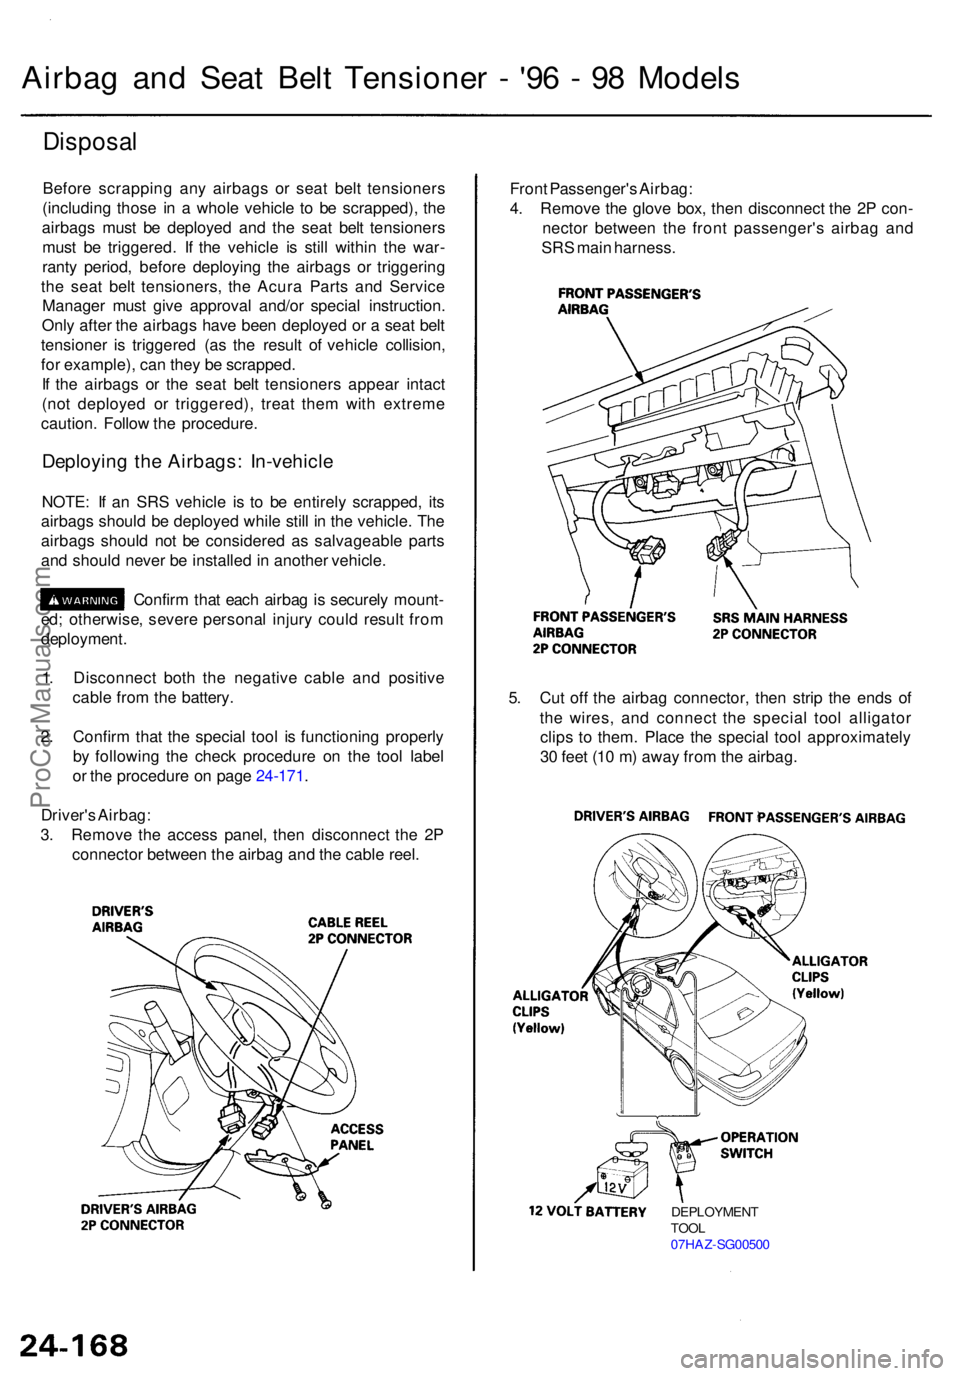
Driver' s Airbag :
3 . Remov e th e acces s panel , the n disconnec t th e 2 P
connecto r betwee n th e airba g an d th e cabl e reel .
Airba g an d Sea t Bel t Tensione r - '9 6 - 9 8 Model s
Front Passenger' s Airbag :
4 . Remov e th e glov e box , the n disconnec t th e 2 P con -
necto r betwee n th e fron t passenger' s airba g an d
SR S mai n harness .
5 . Cu t of f th e airba g connector , the n stri p th e end s o f
th e wires , an d connec t th e specia l too l alligato r
clip s t o them . Plac e th e specia l too l approximatel y
3 0 fee t (1 0 m ) awa y fro m th e airbag .
DEPLOYMEN T
TOO L
07HA Z-SG0050 0
ProCarManuals.com
Page 1940 of 1954
6. Connec t a 1 2 vol t batter y to th e tool :
• I f th e gree n ligh t o n th e too l come s on , th e airba g
ignite r circui t i s defectiv e an d canno t deplo y th e
airbag . G o to Damage d Airba g Specia l Procedure .
• I f th e re d ligh t o n th e too l come s on , th e airba g i s
read y t o b e deployed .
7 . Pus h th e tool' s deploymen t switch . Th e airba g
shoul d deplo y (deploymen t i s bot h highl y audibl e
an d visibl e a lou d nois e an d rapi d inflatio n o f th e
bag , followe d b y slo w deflation) .
• I f audible/visibl e deploymen t happens , an d th e
gree n ligh t o n th e too l come s on , continu e wit h
thi s procedure .
• I f th e airba g doesn' t deploy , ye t th e gree n ligh t
come s ON , it s ignite r i s defective . G o to Damage d
Airba g Specia l Procedure .
During deployment , th e airba g ca n
becom e ho t enoug h t o bur n you . Wai t thirt y min -
ute s afte r deploymen t befor e touchin g th e assem -
bly.
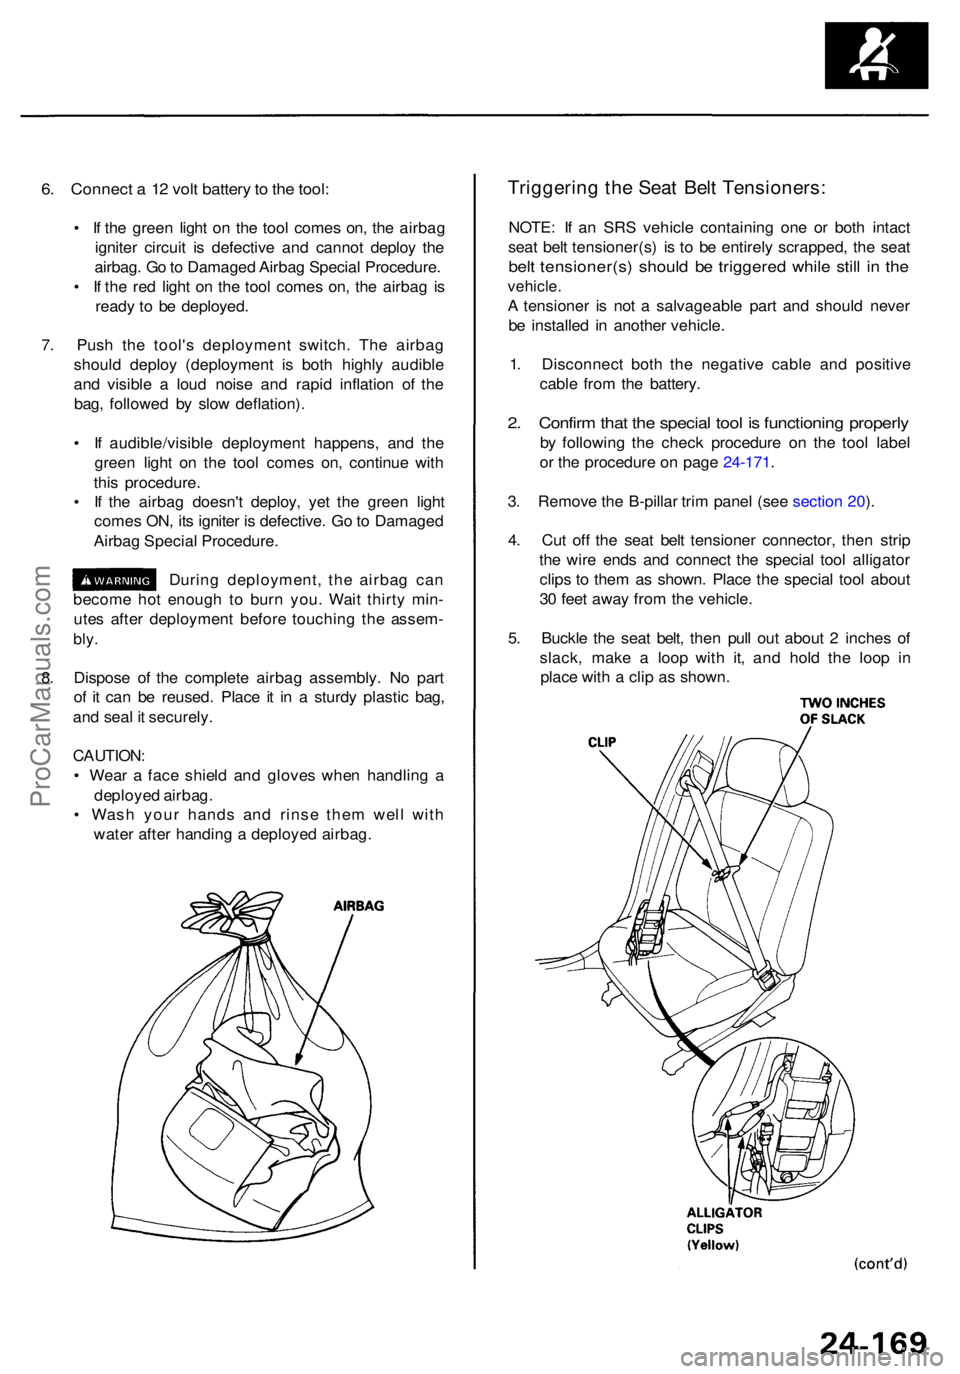
8. Dispos e o f th e complet e airba g assembly . N o par t
o f i t can be reused . Plac e i t i n a sturd y plasti c bag ,
an d sea l i t securely .
CAUTION :
• Wea r a fac e shiel d an d glove s whe n handlin g a
deploye d airbag .
• Was h you r hand s an d rins e the m wel l wit h
wate r afte r handin g a deploye d airbag .
Triggerin g th e Sea t Bel t Tensioners :
NOTE: I f a n SR S vehicl e containin g on e o r bot h intac t
sea t bel t tensioner(s ) i s t o b e entirel y scrapped , th e sea t
belt tensioner(s ) shoul d b e triggere d whil e stil l i n th e
vehicle .
A tensione r i s no t a salvageabl e par t an d shoul d neve r
b e installe d i n anothe r vehicle .
1 . Disconnec t bot h th e negativ e cabl e an d positiv e
cabl e fro m th e battery .
2. Confir m tha t th e specia l too l i s functionin g properl y
by followin g th e chec k procedur e o n th e too l labe l
o r th e procedur e o n pag e 24-171 .
3 . Remov e th e B-pilla r tri m pane l (se e sectio n 20 ).
4 . Cu t of f th e sea t bel t tensione r connector , the n stri p
th e wir e end s an d connec t th e specia l too l alligato r
clip s t o the m a s shown . Plac e th e specia l too l abou t
3 0 fee t awa y fro m th e vehicle .
5 . Buckl e th e sea t belt , the n pul l ou t abou t 2 inche s o f
slack , mak e a loo p wit h it , an d hol d th e loo p i n
plac e wit h a cli p a s shown .
ProCarManuals.com
Page 1943 of 1954
Airbag, Side Airbag and Seat Belt Tensioner - '99 - 01 Models
Disposal
Before scrappin g an y airbag s o r sid e airbag s o r sea t bel t
tensioner s (includin g thos e i n a whol e vehicl e t o b e
scrapped) , th e airbag s o r sid e airbag s mus t b e deploye d
and th e sea t bel t tensioner s mus t b e triggered . I f th e
vehicl e i s stil l withi n th e warrant y period , befor e deploy -
in g th e airbag s o r sid e airbag s o r triggerin g th e sea t bel t
tensioners , th e Acur a Part s an d Servic e Manage r mus t
giv e approva l and/o r specia l instruction . Onl y afte r th e
airbag s o r sid e airbag s hav e bee n deploye d o r a sea t
bel t tensione r i s triggere d (a s th e resul t o f vehicl e colli -
sion , fo r example) , ca n the y b e scrapped .
I f th e airbag s o r sid e airbag s o r th e sea t bel t tensioner s
appear intac t (no t deploye d o r triggered) , trea t the m
with extrem e caution . Follo w th e procedure .
Deploying th e Airbags : In-vehicl e
NOTE:
• I f a n SR S vehicl e i s t o b e entirel y scrapped , it s
airbag s o r sid e airba g shoul d b e deploye d whil e stil l
in th e vehicle . Th e airbag s o r sid e airba g shoul d no t
b e considere d a s salvageabl e part s an d shoul d neve r
be installe d in anothe r vehicle .
Confirm tha t eac h airba g o r sid e airba g is
securel y mounted ; otherwise , sever e persona l injur y coul d
resul t fro m deployment .
1 . Disconnec t bot h th e negativ e cabl e an d positiv e
cable fro m th e battery .
2. Confir m tha t th e specia l too l i s functionin g properl y
b y followin g th e chec k procedur e o n th e too l labe l
o r th e procedur e o n pag e 24-175 .
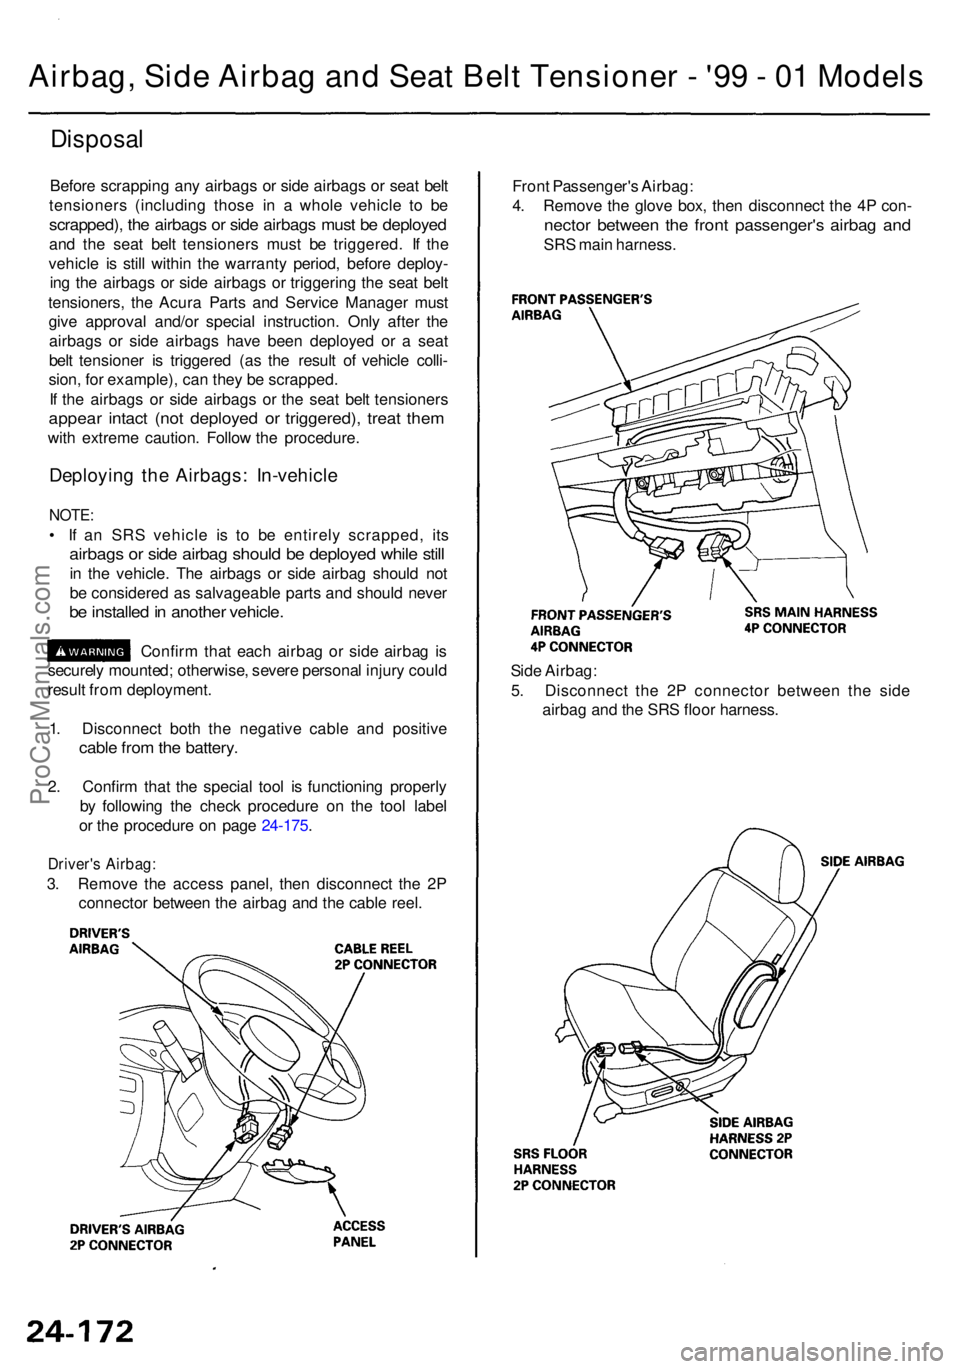
Driver's Airbag :
3. Remov e th e acces s panel , the n disconnec t th e 2 P
connecto r betwee n th e airba g an d th e cabl e reel . Fron
t Passenger' s Airbag :
4 . Remov e th e glov e box , the n disconnec t th e 4 P con -
necto r betwee n th e fron t passenger' s airba g an d
SRS mai n harness .
Sid e Airbag :
5 . Disconnec t th e 2 P connecto r betwee n th e sid e
airba g an d th e SR S floo r harness .
ProCarManuals.com
Page 1944 of 1954
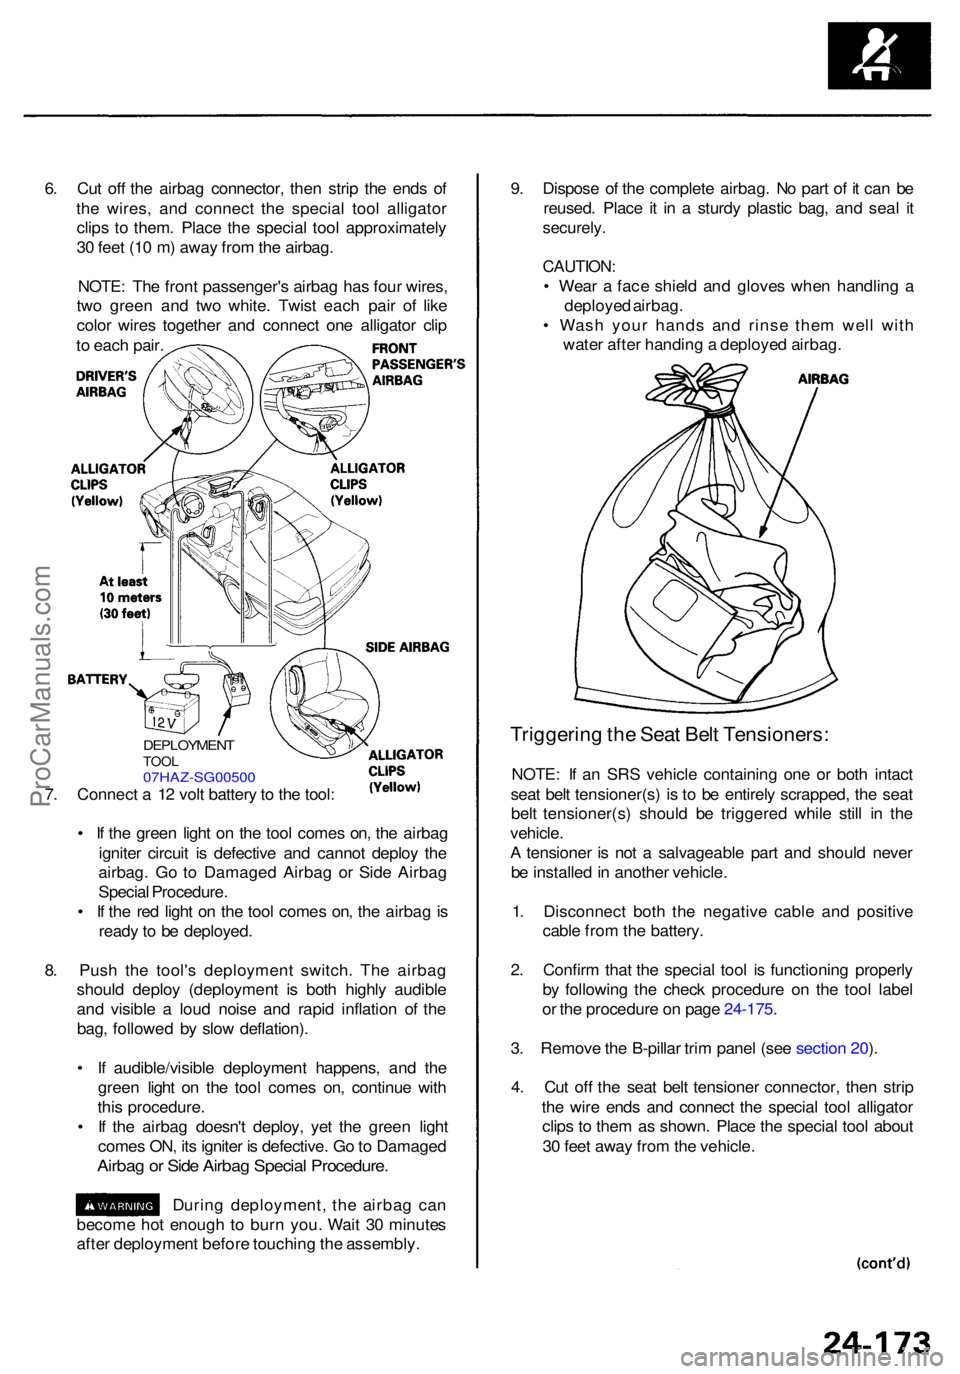
6. Cu t of f th e airba g connector , the n stri p th e end s o f
th e wires , an d connec t th e specia l too l alligato r
clip s t o them . Plac e th e specia l too l approximatel y
3 0 fee t (1 0 m ) awa y fro m th e airbag .
NOTE : Th e fron t passenger' s airba g ha s fou r wires ,
tw o gree n an d tw o white . Twis t eac h pai r o f lik e
colo r wire s togethe r an d connec t on e alligato r cli p
t o eac h pair . 9
. Dispos e o f th e complet e airbag . N o par t o f i t ca n b e
reused . Plac e i t i n a sturd y plasti c bag , an d sea l i t
securely .
CAUTION :
• Wea r a fac e shiel d an d glove s whe n handlin g a
deploye d airbag .
• Was h you r hand s an d rins e the m wel l wit h
wate r afte r handin g a deploye d airbag .
Triggerin g th e Sea t Bel t Tensioners :
NOTE: I f a n SR S vehicl e containin g on e o r bot h intac t
sea t bel t tensioner(s ) i s t o b e entirel y scrapped , th e sea t
bel t tensioner(s ) shoul d b e triggere d whil e stil l i n th e
vehicle .
A tensione r i s no t a salvageabl e par t an d shoul d neve r
b e installe d in anothe r vehicle .
1 . Disconnec t bot h th e negativ e cabl e an d positiv e
cabl e fro m th e battery .
2 . Confir m tha t th e specia l too l i s functionin g properl y
b y followin g th e chec k procedur e o n th e too l labe l
o r th e procedur e o n pag e 24-175 .
3 . Remov e th e B-pilla r tri m pane l (se e sectio n 20 ).
4 . Cu t of f th e sea t bel t tensione r connector , the n stri p
th e wir e end s an d connec t th e specia l too l alligato r
clip s t o the m a s shown . Plac e th e specia l too l abou t
3 0 fee t awa y fro m th e vehicle .
DEPLOYMEN TTOOL07HAZ-SG0050 0
7. Connec t a 1 2 vol t batter y to th e tool :
• I f th e gree n ligh t o n th e too l come s on , th e airba g
ignite r circui t i s defectiv e an d canno t deplo y th e
airbag . G o t o Damage d Airba g o r Sid e Airba g
Specia l Procedure .
• I f th e re d ligh t o n th e too l come s on , th e airba g is
read y t o b e deployed .
8 . Pus h th e tool' s deploymen t switch . Th e airba g
shoul d deplo y (deploymen t i s bot h highl y audibl e
an d visibl e a lou d nois e an d rapi d inflatio n o f th e
bag , followe d b y slo w deflation) .
• I f audible/visibl e deploymen t happens , an d th e
gree n ligh t o n th e too l come s on , continu e wit h
thi s procedure .
• I f th e airba g doesn' t deploy , ye t th e gree n ligh t
come s ON , it s ignite r i s defective . G o to Damage d
Airbag o r Sid e Airba g Specia l Procedure .
During deployment , th e airba g ca n
becom e ho t enoug h to bur n you . Wai t 3 0 minute s
afte r deploymen t befor e touchin g th e assembly .
ProCarManuals.com