1996 ACURA RL KA9 flat tire
[x] Cancel search: flat tirePage 298 of 1954
Towing
If th e vehicl e need s t o b e towed , cal l a professiona l tow -
in g service . Neve r to w th e vehicl e behin d anothe r vehi -
cl e wit h jus t a rop e o r chain . I t i s ver y dangerous .
Emergenc y Towin g
Ther e ar e thre e popula r method s o f towin g a vehicle .
Flat-be d Equipmen t — Th e operato r load s th e vehicl e o n
th e bac k o f a truck . Thi s is th e bes t wa y o f transportin g th e
vehicle .
Whee l Lif t Equipmen t — Th e to w truc k use s tw o pivotin g
arm s tha t g o unde r th e tire s (fron t o r rear ) an d lift s the m
off th e ground . Th e othe r tw o wheel s remai n o n th e
ground .
Sling-typ e Equipmen t — Th e to w truc k use s meta l cable s
wit h hook s o n th e ends . Thes e hook s g o aroun d part s o f
th e fram e o r suspensio n an d th e cable s lif t tha t en d o f
th e vehicl e of f th e ground . Th e vehicle' s suspensio n an d
bod y ca n b e seriousl y damage d i f thi s metho d o f towin g
i s attempted .
I f th e vehicl e canno t b e transporte d b y flat-bed , i t shoul d
b e towe d wit h th e fron t wheel s of f th e ground . I f du e t o
damage , th e vehicl e mus t b e towe d wit h th e fron t
wheel s o n th e ground , d o th e following .
Release th e parkin g brake .
Star t th e engine .
Shift t o position , the n position .
Tur n of f th e engine .
Leav e th e ignitio n switc h in Accessor y (I ) s o th e steer -
in g whee l doe s no t look .
CAUTION : Imprope r towin g preparatio n wil l damag e
th e transmission . Follo w th e abov e procedur e exactly . I f
yo u canno t shif t th e transmissio n o r star t th e engine ,
th e vehicl e mus t b e transporte d o n a flat-bed .
I t i s bes t t o to w th e vehicl e n o farthe r tha n 5 0 mile s
(8 0 km) , an d kee p th e spee d belo w 35 mp h (5 5 km/h) .
CAUTION : Tryin g to lif t o r to w th e vehicl e b y th e bumper s
wil l caus e seriou s damage . Th e bumper s ar e no t designe d
t o suppor t th e vehicle' s weight .
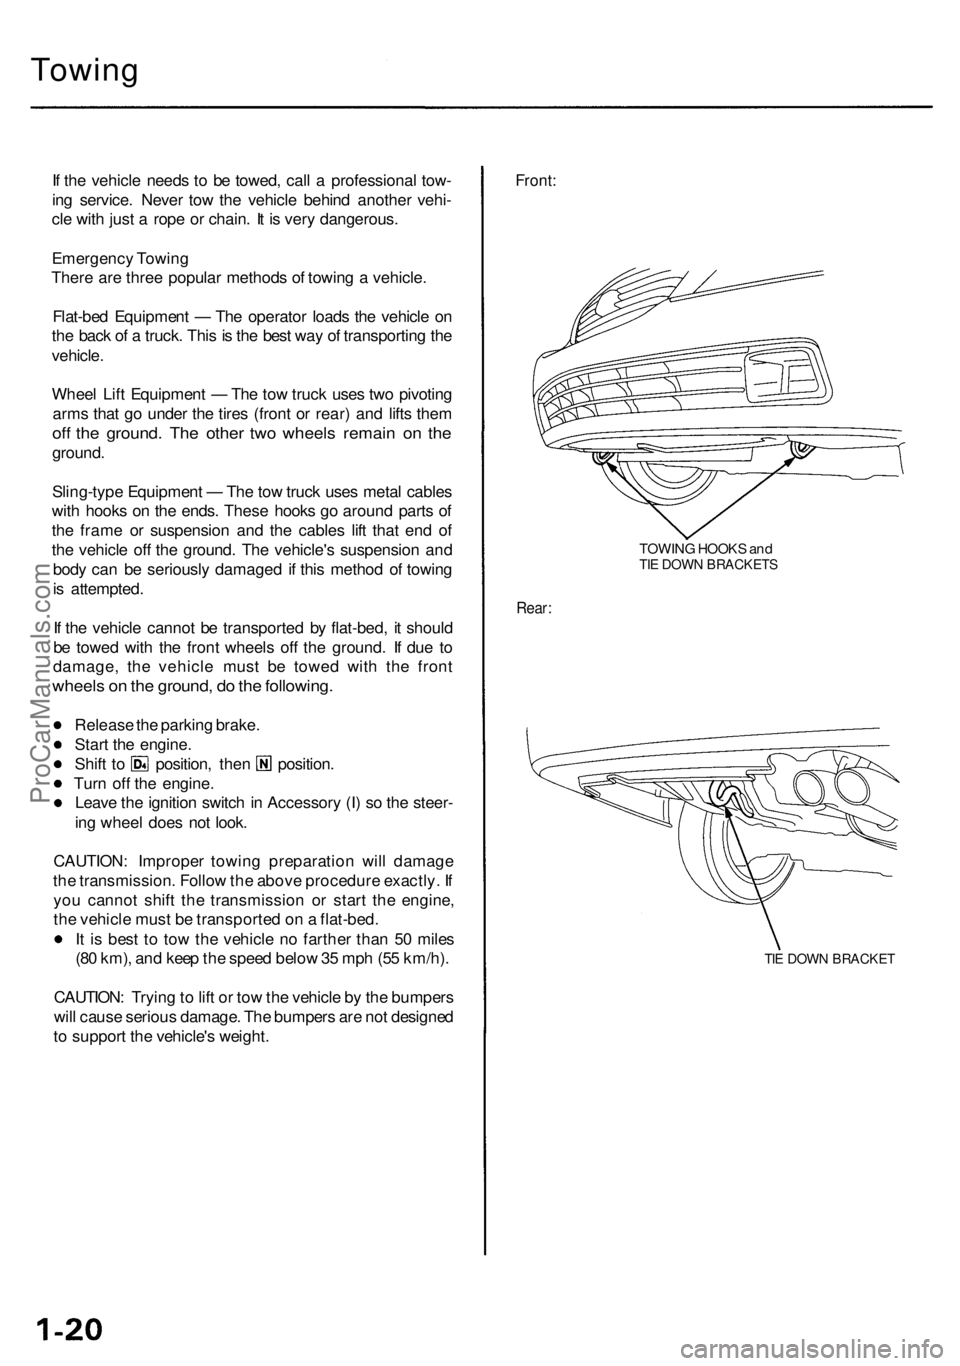
Front:
TOWIN G HOOK S an dTIE DOW N BRACKET S
Rear:
TIE DOW N BRACKE T
ProCarManuals.com
Page 1197 of 1954
Troubleshooting Precautions
1. In any of these cases, the TCS indicator light may come on or stay on even the TCS system is normal.
The coolant temperature is 32°F (0°C) or below.
The parking brake is applied for more than 30 seconds while the vehicle is being driven.
The tires are not inflated to the specified pressure.
The wheel sensor signal is interrupted during driving at speeds of 6 mph (10 km/h) or above due to, for example, a
vehicle spinning.
The MAP sensor, the coolant temperature sensor, the ICM or the atmospheric pressure sensor system of the PGM-FI
system is faulty.
2. TCS does not function when the TCS indicator light is ON.
3. When both the TCS indicator light and the MIL are ON, troubleshoot the PGM-FI system first.
4. When both the TCS indicator light and the ABS indicator light are ON, troubleshoot the ABS first.
5. The DTC 4-9 (ABS down) is memorized when the ABS control unit cannot output the wheel speed signal due to, for
example, a missing or blown ABS B2 (15 A) fuse. If you fail to erase the DTC of the TCS after troubleshooting the ABS,
the DTC remains in the TCS control unit memory. Therefore, be sure to test-drive the vehicle, and check the TCS indica-
tor light before starting to troubleshoot the TCS.ProCarManuals.com
Page 1279 of 1954
Troubleshooting
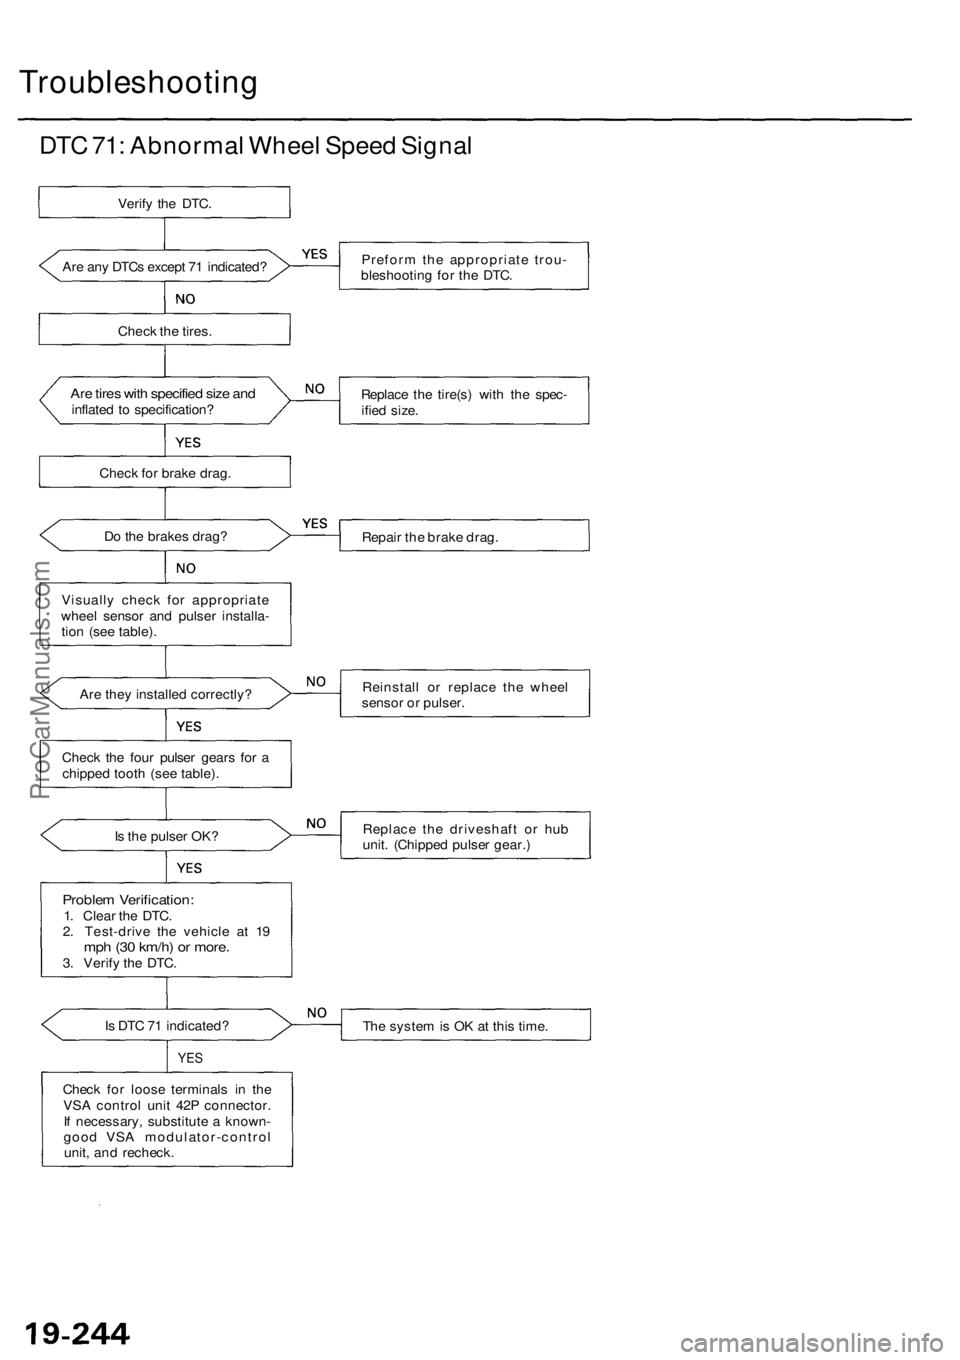
DTC 71: Abnormal Wheel Speed Signal
Are any DTCs except 71 indicated?
Check the tires.
Are tires with specified size and
inflated to specification?
Check for brake drag.
Do the brakes drag?
Visually check for appropriate
wheel sensor and pulser installa-
tion (see table).
Are they installed correctly?
Check the four pulser gears for a
chipped tooth (see table).
Is the pulser OK?
Problem Verification:
1. Clear the DTC.
2. Test-drive the vehicle at 19
mph (30 km/h) or more.
3. Verify the DTC.
Is DTC 71 indicated?
YES
Check for loose terminals in the
VSA control unit 42P connector.
If necessary, substitute a known-
good VSA modulator-control
unit, and recheck.
Preform the appropriate trou-
bleshooting for the DTC.
Replace the tire(s) with the spec-
ified size.
Repair the brake drag.
Reinstall or replace the wheel
sensor or pulser.
Replace the driveshaft or hub
unit. (Chipped pulser gear.)
The system is OK at this time.
Verify the DTC.ProCarManuals.com
Page 1940 of 1954
6. Connec t a 1 2 vol t batter y to th e tool :
• I f th e gree n ligh t o n th e too l come s on , th e airba g
ignite r circui t i s defectiv e an d canno t deplo y th e
airbag . G o to Damage d Airba g Specia l Procedure .
• I f th e re d ligh t o n th e too l come s on , th e airba g i s
read y t o b e deployed .
7 . Pus h th e tool' s deploymen t switch . Th e airba g
shoul d deplo y (deploymen t i s bot h highl y audibl e
an d visibl e a lou d nois e an d rapi d inflatio n o f th e
bag , followe d b y slo w deflation) .
• I f audible/visibl e deploymen t happens , an d th e
gree n ligh t o n th e too l come s on , continu e wit h
thi s procedure .
• I f th e airba g doesn' t deploy , ye t th e gree n ligh t
come s ON , it s ignite r i s defective . G o to Damage d
Airba g Specia l Procedure .
During deployment , th e airba g ca n
becom e ho t enoug h t o bur n you . Wai t thirt y min -
ute s afte r deploymen t befor e touchin g th e assem -
bly.
8. Dispos e o f th e complet e airba g assembly . N o par t
o f i t can be reused . Plac e i t i n a sturd y plasti c bag ,
an d sea l i t securely .
CAUTION :
• Wea r a fac e shiel d an d glove s whe n handlin g a
deploye d airbag .
• Was h you r hand s an d rins e the m wel l wit h
wate r afte r handin g a deploye d airbag .
Triggerin g th e Sea t Bel t Tensioners :
NOTE: I f a n SR S vehicl e containin g on e o r bot h intac t
sea t bel t tensioner(s ) i s t o b e entirel y scrapped , th e sea t
belt tensioner(s ) shoul d b e triggere d whil e stil l i n th e
vehicle .
A tensione r i s no t a salvageabl e par t an d shoul d neve r
b e installe d i n anothe r vehicle .
1 . Disconnec t bot h th e negativ e cabl e an d positiv e
cabl e fro m th e battery .
2. Confir m tha t th e specia l too l i s functionin g properl y
by followin g th e chec k procedur e o n th e too l labe l
o r th e procedur e o n pag e 24-171 .
3 . Remov e th e B-pilla r tri m pane l (se e sectio n 20 ).
4 . Cu t of f th e sea t bel t tensione r connector , the n stri p
th e wir e end s an d connec t th e specia l too l alligato r
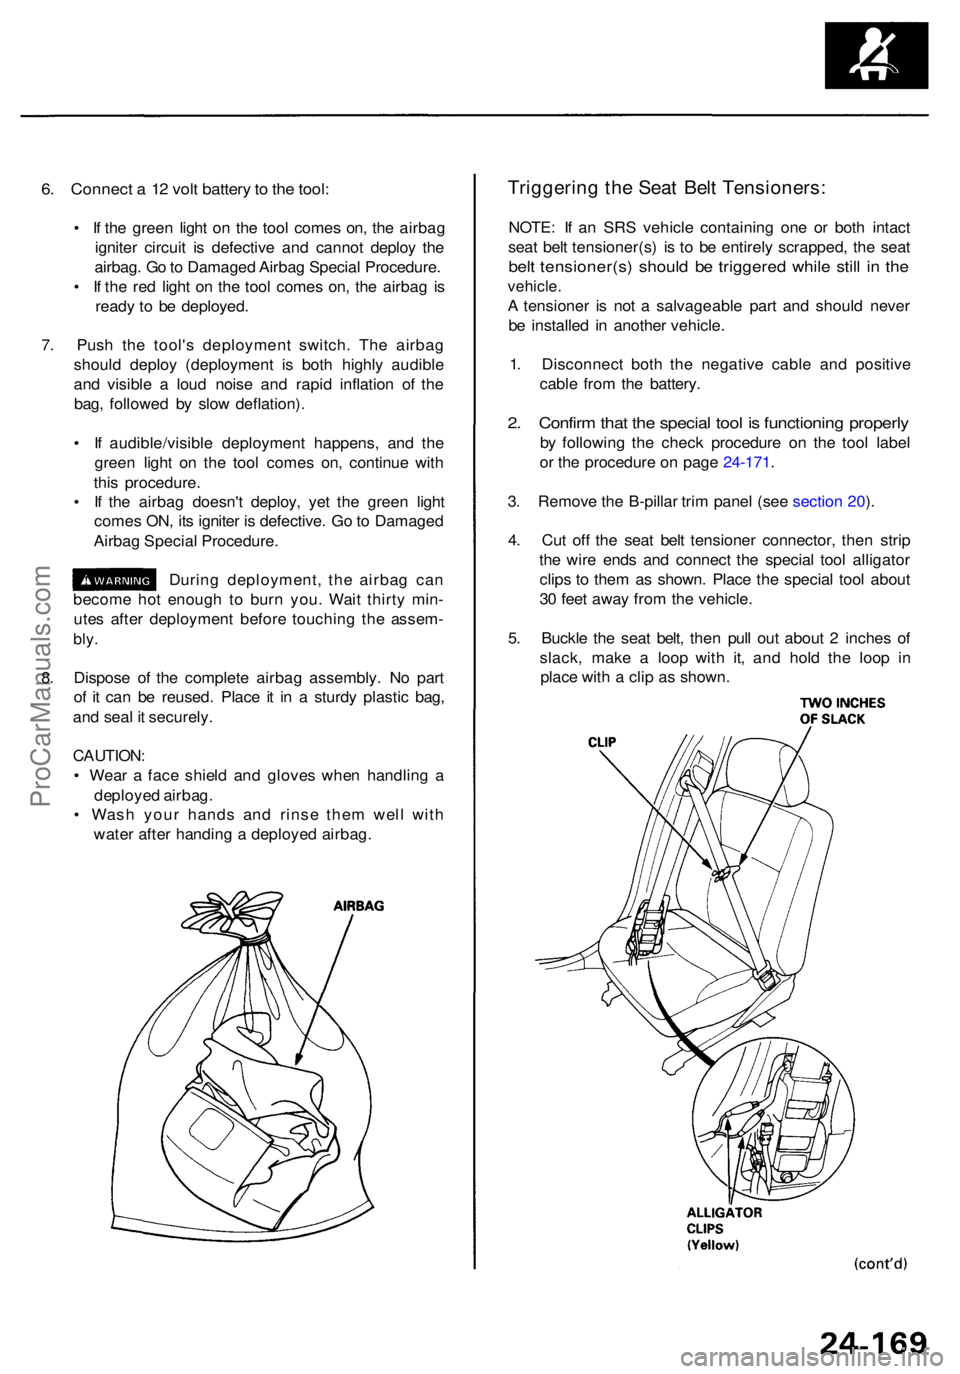
clip s t o the m a s shown . Plac e th e specia l too l abou t
3 0 fee t awa y fro m th e vehicle .
5 . Buckl e th e sea t belt , the n pul l ou t abou t 2 inche s o f
slack , mak e a loo p wit h it , an d hol d th e loo p i n
plac e wit h a cli p a s shown .
ProCarManuals.com
Page 1944 of 1954
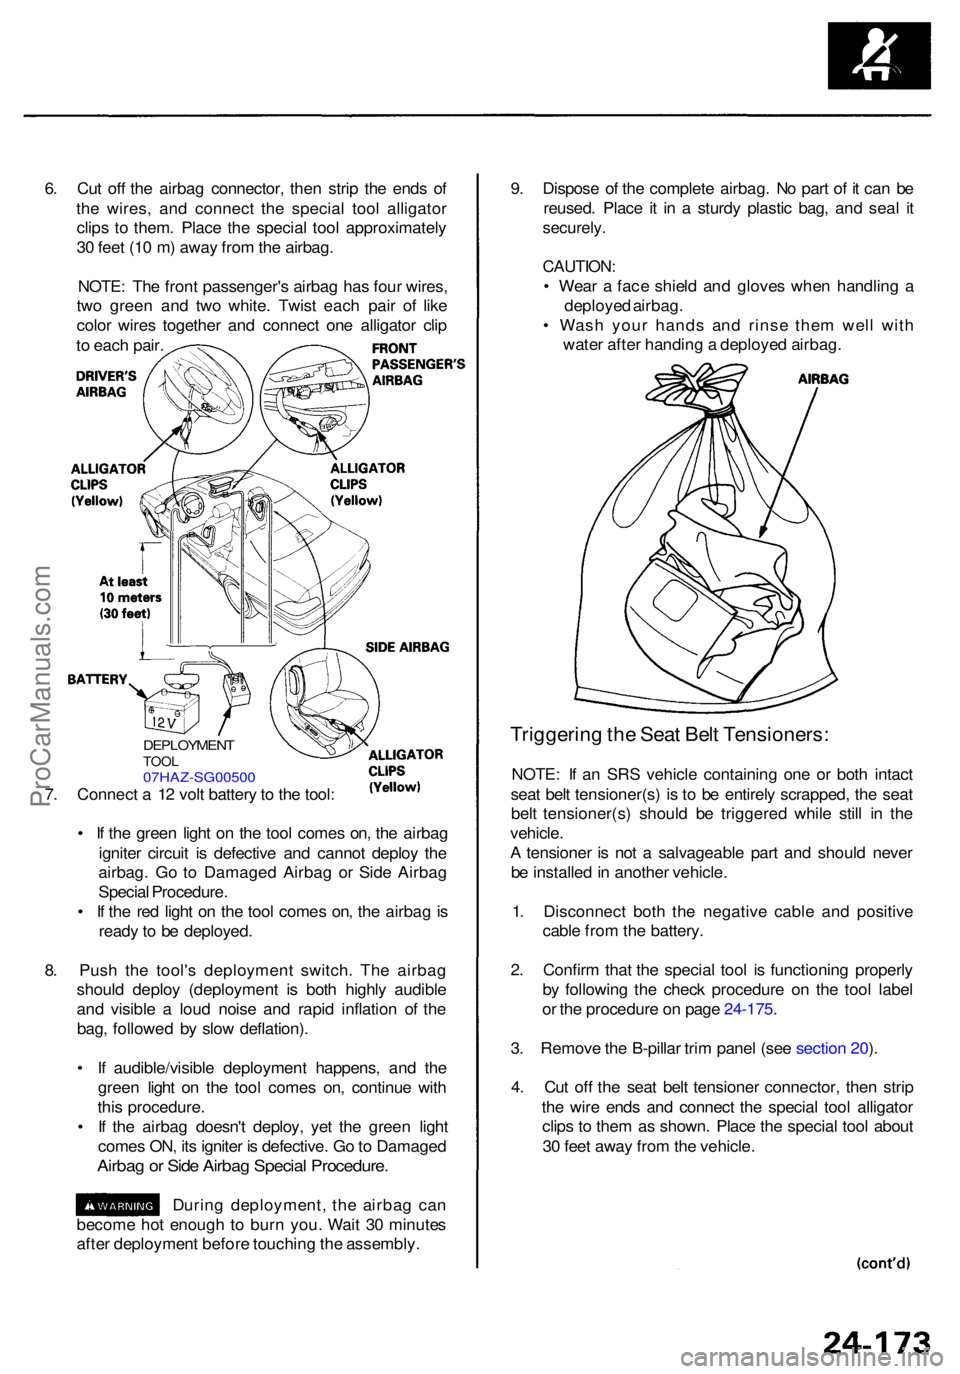
6. Cu t of f th e airba g connector , the n stri p th e end s o f
th e wires , an d connec t th e specia l too l alligato r
clip s t o them . Plac e th e specia l too l approximatel y
3 0 fee t (1 0 m ) awa y fro m th e airbag .
NOTE : Th e fron t passenger' s airba g ha s fou r wires ,
tw o gree n an d tw o white . Twis t eac h pai r o f lik e
colo r wire s togethe r an d connec t on e alligato r cli p
t o eac h pair . 9
. Dispos e o f th e complet e airbag . N o par t o f i t ca n b e
reused . Plac e i t i n a sturd y plasti c bag , an d sea l i t
securely .
CAUTION :
• Wea r a fac e shiel d an d glove s whe n handlin g a
deploye d airbag .
• Was h you r hand s an d rins e the m wel l wit h
wate r afte r handin g a deploye d airbag .
Triggerin g th e Sea t Bel t Tensioners :
NOTE: I f a n SR S vehicl e containin g on e o r bot h intac t
sea t bel t tensioner(s ) i s t o b e entirel y scrapped , th e sea t
bel t tensioner(s ) shoul d b e triggere d whil e stil l i n th e
vehicle .
A tensione r i s no t a salvageabl e par t an d shoul d neve r
b e installe d in anothe r vehicle .
1 . Disconnec t bot h th e negativ e cabl e an d positiv e
cabl e fro m th e battery .
2 . Confir m tha t th e specia l too l i s functionin g properl y
b y followin g th e chec k procedur e o n th e too l labe l
o r th e procedur e o n pag e 24-175 .
3 . Remov e th e B-pilla r tri m pane l (se e sectio n 20 ).
4 . Cu t of f th e sea t bel t tensione r connector , the n stri p
th e wir e end s an d connec t th e specia l too l alligato r
clip s t o the m a s shown . Plac e th e specia l too l abou t
3 0 fee t awa y fro m th e vehicle .
DEPLOYMEN TTOOL07HAZ-SG0050 0
7. Connec t a 1 2 vol t batter y to th e tool :
• I f th e gree n ligh t o n th e too l come s on , th e airba g
ignite r circui t i s defectiv e an d canno t deplo y th e
airbag . G o t o Damage d Airba g o r Sid e Airba g
Specia l Procedure .
• I f th e re d ligh t o n th e too l come s on , th e airba g is
read y t o b e deployed .
8 . Pus h th e tool' s deploymen t switch . Th e airba g
shoul d deplo y (deploymen t i s bot h highl y audibl e
an d visibl e a lou d nois e an d rapi d inflatio n o f th e
bag , followe d b y slo w deflation) .
• I f audible/visibl e deploymen t happens , an d th e
gree n ligh t o n th e too l come s on , continu e wit h
thi s procedure .
• I f th e airba g doesn' t deploy , ye t th e gree n ligh t
come s ON , it s ignite r i s defective . G o to Damage d
Airbag o r Sid e Airba g Specia l Procedure .
During deployment , th e airba g ca n
becom e ho t enoug h to bur n you . Wai t 3 0 minute s
afte r deploymen t befor e touchin g th e assembly .
ProCarManuals.com