Page 5 of 2543
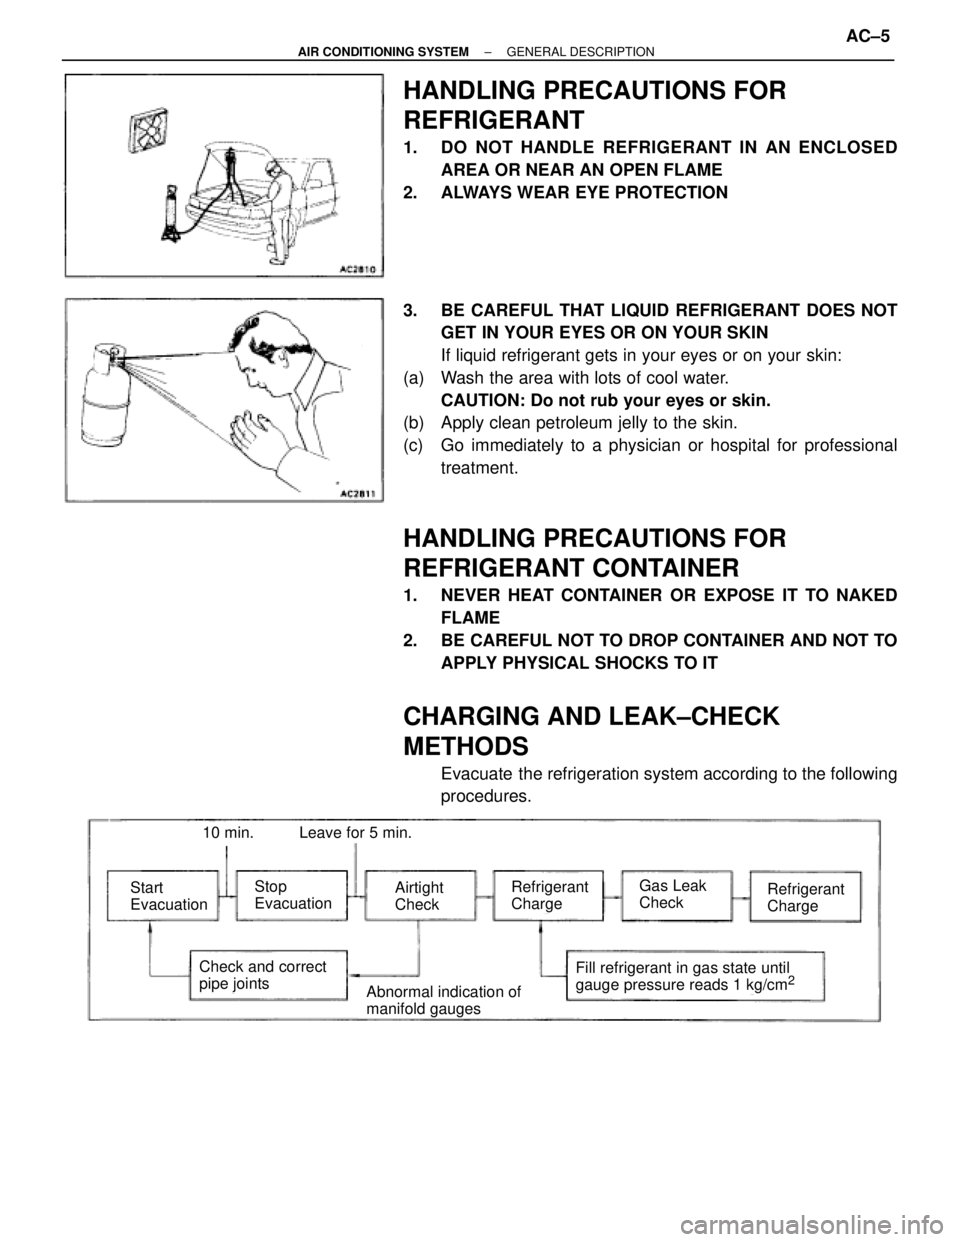
HANDLING PRECAUTIONS FOR
REFRIGERANT
1. DO NOT HANDLE REFRIGERANT IN AN ENCLOSED
AREA OR NEAR AN OPEN FLAME
2. ALWAYS WEAR EYE PROTECTION
3. BE CAREFUL THAT LIQUID REFRIGERANT DOES NOT
GET IN YOUR EYES OR ON YOUR SKIN
If liquid refrigerant gets in your eyes or on your skin:
(a) Wash the area with lots of cool water.
CAUTION: Do not rub your eyes or skin.
(b) Apply clean petroleum jelly to the skin.
(c) Go immediately to a physician or hospital for professional
treatment.
HANDLING PRECAUTIONS FOR
REFRIGERANT CONTAINER
1. NEVER HEAT CONTAINER OR EXPOSE IT TO NAKED
FLAME
2. BE CAREFUL NOT TO DROP CONTAINER AND NOT TO
APPLY PHYSICAL SHOCKS TO IT
CHARGING AND LEAK±CHECK
METHODS
Evacuate the refrigeration system according to the following
procedures.
Start
EvacuationStop
EvacuationAirtight
CheckRefrigerant
ChargeRefrigerant
ChargeGas Leak
Check
Check and correct
pipe jointsFill refrigerant in gas state until
gauge pressure reads 1 kg/cm2Abnormal indication of
manifold gauges
10 min.Leave for 5 min.
± AIR CONDITIONING SYSTEMGENERAL DESCRIPTIONAC±5
Page 85 of 2543
AIR CONDITIONING UNIT ASSEMBLY
Assembly is in the reverse order of disassembly.
AIR CONDITIONING UNIT INSTALLATION
Installation is in the reverse order of removal.
COMPRESSOR
ON±VEHICLE INSPECTION
Magnetic Clutch:
(See page AC±62)
Compressor:
1. INSTALL MANIFOLD GAUGE SET
(See page AC±11)
2. START ENGINE
3. INSPECT COMPRESSOR FOR METALLIC SOUND
Check that there is metallic sound from the compressor when
the A/C switch is turned ON.
If a metallic sound is heard, replace the compressor assem-
bly.
4. INSPECT PRESSURE OF REFRIGERATION SYSTEM
See ºRefrigeration System Inspection with Manifold Gauge
Setº on page AC±71.
5. STOP ENGINE
6. INSPECT VISUALLY FOR LEAKAGE OF REFRIGERANT
FROM SAFETY SEAL
If there is any leakage, replace the compressor assembly.
± AIR CONDITIONING SYSTEMAIR CONDITIONING UNITAC±85
Page 427 of 2543
(b) Check engine braking.
While running in the L position, release the accelerator pedal
and check the engine braking effect.
(c) C h e c k f o r abnormal noise during acceleration and
deceleration.
6. R POSITION TEST
Shift into the R position and while starting at full throttle,
check for slipping.
CAUTION: Before conducting this test ensure that the
test area is free from personnel and obstruction.
7. P POSITION TEST
Stop the vehicle on a gradient (more than 5°) and after shift-
ing into the P position, release the parking brake.
Then check to see that the parking lock pawl holds the ve-
hicle in place.
± AT340E (2JZ±GE) AUTOMATIC TRANSMISSIONTROUBLESHOOTINGAT1±41
Page 429 of 2543
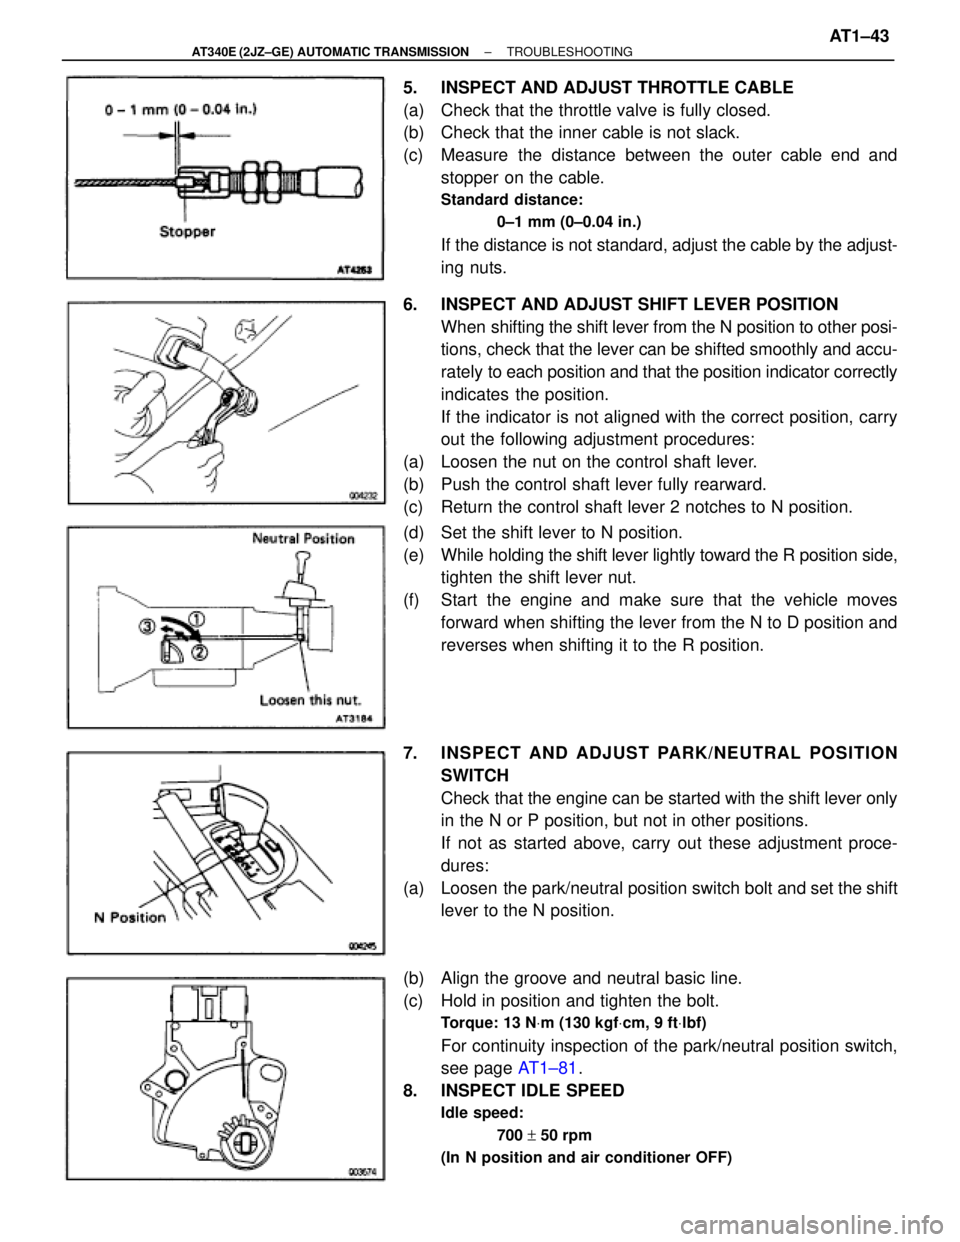
5. INSPECT AND ADJUST THROTTLE CABLE
(a) Check that the throttle valve is fully closed.
(b) Check that the inner cable is not slack.
(c) Measure the distance between the outer cable end and
stopper on the cable.
Standard distance:
0±1 mm (0±0.04 in.)
If the distance is not standard, adjust the cable by the adjust-
ing nuts.
6. INSPECT AND ADJUST SHIFT LEVER POSITION
When shifting the shift lever from the N position to other posi-
tions, check that the lever can be shifted smoothly and accu-
rately to each position and that the position indicator correctly
indicates the position.
If the indicator is not aligned with the correct position, carry
out the following adjustment procedures:
(a) Loosen the nut on the control shaft lever.
(b) Push the control shaft lever fully rearward.
(c) Return the control shaft lever 2 notches to N position.
(d) Set the shift lever to N position.
(e) While holding the shift lever lightly toward the R position side,
tighten the shift lever nut.
(f) Start the engine and make sure that the vehicle moves
forward when shifting the lever from the N to D position and
reverses when shifting it to the R position.
7. INSPECT AND ADJUST PARK/NEUTRAL POSITION
SWITCH
Check that the engine can be started with the shift lever only
in the N or P position, but not in other positions.
If not as started above, carry out these adjustment proce-
dures:
(a) Loosen the park/neutral position switch bolt and set the shift
lever to the N position.
(b) Align the groove and neutral basic line.
(c) Hold in position and tighten the bolt.
Torque: 13 NVm (130 kgfVcm, 9 ftVlbf)
For continuity inspection of the park/neutral position switch,
see page AT1±81.
8. INSPECT IDLE SPEED
Idle speed:
700 + 50 rpm
(In N position and air conditioner OFF)
± AT340E (2JZ±GE) AUTOMATIC TRANSMISSIONTROUBLESHOOTINGAT1±43
Page 430 of 2543
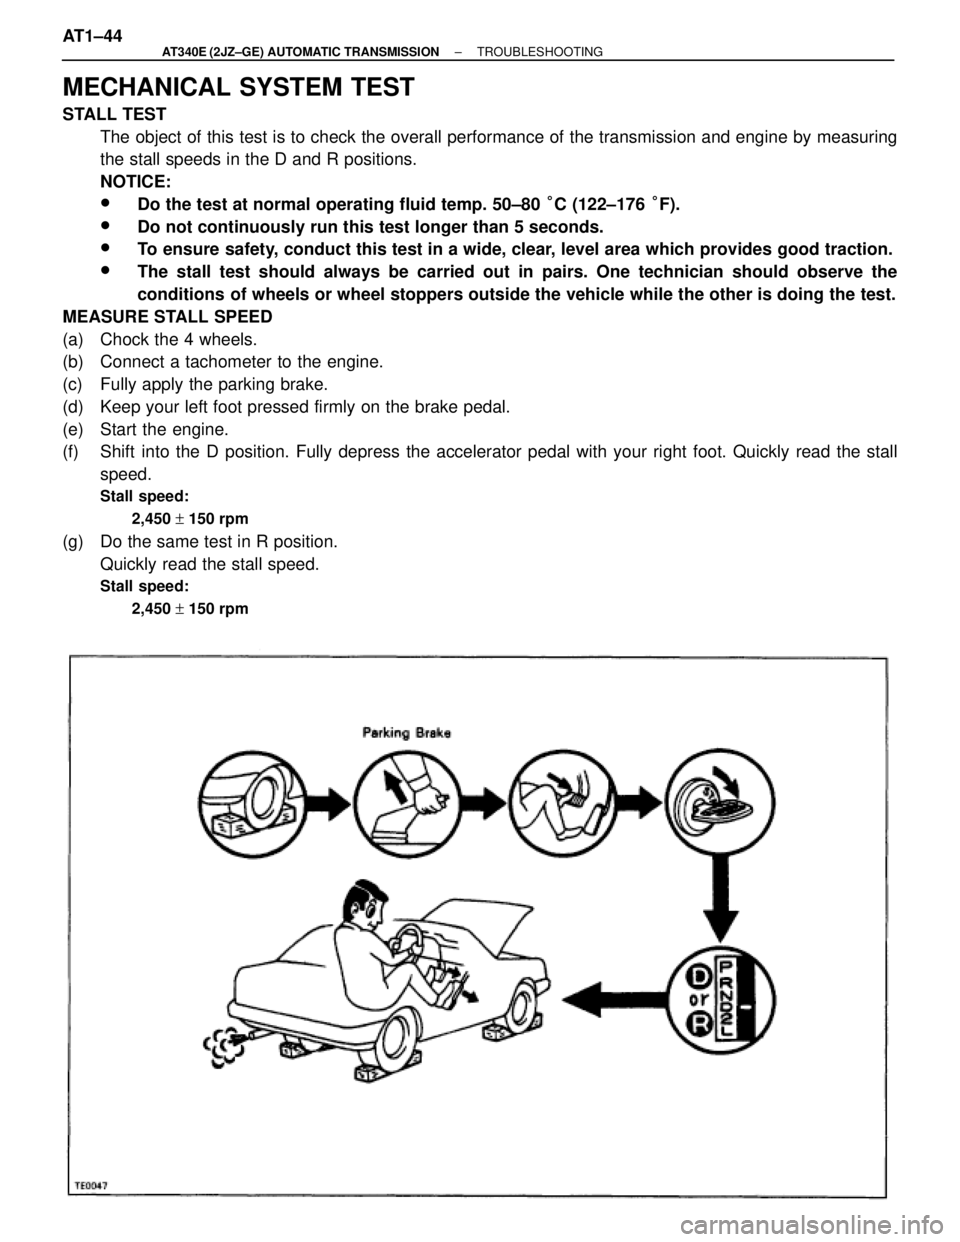
MECHANICAL SYSTEM TEST
STALL TEST
The object of this test is to check the overall performance of the transmission and engine by measuring
the stall speeds in the D and R positions.
NOTICE:
wDo the test at normal operating fluid temp. 50±80 °C (122±176 °F).
wDo not continuously run this test longer than 5 seconds.
wTo ensure safety, conduct this test in a wide, clear, level area which provides good traction.
wThe stall test should always be carried out in pairs. One technician should observe the
conditions of wheels or wheel stoppers outside the vehicle while the other is doing the test.
MEASURE STALL SPEED
(a) Chock the 4 wheels.
(b) Connect a tachometer to the engine.
(c) Fully apply the parking brake.
(d) Keep your left foot pressed firmly on the brake pedal.
(e) Start the engine.
(f) Shift into the D position. Fully depress the accelerator pedal with your right foot. Quickly read the stall
speed.
Stall speed:
2,450 + 150 rpm
(g) Do the same test in R position.
Quickly read the stall speed.
Stall speed:
2,450 + 150 rpm
AT1±44± AT340E (2JZ±GE) AUTOMATIC TRANSMISSIONTROUBLESHOOTING
Page 432 of 2543
TIME LAG TEST
When the shift lever is shifted while the engine is idling, there will be a certain time lapse or lag before the
shock can be felt. This is used for checking the condition of the O/D direct clutch, forward clutch, direct
clutch, and first and reverse brake.
NOTICE:
wDo the test at normal operating fluid temp. 50±80
°C (122±176 °F).
wBe sure to allow a one minute interval between tests.
wTake 3 measurements and take the average value.
MEASURE TIME LAG
(a) Fully apply the parking brake
(b) Start the engine and check idle speed.
Idle speed:
700 + 50 rpm (In N position and air conditioner OFF)
(c) Shift the shift lever from N to D position. Using a stop watch, measure the time it takes from shifting the
lever until the shock is felt.
In same manner, measure the time lag for N " R.
Time lag:
N
" D Less than 1.2 seconds
N
" R Less than 1.5 seconds
AT1±46± AT340E (2JZ±GE) AUTOMATIC TRANSMISSIONTROUBLESHOOTING
Page 434 of 2543
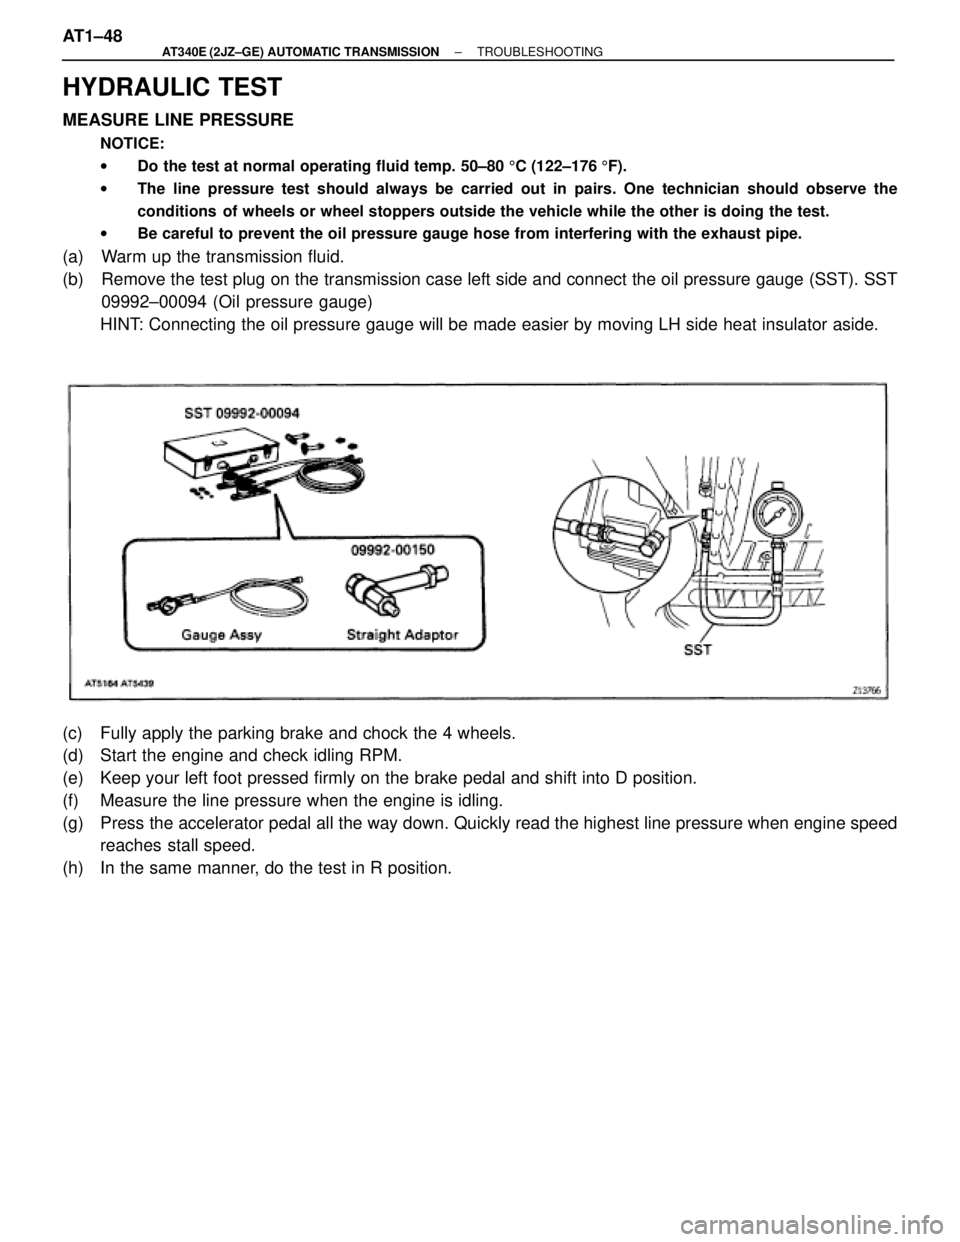
HYDRAULIC TEST
MEASURE LINE PRESSURE
NOTICE:
wDo the test at normal operating fluid temp. 50±80 5C (122±176 5F).
wThe line pressure test should always be carried out in pairs. One technician should observe the
conditions of wheels or wheel stoppers outside the vehicle while the other is doing the test.
wBe careful to prevent the oil pressure gauge hose from interfering with the exhaust pipe.
(a) Warm up the transmission fluid.
(b) Remove the test plug on the transmission case left side and connect the oil pressure gauge (SST). SST
09992±00094 (Oil pressure gauge)
HINT: Connecting the oil pressure gauge will be made easier by moving LH side heat insulator aside.
(c) Fully apply the parking brake and chock the 4 wheels.
(d) Start the engine and check idling RPM.
(e) Keep your left foot pressed firmly on the brake pedal and shift into D position.
(f) Measure the line pressure when the engine is idling.
(g) Press the accelerator pedal all the way down. Quickly read the highest line pressure when engine speed
reaches stall speed.
(h) In the same manner, do the test in R position. AT1±48
± AT340E (2JZ±GE) AUTOMATIC TRANSMISSIONTROUBLESHOOTING
Page 444 of 2543
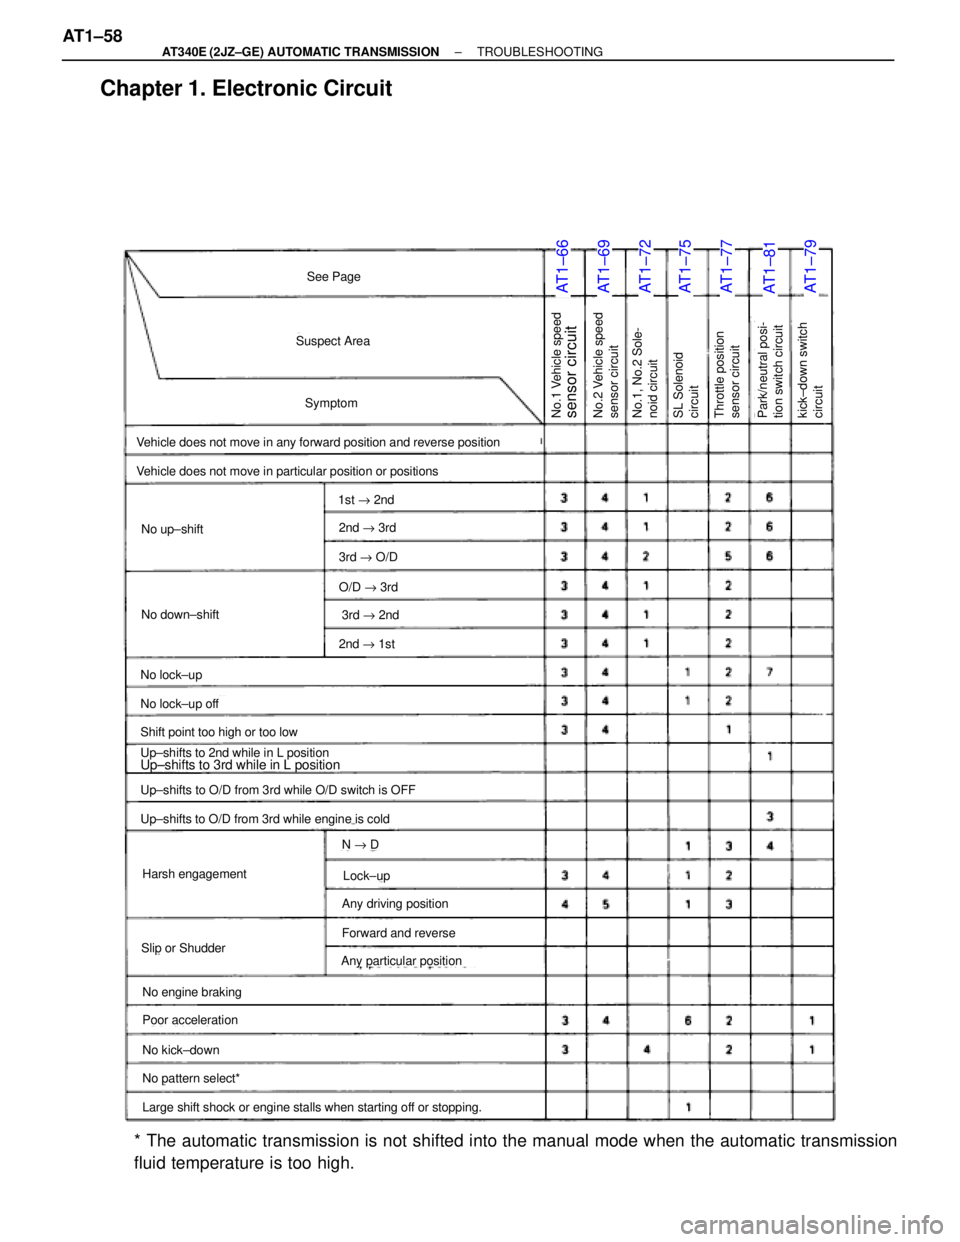
Chapter 1. Electronic Circuit
AT1±66AT1±69AT1±72AT1±75AT1±77AT1±81AT1±79
No.1 Vehicle speedsensor circuitNo.2 Vehicle speed
sensor circuitNo.1, No.2 Sole-
noid circuitkick±down switch
circuitThrottle position
sensor circuitSL Solenoid
circuitPark/neutral posi-
tion switch circuit
See Page
Suspect Area
Symptom
Vehicle does not move in any forward position and reverse position
Vehicle does not move in particular position or positions
No up±shift
No down±shift
No lock±up
No lock±up off
Shift point too high or too low
Up±shifts to 2nd while in L positionUp±shifts to 3rd while in L position
Up±shifts to O/D from 3rd while O/D switch is OFF
Up±shifts to O/D from 3rd while engine is cold
Harsh engagement
Slip or Shudder
Poor acceleration
No kick±down
No engine braking
No pattern select*
Large shift shock or engine stalls when starting off or stopping.
Any particular position
Forward and reverse
Any driving position
Lock±up
N " D
1st " 2nd
2nd " 3rd
3rd " O/D
O/D " 3rd
3rd " 2nd
2nd " 1st
* The automatic transmission is not shifted into the manual mode when the automatic transmission
fluid temperature is too high. AT1±58
± AT340E (2JZ±GE) AUTOMATIC TRANSMISSIONTROUBLESHOOTING