Page 1945 of 2543
Check sub heated oxygen sensor heater.
Disconnect sub heated oxygen sensor connector.
(See page EG±250)
Measure resistance between terminals 1 and 2 of
sub heated oxygen sensor connector.
Resistance: 11 Ð 16 � at 20°C (68°F)
Check for open and short in harness and connector between EFI main relay and
engine control module (See page
IN±30).
Replace sub heated oxygen sensor.
Repair or replace harness or connector.
Check and replace engine control module.
Check voltage between terminal HT3 of engine control module connector and
body ground.
Warm up engine to normal operating temperature.
Measure voltage between terminal HT3 of engine
control module connector and body ground, when
engine is idling and racing at 3,500 rpm.
Replace sub heated oxygen sensor.
Check and replace engine control module.
*: It is probable the oxygen sensor has
deteriorated.
Usually, this cannot be confirmed by visual
inspection.
± ENGINE2JZ±GE ENGINE TROUBLESHOOTINGEG±437
Page 1949 of 2543
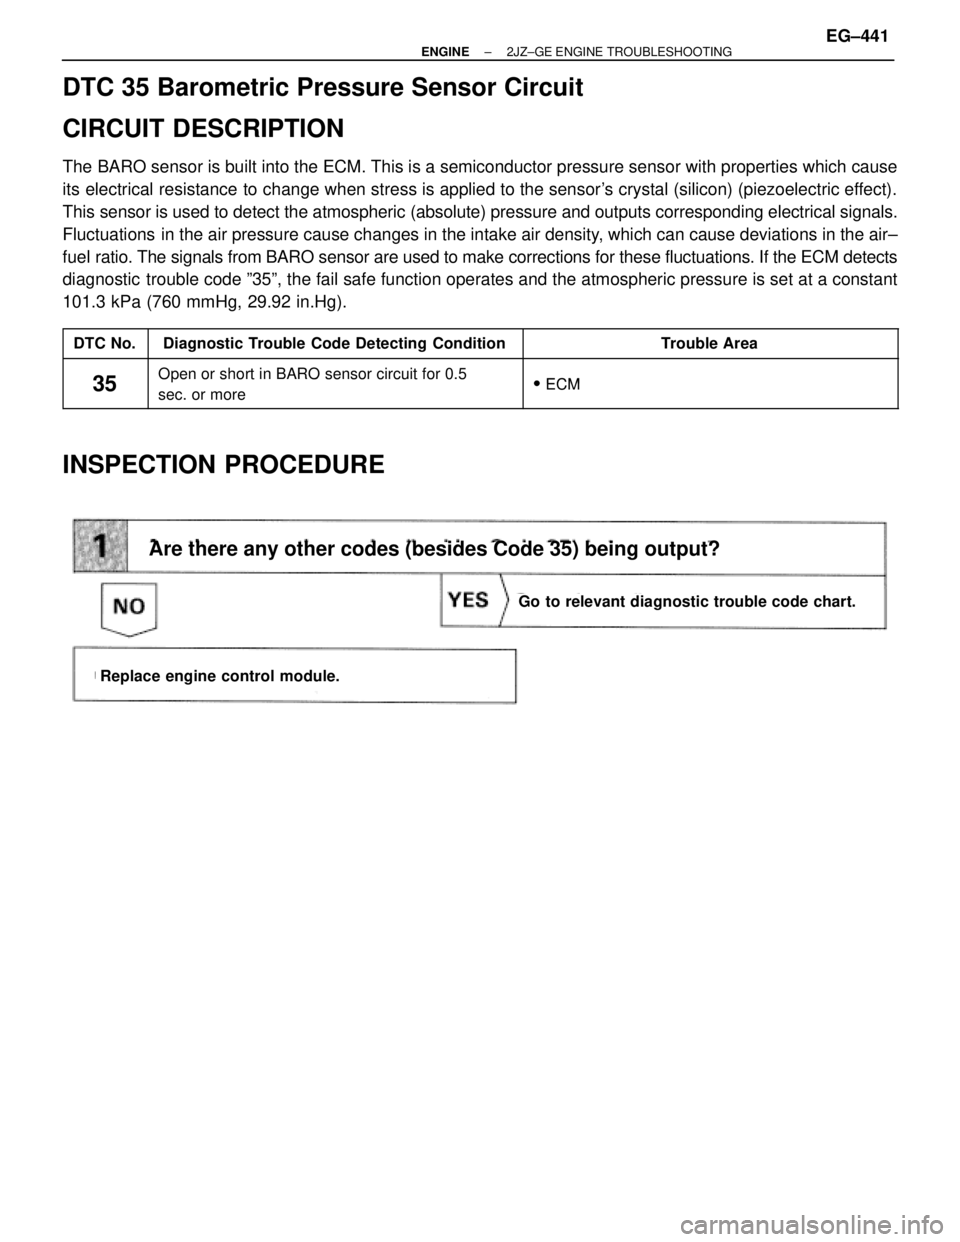
DTC 35 Barometric Pressure Sensor Circuit
CIRCUIT DESCRIPTION
The BARO sensor is built into the ECM. This is a semiconductor pressure sensor with properties which cause
its electrical resistance to change when stress is applied to the sensor's crystal (silicon) (piezoelectric effect).
This sensor is used to detect the atmospheric (absolute) pressure and outputs corresponding electrical signals.
Fluctuations in the air pressure cause changes in the intake air density, which can cause deviations in the air±
fuel ratio. The signals from BARO sensor are used to make corrections for these fluctuations. If the ECM detects
diagnostic trouble code º35º, the fail safe function operates and the atmospheric pressure is set at a constant
101.3 kPa (760 mmHg, 29.92 in.Hg).
����� �����DTC No.���������������� ����������������Diagnostic Trouble Code Detecting Condition����������������� �����������������Trouble Area����� �����
35
���������������� ����������������
Open or short in BARO sensor circuit for 0.5
����������������� �����������������
�ECM����� �����35���������������� ���������������� Oen or short in BARO sensor circuit for 0.5
sec. or more����������������� ����������������� � ECM
INSPECTION PROCEDURE
Are there any other codes (besides Code 35) being output?
Go to relevant diagnostic trouble code chart.
Replace engine control module.
± ENGINE2JZ±GE ENGINE TROUBLESHOOTINGEG±441
Page 1950 of 2543
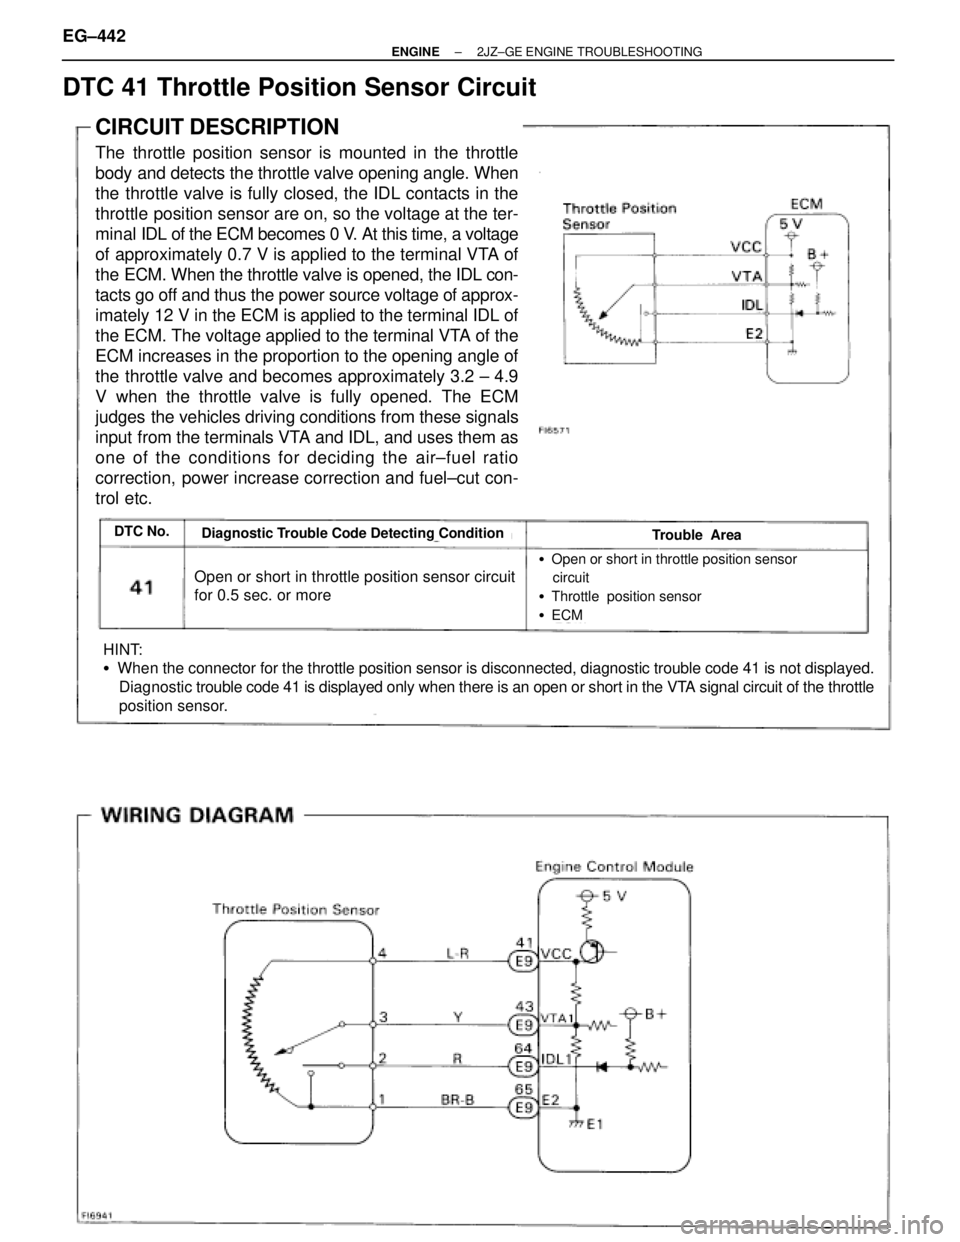
DTC 41 Throttle Position Sensor Circuit
CIRCUIT DESCRIPTION
The throttle position sensor is mounted in the throttle
body and detects the throttle valve opening angle. When
the throttle valve is fully closed, the IDL contacts in the
throttle position sensor are on, so the voltage at the ter-
minal IDL of the ECM becomes 0 V. At this time, a voltage
of approximately 0.7 V is applied to the terminal VTA of
the ECM. When the throttle valve is opened, the IDL con-
tacts go off and thus the power source voltage of approx-
imately 12 V in the ECM is applied to the terminal IDL of
the ECM. The voltage applied to the terminal VTA of the
ECM increases in the proportion to the opening angle of
the throttle valve and becomes approximately 3.2 ± 4.9
V when the throttle valve is fully opened. The ECM
judges the vehicles driving conditions from these signals
input from the terminals VTA and IDL, and uses them as
one of the conditions for deciding the air±fuel ratio
correction, power increase correction and fuel±cut con-
trol etc.
Diagnostic Trouble Code Detecting ConditionDTC No.Trouble Area
�Open or short in throttle position sensor
circuit
�Throttle position sensor
�ECM
Open or short in throttle position sensor circuit
for 0.5 sec. or more
HINT:
�When the connector for the throttle position sensor is disconnected, diagnostic trouble code 41 is not displayed.
Diagnostic trouble code 41 is displayed only when there is an open or short in the VTA signal circuit of the throttle
position sensor.
EG±442± ENGINE2JZ±GE ENGINE TROUBLESHOOTING
Page 1951 of 2543
INSPECTION PROCEDURE
HINT:
wIf diagnostic trouble code º22º (engine coolant temperature sensor circuit), º24º (intake air temperature
sensor circuit) and º41º (throttle position sensor circuit) are output simultaneously, E2 (sensor ground) may
be open.
(See page EG±219)
Check voltage between VTA1, IDL1 and E2 of engine control module connec-
tor.
(1) Connect SST (check harness ªAº).
(See page EG±404)
SST 09990±01000
(2) Turn ignition switch ON.
(3) Disconnect the vacuum hose from the throttle
body, then apply vacuum to the throttle opener.
(See page EG±219)
Measure voltage between terminals VTA1, IDL1
and E2 of engine control module connector when
the throttle valve is opened gradually from the
closed condition.
Check for intermittent problems.
(See page EG±399)
The voltage should increase steadily in proportion
to the throttle valve opening angle.
Terminal
Throttle Valve
Fully Closed
Fully Open
± ENGINE2JZ±GE ENGINE TROUBLESHOOTINGEG±443
Page 1952 of 2543
Check throttle position sensor
(1) Disconnect throttle position sensor connector.
(2) Disconnect the vacuum hose from the throttle
body, then apply vacuum to the throttle open±
er. (See page EG±219)
Measure resistance between terminals 3 (VTA1),
2 (IDL1) and 1 (E2) of throttle position sensor con-
nector when the throttle valve is opened gradually
from the closed condition.
Resistance between terminals 3 (VTA1) and 1 (E2)
should increase gradually in accordance with the
throttle valve opening angle.
Adjust or replace throttle position sensor.
(see page EG±223)
Check for open and short in harness and connector between engine control
module and throttle position sensor (See page IN30).
Repair or replace harness or connector.
Check and replace engine control module.
Terminal
Throttle Valve
Fully Closed
Fully Open
EG±444± ENGINE2JZ±GE ENGINE TROUBLESHOOTING
Page 1953 of 2543
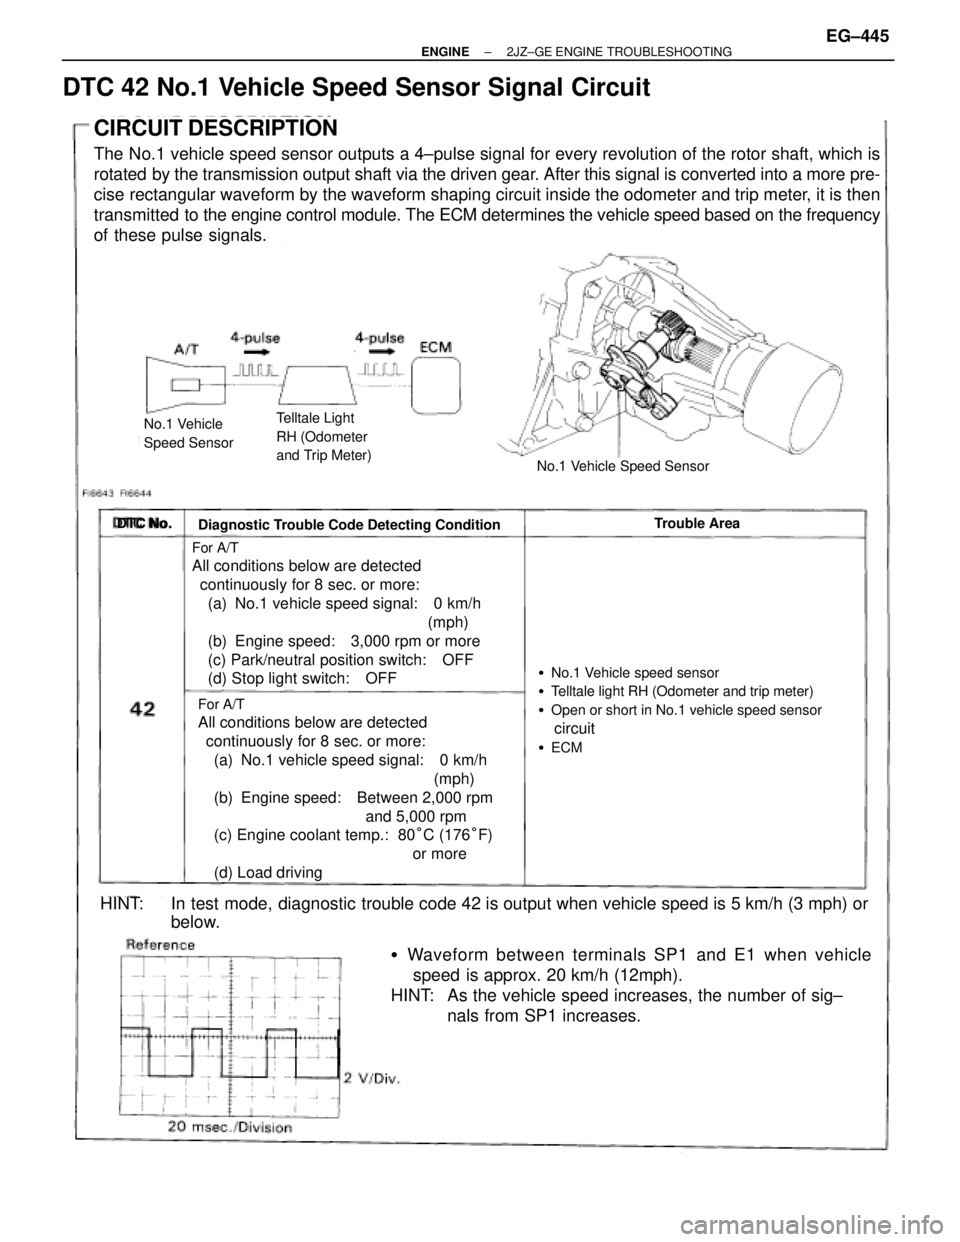
DTC 42 No.1 Vehicle Speed Sensor Signal Circuit
CIRCUIT DESCRIPTION
The No.1 vehicle speed sensor outputs a 4±pulse signal for every revolution of the rotor shaft, which is
rotated by the transmission output shaft via the driven gear. After this signal is converted into a more pre-
cise rectangular waveform by the waveform shaping circuit inside the odometer and trip meter, it is then
transmitted to the engine control module. The ECM determines the vehicle speed based on the frequency
of these pulse signals.
No.1 Vehicle
Speed SensorTelltale Light
RH (Odometer
and Trip Meter)
No.1 Vehicle Speed Sensor
DTC No.
Diagnostic Trouble Code Detecting ConditionTrouble Area
�No.1 Vehicle speed sensor
�Telltale light RH (Odometer and trip meter)
�Open or short in No.1 vehicle speed sensor
circuit
�ECM
For A/T
All conditions below are detected
continuously for 8 sec. or more:
(a) No.1 vehicle speed signal: 0 km/h
(mph)
(b) Engine speed: 3,000 rpm or more
(c) Park/neutral position switch: OFF
(d) Stop light switch: OFF
For A/T
All conditions below are detected
continuously for 8 sec. or more:
(a) No.1 vehicle speed signal: 0 km/h
(mph)
(b) Engine speed: Between 2,000 rpm
and 5,000 rpm
(c) Engine coolant temp.: 80°C (176°F)
or more
(d) Load driving
�Waveform between terminals SP1 and E1 when vehicle
speed is approx. 20 km/h (12mph).
HINT: As the vehicle speed increases, the number of sig±
nals from SP1 increases.
HINT: In test mode, diagnostic trouble code 42 is output when vehicle speed is 5 km/h (3 mph) or
below.
± ENGINE2JZ±GE ENGINE TROUBLESHOOTINGEG±445
Page 1955 of 2543
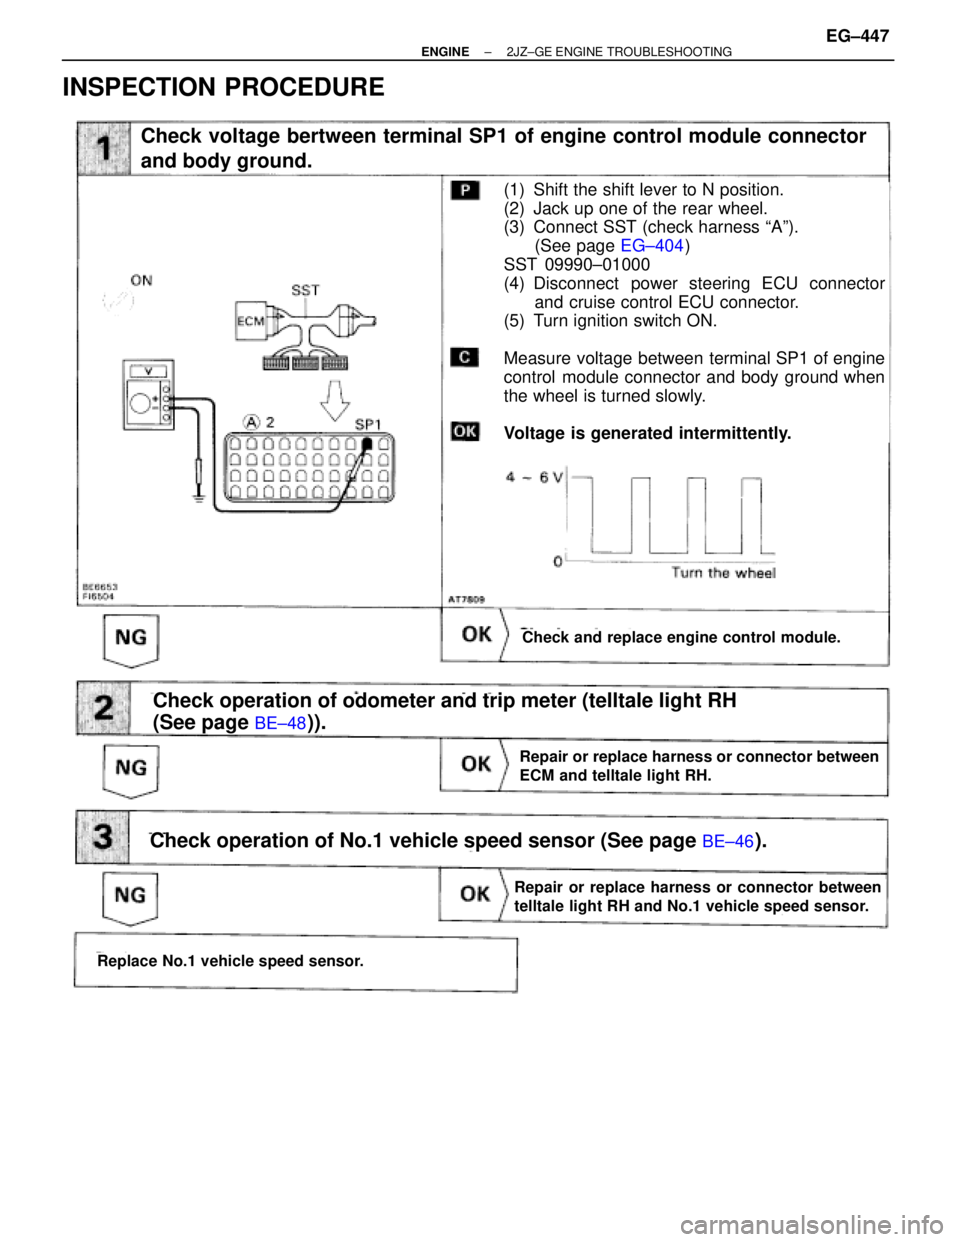
INSPECTION PROCEDURE
(See page
EG±404)
(See page BE±48)).
Check voltage bertween terminal SP1 of engine control module connector
and body ground.
Check and replace engine control module.
(1) Shift the shift lever to N position.
(2) Jack up one of the rear wheel.
(3) Connect SST (check harness ªAº).
(See page EG±404)
SST 09990±01000
(4) Disconnect power steering ECU connector
and cruise control ECU connector.
(5) Turn ignition switch ON.
Measure voltage between terminal SP1 of engine
control module connector and body ground when
the wheel is turned slowly.
Voltage is generated intermittently.
Repair or replace harness or connector between
ECM and telltale light RH.
Check operation of odometer and trip meter (telltale light RH
(See page
BE±48)).
Check operation of No.1 vehicle speed sensor (See page BE±46).
Replace No.1 vehicle speed sensor.
Repair or replace harness or connector between
telltale light RH and No.1 vehicle speed sensor.
± ENGINE2JZ±GE ENGINE TROUBLESHOOTINGEG±447
Page 1958 of 2543
DTC 52 53 55 Knock Sensor Circuit
Knock sensors are fitted one each to the front and rear of the left side of the cylinder block to detect
engine knocking. This sensor contains a piezoelectric element which generates a voltage when it be-
comes deformed, which occurs when the cylinder block vibrates due to knocking. If engine knocking
occurs, ignition timing is retarded to suppress it.
DTC No.Diagnostic Trouble Code Detecting ConditionTrouble Area
No No.1 knock sensor signal to ECM for 4
crank revolutions with engine speed between
1,600 rpm and 5,200 rpm
Engine control computer (for knock control)
malfunction at engine speed between 650 rpm
and 5,200 rpm
No No.2 knock sensor signal to ECM for 4 crank
revolutions with engine speed between 1,600
rpm and 5,200 rpm
�Open or short in No.1 knock sensor circuit
�No.1 knock sensor (looseness)
�ECM
�ECM
�Open or short in No.2 knock sensor circuit
�No.2 knock sensor (looseness)
�ECM
If the ECM detects the above diagnosis conditions, it operates the fail safe function in which the correc-
tive retard angle value is set to the maximum value.
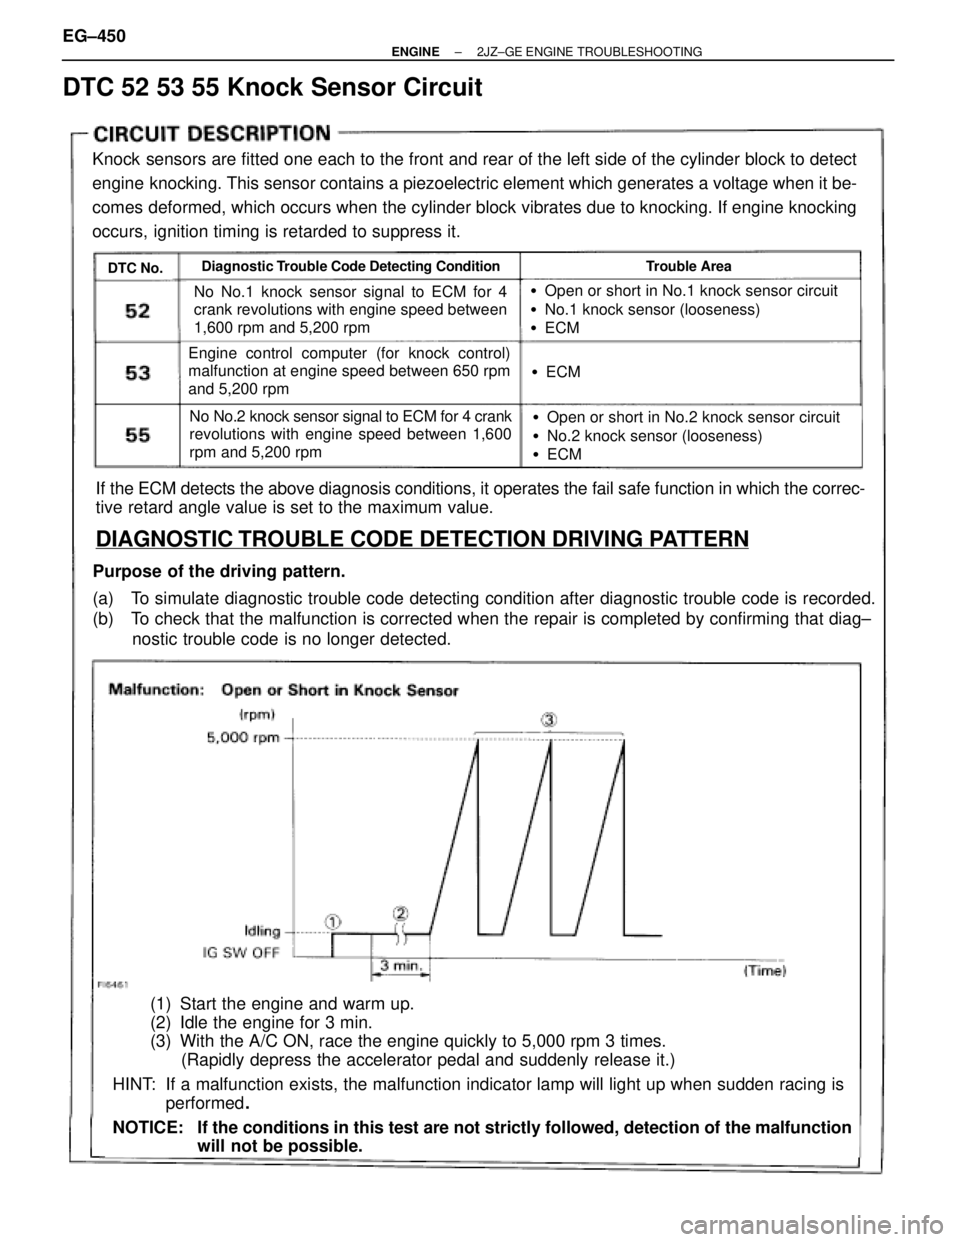
DIAGNOSTIC TROUBLE CODE DETECTION DRIVING PATTERN
Purpose of the driving pattern.
(a) To simulate diagnostic trouble code detecting condition after diagnostic trouble code is recorded.
(b) To check that the malfunction is corrected when the repair is completed by confirming that diag±
nostic trouble code is no longer detected.
(1) Start the engine and warm up.
(2) Idle the engine for 3 min.
(3) With the A/C ON, race the engine quickly to 5,000 rpm 3 times.
(Rapidly depress the accelerator pedal and suddenly release it.)
HINT: If a malfunction exists, the malfunction indicator lamp will light up when sudden racing is
performed.
NOTICE: If the conditions in this test are not strictly followed, detection of the malfunction
will not be possible. EG±450
± ENGINE2JZ±GE ENGINE TROUBLESHOOTING