Page 977 of 2248
1. Door and Rear Gate
A: DOOR ALIGNMENT
B5M0051A
2
5-2SERVICE DATA
1. Door and Rear Gate
Page 987 of 2248

1. Procedure Chart for Removing and
Installing Door and Related Parts
NOTE:
This flow chart shows the main procedures for removing
and installing the door and its related parts. For details,
refer to the text.
DoorDoor lock systemDoor regulator
�
Door glass
�
Remove door trim parts, etc.
�
REMOVALRemove front and rear upper stoppers
and stabilizer (inner).
�
Remove door.Disconnect joints
between latch, outer
handle, key lock and
remote assembly.Separate door glass from regulator.
Remove guide
channel B.Remove door
glass.
Remove door
lock system.Remove
regulator.
Install door.Install door
lock system.Install regulator.
Install guide
channel.Insert door glass.
�
Adjust door alignment.Adjust door
lock system.Mount door glass on regulator.
�
INSTALLATION
AND
ADJUSTMENTAdjust striker.Link latch, outer handle,
key lock and remote
assembly together.Install front and rear upper stoppers
and stabilizer (inner).
�
Adjust glass position.
��
Install door trim parts, etc.
���
Confirm.
�
�
���
��
��
���
��
���
���
�
�
�
12
5-2SERVICE PROCEDURE
1. Procedure Chart for Removing and Installing Door and Related Parts
Page 994 of 2248
B: ADJUSTMENT
1. DOOR ASSY
1) Using ST, loosen bolts securing upper and lower hinges
to body, and adjust fore-and-aft and vertical alignment of
door.
ST 925610000 DOOR HINGE WRENCH
B5M0071A
2) Loosen mounting screws approximately one rotation.
Adjust striker�
1position by lightly tapping with hammer. (To
adjust, utilize the shape of striker nut plate�
2support.)
CAUTION:
�Use cloth to prevent damaging body or other parts.
�Do not directly tap striker plastic portion.
�Do not apply impact on spot-welded striker nut
plate.
Hinge tightening torque (body side):
29±5 N⋅m (3.0±0.5 kg-m, 21.7±3.6 ft-lb)
Striker tightening torque:
14±4 N⋅m (1.4±0.4 kg-m, 10.1±2.9 ft-lb)
19
5-2SERVICE PROCEDURE
2. Door
Page 996 of 2248
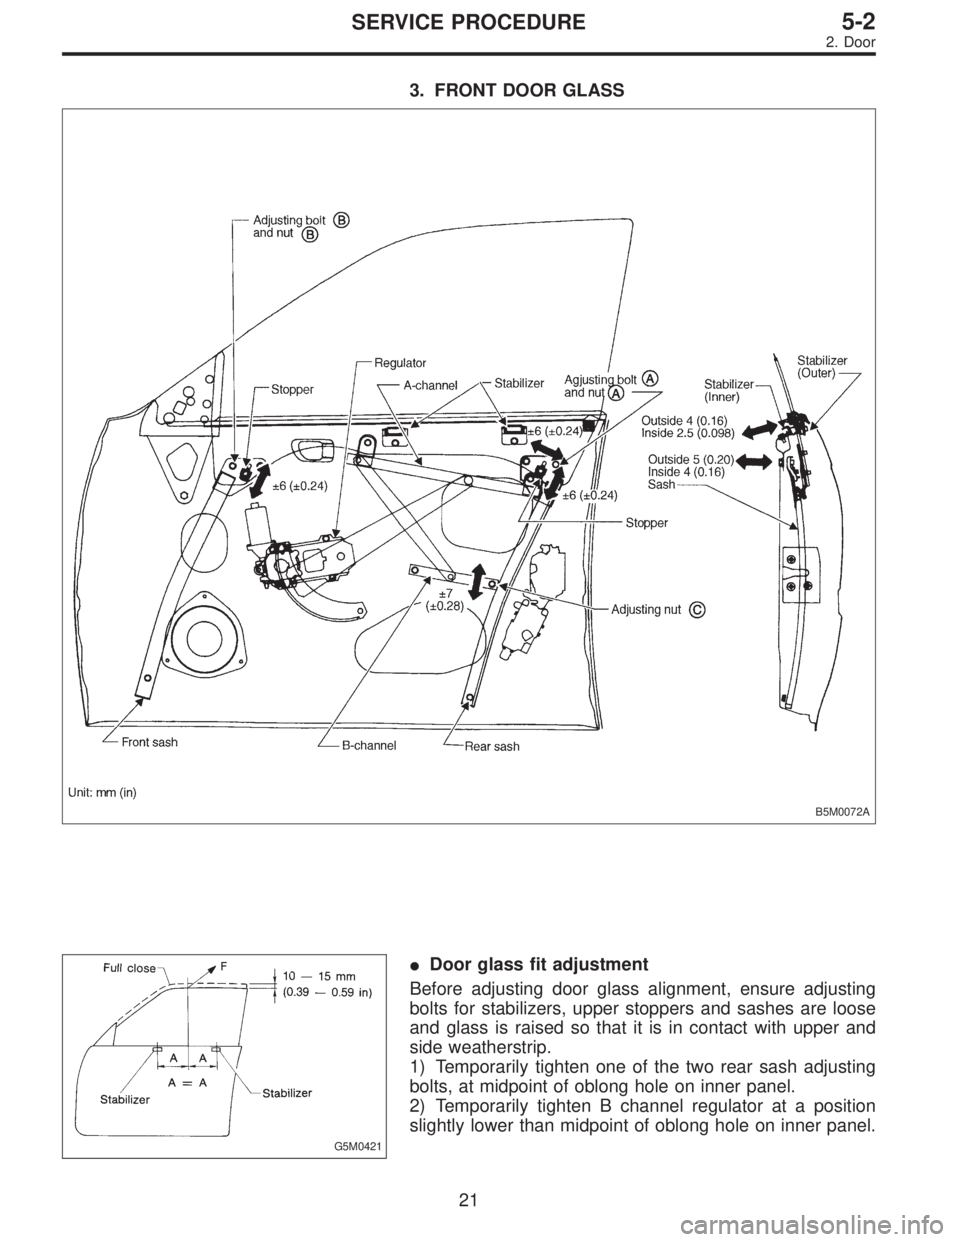
3. FRONT DOOR GLASS
B5M0072A
G5M0421
�Door glass fit adjustment
Before adjusting door glass alignment, ensure adjusting
bolts for stabilizers, upper stoppers and sashes are loose
and glass is raised so that it is in contact with upper and
side weatherstrip.
1) Temporarily tighten one of the two rear sash adjusting
bolts, at midpoint of oblong hole on inner panel.
2) Temporarily tighten B channel regulator at a position
slightly lower than midpoint of oblong hole on inner panel.
21
5-2SERVICE PROCEDURE
2. Door
Page 999 of 2248
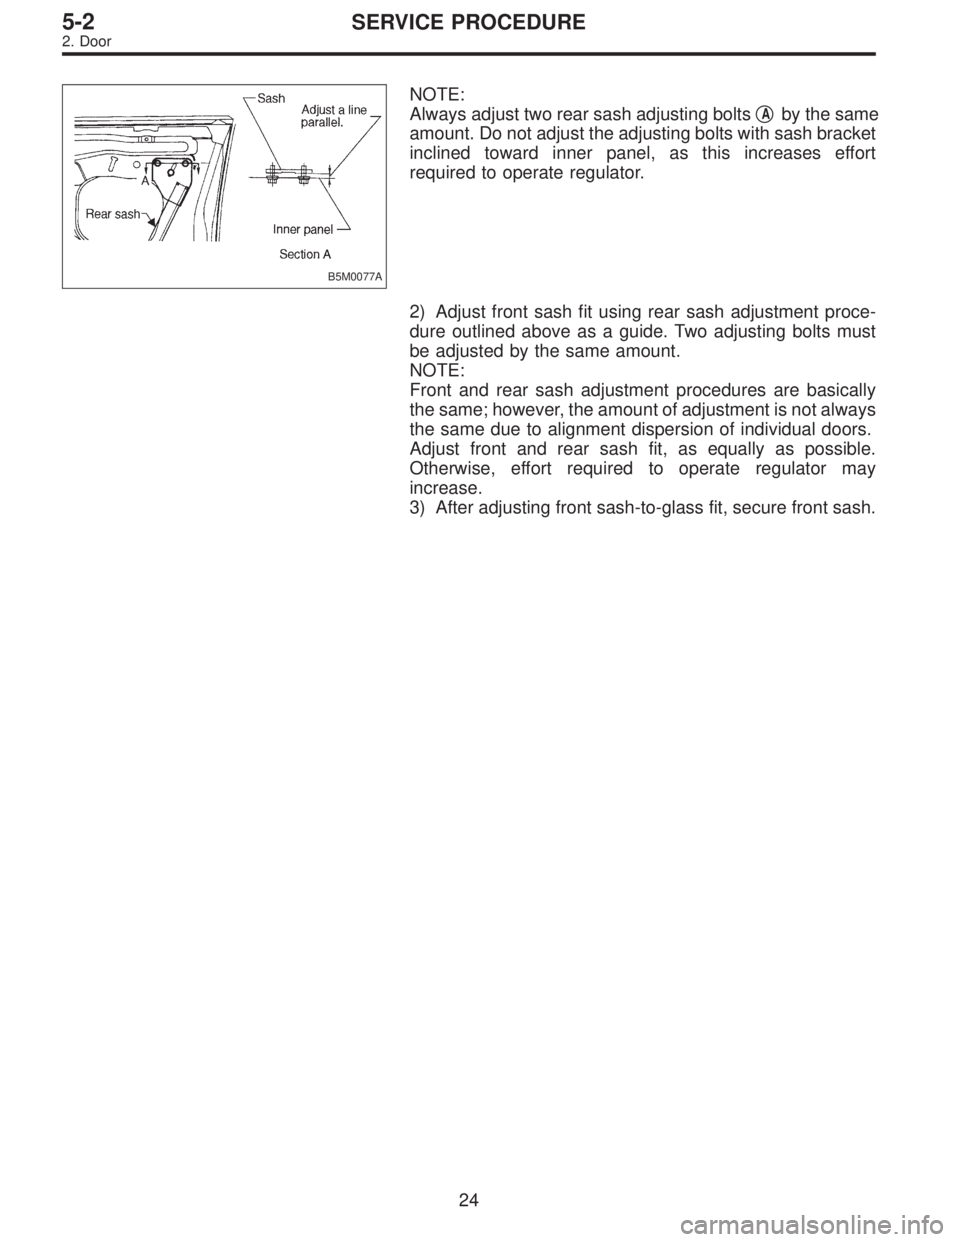
B5M0077A
NOTE:
Always adjust two rear sash adjusting bolts�
Aby the same
amount. Do not adjust the adjusting bolts with sash bracket
inclined toward inner panel, as this increases effort
required to operate regulator.
2) Adjust front sash fit using rear sash adjustment proce-
dure outlined above as a guide. Two adjusting bolts must
be adjusted by the same amount.
NOTE:
Front and rear sash adjustment procedures are basically
the same; however, the amount of adjustment is not always
the same due to alignment dispersion of individual doors.
Adjust front and rear sash fit, as equally as possible.
Otherwise, effort required to operate regulator may
increase.
3) After adjusting front sash-to-glass fit, secure front sash.
24
5-2SERVICE PROCEDURE
2. Door
Page 1000 of 2248
4. REAR DOOR GLASS
Alignment of rear door glass is basically the same as for
the front door glass. Due to slight difference in adjustment
dimensions for fore-aft, up-down, and in-out alignments,
key points for rear door adjustment are described below.
B5M0078A
B5M0074A
�Fore-aft adjustment
1) Door glass alignment must be adjusted so that glass-
to-center pillar fit is equal at all points. Always use dimen-
sions (indicated in figure) as a guide during adjustment.
NOTE:
If dimensions are smaller than those indicated, glass will be
caught in weatherstrip and may not raise to the fully closed
position.
2) After making fore-aft adjustment, raise and lower glass
to ensure it is free from any binding.
25
5-2SERVICE PROCEDURE
2. Door
Page 1015 of 2248
 Glass runs out of weatherstrip lip when considerable hand
pressure is applied to it from inside.
G5M0502(This conditi")
1. Door Glass
Condition Apparent cause/Correction
Glass in fully closed
position1) Glass runs out of weatherstrip lip when considerable hand
pressure is applied to it from inside.
G5M0502(This condition may cause wind/booming noise during high-
speed operation.)�Insufficient upward travel of glass
Increase upward travel of glass.
2) Clearance exists between glass and weatherstrip when light
hand pressure is applied to it at center and rear pillar
locations.
G5M0503(This condition may cause wind noise and/or water leakage.)�Insufficient glass-to-door
weatherstrip contact
Check stabilizer and glass for
proper contact. Increase contact
using upper sash adjustment bolt.
�Improper adjustment of striker in
in-out direction
Close door and check for alignment
of striker with vehicle body.
3) Adjust door glass so that it is aligned with door rearview
mirror gusset.
G5M0504
�Window is not properly adjusted in
up-down/fore-aft direction.
Adjust window. If necessary, move
B channel regulator to eliminate
window tilt.
�Gusset is not properly adjusted in
fore-aft direction.
Adjust gusset after loosing all bolts
and nuts witch tightening it.
39
5-2DIAGNOSTICS
1. Door Glass
Page 1016 of 2248
 Glass rides over weatherstrip lip when door is closed.
G5M0505(This condition increases wind/booming noise, leakage and/or
eff")
Condition Apparent cause/Correction
Door in fully closed/
open position1) Glass rides over weatherstrip lip when door is closed.
G5M0505(This condition increases wind/booming noise, leakage and/or
effort required to close door.)�Improper up-down and in-out glass
alignments
Adjust glass for up-down and in-out
alignments (incl. rear sash, upper
stopper adjustment, etc.). If
necessary, correct glass tilt by
moving B channel regulator.
2) Edge of glass contacts retainer when door is fully closed.
G5M0506
�Improper glass-to-center pillar
weatherstrip or excessive glass
contact to weatherstrip
�Excessive adjusting in contact to
weatherstrip
Causes rear edge of glass to tilt
inboard closer to center pillar.
Adjust rear sash adjustment bolt to
reduce glass contact to
weatherstrip.
Raise or lower
window glass1) Considerable effort or time is required to operate regulator.
Standard operating effort:
�Entire up-down travel except for point 5 mm (0.20 in)
below fully closed position:
29.4 N (3.0 kg, 6.6 lb)
�Point 5 mm (0.20 in) below fully closed position:
44.1 N (4.5 kg, 9.9 lb)
G5M0507
�Sliding resistance increased due to
high stabilizer-to-glass contact
pressure.
Reduce contact by mounting inner
stabilizer to inside of the vehicle.
�High glass-to-windshield contact
pressure
Reduce contact using upper sash
adjustment bolt.
�Unequal contact adjustment stroke
between front and rear sashes
Set to equal stroke.
�Tilt of rear sash adjustment bolt
mounting bracket
Correct tilt of bracket so it is
parallel to inner panel.
40
5-2DIAGNOSTICS
1. Door Glass

 Using ST, loosen bolts securing upper and lower hinges
to body, and adjust fore-and-aft and vertical alignment of
door.
ST 925610000 DOOR HINGE WRENCH
B5M0071A
2) Loosen")