Page 641 of 2248
G4M0126
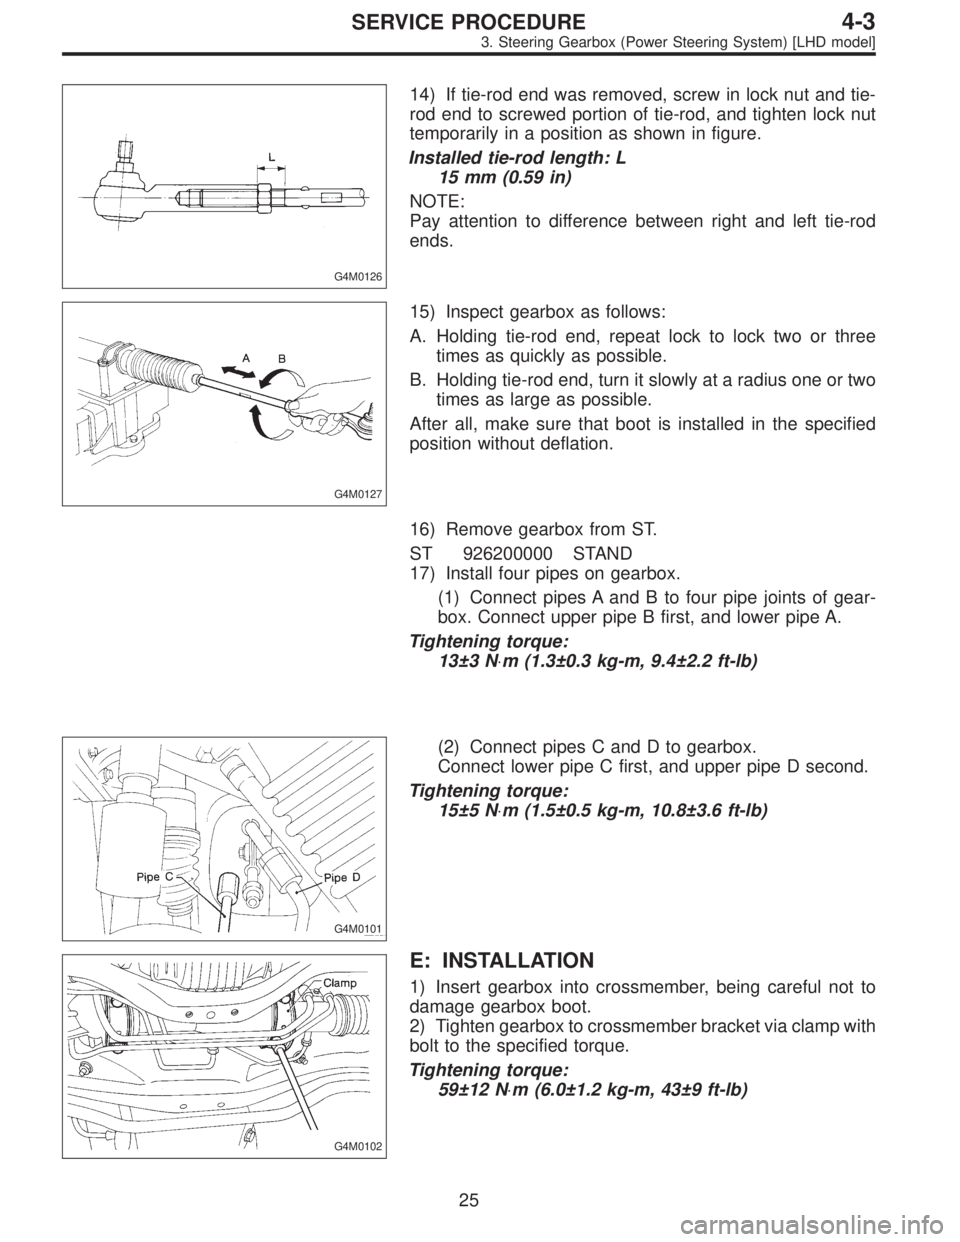
14) If tie-rod end was removed, screw in lock nut and tie-
rod end to screwed portion of tie-rod, and tighten lock nut
temporarily in a position as shown in figure.
Installed tie-rod length: L
15 mm (0.59 in)
NOTE:
Pay attention to difference between right and left tie-rod
ends.
G4M0127
15) Inspect gearbox as follows:
A. Holding tie-rod end, repeat lock to lock two or three
times as quickly as possible.
B. Holding tie-rod end, turn it slowly at a radius one or two
times as large as possible.
After all, make sure that boot is installed in the specified
position without deflation.
16) Remove gearbox from ST.
ST 926200000 STAND
17) Install four pipes on gearbox.
(1) Connect pipes A and B to four pipe joints of gear-
box. Connect upper pipe B first, and lower pipe A.
Tightening torque:
13±3 N⋅m (1.3±0.3 kg-m, 9.4±2.2 ft-lb)
G4M0101
(2) Connect pipes C and D to gearbox.
Connect lower pipe C first, and upper pipe D second.
Tightening torque:
15±5 N⋅m (1.5±0.5 kg-m, 10.8±3.6 ft-lb)
G4M0102
E: INSTALLATION
1) Insert gearbox into crossmember, being careful not to
damage gearbox boot.
2) Tighten gearbox to crossmember bracket via clamp with
bolt to the specified torque.
Tightening torque:
59±12 N⋅m (6.0±1.2 kg-m, 43±9 ft-lb)
25
4-3SERVICE PROCEDURE
3. Steering Gearbox (Power Steering System) [LHD model]
Page 642 of 2248
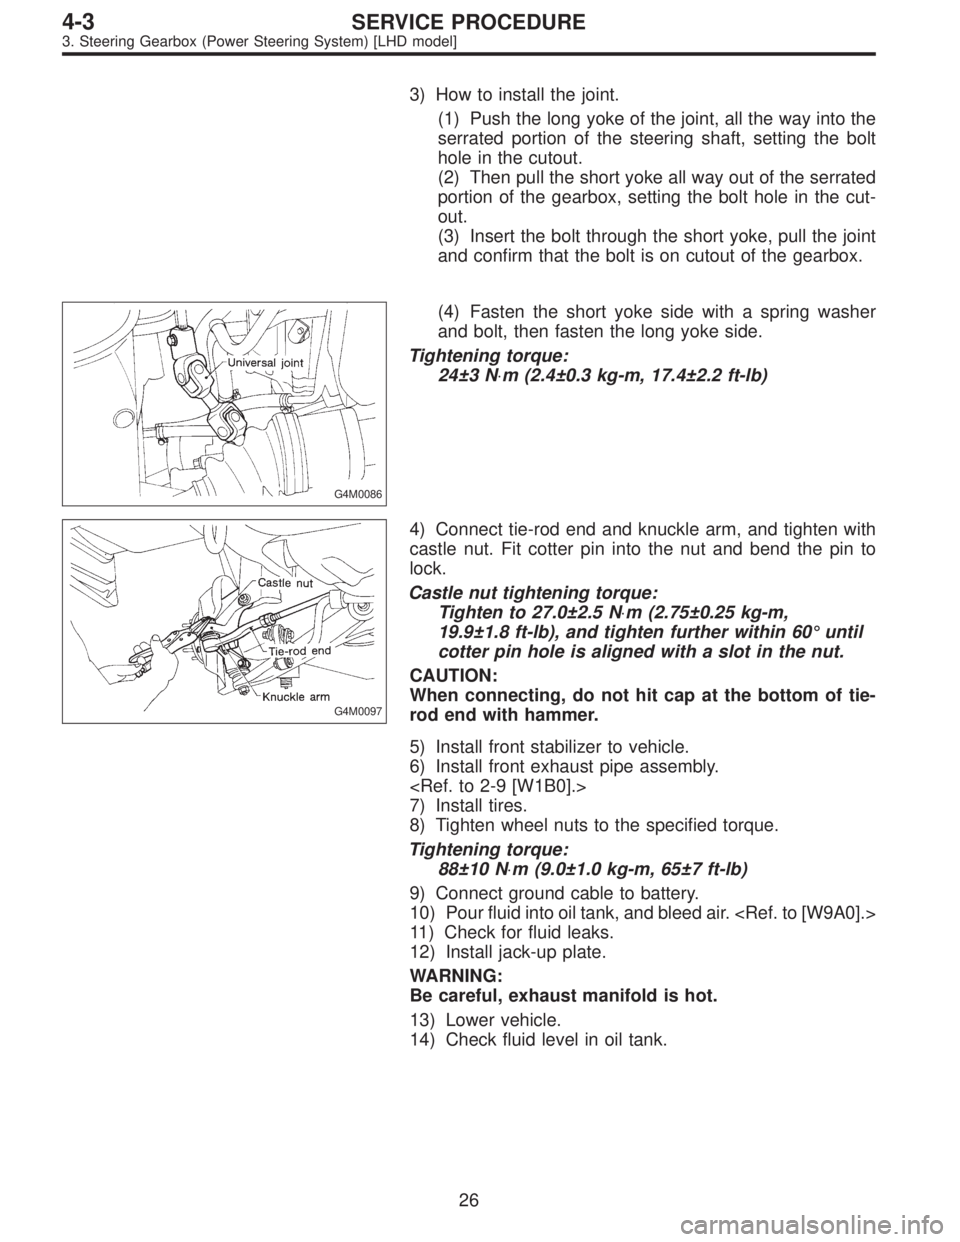
3) How to install the joint.
(1) Push the long yoke of the joint, all the way into the
serrated portion of the steering shaft, setting the bolt
hole in the cutout.
(2) Then pull the short yoke all way out of the serrated
portion of the gearbox, setting the bolt hole in the cut-
out.
(3) Insert the bolt through the short yoke, pull the joint
and confirm that the bolt is on cutout of the gearbox.
G4M0086
(4) Fasten the short yoke side with a spring washer
and bolt, then fasten the long yoke side.
Tightening torque:
24±3 N⋅m (2.4±0.3 kg-m, 17.4±2.2 ft-lb)
G4M0097
4) Connect tie-rod end and knuckle arm, and tighten with
castle nut. Fit cotter pin into the nut and bend the pin to
lock.
Castle nut tightening torque:
Tighten to 27.0±2.5 N⋅m (2.75±0.25 kg-m,
19.9±1.8 ft-lb), and tighten further within 60°until
cotter pin hole is aligned with a slot in the nut.
CAUTION:
When connecting, do not hit cap at the bottom of tie-
rod end with hammer.
5) Install front stabilizer to vehicle.
6) Install front exhaust pipe assembly.
7) Install tires.
8) Tighten wheel nuts to the specified torque.
Tightening torque:
88±10 N⋅m (9.0±1.0 kg-m, 65±7 ft-lb)
9) Connect ground cable to battery.
10) Pour fluid into oil tank, and bleed air.
11) Check for fluid leaks.
12) Install jack-up plate.
WARNING:
Be careful, exhaust manifold is hot.
13) Lower vehicle.
14) Check fluid level in oil tank.
26
4-3SERVICE PROCEDURE
3. Steering Gearbox (Power Steering System) [LHD model]
Page 643 of 2248
G4M0132
15) After adjusting toe-in and steering angle, tighten lock
nut on tie-rod end.
Tightening torque:
83±5 N⋅m (8.5±0.5 kg-m, 61.5±3.6 ft-lb)
CAUTION:
When adjusting toe-in, hold boot as shown to prevent
it from being rotated or twisted. If twisted, straighten it.
G4M0133
F: ADJUSTMENT
1) Adjust front toe.
Standard of front toe:
IN 3—OUT 3 mm (IN 0.12—OUT 0.12 in)
2) Adjust steering angle of wheels.
Inner wheel: 37.6°±1.5
Outer wheel: 32.6°±1.5
B4M0133A
3) If steering wheel spokes are not horizontal when wheels
are set in the straight ahead position, and error is more
than 5°on the periphery of steering wheel, correctly re-in-
stall the steering wheel.
G4M0135
4) If steering wheel spokes are not horizontal with vehicle
set in the straight ahead position after this adjustment,
correct it by turning the right and left tie-rods in the same
direction by the same turns.
27
4-3SERVICE PROCEDURE
3. Steering Gearbox (Power Steering System) [LHD model]
Page 644 of 2248
4. Steering Gearbox (Power Steering
System) [RHD model]
NOTE:
For disassembly and assembly of gearbox unit, refer to
section Control Valve (Power Steering Gearbox).
B4M0666A
Tightening torque: N⋅m (kg-m, ft-lb)
T1: 20±4 (2.0±0.4, 14.5±2.9)
T2: 25±5 (2.5±0.5, 18.1±3.6)
T3: 39±10 (4.0±1.0, 29±7)
T4: 64±10 (6.5±1.0, 47±7)
T5: 78±10 (8.0±1.0, 58±7)
T6: 83±5 (8.5±0.5, 61.5±3.6)
28
4-3SERVICE PROCEDURE
4. Steering Gearbox (Power Steering System) [RHD model]
Page 649 of 2248
C: INSPECTION
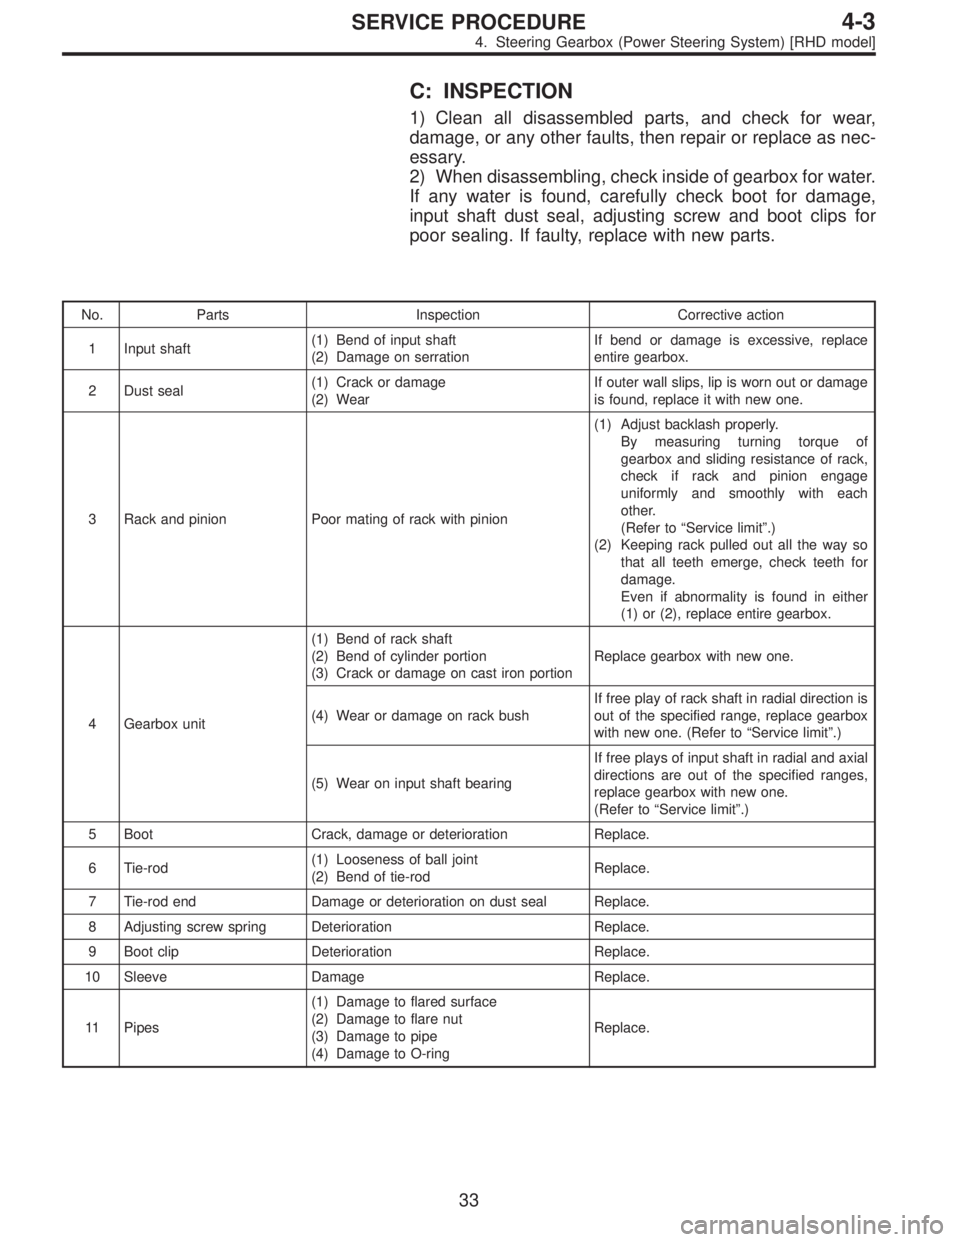
1) Clean all disassembled parts, and check for wear,
damage, or any other faults, then repair or replace as nec-
essary.
2) When disassembling, check inside of gearbox for water.
If any water is found, carefully check boot for damage,
input shaft dust seal, adjusting screw and boot clips for
poor sealing. If faulty, replace with new parts.
No. Parts Inspection Corrective action
1 Input shaft(1) Bend of input shaft
(2) Damage on serrationIf bend or damage is excessive, replace
entire gearbox.
2 Dust seal(1) Crack or damage
(2) WearIf outer wall slips, lip is worn out or damage
is found, replace it with new one.
3 Rack and pinion Poor mating of rack with pinion(1) Adjust backlash properly.
By measuring turning torque of
gearbox and sliding resistance of rack,
check if rack and pinion engage
uniformly and smoothly with each
other.
(Refer to“Service limit”.)
(2) Keeping rack pulled out all the way so
that all teeth emerge, check teeth for
damage.
Even if abnormality is found in either
(1) or (2), replace entire gearbox.
4 Gearbox unit(1) Bend of rack shaft
(2) Bend of cylinder portion
(3) Crack or damage on cast iron portionReplace gearbox with new one.
(4) Wear or damage on rack bushIf free play of rack shaft in radial direction is
out of the specified range, replace gearbox
with new one. (Refer to“Service limit”.)
(5) Wear on input shaft bearingIf free plays of input shaft in radial and axial
directions are out of the specified ranges,
replace gearbox with new one.
(Refer to“Service limit”.)
5 Boot Crack, damage or deterioration Replace.
6 Tie-rod(1) Looseness of ball joint
(2) Bend of tie-rodReplace.
7 Tie-rod end Damage or deterioration on dust seal Replace.
8 Adjusting screw spring Deterioration Replace.
9 Boot clip Deterioration Replace.
10 Sleeve Damage Replace.
11 Pipes(1) Damage to flared surface
(2) Damage to flare nut
(3) Damage to pipe
(4) Damage to O-ringReplace.
33
4-3SERVICE PROCEDURE
4. Steering Gearbox (Power Steering System) [RHD model]
Page 652 of 2248
G4M0803
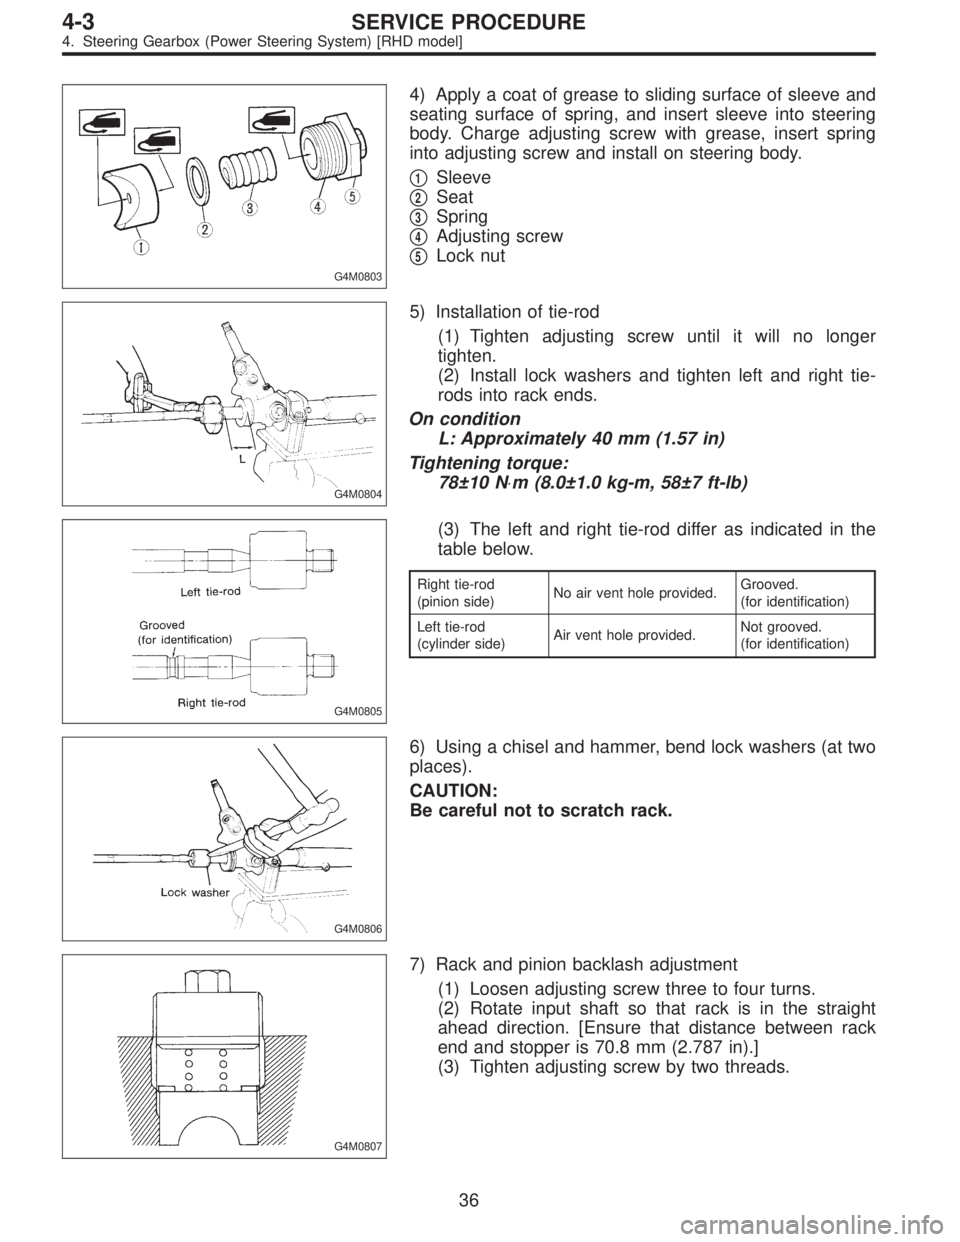
4) Apply a coat of grease to sliding surface of sleeve and
seating surface of spring, and insert sleeve into steering
body. Charge adjusting screw with grease, insert spring
into adjusting screw and install on steering body.
�
1Sleeve
�
2Seat
�
3Spring
�
4Adjusting screw
�
5Lock nut
G4M0804
5) Installation of tie-rod
(1) Tighten adjusting screw until it will no longer
tighten.
(2) Install lock washers and tighten left and right tie-
rods into rack ends.
On condition
L: Approximately 40 mm (1.57 in)
Tightening torque:
78±10 N⋅m (8.0±1.0 kg-m, 58±7 ft-lb)
G4M0805
(3) The left and right tie-rod differ as indicated in the
table below.
Right tie-rod
(pinion side)No air vent hole provided.Grooved.
(for identification)
Left tie-rod
(cylinder side)Air vent hole provided.Not grooved.
(for identification)
G4M0806
6) Using a chisel and hammer, bend lock washers (at two
places).
CAUTION:
Be careful not to scratch rack.
G4M0807
7) Rack and pinion backlash adjustment
(1) Loosen adjusting screw three to four turns.
(2) Rotate input shaft so that rack is in the straight
ahead direction. [Ensure that distance between rack
end and stopper is 70.8 mm (2.787 in).]
(3) Tighten adjusting screw by two threads.
36
4-3SERVICE PROCEDURE
4. Steering Gearbox (Power Steering System) [RHD model]
Page 653 of 2248
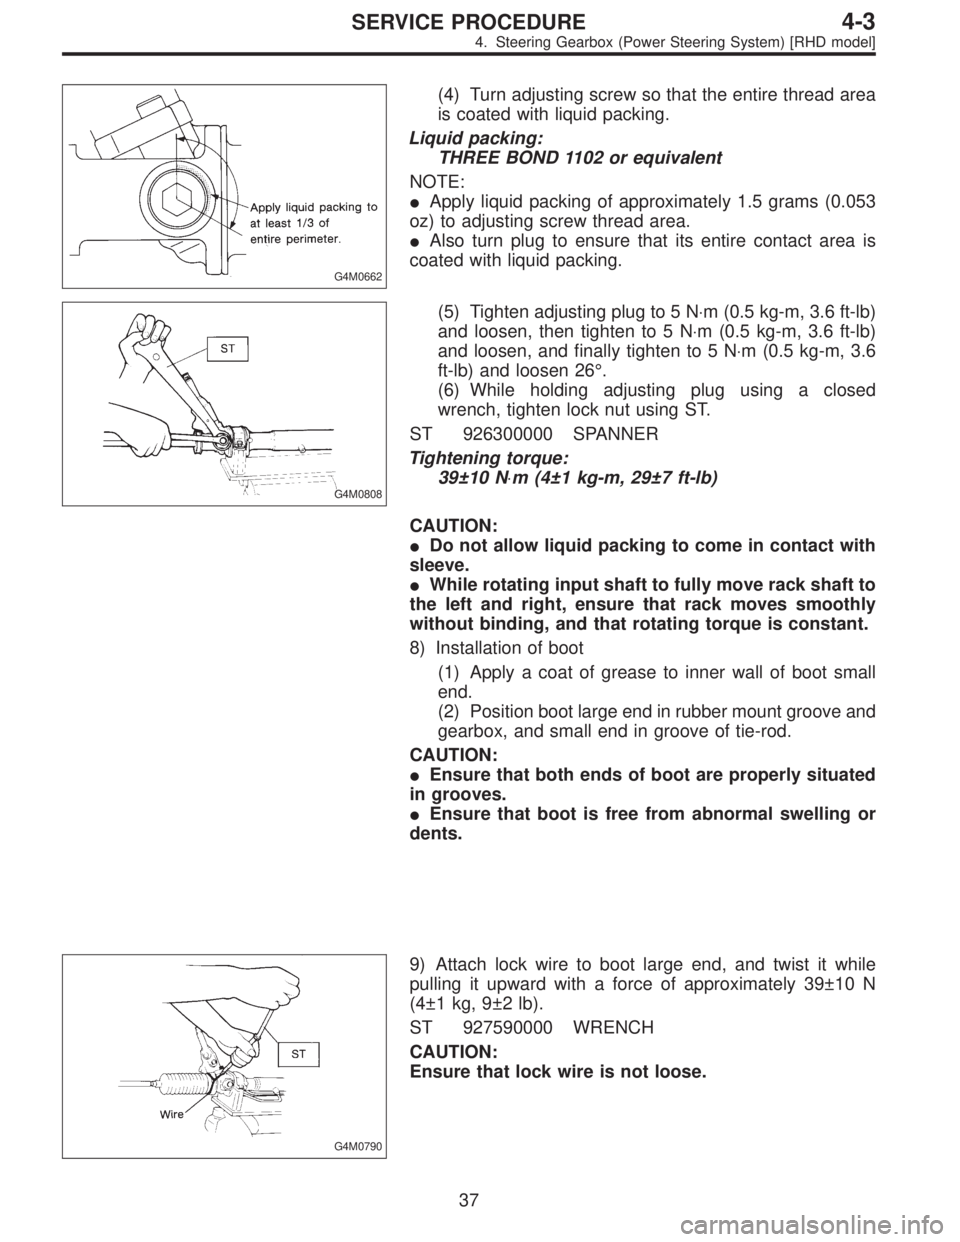
G4M0662
(4) Turn adjusting screw so that the entire thread area
is coated with liquid packing.
Liquid packing:
THREE BOND 1102 or equivalent
NOTE:
�Apply liquid packing of approximately 1.5 grams (0.053
oz) to adjusting screw thread area.
�Also turn plug to ensure that its entire contact area is
coated with liquid packing.
G4M0808
(5) Tighten adjusting plug to 5 N⋅m (0.5 kg-m, 3.6 ft-lb)
and loosen, then tighten to 5 N⋅m (0.5 kg-m, 3.6 ft-lb)
and loosen, and finally tighten to 5 N⋅m (0.5 kg-m, 3.6
ft-lb) and loosen 26°.
(6) While holding adjusting plug using a closed
wrench, tighten lock nut using ST.
ST 926300000 SPANNER
Tightening torque:
39±10 N⋅m (4±1 kg-m, 29±7 ft-lb)
CAUTION:
�Do not allow liquid packing to come in contact with
sleeve.
�While rotating input shaft to fully move rack shaft to
the left and right, ensure that rack moves smoothly
without binding, and that rotating torque is constant.
8) Installation of boot
(1) Apply a coat of grease to inner wall of boot small
end.
(2) Position boot large end in rubber mount groove and
gearbox, and small end in groove of tie-rod.
CAUTION:
�Ensure that both ends of boot are properly situated
in grooves.
�Ensure that boot is free from abnormal swelling or
dents.
G4M0790
9) Attach lock wire to boot large end, and twist it while
pulling it upward with a force of approximately 39±10 N
(4±1 kg, 9±2 lb).
ST 927590000 WRENCH
CAUTION:
Ensure that lock wire is not loose.
37
4-3SERVICE PROCEDURE
4. Steering Gearbox (Power Steering System) [RHD model]
Page 654 of 2248
G4M0810
10) Then bend wire end along boot as shown.
G4M0812
11) Install clip using pliers.
CAUTION:
After installing clip, ensure that boot’s small end is
properly positioned in groove on tie-rod.
12) Install pipes A and B.
Tightening torque:
20±4 N⋅m (2.0±0.4 kg-m, 14.5±2.9 ft-lb)
G4M0132
E: INSTALLATION
Installation is in the reverse order of removal.
Do the following:
CAUTION:
When adjusting toe-in, hold boot as shown to prevent
it from being rotated or twisted. If twisted, straighten it.
G4M0133
F: ADJUSTMENT
1) Adjust front toe.
Standard of front toe:
IN 3—OUT 3 mm (IN 0.12—OUT 0.12 in)
38
4-3SERVICE PROCEDURE
4. Steering Gearbox (Power Steering System) [RHD model]