Page 275 of 2248
G2M0312
16) Install transmission connector holder bracket.
B2M0031
17) Install ATF level gauge. (AT model)
18) Connect connectors and cables.
(1) Connect the following connectors.
�Transmission harness connectors
�Transmission ground terminal
�Front oxygen sensor connector
�Vehicle speed sensor 2
�Neutral position switch connector (MT model)
�Back-up light switch connector (MT model)
(2) Connect the following cables.
�Cruise control cable
(With cruise control model)
�Clutch cable
G2M0309
19) Install starter.
(1) Install starter onto transmission case, and connect
connectors and terminals.
(2) Tighten bolt and nut which install starter onto trans-
mission.
Tightening torque:
40±4 N⋅m (4.1±0.4 kg-m, 29.7±2.9 ft-lb)
41
2-11SERVICE PROCEDURE
3. Transmission
Page 281 of 2248
1. Transfer Case and Extension (AWD
Model)
B3M0326A
�1Transfer cover
�
2Cover gasket
�
3Oil seal
�
4Gasket
�
5Neutral switch
�
6Back-up light switch
�
7Transfer case
�
8Gasket
�
9Oil guide
�
10Ball
�
11Reverse accent spring
�
12Gasket
�
13Plug
�
14Snap ring (Inner)
�
15Reverse check plate�
16Reverse check spring
�
17Reverse return spring
�
18Reverse check cam
�
19Reverse accent shaft
�
20O-ring
�
21Adjusting select shim
�
22Reverse check sleeve
�
23Adjusting washer
�
24Ball bearing
�
25Transfer driven gear
�
26Ball bearing
�
27Oil seal
�
28Shift bracket
�
29Extension cover
�
30Gasket�
31Snap ring (Outer-30)
�
32Gasket
�
33Ball bearing
�
34Snap ring (Inner-72)
�
35Transfer drive gear
�
36Extension
Tightening torque: N⋅m (kg-m, ft-lb)
T1: 5±1 (0.5±0.1, 3.6±0.7)
T2: 10±1 (1.0±0.1, 7.2±0.7)
T3: 15.7±1.5
(1.6±0.15, 11.6±1.1)
T4: 25±2 (2.5±0.2, 18.1±1.4)
T5: 37±3 (3.8±0.3, 27.5±2.2)
6
3-1COMPONENT PARTS
1. Transfer Case and Extension (AWD Model)
Page 282 of 2248
2. Rear Case (FWD Model)
G3M0265
�1Rear case
�
2Case gasket
�
3Back-up light switch
�
4Neutral switch
�
5Reverse check sleeve ASSY
�
6Gasket
�
7Adjusting shim�
8O-ring
�
9Oil seal
Tightening torque: N⋅m (kg-m, ft-lb)
T1: 6.4±0.5 (0.65±0.05, 4.7±0.4)
T2: 25±2 (2.5±0.2, 18.1±1.4)
7
3-1COMPONENT PARTS
2. Rear Case (FWD Model)
Page 291 of 2248

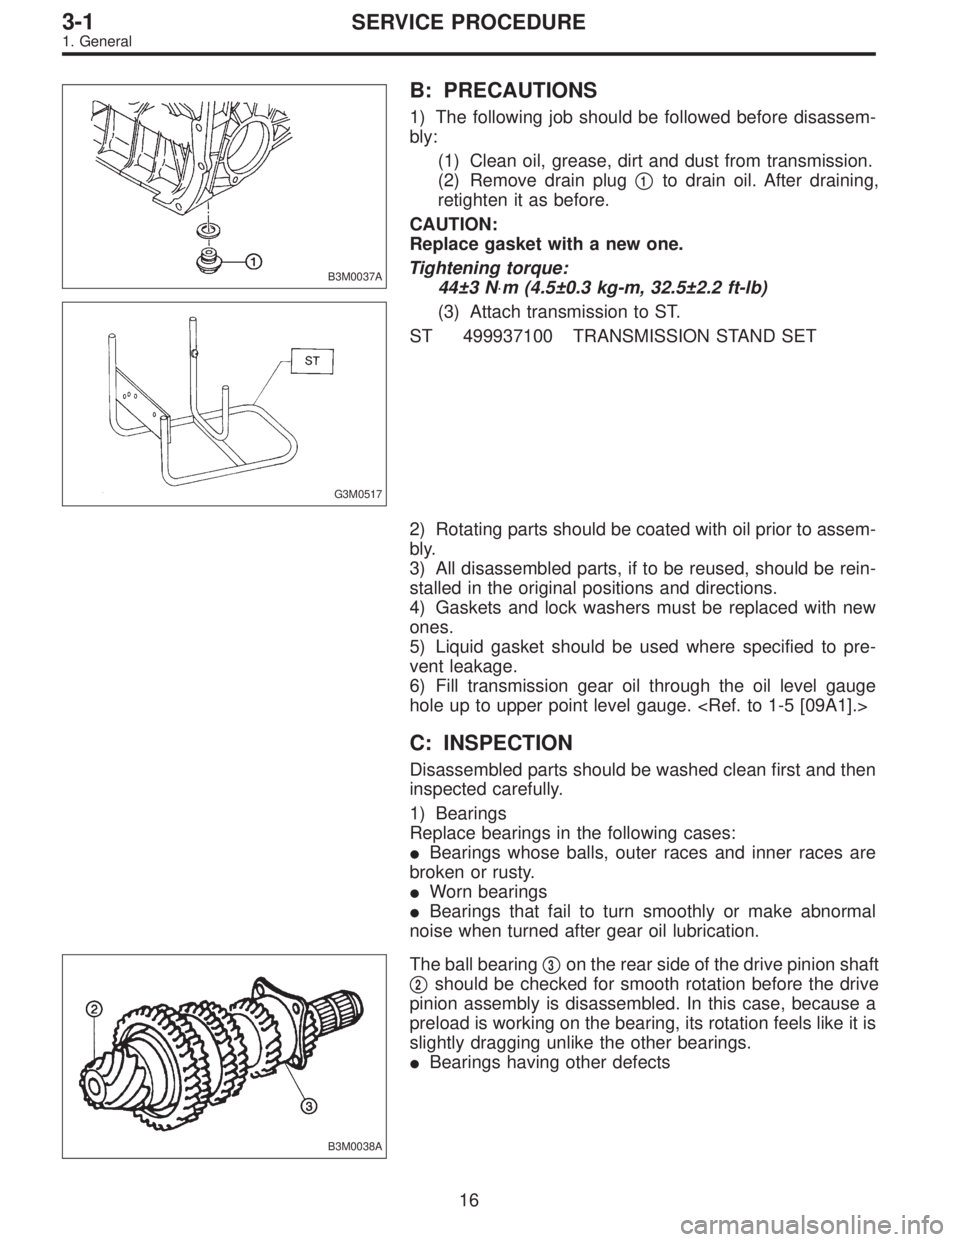
B3M0037A
B: PRECAUTIONS
1) The following job should be followed before disassem-
bly:
(1) Clean oil, grease, dirt and dust from transmission.
(2) Remove drain plug�
1to drain oil. After draining,
retighten it as before.
CAUTION:
Replace gasket with a new one.
Tightening torque:
44±3 N⋅m (4.5±0.3 kg-m, 32.5±2.2 ft-lb)
G3M0517
(3) Attach transmission to ST.
ST 499937100 TRANSMISSION STAND SET
2) Rotating parts should be coated with oil prior to assem-
bly.
3) All disassembled parts, if to be reused, should be rein-
stalled in the original positions and directions.
4) Gaskets and lock washers must be replaced with new
ones.
5) Liquid gasket should be used where specified to pre-
vent leakage.
6) Fill transmission gear oil through the oil level gauge
hole up to upper point level gauge.
C: INSPECTION
Disassembled parts should be washed clean first and then
inspected carefully.
1) Bearings
Replace bearings in the following cases:
�Bearings whose balls, outer races and inner races are
broken or rusty.
�Worn bearings
�Bearings that fail to turn smoothly or make abnormal
noise when turned after gear oil lubrication.
B3M0038A
The ball bearing�3on the rear side of the drive pinion shaft
�
2should be checked for smooth rotation before the drive
pinion assembly is disassembled. In this case, because a
preload is working on the bearing, its rotation feels like it is
slightly dragging unlike the other bearings.
�Bearings having other defects
16
3-1SERVICE PROCEDURE
1. General
Page 296 of 2248
B3M0043A
4) Remove reverse check sleeve�5.
Disassembly procedure is as follows:
(1) Using a standard screwdriver, remove snap ring�
A
(Inner-28).
NOTE:
Replace snap ring with a new one if deformed or weak-
ened.
(2) Remove reverse check plate�
B.
(3) Remove reverse check spring�
Cwith cam�D.
(4) Remove reverse return spring�
E.
(5) Remove reverse accent shaft�
F.
(6) Remove O-ring�
G.
NOTE:
�Reverse check sleeve assembly uses an O-ring which
should not be scratched.
�Be careful not to break adjustment shim placed between
reverse check sleeve assembly and case.
B3M0042A
5) Remove back-up light switch�7.
6) Remove oil guide�
9.
Tightening torque:
T1: 6.4±0.5 N⋅m (0.65±0.05 kg-m, 4.7±0.4 ft-lb)
T2: 10±1 N⋅m (1.0±0.1 kg-m, 7.2±0.7 ft-lb)
T3: 19.6±1.5 N⋅m (2.00±0.15 kg-m, 14.5±1.1 ft-lb)
T4: 25±2 N⋅m (2.5±0.2 kg-m, 18.1±1.4 ft-lb)
21
3-1SERVICE PROCEDURE
2. Transfer Case and Extension (AWD Model)
Page 303 of 2248

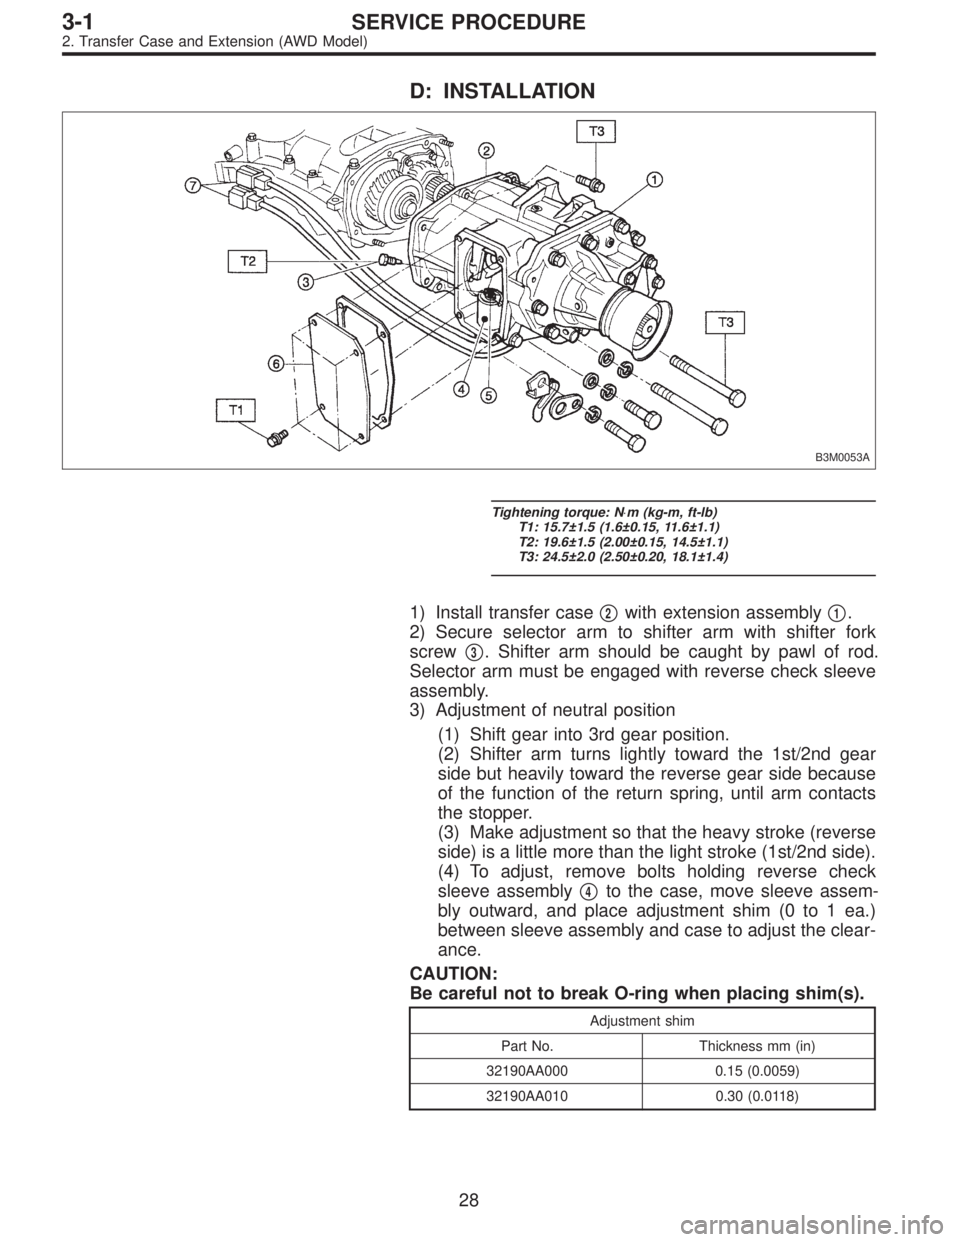
D: INSTALLATION
B3M0053A
Tightening torque: N⋅m (kg-m, ft-lb)
T1: 15.7±1.5 (1.6±0.15, 11.6±1.1)
T2: 19.6±1.5 (2.00±0.15, 14.5±1.1)
T3: 24.5±2.0 (2.50±0.20, 18.1±1.4)
1) Install transfer case�2with extension assembly�1.
2) Secure selector arm to shifter arm with shifter fork
screw�
3. Shifter arm should be caught by pawl of rod.
Selector arm must be engaged with reverse check sleeve
assembly.
3) Adjustment of neutral position
(1) Shift gear into 3rd gear position.
(2) Shifter arm turns lightly toward the 1st/2nd gear
side but heavily toward the reverse gear side because
of the function of the return spring, until arm contacts
the stopper.
(3) Make adjustment so that the heavy stroke (reverse
side) is a little more than the light stroke (1st/2nd side).
(4) To adjust, remove bolts holding reverse check
sleeve assembly�
4to the case, move sleeve assem-
bly outward, and place adjustment shim (0 to 1 ea.)
between sleeve assembly and case to adjust the clear-
ance.
CAUTION:
Be careful not to break O-ring when placing shim(s).
Adjustment shim
Part No. Thickness mm (in)
32190AA000 0.15 (0.0059)
32190AA010 0.30 (0.0118)
28
3-1SERVICE PROCEDURE
2. Transfer Case and Extension (AWD Model)
Page 305 of 2248
3. Rear Case (FWD Model)
A: DISASSEMBLY
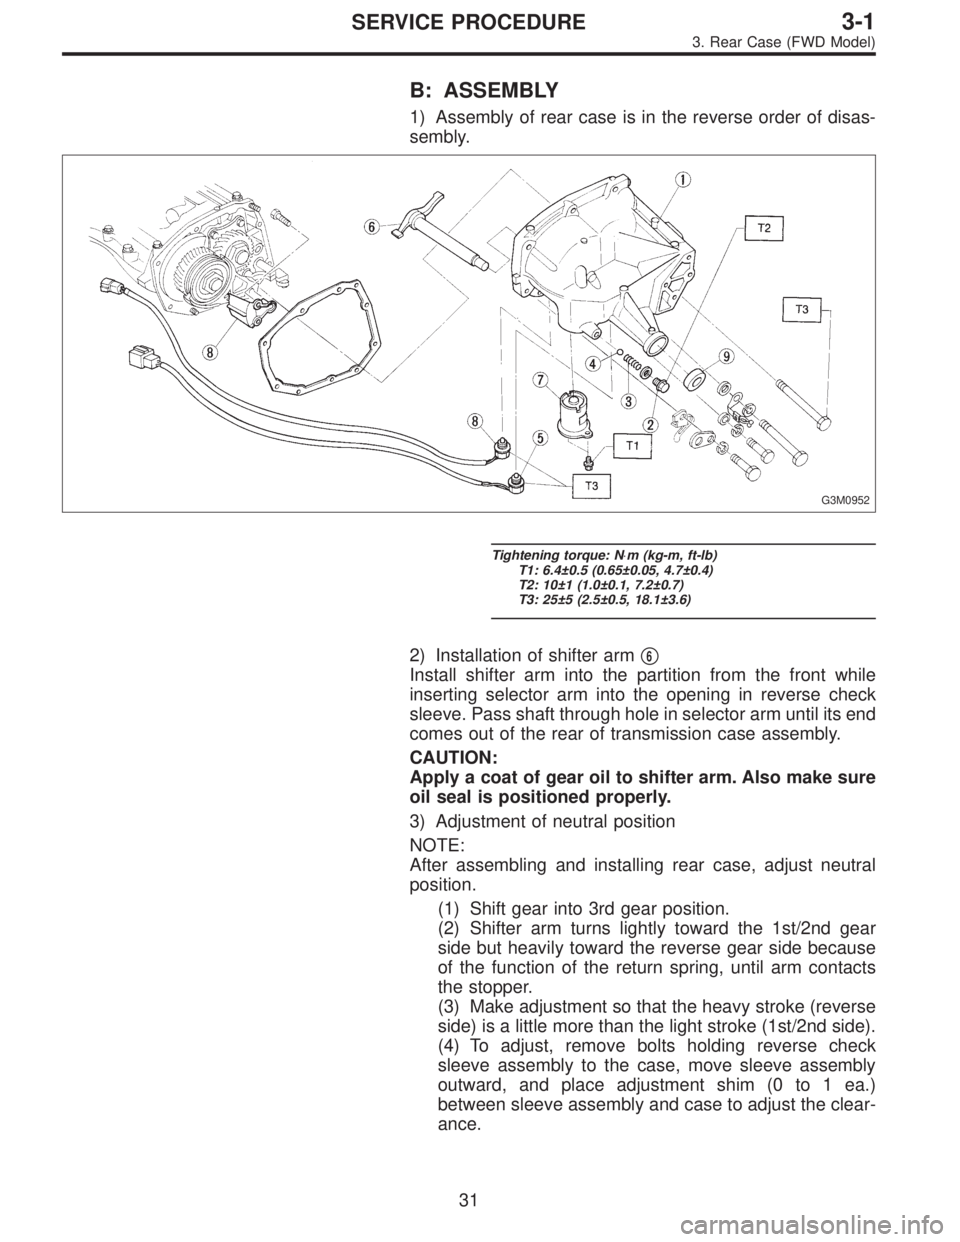
G3M0952
Tightening torque: N⋅m (kg-m, ft-lb)
T1: 6.4±0.5 (0.65±0.05, 4.7±0.4)
T2: 10±1 (1.0±0.1, 7.2±0.7)
T3: 25±2 (2.5±0.2, 18.1±1.4)
1) Remove rear case�1.
2) Remove plug�
2, spring�3and reverse check ball�4.
3) Remove neutral switch�
5.
4) Pull out shifter arm�
6.
5) Remove reverse check sleeve�
7.
NOTE:
The disassembly procedure is the same as for AWD model.
B3M0056A
6) Remove back-up light switch�8.
7) Remove oil seal�
9.
CAUTION:
Do not reuse oil seal.
30
3-1SERVICE PROCEDURE
3. Rear Case (FWD Model)
Page 306 of 2248

B: ASSEMBLY
1) Assembly of rear case is in the reverse order of disas-
sembly.
G3M0952
Tightening torque: N⋅m (kg-m, ft-lb)
T1: 6.4±0.5 (0.65±0.05, 4.7±0.4)
T2: 10±1 (1.0±0.1, 7.2±0.7)
T3: 25±5 (2.5±0.5, 18.1±3.6)
2) Installation of shifter arm�6
Install shifter arm into the partition from the front while
inserting selector arm into the opening in reverse check
sleeve. Pass shaft through hole in selector arm until its end
comes out of the rear of transmission case assembly.
CAUTION:
Apply a coat of gear oil to shifter arm. Also make sure
oil seal is positioned properly.
3) Adjustment of neutral position
NOTE:
After assembling and installing rear case, adjust neutral
position.
(1) Shift gear into 3rd gear position.
(2) Shifter arm turns lightly toward the 1st/2nd gear
side but heavily toward the reverse gear side because
of the function of the return spring, until arm contacts
the stopper.
(3) Make adjustment so that the heavy stroke (reverse
side) is a little more than the light stroke (1st/2nd side).
(4) To adjust, remove bolts holding reverse check
sleeve assembly to the case, move sleeve assembly
outward, and place adjustment shim (0 to 1 ea.)
between sleeve assembly and case to adjust the clear-
ance.
31
3-1SERVICE PROCEDURE
3. Rear Case (FWD Model)