Page 1525 of 1771

Clutch Inspectio n
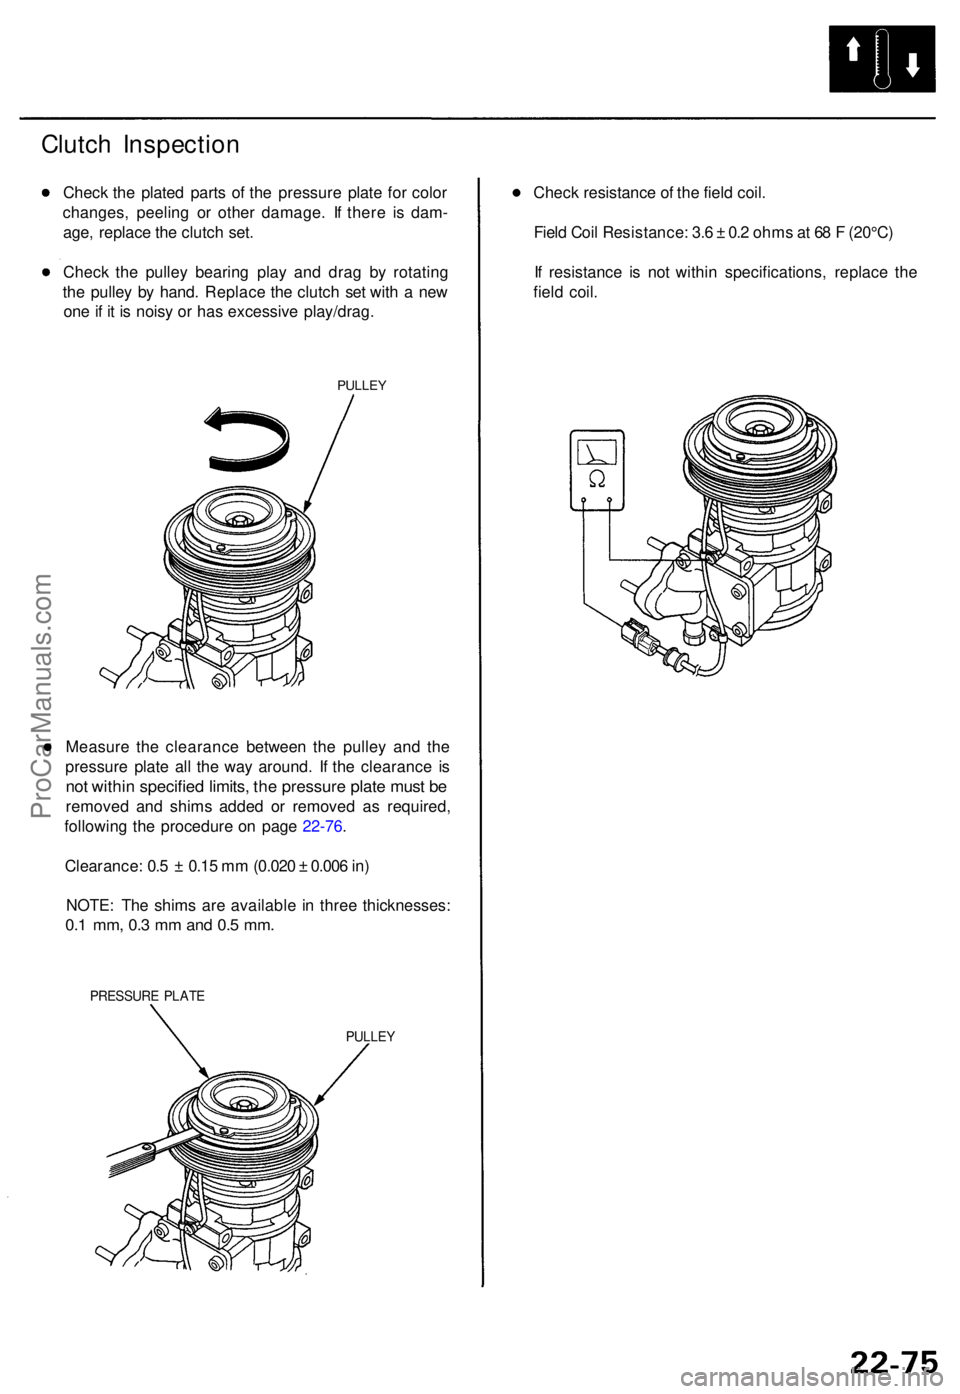
Check th e plate d part s o f th e pressur e plat e fo r colo r
changes , peelin g o r othe r damage . I f ther e i s dam -
age , replac e th e clutc h set .
Chec k th e pulle y bearin g pla y an d dra g b y rotatin g
th e pulle y b y hand . Replac e th e clutc h se t wit h a ne w
on e if i t i s nois y o r ha s excessive play/drag.
PULLEY
Measur e th e clearanc e betwee n th e pulle y an d th e
pressur e plat e al l th e wa y around . I f th e clearanc e i s
no t withi n specifie d limits , th e pressur e plat e mus t b e
remove d an d shim s added or remove d a s required ,
followin g th e procedur e o n pag e 22-76 .
Clearance : 0. 5 ± 0.1 5 m m (0.02 0 ± 0.00 6 in )
NOTE : Th e shim s ar e availabl e i n thre e thicknesses :
0.1 mm , 0. 3 m m an d 0. 5 mm .
PRESSUR E PLAT E
PULLE Y
Check resistanc e o f th e fiel d coil .
Fiel d Coi l Resistance : 3. 6 ± 0. 2 ohm s a t 6 8 F (20°C )
I f resistanc e i s no t withi n specifications , replac e th e
fiel d coil .
ProCarManuals.com
Page 1558 of 1771
Starter Solenoid Test
1. Make sure you have the anti-theft code for the
radio, then write down the frequencies for the
radio's preset buttons.
2. Disconnect the battery negative cable, then discon-
nect the positive cable.
3. Check the hold-in coil for continuity between the S
terminal and the armature housing (ground). The
coil is OK if there is continuity.
4. Check the pull-in coil for continuity between the S and
M terminals. The coil is OK if there is continuity.ProCarManuals.com
Page 1562 of 1771
4.
Check for mica depth. If necessary, undercut the mica
with a hacksaw blade to achieve proper depth. If the
service limit cannot be maintained, replace the arma-
ture.
HIGH
MICA
NOT GOOD
GOOD
MICA DEPTH
Commutator Mica Depth
Standard (NEW)
0.4-0.5 mm
(0.016 -0.020 in)
Service Limit
0.15
mm
(0.006 in)
5.
Check for continuity between the segments of the
commutator. If an open circuit exists between any
segments, replace the armature.
COMMUTATOR SEGMENT
6.
Place the armature on an armature tester. Hold a
hacksaw blade on the armature core. If the blade is
attracted to the core or vibrates while the core is
turned, the armature is shorted. Replace the arma-
ture.
ARMATURE TESTER
HACKSAW BLADE
ARMATURE
7. Check with an ohmmeter that no continuity exists
between the commutator and armature coil core,
and between the commutator and armature shaft. If
continuity exists, replace the armature.
SHAFT
COIL CORE
COMMUTATORProCarManuals.com
Page 1565 of 1771

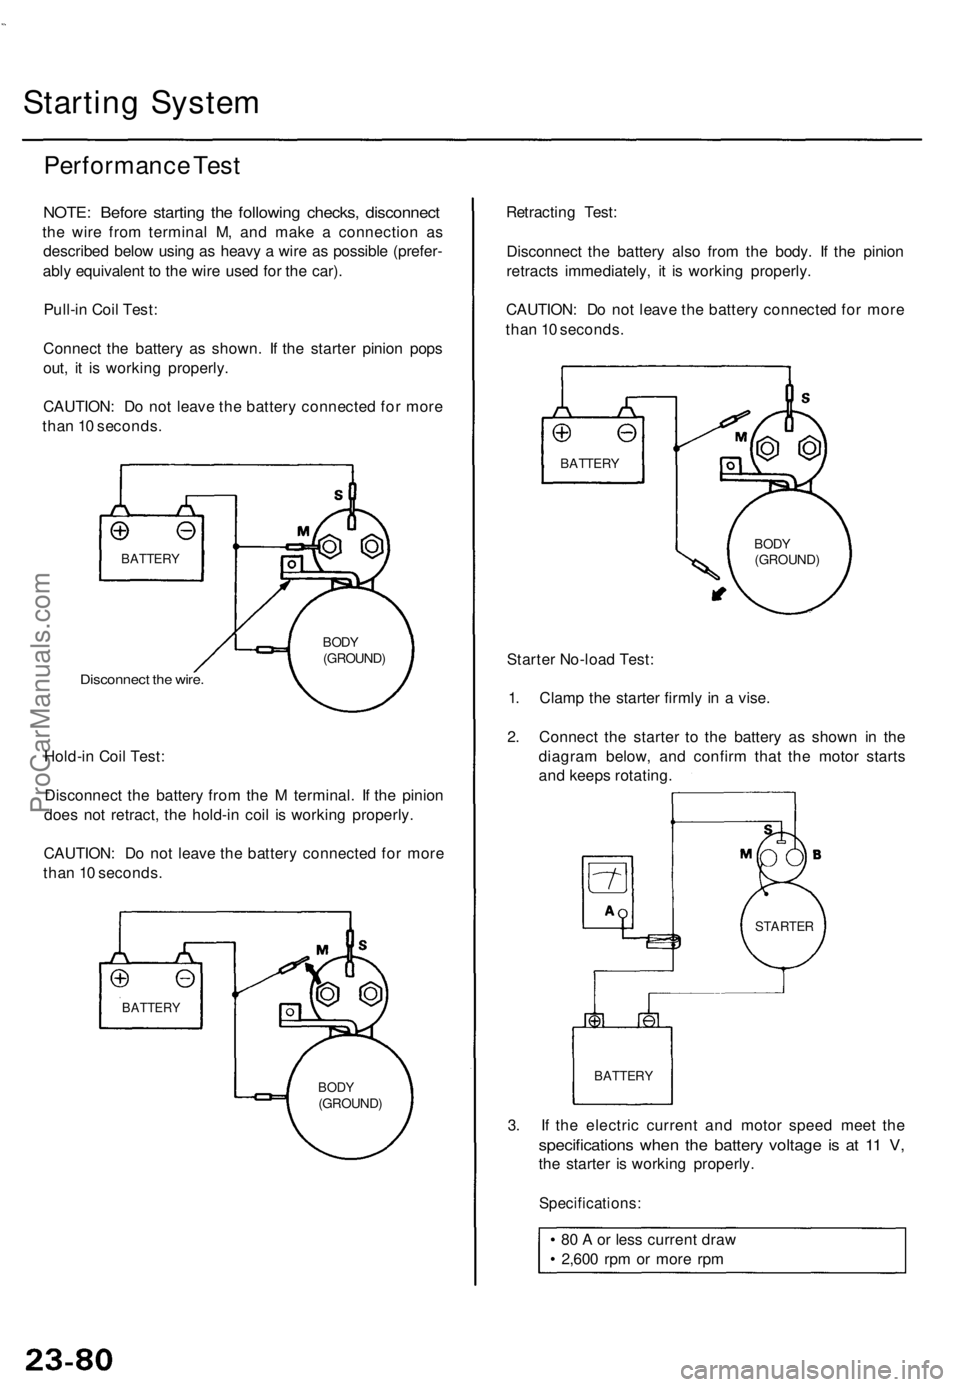
Starting System
Performance Test
NOTE: Before starting the following checks, disconnect
the wire from terminal M, and make a connection as
described below using as heavy a wire as possible (prefer-
ably equivalent to the wire used for the car).
Pull-in Coil Test:
Connect the battery as shown. If the starter pinion pops
out, it is working properly.
CAUTION: Do not leave the battery connected for more
than 10 seconds.
Disconnect the wire.
Hold-in Coil Test:
Disconnect the battery from the M terminal. If the pinion
does not retract, the hold-in coil is working properly.
CAUTION: Do not leave the battery connected for more
than 10 seconds.
Retracting Test:
Disconnect the battery also from the body. If the pinion
retracts immediately, it is working properly.
CAUTION: Do not leave the battery connected for more
than 10 seconds.
Starter No-load Test:
1. Clamp the starter firmly in a vise.
2. Connect the starter to the battery as shown in the
diagram below, and confirm that the motor starts
and keeps rotating.
3. If the electric current and motor speed meet the
specifications when the battery voltage is at 11 V,
the starter is working properly.
Specifications:
80 A or less current draw
2,600 rpm or more rpm
BATTERY
BODY
(GROUND)
BATTERY
STARTER
BODY
(GROUND)
BATTERY
BODY
(GROUND)
BATTERYProCarManuals.com
Page 1571 of 1771
Distributor Top End Inspection
1. Check for rough or pitted rotor and cap terminals.
2. Scrape or file off the carbon deposits. Smooth the
rotor terminal with an oil stone or #600 sandpaper if
rough.
ROTOR
TERMINAL
CAP TERMINAL
CARBON
POINT
3. Check the distributor ignition (Dl) cap for cracks, wear,
and damage. If necessary, clean or replace it.
Noise Condenser Capacity Test
1. Use a commercially available condenser tester.
Connect the condenser tester probes and measure
the condenser capacity.
Condenser capacity: 0.47 ± 0.09 microfarads
POSITIVE TERMINAL
BODY GROUND
(Negative)
NOTE: The noise condenser is intended to reduce
ignition noise. However, condenser failure may cause
the engine to stop running.
2. If not within the specifications, replace the noise con-
denser.ProCarManuals.com
Page 1574 of 1771

Ignition Syste m
Ignition Contro l Modul e (ICM ) Inpu t Tes t
NOTE :
Se e sectio n 1 1 whe n th e malfunctio n indicator lamp
(MIL ) blinks .
Perform a n inpu t tes t o n th e ignitio n contro l modul e
(ICM) afte r finishin g th e fundamenta l test s fo r th e
ignitio n syste m an d fue l emissio n system .
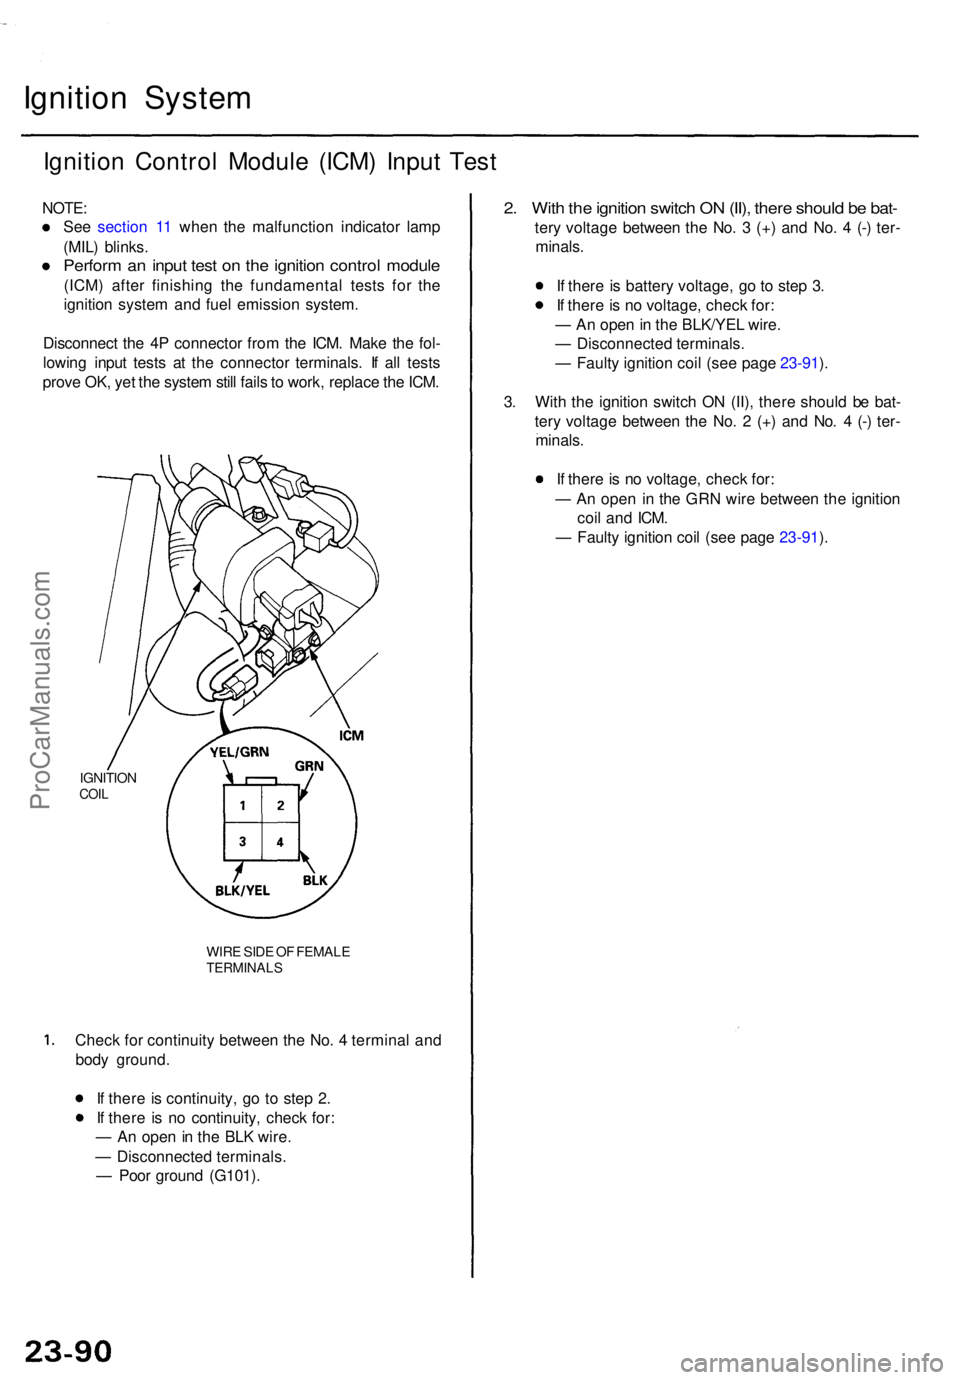
Disconnec t th e 4 P connecto r fro m th e ICM . Mak e th e fol -
lowin g inpu t test s a t th e connecto r terminals . I f al l test s
prov e OK , ye t th e syste m stil l fail s to work , replac e th e ICM .
IGNITIO NCOIL
WIR E SID E O F FEMAL ETERMINAL S
Check fo r continuit y betwee n th e No . 4 termina l an d
bod y ground .
I f ther e is continuity , g o t o ste p 2 .
I f ther e i s n o continuity , chec k for :
— A n ope n in th e BL K wire .
— Disconnecte d terminals .
— Poo r groun d (G101) .
2. Wit h th e ignitio n switc h O N (II) , ther e shoul d b e bat -
tery voltag e betwee n th e No . 3 (+ ) an d No . 4 (- ) ter -
minals .
I f ther e is batter y voltage , g o t o ste p 3 .
I f ther e is n o voltage , chec k for :
— A n ope n in th e BLK/YE L wire .
— Disconnecte d terminals .
— Fault y ignitio n coi l (se e pag e 23-91 ).
3 . Wit h th e ignitio n switc h O N (II) , ther e shoul d b e bat -
ter y voltag e betwee n th e No . 2 (+ ) an d No . 4 (-) ter -
minals .
I f ther e is n o voltage , chec k for :
— A n ope n i n th e GR N wir e betwee n th e ignitio n
coi l an d ICM .
— Fault y ignitio n coi l (se e pag e 23-91 ).
ProCarManuals.com
Page 1575 of 1771
Ignition Coil Test
1. Turn the ignition switch OFF.
2. Disconnect the 4P connector and ignition coil wire.
SECONDARY
WINDING
TERMINAL
4P CONNECTOR
TERMINAL SIDE OF
MALE TERMINALS
3. Using an ohmmeter, measure resistance between
the terminals. Replace the coil if the resistance is
not within specifications.
NOTE: Resistance will vary with the coil tempera-
ture; specifications are at 68°F (20°C).
Primary Winding Resistance
(Between the No. 2 and No. 3 terminals):
0.36 - 0.44 ohms
Secondary Winding Resistance
(Between the No. 2 and secondary winding terminals):
10.8-16.2k
Resistance between the No. 3 and No. 4 terminals:
2.0-2.3k
SECONDARY
WINDING
TERMINAL
4. Check for continuity between the No. 1 and No. 2
terminals. Replace the coil if there is no continuity.ProCarManuals.com
Page 1576 of 1771
Ignition System
Spark Plug Inspection
1. Inspect the electrodes and ceramic insulator for:
2. Check the electrode gap.
• Adjust the gap with a suitable gapping tool.
Electrode Gap
• Replace the plug if the center electrode is rounded
as shown below:
Burned or worn electrodes may be caused by:
• Advanced ignition timing
• Loose spark plug
• Plug heat range too low
• Insufficient cooling
Fouled plug may be caused by:
Retarded ignition timing
Oil in combustion chamber
Incorrect spark plug gap
Plug heat range too high
Excessive idling/low speed running
Clogged air cleaner element
Deteriorated ignition coil or ignition wires
3. Apply a small quantity of anti-seize compound to
the plug threads, and screw the plugs into the cylin-
der head finger-tight. Then torque them to 18 N-m
(1.8 kgf-m, 13 Ibf-ft).
Spark PlugsProCarManuals.com