Page 128 of 1771
The numbers in the middle of the API Service label tell
you the oil's SAE viscosity or weight. Select the oil for
your car according to this chart:
Ambient Temperature
-20
An oil with a viscosity of 5W - 30 is preferred for
improved fuel economy and year-round protection in
the car. You may use a 10W - 30 oil if the climate in your
area is limited to the temperature range shown on the
chart.
API SERVICE LABEL
4.
API CERTIFICATION MARK
Run the engine for more than three minutes, then
check for oil leakage.ProCarManuals.com
Page 130 of 1771

Oil Pressur e Engin
e Oi l Temperatur e Switc h
Testin gTestin g
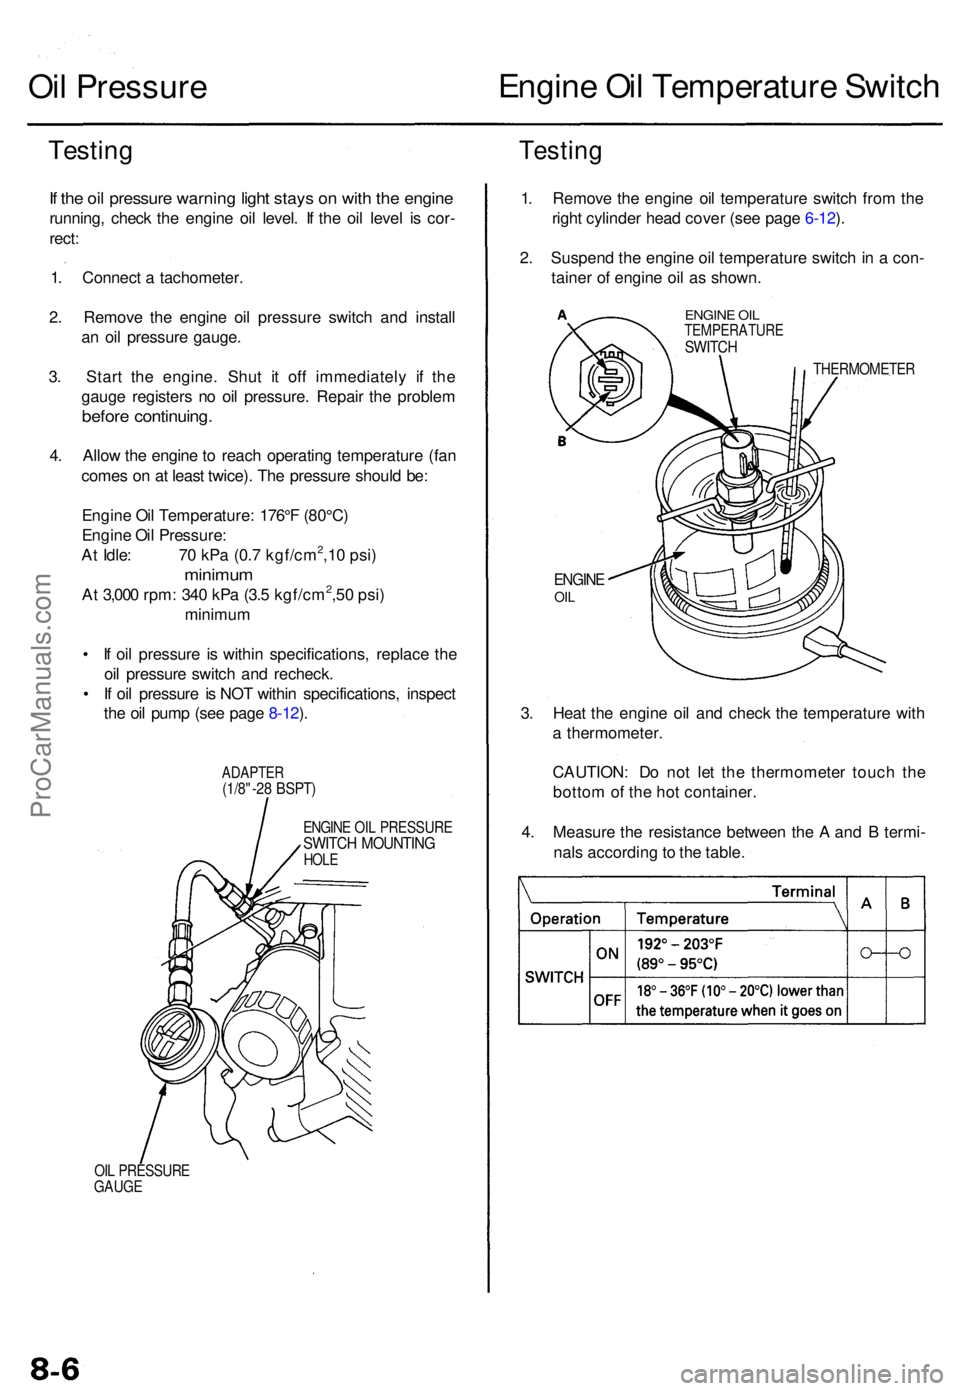
If th e oi l pressur e warnin g ligh t stay s o n wit h th e engin e
running , chec k th e engin e oi l level . I f th e oi l leve l i s cor -
rect :
1 . Connec t a tachometer .
2 . Remov e th e engin e oi l pressur e switc h an d instal l
a n oi l pressur e gauge .
3 . Star t th e engine . Shu t i t of f immediatel y i f th e
gaug e register s n o oi l pressure . Repai r th e proble m
before continuing .
4. Allo w th e engin e to reac h operatin g temperatur e (fa n
come s o n a t leas t twice) . Th e pressur e shoul d be :
Engin e Oi l Temperature : 176° F (80°C )
Engin e Oi l Pressure :
A t Idle : 7 0 kP a (0. 7 kgf/cm
2,1 0 psi )
minimu m
At 3,00 0 rpm : 34 0 kP a (3. 5 kgf/cm2,5 0 psi )
minimu m
• I f oi l pressur e i s withi n specifications , replac e th e
oi l pressur e switc h an d recheck .
• I f oi l pressur e i s NO T withi n specifications , inspec t
th e oi l pum p (se e pag e 8-12 ).
ADAPTE R(1/8"-28 BSPT )
ENGIN E OI L PRESSUR ESWITCH MOUNTIN GHOLE
OIL PRESSUR E
GAUG E
1. Remov e th e engin e oi l temperatur e switc h fro m th e
righ t cylinde r hea d cove r (se e pag e 6-12 ).
2 . Suspen d th e engin e oi l temperatur e switc h in a con -
taine r o f engin e oi l a s shown .
ENGINE OI LTEMPERATUR ESWITCH
THERMOMETE R
ENGINEOIL
3. Hea t th e engin e oi l an d chec k th e temperatur e wit h
a thermometer .
CAUTION : D o no t le t th e thermomete r touc h th e
botto m of th e ho t container .
4 . Measur e th e resistanc e betwee n th e A an d B termi -
nal s accordin g to th e table .
ProCarManuals.com
Page 145 of 1771
Radiator
Cap Testing
1. Remove the radiator cap, wet its seal with engine
coolant, then install it on the pressure tester.
2. Apply a pressure of 93-123 kPa (0.95-1.25 kgf/cm2,
14- 18
psi).
3. Check for a drop in pressure.
4. If the pressure drops, replace the cap.
RADIATOR PRESSURE TESTER
(Commercially available)
Testing
RADIATOR
CAP
SMALL ADAPTOR
(for 32 mm neck, low profile)
1. Wait until the engine is cool, then carefully remove
the
radiator
cap and
fill
the
radiator
with
engine
coolant to the top of the filler neck.
2. Attach the pressure tester to the radiator and apply
a pressure of 93-123 kPa (0.95 - 1.25 kgf/cm2, 14 -
18
psi).
3. Inspect for engine coolant leaks and a drop in pres-
sure.
4. Remove the tester and reinstall the radiator cap.
NOTE: Check for engine oil in the coolant and/or
coolant in the engine oil.
SMALL ADAPTOR
(for 32 mm neck, low profile)
RADIATOR PRESSURE
TESTER
(Commercially available)ProCarManuals.com
Page 201 of 1771

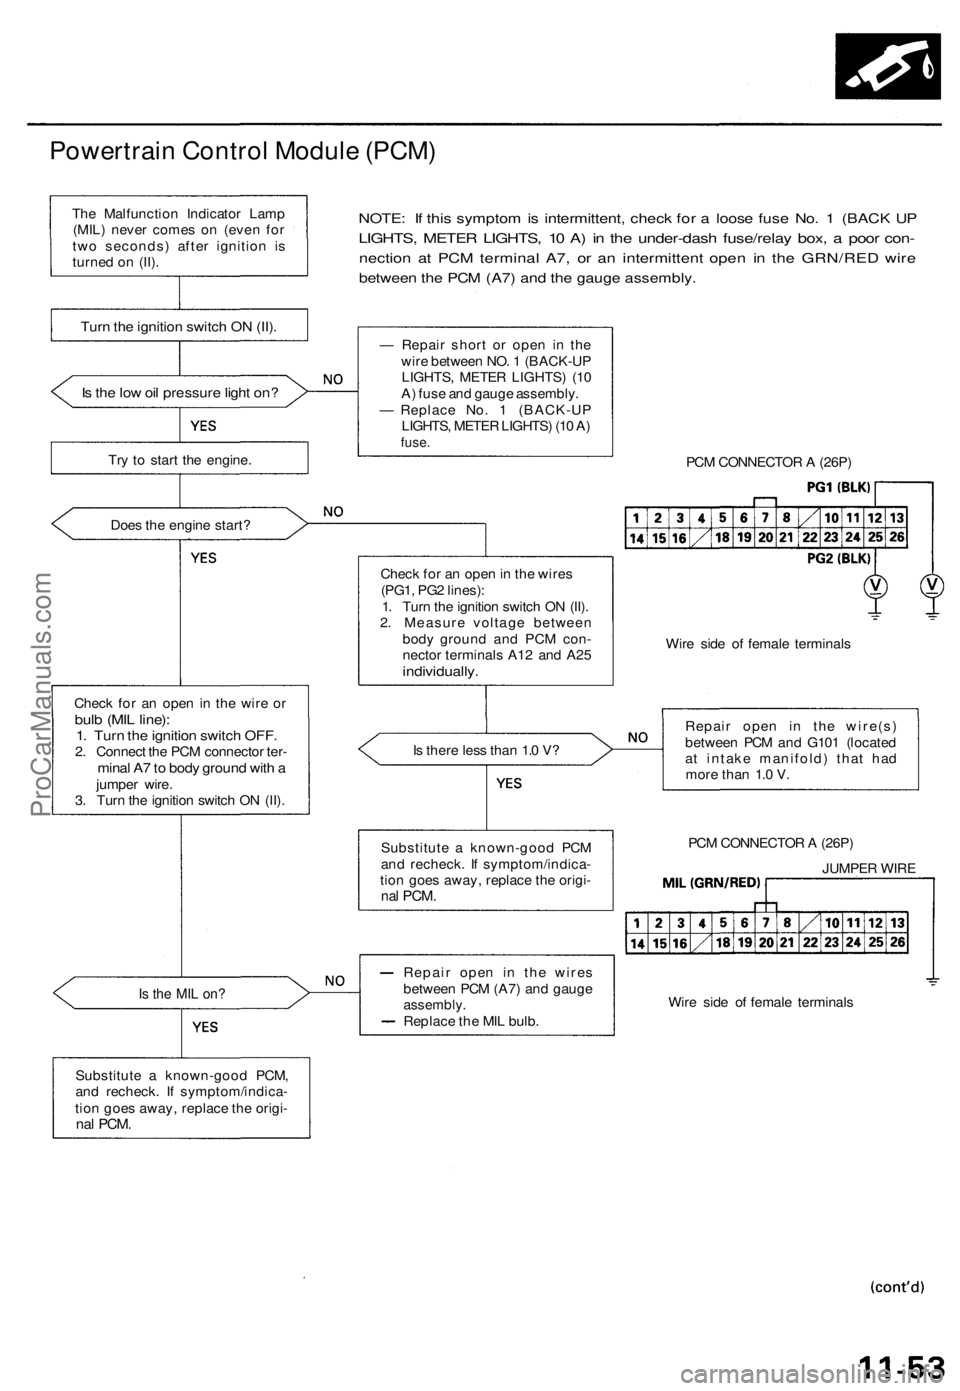
Powertrain Control Module (PCM)
NOTE: If this symptom is intermittent, check for a loose fuse No. 1 (BACK UP
LIGHTS, METER LIGHTS, 10 A) in the under-dash fuse/relay box, a poor con-
nection at PCM terminal A7, or an intermittent open in the GRN/RED wire
between the PCM (A7) and the gauge assembly.
Is the low oil pressure light on?
Try to start the engine.
Does the engine start?
Check for an open in the wire or
bulb (MIL line):
1. Turn the ignition switch OFF.
2. Connect the PCM connector ter-
minal A7 to body ground with a
jumper wire.
3. Turn the ignition switch ON (II).
Is the MIL on?
Substitute a known-good PCM,
and recheck. If symptom/indica-
tion goes away, replace the origi-
nal
PCM.
— Repair short or open in the
wire between NO. 1 (BACK-UP
LIGHTS, METER LIGHTS) (10
A) fuse and gauge assembly.
— Replace No. 1 (BACK-UP
LIGHTS, METER LIGHTS) (10 A)
fuse.
PCM CONNECTOR A (26P)
Check for an open in the wires
(PG1, PG2 lines):
1. Turn the ignition switch ON (II).
2. Measure voltage between
body ground and PCM con-
nector terminals A12 and A25
individually.
Wire side of female terminals
Is there less than 1.0 V?
Repair open in the wire(s)
between PCM and G101 (located
at intake manifold) that had
more than 1.0 V.
PCM CONNECTOR A (26P)
JUMPER WIRE
Wire side of female terminals
Repair open in the wires
between PCM (A7) and gauge
assembly.
Replace the MIL bulb.
Substitute a known-good PCM
and recheck. If symptom/indica-
tion goes away, replace the origi-
nal
PCM.
Turn the ignition switch ON (II).
The Malfunction Indicator Lamp
(MIL) never comes on (even for
two seconds) after ignition is
turned on (II).ProCarManuals.com
Page 368 of 1771
CHECK BALL
CHECK BALLS
CHECK BALL
FILTERS
CHOKE
MAIN VALVE BODY
(Sectional View)
SPRING SPECIFICATIONS
Unit: mm (in)
No.
Spring
4-3 kick-down valve spring
3-4 shift valve spring
2-3 shift valve spring
1-2 shift valve spring
CPC valve spring
Standard (New)
Wire Dia.
1.1 (0.043)
0.8(0.031)
0.8(0.031)
0.9 (0.035)
1.0(0.039)
O.D.
7.1 (0.280)
6.6 (0.260)
6.6 (0.260)
7.6 (0.299)
6.8 (0.268)
Free Length
51.3(2.020)
42.1 (1.657)
42.1 (1.657)
55.5(2.185)
34.3(1.350)
No. of Coils
22.5
22.0
22.0
24.0
14.2
CHECK BALLSProCarManuals.com
Page 370 of 1771
CHECK BAL L
CHECK BALL S
CHEC K BALL S
FILTER S CHOK
E
SPRIN G SPECIFICATION SUnit: m m (in )
No.Sprin g
4-3 kick-dow n valv e sprin g
3-4 shif t valv e sprin g
2-3 shif t valv e sprin g
1-2 shif t valv e sprin g
Main orific e contro l valv e sprin g
Standar d (New )
Wire Dia .
1.1 (0.043 )
0. 8 (0.031 )
0.8(0.031 )
0. 9 (0.035 )
1.0(0.039 )
O.D.
7.1 (0.280 )
6. 6 (0.260 )
6. 6 (0.260 )
7. 6 (0.299 )
6. 6 (0.260 )
Free Lengt h
44.6(1.756 )
42. 1 (1.657 )
42. 1 (1.657 )
55. 5 (2.185 )
42.0(1.654 )
No. o f Coil s
22.5
22.0
22. 0
24. 0
21. 6
CHEC K BALL S
ProCarManuals.com
Page 375 of 1771

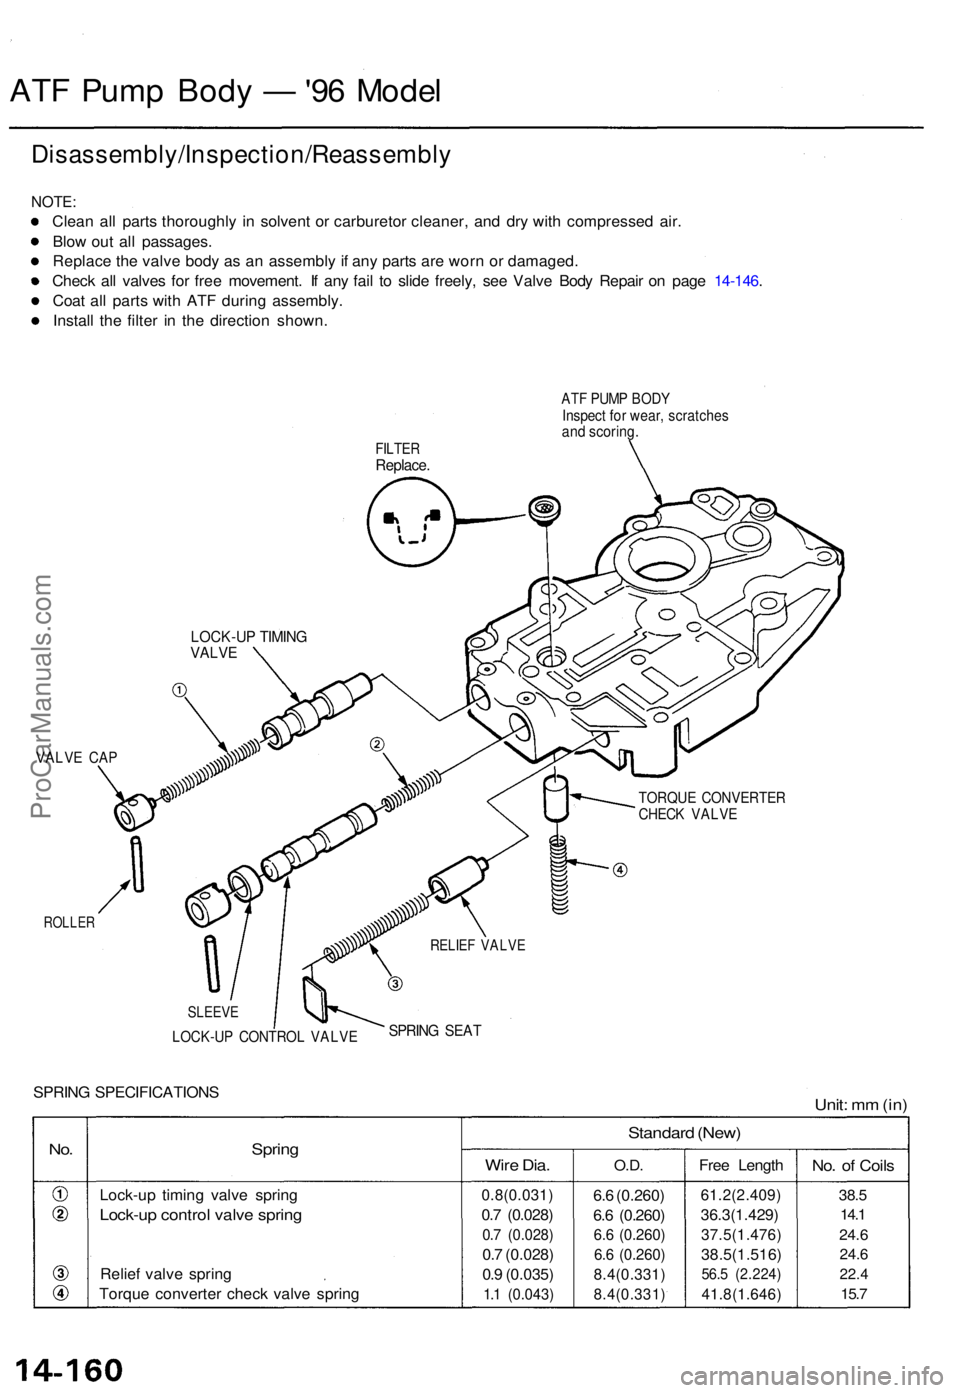
ATF Pum p Bod y — '96 Mode l
Disassembly/Inspection/Reassembl y
NOTE:
Clean al l part s thoroughl y i n solven t o r carbureto r cleaner , an d dr y wit h compresse d air .
Blo w ou t al l passages .
Replac e th e valv e bod y a s a n assembl y if an y part s ar e wor n o r damaged .
Chec k al l valve s fo r fre e movement . I f an y fai l t o slid e freely , se e Valv e Bod y Repai r o n pag e 14-146 .
Coa t al l part s wit h AT F durin g assembly .
Instal l th e filte r i n th e directio n shown .
FILTERReplace .
LOCK-U P TIMIN GVALVE
VALV E CA P
ROLLE R
TORQU E CONVERTE RCHECK VALV E
SPRING SPECIFICATION SUnit: m m (in )
No.Sprin g
Lock-u p timin g valv e sprin g
Lock-u p contro l valv e sprin g
Relief valv e sprin g
Torqu e converte r chec k valv e sprin g
Standar d (New )
Wire Dia .
0.8(0.031 )
0.7 (0.028 )
0.7 (0.028 )
0.7 (0.028 )
0. 9 (0.035 )
1.1 (0.043 )
O.D.
6.6 (0.260 )
6. 6 (0.260 )
6.6 (0.260 )
6. 6 (0.260 )
8.4(0.331 )
8.4(0.331 )
Free Lengt h
61.2(2.409 )
36.3(1.429)
37.5(1.476 )
38.5(1.516)
56.5 (2.224 )
41.8(1.646 )
No. o f Coil s
38.5
14. 1
24. 6
24. 6
22. 4
15.7
RELIE F VALV E
SLEEV E
SPRING SEA TLOCK-U P CONTRO L VALV E
ATF PUM P BOD YInspec t fo r wear , scratche sand scoring .
ProCarManuals.com
Page 376 of 1771

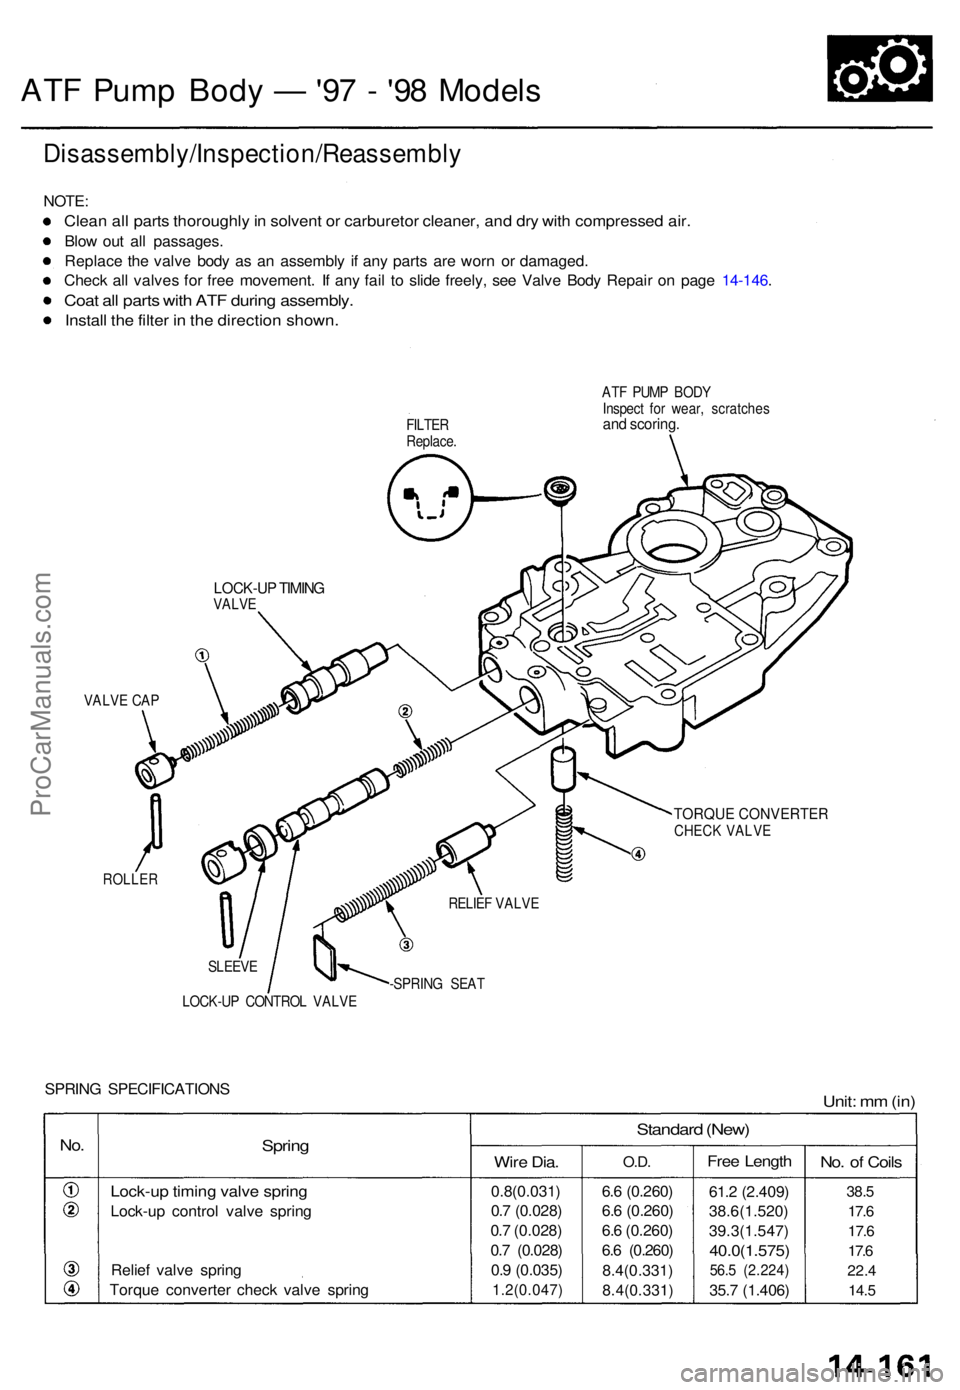
ATF Pum p Bod y — '97 - '9 8 Model s
Disassembly/Inspection/Reassembl y
NOTE:
Clean al l part s thoroughl y in solven t o r carbureto r cleaner , an d dr y wit h compresse d air .
Blow ou t al l passages .
Replac e th e valv e bod y a s a n assembl y i f an y part s ar e wor n o r damaged .
Chec k al l valve s fo r fre e movement . I f an y fai l t o slid e freely , se e Valv e Bod y Repai r o n pag e 14-146 .
Coat al l part s wit h AT F durin g assembly .
Install th e filte r i n th e directio n shown .
FILTER
Replace . AT
F PUM P BOD Y
Inspec t fo r wear , scratche sand scoring .
TORQUE CONVERTERCHECK VALVE
ROLLE R
SLEEVE
LOCK-U P CONTRO L VALV E -SPRIN
G SEA T
SPRIN G SPECIFICATION SUnit: m m (in )
No.Sprin g
Lock-u p timin g valv e sprin g
Lock-u p contro l valv e sprin g
Relie f valv e sprin g
Torqu e converte r chec k valv e sprin g
Standar d (New )
Wire Dia .
0.8(0.031 )
0. 7 (0.028 )
0. 7 (0.028 )
0. 7 (0.028 )
0. 9 (0.035 )
1.2(0.047 )
O.D.
6.6 (0.260 )
6. 6 (0.260 )
6. 6 (0.260 )
6. 6 (0.260 )
8.4(0.331 )
8.4(0.331 )
Free Lengt h
61.2 (2.409 )
38.6(1.520 )
39.3(1.547 )
40.0(1.575)
56.5 (2.224 )
35.7 (1.406 )
No. o f Coil s
38.5
17. 6
17. 6
17. 6
22. 4
14. 5
VALV E CA P
RELIEF VALV E
LOCK-U P TIMIN GVALV E
ProCarManuals.com