1995 ACURA TL gearbox
[x] Cancel search: gearboxPage 479 of 1771
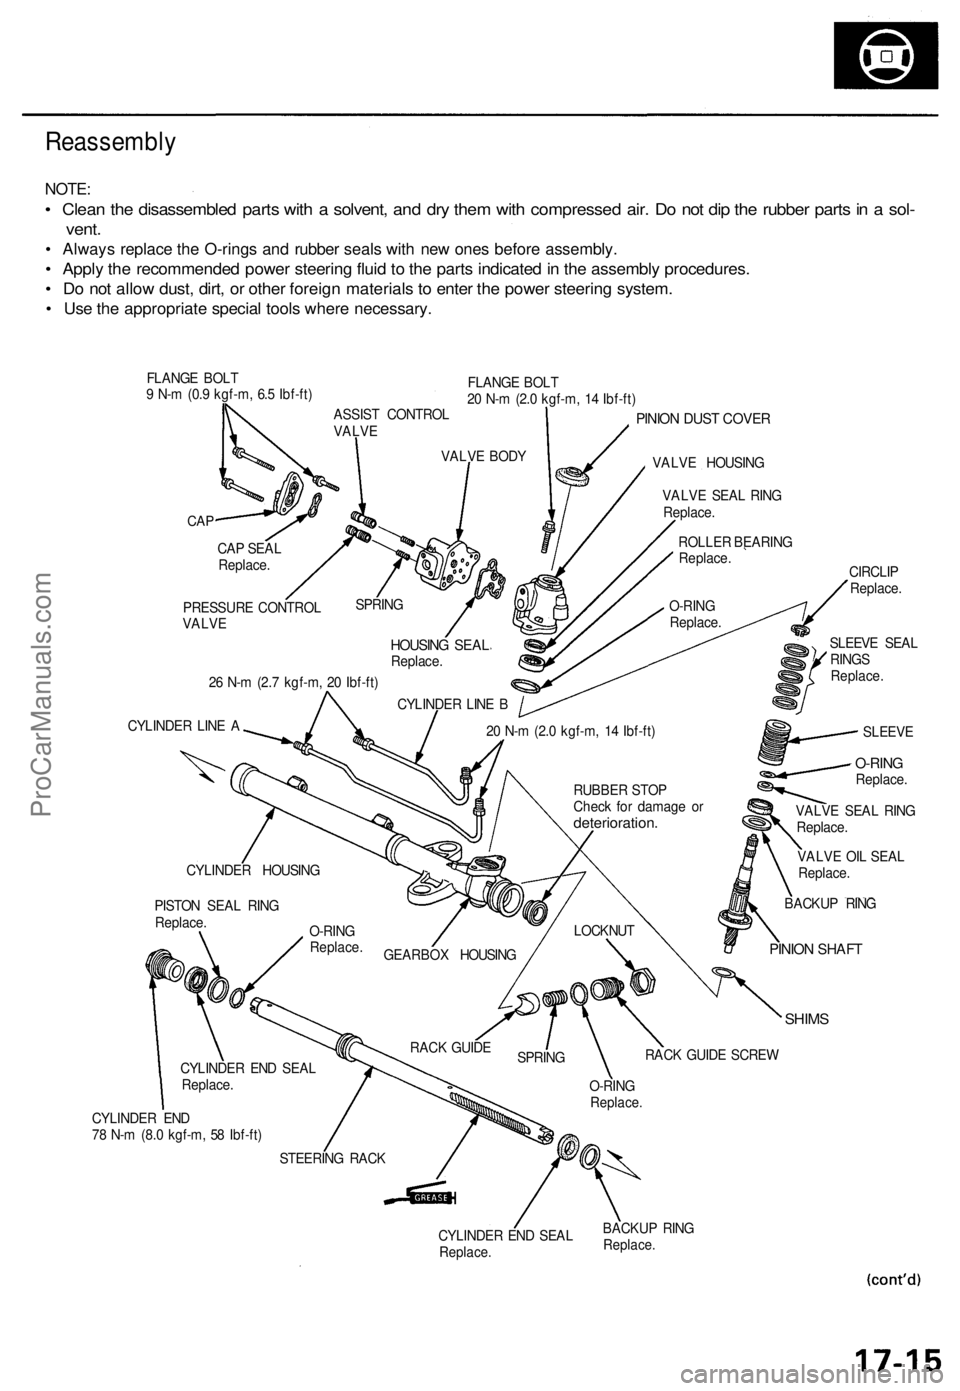
Reassembly
NOTE:
• Clean the disassembled parts with a solvent, and dry them with compressed air. Do not dip the rubber parts in a sol-
vent.
• Always replace the O-rings and rubber seals with new ones before assembly.
• Apply the recommended power steering fluid to the parts indicated in the assembly procedures.
• Do not allow dust, dirt, or other foreign materials to enter the power steering system.
• Use the appropriate special tools where necessary.
FLANGE BOLT
9 N-m (0.9 kgf-m, 6.5 Ibf-ft)
FLANGE BOLT
20 N-m (2.0 kgf-m, 14 Ibf-ft)
CAP
PINION DUST COVER
VALVE HOUSING
26 N-m (2.7 kgf-m, 20 Ibf-ft)
CYLINDER LINE A
VALVE OIL SEAL
Replace.
SHIMS
CYLINDER END
78 N-m (8.0 kgf-m, 58 Ibf-ft)
CYLINDER END SEAL
Replace.
BACKUP RING
Replace.
CAP SEAL
Replace.
PRESSURE CONTROL
VALVE
SPRING
HOUSING SEAL
Replace.
CYLINDER LINE B
VALVE BODY
ASSIST CONTROL
VALVE
VALVE SEAL RING
Replace.
ROLLER BEARING
Replace.
O-RING
Replace.
SLEEVE SEAL
RINGS
Replace.
CIRCLIP
Replace.
SLEEVE
20 N-m (2.0 kgf-m, 14 Ibf-ft)
BACKUP RING
PINION SHAFT
LOCKNUT
RACK GUIDE SCREW
O-RING
Replace.
SPRING
RACK GUIDE
STEERING RACK
CYLINDER END SEAL
Replace.
PISTON SEAL RING
Replace.
CYLINDER HOUSING
GEARBOX HOUSING
O-RING
Replace.
RUBBER STOP
Check for damage or
deterioration.
VALVE SEAL RING
Replace.
O-RING
Replace.ProCarManuals.com
Page 482 of 1771
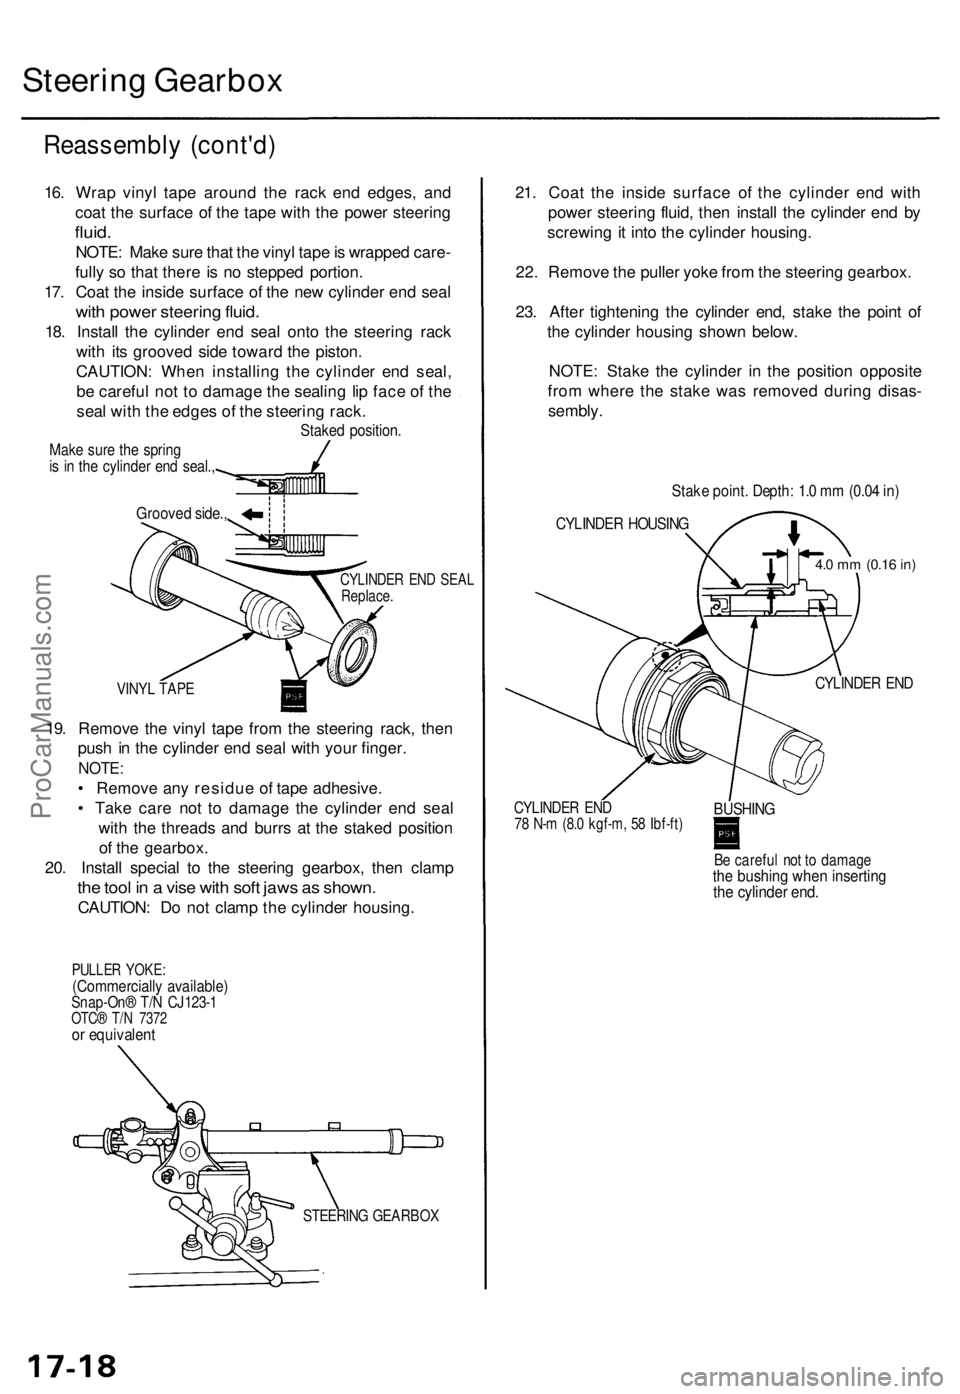
Steering Gearbox
Reassembly (cont'd)
CYLINDER END SEAL
Replace.
VINYL TAPE
19. Remove the vinyl tape from the steering rack, then
push in the cylinder end seal with your finger.
NOTE:
• Remove any residue of tape adhesive.
• Take care not to damage the cylinder end seal
with the threads and burrs at the staked position
of the gearbox.
20. Install special to the steering gearbox, then clamp
the tool in a vise with soft jaws as shown.
CAUTION: Do not clamp the cylinder housing.
PULLER YOKE:
(Commercially available)
Snap-On® T/N CJ123-1
OTC® T/N 7372
or equivalent
21. Coat the inside surface of the cylinder end with
power steering fluid, then install the cylinder end by
screwing it into the cylinder housing.
22. Remove the puller yoke from the steering gearbox.
23. After tightening the cylinder end, stake the point of
the cylinder housing shown below.
NOTE: Stake the cylinder in the position opposite
from where the stake was removed during disas-
sembly.
CYLINDER END
CYLINDER END
78 N-m (8.0 kgf-m, 58 Ibf-ft)
BUSHING
Be careful not to damage
the bushing when inserting
the cylinder end.
Grooved side.,
Stake point. Depth: 1.0 mm (0.04 in)
CYLINDER HOUSING
4.0 mm
(0.16
in)
STEERING GEARBOX
16. Wrap vinyl tape around the rack end edges, and
coat the surface of the tape with the power steering
fluid.
NOTE: Make sure that the vinyl tape is wrapped care-
fully so that there is no stepped portion.
17. Coat the inside surface of the new cylinder end seal
with power steering fluid.
18. Install the cylinder end seal onto the steering rack
with its grooved side toward the piston.
CAUTION: When installing the cylinder end seal,
be careful not to damage the sealing lip face of the
seal with the edges of the steering rack.
Staked position.
Make sure the spring
is in the cylinder end seal.,ProCarManuals.com
Page 483 of 1771
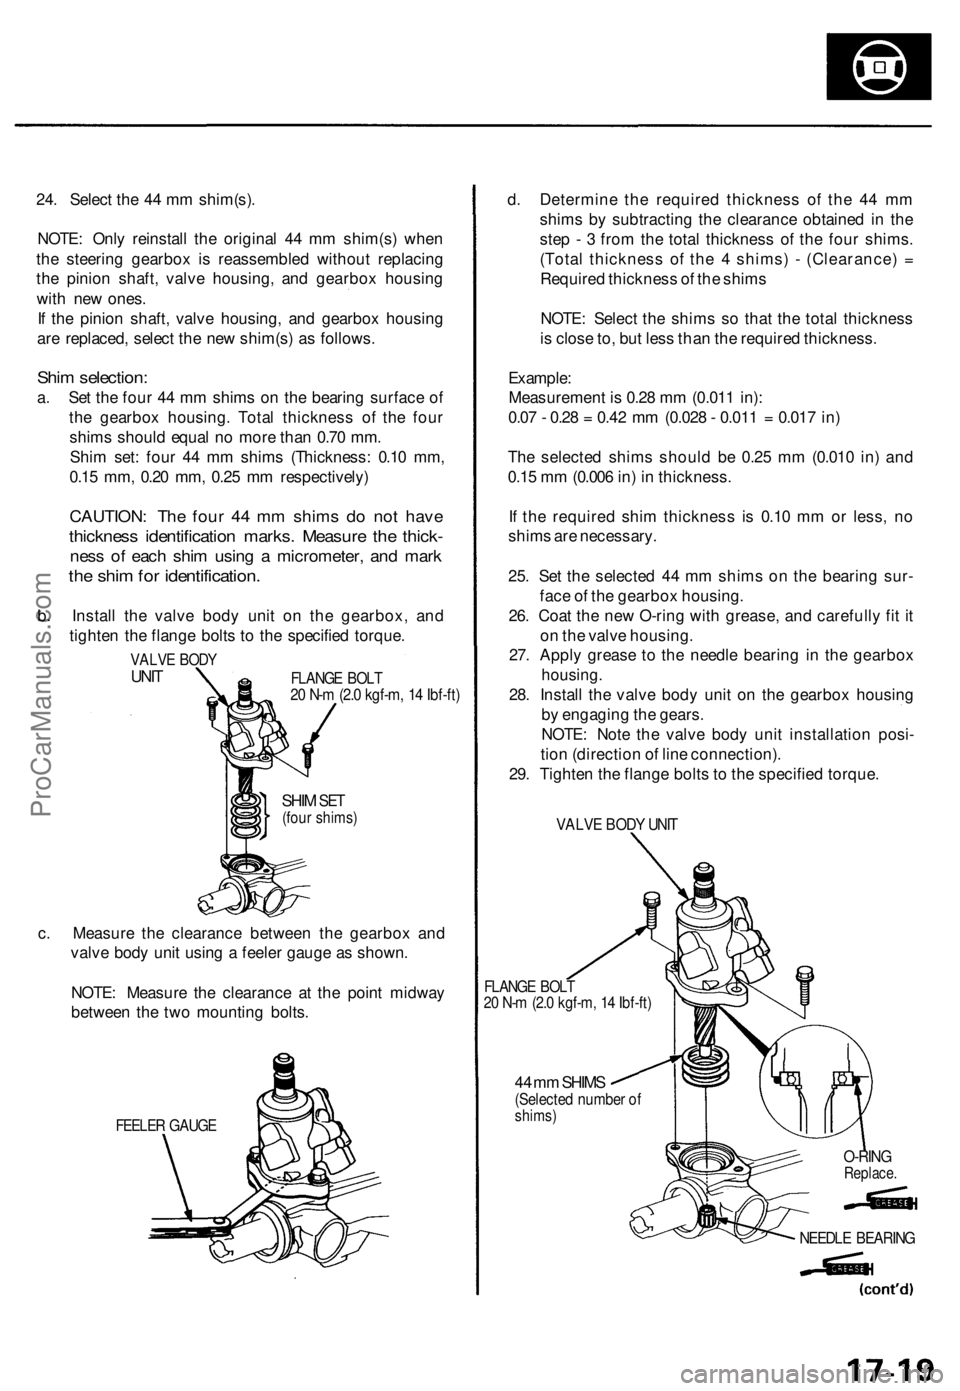
24. Selec t th e 4 4 m m shim(s) .
NOTE : Onl y reinstal l th e origina l 4 4 m m shim(s ) whe n
th e steerin g gearbo x i s reassemble d withou t replacin g
th e pinio n shaft , valv e housing , an d gearbo x housin g
wit h ne w ones .
I f th e pinio n shaft , valv e housing , an d gearbo x housin g
ar e replaced , selec t th e ne w shim(s ) a s follows .
Shim selection :
a. Se t th e fou r 4 4 m m shim s o n th e bearin g surfac e o f
th e gearbo x housing . Tota l thicknes s o f th e fou r
shim s shoul d equa l n o mor e tha n 0.7 0 mm .
Shi m set : fou r 4 4 m m shim s (Thickness : 0.1 0 mm ,
0.1 5 mm , 0.2 0 mm , 0.2 5 m m respectively )
CAUTION: Th e fou r 4 4 m m shim s d o no t hav e
thicknes s identificatio n marks . Measur e th e thick -
ness o f eac h shi m usin g a micrometer , an d mar k
the shi m fo r identification .
b. Instal l th e valv e bod y uni t o n th e gearbox , an d
tighte n th e flang e bolt s t o th e specifie d torque .
VALVE BOD YUNITFLANG E BOL T20 N- m (2. 0 kgf-m , 1 4 Ibf-ft )
SHIM SET(fou r shims )
c. Measur e th e clearanc e betwee n th e gearbo x an d
valv e bod y uni t usin g a feele r gaug e a s shown .
NOTE : Measur e th e clearanc e a t th e poin t midwa y
betwee n th e tw o mountin g bolts .
FEELE R GAUG E
d. Determin e th e require d thicknes s o f th e 4 4 m m
shim s b y subtractin g th e clearanc e obtaine d in th e
ste p - 3 fro m th e tota l thicknes s o f th e fou r shims .
(Tota l thicknes s o f th e 4 shims ) - (Clearance ) =
Require d thicknes s o f th e shim s
NOTE : Selec t th e shim s s o tha t th e tota l thicknes s
i s clos e to , bu t les s tha n th e require d thickness .
Example :
Measuremen t i s 0.2 8 m m (0.01 1 in) :
0.0 7 - 0.2 8 = 0.4 2 m m (0.02 8 - 0.01 1 = 0.01 7 in )
Th e selecte d shim s shoul d b e 0.2 5 m m (0.01 0 in ) an d
0.1 5 m m (0.00 6 in ) i n thickness .
I f th e require d shi m thicknes s i s 0.1 0 m m o r less , n o
shim s ar e necessary .
25 . Se t th e selecte d 4 4 m m shim s o n th e bearin g sur -
fac e o f th e gearbo x housing .
26 . Coa t th e ne w O-rin g wit h grease , an d carefull y fi t i t
o n th e valv e housing .
27 . Appl y greas e t o th e needl e bearin g i n th e gearbo x
housing.
28. Instal l th e valv e bod y uni t o n th e gearbo x housin g
b y engagin g th e gears .
NOTE : Not e th e valv e bod y uni t installatio n posi -
tio n (directio n o f lin e connection) .
29 . Tighte n th e flang e bolt s to th e specifie d torque .
VALVE BOD Y UNI T
FLANG E BOL T20 N- m (2. 0 kgf-m , 1 4 Ibf-ft )
44 m m SHIM S(Selecte d numbe r o fshims )
O-RINGReplace .
NEEDLE BEARIN G
ProCarManuals.com
Page 486 of 1771
Steering Gearbox
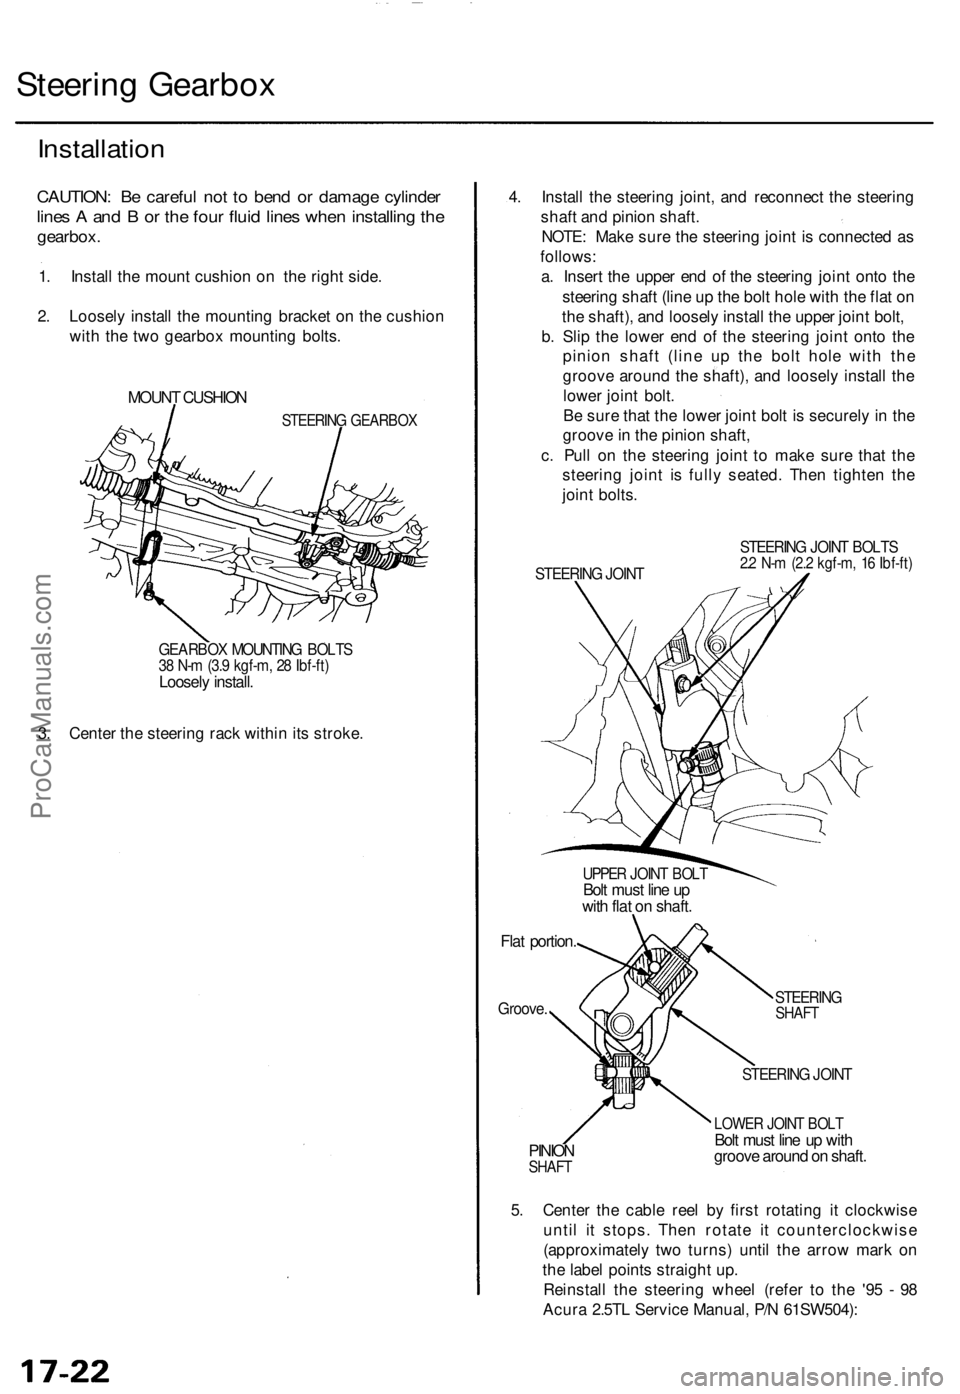
Installation
CAUTION: Be careful not to bend or damage cylinder
lines A and B or the four fluid lines when installing the
gearbox.
1. Install the mount cushion on the right side.
2. Loosely install the mounting bracket on the cushion
with the two gearbox mounting bolts.
MOUNT CUSHION
STEERING GEARBOX
GEARBOX MOUNTING BOLTS
38 N-m (3.9 kgf-m, 28 Ibf-ft)
Loosely install.
3. Center the steering rack within its stroke.
4. Install the steering joint, and reconnect the steering
shaft and pinion shaft.
NOTE: Make sure the steering joint is connected as
follows:
a. Insert the upper end of the steering joint onto the
steering shaft (line up the bolt hole with the flat on
the shaft), and loosely install the upper joint bolt,
b. Slip the lower end of the steering joint onto the
pinion shaft (line up the bolt hole with the
groove around the shaft), and loosely install the
lower joint bolt.
Be sure that the lower joint bolt is securely in the
groove in the pinion shaft,
c. Pull on the steering joint to make sure that the
steering joint is fully seated. Then tighten the
joint bolts.
STEERING JOINT
STEERING JOINT BOLTS
2.2 N-m (2.2 kgf-m, 16 Ibf-ft)
UPPER JOINT BOLT
Bolt must line up
with flat on shaft.
Flat portion.
Groove.
STEERING
SHAFT
PINION
SHAFT
STEERING JOINT
LOWER JOINT BOLT
Bolt must line up with
groove around on shaft.
5. Center the cable reel by first rotating it clockwise
until it stops. Then rotate it counterclockwise
(approximately two turns) until the arrow mark on
the label points straight up.
Reinstall the steering wheel (refer to the '95 - 98
Acura 2.5TL Service Manual, P/N 61SW504):ProCarManuals.com
Page 545 of 1771
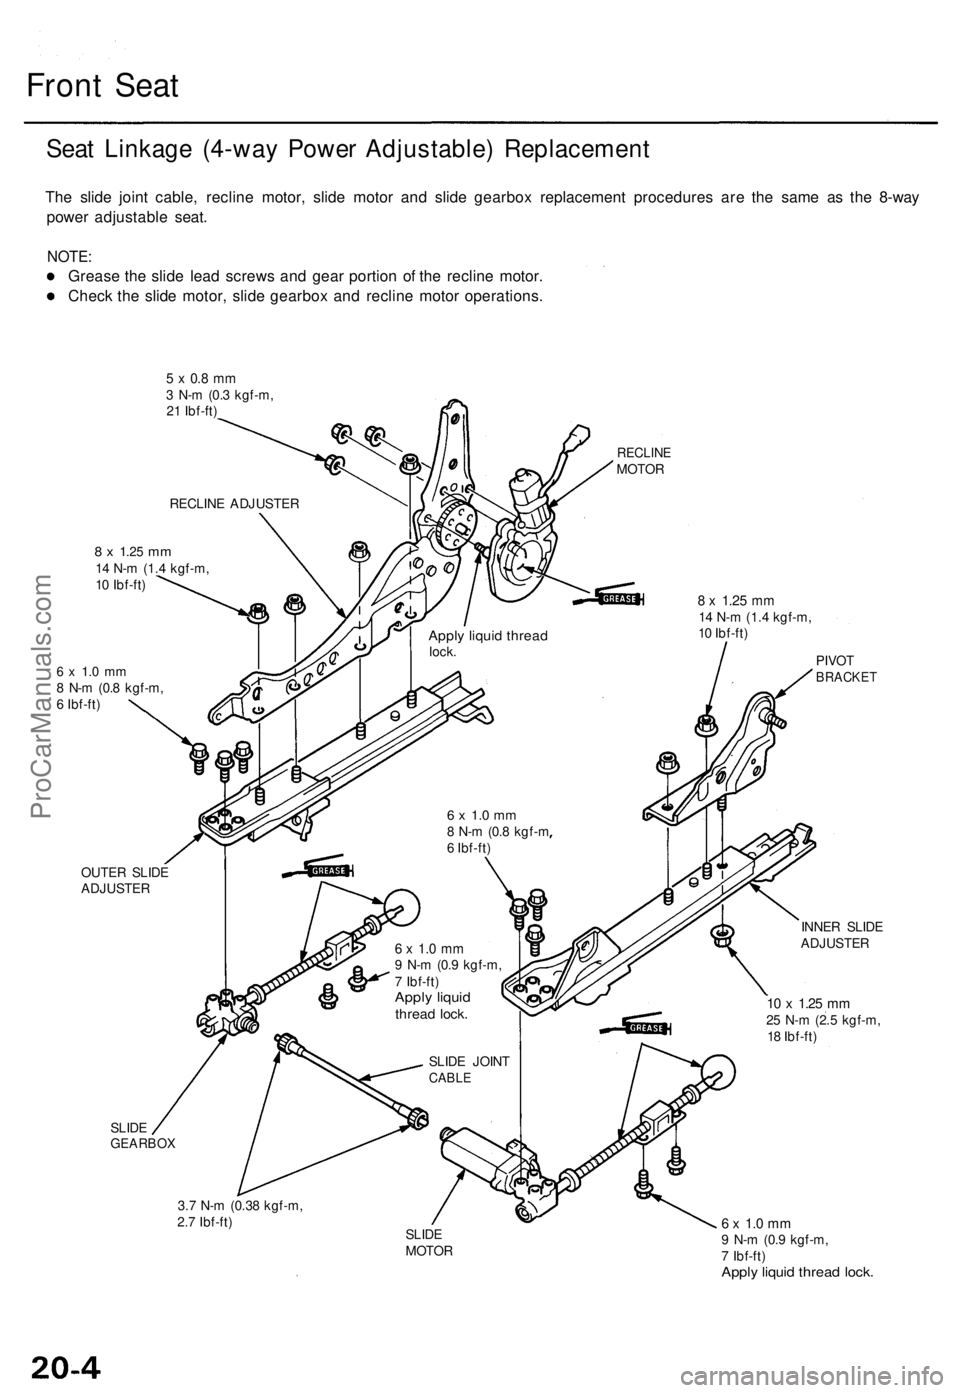
Front Seat
Seat Linkage (4-way Power Adjustable) Replacement
The slide joint cable, recline motor, slide motor and slide gearbox replacement procedures are the same as the 8-way
power adjustable seat.
NOTE:
Grease the slide lead screws and gear portion of the recline motor.
Check the slide motor, slide gearbox and recline motor operations.
5 x 0.8 mm
3 N-m (0.3 kgf-m,
21 Ibf-ft)
8 x
1.25
mm
14 N-m (1.4 kgf-m,
10 Ibf-ft)
6 x 1.0 mm
8 N-m (0.8 kgf-m,
6 Ibf-ft)
RECLINE
MOTOR
8 x
1.25
mm
14 N-m (1.4 kgf-m,
10 Ibf-ft)
OUTER SLIDE
ADJUSTER
SLIDE
GEARBOX
6 x 1.0 mm
8 N-m (0.8 kgf-m
6 Ibf-ft)
3.7 N-m (0.38 kgf-m,
2.7 Ibf-ft)
PIVOT
BRACKET
6 x 1.0 mm
9 N-m (0.9 kgf-m,
7 Ibf-ft)
Apply liquid
thread lock.
INNER SLIDE
ADJUSTER
10 x
1.25
mm
25 N-m (2.5 kgf-m,
18 Ibf-ft)
SLIDE
MOTOR
6 x 1.0 mm
9 N-m (0.9 kgf-m,
7 Ibf-ft)
Apply liquid thread lock.
SLIDE JOINT
CABLE
Apply liquid thread
lock.
RECLINE ADJUSTERProCarManuals.com
Page 1144 of 1771
Component Location s
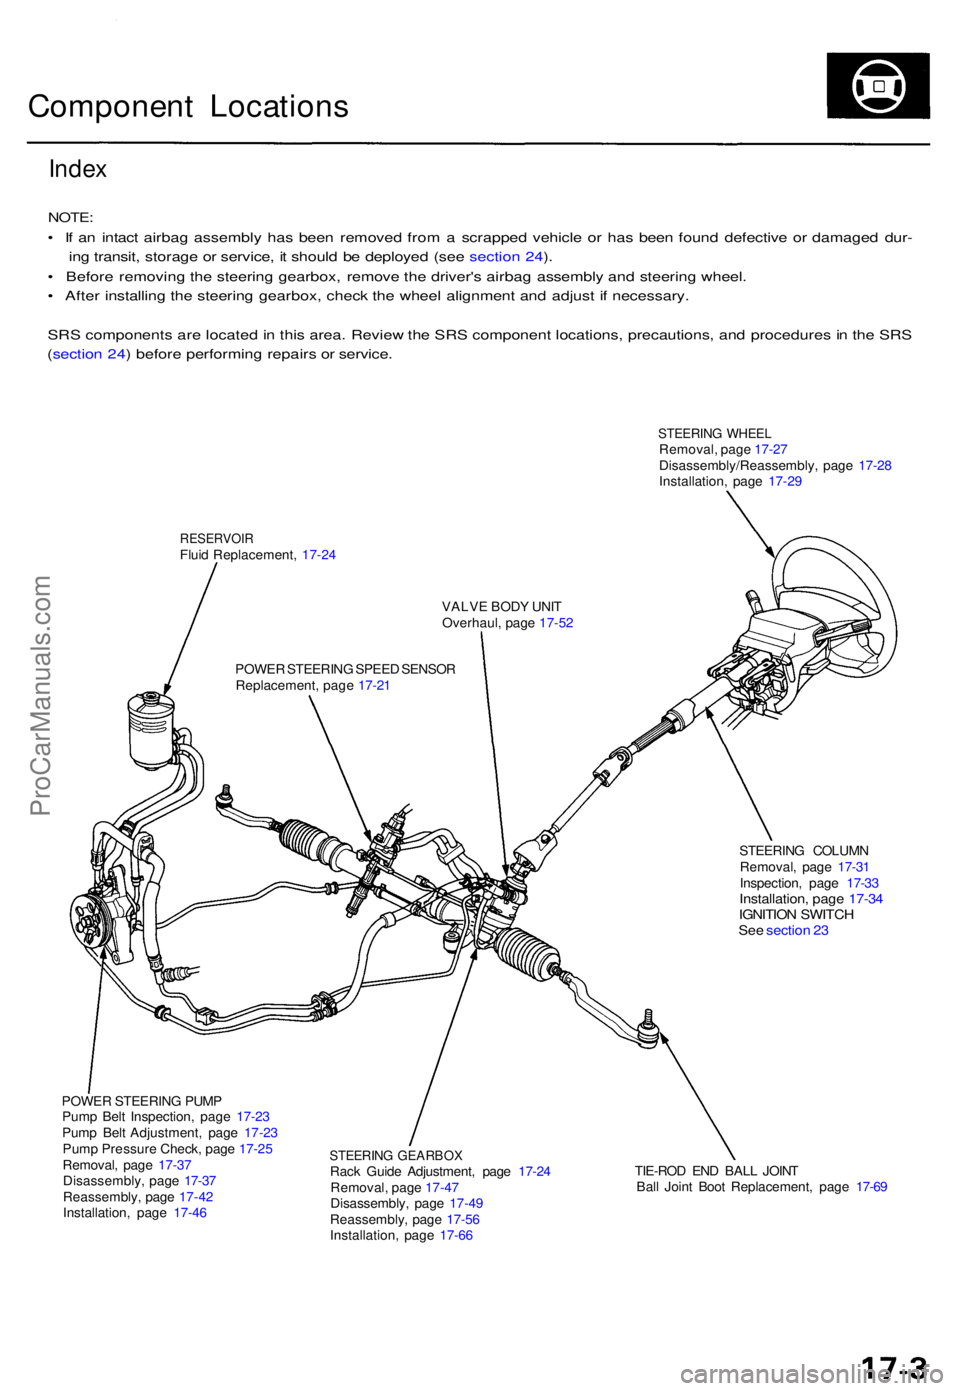
Index
NOTE :
• I f a n intac t airba g assembl y ha s bee n remove d fro m a scrappe d vehicl e o r ha s bee n foun d defectiv e o r damage d dur -
in g transit , storag e o r service , i t shoul d b e deploye d (se e sectio n 24 ).
• Befor e removin g th e steerin g gearbox , remov e th e driver' s airba g assembl y an d steerin g wheel .
• Afte r installin g th e steerin g gearbox , chec k th e whee l alignmen t an d adjus t i f necessary .
SR S component s ar e locate d in thi s area . Revie w th e SR S componen t locations , precautions , an d procedure s in th e SR S
( sectio n 24 ) befor e performin g repair s o r service .
STEERIN G WHEE LRemoval , pag e 17-2 7
Disassembly/Reassembly , pag e 17-2 8
Installation , pag e 17-2 9
RESERVOI RFluid Replacement , 17-2 4
VALVE BOD Y UNI T
Overhaul , pag e 17-5 2
POWE R STEERIN G SPEE D SENSO R
Replacement , pag e 17-2 1
STEERING COLUM N
Removal , pag e 17-3 1
Inspection , pag e 17-3 3
Installation , pag e 17-3 4IGNITIO N SWITC HSee sectio n 2 3
POWE R STEERIN G PUM P
Pum p Bel t Inspection , pag e 17-2 3
Pum p Bel t Adjustment , pag e 17-2 3
Pum p Pressur e Check , pag e 17-2 5
Removal , pag e 17-3 7
Disassembly , pag e 17-3 7
Reassembly , pag e 17-4 2
Installation , pag e 17-4 6
STEERIN G GEARBO XRack Guid e Adjustment , pag e 17-2 4
Removal , pag e 17-4 7
Disassembly , pag e 17-4 9
Reassembly , pag e 17-5 6
Installation , pag e 17-6 6 TIE-RO
D EN D BAL L JOIN T
Bal l Join t Boo t Replacement , pag e 17-6 9
ProCarManuals.com
Page 1145 of 1771
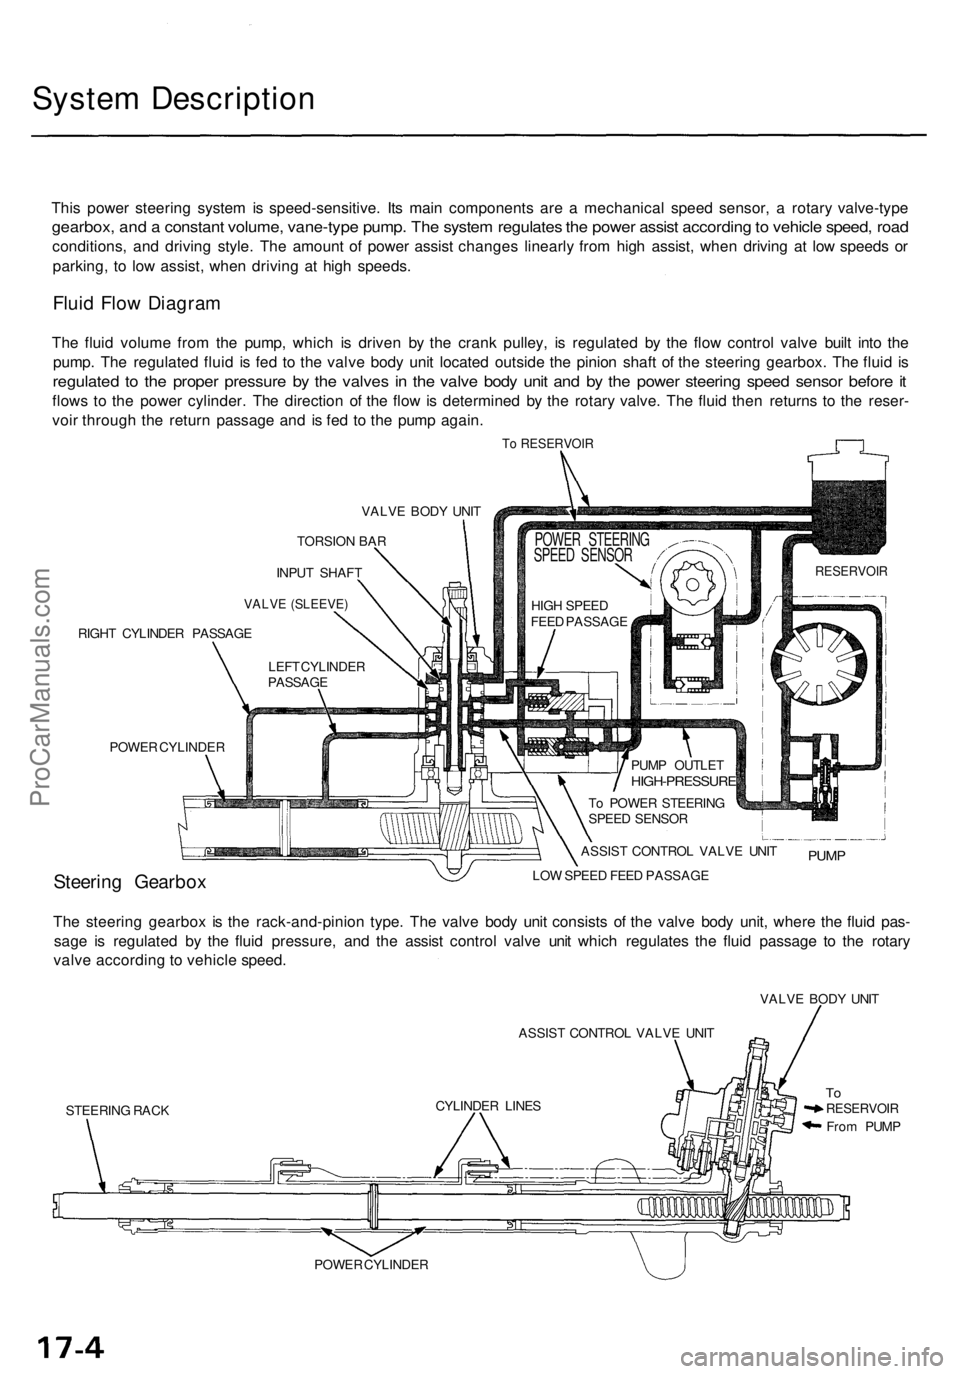
System Descriptio n
This powe r steerin g syste m is speed-sensitive . It s mai n component s ar e a mechanica l spee d sensor , a rotar y valve-typ e
gearbox, an d a constan t volume , vane-typ e pump . Th e syste m regulate s th e powe r assis t accordin g to vehicl e speed , roa d
conditions , an d drivin g style . Th e amoun t o f powe r assis t change s linearl y fro m hig h assist , whe n drivin g a t lo w speed s o r
parking , t o lo w assist , whe n drivin g a t hig h speeds .
Fluid Flo w Diagra m
The flui d volum e fro m th e pump , whic h i s drive n b y th e cran k pulley , i s regulate d b y th e flo w contro l valv e buil t int o th e
pump . Th e regulate d flui d i s fe d t o th e valv e bod y uni t locate d outsid e th e pinio n shaf t o f th e steerin g gearbox . Th e flui d i s
regulate d t o th e prope r pressur e b y th e valve s i n th e valv e bod y uni t an d b y th e powe r steerin g spee d senso r befor e it
flow s t o th e powe r cylinder . Th e directio n o f th e flo w is determine d b y th e rotar y valve . Th e flui d the n returns to th e reser -
voi r throug h th e retur n passag e an d i s fe d t o th e pum p again .
To RESERVOI R
VALVE BOD Y UNI T
TORSIO N BA R
INPU T SHAF T
VALVE (SLEEVE )
RIGHT CYLINDE R PASSAG E
POWE R CYLINDE R
Steering Gearbo xLOW SPEE D FEE D PASSAG E
The steerin g gearbo x i s th e rack-and-pinio n type . Th e valv e bod y uni t consist s o f th e valv e bod y unit , wher e th e flui d pas -
sag e i s regulate d b y th e flui d pressure , an d th e assis t contro l valv e uni t whic h regulate s th e flui d passag e t o th e rotar y
valv e accordin g t o vehicl e speed .
ASSIST CONTRO L VALV E UNI T
STEERIN G RAC K VALV
E BOD Y UNI T
ToRESERVOI R
From PUM P
POWE R CYLINDE RCYLINDE
R LINE S ASSIS
T CONTRO L VALV E UNI T
PUM P
To POWE R STEERIN G
SPEE D SENSO R
PUM
P OUTLE T
HIGH-PRESSUR E
HIGH SPEE D
FEE D PASSAG E
POWER STEERIN G
SPEE D SENSO R
RESERVOI R
LEFT CYLINDE R
PASSAG E
ProCarManuals.com
Page 1155 of 1771
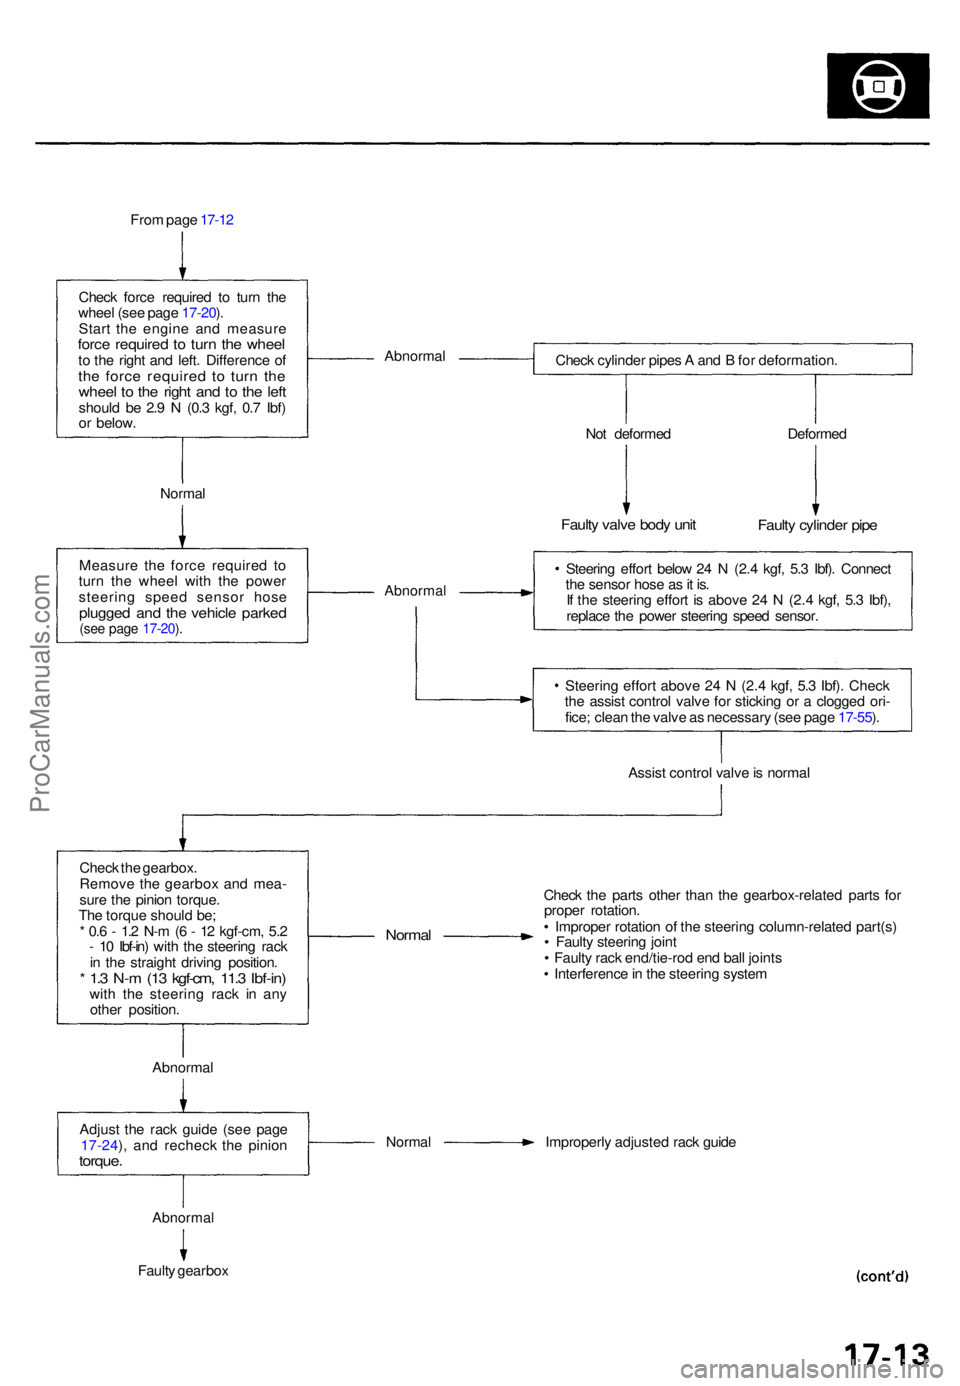
From pag e 17-1 2
Chec k forc e require d t o tur n th e
whee l (se e pag e 17-20 ).
Star t th e engin e an d measur e
force require d t o tur n th e whee lto th e righ t an d left . Differenc e o fth e forc e require d t o tur n th ewhee l t o th e righ t an d t o th e lef tshoul d b e 2. 9 N (0. 3 kgf , 0. 7 Ibf )
o r below . Abnorma
l
Check cylinde r pipe s A an d B fo r deformation .
Norma l No
t deforme d
Faulty valv e bod y uni t
Deforme d
Faulty cylinde r pip e
Measur e th e forc e require d t o
tur n th e whee l wit h th e powe r
steerin g spee d senso r hos e
plugge d an d th e vehicl e parke d(see pag e 17-20 ).
Abnorma l
Steering effor t belo w 2 4 N (2. 4 kgf , 5. 3 Ibf) . Connec t
th e senso r hos e a s it is .
I f th e steerin g effor t i s abov e 2 4 N (2. 4 kgf , 5. 3 Ibf) ,
replac e th e powe r steerin g spee d sensor .
Steerin g effor t abov e 2 4 N (2. 4 kgf , 5. 3 Ibf) . Chec k
th e assis t contro l valv e fo r stickin g o r a clogge d ori -
fice ; clea n th e valv e a s necessar y (se e pag e 17-55 ).
Assis t contro l valv e is norma l
Chec k th e gearbox .
Remov e th e gearbo x an d mea -
sur e th e pinio n torque .
Th e torqu e shoul d be ;
* 0. 6 - 1. 2 N- m (6 - 1 2 kgf-cm , 5. 2
- 1 0 Ibf-in ) wit h th e steerin g rac k
i n th e straigh t drivin g position .
* 1. 3 N- m (1 3 kgf-cm , 11. 3 Ibf-in )with th e steerin g rac k i n an y
othe r position .
Normal
Check th e part s othe r tha n th e gearbox-relate d part s fo r
prope r rotation .
• Imprope r rotatio n o f th e steerin g column-relate d part(s )
• Fault y steerin g join t
• Fault y rac k end/tie-ro d en d bal l joint s
• Interferenc e in th e steerin g syste m
Abnorma l
Adjus t th e rac k guid e (se e pag e
17-24 ), an d rechec k th e pinio n
torque.
Norma l Improperl y adjuste d rac k guid e
Abnorma l
Faulty gearbo x
ProCarManuals.com