Page 564 of 1771
Compressor
Replacemen t
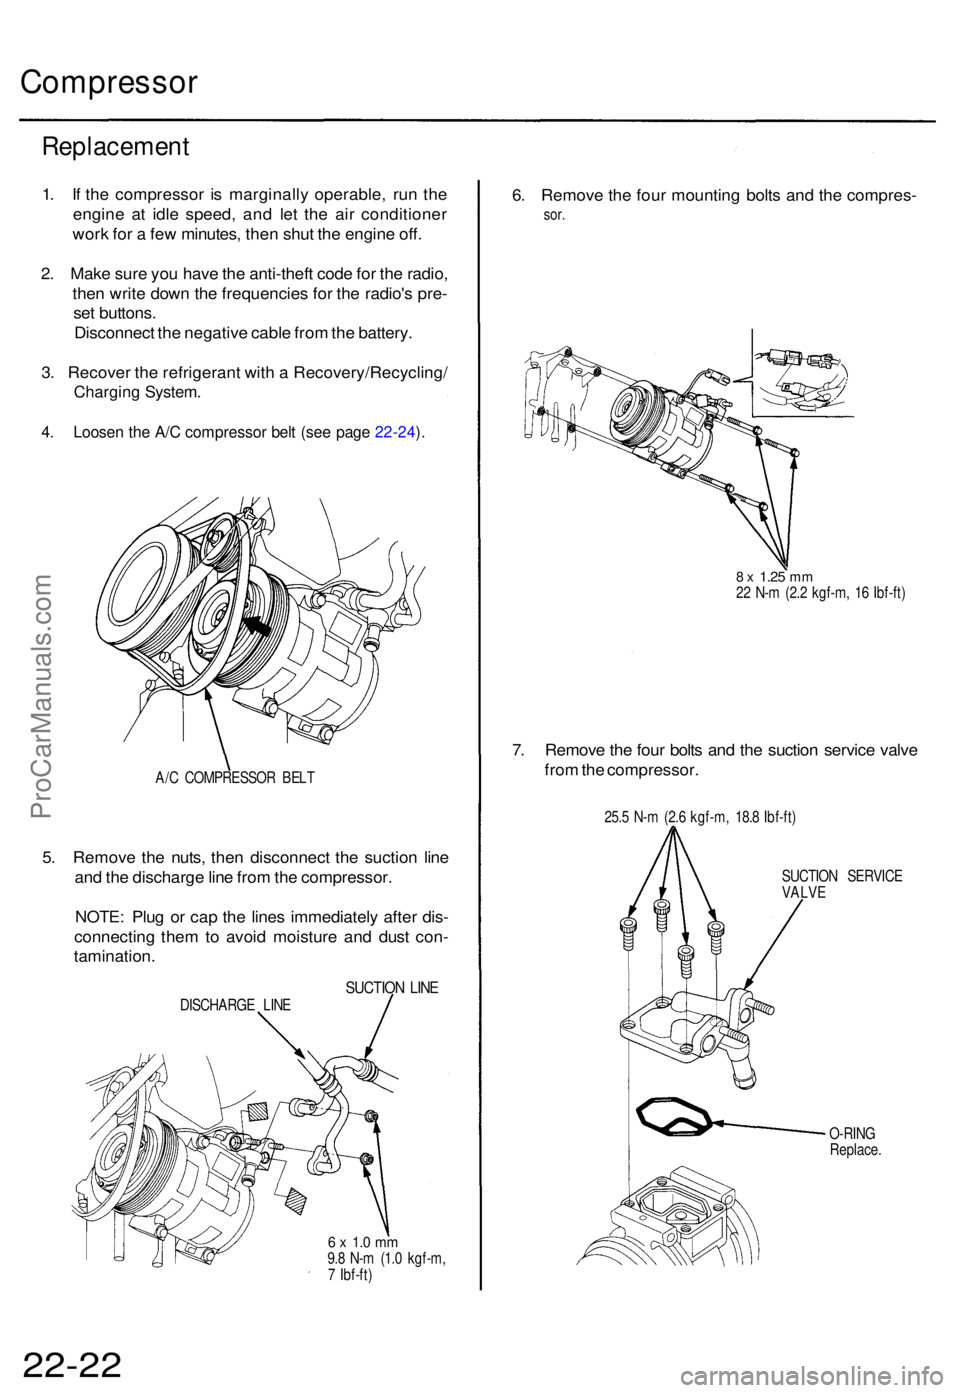
1. I f th e compresso r i s marginall y operable , ru n th e
engin e a t idl e speed , an d le t th e ai r conditione r
wor k fo r a fe w minutes , the n shu t th e engin e off .
2 . Mak e sur e yo u hav e th e anti-thef t cod e fo r th e radio ,
the n writ e dow n th e frequencie s fo r th e radio' s pre -
se t buttons .
Disconnec t th e negativ e cabl e fro m th e battery .
3 . Recove r th e refrigeran t wit h a Recovery/Recycling /
Charging System .
4. Loose n th e A/ C compresso r bel t (se e pag e 22-24 ).
A/ C COMPRESSO R BEL T
5. Remov e th e nuts , the n disconnec t th e suctio n lin e
an d th e discharg e lin e fro m th e compressor .
NOTE : Plu g o r cap the line s immediatel y afte r dis -
connectin g the m to avoi d moistur e an d dus t con -
tamination .
SUCTION LIN EDISCHARG E LIN E
6 x 1. 0 m m9.8 N- m (1. 0 kgf-m ,
7 Ibf-ft )
6. Remov e th e fou r mountin g bolt s an d th e compres -
sor.
8 x 1.2 5 mm22 N- m (2. 2 kgf-m , 1 6 Ibf-ft )
7. Remov e th e fou r bolt s an d th e suctio n servic e valv e
fro m th e compressor .
25.5 N- m (2. 6 kgf-m , 18. 8 Ibf-ft )
SUCTIO N SERVIC E
VALVE
O-RIN G
Replace .
22-22ProCarManuals.com
Page 586 of 1771
Starter Solenoid Test
1. Make sure you have the anti-theft code for the
radio, then write down the frequencies for the
radio's preset buttons.
2. Disconnect the battery negative cable, then discon-
nect the positive cable.
3. Check the hold-in coil for continuity between the S
terminal and the armature housing (ground). The
coil is OK if there is continuity.
4. Check the pull-in coil for continuity between the S and
M terminals. The coil is OK if there is continuity.
PULL-IN COIL HOLD-IN COILProCarManuals.com
Page 587 of 1771
Starting Syste m
Starter Replacemen t
1. Mak e sur e yo u hav e th e anti-thef t cod e fo r th e radio ,
the n writ e dow n th e frequencie s fo r th e radio' s prese t
buttons .
2 . Disconnec t th e batter y negativ e cable , the n disconnec t
th e positiv e cable .
3 . Remov e th e lef t driv e shaft .
4 . Remov e th e exhaus t pip e A .
5 . Disconnec t th e starte r cabl e fro m th e B termina l o n
th e solenoid , the n disconnec t th e BLK/WH T wir e
fro m th e S (SOLENOID ) termina l wire . 6
. Remov e th e tw o bolt s holdin g th e starter , the n
remov e th e starter .
7 . Instal l i n th e revers e orde r o f removal .
NOTE : Whe n installin g th e starte r cable , mak e sur e
tha t th e crimpe d sid e o f th e rin g termina l i s facin g out .
8 . Connec t th e batter y positiv e cabl e an d negativ e cabl e
t o th e battery .
9 . Ente r th e anti-thef t cod e fo r th e radio , the n ente r th e
customer' s radi o statio n presets .
ProCarManuals.com
Page 606 of 1771
Alternator Replacemen t
1. Mak e sur e yo u hav e th e anti-thef t cod e fo r th e radio ,
the n writ e dow n th e frequencie s fo r th e radio' s pre -
set buttons .
2. Disconnec t th e batter y negativ e cable , the n discon -
nec t th e positiv e cable .
3 . Remov e th e lowe r mountin g bolt , adjustin g loc k
bol t an d adjustin g rod , the n remov e th e bel t fro m
th e pulley . 4
. A s show n i n th e illustration , rotat e th e alternato r 9 0
degree s counterclockwis e an d pul l i t ou t towar d you .
5 . Disconnec t th e 4 P connecto r an d th e harnes s cli p
bracket , the n remov e th e termina l nu t an d th e BL K
wir e fro m th e B terminal . Tak e ou t th e alternator .
6 . Instal l i n th e revers e orde r o f removal .
7 . Adjus t th e alternato r bel t tensio n (se e pag e 23-89 ).
8 . Ente r th e anti-theft code fo r th e radio , the n ente r th e
customer' s radi o statio n presets .
ProCarManuals.com
Page 650 of 1771
Disconnecting th e Airba g Connector s
To preven t accidenta l airba g deployment , tur n th e ignitio n switc h OFF , disconnec t th e negativ e batter y
cable , an d wai t thre e minute s befor e disconnectin g an y SR S connectors .
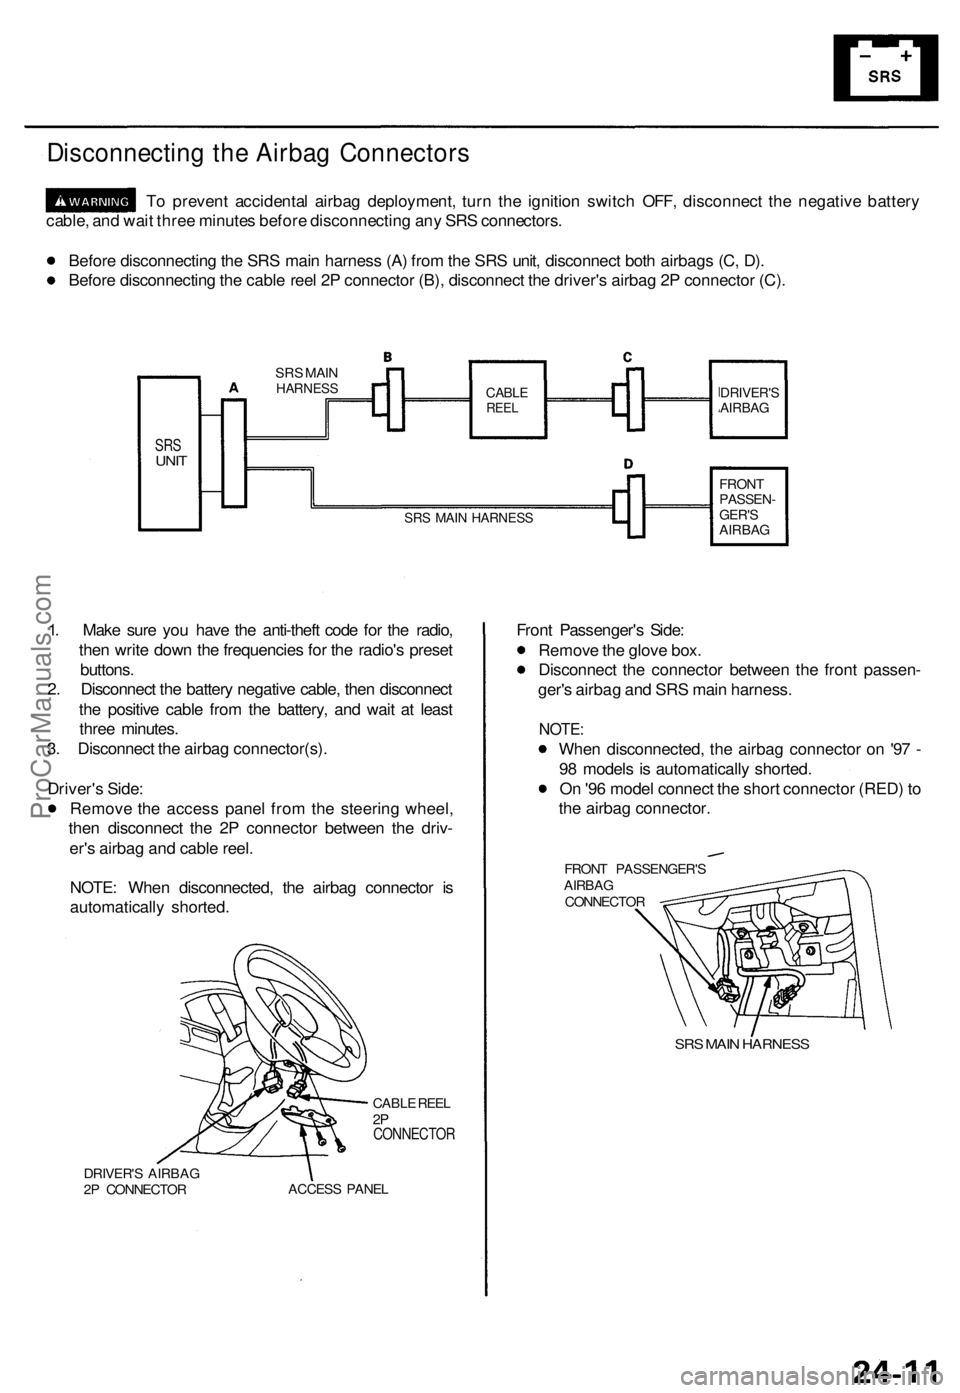
Befor e disconnectin g th e SR S mai n harnes s (A ) fro m th e SR S unit , disconnec t bot h airbag s (C , D) .
Befor e disconnectin g th e cabl e ree l 2 P connecto r (B) , disconnec t th e driver' s airba g 2 P connecto r (C) .
SRSUNI T
1. Mak e sur e yo u hav e th e anti-thef t cod e fo r th e radio ,
the n writ e dow n th e frequencie s fo r th e radio' s prese t
buttons .
2 . Disconnec t th e batter y negativ e cable , the n disconnec t
th e positiv e cabl e fro m th e battery , an d wai t a t leas t
thre e minutes .
3 . Disconnec t th e airba g connector(s) .
Driver' s Side :
Remov e th e acces s pane l fro m th e steerin g wheel ,
the n disconnec t th e 2 P connecto r betwee n th e driv -
er' s airba g an d cabl e reel .
NOTE : Whe n disconnected , th e airba g connecto r i s
automaticall y shorted .
DRIVER'S AIRBA G
2 P CONNECTO R CABL
E REE L
2PCONNECTO R
ACCESS PANE L
Front Passenger' s Side :
Remov e th e glov e box .
Disconnec t th e connecto r betwee n th e fron t passen -
ger' s airba g an d SR S mai n harness .
NOTE:
When disconnected , th e airba g connecto r o n '9 7 -
9 8 model s i s automaticall y shorted .
O n '9 6 mode l connec t th e shor t connecto r (RED ) t o
th e airba g connector .
FRONT PASSENGER' S
AIRBA G
CONNECTO R
SRS MAI N HARNES S
SRS MAI NHARNES SCABLEREELDRIVER' SAIRBAG
FRONT
PASSEN -
GER' S
AIRBA GSRS MAI N HARNES S
ProCarManuals.com
Page 658 of 1771
Airbag
Replacement
After a collision in which the airbags were deployed, the
airbag assemblies and the SRS unit must be replaced.
Store a removed airbag assembly with
the pad surface up. If the airbag is improperly stored
face down, accidental deployment could propel the unit
with enough force to cause serious injury.
CAUTION:
Always disconnect the airbag connectors when the
SRS main harness is disconnected.
'96 Model: Always keep the short connector (RED) on
the passenger's airbag when the harness is discon-
nected.
Do not disassemble or tamper with the airbag.
NOTE:
Do not install used SRS parts from another vehicle.
When repairing, use only new SRS parts.
Carefully inspect the airbag before you install it. Do
not install an airbag that shows signs of being
dropped or improperly handled, such as dents, cracks
or deformation.
1. Make sure you have the anti-theft code for the radio,
then write down the frequencies for the radio's pre-
set buttons.
2. Disconnect the battery negative cable, then discon-
nect the positive cable from the battery, and wait at
least three minutes.
3. Disconnect the airbag connectors:
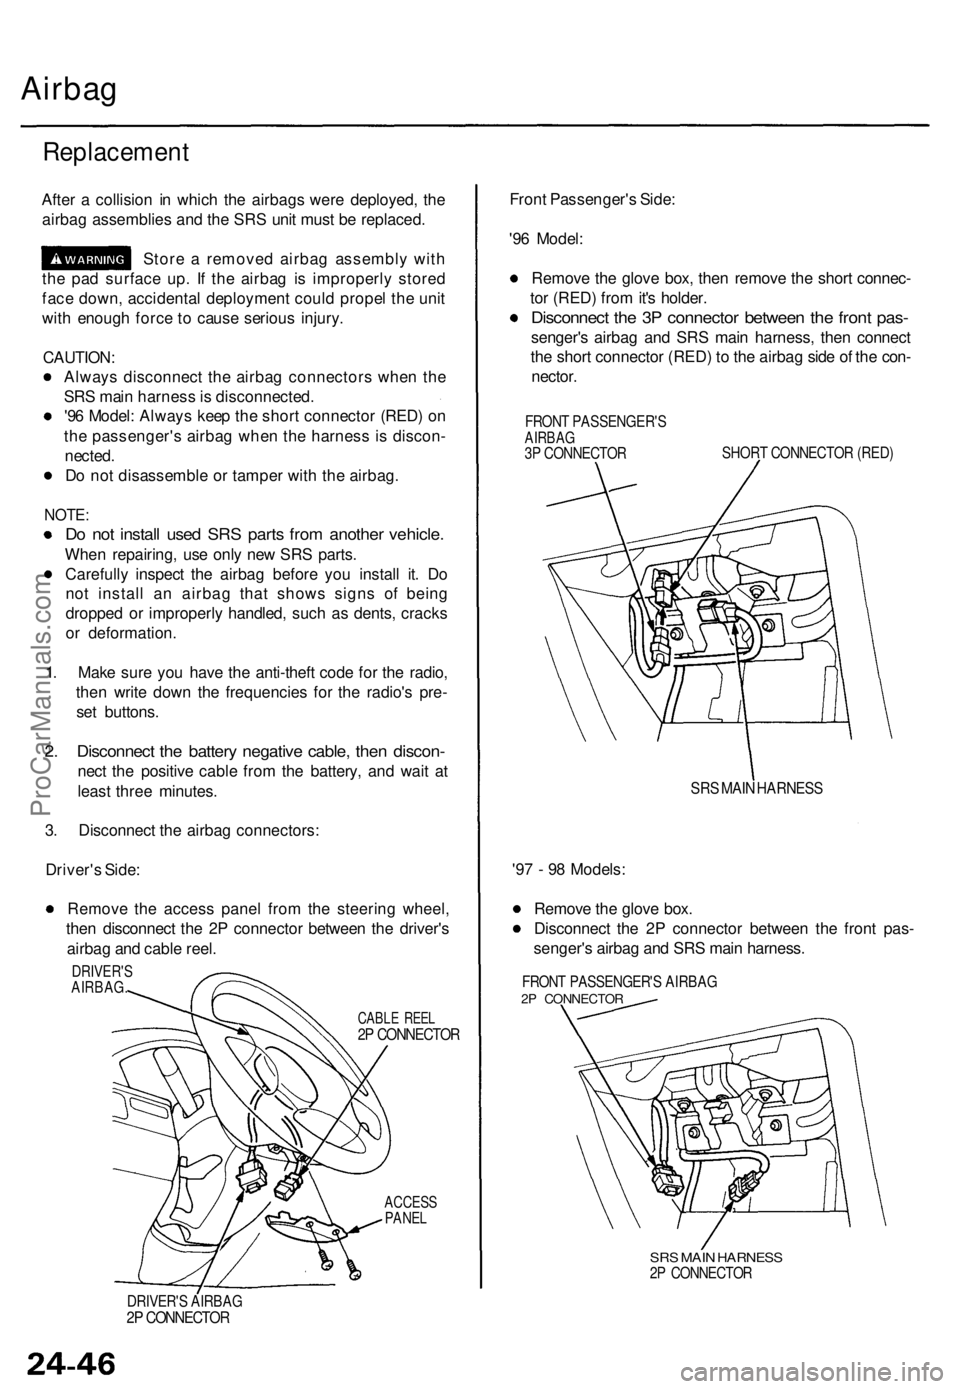
Driver's Side:
Remove the access panel from the steering wheel,
then disconnect the 2P connector between the driver's
airbag and cable reel.
ACCESS
PANEL
Front Passenger's Side:
'96 Model:
Remove the glove box, then remove the short connec-
tor (RED) from it's holder.
Disconnect the 3P connector between the front pas-
senger's airbag and SRS main harness, then connect
the short connector (RED) to the airbag side of the con-
nector.
FRONT PASSENGER'S
AIRBAG
3P CONNECTOR
SHORT CONNECTOR (RED)
SRS MAIN HARNESS
'97 - 98 Models:
Remove the glove box.
Disconnect the 2P connector between the front pas-
senger's airbag and SRS main harness.
FRONT PASSENGER'S AIRBAG
2P CONNECTOR
SRS MAIN HARNESS
2P CONNECTOR
DRIVER'S AIRBAG
2P CONNECTOR
CABLE REEL
2P CONNECTOR
DRIVER'S
AIRBAG.ProCarManuals.com
Page 661 of 1771
6. Reconnect the airbag connectors.
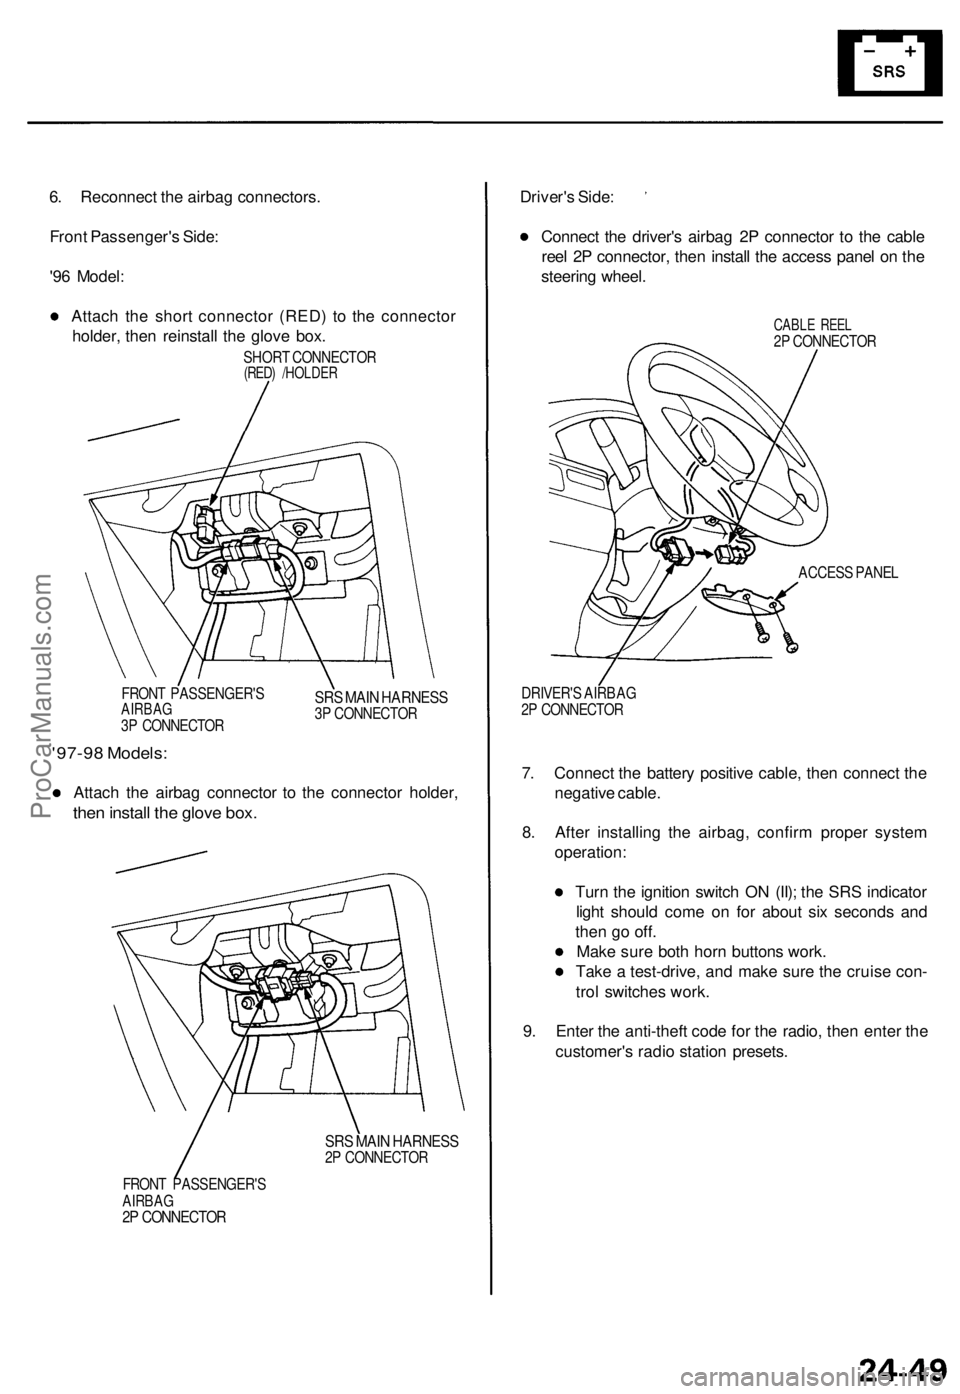
Front Passenger's Side:
'96 Model:
Attach the short connector (RED) to the connector
holder, then reinstall the glove box.
SHORT CONNECTOR
(RED) /HOLDER
FRONT PASSENGER'S
AIRBAG
3P CONNECTOR
SRS MAIN HARNESS
3P CONNECTOR
'97-98 Models:
Attach the airbag connector to the connector holder,
then install the glove box.
SRS MAIN HARNESS
2P CONNECTOR
FRONT PASSENGER'S
AIRBAG
2P CONNECTOR
Driver's Side:
Connect the driver's airbag 2P connector to the cable
reel 2P connector, then install the access panel on the
steering wheel.
CABLE REEL
2P CONNECTOR
ACCESS PANEL
DRIVER'S AIRBAG
2P CONNECTOR
7. Connect the battery positive cable, then connect the
negative cable.
8. After installing the airbag, confirm proper system
operation:
Turn the ignition switch ON (II); the SRS indicator
light should come on for about six seconds and
then go off.
Make sure both horn buttons work.
Take a test-drive, and make sure the cruise con-
trol switches work.
9. Enter the anti-theft code for the radio, then enter the
customer's radio station presets.ProCarManuals.com
Page 662 of 1771
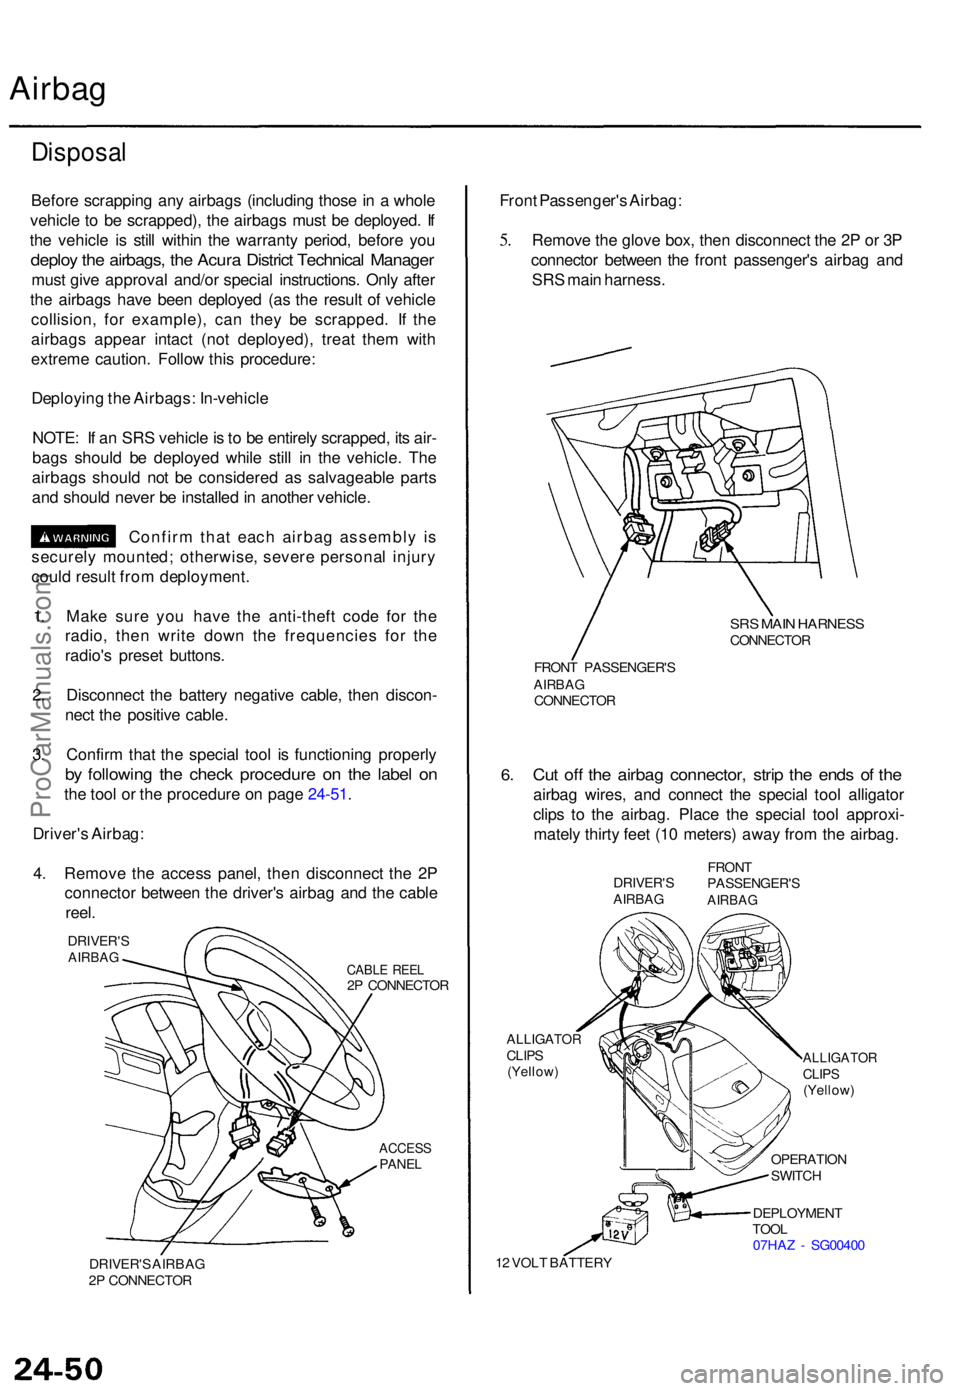
Airbag
Disposa l
Before scrappin g an y airbag s (includin g thos e in a whol e
vehicl e t o b e scrapped) , th e airbag s mus t b e deployed . I f
th e vehicl e i s stil l withi n th e warrant y period , befor e yo u
deplo y th e airbags , th e Acur a Distric t Technica l Manage r
must giv e approva l and/o r specia l instructions . Onl y afte r
th e airbag s hav e bee n deploye d (a s th e resul t o f vehicl e
collision , fo r example) , ca n the y b e scrapped . I f th e
airbag s appea r intac t (no t deployed) , trea t the m wit h
extrem e caution . Follo w thi s procedure :
Deployin g th e Airbags : In-vehicl e
NOTE : I f a n SR S vehicl e is t o b e entirel y scrapped , it s air -
bag s shoul d b e deploye d whil e stil l i n th e vehicle . Th e
airbag s shoul d no t b e considere d a s salvageabl e part s
an d shoul d neve r b e installe d in anothe r vehicle .
Confir m tha t eac h airba g assembl y i s
securel y mounted ; otherwise , sever e persona l injur y
coul d resul t fro m deployment .
1 . Mak e sur e yo u hav e th e anti-thef t cod e fo r th e
radio , the n writ e dow n th e frequencie s fo r th e
radio' s prese t buttons .
2 . Disconnec t th e batter y negativ e cable , the n discon -
nec t th e positiv e cable .
3 . Confir m tha t th e specia l too l i s functionin g properl y
by followin g th e chec k procedur e o n th e labe l o n
the too l o r th e procedur e o n pag e 24-51 .
Driver' s Airbag :
4 . Remov e th e acces s panel , the n disconnec t th e 2 P
connecto r betwee n th e driver' s airba g an d th e cabl e
reel .
DRIVER' SAIRBAGCABLE REE L2P CONNECTO R
ACCESSPANEL
DRIVER' S AIRBA G
2 P CONNECTO R
Front Passenger' s Airbag :
5.Remov e th e glov e box , the n disconnec t th e 2 P o r 3 P
connecto r betwee n th e fron t passenger' s airba g an d
SR S mai n harness .
SRS MAI N HARNES SCONNECTO R
6.
FRON T PASSENGER' SAIRBAGCONNECTO R
Cut of f th e airba g connector , stri p th e end s o f th e
airba g wires , an d connec t th e specia l too l alligato r
clip s t o th e airbag . Plac e th e specia l too l approxi -
matel y thirt y fee t (1 0 meters ) awa y fro m th e airbag .
DRIVER' SAIRBAG
FRONT
PASSENGER' S
AIRBAG
ALLIGATO RCLIPS(Yellow )
12 VOL T BATTER Y
ALLIGATO RCLIPS(Yellow )
OPERATIO N
SWITC H
DEPLOYMEN T
TOO L
07HA Z - SG0040 0
ProCarManuals.com