1995 ACURA TL battery
[x] Cancel search: batteryPage 1698 of 1771
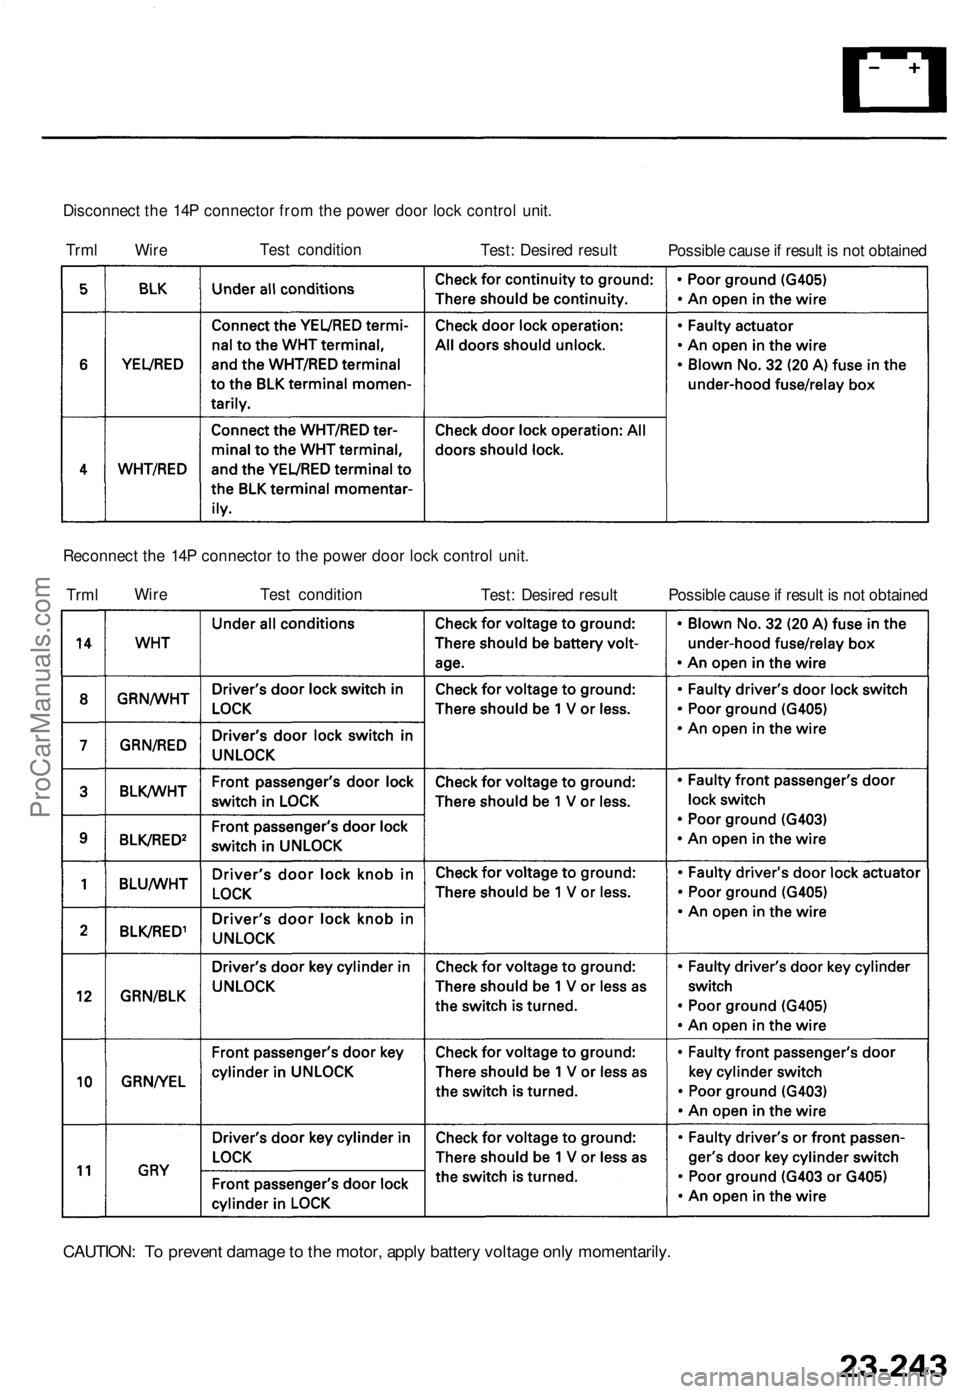
Disconnect the 14P connector from the power door lock control unit.
Trml Wire
Test condition
Test: Desired result
Possible cause if result is not obtained
Reconnect the 14P connector to the power door lock control unit.
Trml
Wire
Test condition
Test: Desired result
Possible cause if result is not obtained
CAUTION: To prevent damage to the motor, apply battery voltage only momentarily.ProCarManuals.com
Page 1700 of 1771
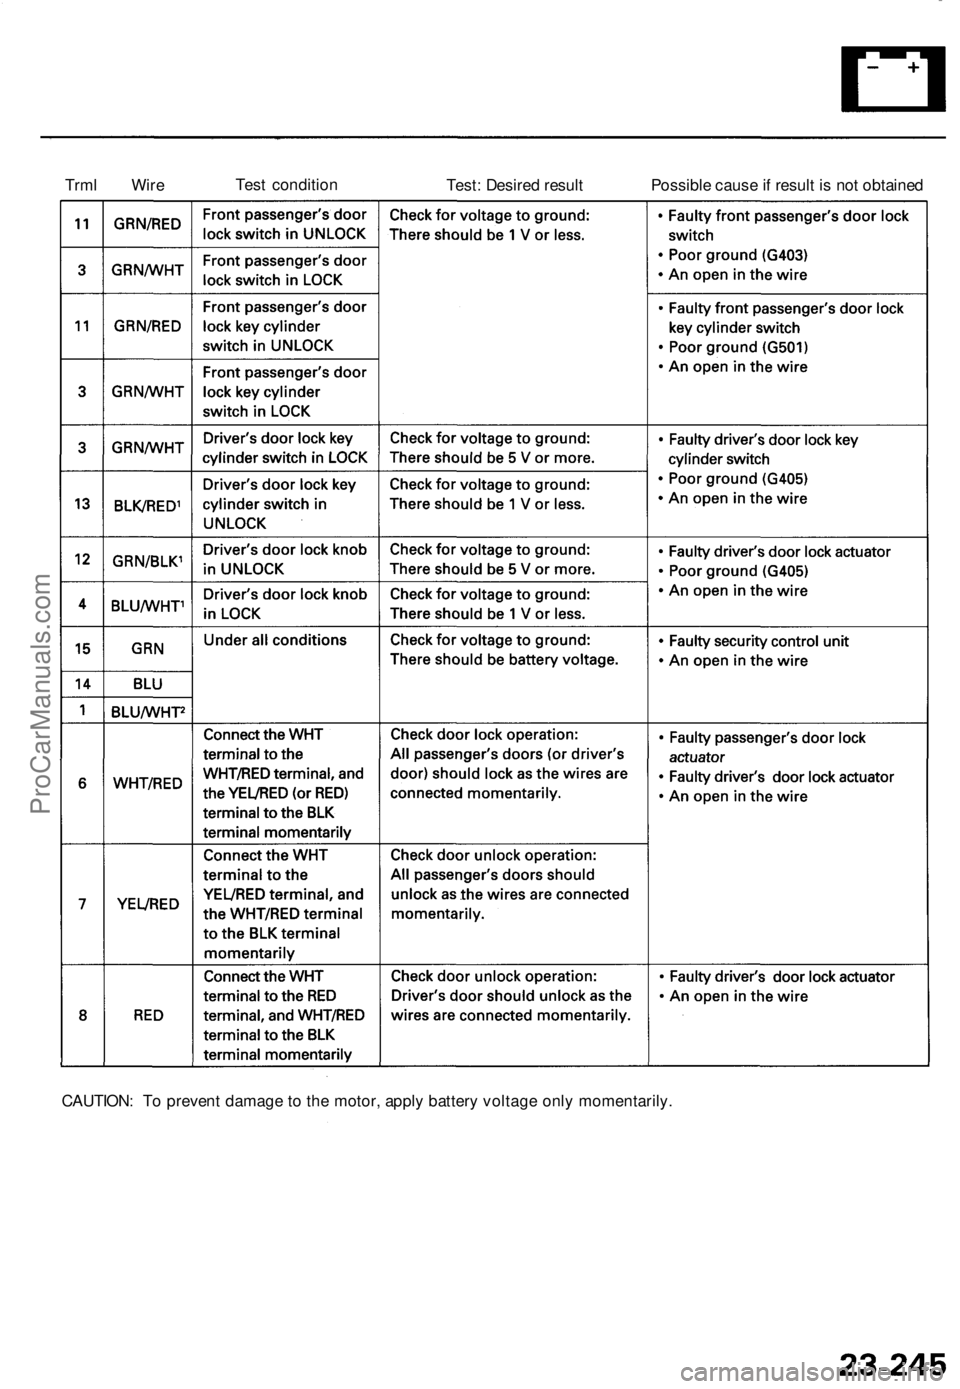
Trml Wire
Test condition
Test: Desired result
Possible cause if result is not obtained
CAUTION: To prevent damage to the motor, apply battery voltage only momentarily.ProCarManuals.com
Page 1723 of 1771
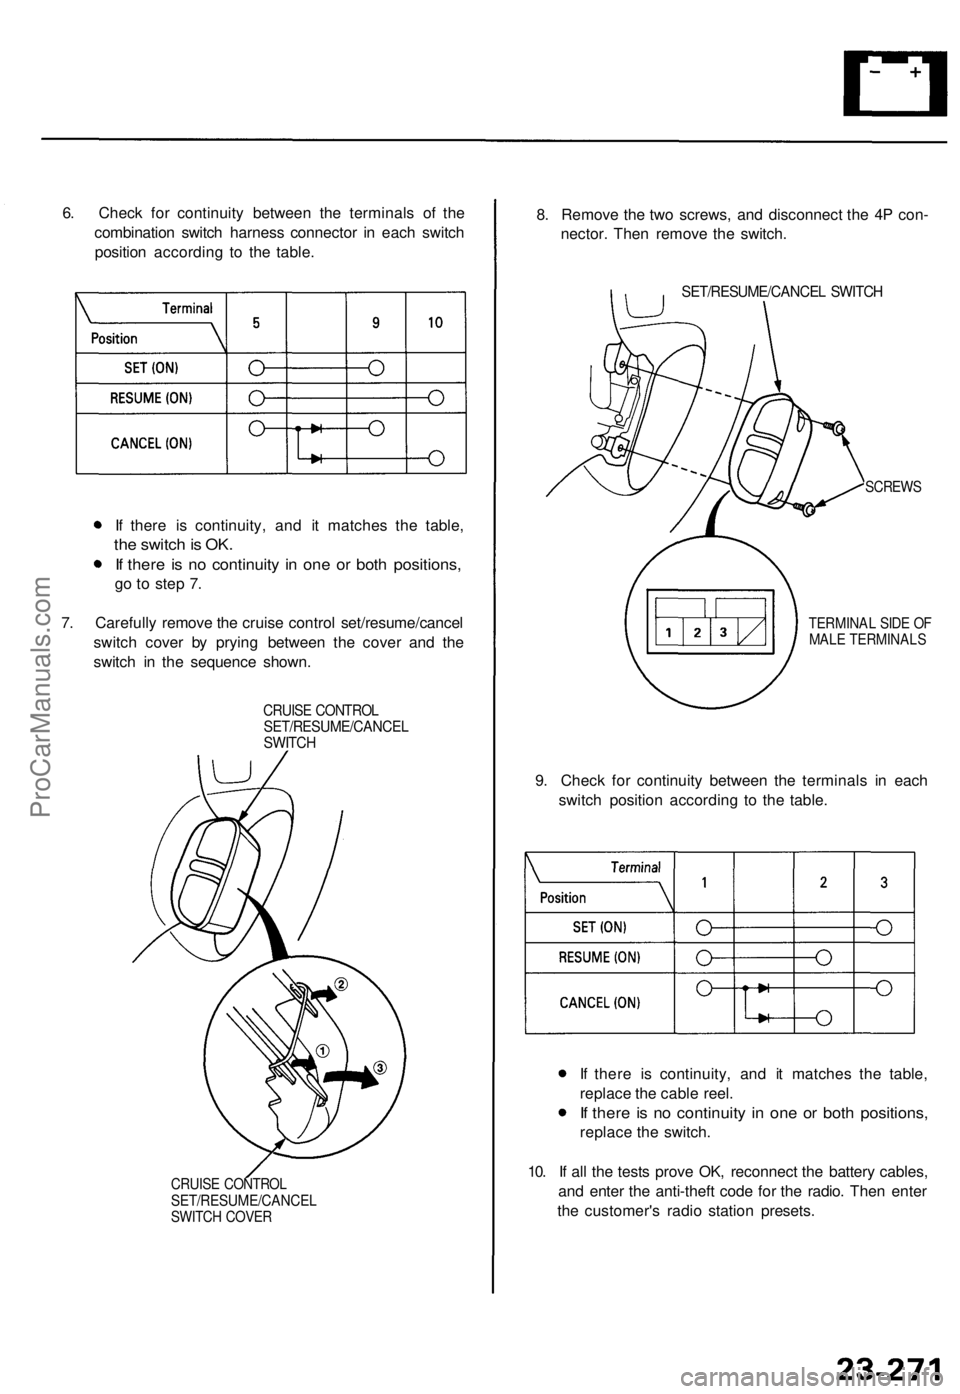
6. Check for continuity between the terminals of the
combination switch harness connector in each switch
position according to the table.
If there is continuity, and it matches the table,
the switch is OK.
If there is no continuity in one or both positions,
go to step 7.
7. Carefully remove the cruise control set/resume/cancel
switch cover by prying between the cover and the
switch in the sequence shown.
CRUISE CONTROL
SET/RESUME/CANCEL
SWITCH
CRUISE CONTROL
SET/RESUME/CANCEL
SWITCH COVER
8. Remove the two screws, and disconnect the 4P con-
nector. Then remove the switch.
SET/RESUME/CANCEL SWITCH
SCREWS
TERMINAL SIDE OF
MALE TERMINALS
9. Check for continuity between the terminals in each
switch position according to the table.
If there is continuity, and it matches the table,
replace the cable reel.
If there is no continuity in one or both positions,
replace the switch.
10. If all the tests prove OK, reconnect the battery cables,
and enter the anti-theft code for the radio. Then enter
the customer's radio station presets.ProCarManuals.com
Page 1740 of 1771
Precautions/Procedures
General Precaution s
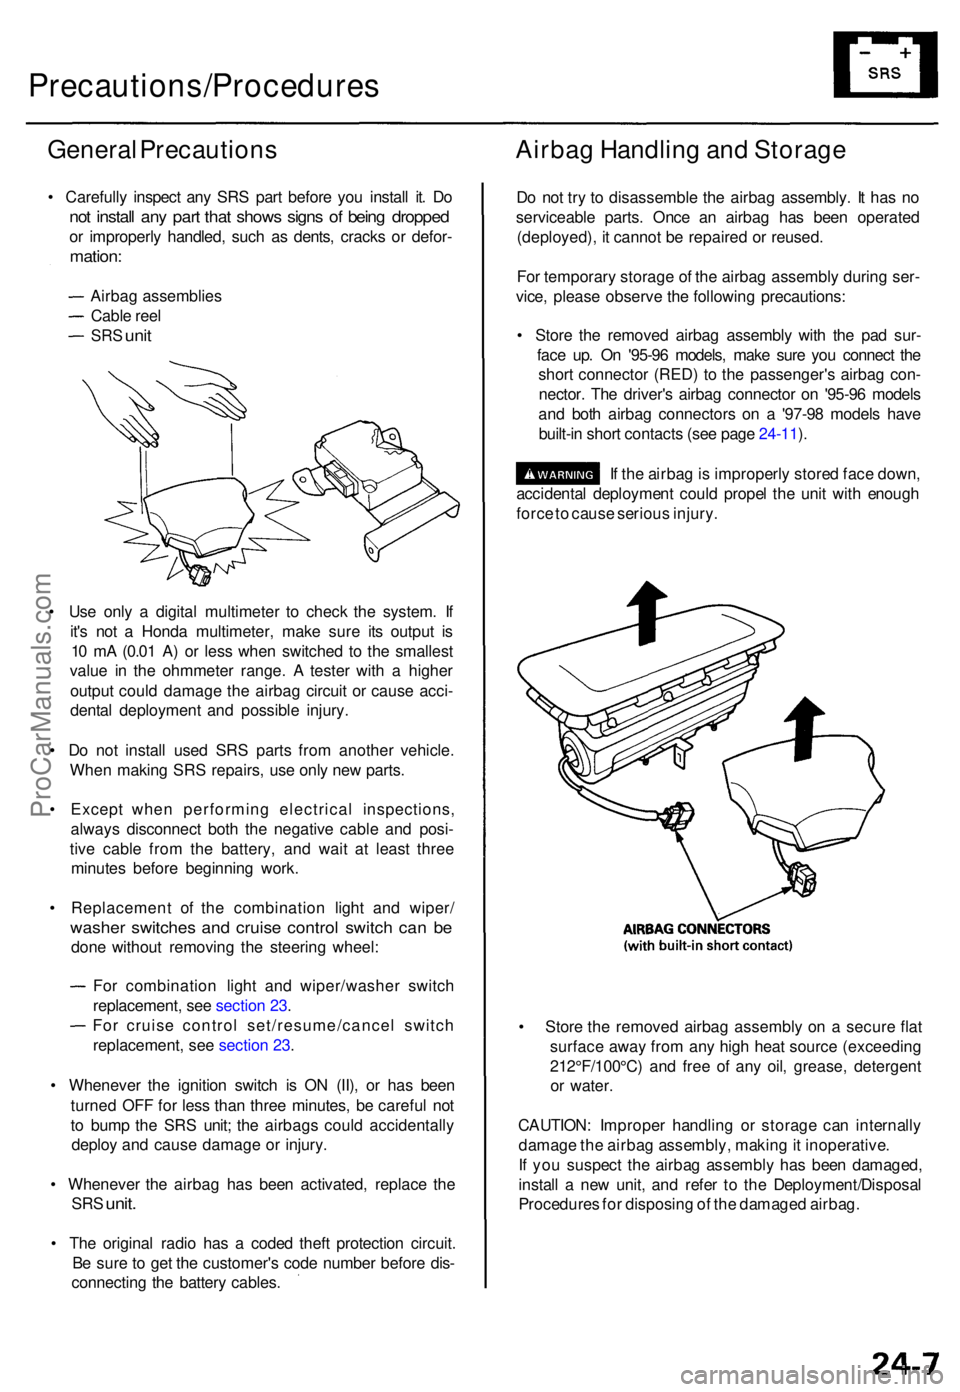
• Carefull y inspec t an y SR S par t befor e yo u instal l it . D o
not instal l an y par t tha t show s sign s o f bein g droppe d
or improperl y handled , suc h a s dents , crack s o r defor -
mation :
Airbag assemblie s
Cabl e ree l
SRS uni t
• Us e onl y a digita l multimete r t o chec k th e system . I f
it' s no t a Hond a multimeter , mak e sur e it s outpu t i s
1 0 m A (0.0 1 A ) o r les s whe n switche d t o th e smalles t
valu e i n th e ohmmete r range . A teste r wit h a highe r
outpu t coul d damag e th e airba g circui t o r caus e acci -
denta l deploymen t an d possibl e injury .
• D o no t instal l use d SR S part s fro m anothe r vehicle .
Whe n makin g SR S repairs , us e onl y ne w parts .
• Excep t whe n performin g electrica l inspections ,
alway s disconnec t bot h th e negativ e cabl e an d posi -
tiv e cabl e fro m th e battery , an d wai t a t leas t thre e
minute s befor e beginnin g work .
• Replacemen t of the combinatio n ligh t an d wiper /
washer switche s an d cruis e contro l switc h ca n b e
don e withou t removin g th e steerin g wheel :
Fo r combinatio n ligh t an d wiper/washe r switc h
replacement , se e sectio n 23 .
Fo r cruis e contro l set/resume/cance l switc h
replacement , se e sectio n 23 .
• Wheneve r th e ignitio n switc h i s O N (II) , o r ha s bee n
turne d OF F fo r les s tha n thre e minutes , b e carefu l no t
t o bum p th e SR S unit ; th e airbag s coul d accidentall y
deplo y an d caus e damag e o r injury .
• Wheneve r th e airba g ha s bee n activated , replac e th e
SR S unit .
• Th e origina l radi o ha s a code d thef t protectio n circuit .
B e sur e to ge t th e customer' s cod e numbe r befor e dis -
connectin g th e batter y cables .
Airbag Handlin g an d Storag e
Do no t tr y t o disassembl e th e airba g assembly . I t ha s n o
serviceabl e parts . Onc e a n airba g ha s bee n operate d
(deployed) , i t canno t b e repaire d o r reused .
Fo r temporar y storag e o f th e airba g assembl y durin g ser -
vice , pleas e observ e th e followin g precautions :
• Stor e th e remove d airba g assembl y wit h th e pa d sur -
fac e up . O n '95-9 6 models , mak e sur e yo u connec t th e
shor t connecto r (RED ) t o th e passenger' s airba g con -
nector . Th e driver' s airba g connecto r o n '95-9 6 model s
an d bot h airba g connector s o n a '97-9 8 model s hav e
built-i n shor t contact s (se e pag e 24-11 ).
I f th e airba g is improperl y store d fac e down ,
accidenta l deploymen t coul d prope l th e uni t wit h enoug h
forc e to caus e seriou s injury .
• Stor e th e remove d airba g assembl y o n a secur e fla t
surfac e awa y fro m an y hig h hea t sourc e (exceedin g
212°F/100°C ) an d fre e o f an y oil , grease , detergen t
o r water .
CAUTION : Imprope r handlin g o r storag e ca n internall y
damag e th e airba g assembly , makin g it inoperative .
I f yo u suspec t th e airba g assembl y ha s bee n damaged ,
instal l a ne w unit , an d refe r t o th e Deployment/Disposa l
Procedure s fo r disposin g o f th e damage d airbag .
ProCarManuals.com
Page 1759 of 1771
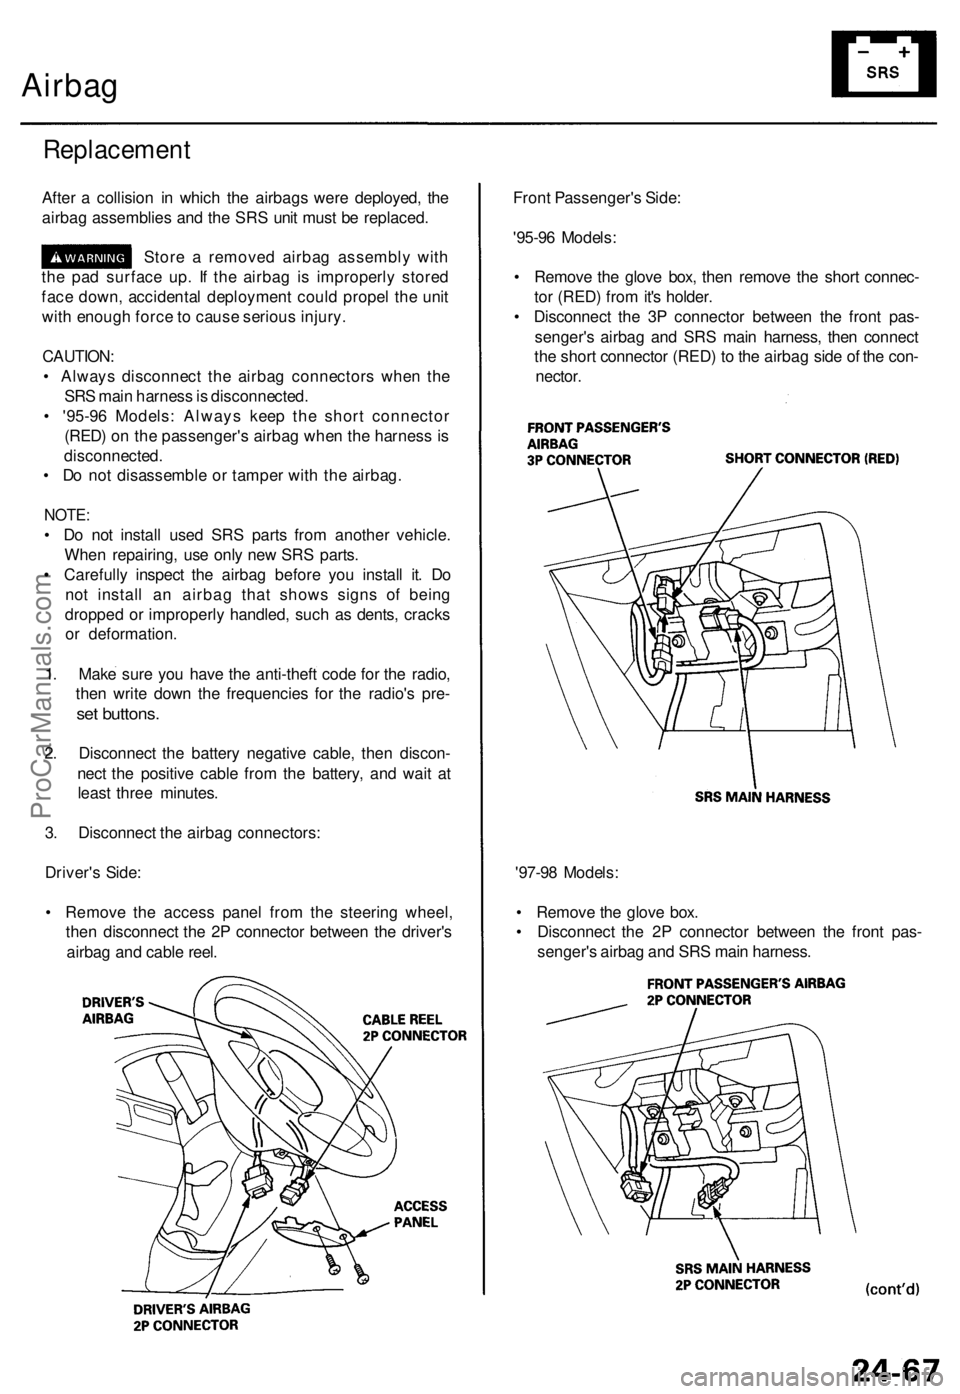
Airbag
Replacemen t
After a collisio n i n whic h th e airbag s wer e deployed , th e
airba g assemblie s an d th e SR S uni t mus t b e replaced .
Stor e a remove d airba g assembl y wit h
th e pa d surfac e up . I f th e airba g i s improperl y store d
fac e down , accidenta l deploymen t coul d prope l th e uni t
wit h enoug h forc e to caus e seriou s injury . Fron
t Passenger' s Side :
'95-9 6 Models :
• Remov e th e glov e box , the n remov e th e shor t connec -
to r (RED ) fro m it' s holder .
• Disconnec t th e 3 P connecto r betwee n th e fron t pas -
senger' s airba g an d SR S mai n harness , the n connec t
th e shor t connecto r (RED ) t o th e airba g sid e o f th e con -
nector .
CAUTION
:
• Alway s disconnec t th e airba g connector s whe n th e
SR S mai n harnes s is disconnected .
• '95-9 6 Models : Alway s kee p th e shor t connecto r
(RED ) o n th e passenger' s airba g whe n th e harnes s is
disconnected .
• D o no t disassembl e o r tampe r wit h th e airbag .
NOTE:
• D o no t instal l use d SR S part s fro m anothe r vehicle .
Whe n repairing , us e onl y ne w SR S parts .
• Carefull y inspec t th e airba g befor e yo u instal l it . D o
no t instal l a n airba g tha t show s sign s o f bein g
droppe d o r improperl y handled , suc h a s dents , crack s
o r deformation .
1 . Mak e sur e yo u hav e th e anti-thef t cod e fo r th e radio ,
the n writ e dow n th e frequencie s fo r th e radio' s pre -
set buttons .
2. Disconnec t th e batter y negativ e cable , the n discon -
nec t th e positiv e cabl e fro m th e battery , an d wai t a t
leas t thre e minutes .
3 . Disconnec t th e airba g connectors :
Driver' s Side :
• Remov e th e acces s pane l fro m th e steerin g wheel ,
the n disconnec t th e 2 P connecto r betwee n th e driver' s
airba g an d cabl e reel . '97-9
8 Models :
• Remov e th e glov e box .
• Disconnec t th e 2 P connecto r betwee n th e fron t pas -
senger' s airba g an d SR S mai n harness .
ProCarManuals.com
Page 1764 of 1771
Airbag
Disposa l (cont'd )
7. Connec t a 1 2 vol t batter y t o th e tool :
• I f th e gree n ligh t o n th e too l come s on , th e air -
ba g ignite r circui t i s defectiv e an d canno t deplo y
th e airbag . G o t o Damage d Airba g Specia l
Procedure .
• I f th e re d ligh t o n th e too l come s on , th e airba g i s
read y t o b e deployed .
8 . Pus h th e tool' s deploymen t switch . Th e airba g
shoul d deplo y (deploymen t i s bot h highl y audibl e
an d visibl e a lou d nois e an d rapi d inflatio n o f th e
bag , followe d b y slo w deflation) .
• I f audible/visibl e deploymen t happens , an d th e
gree n ligh t o n th e too l come s on , continu e wit h
this procedure .
• I f th e airba g doesn' t deploy , ye t th e gree n ligh t
come s ON , it s ignite r i s defective . G o t o Dam -
age d Airba g Specia l Procedure .
• Durin g deployment , th e airba g ca n becom e ho t
enoug h t o bur n you . Wai t thirt y minute s afte r
deploymen t befor e touchin g th e airbag .
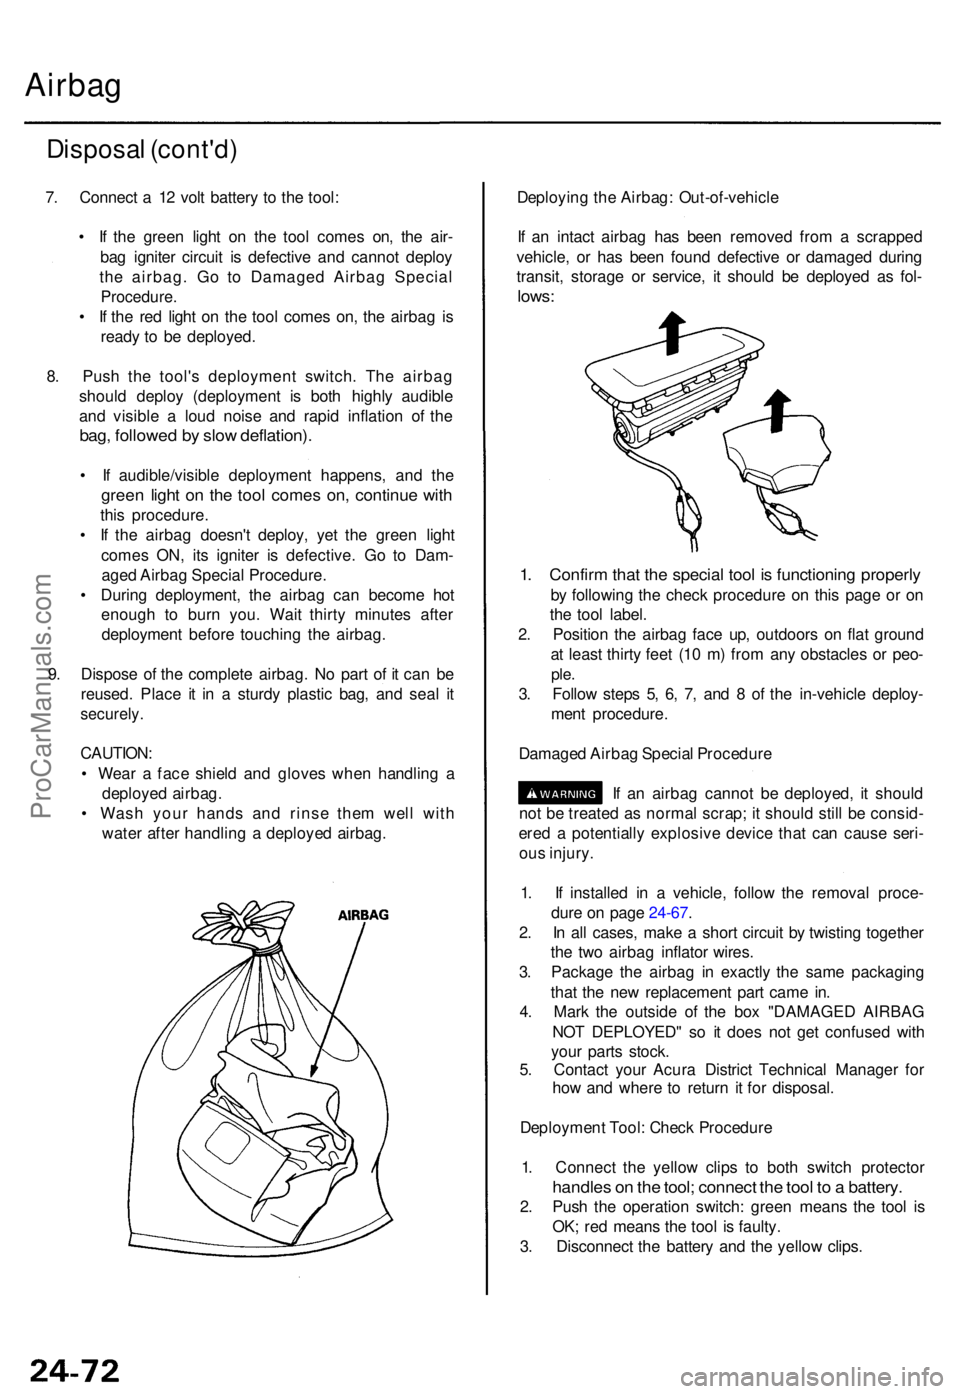
9 . Dispos e o f th e complet e airbag . N o par t o f i t ca n b e
reused . Plac e i t i n a sturd y plasti c bag , an d sea l i t
securely .
CAUTION :
• Wea r a fac e shiel d an d glove s whe n handlin g a
deploye d airbag .
• Was h you r hand s an d rins e the m wel l wit h
wate r afte r handlin g a deploye d airbag . Deployin
g th e Airbag : Out-of-vehicl e
I f a n intac t airba g ha s bee n remove d fro m a scrappe d
vehicle , o r ha s bee n foun d defectiv e o r damage d durin g
transit , storag e o r service , i t shoul d b e deploye d a s fol -
lows :
1. Confir m tha t th e specia l too l i s functionin g properl y
by followin g th e chec k procedur e o n thi s pag e o r o n
th e too l label .
2 . Positio n th e airba g fac e up , outdoor s o n fla t groun d
a t leas t thirt y fee t (1 0 m ) fro m an y obstacle s o r peo -
ple.
3. Follo w step s 5 , 6 , 7 , an d 8 of th e in-vehicl e deploy -
men t procedure .
Damage d Airba g Specia l Procedur e
I f a n airba g canno t b e deployed , i t shoul d
no t b e treate d a s norma l scrap ; i t shoul d stil l b e consid -
ere d a potentiall y explosiv e devic e tha t ca n caus e seri -
ou s injury .
1 . I f installe d i n a vehicle , follo w th e remova l proce -
dur e o n pag e 24-67 .
2 . I n al l cases , mak e a shor t circui t b y twistin g togethe r
th e tw o airba g inflato r wires .
3 . Packag e th e airba g i n exactl y th e sam e packagin g
tha t th e ne w replacemen t par t cam e in .
4 . Mar k th e outsid e o f th e bo x "DAMAGE D AIRBA G
NO T DEPLOYED " s o i t doe s no t ge t confuse d wit h
you r part s stock .
5 . Contac t you r Acur a Distric t Technica l Manage r fo r
ho w an d wher e t o retur n i t fo r disposal .
Deploymen t Tool : Chec k Procedur e
1 . Connec t th e yello w clip s t o bot h switc h protecto r
handles o n th e tool ; connec t th e too l t o a battery .
2. Pus h th e operatio n switch : gree n mean s th e too l i s
OK ; re d mean s th e too l i s faulty .
3 . Disconnec t th e batter y an d th e yello w clips .
ProCarManuals.com
Page 1765 of 1771
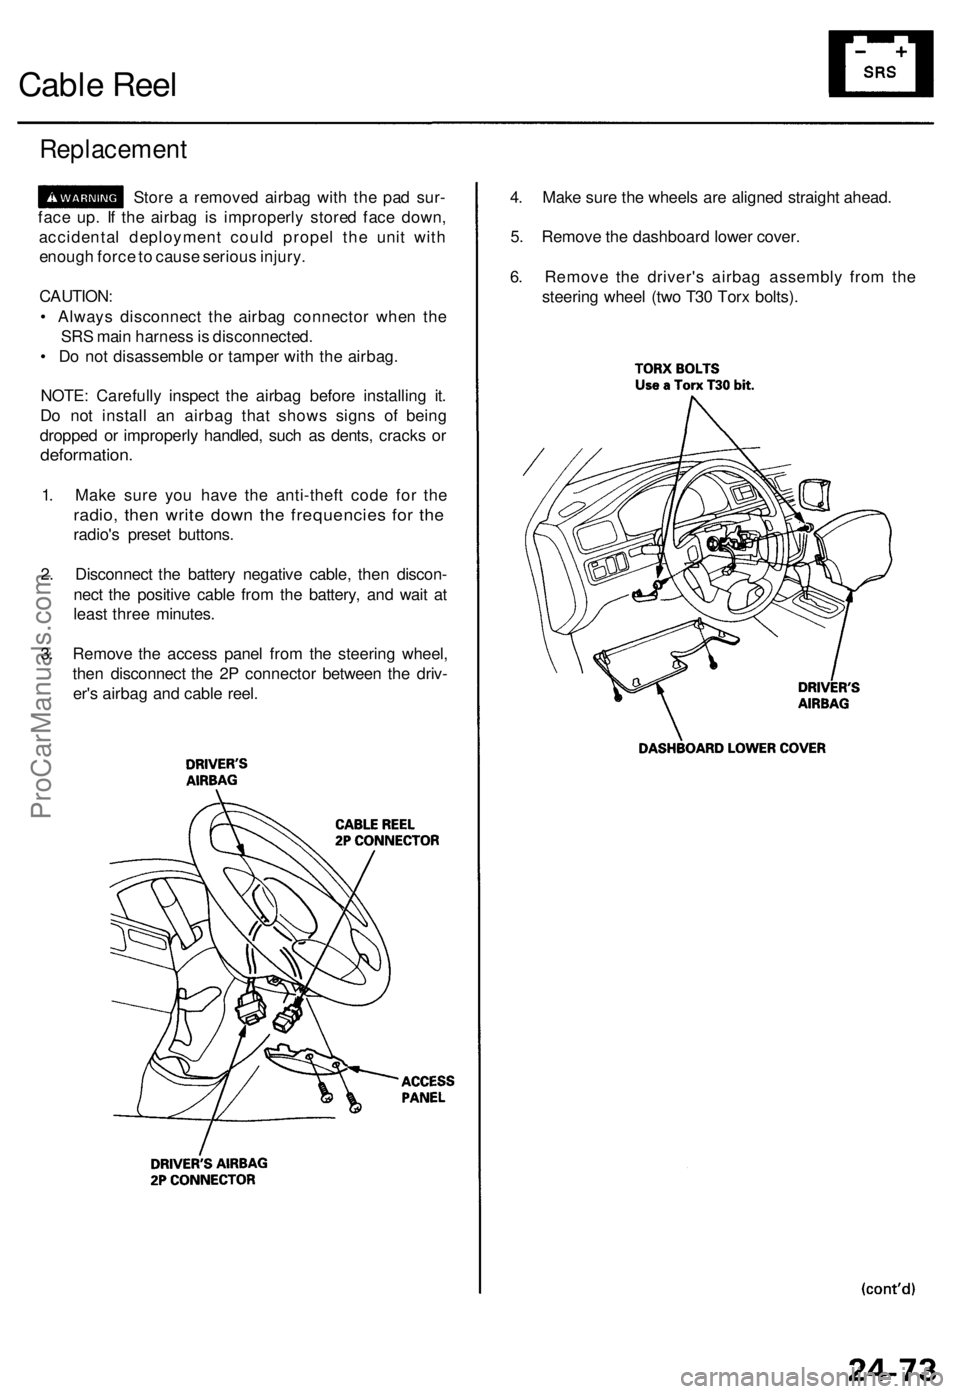
Cable Reel
Replacement
Store a remove d airba g wit h th e pa d sur -
fac e up . I f th e airba g i s improperl y store d fac e down ,
accidenta l deploymen t coul d prope l th e uni t wit h
enoug h forc e to caus e seriou s injury .
CAUTION :
• Alway s disconnec t th e airba g connecto r whe n th e
SR S mai n harnes s is disconnected .
• D o no t disassembl e o r tampe r wit h th e airbag .
NOTE : Carefull y inspec t th e airba g befor e installin g it .
D o no t instal l a n airba g tha t show s sign s o f bein g
droppe d o r improperl y handled , suc h a s dents , crack s o r
deformation .
1. Mak e sur e yo u hav e th e anti-thef t cod e fo r th e
radio , the n writ e dow n th e frequencie s fo r th e
radio' s prese t buttons .
2 . Disconnec t th e batter y negativ e cable , the n discon -
nec t th e positiv e cabl e fro m th e battery , an d wai t a t
leas t thre e minutes .
3 . Remov e th e acces s pane l fro m th e steerin g wheel ,
the n disconnec t th e 2 P connecto r betwee n th e driv -
er' s airba g an d cabl e reel . 4
. Mak e sur e th e wheel s ar e aligne d straigh t ahead .
5 . Remov e th e dashboar d lowe r cover .
6 . Remov e th e driver' s airba g assembl y fro m th e
steerin g whee l (tw o T3 0 Tor x bolts) .
ProCarManuals.com
Page 1769 of 1771
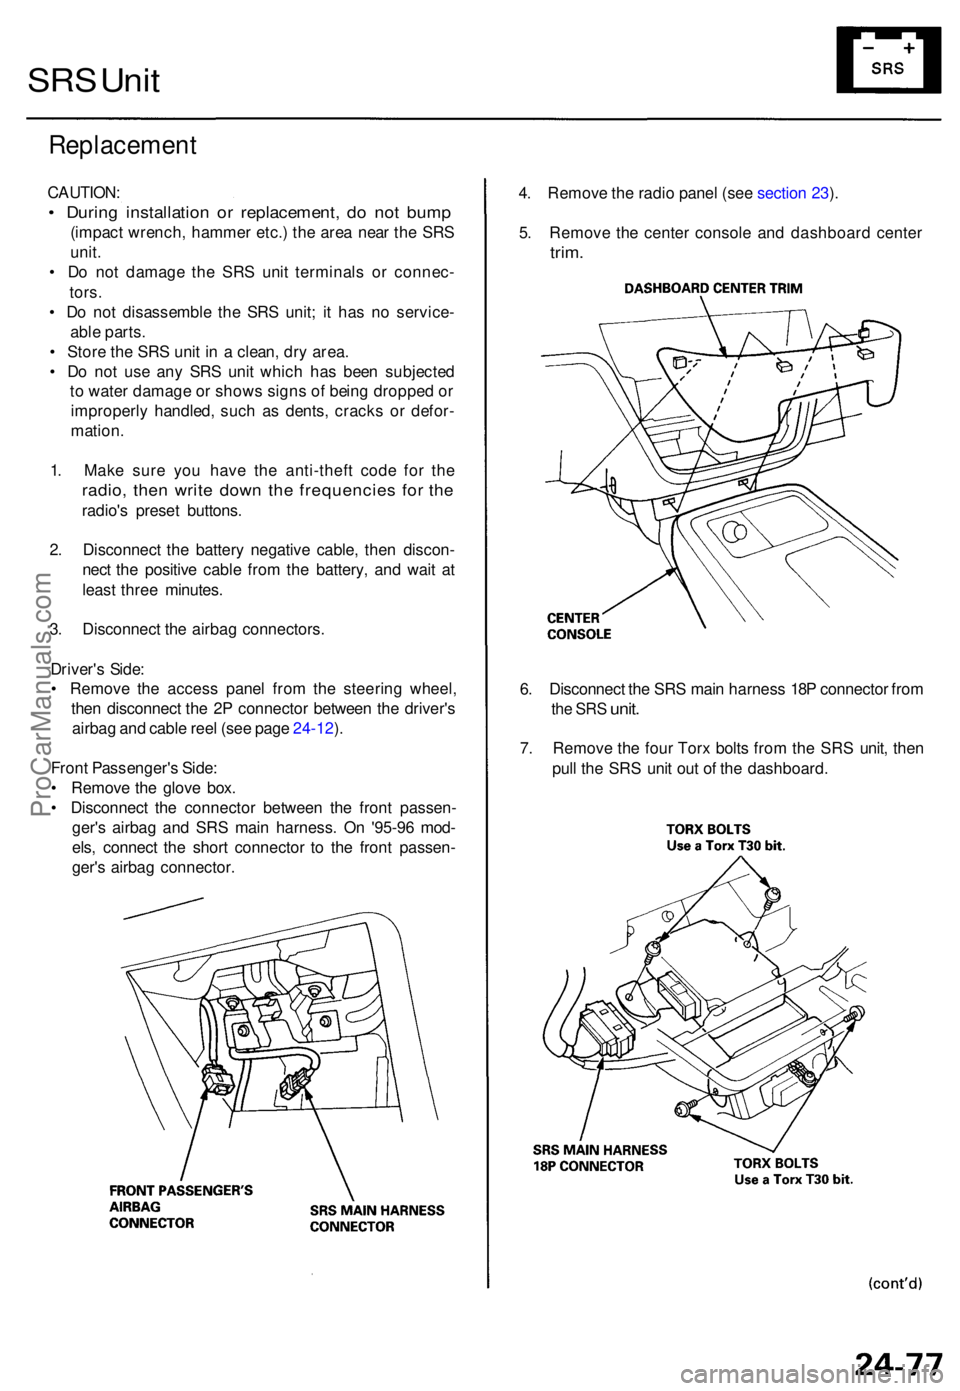
SRS Uni t
Replacemen t
CAUTION:
• Durin g installatio n o r replacement , d o no t bum p
(impac t wrench , hamme r etc. ) th e are a nea r th e SR S
unit .
• D o no t damag e th e SR S uni t terminal s o r connec -
tors .
• D o no t disassembl e th e SR S unit ; i t ha s n o service -
abl e parts .
• Stor e th e SR S uni t i n a clean , dr y area .
• D o no t us e an y SR S uni t whic h ha s bee n subjecte d
t o wate r damag e o r show s sign s o f bein g droppe d o r
improperl y handled , suc h a s dents , crack s o r defor -
mation .
1 . Mak e sur e yo u hav e th e anti-thef t cod e fo r th e
radio , the n writ e dow n th e frequencie s fo r th e
radio' s prese t buttons .
2 . Disconnec t th e batter y negativ e cable , the n discon -
nec t th e positiv e cabl e fro m th e battery , an d wai t a t
leas t thre e minutes .
3 . Disconnec t th e airba g connectors .
Driver' s Side :
• Remov e th e acces s pane l fro m th e steerin g wheel ,
the n disconnec t th e 2 P connecto r betwee n th e driver' s
airba g an d cabl e ree l (se e pag e 24-12 ).
Fron t Passenger' s Side :
• Remov e th e glov e box .
• Disconnec t th e connecto r betwee n th e fron t passen -
ger' s airba g an d SR S mai n harness . O n '95-9 6 mod -
els , connec t th e shor t connecto r t o th e fron t passen -
ger' s airba g connector . 4
. Remov e th e radi o pane l (se e sectio n 23 ).
5 . Remov e th e cente r consol e an d dashboar d cente r
trim.
6. Disconnec t th e SR S mai n harnes s 18 P connecto r fro m
the SR S unit .
7. Remov e th e fou r Tor x bolt s fro m th e SR S unit , the n
pul l th e SR S uni t ou t o f th e dashboard .
ProCarManuals.com