Page 1500 of 1784
Fig. 35 Rear Door With Power Windows
JBODY COMPONENTSÐXJ VEHICLES 23 - 45
Page 1503 of 1784

FRONT DOOR WINDOW GLASS REGULATOR
REMOVAL
(1) Remove the door trim panel and waterdam.
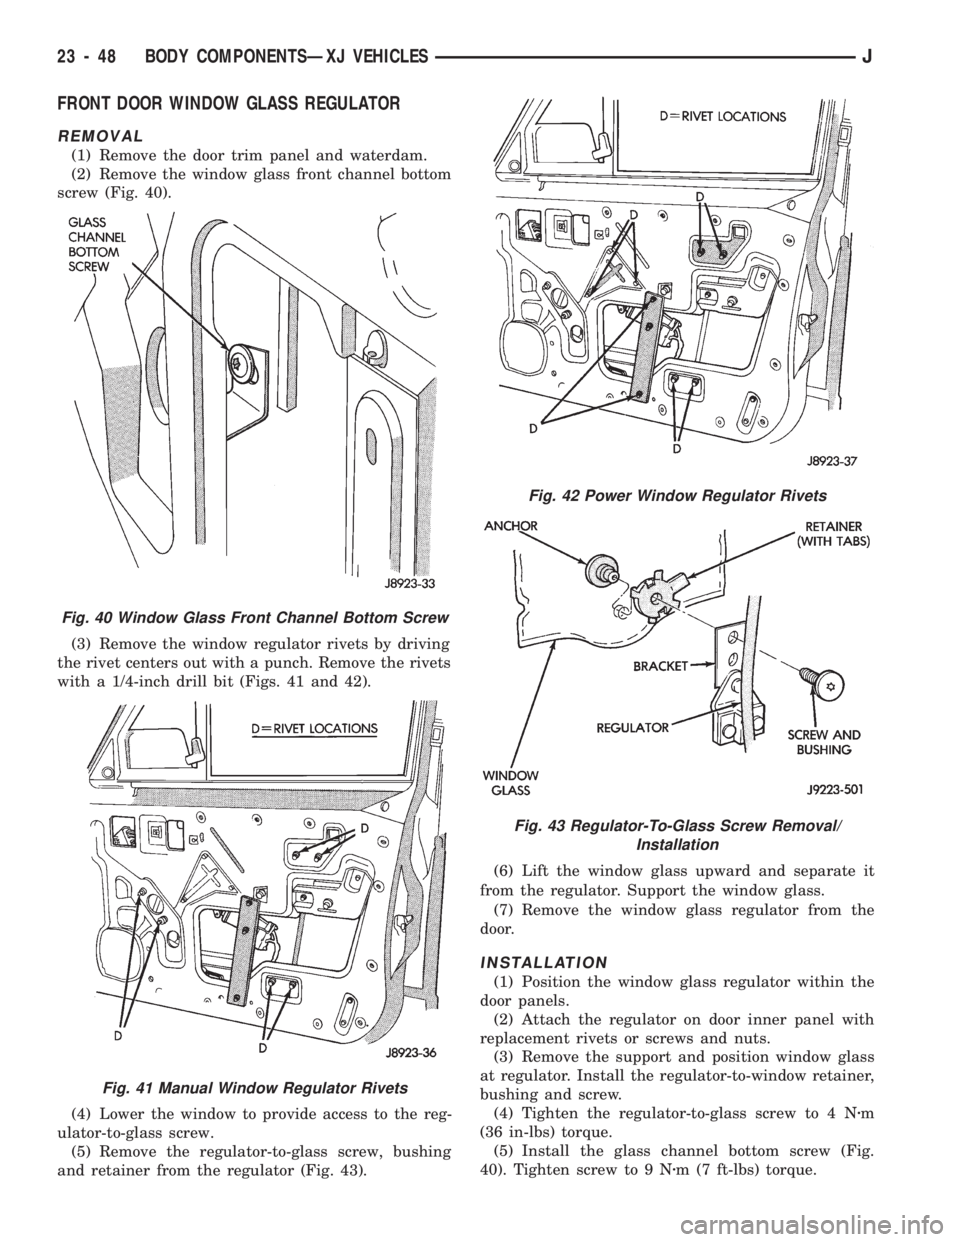
(2) Remove the window glass front channel bottom
screw (Fig. 40).
(3) Remove the window regulator rivets by driving
the rivet centers out with a punch. Remove the rivets
with a 1/4-inch drill bit (Figs. 41 and 42).
(4) Lower the window to provide access to the reg-
ulator-to-glass screw.
(5) Remove the regulator-to-glass screw, bushing
and retainer from the regulator (Fig. 43).(6) Lift the window glass upward and separate it
from the regulator. Support the window glass.
(7) Remove the window glass regulator from the
door.
INSTALLATION
(1) Position the window glass regulator within the
door panels.
(2) Attach the regulator on door inner panel with
replacement rivets or screws and nuts.
(3) Remove the support and position window glass
at regulator. Install the regulator-to-window retainer,
bushing and screw.
(4) Tighten the regulator-to-glass screw to 4 Nzm
(36 in-lbs) torque.
(5) Install the glass channel bottom screw (Fig.
40). Tighten screw to 9 Nzm (7 ft-lbs) torque.
Fig. 40 Window Glass Front Channel Bottom Screw
Fig. 41 Manual Window Regulator Rivets
Fig. 42 Power Window Regulator Rivets
Fig. 43 Regulator-To-Glass Screw Removal/
Installation
23 - 48 BODY COMPONENTSÐXJ VEHICLESJ
Page 1504 of 1784
(6) Attach the door waterdam to the door inner
panel with sealant.
(7) Install the trim panel.
FRONT DOOR WINDOW GLASS
REMOVAL
(1) Remove the door trim panel and waterdam.
(2) Remove the window glass channel hardware,
beltline moulding and weatherstrip seals (Figs. 48
and 49).
(3) Remove the glass channel bottom screw.
(4) Remove the regulator-to-window glass screw,
bushing and retainer (Fig. 43).
(5) Lift the glass upward and out of the door.
INSTALLATION
(1) Position the glass in the door and install the
regulator-to-glass retainer, bushing and screw.
(2) Tighten the screw to 4 Nzm (36 in-lbs) torque.
Fig. 44 Manual Regulator InstallationÐUpper Rivets
Fig. 45 Manual Regulator InstallationÐLower Rivets
and Glass Retaining Screw
Fig. 46 Power Regulator InstallationÐUpper Rivets
Fig. 47 Power Regulator InstallationÐLower Rivets
Fig. 48 Front Door Beltline Moulding and Weatherstrip
Seals
JBODY COMPONENTSÐXJ VEHICLES 23 - 49
Page 1505 of 1784

(3) Install the channel bottom screw. Tighten the
screw to 9 Nzm (7 ft-lbs) torque.
(4) Install the channel hardware, beltline mould-
ing and weatherstrip seals.(5) Attach the door waterdam to the door inner
panel with adhesive/sealant.
(6) Install the door trim panel.
FRONT DOOR VENT WINDOW
REMOVAL
(1) Remove the door trim panel and waterdam.
(2) Remove the window glass channel bottom
screw.
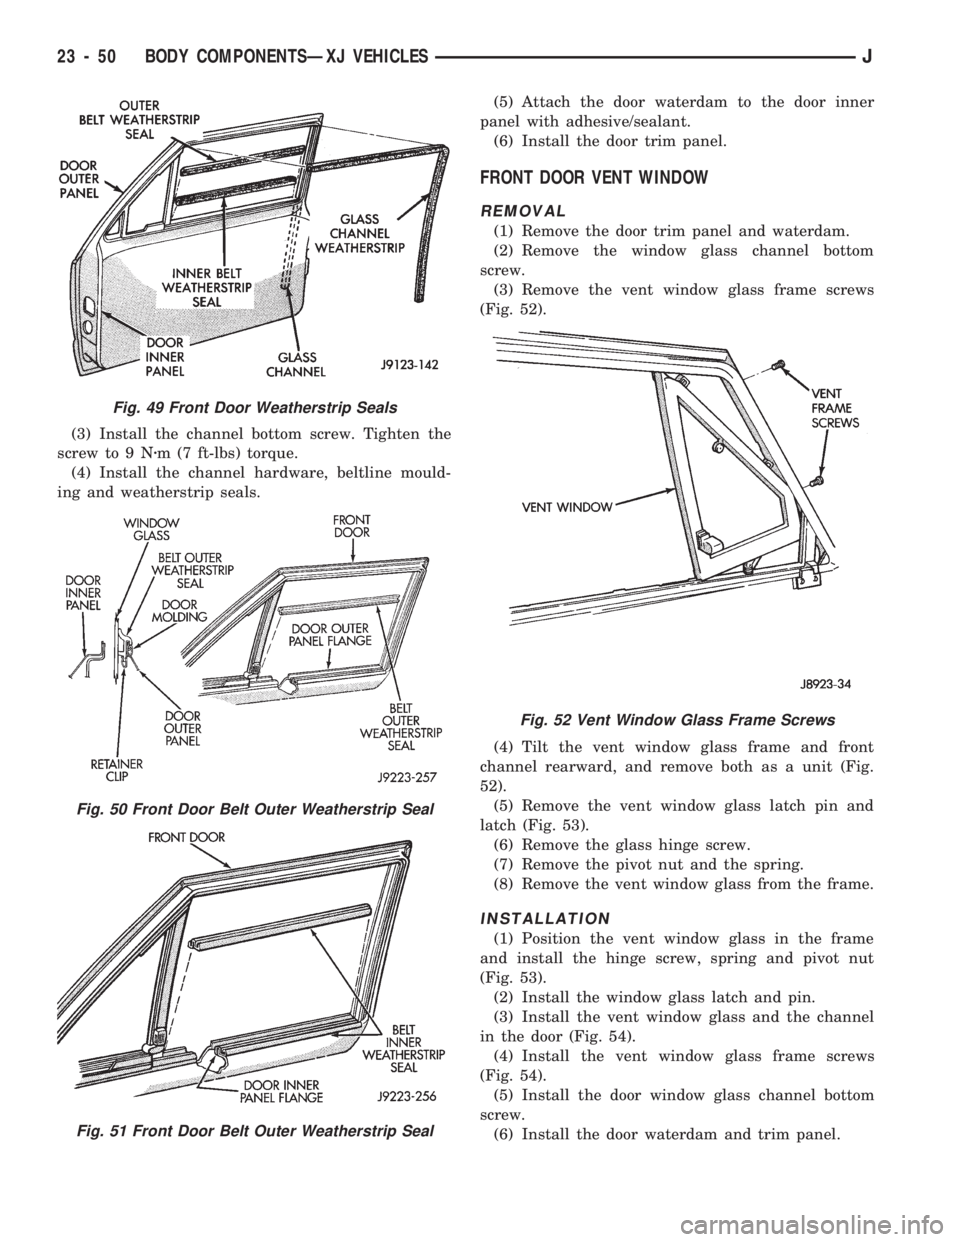
(3) Remove the vent window glass frame screws
(Fig. 52).
(4) Tilt the vent window glass frame and front
channel rearward, and remove both as a unit (Fig.
52).
(5) Remove the vent window glass latch pin and
latch (Fig. 53).
(6) Remove the glass hinge screw.
(7) Remove the pivot nut and the spring.
(8) Remove the vent window glass from the frame.
INSTALLATION
(1) Position the vent window glass in the frame
and install the hinge screw, spring and pivot nut
(Fig. 53).
(2) Install the window glass latch and pin.
(3) Install the vent window glass and the channel
in the door (Fig. 54).
(4) Install the vent window glass frame screws
(Fig. 54).
(5) Install the door window glass channel bottom
screw.
(6) Install the door waterdam and trim panel.
Fig. 49 Front Door Weatherstrip Seals
Fig. 50 Front Door Belt Outer Weatherstrip Seal
Fig. 51 Front Door Belt Outer Weatherstrip Seal
Fig. 52 Vent Window Glass Frame Screws
23 - 50 BODY COMPONENTSÐXJ VEHICLESJ
Page 1506 of 1784
REAR DOOR WINDOW GLASS REGULATOR
REMOVAL
(1) Remove the door trim panel and waterdam.(2) Remove the window glass attaching screw,
bushing and retainer from the regulator (Fig. 55).
Support the glass.
Fig. 53 Vent Window Glass Disassembly/Assembly
Fig. 54 Vent Window Frame and Front Channel
Installation
Fig. 55 Regulator-To-Glass Screw
Removal/Installation
JBODY COMPONENTSÐXJ VEHICLES 23 - 51
Page 1507 of 1784

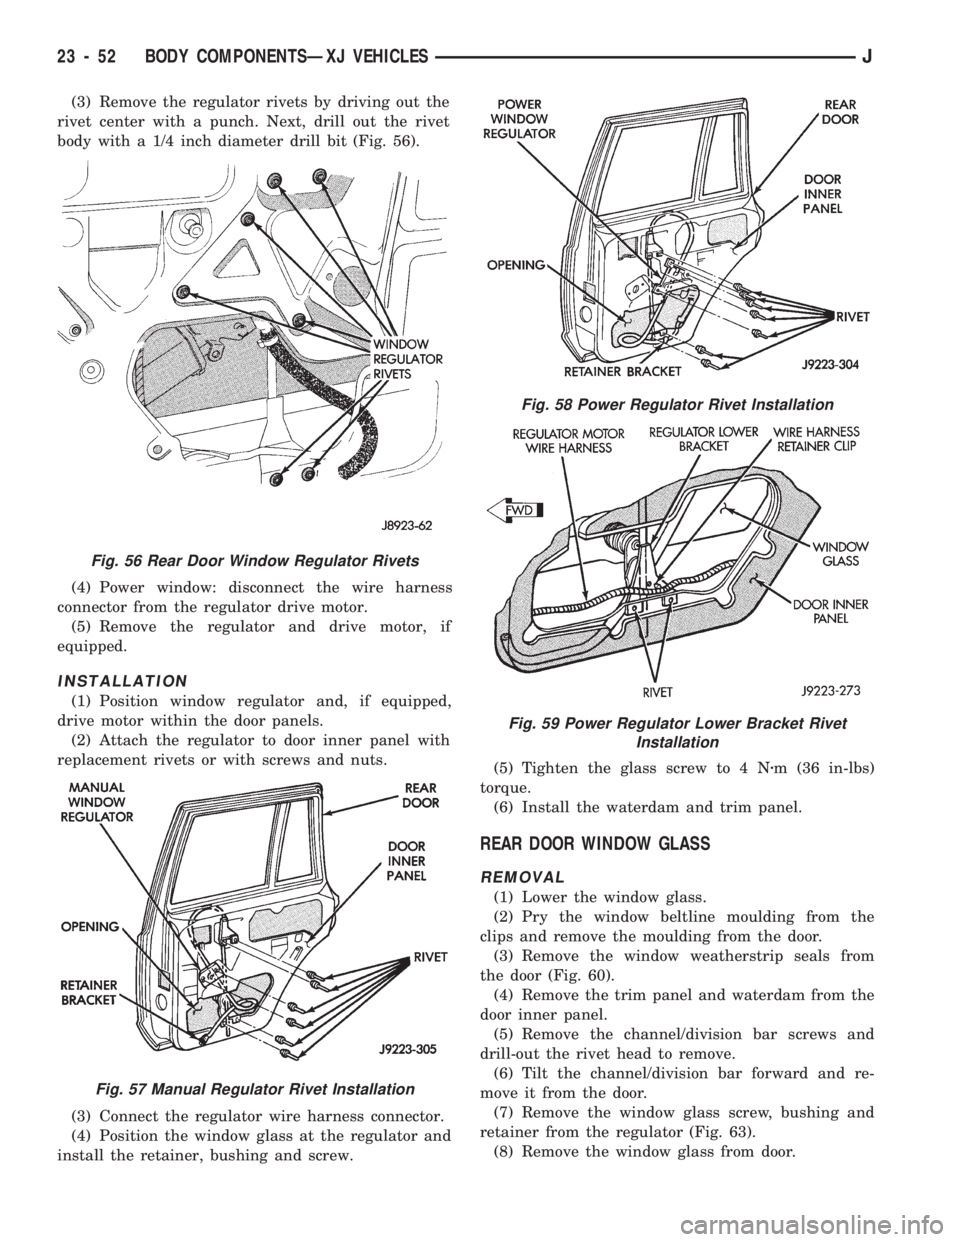
(3) Remove the regulator rivets by driving out the
rivet center with a punch. Next, drill out the rivet
body with a 1/4 inch diameter drill bit (Fig. 56).
(4) Power window: disconnect the wire harness
connector from the regulator drive motor.
(5) Remove the regulator and drive motor, if
equipped.
INSTALLATION
(1) Position window regulator and, if equipped,
drive motor within the door panels.
(2) Attach the regulator to door inner panel with
replacement rivets or with screws and nuts.
(3) Connect the regulator wire harness connector.
(4) Position the window glass at the regulator and
install the retainer, bushing and screw.(5) Tighten the glass screw to 4 Nzm (36 in-lbs)
torque.
(6) Install the waterdam and trim panel.
REAR DOOR WINDOW GLASS
REMOVAL
(1) Lower the window glass.
(2) Pry the window beltline moulding from the
clips and remove the moulding from the door.
(3) Remove the window weatherstrip seals from
the door (Fig. 60).
(4) Remove the trim panel and waterdam from the
door inner panel.
(5) Remove the channel/division bar screws and
drill-out the rivet head to remove.
(6) Tilt the channel/division bar forward and re-
move it from the door.
(7) Remove the window glass screw, bushing and
retainer from the regulator (Fig. 63).
(8) Remove the window glass from door.
Fig. 56 Rear Door Window Regulator Rivets
Fig. 57 Manual Regulator Rivet Installation
Fig. 58 Power Regulator Rivet Installation
Fig. 59 Power Regulator Lower Bracket Rivet
Installation
23 - 52 BODY COMPONENTSÐXJ VEHICLESJ
Page 1508 of 1784
INSTALLATION
(1) Install the glass in the door, and install the re-
tainer, bushing and screw (Fig. 63).
(2) Tighten the glass attaching screw 6 Nzm (53 in-
lbs) torque.
(3) Install the window glass channel/division bar in
the door.
(4) Install the window glass channel/division bar
screws and rivet. Tighten the screws to 6 Nzm(5ft-
lbs) torque.
(5) Install the window glass channel and belt
weatherstrip seals.
(6) Install the window beltline moulding.
(7) Install the door waterdam and trim panel.
REAR DOOR FIXED WINDOW GLASS
REMOVAL
(1) Lower the window glass.
Fig. 62 Window Channel/Division Bar Rivet
Fig. 63 Regulator-To-Glass Screw
Removal/Installation
Fig. 64 Glass Channel Weatherstrip Seal
Fig. 60 Rear Door Window Weatherstrip Seals
Fig. 61 Window Channel/Division Bar Screws and
Rivet
JBODY COMPONENTSÐXJ VEHICLES 23 - 53
Page 1509 of 1784

(2) Pry the window beltline moulding away from
the clips and remove the moulding from the door.
(3) Remove the window weatherstrip seals from
the door.
(4) Remove the trim panel and waterdam from
door inner panel.
(5) Remove the channel/division bar screws. Drill
out the rivet head to remove it from the inner panel.
(6) Tilt the channel/division bar forward and re-
move it from the door.
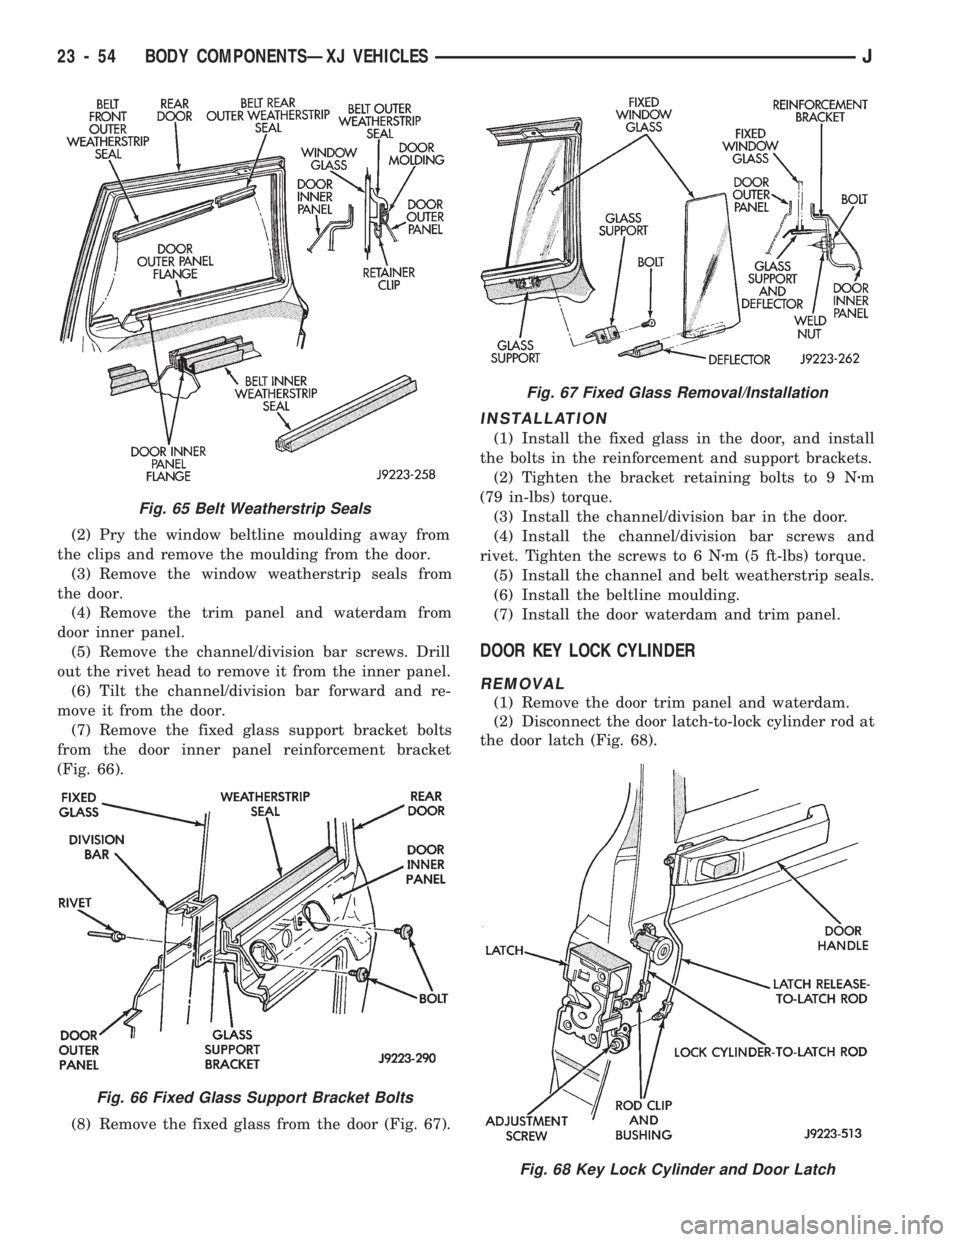
(7) Remove the fixed glass support bracket bolts
from the door inner panel reinforcement bracket
(Fig. 66).
(8) Remove the fixed glass from the door (Fig. 67).
INSTALLATION
(1) Install the fixed glass in the door, and install
the bolts in the reinforcement and support brackets.
(2) Tighten the bracket retaining bolts to 9 Nzm
(79 in-lbs) torque.
(3) Install the channel/division bar in the door.
(4) Install the channel/division bar screws and
rivet. Tighten the screws to 6 Nzm (5 ft-lbs) torque.
(5) Install the channel and belt weatherstrip seals.
(6) Install the beltline moulding.
(7) Install the door waterdam and trim panel.
DOOR KEY LOCK CYLINDER
REMOVAL
(1) Remove the door trim panel and waterdam.
(2) Disconnect the door latch-to-lock cylinder rod at
the door latch (Fig. 68).
Fig. 67 Fixed Glass Removal/Installation
Fig. 65 Belt Weatherstrip Seals
Fig. 66 Fixed Glass Support Bracket Bolts
Fig. 68 Key Lock Cylinder and Door Latch
23 - 54 BODY COMPONENTSÐXJ VEHICLESJ