Page 1349 of 1784

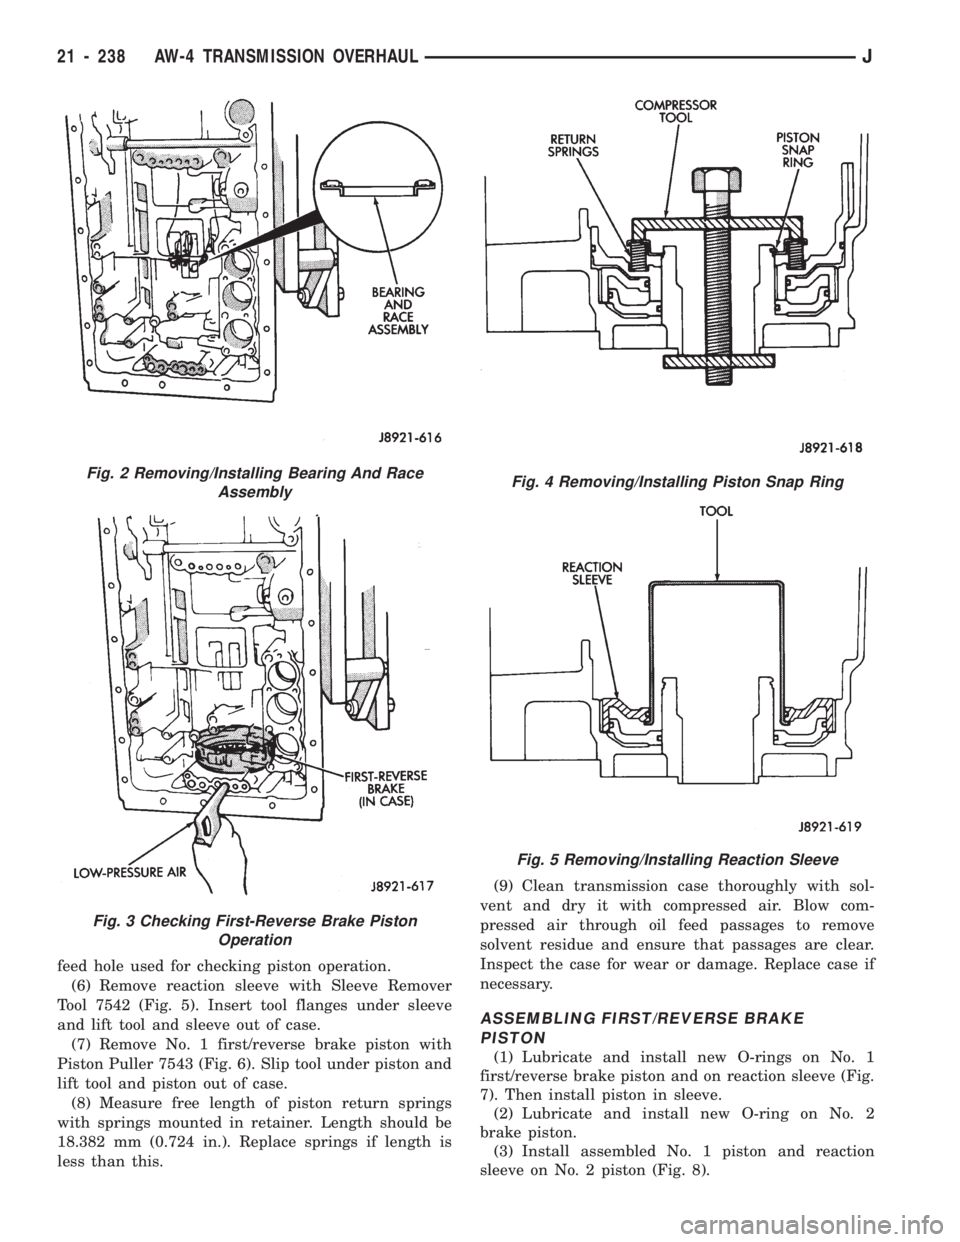
feed hole used for checking piston operation.
(6) Remove reaction sleeve with Sleeve Remover
Tool 7542 (Fig. 5). Insert tool flanges under sleeve
and lift tool and sleeve out of case.
(7) Remove No. 1 first/reverse brake piston with
Piston Puller 7543 (Fig. 6). Slip tool under piston and
lift tool and piston out of case.
(8) Measure free length of piston return springs
with springs mounted in retainer. Length should be
18.382 mm (0.724 in.). Replace springs if length is
less than this.(9) Clean transmission case thoroughly with sol-
vent and dry it with compressed air. Blow com-
pressed air through oil feed passages to remove
solvent residue and ensure that passages are clear.
Inspect the case for wear or damage. Replace case if
necessary.
ASSEMBLING FIRST/REVERSE BRAKE
PISTON
(1) Lubricate and install new O-rings on No. 1
first/reverse brake piston and on reaction sleeve (Fig.
7). Then install piston in sleeve.
(2) Lubricate and install new O-ring on No. 2
brake piston.
(3) Install assembled No. 1 piston and reaction
sleeve on No. 2 piston (Fig. 8).
Fig. 2 Removing/Installing Bearing And Race
Assembly
Fig. 3 Checking First-Reverse Brake Piston
Operation
Fig. 4 Removing/Installing Piston Snap Ring
Fig. 5 Removing/Installing Reaction Sleeve
21 - 238 AW-4 TRANSMISSION OVERHAULJ
Page 1350 of 1784
(4) Lubricate and install piston assembly in case
(Fig. 9). Align piston and case slots and press piston
assembly into case with hand pressure.
(5) Position piston return springs on No. 2 piston.
(6) Compress piston return springs with Tool 7539
and install piston snap ring (Fig. 4). Be sure snap
ring end gap is not aligned with any tangs on return
spring retainer.
(7) Verify piston operation with compressed air as
outlined in disassembly procedure.
(8) Coat bearing and race assembly with petroleum
jelly and install it in piston assembly (Fig. 2). Bear-
ing and race assembly outer diameter is 57.7 mm
(2.272 in.) and inner diameter is 39.2 mm (1.543 in.).
Fig. 6 Removing/Installing First-Reverse Brake No.1
Piston
Fig. 7 Assembling No. 1 Piston And Sleeve
Fig. 8 Assembling First-Reverse Brake Pistons
Fig. 9 Installing First-Reverse Brake Piston
Assembly
JAW-4 TRANSMISSION OVERHAUL 21 - 239
Page 1351 of 1784
TRANSMISSION VALVE BODY OVERHAUL
The valve body assembly consists of two sections
which are the upper body and lower body (Figures 1and 2). Disassembly, inspection and overhaul proce-
dures for each section are outlined separately. Refer
to the appropriate procedure as needed.
Fig. 1 Lower Body Components
21 - 240 AW-4 TRANSMISSION OVERHAULJ
Page 1352 of 1784
Fig. 2 Upper Body Components
JAW-4 TRANSMISSION OVERHAUL 21 - 241
Page 1353 of 1784
REMOVING UPPER BODY FROM LOWER BODY
(1) Remove two-piece detent spring (Fig. 3). Note
position of spring sections for assembly reference.
(2) Remove manual valve from lower body (Fig. 4).
(3) Remove bolts attaching upper body to lower
body (Fig. 5).
(4) Carefully lift and remove upper body, plate and
gaskets from lower body (Fig. 6).
(5) Disassemble and overhaul upper and lower
body sections as outlined in following procedures.
LOWER BODY DISASSEMBLY
(1) Remove check valve and spring, pressure relief
valve and spring and ball check and seat from lower
body. Note location of each valve for assembly refer-
ence (Fig. 1).
Fig. 3 Removing/Installing Detent Spring
Fig. 4 Removing/Installing Manual Valve
Fig. 5 Valve Body Bolt Locations
Fig. 6 Upper Body, Plate And Gaskets
Fig. 1 Lower Body Check Valve And Strainer Location
21 - 242 AW-4 TRANSMISSION OVERHAULJ
Page 1354 of 1784
(2) Remove oil strainers (Fig. 2).
(3) Note or mark position of valve retainers and
pressure reducing plug clip for assembly reference
(Fig. 2). Do not remove the retainers at this time.
(4) Remove solenoid No. 1, 2 and 3. Discard sole-
noid O-rings.
(5) Remove 1-2 shift valve retainer (Fig. 3).
(6) Remove 1-2 shift valve plug, valve spring and
valve (Fig. 4).
(7) Remove primary regulator valve as follows:
WARNING: THE PRIMARY REGULATOR VALVE
SLEEVE AND PLUNGER ARE UNDER TENSION
FROM THE VALVE SPRING. EXERT COUNTER-
PRESSURE ON THE SPRING WHILE REMOVING
THE VALVE RETAINER TO PREVENT COMPONENTS
FROM FLYING OUT.(a) Note position of valve retainer for assembly
reference (Fig. 5). Then press valve sleeve inward
with your thumb and remove retainer with magnet.
Fig. 2 Valve Retainer And Clip Location
Fig. 3 Removing 1-2 Shift Valve Retainer
Fig. 4 Removing/Installing 1-2 Shift Valve
Fig. 5 Regulator Valve Retainer Position
JAW-4 TRANSMISSION OVERHAUL 21 - 243
Page 1355 of 1784

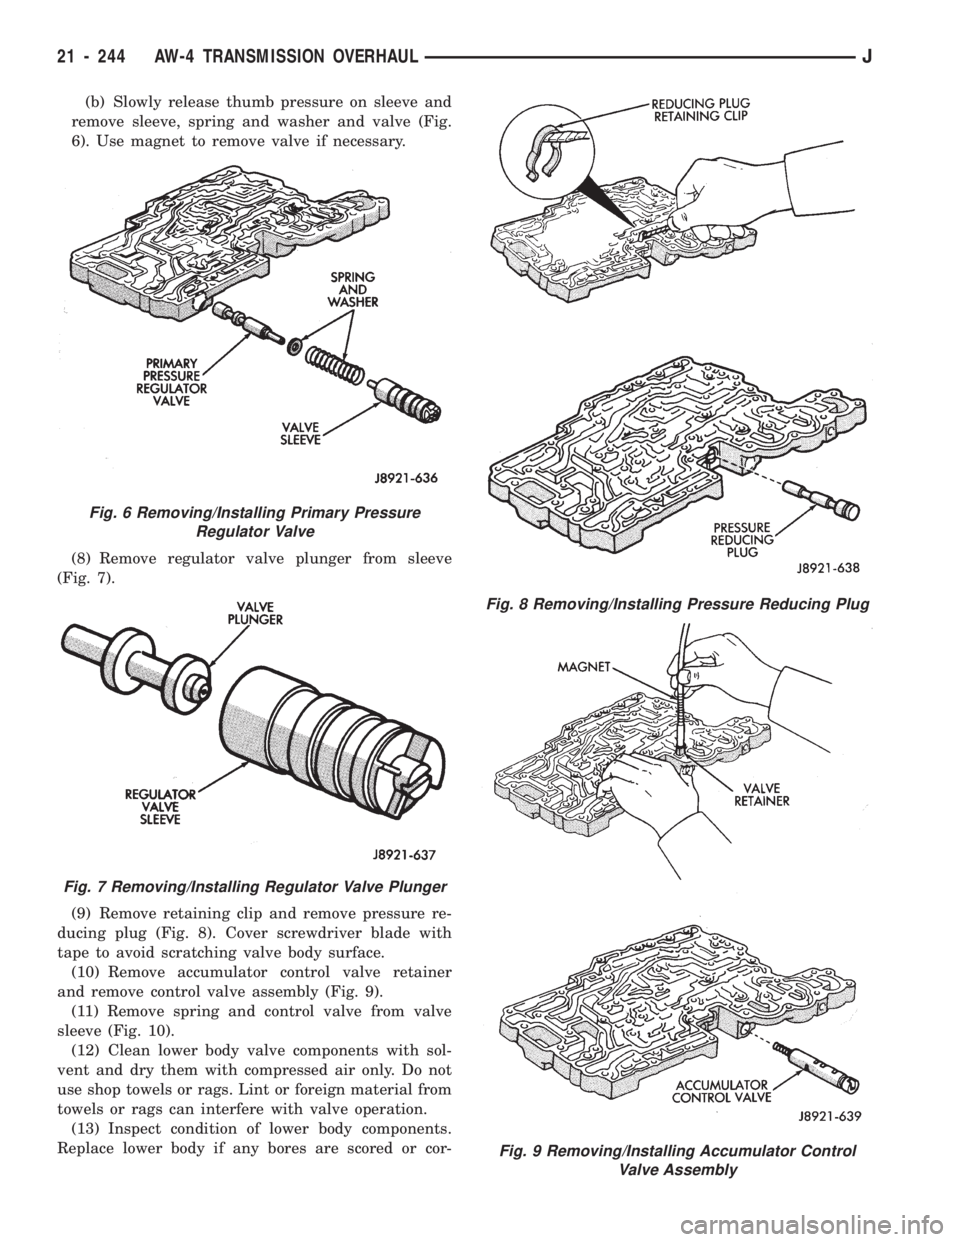
(b) Slowly release thumb pressure on sleeve and
remove sleeve, spring and washer and valve (Fig.
6). Use magnet to remove valve if necessary.
(8) Remove regulator valve plunger from sleeve
(Fig. 7).
(9) Remove retaining clip and remove pressure re-
ducing plug (Fig. 8). Cover screwdriver blade with
tape to avoid scratching valve body surface.
(10) Remove accumulator control valve retainer
and remove control valve assembly (Fig. 9).
(11) Remove spring and control valve from valve
sleeve (Fig. 10).
(12) Clean lower body valve components with sol-
vent and dry them with compressed air only. Do not
use shop towels or rags. Lint or foreign material from
towels or rags can interfere with valve operation.
(13) Inspect condition of lower body components.
Replace lower body if any bores are scored or cor-
Fig. 9 Removing/Installing Accumulator Control
Valve Assembly
Fig. 6 Removing/Installing Primary Pressure
Regulator Valve
Fig. 7 Removing/Installing Regulator Valve Plunger
Fig. 8 Removing/Installing Pressure Reducing Plug
21 - 244 AW-4 TRANSMISSION OVERHAULJ
Page 1356 of 1784

roded. Replace valves, plugs or sleeves that are
scored or worn. Replace oil strainers if cut, torn or
damaged in any way.
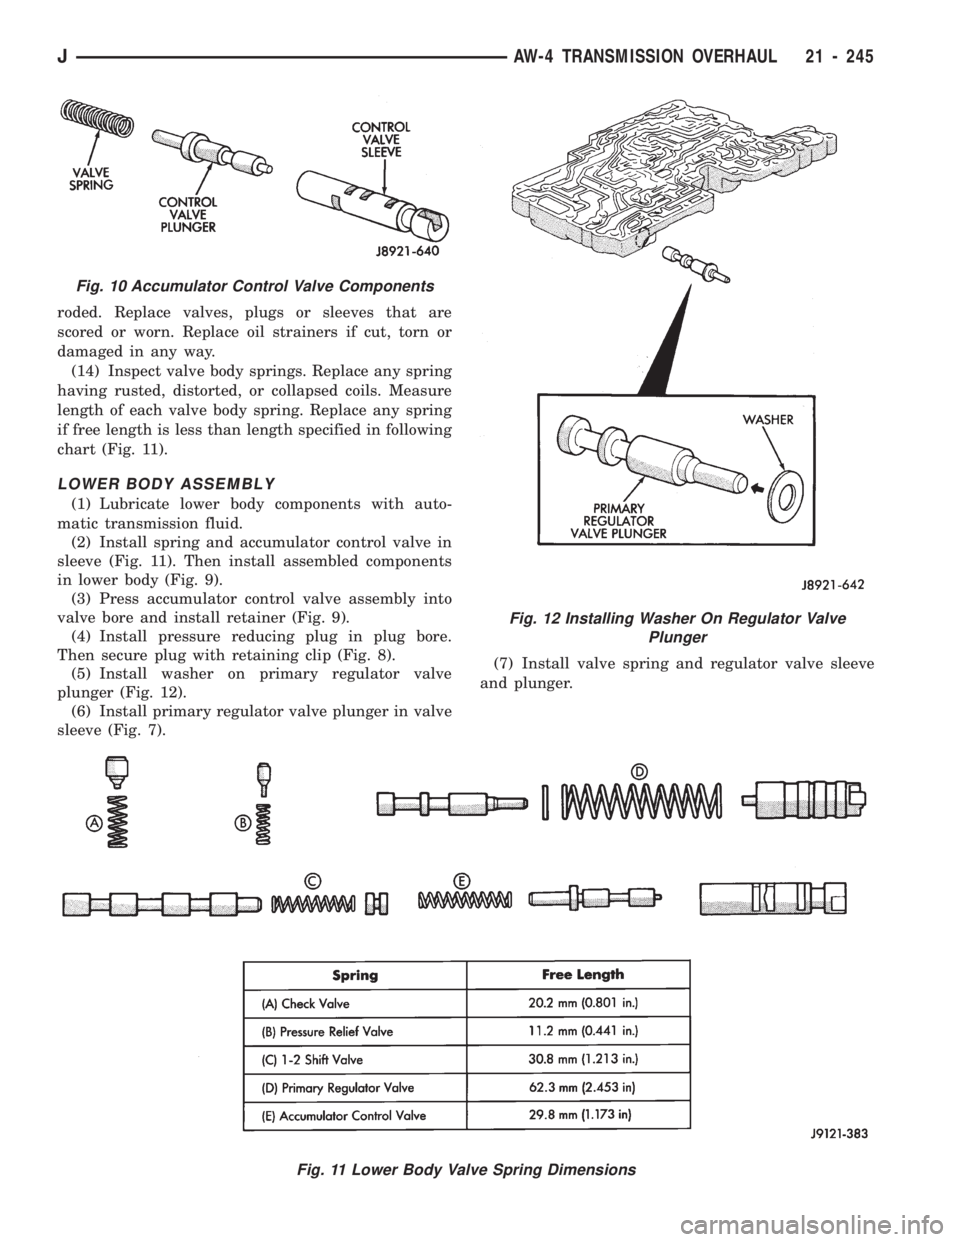
(14) Inspect valve body springs. Replace any spring
having rusted, distorted, or collapsed coils. Measure
length of each valve body spring. Replace any spring
if free length is less than length specified in following
chart (Fig. 11).
LOWER BODY ASSEMBLY
(1) Lubricate lower body components with auto-
matic transmission fluid.
(2) Install spring and accumulator control valve in
sleeve (Fig. 11). Then install assembled components
in lower body (Fig. 9).
(3) Press accumulator control valve assembly into
valve bore and install retainer (Fig. 9).
(4) Install pressure reducing plug in plug bore.
Then secure plug with retaining clip (Fig. 8).
(5) Install washer on primary regulator valve
plunger (Fig. 12).
(6) Install primary regulator valve plunger in valve
sleeve (Fig. 7).(7) Install valve spring and regulator valve sleeve
and plunger.
Fig. 11 Lower Body Valve Spring Dimensions
Fig. 10 Accumulator Control Valve Components
Fig. 12 Installing Washer On Regulator Valve
Plunger
JAW-4 TRANSMISSION OVERHAUL 21 - 245