1993 CHEVROLET PLYMOUTH ACCLAIM check engine
[x] Cancel search: check enginePage 1748 of 2438
CAUTION: When using the ASD Fuel System Test,
the Auto Shutdown (ASD) Relay remains energized
for either 7 minutes, until the test is stopped, or un-
til the ignition switch is turned to the Off position.
(4) Place the ignition key in the ON position. Us-
ing the DRBII scan tool, access ASD Fuel System
Test. The ASD Fuel System Test will activate the
fuel pump and pressurize the system. If the gauge reads the pressure shown in the Fuel
System Pressure chart, further testing is not re-
quired. If pressure is not correct, record the pressure
and remove gauge. If pressure is below specifications, proceed to Fuel
System Pressure Below Specifications . If pressure
is above specifications, proceed to Fuel System
Pressure Above Specifications .
Fuel System Pressure Below Specifications
If the fuel pressure reading in step (4) was below
specifications, test the system according to the fol-
lowing procedure.
WARNING: RELEASE FUEL SYSTEM PRESSURE
BEFORE DISCONNECTING A FUEL SYSTEM HOSE
OR COMPONENT.
(a) Perform Fuel Pressure Release procedure.
(b) Install Fuel Pressure Gauge C-4799 and Fuel
Pressure Adapter 6433 in the fuel supply line (Fig.
7) between the fuel tank and fuel filter. (c) Using the DRBII scan tool, with the ignition
key in the ON position, repeat the ASD Fuel Sys-
tem Test.
² If pressure is at least 5 psi higher than reading
recorded in step (4), replace fuel filter. ² If no change is observed, gently the squeeze re-
turn hose. If fuel pressure increases, replace pressure
regulator. If the gauge reading does not change while
squeezing the return hose, the problem is either a
plugged inlet strainer or defective fuel pump. Fuel System Pressure Above Specifications If the fuel pressure reading in step (4) was above
specifications test the system according to the follow-
ing procedure.
WARNING: FUEL SYSTEM PRESSURE MUST BE
RELEASED BEFORE A FUEL SYSTEM HOSE OR
COMPONENT IS DISCONNECTED.
(a) Perform Fuel Pressure Release procedure.
(b) Install Fuel Pressure Gauge C-4799 and Fuel
Pressure Adapter 6433 in the fuel supply line be-
tween the fuel tank and fuel filter (Fig. 7). (c) Remove the fuel return line hose from the
fuel pump at fuel tank. Connect Fuel Pressure Test
Adapter 6541 to the return line (Fig. 8). Place the
other end of adapter 6541 into an approved gaso-
line container or a container approved for gasoline/
methanol mixtures (minimum 2 gallon size). All
return fuel will flow into container. (d) Using the DRBII scan tool, with the ignition
key in the ON position, repeat the ASD Fuel Sys-
tem Test.
² If pressure is now correct, replace fuel pump as-
sembly. ²
If pressure is still above specifications, remove fuel
return hose from chassis fuel tubes (at engine). Attach
Fuel Pressure Test Connect Adapter 6541 to the fuel re-
turn hose and place other end of hose in clean approved
gasoline container or a container approved for metha-
nol/gasoline mixtures (Fig. 9). Repeat test. If pressure is
now correct, check for restricted fuel return line. If no
change is observed, replace fuel pressure regulator.
MECHANICAL MALFUNCTIONS
Mechanical malfunctions are more difficult to diag-
nose with this system. The powertrain control mod-
ule (PCM) compensates for some mechanical
malfunctions. If engine performance problems are en-
countered, and no fault codes are displayed, the prob-
lem may be mechanical rather than electronic.
FUEL PUMP MODULE REMOVAL
WARNING: RELEASE FUEL SYSTEM PRESSURE
BEFORE SERVICING FUEL SYSTEM COMPONENTS.
WHEN SERVICING FLEXIBLE FUEL VEHICLES,
WEAR METHANOL RESISTANT GLOVES AND EYE
PROTECTION AND AVOID BREATHING FUMES. DO
NOT ALLOW METHANOL/GASOLINE MIXTURES TO
CONTACT SKIN. SERVICE VEHICLES IN WELL VEN-
TILATED AREAS AND AVOID IGNITION SOURCES.
NEVER SMOKE WHILE SERVICING THE VEHICLE.
Remove the fuel tank to service the fuel pump. Re-
fer to Fuel Tank Section for fuel tank removal. (1) Using a hammer and a brass drift punch care-
fully tap lock ring counter clockwise to release pump
(Fig. 11).
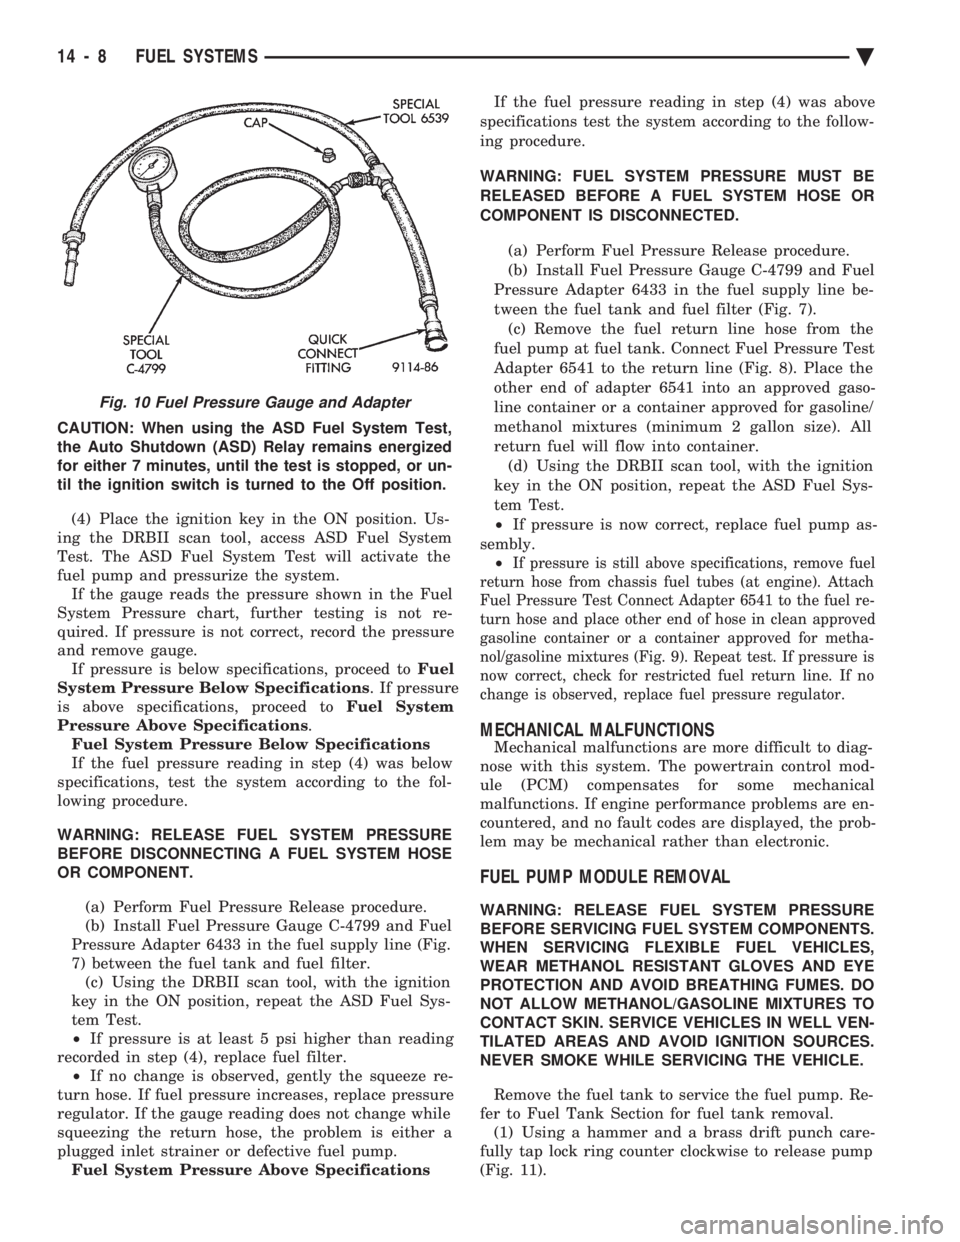
Fig. 10 Fuel Pressure Gauge and Adapter
14 - 8 FUEL SYSTEMS Ä
Page 1754 of 2438
FUEL TANKS INDEX
page page
Flexible Fuel Vehicles ..................... 14
Fuel Pump Module ....................... 18
Fuel Reservoir ........................... 18
Fuel System Pressure Release ProcedureÐ 2.2L/2.5L TBI .......................... 15
Fuel System Pressure Release ProcedureÐ3.0L . 15
Fuel System Pressure Release ProcedureÐ Except 2.2L/2.5L TBI and 3.0L ............. 15 Fuel Tank
.............................. 16
Fuel Tank Level Sensor ................... 18
Fuel Tank Pressure Relief and Roll-Over Valve . . 20
General Information ....................... 14
Identifying Flexible Fuel Components .......... 14
Methanol Concentration Sensor .............. 18
Pressure Vacuum Fuel Filler Tube Cap ........ 14
Service Precautions for Flexible Fuel Vehicles . . . 14
GENERAL INFORMATION
The fuel tanks of Chrysler Corporation built vehi-
cles are equipped with fuel and vapor controls that
allow the vehicle to pass a full 360É rollover. The fuel delivery system used on front wheel drive
vehicles contains a fuel tank pressure relief/rollover
valve. The valve mounts on the top of the fuel tank.
The valve functions as a pressure relief valve while
the vehicle is upright. The valve also contains a
check valve that prevents fuel from escaping the fuel
tank if the vehicle turns over. The fuel filler cap also acts as a pressure/vacuum
valve. When pressure inside the fuel tank gets too
high or too low, the fuel filler cap opens to relieve
the difference in air pressure. An evaporation control system restricts fuel evapo-
ration into the atmosphere and reduces unburned hy-
drocarbons. Vapors from the fuel tank are collected
in a charcoal filled canister. The vapors are held in
the canister until the engine is operating. When the
engine operates, vapors are drawn through the in-
take manifold into the combustion chambers.
FLEXIBLE FUEL VEHICLES
Beginning this model year, Chrysler began produc-
ing AA-Body vehicles designed to operate on a mix-
ture of gasoline and methanol. These automobiles are
referred to as Flexible Fuel Vehicles. Flexible fuel vehicles can operate on a mixture of
up to 85 percent methanol, 15 percent unleaded gas-
oline. These vehicles also operate on mixtures con-
taining a lower percentage of methanol or just pure
unleaded gasoline. In many cases, the procedures for servicing flexible
fuel components is identical to gasoline only compo-
nents. Refer to the particular Service Procedure in
this section. If the service procedure for flexible fuel
component differs from a gasoline only component,
the title of each service procedure identifies the ap-
plication.
IDENTIFYING FLEXIBLE FUEL COMPONENTS
Flexible Fuel vehicles have unique methanol com-
patible fuel system components. Chrysler identifies
methanol compatible components that could be phys-
ically interchanged with gasoline only parts by color-
ing them green or applying a green label or tag to
them. Even though they may appear physically iden-
tical, components for gasoline only AA-body vehicles
must not be used on flexible fuel vehicles.
SERVICE PRECAUTIONS FOR FLEXIBLE FUEL
VEHICLES
Methanol is more toxic than gasoline. Always re-
lease fuel system pressure before servicing fuel sys-
tem components and wear methanol resistant gloves
and eye protection. Avoid breathing methanol vapors or ingesting
methanol. Headaches, dizziness and even uncon-
sciousness could result from breathing these vapors.
Serious injury, blindness and even death could result
from ingesting methanol. Methanol vapors are extremely flammable and can
travel along the ground. Service vehicles in well ven-
tilated areas and avoid ignition sources. Never
smoke while servicing the vehicle. Do not allow methanol to contact skin. Prolonged
contact with methanol can cause dry skin or an al-
lergic skin reaction. Also, prolonged contact could re-
sult in absorption through the skin.
PRESSURE VACUUM FUEL FILLER TUBE CAP
WARNING: REMOVE FUEL FILLER TUBE CAP TO
RELIEVE TANK PRESSURE BEFORE REMOVING
OR REPAIRING FUEL SYSTEM COMPONENTS.
The loss of any fuel or vapor out of the filler tube
neck is prevented by the use of a safety filler cap.
The cap releases only under significant pressure 10.9
to 13.45 kPa (1.58 to 1.95 psi). The vacuum release
for all gas caps is between .97 and 2.0 kPa (.14 and
.29 psi). The cap must be replaced by a similar unit
in order for the system to remain effective.
14 - 14 FUEL SYSTEMS Ä
Page 1758 of 2438
INSTALLATION
WARNING: FUEL TANKS DESIGNED FOR GASO-
LINE ONLY VEHICLES CANNOT BE USED ON
FLEXIBLE FUEL AA-BODY VEHICLES. WHEN SER-
VICING THE FUEL SYSTEM OF A FLEXIBLE FUEL
VEHICLE, ONLY USE ORIGINAL EQUIPMENT OR
EQUIVALENT REPLACEMENT COMPONENTS. (1) Position fuel tank on transmission jack. Con-
nect vapor separator/rollover valve hose and position
insulator pad on fuel tank. Position vapor vent so
that it is not pinched between tank and floor pan
during installation. (2) Raise tank and fuel filler tube carefully into
position. Use a light coating of power steering fluid
to ease fuel filler tube installation. Ensure filler tube
grommet is not damaged. Verify that the tube is in-
stalled correctly. (3) Tighten fuel tank strap nuts to 23 N Im (250 in.
lbs.) torque. Remove transmission jack. Ensure
straps are not twisted or bent. (4) Lubricate the metal tubes on the fuel pump
with clean 30 weight engine oil. Install the quick
connect fuel fittings. Refer to Quick Connect Fittings
in the Fuel Delivery section of this Group. (5) Attach electrical connector to fuel pump mod-
ule and level sensor unit. (6) Lower the vehicle.
(7) Attach filler tube to filler neck opening in
quarter panel. Tighten quarter panel screws to 2
N Im (17 in. lbs.) torque.
(8) Fill fuel tank, install filler cap, and connect
battery cable.
CAUTION: When using the ASD Fuel System Test,
the Auto Shutdown (ASD) Relay remains energized
for either 7 minutes, until the test is stopped, or un-
til the ignition switch is turned to the Off position.
(9) Use the DRBII scan tool ASD Fuel System Test
to pressurize the fuel system. Check for leaks.
FUEL PUMP MODULE
Refer to the Fuel Delivery section of this group.
METHANOL CONCENTRATION SENSOR
Refer to the Fuel Delivery section of this group.
FUEL RESERVOIR
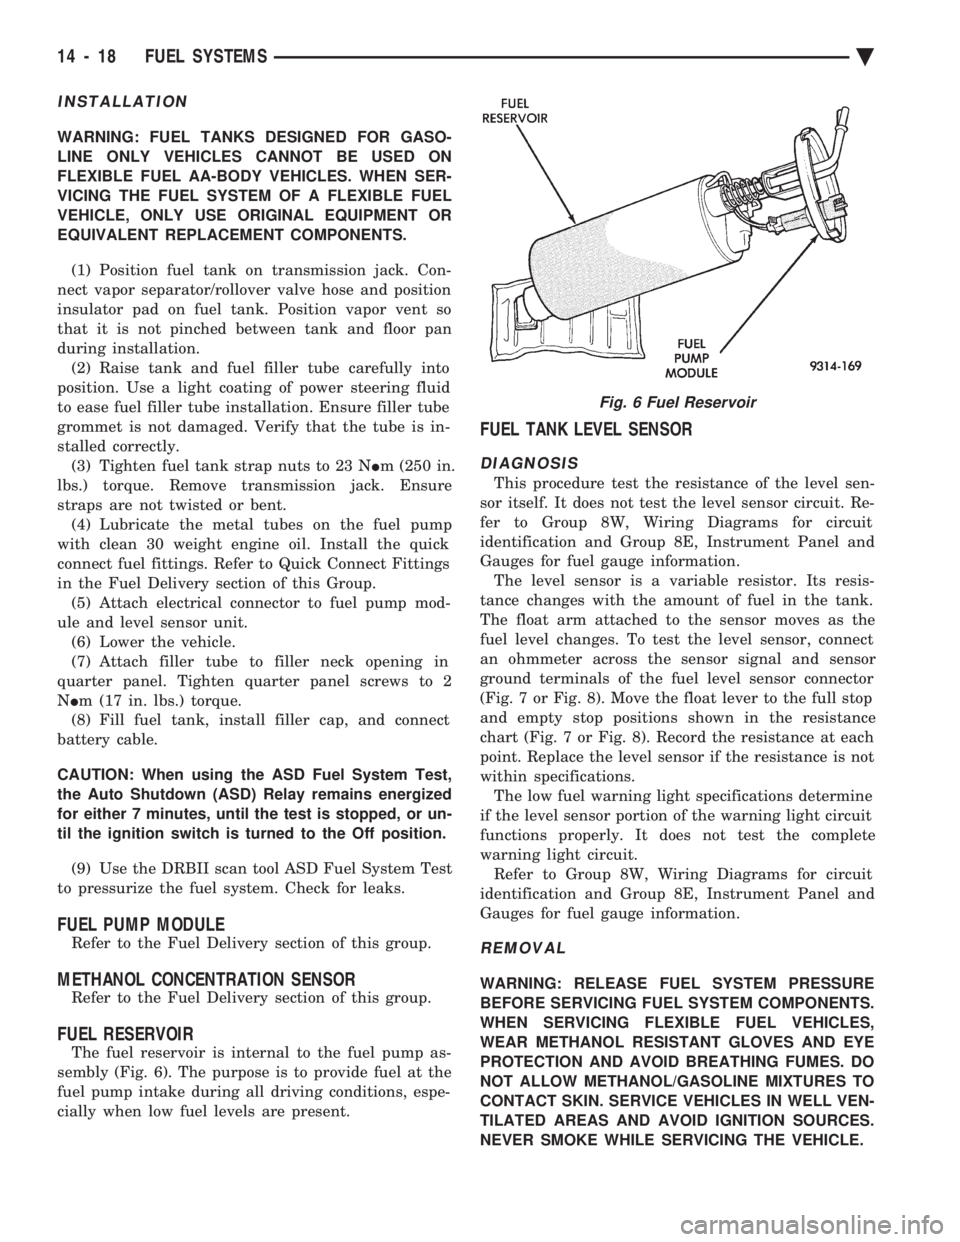
The fuel reservoir is internal to the fuel pump as-
sembly (Fig. 6). The purpose is to provide fuel at the
fuel pump intake during all driving conditions, espe-
cially when low fuel levels are present.
FUEL TANK LEVEL SENSOR
DIAGNOSIS
This procedure test the resistance of the level sen-
sor itself. It does not test the level sensor circuit. Re-
fer to Group 8W, Wiring Diagrams for circuit
identification and Group 8E, Instrument Panel and
Gauges for fuel gauge information. The level sensor is a variable resistor. Its resis-
tance changes with the amount of fuel in the tank.
The float arm attached to the sensor moves as the
fuel level changes. To test the level sensor, connect
an ohmmeter across the sensor signal and sensor
ground terminals of the fuel level sensor connector
(Fig. 7 or Fig. 8). Move the float lever to the full stop
and empty stop positions shown in the resistance
chart (Fig. 7 or Fig. 8). Record the resistance at each
point. Replace the level sensor if the resistance is not
within specifications. The low fuel warning light specifications determine
if the level sensor portion of the warning light circuit
functions properly. It does not test the complete
warning light circuit. Refer to Group 8W, Wiring Diagrams for circuit
identification and Group 8E, Instrument Panel and
Gauges for fuel gauge information.
REMOVAL
WARNING: RELEASE FUEL SYSTEM PRESSURE
BEFORE SERVICING FUEL SYSTEM COMPONENTS.
WHEN SERVICING FLEXIBLE FUEL VEHICLES,
WEAR METHANOL RESISTANT GLOVES AND EYE
PROTECTION AND AVOID BREATHING FUMES. DO
NOT ALLOW METHANOL/GASOLINE MIXTURES TO
CONTACT SKIN. SERVICE VEHICLES IN WELL VEN-
TILATED AREAS AND AVOID IGNITION SOURCES.
NEVER SMOKE WHILE SERVICING THE VEHICLE.
Fig. 6 Fuel Reservoir
14 - 18 FUEL SYSTEMS Ä
Page 1764 of 2438
2.2L/2.5L SINGLE POINT FUEL INJECTIONÐSYSTEM OPERATION INDEX
page page
Air Conditioning (A/C) Clutch RelayÐPCM Output.28
Air Conditioning Switch SenseÐPCM Input ..... 26
Auto Shutdown (ASD) Relay and Fuel Pump RelayÐPCM Output ..................... 29
Battery VoltageÐPCM Input ................ 26
Brake SwitchÐPCM Input .................. 26
EVAP Canister Purge SolenoidÐPCM Output . . . 29
CCD Bus .............................. 25
Coolant Temperature SensorÐPCM Input ...... 26
Data Link ConnectorÐPCM Output ........... 30
Distributor (Hall Effect) Pick-UpÐPCM Input .... 26
Electric Electronic Gas RecirculationÐPCM Output.30
Fuel InjectorÐPCM Output ................. 31
Fuel Pressure Regulator ................... 33
General Information ....................... 24
Generator FieldÐPCM Output ............... 31
Heated Oxygen Sensor (O
2Sensor)ÐPCM Input . 27
Idle Air Control MotorÐPCM Output .......... 29 Ignition CoilÐPCM Output
.................. 31
Malfunction Indicator Lamp (Check Engine)ÐPCM Output ............................... 30
Manifold Absolute Pressure (MAP) SensorÐPCM Input ................................ 27
Modes of Operation ....................... 32
Part Throttle Unlock SolenoidÐPCM Output .... 31
Powertrain Control Module ................. 25
Radiator Fan RelayÐPCM Output ............ 31
Speed Control SolenoidsÐPCM Output ........ 31
Speed ControlÐPCM Input ................. 27
System Diagnosis ........................ 25
TachometerÐPCM Output .................. 32
Throttle Body ............................ 33
Throttle Position Sensor (TPS)ÐPCM Input ..... 28
Transaxle Park/Neutral SwitchÐPCM Input ..... 28
Vehicle Speed SensorÐPCM Input ........... 28
GENERAL INFORMATION
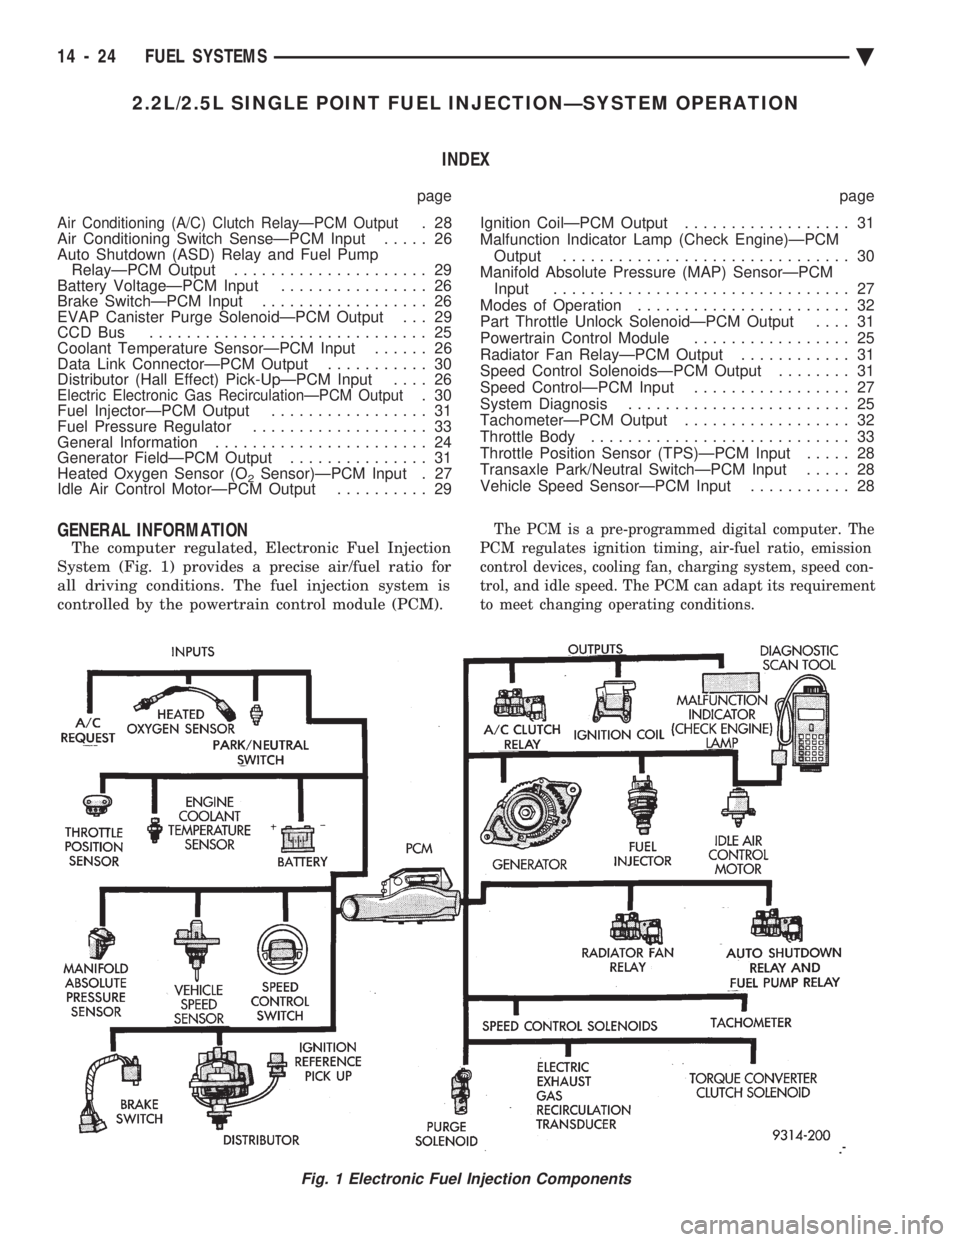
The computer regulated, Electronic Fuel Injection
System (Fig. 1) provides a precise air/fuel ratio for
all driving conditions. The fuel injection system is
controlled by the powertrain control module (PCM).
The PCM is a pre-programmed digital computer. The
PCM regulates ignition timing, air-fuel ratio, emission
control devices, cooling fan, charging system, speed con-
trol, and idle speed. The PCM can adapt its requirement
to meet changing operating conditions.
Fig. 1 Electronic Fuel Injection Components
14 - 24 FUEL SYSTEMS Ä
Page 1765 of 2438
Various sensors provide the inputs necessary for
the PCM to correctly regulate fuel flow at the fuel
injector. These include the manifold absolute pres-
sure, throttle position, oxygen sensor, coolant tem-
perature, and vehicle speed sensors. In addition to
the sensors, various switches and relays provide im-
portant information and system control. The inputs
include the park/neutral switch and air conditioning
clutch switch. The outputs include the auto shutdown
relay and fuel pump relay. All inputs to the PCM are converted into signals.
Based on these inputs the PCM adjusts air-fuel ratio,
ignition timing and other controlled outputs. The
PCM adjusts the air-fuel ratio by changing the injec-
tor pulse width. Injector pulse width is the period of
time the injector is energized.
SYSTEM DIAGNOSIS
The PCM tests many of its own input and output
circuits. If a fault is found in a major system, the in-
formation is stored in memory. Technicians can dis-
play fault information through the instrument panel
Malfunction Indicator lamp (instrument panel Check
Engine lamp) or by connecting the DRBII scan tool.
For diagnostic trouble code information, refer to On
Board Diagnostics in 2.2L/2.5L Single Point Fuel In-
jectionÐGeneral Diagnosis section of this group.
CCD BUS
Various modules exchange information through a
communications port called the CCD Bus. The pow-
ertrain control module (PCM) transmits vehicle load
data on the CCD Bus.
POWERTRAIN CONTROL MODULE
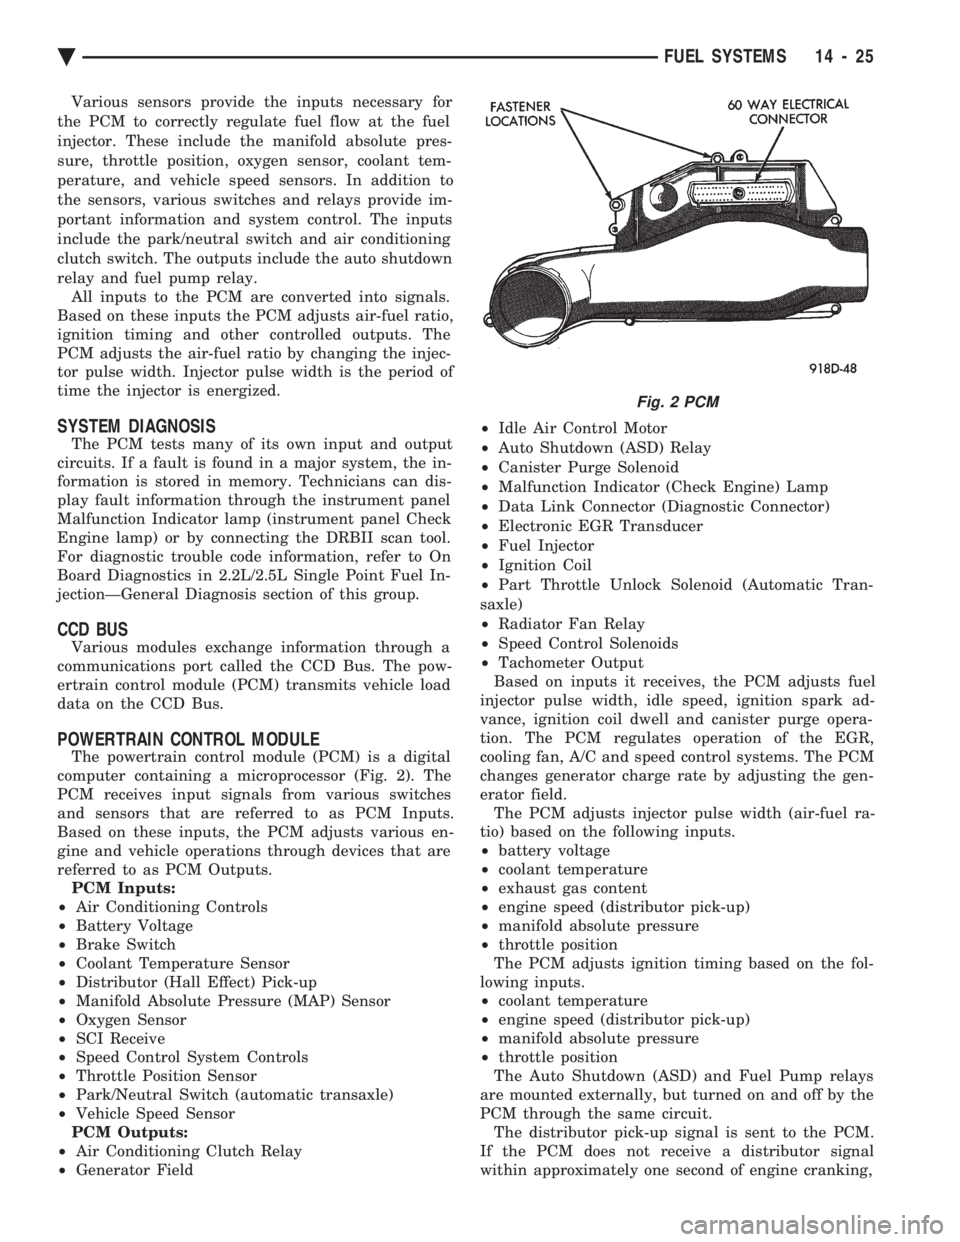
The powertrain control module (PCM) is a digital
computer containing a microprocessor (Fig. 2). The
PCM receives input signals from various switches
and sensors that are referred to as PCM Inputs.
Based on these inputs, the PCM adjusts various en-
gine and vehicle operations through devices that are
referred to as PCM Outputs. PCM Inputs:
² Air Conditioning Controls
² Battery Voltage
² Brake Switch
² Coolant Temperature Sensor
² Distributor (Hall Effect) Pick-up
² Manifold Absolute Pressure (MAP) Sensor
² Oxygen Sensor
² SCI Receive
² Speed Control System Controls
² Throttle Position Sensor
² Park/Neutral Switch (automatic transaxle)
² Vehicle Speed Sensor
PCM Outputs:
² Air Conditioning Clutch Relay
² Generator Field ²
Idle Air Control Motor
² Auto Shutdown (ASD) Relay
² Canister Purge Solenoid
² Malfunction Indicator (Check Engine) Lamp
² Data Link Connector (Diagnostic Connector)
² Electronic EGR Transducer
² Fuel Injector
² Ignition Coil
² Part Throttle Unlock Solenoid (Automatic Tran-
saxle)
² Radiator Fan Relay
² Speed Control Solenoids
² Tachometer Output
Based on inputs it receives, the PCM adjusts fuel
injector pulse width, idle speed, ignition spark ad-
vance, ignition coil dwell and canister purge opera-
tion. The PCM regulates operation of the EGR,
cooling fan, A/C and speed control systems. The PCM
changes generator charge rate by adjusting the gen-
erator field. The PCM adjusts injector pulse width (air-fuel ra-
tio) based on the following inputs.
² battery voltage
² coolant temperature
² exhaust gas content
² engine speed (distributor pick-up)
² manifold absolute pressure
² throttle position
The PCM adjusts ignition timing based on the fol-
lowing inputs.
² coolant temperature
² engine speed (distributor pick-up)
² manifold absolute pressure
² throttle position
The Auto Shutdown (ASD) and Fuel Pump relays
are mounted externally, but turned on and off by the
PCM through the same circuit. The distributor pick-up signal is sent to the PCM.
If the PCM does not receive a distributor signal
within approximately one second of engine cranking,
Fig. 2 PCM
Ä FUEL SYSTEMS 14 - 25
Page 1770 of 2438
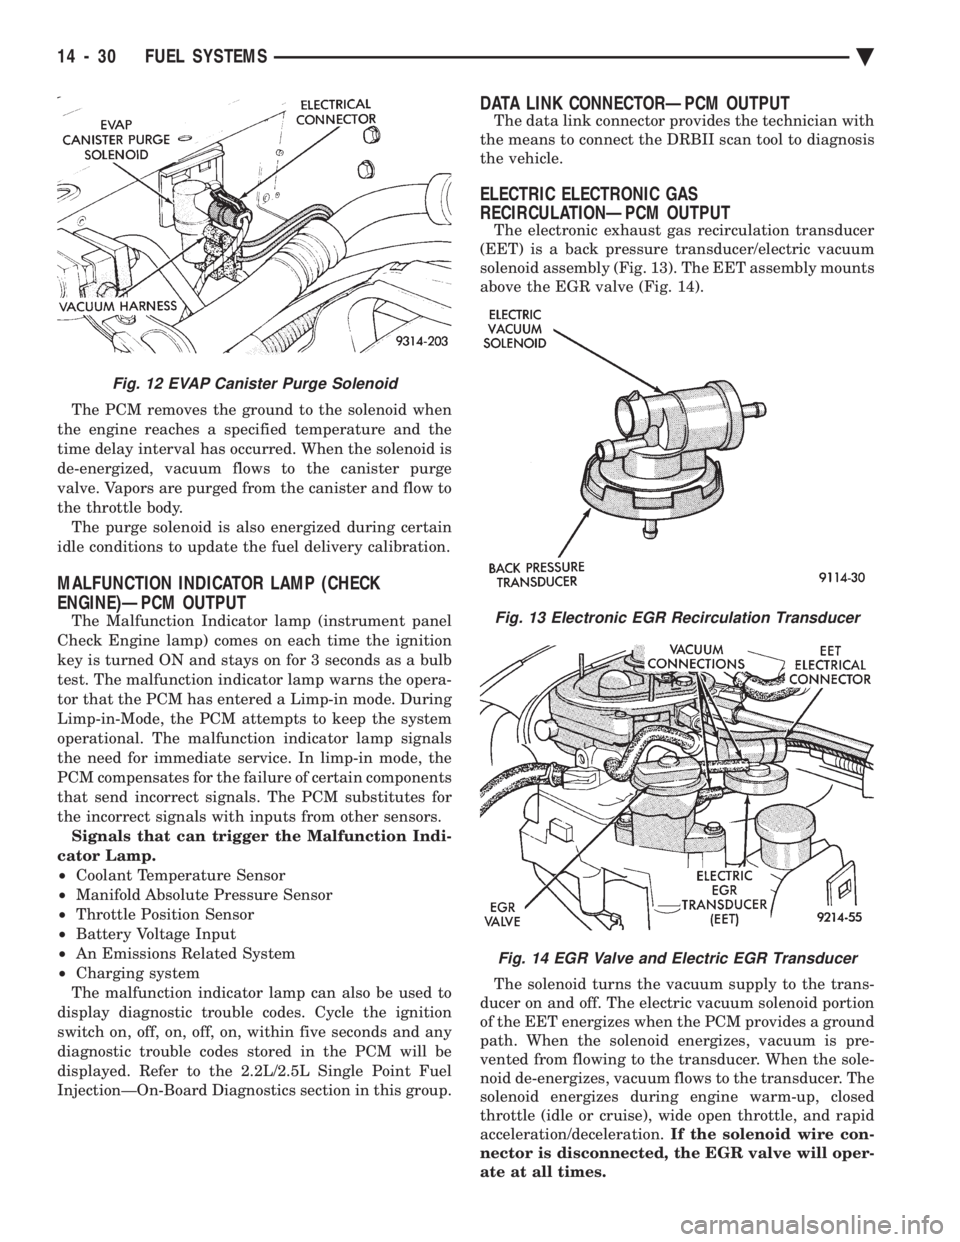
The PCM removes the ground to the solenoid when
the engine reaches a specified temperature and the
time delay interval has occurred. When the solenoid is
de-energized, vacuum flows to the canister purge
valve. Vapors are purged from the canister and flow to
the throttle body. The purge solenoid is also energized during certain
idle conditions to update the fuel delivery calibration.
MALFUNCTION INDICATOR LAMP (CHECK
ENGINE)ÐPCM OUTPUT
The Malfunction Indicator lamp (instrument panel
Check Engine lamp) comes on each time the ignition
key is turned ON and stays on for 3 seconds as a bulb
test. The malfunction indicator lamp warns the opera-
tor that the PCM has entered a Limp-in mode. During
Limp-in-Mode, the PCM attempts to keep the system
operational. The malfunction indicator lamp signals
the need for immediate service. In limp-in mode, the
PCM compensates for the failure of certain components
that send incorrect signals. The PCM substitutes for
the incorrect signals with inputs from other sensors. Signals that can trigger the Malfunction Indi-
cator Lamp.
² Coolant Temperature Sensor
² Manifold Absolute Pressure Sensor
² Throttle Position Sensor
² Battery Voltage Input
² An Emissions Related System
² Charging system
The malfunction indicator lamp can also be used to
display diagnostic trouble codes. Cycle the ignition
switch on, off, on, off, on, within five seconds and any
diagnostic trouble codes stored in the PCM will be
displayed. Refer to the 2.2L/2.5L Single Point Fuel
InjectionÐOn-Board Diagnostics section in this group.
DATA LINK CONNECTORÐPCM OUTPUT
The data link connector provides the technician with
the means to connect the DRBII scan tool to diagnosis
the vehicle.
ELECTRIC ELECTRONIC GAS
RECIRCULATIONÐPCM OUTPUT
The electronic exhaust gas recirculation transducer
(EET) is a back pressure transducer/electric vacuum
solenoid assembly (Fig. 13). The EET assembly mounts
above the EGR valve (Fig. 14).
The solenoid turns the vacuum supply to the trans-
ducer on and off. The electric vacuum solenoid portion
of the EET energizes when the PCM provides a ground
path. When the solenoid energizes, vacuum is pre-
vented from flowing to the transducer. When the sole-
noid de-energizes, vacuum flows to the transducer. The
solenoid energizes during engine warm-up, closed
throttle (idle or cruise), wide open throttle, and rapid
acceleration/deceleration. If the solenoid wire con-
nector is disconnected, the EGR valve will oper-
ate at all times.
Fig. 12 EVAP Canister Purge Solenoid
Fig. 13 Electronic EGR Recirculation Transducer
Fig. 14 EGR Valve and Electric EGR Transducer
14 - 30 FUEL SYSTEMS Ä
Page 1779 of 2438
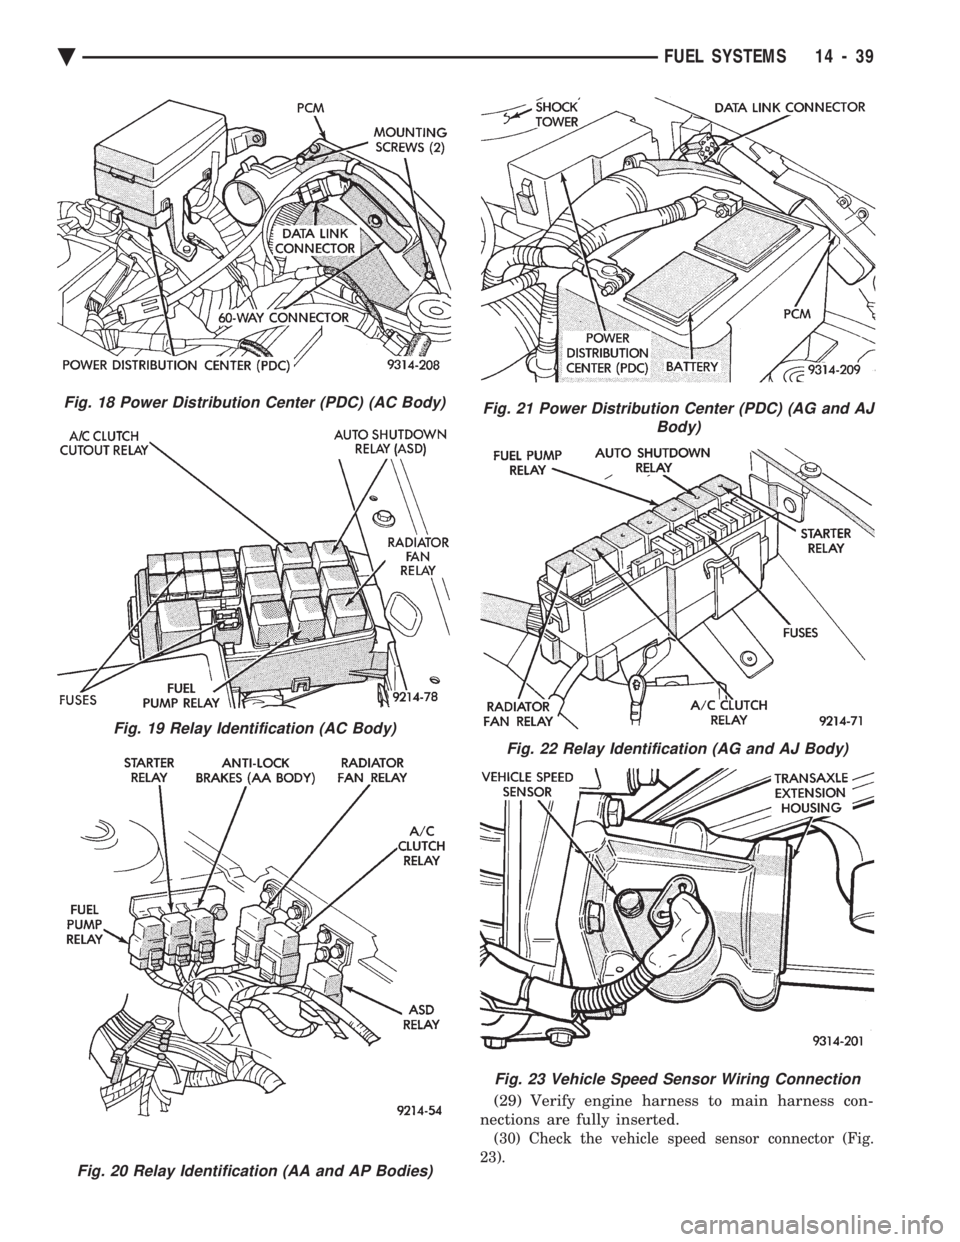
(29) Verify engine harness to main harness con-
nections are fully inserted.
(30) Check the vehicle speed sensor connector (Fig.
23).
Fig. 18 Power Distribution Center (PDC) (AC Body)
Fig. 19 Relay Identification (AC Body)
Fig. 20 Relay Identification (AA and AP Bodies)
Fig. 21 Power Distribution Center (PDC) (AG and AJ Body)
Fig. 22 Relay Identification (AG and AJ Body)
Fig. 23 Vehicle Speed Sensor Wiring Connection
Ä FUEL SYSTEMS 14 - 39
Page 1780 of 2438
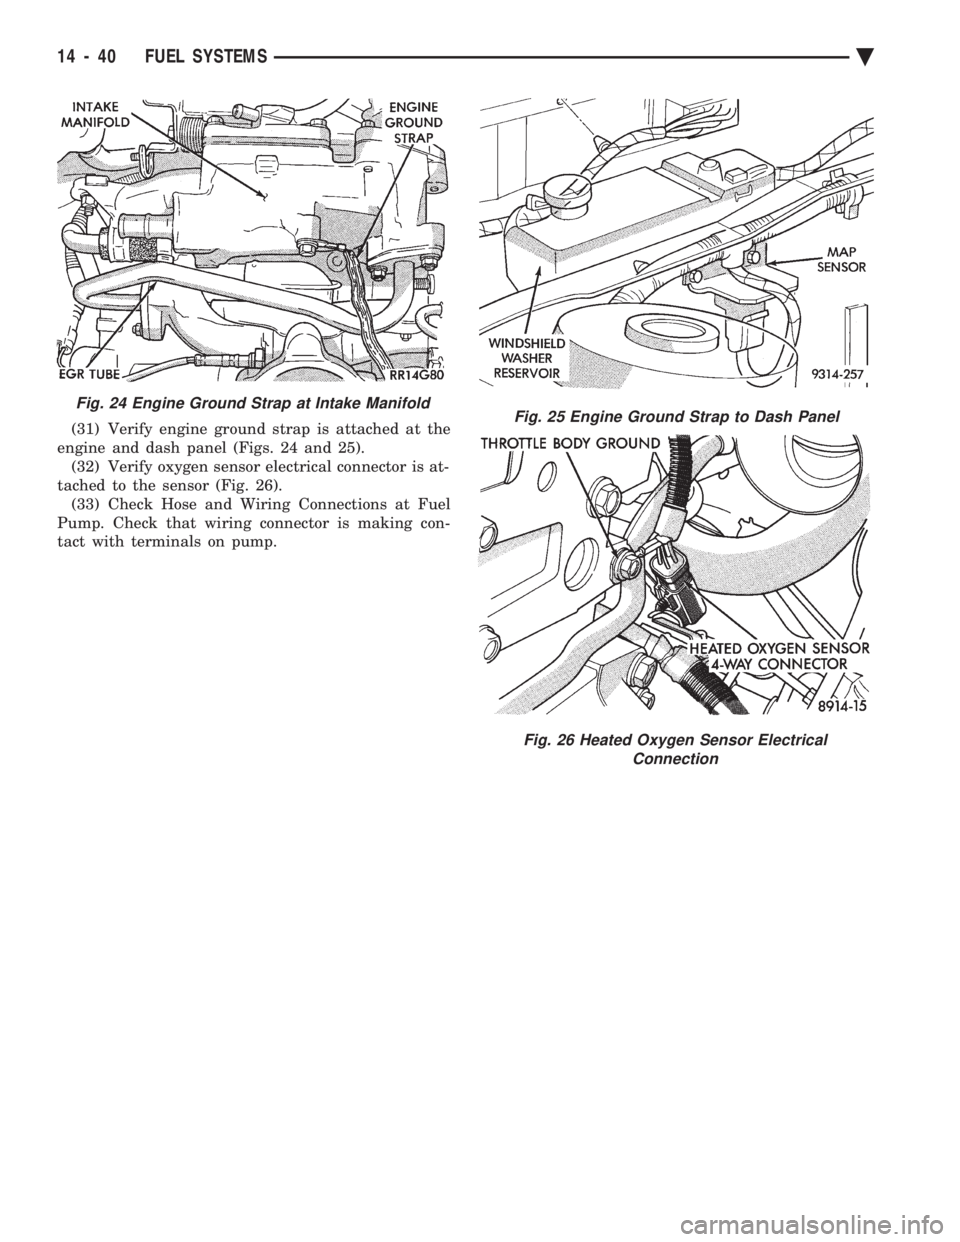
(31) Verify engine ground strap is attached at the
engine and dash panel (Figs. 24 and 25). (32) Verify oxygen sensor electrical connector is at-
tached to the sensor (Fig. 26). (33) Check Hose and Wiring Connections at Fuel
Pump. Check that wiring connector is making con-
tact with terminals on pump.
Fig. 24 Engine Ground Strap at Intake ManifoldFig. 25 Engine Ground Strap to Dash Panel
Fig. 26 Heated Oxygen Sensor Electrical Connection
14 - 40 FUEL SYSTEMS Ä