Page 1139 of 1216
BODY - Seat Belt23-9535-55 Nm
25-40 ft.lbs.\17-26 Nm
Shoulder belt removal steps
10. Guide ring
1 1. Shoulder beltc*12. Floor console assembly22. Outer switch connector connection
23. Retractor assembly (for shoulder belt)
19A0309
Buzzer removal stepsInstrument panel assembly24
(gy;ZfieerrtO P.23-80.)
NOTE(1) Reverse the removal procedures to reinstall.(2) +e : Refer to “Service Points of Removal”
19A0319
SERVICE POINTS OF REMOVAL
12. REMOVAL OF FLOOR CONSOLE ASSEMBLYRefer to
P.23-84.14. REMOVAL OF FRONT SEAT ASSEMBLY
Refer to
P.23-90.19. REMOVAL OF DOOR LATCH SWITCH
Refer to
P.23-69.
INSPECTION
MOTOR
(1) Unplug the automatic seat belt motor relay connector.
(2) Connect the terminals (indicated in the illustration) of the
automatic seat belt wiring harness connector directly to the
battery, and check that the motor operates smoothly. Next,reverse the polarity and check that the motor operates
smoothly in the reverse direction.
Page 1140 of 1216

23-96BODY - Seat Belt
Q ET19A0316
I) : Terminal to checkthe release switch
I+ : Terminal to check
the fasten switchlQA0316
16A07.51
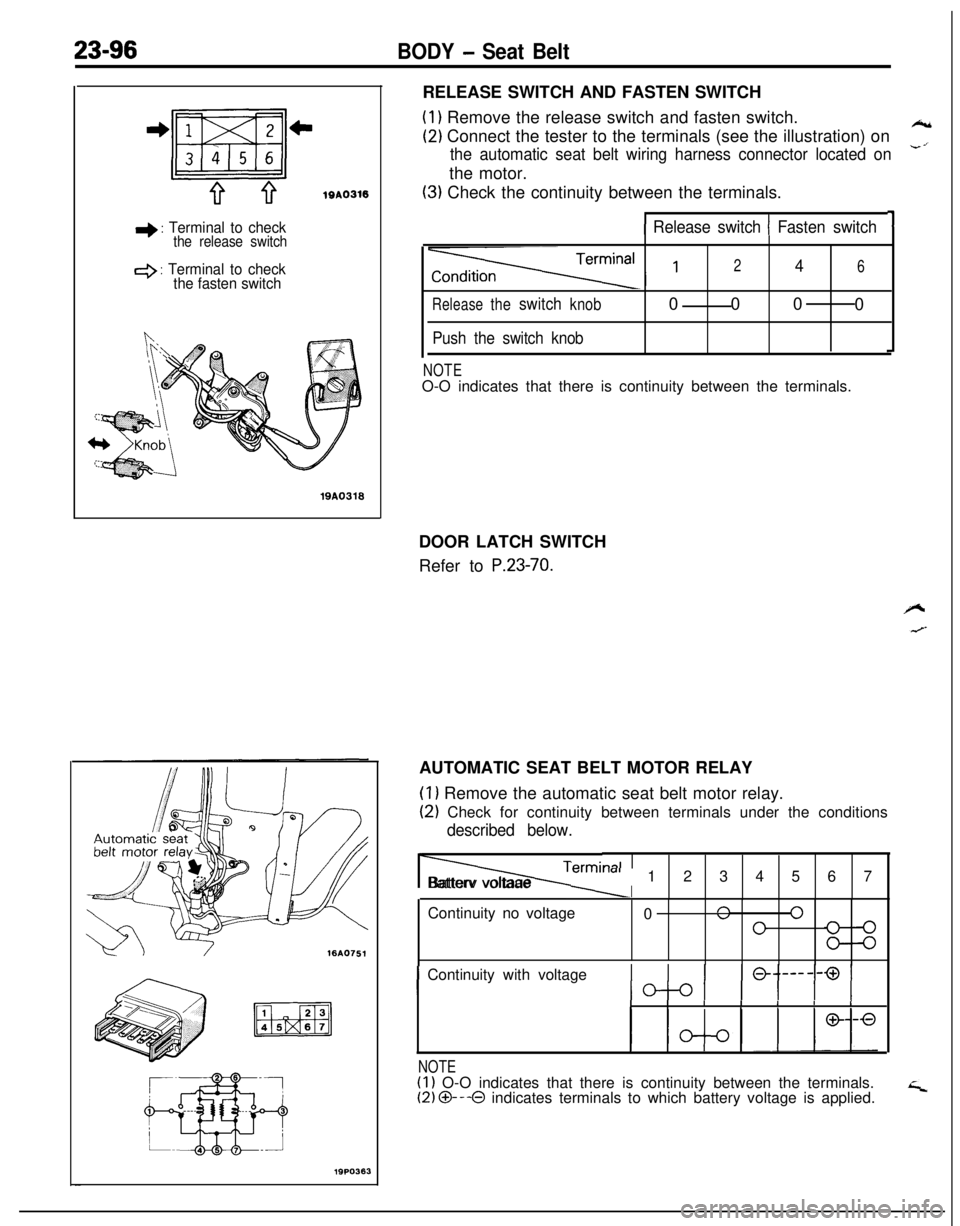
19PO363RELEASE SWITCH AND FASTEN SWITCH
(1) Remove the release switch and fasten switch.
(2) Connect the tester to the terminals (see the illustration) on*
the automatic seat belt wiring harness connector located on-’the motor.
(3) Check the continuity between the terminals.
11 Release switch 1 Fasten switch
Releasetheswitchknob
Push the switch knob
246000
0
NOTEO-O indicates that there is continuity between the terminals.
DOOR LATCH SWITCH
Refer to
P.23-70.AUTOMATIC SEAT BELT MOTOR RELAY
(1) Remove the automatic seat belt motor relay.
(2) Check for continuity between terminals under the conditions
described below.
Termi, lalIIBatterv voltaae
m-al1234567
Continuity no voltage
0
n 0”0
IContinuity with voltageIIIIIIII
NOTE(1) O-O indicates that there is continuity between the terminals.(2) O---O indicates terminals to which battery voltage is applied.
Page 1141 of 1216

BODY - Seat Belt23-97
4 : Terminal to check
outer switch IL.H.1
+ : Terminal to check
outer switch (R.H.1
lQPO36119A0322lQA0317
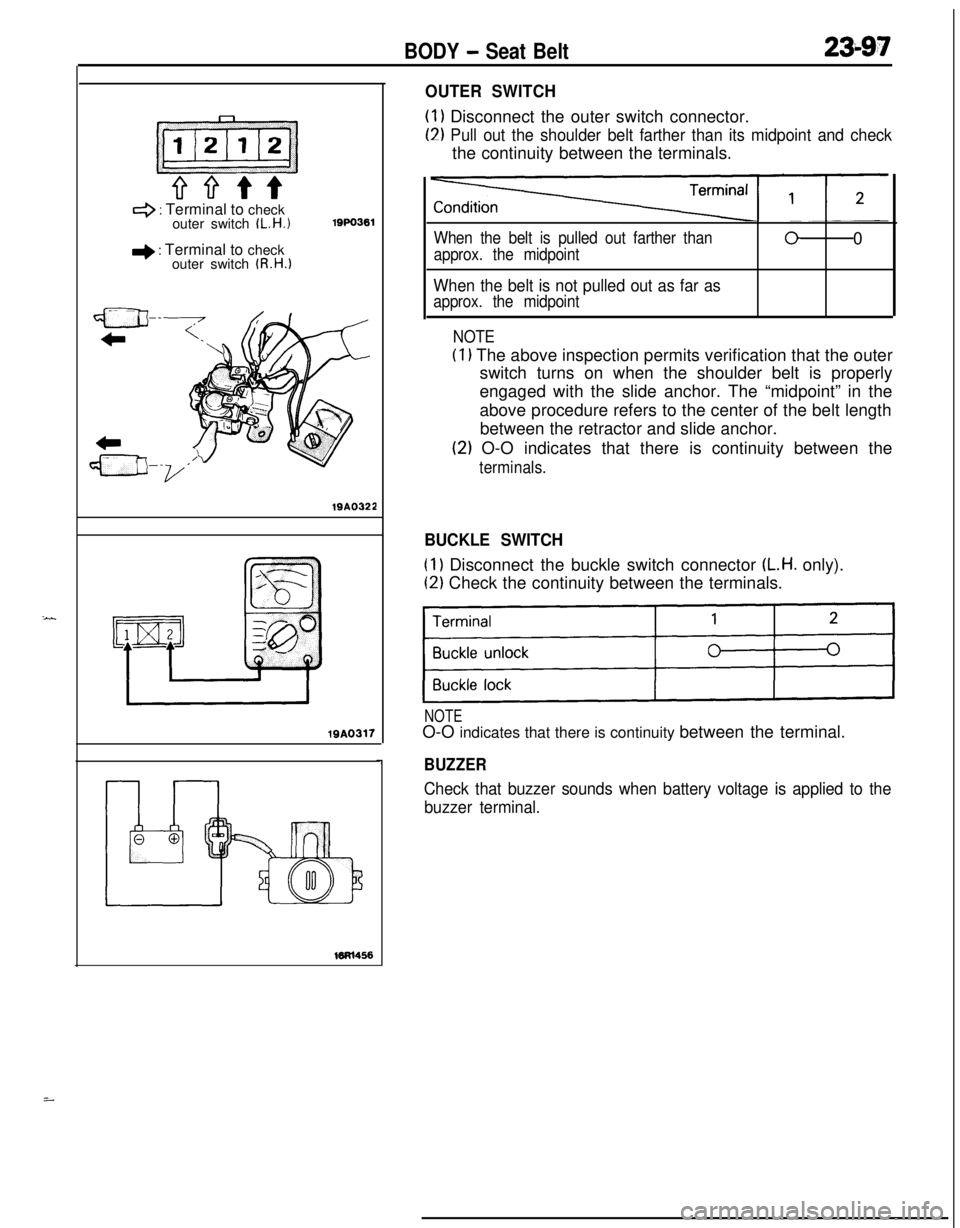
OUTER SWITCH
(1) Disconnect the outer switch connector.
(2) Pull out the shoulder belt farther than its midpoint and checkthe continuity between the terminals.
When the belt is pulled out farther than
approx. the midpoint00
When the belt is not pulled out as far as
approx. the midpoint
NOTE
(1) The above inspection permits verification that the outer
switch turns on when the shoulder belt is properly
engaged with the slide anchor. The “midpoint” in the
above procedure refers to the center of the belt length
between the retractor and slide anchor.
(2) O-O indicates that there is continuity between the
terminals.
BUCKLE SWITCH
(1) Disconnect the buckle switch connector (L.H. only).
(2) Check the continuity between the terminals.
)I
NOTEO-O indicates that there is continuity between the terminal.
BUZZER
Check that buzzer sounds when battery voltage is applied to the
buzzer terminal.
i
Page 1142 of 1216
23-98BODY - Seat Belt
\9-14 Nms-55 Nm
7-10 ft.lbs.25-40 ft.lbs.
Pre-removal Operation0 Removal of Front Seat
(Refer to
P.23-90.)0 Removal of Quarter Trim
(Refer to
P.23-85.)
Post-installation Operationl Installation of Quarter Trim(Refer to P.23-85.)l Installation of Front Seat(Refer to P.23-90.)
Buckle removal steps1. Seat belt switch harness
2. Buckle cover
3. Buckle
Front seat belt removal steps
4. Bolt cap
5. Slide bar
l +6. Sash guide cover
l + 7. Front seat belt
8. Cover plate
Buzzer removal stepsInstrument panel assembly
(Refer to P.23-80.)
9. BuzzerNOTE(1) Reverse the removal procedures to reinstall.
(2)
+e : Refer to “Service Points of Removal”.
(3) l + : Refer to “Service Points of Installation”
(4) m : Non-reusable parts
SERVICE POINTS OF REMOVAL6. REMOVAL OF SASH GUIDE COVER
Insert a plastic trim tool from the lower part and open the
sash guide cover.
Page 1143 of 1216
BODY - Seat Belt23-99
19AO239
I ITest bulb 2tI
I I
INSPECTION
SEAT BELT TIMERRemove the seat belt timer from the relay box (indoor).
TIMER OPERATION CHECK(I
1 Connect the battery and the test bulb to the timer, as shown
in the illustration.
(2) Make sure that when terminal 2 is connected to the positive
(+) terminal of the battery, test bulbs 1 and 2 are lighted
for approx. 6 seconds.
(3) Make sure that even when terminal 3 is disconnect while testbulbs 1 and 2 and lighted in
(2) above, test bulb 1 remains
lighted.
BUCKLE SWITCHRefer to
P.23-97.
BUZZERRefer to
P.23-97.
SERVICE POINTS OF INSTALLATION7. INSTALLATION OF FRONT SEAT BELT
Fit the retractor retaining lug in the slot provided in the
vehicle body, and secure the retractor with the bolt by
tightening it to the specified torque.
Page 1144 of 1216
23-100BODY - Seat Belt
35-55 Nm
25-40 ft.lbs.
Inner seat belt removalsteps319A029S
M l 1. Rear seat cushion
2. Inner seat belt
3. Bracket
Outer seat belt removal steps7. Seat belt protector
8. Retractor bracket mounting bolts
9. Outer seat belt
w H 1. Rear seat cushionNOTEl + 4. Seat belt anchor plate attaching bolts(I 1 Reverse the removal procedures to reinstall.
5. Retractor cover(2) ** : Refer to “Service Points of Removql”.
*I)6. Rear side trim(3) l + : Refer to “Service Points of Installation”.
SERVICE POINTS OF REMOVAL1. REMOVAL OF REAR SEAT CUSHION
Refer to
P.23-93.6. REMOVAL OF REAR SIDE TRIM
Refer to
P.23-85.
SERVICE POINTS OF INSTALLATION4. INSTALLATION OF SEAT BELT ANCHOR PLATE AT-
TACHING BOLTS
Install the anchor plate so that it conforms to the floor bead.1. INSTALLATION OF REAR SEAT CUSHION
Refer to
P.23-93.
Page 1145 of 1216

24-l
HEATERS ANDAIR CONDITIONING
CONTENTSN24M--AIR CONDITIONER SWITCH
..........................30BLOWER ASSEMBLY
.....................................33
COMPRESSOR.................................................37CONDENSER AND CONDENSER FAN
MOTOR............................................................45ENGINE COOLANT TEMPERATURE
-‘-.,SWITCH............................................................51
EVAPORATOR.................................................
34
HEATERCONTROLASSEMBLY....................
26HEATER UNIT
.................................................31
REFRIGERANTLINE........................................47
RESISTOR........................................................29SAFETY PRECAUTIONS
.................................10SERVICE ADJUSTMENT PROCEDURES..
.....11Compressor Drive
Belt Adjustment
.............
23
CompressorNoise........................................24
Handling
TubingandFittings.......................22Idle-up
OperationCheck..............................25Manifold
GaugeSetInstallation..................11Performance Test
.........................................16Power Relay Check
......................................24Refrigerant Leak Repair Procedure
.............17
TestingSystemforLeaks...........................15Test Procedures
...........................................11
SPECIFICATIONS.............................................2
General Specifications..................................2
Lubricants......................................................3Sealant and Adhesives
.................................3Service Specifications
...................................2
TorqueSpecifications...................................2
TROUBLESHOOTING. . . ..a................................3
VENTILATORS(AIR INLET AND AIR OUTLET)
..,....s............. 50
VENTILATORS(INSTRUMENT PANEL)
..,...................*...........49
Page 1146 of 1216

24-2HEATERS AND AIR CONDITIONING - Specifications
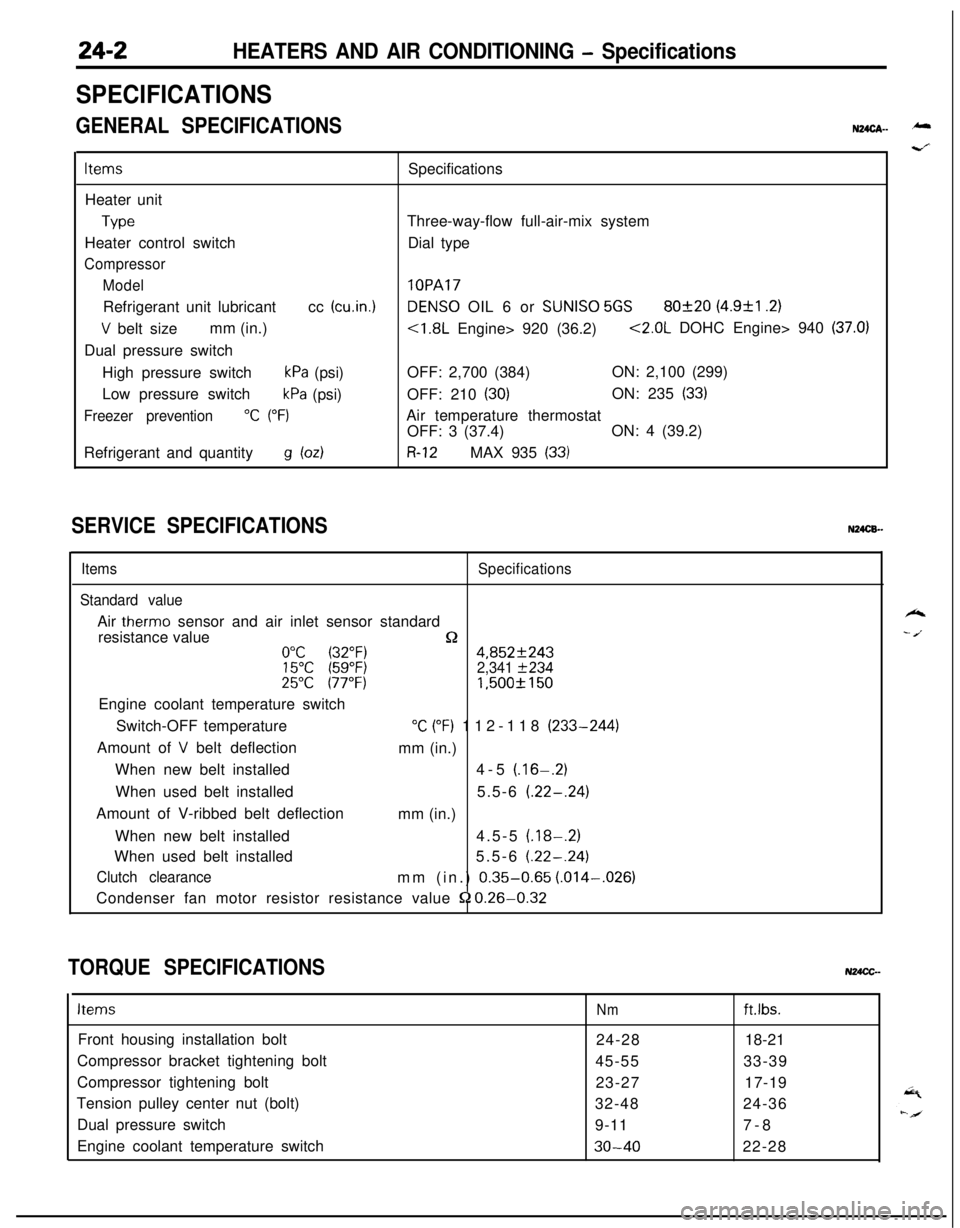
SPECIFICATIONS
GENERAL SPECIFICATIONSN24cA- -
ItemsSpecifications
Heater unit
TypeThree-way-flow full-air-mix system
Heater control switchDial type
Compressor
Model
lOPARefrigerant unit lubricantcc
(cu.in.1DENS0 OIL 6 or SUNISO 5GS80f20 (4.9&l .2)
V belt sizemm (in.)<1.8L Engine> 920 (36.2)<2.0L DOHC Engine> 940 (37.0)Dual pressure switch
High pressure switch
kPa (psi)OFF: 2,700 (384)ON: 2,100 (299)
Low pressure switch
kPa (psi)OFF: 210 (30)ON: 235 (33)
Freezer prevention“C (“F)Air temperature thermostat
OFF: 3 (37.4)ON: 4 (39.2)
Refrigerant and quantity
g bdR-12MAX 935 (33)
SERVICE SPECIFICATIONSN24CB.-
ItemsSpecifications
Standard valueAir
therm0 sensor and air inlet sensor standard
resistance value
n0°C (32°F)4,852f24315°C (59°F)2,341 f23425°C 177°F)1,500f 150Engine coolant temperature switch
Switch-OFF temperature
“C (“F) 112-118 (233-244)
Amount of
V belt deflection
mm (in.)
When new belt installed4-5
(.16-.2)When used belt installed5.5-6
(.22-.24)Amount of V-ribbed belt deflection
mm (in.)
When new belt installed4.5-5
(.18-.2)When used belt installed5.5-6
(.22-.24)
Clutch clearancemm (in.) 0.35-0.65 (.014-,026)
Condenser fan motor resistor resistance value
52 0.26-0.32
TORQUE SPECIFICATIONSN24CC-
ItemsNmft.lbs.Front housing installation bolt
24-2818-21
Compressor bracket tightening bolt
45-5533-39
Compressor tightening bolt
23-2717-19
Tension pulley center nut (bolt)
32-4824-36
Dual pressure switch
9-117-8
Engine coolant temperature switch
30-4022-28
k
- /.