Page 1116 of 1216

23-72BODY -Door Moulding and Drip Line Weatherstrip/Door Mirror
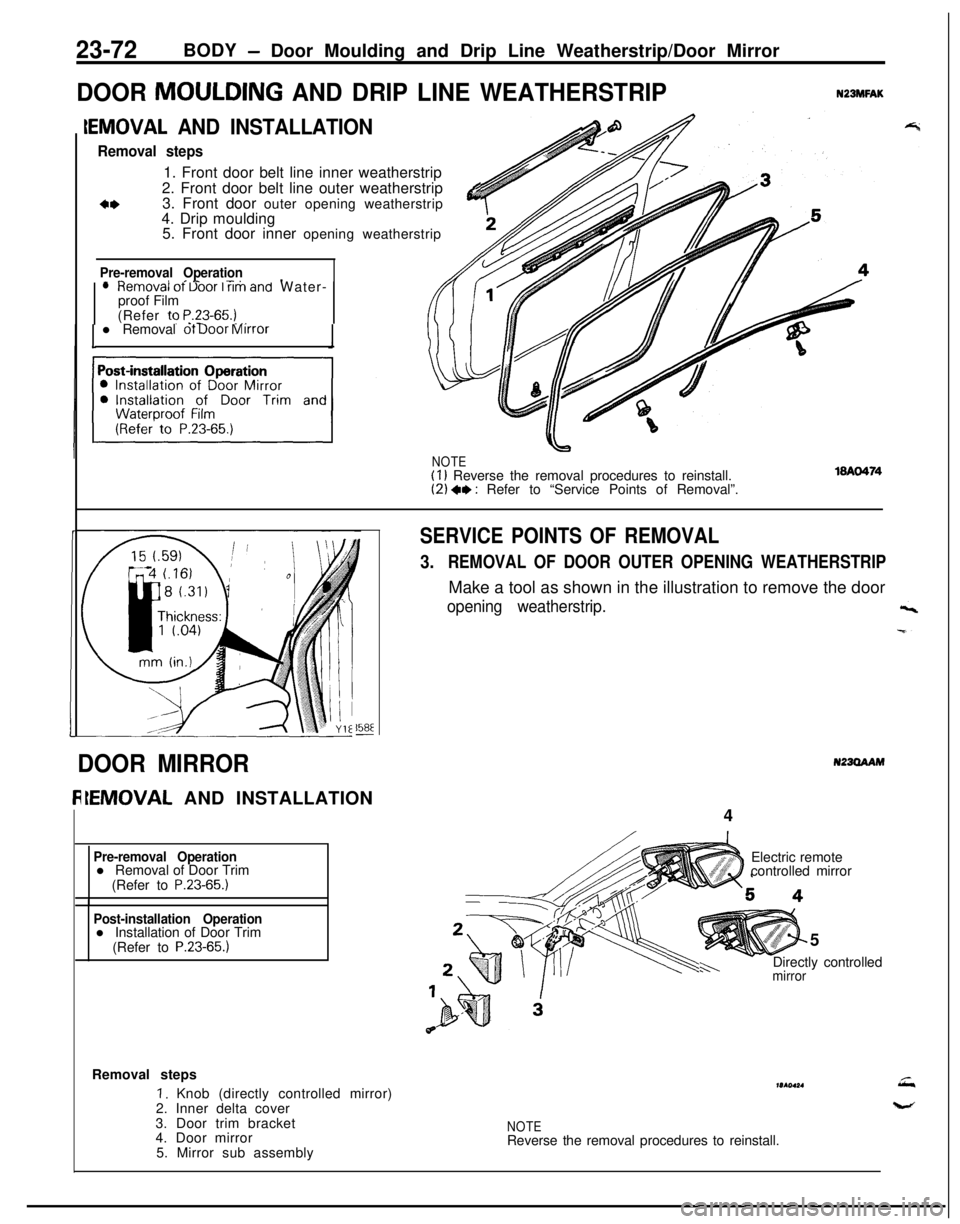
DOOR MOULDING AND DRIP LINE WEATHERSTRIPNZBMFAK
IEMOVAL AND INSTALLATION
Removal steps1. Front door belt line inner weatherstrip
2. Front door belt line outer weatherstrip
3. Front door outer opening weatherstrip
&4. Drip moulding
5. Front door inner opening weatherstrip
Pre-removal Operation- ^II_ -..lHemOVal ot Uoor I rim and Water-
proof Film
(Refer to
P.23-65.) _,. -l Removal ot Door Mirror
NOTE(I 1 Reverse the removal procedures to reinstall.(2) +, : Refer to “Service Points of Removal”.
158E-
SERVICE POINTS OF REMOVAL
3.REMOVAL OF DOOR OUTER OPENING WEATHERSTRIPMake a tool as shown in the illustration to remove the door
opening weatherstrip.
N23OAAMDOOR MIRROR
IEMOVAL AND INSTALLATION
4
Pre-removal Operationl Removal of Door Trim
(Refer to
P.23-65.)
Post-installation Operationl Installation of Door Trim
(Refer to
P.23-65.)5
mirrorh-.Directly controlled Electric remote
controlled mirror
Removal steps
I. Knob (directly controlled mirror)
2. Inner delta cover
3. Door trim bracket
4. Door mirror
5. Mirror sub assemblymr(ol*.
NOTEReverse the removal procedures to reinstall.
Page 1128 of 1216
Page 1129 of 1216
BODY - Trims23-85
TRIMS
‘A REMOVAL AND INSTALLATION
6,Cowl side trim removal steps
1. Scuff plate
2. Cowl side trim
Quarter trim removal steps
Rear seat (Refer to P.23-93.1. Scuff plate
a*5. Quarter trim
6. Quarter trim lower bracket
Center shelf removal steps
3. Center shelf
4. Shelf holder
Rear end trim removal steps
7. Lid
(B)8. Lid
(D)4*9. Rear end trim
10. Bracket11. FWD bracket
12. AWD trim bracket
35-65 Nm25-40 ftlbs.
19AO413Rear side trim removal steps
Rear seat (Refer to P.2393.11. Scuff plate
3. Center shelf4. Shelf holder
4*5. Quarter trim
7. Lid tB)-. _ -8. Lid (D)l *9. Rear end trim
13. Rear seat belt anchor plate
14. Retractor cover
15. Rear seat belt protector
a*16. Rear side trim
17. Shelf catcher
18. Rear speaker bracket assembly1 S.‘Quarter trim upper bracket
NOTEFor the bolts indicated by the h. screws are
used for the left side.
Page 1130 of 1216

23-86BODY - Trims
-55 Nm
Qi----- %40 ft.lbs.
>
u.u19AO300
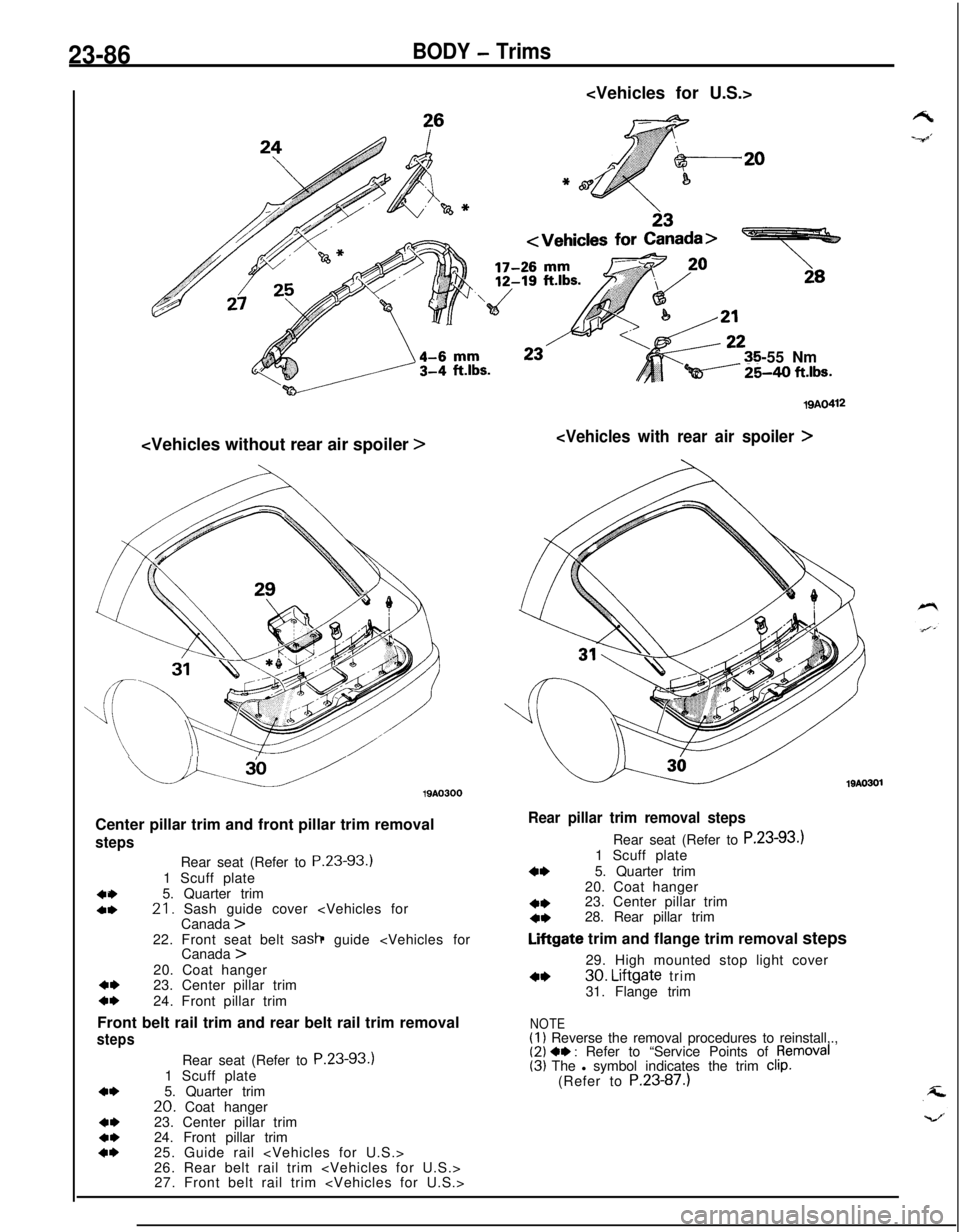
Center pillar trim and front pillar trim removal
steps
404,Rear seat (Refer to P.23-93.)
1 Scuff plate
5. Quarter trim21. Sash guide cover
Canada >22. Front seat belt sash guide
Canada >20. Coat hanger
4,23. Center pillar trimc*24. Front pillar trim
Front belt rail trim and rear belt rail trim removal
steps
4*
4,4*4*Rear seat (Refer to P.23-93.)
1 Scuff plate
5. Quarter trim
20. Coat hanger
23. Center pillar trim
24. Front pillar trim
25. Guide rail
26. Rear belt rail trim
27. Front belt rail trim
19AO412
19AO301
Rear pillar trim removal stepsRear seat (Refer to P.23-93.)
1 Scuff plate
4*5. Quarter trim
20. Coat hanger
4*23. Center pillar trim4*28. Rear pillar trim
Liftgate trim and flange trim removal steps
29. High mounted stop light cover
4*30. Liftgate trim
31. Flange trim
NOTE(1) Reverse the removal procedures to reinstall,.,(2) 4, : Refer to “Service Points of pemoval(3) The l symbol indicates the trim clip.(Refer to P.23-87.)
Page 1134 of 1216
23-90BODY - Headlining/Front Seat
19A0294
FRONT SEAT
REMOVAL AND INSTALLATION17-26
12-19
SERVICE POINTS OF REMOVAL5. REMOVAL OF HEADLINING TRIM
Remove the headlining trim like turning it outward.
NZBUEAP4
17-26 ft.lbs.WA0306
Removal stepsl + 1. Slider rail anchor cover
l + 2. Seat anchor covers
3. Slider rail
l * 4. Seat mounting bolts
l * 5. Seat mounting nuts
6. Seat belt switch connector(L.H. only)7. Lap belt
8. Guide ring
9. Shoulder belt 10. Front seat assembly
NOTE(1) Reverse the removal procedures to reinstall.(2) +* : Refer to “Service Points of Installation”.
Page 1136 of 1216
23-92BODY - Front Seat
DISASSEMBLY AND REASSEMBLY35-55 Nm
25-40 ft.lbs. ---.-.,9-14 Nm
6
7-10 ft.lbs./
e 7-10 ft.lbs.
19Ao3m35-55 Nm
25-40 ft.lbs.9-14 Nm
r I
7-10 ft.lbs. 4
k 9-14 Nm\ 35-55 Nm 18A07207-10 ft.lbs.25-40 ft.lbs.
Disassembly steps
1. Reclining knob
2. Belt holder 3. Shield cover
4. Thigh support cap
5. Thigh support lever
6. Thigh support lever garnish
7. Lumber support cap
8. Side support lever
9. Lumber support lever
IO. Lumber support lever garnish11. Guide ring bracket 12. Buckle cover
13. Buckle14. Slider bracket cover
15. Slider bracket16. Seat frame protector
17. Bushing18. Seat adjuster, inner419. Pull wire
$I: ,“S;; ;zt;E;, outer
22.
Seatback
NOTEReverse the disassembly procedures to reassemble.
Page 1137 of 1216
BODY - Rear Seat23-93
REAR SEATN23UFAN
.~x REMOVAL AND INSTALLATION4-6 Nm
3-4
ft.lbs.
A12-19
ft.lbs.12-19
ft.lbs.
Removal steps
w w 1. Seat cushion
2. Clips3. Seatback4. Striker
19AO411
NOTE(1) Reverse the removal procedures to reinstall.(2) +* : Refer to “Service Points of Removal”.(3) l 4 : Refer to “Service Points of Installation”.
ISeat back hinge bracket I
Seatbracket
1910323
SERVICE POINTS OF REMOVAL1. REMOVAL OF SEAT CUSHION
Pulling the lever, raise the front of the seat cushion and
remove the seat cushion.
SERVICE POINTS OF INSTALLATION1. INSTALLATION OF SEAT CUSHION
(1) Securely insert the attachment wire of the rear cushion
into under the hinge bracket of the seat back.
(2) Pass the rear seat belt buckle.
(3) Securely insert the hook of the seat cushion into the seat
support bracket.
Page 1138 of 1216

23-94BODY - Seat Belt
SEAT BELT
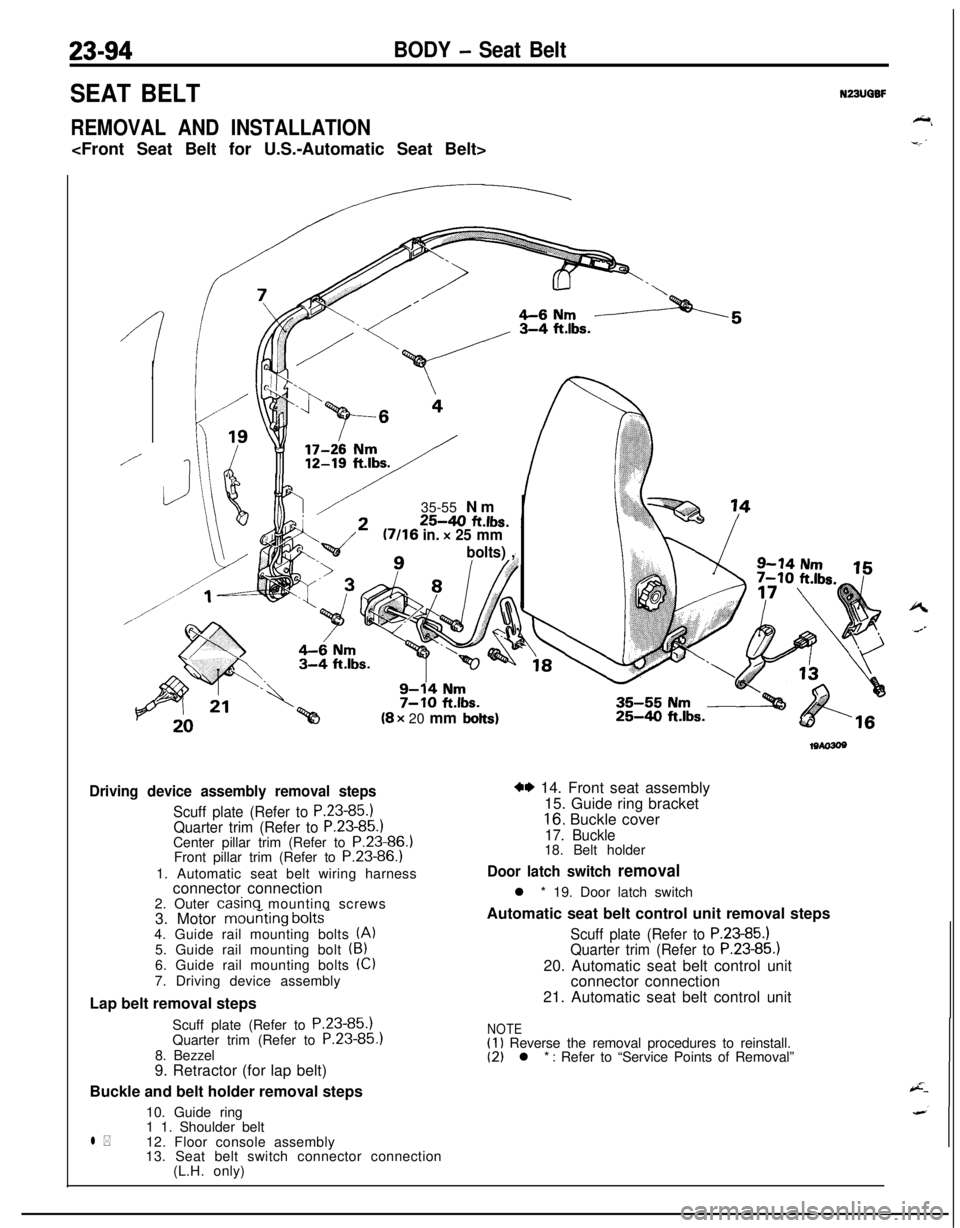
REMOVAL AND INSTALLATION
N23UQBF
/
//35-55 Nm
25-40 ft.lbs.U/16 in. x 25 mm
bolts) ,n(8 x 20 mm
bolts)
Driving device assembly removal steps
Scuff plate (Refer to P.23-85.1Quarter trim (Refer to P.23-85.)Center pillar trim (Refer to P.23-86.)
Front pillar trim (Refer to P.23-86.)
1. Automatic seat belt wiring harness
connector connection
2. Outer
casinq mounting screws
3. Motor mouriting bolts-4. Guide rail mounting bolts (A)5. Guide rail mounting bolt (B)6. Guide rail mounting bolts (Cl
7. Driving device assembly
Lap belt removal steps
Scuff plate (Refer to P.23-85.)
Quarter trim (Refer to P.23-85
8. Bezzel
9. Retractor (for lap belt)
Buckle and belt holder removal steps
10. Guide ring
l *1 1. Shoulder belt
12. Floor console assembly
13. Seat belt switch connector connection
(L.H. only)
25-4.0 ft.lbs.
w 14. Front seat assembly
15. Guide ring bracket
16. Buckle cover
17. Buckle18. Belt holder
Door latch switch removall * 19. Door latch switch
Automatic seat belt control unit removal steps
Scuff plate (Refer to P.23-85.)Quarter trim (Refer to P.23-85.)20. Automatic seat belt control unit
connector connection
21. Automatic seat belt control unit
NOTE(1) Reverse the removal procedures to reinstall.(2) l * : Refer to “Service Points of Removal”